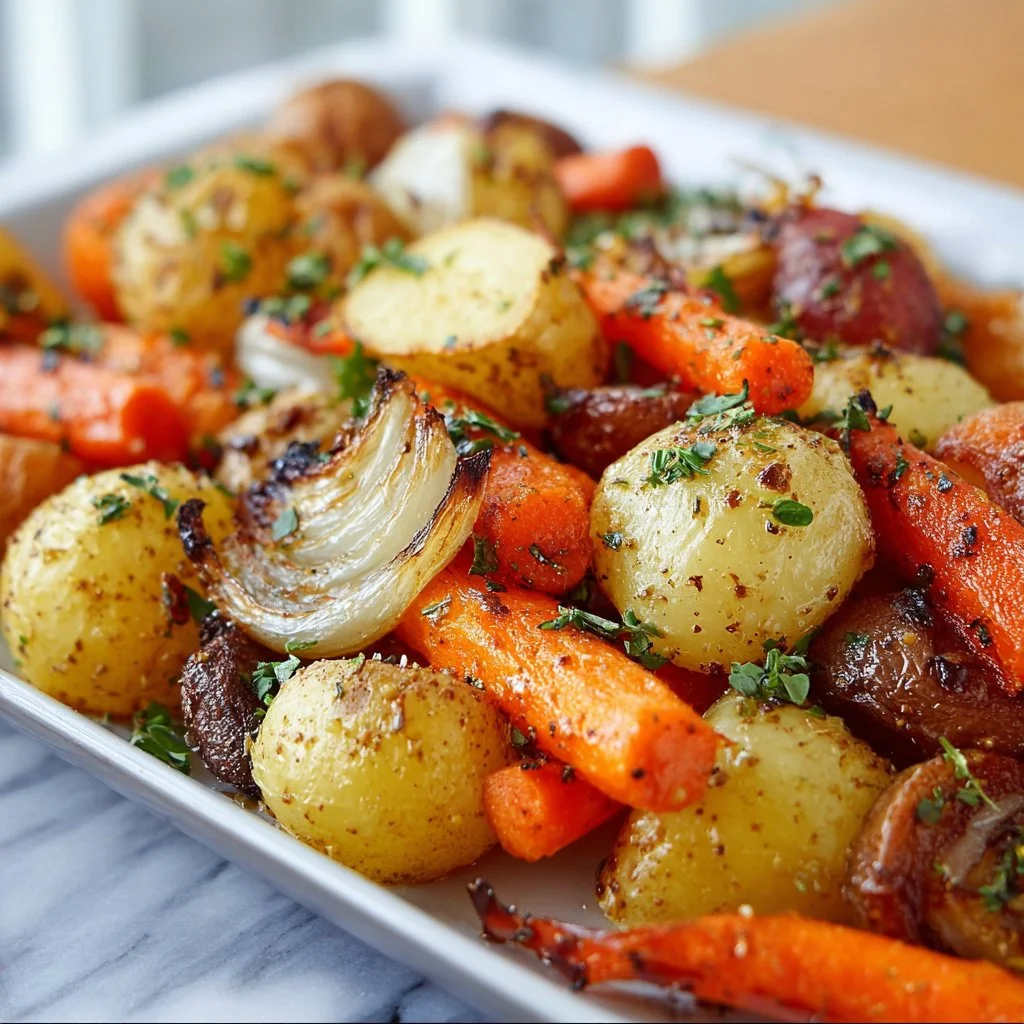
Roast Carrots, Potatoes & Onions: A Simple, Flavorful Side Dish
Roast Carrots, Potatoes & Onions: A Simple, Flavorful Side Dish
Hello, fellow food lovers! Today, we’re diving into a dish that’s as simple as it is stunning: Roast Carrots, Potatoes, and Onions. Picture it: vibrant orange carrots, hearty potatoes, and sweet onions culminating in a golden-brown roast that enchants your kitchen with mouthwatering aromas. Doesn’t that sound delightful? This isn’t just a side dish; it’s a canvas for flavor and a celebration of seasonal ingredients that can elevate any meal, from casual weeknight dinners to festive gatherings!
Roasted vegetables are like the unassuming heroes of the culinary world. They require minimal finesse but yield extraordinary results. Trust me, if you’re in a pinch and need something to wow your guests, this is it! It’s one of those recipes that embodies my cooking philosophy: elegant yet achievable. Plus, the best part? You don’t need any fancy gadgets or culinary degrees to make this dish shine. Just a few quality ingredients, some love, and a dash of creativity, and you’ll be serving up a side dish that even the pickiest eaters will clamor for!
In this post, I’ll guide you through each step of the process, share some personal stories, and give you a few handy tips to amp up the flavor and presentation of your roasted veggies. So, gather your carrots, potatoes, and onions – let’s set the table for some flavorful fun!
Personal Story
Let me take you on a little trip down memory lane. I remember the first time I prepared roasted vegetables for a gathering. I was hosting a dinner party, filled with laughter, candles, and an air of joyous anticipation. Of course, I wanted everything to be perfect. After scanning countless recipes, I stumbled upon a simple roasted vegetable recipe that spoke to me.
As I chopped the vibrant carrots and chunky potatoes, I could hear my grandmother’s voice in my head, telling me, “Food is an extension of your heart, darling.” She used to roast her veggies with love, wisdom, and just the right amount of olive oil, telling me how roasting brings out the natural sweetness in every ingredient. I was a tad nervous, but as the dish came together, I could smell the warmth enveloping my kitchen.
When the vegetables emerged from the oven, they were caramelized to perfection, and I couldn’t wait to tantalize my guests with their flavors. The crispy edges and soft interiors were a hit! Everyone kept going back for seconds, and that was when I realized that roasting veggies wasn’t just a cooking technique; it was a way to create lasting memories around the table. This roast carrots, potatoes, and onions dish has been a staple in my kitchen ever since, always reminding me of the power of shared meals!
Ingredients
To embark on your journey to perfect roasted vegetables, you’ll need the following ingredients:
-
2 pounds of carrots (peeled and cut into uniform pieces)
Carrots not only add vibrant color but also natural sweetness. Choose firm, fresh carrots for the best flavor. If you prefer, consider using baby carrots for a more rustic look! -
6 whole potatoes (washed and cut into even pieces)
Potatoes bring heartiness to the dish. I often use Yukon Gold for their buttery flavor, but feel free to substitute with red potatoes or sweet potatoes for a twist! -
1 whole sweet onion (peeled and cut into eighths)
Sweet onions, like Vidalia, add elegance and balance. If you want more bite, use yellow onions. They caramelize beautifully and provide a depth of flavor. -
3 cloves garlic (minced)
Garlic enhances the aromatic qualities of the dish. If you’re a garlic lover, feel free to add more or use roasted garlic for a sweeter flavor. -
6 tbsp olive oil (for coating vegetables)
Extra virgin olive oil drizzles lovingly over the veggies, ensuring they don’t stick and enhances their rich flavors. Replace it with melted coconut oil for a different profile! -
1/2 tsp dried thyme (for seasoning)
Thyme pairs beautifully with all root vegetables. If you have fresh thyme on hand, use a tablespoon instead! How delightful would that be? -
1/2 tsp dried parsley (for seasoning)
Parsley brings a refreshing pop of herbaceousness. If you want a punchier flavor, you could substitute fresh parsley. -
Salt (to taste)
The secret to great flavor! Sea salt is my go-to, but kosher salt works just as well. -
Black pepper (to taste)
Freshly cracked black pepper adds warmth and a little heat. If you’re feeling adventurous, use smoked pepper for added depth!
Step-by-Step Instructions
Step 1: Preheat Your Oven
Start by preheating your oven to 425°F (220°C). This high temperature creates those coveted caramelized edges that make roasted vegetables so irresistible. While your oven is warming up, gather your ingredients and get ready to chop!
Step 2: Prep Your Veggies
Next, grab your cutting board and sharp knife. Peel the carrots and cut them into uniform pieces (about 1 inch long works well) to ensure even cooking. Wash your potatoes thoroughly – we want all that earthy goodness! Cut them into half or quarters, depending on their size. Aim for pieces similar in size to your carrot pieces. Finally, slice your onion into eighths, breaking them into individual layers. Aim for a rustic vibe; they’ll caramelize beautifully!
Step 3: Combine Ingredients
In a large mixing bowl, toss together your chopped carrots, potatoes, and onions. Then, sprinkle in the minced garlic, dried thyme, and dried parsley. The flavors will mingle together beautifully!
Step 4: Drizzle & Season
Now for the olive oil! Drizzle 6 tablespoons over the vegetable mix and season with salt and freshly cracked black pepper. Using your clean hands, toss everything together until every piece is glistening with oil and seasoning. This step is crucial—don’t be shy; get your hands in there!
Step 5: Spread on a Baking Sheet
Transfer your vibrant vegetable mixture to a large baking sheet. Make sure they’re spread out in a single layer – overcrowding the pan will lead to steaming instead of roasting. If they’re too close, the flavors won’t meld as beautifully.
Step 6: Roast Away
Pop the baking sheet into your preheated oven and roast for about 25-30 minutes. Halfway through, give them a good toss with a spatula to ensure even browning. You’ll know they’re done when they are fork-tender and have that beautiful golden-brown color—just divine!
Step 7: Cool and Serve
Once they’re out of the oven, let them cool for a few minutes (if you can wait!). Taste a piece and adjust your seasoning if necessary. Those caramelized bits will provide an explosion of flavor, making it hard to resist them straight off the tray.
Serving Suggestions
For presentation, I love serving these roasted veggies in a large, elegant bowl or platter, topped with a sprinkle of fresh parsley for color. If you’re feeling extra festive, drizzle a balsamic glaze over the top or a squeeze of fresh lemon to brighten the flavors even more. Gather your friends and family around the table, and watch them marvel at the beautiful colors and aromas before diving in!
Recipe Variations
Want to switch things up? Here are a few fun ideas:
- Add Spices: Try sprinkling some cumin or paprika for a warm, smoky flavor.
- Cheesy Delight: Add Parmesan cheese during the last 5 minutes of roasting for a savory twist.
- Sweet Surprise: Toss in apple slices or dried cranberries for a sweet and savory combination—perfect for fall gatherings!
- Herb Infusion: Use fresh herbs like rosemary or dill for a fragrant touch.
- Nutty Crunch: Top with toasted nuts or seeds for added texture.
Chef’s Notes
Over the years, my roast carrots, potatoes, and onions recipe has become a fan favorite at my dinner parties. The beauty of this dish is its simplicity and versatility. I once made a double batch for a large family reunion, and it vanished in minutes! I also remember roasting these veggies with my best friend, who hilariously mistook a tablespoon for a teaspoon while seasoning them. The look on her face when we tasted the overly salted dish had us both in stitches!
This recipe has taught me that even in the kitchen, laughing at little mishaps can lead to the best memories—the kind you tell over and over again!
FAQs and Troubleshooting
Q: How do I prevent my vegetables from getting mushy?
A: Always cut your veggies into uniform sizes and avoid overcrowding the baking sheet. This ensures they roast instead of steam!
Q: Can I make this dish in advance?
A: Absolutely! Roast the vegetables, let them cool, and store them in an airtight container. Reheat them in the oven or microwave before serving.
Q: What can I do with leftovers?
A: Leftover roasted veggies make fantastic additions to salads, grain bowls, or omelets. You can even blend them into a soup for a quick meal!
Q: How do I know when they’re done?
A: Look for tender vegetables that are golden-brown on the edges but still have a bit of firmness. You can test with a fork for doneness.
Nutritional Info (Optional)
This dish is chock-full of vitamins and minerals! Here’s a rough estimate per serving (using 6 servings):
- Calories: 180
- Protein: 3g
- Fat: 7g
- Carbohydrates: 27g
- Dietary Fiber: 4g
This nutritional info will vary depending on the exact ingredients used and serving size. Always feel free to adjust based on your dietary needs!
So there you have it—my love letter to Roast Carrots, Potatoes, and Onions! I hope it brings warmth, flavors, and fond memories to your table, just like it has to mine. Tie on your apron, get cooking, and don’t forget to invite your loved ones to gather around! Happy roasting!
PrintRoast Carrots, Potatoes & Onions
A simple yet stunning side dish featuring roasted carrots, potatoes, and onions that elevate any meal with vibrant flavors and aromas.
- Prep Time: 15 minutes
- Cook Time: 30 minutes
- Total Time: 45 minutes
- Yield: 6 servings 1x
- Category: Side Dish
- Method: Roasting
- Cuisine: American
- Diet: Vegetarian
Ingredients
- 2 pounds carrots, peeled and cut into uniform pieces
- 6 whole potatoes, washed and cut into even pieces
- 1 whole sweet onion, peeled and cut into eighths
- 3 cloves garlic, minced
- 6 tbsp olive oil
- 1/2 tsp dried thyme
- 1/2 tsp dried parsley
- Salt, to taste
- Black pepper, to taste
Instructions
- Preheat your oven to 425°F (220°C).
- Prep your veggies by cutting them into uniform pieces for even cooking.
- Combine carrots, potatoes, onions, garlic, thyme, and parsley in a large mixing bowl.
- Drizzle olive oil over the mixture and season with salt and black pepper; toss to combine.
- Spread the vegetable mixture on a large baking sheet in a single layer.
- Roast in the oven for 25-30 minutes, tossing halfway through.
- Cool slightly, taste, and adjust seasoning if necessary before serving.
Notes
For presentation, serve in a large bowl or platter, optionally drizzled with balsamic glaze or fresh lemon juice.
Nutrition
- Serving Size: 1 serving
- Calories: 180
- Sugar: 4g
- Sodium: 200mg
- Fat: 7g
- Saturated Fat: 1g
- Unsaturated Fat: 5g
- Trans Fat: 0g
- Carbohydrates: 27g
- Fiber: 4g
- Protein: 3g
- Cholesterol: 0mg
Keywords: roasted vegetables, side dish, carrots, potatoes, onions, easy recipe
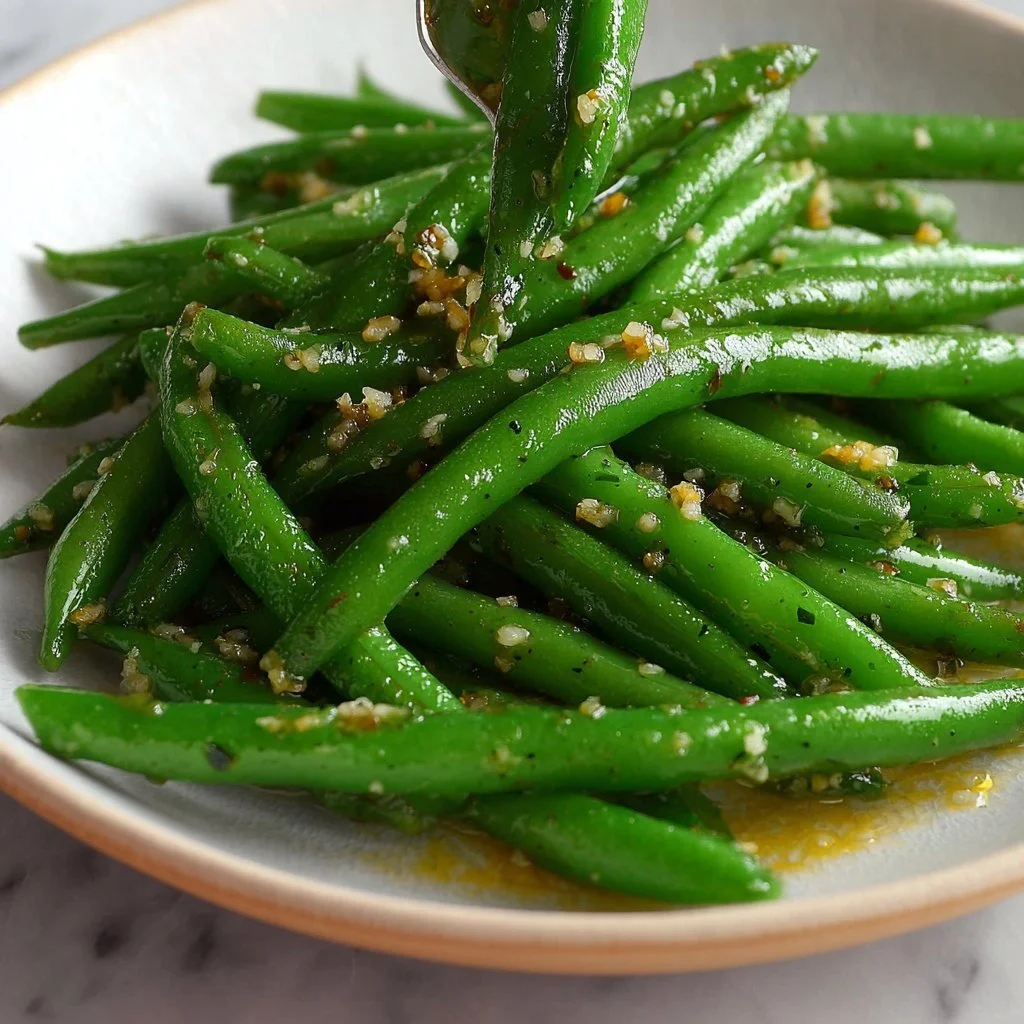
Garlic Green Beans
Garlic Green Beans: Elevate Your Side Dish Game!
Hey fellow food lovers! If there’s one thing I absolutely adore, it’s making vegetables sing on the dinner table. Today, I’m sharing a simple yet elegant side dish that’s bound to become a staple in your kitchen: Garlic Green Beans. Ah, green beans—the unsung heroes of the vegetable world! These beauties are not only nutritious but also incredibly versatile, making them a fantastic addition to any meal.
Imagine sitting at your dining table, surrounded by friends or family, with a steaming platter of vibrant, garlic-infused green beans in front of you. The aroma fills the air, and you can almost taste the love that went into preparing this dish. And trust me, it’s as easy as it is delightful! With just a handful of quality ingredients and a few simple steps, you can whip up a dish that feels both sophisticated and homey.
I was inspired to share this recipe after reminiscing about family dinners growing up, where Mom would always make green beans that were perfectly tender and bursting with flavor. She’d roast them with garlic until lightly caramelized, and the kitchen would smell heavenly! This dish brings back those comforting, nostalgic memories while adding a modern twist that I know you’ll love. So, let’s roll up those sleeves, tie on that apron, and dive right into the world of Garlic Green Beans!
Personal Story
I’ll never forget the first time I attempted to make green beans on my own. Picture this: a young Savannah, freshly out of college, excited to impress my friends with what I thought would be a remarkable dinner. I had grand plans for a three-course meal, complete with a fancy main dish and decadent dessert. But when it came to the sides, I almost defaulted to frozen peas (gasp!). Instead, I thought of those delicious garlic green beans Mom would make.
I called her up, and with a dash of self-doubt, I asked for her secret. “It’s simple, darling. Just sauté garlic in olive oil, toss in the beans, and finish with a sprinkle of salt. Trust your instincts!” Her words resonated. That night, as I heard laughter and clinking glasses around the table, I served those glorious green beans. They were a hit! That meal affirmed my belief that good cooking doesn’t have to be complicated; it’s all about loving the process and sharing moments together.
Fast forward to today, and this recipe continues to be a favorite in my kitchen! Join me as I explore this timeless dish and share tips to make it your own.
Ingredients
Let’s gather our ingredients for the Garlic Green Beans and chat about each one!
-
1 pound fresh green beans, trimmed
Fresh green beans are crisp, vibrant, and full of nutrients. Look for ones that are firm and bright green with no blemishes. If you can’t find fresh ones, frozen will work just fine! Simply thaw and pat dry before using. -
2 tablespoons olive oil
Extra virgin olive oil adds richness and a beautiful flavor. It’s my go-to, but feel free to substitute with avocado oil or even unsalted butter for a different twist! -
3 cloves garlic, minced
Ah, garlic—the star of the show! Minced garlic adds a bold flavor and a touch of sweetness when cooked. If you’re short on fresh garlic, you can use ½ teaspoon of garlic powder as a substitute, though I personally recommend fresh for the best taste. -
Salt and pepper to taste
Simple seasoning is essential. Kosher salt is my preference because it’s easy to pinch and sprinkle! Adjust the amount according to your palate; you can also experiment with flavored salts for an extra kick. -
Lemon wedges (optional, for serving)
A squeeze of fresh lemon juice elevates the flavor profile and adds brightness to the dish. Don’t skip this if you love citrus zest!
Step-by-Step Instructions
Now that we’ve got our ingredients, let’s dive into the cooking process! Here’s how to make Garlic Green Beans that will impress everyone around your table.
Step 1: Prep Your Ingredients
Start by washing your green beans under cold water. Trim the ends by snapping them off or cutting with a knife. Fresh, crisp beans are ideal! Mince the garlic as finely as you can; this allows it to infuse the oil beautifully.
Step 2: Heat the Olive Oil
In a large skillet or sauté pan, heat the olive oil over medium heat. You want the oil to shimmer but not smoke. This is a great time to add a pinch of salt to the oil, which helps flavor the beans while they cook.
Step 3: Sauté the Garlic
Once your oil is ready, add the minced garlic to the pan. Keep an eye on it, as garlic can go from perfectly golden to burnt in a heartbeat! Stir the garlic frequently for about 30 seconds or until it becomes fragrant and lightly golden. This is the moment where your kitchen will start smelling heavenly—trust me!
Step 4: Add the Green Beans
Now, it’s time to increase the flavor game! Add the trimmed green beans to the pan with the sautéed garlic. Toss them around gently in the oil, ensuring they get a good coating. You want to stir-fry the beans for about 5-7 minutes until they’re bright green and tender-crisp. If you prefer them softer, cook them a few minutes longer—just don’t let them get mushy!
Step 5: Season to Taste
Once your green beans are cooked to perfection, season them with salt and pepper. Give them a good toss, and taste to see if they need any more seasoning. If you’re feeling adventurous, consider adding a pinch of red pepper flakes for some heat or a sprinkle of parmesan cheese if you’re looking for that creamy finish!
Step 6: Serve and Enjoy
Transfer your beautifully sautéed garlic green beans to a serving dish. If you’re using lemon, cut a few wedges to serve on the side. A little drizzle of lemon juice adds that final touch of brightness. Gather your family around the table to share in the deliciousness you just created!
Serving Suggestions
For an elegant touch, I recommend plating the Garlic Green Beans on a large white platter, creating a lush centerpiece on your table. Drizzle with a touch of olive oil and add a few fresh herb sprigs—like parsley or thyme—on top for a pop of color. Not only does it look fabulous, but it also brings freshness to the dish. Serve alongside your favorite protein (think roasted chicken, grilled fish, or succulent steak) for a full meal experience.
Recipe Variations
-
Balsamic-Glazed Garlic Green Beans
Drizzle balsamic vinegar over the green beans during the last minute of cooking for a tangy twist! -
Asian-Inspired Garlic Green Beans
Add a splash of soy sauce and a sprinkle of sesame seeds to take your dish on a flavor adventure. -
Garlic Green Beans with Nuts
Toss in toasted almonds or pecans just before serving for a delightful crunch. -
Spicy Garlic Green Beans
Add red pepper flakes while sautéing for a kick, or toss in a diced chili pepper with the garlic. -
Herb-Infused Garlic Green Beans
Experiment with fresh herbs like thyme, dill, or basil to add layers of fresh flavor.
Chef’s Notes
Garlic Green Beans have come a long way since my college days! I’ve played around with countless variations, from adding crispy bacon bits to using different oils for deeper flavor. One time, I served these at a potluck, and they disappeared within minutes! I learned quickly that even the simplest recipes can become crowd-pleasers when made with love and quality ingredients.
Don’t hesitate to adapt this recipe as you find your cooking style. Maybe you’ve just harvested herbs from your garden or have a special seasoning blend you love—experiment! You’d be surprised at how a small change can transform the dish.
FAQs and Troubleshooting
Q: Can I use frozen green beans?
A: Absolutely! Just make sure to thaw and pat them dry before sautéing. Frozen beans may require a few extra minutes in the pan.
Q: How can I prevent the garlic from burning?
A: Keep the heat at medium and watch it closely. Stirring constantly will help prevent burning. If you’re worried, you can add the garlic a bit later into the cooking process!
Q: What can I do if my beans are too tough?
A: If they’re still firm after sautéing, you can add a splash of water to the pan, cover it, and let them steam for 2-3 minutes for tenderness.
Q: Can I prepare these ahead of time?
A: Yes! You can blanch the beans ahead of time and then simply sauté them with garlic when you’re ready to serve. Just keep in mind that fresh is always best for flavor.
Nutritional Info
(per serving, based on a 4-serving recipe)
- Calories: 120
- Protein: 3g
- Fat: 9g
- Carbohydrates: 9g
- Fiber: 4g
Cooking Garlic Green Beans is not just about the food; it’s about the joy of gathering, laughing, and creating memories with loved ones. I hope this recipe brings that same warmth to your kitchen as it has to mine. Happy cooking, and remember: every meal is an opportunity to share love! 🥰
Thanks for stopping by Ivory Apron, and don’t forget to sprinkle in your own flair when trying this recipe! Cheers to delicious, heartfelt meals! 🍽️
PrintGarlic Green Beans
A simple yet elegant side dish featuring tender, garlic-infused green beans that’s perfect for family dinners.
- Prep Time: 10 minutes
- Cook Time: 10 minutes
- Total Time: 20 minutes
- Yield: 4 servings 1x
- Category: Side Dish
- Method: Sautéing
- Cuisine: American
- Diet: Vegetarian
Ingredients
- 1 pound fresh green beans, trimmed
- 2 tablespoons olive oil
- 3 cloves garlic, minced
- Salt and pepper to taste
- Lemon wedges (optional, for serving)
Instructions
- Prep your ingredients by washing the green beans and trimming the ends.
- Heat the olive oil in a large skillet over medium heat.
- Sauté the minced garlic in the oil until fragrant and lightly golden.
- Add the trimmed green beans to the pan and toss to coat them in the garlic oil.
- Season with salt and pepper, adjusting to taste.
- Serve the green beans warm, with lemon wedges on the side.
Notes
For added flavor, consider adding red pepper flakes or parmesan cheese when seasoning. You can also experiment with various herbs.
Nutrition
- Serving Size: 1 serving
- Calories: 120
- Sugar: 2g
- Sodium: 200mg
- Fat: 9g
- Saturated Fat: 1g
- Unsaturated Fat: 8g
- Trans Fat: 0g
- Carbohydrates: 9g
- Fiber: 4g
- Protein: 3g
- Cholesterol: 0mg
Keywords: garlic green beans, side dish, vegetarian, easy recipe, healthy cooking