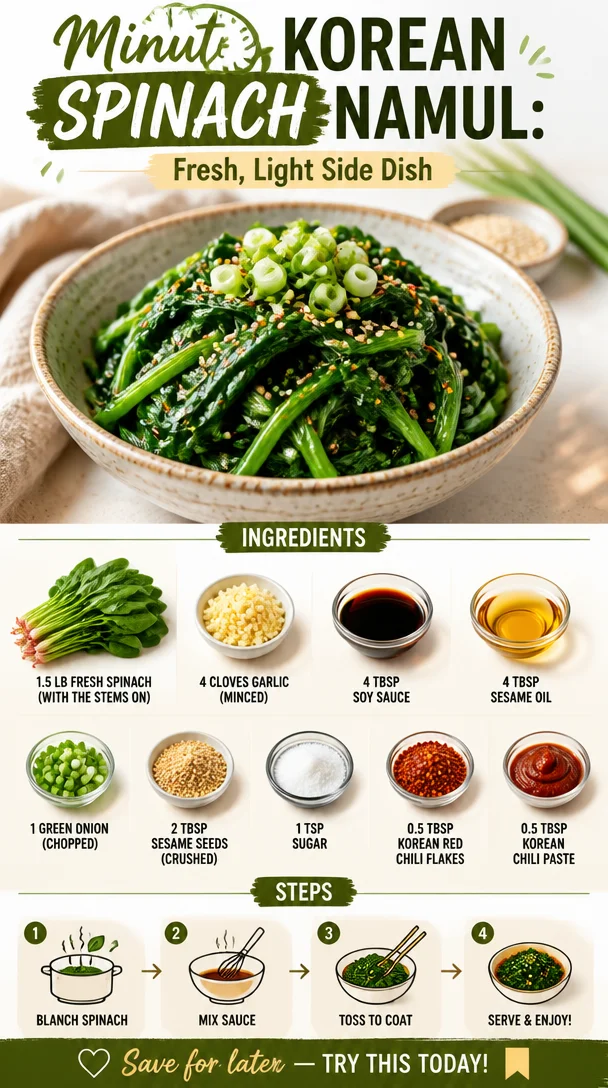
Minute Korean Spinach Namul: Fresh, Light Side Dish
Discover the Joy of Sigeumchi Namul: Korean Spinach Salad
Hello and welcome back, food enthusiasts! Today, I’m thrilled to share a dish that’s as vibrant in flavor as it is in color—Sigeumchi Namul, or Korean Spinach Salad. This delightful side dish is a staple in Korean cuisine, embodying the harmony of simple ingredients coming together to create something extraordinary.
Spinach is often perceived as a boring green, but trust me—once dressed in a rich combination of soy sauce, sesame oil, and garlic, you’ll see it in a whole new light. So, let’s roll up our sleeves, tie on our aprons, and dive into the world of Korean flavors that will make your taste buds sing!
A Nostalgic Kitchen Memory
As much as I adore experimenting in the kitchen, my culinary roots often tie me back to my grandmother’s kitchen, which felt like magic at times. I remember visiting her during summer breaks, where the air was filled with the sumptuous smells of her cooking. On one of those warm afternoons, amidst the clattering of dishes and laughter, she taught me how to prepare Sigeumchi Namul.
Armed with fresh spinach from her garden, she would transform it into something breathtakingly simple yet incredibly flavorful. She used to say, "Food is love." It was her way of connecting, of nurturing, and of creating lasting memories. The crunch of sesame seeds and the vivid green of the spinach would always ignite my appetite. I can still recall watching in awe as she mixed the ingredients, her hands moving gracefully, making something so tender and beautiful. It’s that spirited love of food and fellowship that I channel when I cook this salad today.
Ingredients
Let’s talk ingredients! This salad is wonderfully accessible—most likely, you already have several of these tasty staples in your pantry. Here’s what you’ll need:
-
1.5 lbs Fresh Spinach (with stems on)
- Why? Fresh spinach is vibrant and packed with nutrients. Look for heavy, dark green leaves for the best flavor.
- Tip: If you can’t find fresh spinach, baby spinach or even other leafy greens like kale will work as substitutes.
-
4 cloves Garlic (minced)
- Why? Garlic adds a lovely aromatic punch, enhancing the dish’s flavor profile.
- Tip: Use fresh garlic for the best taste, but you can substitute it with garlic powder in a pinch.
-
4 tbsp Soy Sauce
- Why? This brings the umami and a touch of saltiness.
- Tip: For a gluten-free option, use tamari or coconut aminos.
-
4 tbsp Sesame Oil
- Why? The nutty flavor of sesame oil is a game-changer and key in Korean dishes.
- Tip: If you want a lighter taste, opt for a light sesame oil instead of toasted.
-
1 Green Onion (chopped)
- Why? Green onions lend a hint of freshness and mildness to the dish.
- Tip: If you’re short on green onions, finely chopped chives or shallots can work as substitutes.
-
2 tbsp Sesame Seeds (crushed)
- Why? These add a delicious crunch and a boost of nuttiness.
- Tip: Toast the seeds for an even richer flavor!
-
1 tsp Sugar
- Why? A pinch of sugar balances out the salty and savory aspects.
- Tip: If avoiding sugar, a stevia-based sweetener can also do the trick!
-
0.5 tbsp Korean Red Chili Flakes (Gochugaru)
- Why? Adds a lovely pop of heat and color without overpowering the dish.
- Tip: If you’re sensitive to spice, you can reduce the amount!
-
0.5 tbsp Korean Chili Paste (Gochujang)
- Why? For a touch of sweetness and deep flavor.
- Tip: You can mix it with a little water if you want to reduce its thickness!
With this stellar lineup, we’re ready to create something delicious.
Step-by-Step Instructions
Ready to cook? Let’s get started! Follow these steps for a sensational Sigeumchi Namul.
-
Wash the Spinach:
- Start by rinsing your spinach under cold water to remove any grit or dirt. Give it a slight shake to remove excess moisture. It’s essential not to skip this step!
-
Blanch the Spinach:
-
Bring a large pot of salted water to a boil and add the spinach. Blanch for about 30 seconds, just until the leaves are wilted but still vibrantly green. This step helps retain the nutrients and keeps the spinach looking fresh.
-
Chef Tip: Don’t overcook! Remove it promptly to retain that beautiful green color.
-
-
Ice Bath:
- After blanching, immediately transfer the spinach to a bowl filled with ice water to stop the cooking process. This technique is known as shocking and ensures the spinach remains bright and crisp.
-
Drain and Squeeze:
-
Once cooled, drain the spinach and squeeze it gently to remove excess moisture. This step is crucial; too much water can dilute the flavors of your dressing.
-
Fun Chef Hack: You can use a clean kitchen towel for this step! Just wrap the spinach into the towel and twist it to get the moisture out.
-
-
Prepare the Dressing:
- In a mixing bowl, combine the minced garlic, soy sauce, sesame oil, sugar, gochugaru, and gochujang. Stir until well combined. This dressing is like a hug for your spinach; it’s going to add depth and flavor!
-
Mix Spinach and Dressing:
- Toss the drained spinach in the mixing bowl with the dressing. Make sure every leaf is coated beautifully. Use your hands for this step; it’s therapeutic and helps you connect with your food!
-
Add Toppings:
- Finally, sprinkle on the chopped green onions and sesame seeds. Give it a gentle toss again just to distribute the toppings evenly.
-
Taste Test:
- Always taste and adjust! If you want more saltiness, add a splash more of soy sauce; if you prefer a little sweetness, more sugar can round it out.
-
Serve and Enjoy:
- Transfer your gorgeous Sigeumchi Namul into a serving bowl, and allow it to sit for about 10 minutes—this lets the flavors meld beautifully.
Serving Suggestions
Presentation is key! For a lovely plating, you can gently mound the spinach salad in the center of a beautiful serving platter. Add a few extra sesame seeds and a sprig of green onion on top for visual appeal. Enjoy your Sigeumchi Namul as a delightful side during dinner or as part of a Korean feast. It pairs excellently with grilled meats or fried rice!
Recipe Variations
Let’s talk creativity! Here are some fun twists to make this dish uniquely yours:
-
Spicy Sesame Spinach:
- Add more chili flakes or even some sliced chili peppers for an extra kick.
-
Nutty Spinach:
- Mix in crushed peanuts or walnuts for added crunch and flavor.
-
Sesame-ginger variation:
- Incorporate some minced fresh ginger for a zingy twist.
-
Soy-free option:
- Substitute soy sauce with coconut aminos for a delicious soy-free version.
-
Add Protein:
- Toss in some edamame or pan-seared tofu to make it a full meal.
Chef’s Notes
Over the years, this dish has become a family favorite at gatherings. What I love most is how it evolves with each serving; sometimes I add a sprinkle of nuts or even bring in other veggies like carrots for color. Once, while cooking with my children, we made a "Sigeumchi Namul" competition to see who could create their own unique version. It turned into a full-blown art project—who knew a salad could spark that kind of creativity!
FAQs and Troubleshooting
1. My spinach looks limp. What did I do wrong?
Don’t despair! Spinach wilts quickly when blanched. Ensure you’re not leaving it in the boiling water for more than 30 seconds, and promptly transfer it to an ice bath to stop the cooking.
2. Can I prepare this salad in advance?
Absolutely! You can blanch and dress the spinach up to a day in advance. Just keep it in an airtight container in the fridge. The flavors will even deepen, making it even tastier.
3. My dressing is too salty. How can I fix it?
If you find the dressing too salty, adding a touch more sugar can help balance it out. You could also adjust it by adding more spinach; that will dilute the saltiness.
4. Can I use frozen spinach?
While fresh is best for this salad, you can use frozen spinach if that’s what you have. Just ensure it’s well-drained to get rid of the excess water before mixing with the dressing.
Conclusion
There you have it—a delightful journey through the vibrant world of Sigeumchi Namul. This Korean Spinach Salad is a beautiful way to demonstrate the art of simplicity in the kitchen. Remember, cooking is all about love, care, and connecting over shared moments. So, tie on your apron, gather your ingredients, and create a plate that brings joy to yourself and those around you.
At Ivory Apron, we believe in making elevated cooking accessible for everyone. Thank you for joining me today, and I can’t wait to hear how your Sigeumchi Namul turns out! Happy cooking!
PrintSigeumchi Namul: Korean Spinach Salad
A vibrant and flavorful Korean spinach salad, dressed with soy sauce, sesame oil, and garlic for an irresistible side dish.
- Prep Time: 10 minutes
- Cook Time: 5 minutes
- Total Time: 15 minutes
- Yield: 4 servings 1x
- Category: Side Dish
- Method: Blanching
- Cuisine: Korean
- Diet: Vegetarian
Ingredients
- 1.5 lbs Fresh Spinach (with stems on)
- 4 cloves Garlic (minced)
- 4 tbsp Soy Sauce
- 4 tbsp Sesame Oil
- 1 Green Onion (chopped)
- 2 tbsp Sesame Seeds (crushed)
- 1 tsp Sugar
- 0.5 tbsp Korean Red Chili Flakes (Gochugaru)
- 0.5 tbsp Korean Chili Paste (Gochujang)
Instructions
- Wash the Spinach: Rinse spinach under cold water to remove grit or dirt.
- Blanch the Spinach: Bring salted water to a boil, add spinach and blanch for about 30 seconds.
- Ice Bath: Transfer the blanched spinach to a bowl filled with ice water to stop cooking.
- Drain and Squeeze: Drain spinach and gently squeeze to remove excess moisture.
- Prepare the Dressing: In a bowl, combine minced garlic, soy sauce, sesame oil, sugar, gochugaru, and gochujang.
- Mix Spinach and Dressing: Toss drained spinach in the bowl with the dressing.
- Add Toppings: Sprinkle chopped green onions and sesame seeds over the salad.
- Taste Test: Adjust seasoning to taste with more soy sauce or sugar.
- Serve and Enjoy: Transfer to a serving bowl and allow to sit for about 10 minutes before serving.
Notes
Pair the salad with grilled meats or fried rice for a complete meal. This dish can be prepared in advance and stored in an airtight container in the fridge.
Nutrition
- Serving Size: 1 serving
- Calories: 200
- Sugar: 1g
- Sodium: 800mg
- Fat: 15g
- Saturated Fat: 2g
- Unsaturated Fat: 12g
- Trans Fat: 0g
- Carbohydrates: 10g
- Fiber: 4g
- Protein: 5g
- Cholesterol: 0mg
Keywords: Korean salad, spinach recipe, healthy side dish

Candied Beets
Indulge in the Sweetness of Candied Beets
Hello, fellow food enthusiast! Today, I’m excited to share a delightful recipe that has graced my table time and again: candied beets. These vibrant, sweet jewels of the root vegetable world are not only a feast for the eyes but also a treat for the taste buds. With their earthy undertones paired with a caramelized sweetness, candied beets can elevate any meal into something special. Let’s dive into the creation of this visually stunning and delicious dish, and I promise you’ll leave the kitchen with both a full heart and a satisfied belly!
Now, let’s face it: beets can be a polarizing vegetable. Some people love their unique flavor, while others shy away from them. But I believe that when cooked and prepared with love—or, dare I say, a little sugar—they can transform into a dish that even the most skeptical eaters will adore. The day I first introduced candied beets to my friends was a moment etched in memory. I had just moved into my first place and decided to throw an impromptu dinner party. With a few close friends gathered around, I whipped up a simple meal and, for a touch of sophistication, decided to add candied beets as my side dish.
As I plated the beets, glowing a deep ruby red, one of my friends—a self-proclaimed beet-hater—eyed them suspiciously. But after the first bite, I was met with wide eyes and smiles all around. “These don’t even taste like beets!” she exclaimed. It was a culinary triumph, and from that moment on, candied beets became a staple in my cooking repertoire.
So, are you ready to create your own beet bliss? Let’s roll up our sleeves and get cooking!
Ingredients
Here’s what you’ll need to create these scrumptious candied beets:
-
3–5 medium beets (cooked, peeled, and cut into 2" pieces)
Fresh beets are wonderful, but if you’re short on time, feel free to substitute with whole canned beets. Just be sure to drain and rinse them thoroughly. Fresh beets will bring a deeper flavor and firmer texture. -
3 tablespoons unsalted butter
Unsalted butter allows you to control the saltiness of your dish. If you prefer a dairy-free option, you can use coconut oil, which will impart a subtle sweetness. -
4 tablespoons brown sugar
Brown sugar adds a rich molasses flavor that complements the earthy taste of beets. If you want a lower-sugar option, consider using maple syrup or agave, but note that the cooking times may vary slightly. -
1/4 teaspoon salt
Just a pinch of salt here enhances the sweetness of the beets; however, you can omit it if you’re watching your sodium intake. -
1/2 teaspoon orange zest
The vibrant zest of an orange brightens up the dish and adds a lovely citrus note. If you don’t have oranges, lemon zest could be a delightful substitute, offering an elegant twist.
Step-by-Step Instructions
Step 1: Prepare the Beets
If you’re using fresh beets, start by giving them a good scrub under running water to remove any dirt. Place the beets in a pot, cover them with water, and boil them until fork-tender—this usually takes about 30-45 minutes. Once cool enough to handle, peel the skin off (it should slide right off) and cut them into 2-inch pieces. If you’re using canned beets, skip this step—just cut them up and set aside!
Chef Tip: Save some of the beet greens if they’re attached; they’re delicious sautéed with a little garlic and olive oil.
Step 2: Melt the Butter
In a large skillet, melt the unsalted butter over medium heat. As it melts, enjoy that comforting aroma—it’s the start of something heavenly!
Little Hack: Allow your butter to brown slightly for a nutty flavor twist. Just be careful not to let it burn!
Step 3: Add the Sugar
Once the butter is melted and sizzling, sprinkle the brown sugar into the skillet and stir until it’s fully dissolved. You’ll see a glossy, bubbling mixture form.
Tip: This is the magic moment! Stir continuously to prevent the sugar from sticking or burning.
Step 4: Toss in the Beets
Gently add the beet pieces into the caramelized butter and sugar mixture. Give them a robust toss to ensure every piece is coated in that sticky goodness.
Step 5: Season the Beets
Sprinkle the salt and orange zest over the beets, and stir again to combine. Cook for another 5-8 minutes, turning the beets regularly, letting them absorb all that rich flavor and caramelize beautifully.
Chef’s Insight: You’ll know they’re done when they’re heated through (not mushy!), and their vivid color shines even brighter.
Step 6: Serve and Enjoy
Once the beets are beautifully glazed and gleaming, remove them from the heat. Transfer them to a serving dish—don’t forget to scrape all that delicious sauce on top!
Serving Suggestions
Presentation is everything! Serve your candied beets on a lovely platter, garnished with fresh herbs like parsley or mint for a burst of color and freshness. They make a vibrant side dish for roasted meats or as part of a vegetarian feast. If you’re feeling fancy, add goat cheese crumbles or toasted walnuts for some added texture and flavor. Oh, the options are endless!
Recipe Variations
Get creative with these simple twists on candied beets:
- Spiced Candied Beets: Add a pinch of cinnamon or nutmeg for a warm flavor profile, perfect for cozy meals.
- Balsamic Reduction: Drizzle a balsamic reduction over the finished beets for a tangy contrast.
- Maple-Glazed Beets: Substitute brown sugar with pure maple syrup for a delightful twist.
- Herbed Beets: Mix in fresh herbs like thyme or dill during the last minute of cooking for an herby infusion.
- Vegan Option: Use coconut oil instead of butter and maple syrup instead of brown sugar for a vegan twist.
Chef’s Notes
As a love letter to beets, this recipe has truly evolved over the years. I’ve tried everything from adding cream to experimenting with different sweeteners. What always brings me back is the simplicity and elegance of the core ingredients. It reminds me of the first dinner party I hosted that night when my friends and I laughed over sweet, sticky beets in an utterly cozy setting. Food isn’t just about taste; it’s about the stories we create around it.
If you ever find yourself in the kitchen and the beets aren’t cooperating, don’t stress! Cooking is a journey, not a race. Laugh at the hiccups and keep tasting along the way.
FAQs and Troubleshooting
Q1: My beets are mushy. What went wrong?
Overcooking is the usual culprit! Be sure to check for tenderness with a fork; you want them tender but still holding their shape.
Q2: Can I make candied beets ahead of time?
Absolutely! You can cook and candy the beets in advance. Store them in an airtight container in the fridge for up to 3 days. Reheat gently on the stovetop when ready to serve.
Q3: What should I serve with candied beets?
They pair beautifully with roasted meats like chicken or pork, or as an elegant side dish for a vegetarian meal. They can also be added to salads for a pop of sweetness.
Q4: Is there a way to make this recipe healthier?
You can reduce the amount of sugar or use natural sweeteners like honey or maple syrup. You could also add some sautéed greens for a nutritional boost.
Cooking is all about exploration and adapting to what you have on hand. I hope this recipe sparks joy in your kitchen as it has in mine. Now, go ahead, tie on that apron, and let those beets shine bright on your dining table!
Enjoy the sweetness, and until next time, happy cooking!
PrintCandied Beets

A delightful recipe for candied beets that transforms this polarizing vegetable into a sweet and savory side dish.
- Prep Time: 15 minutes
- Cook Time: 30 minutes
- Total Time: 45 minutes
- Yield: 4 servings 1x
- Category: Side Dish
- Method: Stovetop
- Cuisine: Vegetarian
- Diet: Vegetarian
Ingredients
- 3–5 medium beets (cooked, peeled, and cut into 2″ pieces)
- 3 tablespoons unsalted butter
- 4 tablespoons brown sugar
- 1/4 teaspoon salt
- 1/2 teaspoon orange zest
Instructions
- Prepare the beets by scrubbing them, boiling until fork-tender, and cutting into 2-inch pieces.
- Melt the butter in a large skillet over medium heat.
- Add the brown sugar to the melted butter and stir until dissolved.
- Toss in the beet pieces and coat them in the mixture.
- Season with salt and orange zest, stirring and cooking for another 5-8 minutes.
- Serve the candied beets on a platter, garnished with fresh herbs if desired.
Notes
These candied beets can be made ahead of time and are perfect alongside roasted meats or in salads.
Nutrition
- Serving Size: 1 serving
- Calories: 150
- Sugar: 25g
- Sodium: 100mg
- Fat: 7g
- Saturated Fat: 4g
- Unsaturated Fat: 3g
- Trans Fat: 0g
- Carbohydrates: 20g
- Fiber: 3g
- Protein: 2g
- Cholesterol: 15mg
Keywords: candied beets, side dish, vegetarian, sweet beets, easy recipe
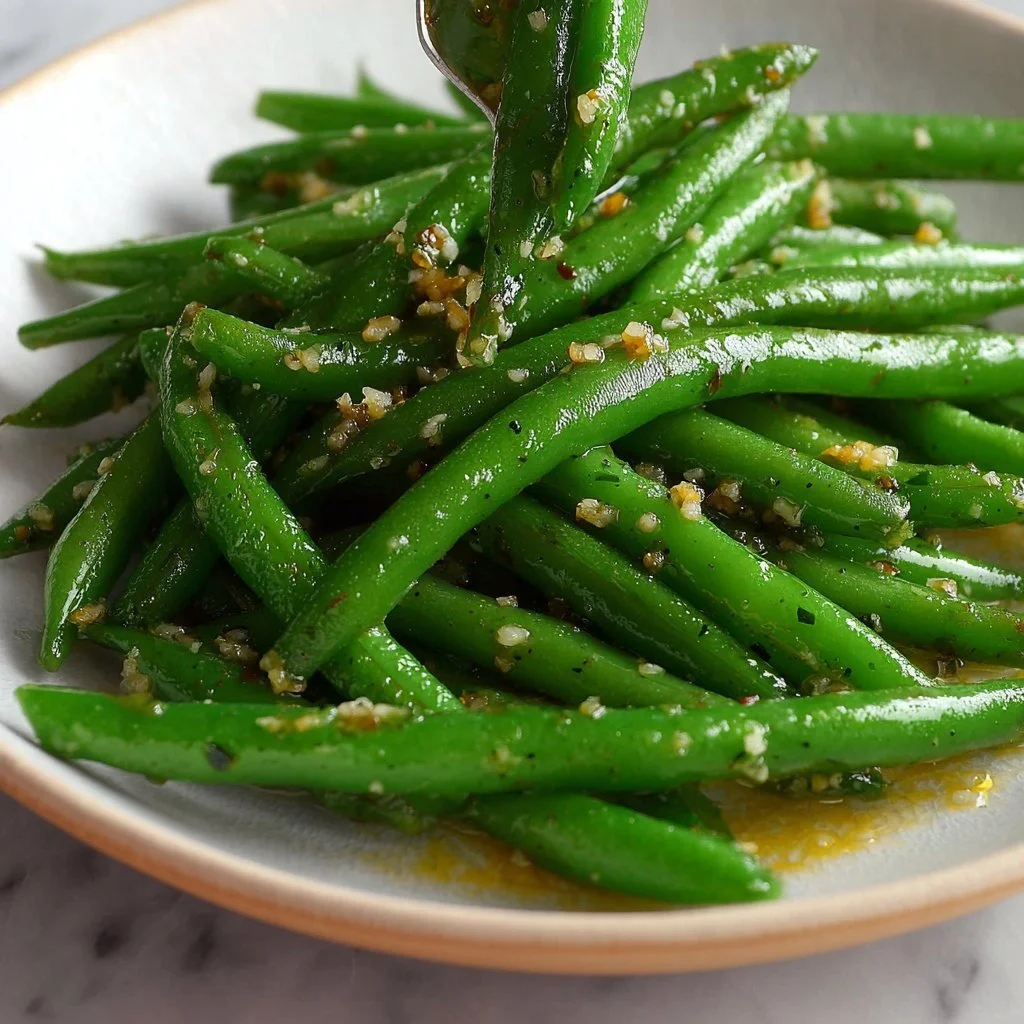
Garlic Green Beans
Garlic Green Beans: Elevate Your Side Dish Game!
Hey fellow food lovers! If there’s one thing I absolutely adore, it’s making vegetables sing on the dinner table. Today, I’m sharing a simple yet elegant side dish that’s bound to become a staple in your kitchen: Garlic Green Beans. Ah, green beans—the unsung heroes of the vegetable world! These beauties are not only nutritious but also incredibly versatile, making them a fantastic addition to any meal.
Imagine sitting at your dining table, surrounded by friends or family, with a steaming platter of vibrant, garlic-infused green beans in front of you. The aroma fills the air, and you can almost taste the love that went into preparing this dish. And trust me, it’s as easy as it is delightful! With just a handful of quality ingredients and a few simple steps, you can whip up a dish that feels both sophisticated and homey.
I was inspired to share this recipe after reminiscing about family dinners growing up, where Mom would always make green beans that were perfectly tender and bursting with flavor. She’d roast them with garlic until lightly caramelized, and the kitchen would smell heavenly! This dish brings back those comforting, nostalgic memories while adding a modern twist that I know you’ll love. So, let’s roll up those sleeves, tie on that apron, and dive right into the world of Garlic Green Beans!
Personal Story
I’ll never forget the first time I attempted to make green beans on my own. Picture this: a young Savannah, freshly out of college, excited to impress my friends with what I thought would be a remarkable dinner. I had grand plans for a three-course meal, complete with a fancy main dish and decadent dessert. But when it came to the sides, I almost defaulted to frozen peas (gasp!). Instead, I thought of those delicious garlic green beans Mom would make.
I called her up, and with a dash of self-doubt, I asked for her secret. “It’s simple, darling. Just sauté garlic in olive oil, toss in the beans, and finish with a sprinkle of salt. Trust your instincts!” Her words resonated. That night, as I heard laughter and clinking glasses around the table, I served those glorious green beans. They were a hit! That meal affirmed my belief that good cooking doesn’t have to be complicated; it’s all about loving the process and sharing moments together.
Fast forward to today, and this recipe continues to be a favorite in my kitchen! Join me as I explore this timeless dish and share tips to make it your own.
Ingredients
Let’s gather our ingredients for the Garlic Green Beans and chat about each one!
-
1 pound fresh green beans, trimmed
Fresh green beans are crisp, vibrant, and full of nutrients. Look for ones that are firm and bright green with no blemishes. If you can’t find fresh ones, frozen will work just fine! Simply thaw and pat dry before using. -
2 tablespoons olive oil
Extra virgin olive oil adds richness and a beautiful flavor. It’s my go-to, but feel free to substitute with avocado oil or even unsalted butter for a different twist! -
3 cloves garlic, minced
Ah, garlic—the star of the show! Minced garlic adds a bold flavor and a touch of sweetness when cooked. If you’re short on fresh garlic, you can use ½ teaspoon of garlic powder as a substitute, though I personally recommend fresh for the best taste. -
Salt and pepper to taste
Simple seasoning is essential. Kosher salt is my preference because it’s easy to pinch and sprinkle! Adjust the amount according to your palate; you can also experiment with flavored salts for an extra kick. -
Lemon wedges (optional, for serving)
A squeeze of fresh lemon juice elevates the flavor profile and adds brightness to the dish. Don’t skip this if you love citrus zest!
Step-by-Step Instructions
Now that we’ve got our ingredients, let’s dive into the cooking process! Here’s how to make Garlic Green Beans that will impress everyone around your table.
Step 1: Prep Your Ingredients
Start by washing your green beans under cold water. Trim the ends by snapping them off or cutting with a knife. Fresh, crisp beans are ideal! Mince the garlic as finely as you can; this allows it to infuse the oil beautifully.
Step 2: Heat the Olive Oil
In a large skillet or sauté pan, heat the olive oil over medium heat. You want the oil to shimmer but not smoke. This is a great time to add a pinch of salt to the oil, which helps flavor the beans while they cook.
Step 3: Sauté the Garlic
Once your oil is ready, add the minced garlic to the pan. Keep an eye on it, as garlic can go from perfectly golden to burnt in a heartbeat! Stir the garlic frequently for about 30 seconds or until it becomes fragrant and lightly golden. This is the moment where your kitchen will start smelling heavenly—trust me!
Step 4: Add the Green Beans
Now, it’s time to increase the flavor game! Add the trimmed green beans to the pan with the sautéed garlic. Toss them around gently in the oil, ensuring they get a good coating. You want to stir-fry the beans for about 5-7 minutes until they’re bright green and tender-crisp. If you prefer them softer, cook them a few minutes longer—just don’t let them get mushy!
Step 5: Season to Taste
Once your green beans are cooked to perfection, season them with salt and pepper. Give them a good toss, and taste to see if they need any more seasoning. If you’re feeling adventurous, consider adding a pinch of red pepper flakes for some heat or a sprinkle of parmesan cheese if you’re looking for that creamy finish!
Step 6: Serve and Enjoy
Transfer your beautifully sautéed garlic green beans to a serving dish. If you’re using lemon, cut a few wedges to serve on the side. A little drizzle of lemon juice adds that final touch of brightness. Gather your family around the table to share in the deliciousness you just created!
Serving Suggestions
For an elegant touch, I recommend plating the Garlic Green Beans on a large white platter, creating a lush centerpiece on your table. Drizzle with a touch of olive oil and add a few fresh herb sprigs—like parsley or thyme—on top for a pop of color. Not only does it look fabulous, but it also brings freshness to the dish. Serve alongside your favorite protein (think roasted chicken, grilled fish, or succulent steak) for a full meal experience.
Recipe Variations
-
Balsamic-Glazed Garlic Green Beans
Drizzle balsamic vinegar over the green beans during the last minute of cooking for a tangy twist! -
Asian-Inspired Garlic Green Beans
Add a splash of soy sauce and a sprinkle of sesame seeds to take your dish on a flavor adventure. -
Garlic Green Beans with Nuts
Toss in toasted almonds or pecans just before serving for a delightful crunch. -
Spicy Garlic Green Beans
Add red pepper flakes while sautéing for a kick, or toss in a diced chili pepper with the garlic. -
Herb-Infused Garlic Green Beans
Experiment with fresh herbs like thyme, dill, or basil to add layers of fresh flavor.
Chef’s Notes
Garlic Green Beans have come a long way since my college days! I’ve played around with countless variations, from adding crispy bacon bits to using different oils for deeper flavor. One time, I served these at a potluck, and they disappeared within minutes! I learned quickly that even the simplest recipes can become crowd-pleasers when made with love and quality ingredients.
Don’t hesitate to adapt this recipe as you find your cooking style. Maybe you’ve just harvested herbs from your garden or have a special seasoning blend you love—experiment! You’d be surprised at how a small change can transform the dish.
FAQs and Troubleshooting
Q: Can I use frozen green beans?
A: Absolutely! Just make sure to thaw and pat them dry before sautéing. Frozen beans may require a few extra minutes in the pan.
Q: How can I prevent the garlic from burning?
A: Keep the heat at medium and watch it closely. Stirring constantly will help prevent burning. If you’re worried, you can add the garlic a bit later into the cooking process!
Q: What can I do if my beans are too tough?
A: If they’re still firm after sautéing, you can add a splash of water to the pan, cover it, and let them steam for 2-3 minutes for tenderness.
Q: Can I prepare these ahead of time?
A: Yes! You can blanch the beans ahead of time and then simply sauté them with garlic when you’re ready to serve. Just keep in mind that fresh is always best for flavor.
Nutritional Info
(per serving, based on a 4-serving recipe)
- Calories: 120
- Protein: 3g
- Fat: 9g
- Carbohydrates: 9g
- Fiber: 4g
Cooking Garlic Green Beans is not just about the food; it’s about the joy of gathering, laughing, and creating memories with loved ones. I hope this recipe brings that same warmth to your kitchen as it has to mine. Happy cooking, and remember: every meal is an opportunity to share love! 🥰
Thanks for stopping by Ivory Apron, and don’t forget to sprinkle in your own flair when trying this recipe! Cheers to delicious, heartfelt meals! 🍽️
PrintGarlic Green Beans

A simple yet elegant side dish featuring tender, garlic-infused green beans that’s perfect for family dinners.
- Prep Time: 10 minutes
- Cook Time: 10 minutes
- Total Time: 20 minutes
- Yield: 4 servings 1x
- Category: Side Dish
- Method: Sautéing
- Cuisine: American
- Diet: Vegetarian
Ingredients
- 1 pound fresh green beans, trimmed
- 2 tablespoons olive oil
- 3 cloves garlic, minced
- Salt and pepper to taste
- Lemon wedges (optional, for serving)
Instructions
- Prep your ingredients by washing the green beans and trimming the ends.
- Heat the olive oil in a large skillet over medium heat.
- Sauté the minced garlic in the oil until fragrant and lightly golden.
- Add the trimmed green beans to the pan and toss to coat them in the garlic oil.
- Season with salt and pepper, adjusting to taste.
- Serve the green beans warm, with lemon wedges on the side.
Notes
For added flavor, consider adding red pepper flakes or parmesan cheese when seasoning. You can also experiment with various herbs.
Nutrition
- Serving Size: 1 serving
- Calories: 120
- Sugar: 2g
- Sodium: 200mg
- Fat: 9g
- Saturated Fat: 1g
- Unsaturated Fat: 8g
- Trans Fat: 0g
- Carbohydrates: 9g
- Fiber: 4g
- Protein: 3g
- Cholesterol: 0mg
Keywords: garlic green beans, side dish, vegetarian, easy recipe, healthy cooking