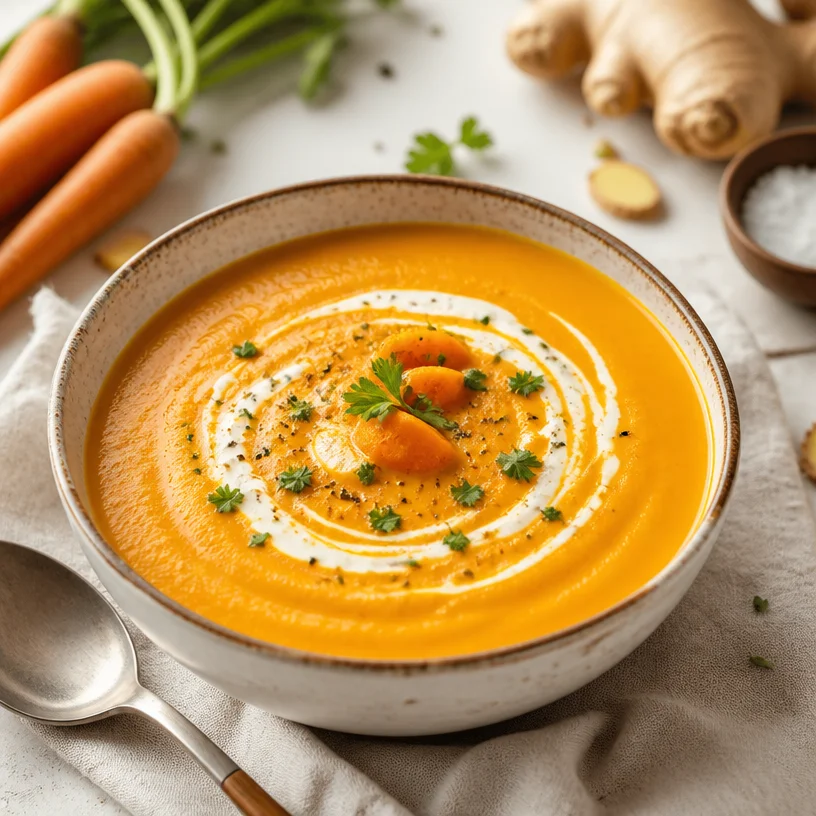
Creamy Carrot-Ginger Soup: 20-Minute Weeknight Comfort
Creamy Carrot Ginger Soup: A Warm Hug in a Bowl
Welcome, friend! Are you ready to explore a delightful dish that warms the soul and tickles the taste buds? Today, we’re diving into the heart of comfort food with one of my all-time favorites: Creamy Carrot Ginger Soup. This vibrant, velvety soup is not only a feast for the eyes but also a nourishing embrace for those chilly nights when all you want is a bowl of something cozy to wrap your hands around.
Growing up, my mother often made this soup whenever we had a few extra carrots lying around or when we were in need of a little “pick-me-up.” I can still recall the aroma wafting through our home—the sweet earthiness of carrots mingling with the spicy warmth of ginger, making our kitchen feel like a sanctuary from the outside world. With just a few simple ingredients, she transformed a humble vegetable into something magical, and every spoonful felt like a hug.
Whether you’re serving it as a starter at a dinner party or enjoying it solo for lunch, this soup is a heartfelt reminder that good food doesn’t have to be complicated. Are you ready to get started? Let’s gather those ingredients!
Personal Story
One of my fondest memories associated with this Creamy Carrot Ginger Soup dates back to a rainy afternoon when my friends and I decided to host an “indoor picnic.” We spread out blankets in the living room, filled bowls with fresh veggies and bread, and whipped up a big pot of this soup to share. As we scooped it out into mismatched bowls—my grandmother’s floral china mixed with my modern favorites—we chatted and laughed about everything and nothing at all.
That day, I realized that food is not just about nourishment; it’s about connection, warmth, and shared experiences. The soup became the centerpiece of our gathering, and it sparked discussions about our childhood favorites and family recipes, allowing us to learn and bond with one another amidst the ingredients and flavors. It’s moments like these that truly embody what Ivory Apron stands for: elegance with ease and warmth with intention.
Ingredients
Here’s what you’ll need to make this luscious Creamy Carrot Ginger Soup. Trust me, each ingredient plays a star role in this cozy melody of flavors!
-
Carrots (4 cups, roughly chopped)
Carrots lend their natural sweetness and vibrant color to the soup. Look for firm, bright orange carrots for the best flavor. You can substitute with parsnips if you’re craving something slightly different! -
Fresh Ginger (2 inches, peeled and grated)
Ginger adds a warming spice that invigorates the senses. If fresh ginger isn’t available, you can use ground ginger, but start with a much smaller amount—about a teaspoon—and adjust to taste. -
Onion (1 medium, diced)
This little powerhouse brings depth and sweetness to the soup base. Feel free to substitute with leeks for a more delicate flavor, or shallots for a gourmet touch! -
Garlic (2 cloves, minced)
Garlic enhances the overall flavor profile, adding layers of richness. If you want a milder flavor, consider roasted garlic, which transforms into a sweet and caramelized delight. -
Vegetable Broth (4 cups)
A comforting base for the soup, vegetable broth offers depth without overpowering the flavors of the carrots and ginger. Chicken broth could be used for extra richness if that fits your taste. -
Cream (1 cup, or coconut milk for a dairy-free option)
Cream provides that rich, velvety texture. If you’re aiming for a lighter version, try using a lower-fat option or even plain Greek yogurt; just stir it in at the end, allowing it to warm through. -
Olive Oil (2 tablespoons)
A splash of olive oil adds richness and helps to sauté the vegetables. You can swap it out for butter if you’re in the mood for something a little more indulgent! -
Salt and Pepper (to taste)
Always important! Don’t forget to season as you go to bring out the full flavors of each ingredient. Freshly cracked black pepper elevates the taste wonderfully.
Step-by-Step Instructions
Now that you’ve gathered your ingredients, let’s get your soup simmering! Follow these steps, and you’ll be enjoying a warm bowl of Creamy Carrot Ginger Soup in no time.
-
Sauté the Aromatics:
In a large pot, heat the olive oil over medium heat. Once hot, add the diced onion and a pinch of salt. Sauté for about 3-5 minutes until the onions are translucent. This step is crucial—the onions lay the flavor groundwork! -
Add Garlic and Ginger:
Toss in the minced garlic and grated ginger, stirring for about a minute until fragrant. This is where the magic starts! The aroma of ginger will fill your kitchen, so let it bloom before adding the carrots. -
Incorporate Carrots:
Add the chopped carrots to the pot, stirring to combine. Let them sauté for another 5 minutes. This step enhances the carrots’ natural sweetness, making the soup even more delightful. -
Pour in the Broth:
Now, your pot is ready for broth! Pour in the vegetable broth, ensuring the carrots are fully submerged. Bring to a gentle boil, then reduce the heat to a simmer. Cover and let it cook for about 20 minutes, or until the carrots are fork-tender. -
Blend it Up:
Once the carrots are tender, remove the pot from heat. Carefully use an immersion blender to purée the soup until smooth. If you’re using a regular blender, allow the soup to cool slightly before blending in batches. Just be cautious of hot splashes—trust me, I’ve learned the hard way! -
Add Cream:
Return the smooth soup to the stove over low heat and stir in the cream until well combined. If you’re opting for coconut milk, do the same! Taste and adjust seasoning with salt and pepper as needed. -
Serve Warm:
Keep your soup on low until you’re ready to serve. This soup is best enjoyed warm, so it’s perfect for entertaining or just cozy evenings at home!
Consider garnishing each bowl with a drizzle of cream, a sprinkle of fresh herbs (like chives or parsley), or even some crispy shallots for added texture.
Serving Suggestions
For an elegant presentation, serve your Creamy Carrot Ginger Soup in shallow bowls. A simple sprinkle of freshly chopped herbs, a swirl of cream (or coconut milk), and some crispy croutons or bread on the side create a beautiful tablescape. You could even pair it with warm, crusty bread—perfect for soaking up every last drop!
Recipe Variations
Feeling adventurous? Here are some creative twists you might consider:
-
Curried Carrot Ginger Soup: Add a tablespoon of curry powder at the same time you add garlic and ginger for a warm spice kick.
-
Apple and Carrot Soup: Toss in one chopped sweet apple with the carrots for a touch of fruity sweetness.
-
Creamy Coconut Soup: Use coconut milk exclusively instead of cream for a tropical twist that pairs beautifully with ginger.
-
Roasted Vegetable Soup: Roast the carrots and onions on baking sheets until caramelized before adding them to the pot for extra depth of flavor.
-
Spicy Ginger Soup: Add a pinch of red pepper flakes or a chopped jalapeño for those who love a little heat in their soup!
Chef’s Notes
This Creamy Carrot Ginger Soup has certainly evolved over the years. I remember the first time I made it for a group of friends—I accidentally added too much ginger, making it more of a “spicy adventure” than a comforting soup! We spent the evening laughing and sipping milk to cool our tongues, and ironically, that mishap became a favorite storytelling moment in our friend group.
As I refined the recipe over time, I learned the beauty of balance in flavors. Now, I love how the sweetness of the carrots harmonizes with the gentle spice of ginger, creating an unforgettable blend. It’s a reminder that even the simplest dishes can always evolve, so don’t be afraid to play and make it your own!
FAQs and Troubleshooting
-
My soup is too thick—what should I do?
No worries! Simply add a little more broth or water until you reach your desired consistency. Blend again if necessary. -
Can I make this soup ahead of time?
Absolutely! This soup stores beautifully in the fridge for up to 5 days. Reheat gently on the stove—just be sure to stir frequently! -
How can I make this vegan?
To make this recipe vegan, use coconut milk instead of cream and check that your vegetable broth is plant-based. -
What can I serve with this soup?
A fresh salad, a sandwich, or cheese toasties would complement this soup very well. You can also serve it alongside a light quiche. The options are endless!
Nutritional Info
(Consider providing estimates like calories, fat, fiber, protein, etc.)
With the cooler months approaching, this Creamy Carrot Ginger Soup is the perfect addition to your recipe collection. Not only is it easy to make, but it’s also packed with nutrients and warmth—everything you need to cozy up your kitchen and heart.
So, grab your apron, gather your ingredients, and let’s create something timeless together. I can’t wait to hear about your experiences as you whip up this delightful dish! Happy cooking!
PrintCreamy Carrot Ginger Soup

A vibrant, velvety soup made with carrots and ginger that warms the soul and tickles the taste buds.
- Prep Time: 10 minutes
- Cook Time: 30 minutes
- Total Time: 40 minutes
- Yield: 4 servings 1x
- Category: Soup
- Method: Blending
- Cuisine: Vegan
- Diet: Vegetarian
Ingredients
- 4 cups Carrots, roughly chopped
- 2 inches Fresh Ginger, peeled and grated
- 1 medium Onion, diced
- 2 cloves Garlic, minced
- 4 cups Vegetable Broth
- 1 cup Cream (or coconut milk for a dairy-free option)
- 2 tablespoons Olive Oil
- Salt and Pepper, to taste
Instructions
- Sauté the aromatics in a large pot with olive oil until the onions are translucent.
- Add the minced garlic and grated ginger, stirring for about a minute until fragrant.
- Incorporate the chopped carrots and sauté for another 5 minutes.
- Pour in the vegetable broth, bring to a gentle boil, then reduce to simmer for 20 minutes until carrots are fork-tender.
- Blend the soup until smooth using an immersion blender.
- Add the cream, stirring until well combined and adjust seasoning as needed.
- Serve warm, garnished as desired.
Notes
Serve in shallow bowls with a drizzle of cream and fresh herbs for an elegant presentation. Pairs well with crusty bread.
Nutrition
- Serving Size: 1 bowl
- Calories: 320
- Sugar: 8g
- Sodium: 450mg
- Fat: 20g
- Saturated Fat: 10g
- Unsaturated Fat: 8g
- Trans Fat: 0g
- Carbohydrates: 35g
- Fiber: 5g
- Protein: 6g
- Cholesterol: 30mg
Keywords: soup, carrot, ginger, creamy soup, comfort food

One-Pot Veggie Mac and Cheese in 25 Minutes: Creamy Dinner
One Pot Veggie Mac and Cheese: Comfort Food Made Easy
Hello, food lovers! Today, we’re diving into the world of ultimate comfort food with my delicious One Pot Veggie Mac and Cheese. When it comes to cozy, satisfying meals, nothing takes the crown quite like a creamy, cheesy bowl of mac and cheese. And let’s be real: the ease of cooking everything in one pot makes it even more appealing. You can indulge your cravings without the mess that typically comes with traditional recipes. Grab your apron, and let’s get started!
A Wholesome Memory
I can still remember the first time I made mac and cheese from scratch. I was a curious little chef, standing on a stool beside my mom as she stirred up a bubbling pot of pasta. The smell of melting cheese and that hint of garlic filled the kitchen, wrapping us in a warm hug of comfort. I remember sneaking bites while my mom attempted to keep me on task. “It’s almost ready!” she would say, and I would promise to wait, only to find myself back at the pot moments later.
Years later, I found myself wanting to recreate that same magic for friends. I added a veggie twist, and the One Pot Veggie Mac and Cheese was born—a dish that retains those nostalgic flavors while adding a healthy spin. It’s perfect for dinner parties or a cozy night in, and trust me, it’s going to become a staple in your weekly rotation!
Ingredients
Here’s what you’ll need to whip up this fantastic dish:
-
8 oz elbow macaroni: This classic pasta shape is the star of the show and perfect for holding creamy cheese sauce. If you’re looking for a gluten-free option, substitute with gluten-free elbow pasta or chickpea pasta.
-
2 cups vegetable broth: Adds depth and flavor! Homemade or store-bought, vegetable broth enriches the dish without overpowering the other flavors. For a low-sodium version, make or buy low-sodium broth.
-
1 cup milk: I typically use whole milk for that creamy consistency, but you can easily swap in almond milk, oat milk, or coconut milk for a dairy-free option.
-
1 cup shredded cheese (cheddar or your choice): Cheddar is traditional, but feel free to mix and match. Gouda, mozzarella, or even a spicy pepper jack can add an exciting twist.
-
1 cup mixed vegetables (like broccoli, peas, and carrots): Fresh or frozen, they’re an easy way to add nutrition! Want to switch it up? Try bell peppers or spinach.
-
1 tablespoon olive oil: Perfect for sautéing before adding your pasta. If you’re in a pinch, any cooking oil works.
-
1 teaspoon garlic powder: Elevates the flavor profile without the chopping! You can substitute with minced garlic—just be cautious as it’s stronger in flavor.
-
Salt and pepper to taste: Essentials that enhance every dish. Always remember to taste as you go!
Step-by-Step Instructions
Now let’s cook this delicious dish step-by-step:
-
Heat Your Pot: Start by placing your large pot over medium heat. Add the olive oil and let it warm for about 1 minute. This is the foundation where all our flavors will come together.
-
Sauté the Veggies: Toss in your mixed vegetables and sauté for about 3-4 minutes. You’ll want them to start softening but not fully cooked yet. If you’re using frozen vegetables, no need to thaw—just toss ‘em right in!
-
Add Macaroni: Next, pour in the elbow macaroni along with the vegetable broth. Give it a gentle stir to combine everything beautifully. At this point, you want to ensure the macaroni is submerged—you don’t want it sticking to the bottom later!
-
Get Cooking: Bring the mixture to a gentle boil, then reduce the heat to a simmer. Cover the pot to help the macaroni cook evenly. Let it simmer for about 8-10 minutes, stirring occasionally to prevent sticking.
-
Pour in the Milk: After the noodles are al dente, add in the milk, garlic powder, salt, and pepper. Give the pot a good stir to combine all those creamy flavors. Allow it to simmer uncovered for another 2-3 minutes. This step is essential for combining that cheese sauce later!
-
Cheesy Goodness: Time for the fun part! Gradually add in your shredded cheese, stirring until it melts and creates a creamy, delightful coating over your pasta and veggies. This is where the magic happens—nothing says comfort like ooey-gooey cheese!
-
Taste and Adjust: Give it a taste. Feel free to add more salt, pepper, or cheese based on your preference. Trust your palate!
-
Final Touch: Once everything is mixed in and creamy, remove the pot from heat. It’s ready to serve and impress your friends.
Serving Suggestions
Plating is super simple! Portion out the mac and cheese into bowls, and consider topping with a sprinkle of freshly grated cheese and a dash of black pepper for some extra flair. If you want to elevate it even further, throw on some fresh herbs like parsley or chives.
Recipe Variations
Get creative with this dish! Here are a few fun twists:
-
Spicy Kick: Add a dash of cayenne pepper or a sprinkle of red pepper flakes to give it some heat.
-
Pesto Power: Stir in a couple of tablespoons of pesto for an herbaceous flavor explosion.
-
Bacon Lover: Top your dish with crispy bacon bits or pancetta for added land-of-luxury richness.
-
Nutty Flavor: Introduce a few tablespoons of nutritional yeast for a cheesy, nutty flavor that’s perfect for your vegan or dairy-free friends.
-
Extra Greens: Toss in some baby spinach or kale right before serving for a boost of nutrients and color.
Chef’s Notes
As I experimented with this recipe over the years, I began to realize that the magic of mac and cheese lies in its adaptability. I’ve played with everything from different cheeses to various vegetables, and each time, it shines in its own way. Funny story: I once decided to add leftover roasted red peppers in a pinch, and it turned out to be one of the favorites among guests. So, don’t hesitate to improvise!
FAQs and Troubleshooting
Q: My mac and cheese turned out too dry! What happened?
A: This can happen if the macaroni absorbs too much liquid. Add a splash more milk or broth, then simmer until the desired creaminess returns!
Q: Can I make this recipe in advance?
A: Absolutely! You can make and refrigerate it. Just reheat slowly over low heat, adding a splash of milk to loosen it back up.
Q: How can I make my mac and cheese cheesier?
A: Incorporate various cheese types and consider using a blend of aged cheddar and cream cheese for a richer texture.
Q: What if I have leftovers?
A: Store leftovers in an airtight container in the fridge for up to 3 days. Reheat gently in the microwave or stovetop, adding a bit of milk if needed to reclaim that creamy texture!
Nutritional Info
While recipes can vary based on ingredient choices, a serving of this One Pot Veggie Mac and Cheese is approximately:
- Calories: 400
- Protein: 15g
- Carbohydrates: 50g
- Fats: 15g
Let’s wrap things up! This One Pot Veggie Mac and Cheese is comfort food that’s simple, creamy, and downright delicious. It’s perfect for both cozy nights in and special gatherings with loved ones. So, slip on your apron, gather your ingredients, and let’s create something timeless together. Happy cooking, everyone!
PrintOne Pot Veggie Mac and Cheese

A creamy, cheesy bowl of mac and cheese made easy in one pot, packed with mixed vegetables for a wholesome twist.
- Prep Time: 10 minutes
- Cook Time: 15 minutes
- Total Time: 25 minutes
- Yield: 4 servings 1x
- Category: Main Course
- Method: Stovetop
- Cuisine: American
- Diet: Vegetarian
Ingredients
- 8 oz elbow macaroni
- 2 cups vegetable broth
- 1 cup milk
- 1 cup shredded cheese (cheddar or your choice)
- 1 cup mixed vegetables (like broccoli, peas, and carrots)
- 1 tablespoon olive oil
- 1 teaspoon garlic powder
- Salt and pepper to taste
Instructions
- Heat your pot: Start by placing your large pot over medium heat. Add the olive oil and let it warm for about 1 minute.
- Sauté the veggies: Toss in your mixed vegetables and sauté for about 3-4 minutes.
- Add macaroni: Pour in the elbow macaroni along with the vegetable broth. Stir gently.
- Get cooking: Bring the mixture to a gentle boil, reduce heat to a simmer, cover and let it simmer for about 8-10 minutes.
- Pour in the milk: After the noodles are al dente, add in the milk, garlic powder, salt, and pepper. Stir to combine.
- Cheesy goodness: Gradually add in your shredded cheese, stirring until it melts and coats the pasta.
- Taste and adjust: Give it a taste and add more salt, pepper, or cheese based on preference.
- Final touch: Once everything is mixed and creamy, remove from heat and serve.
Notes
Experiment with different vegetables and cheeses for a personalized touch. Can be made ahead and reheated.
Nutrition
- Serving Size: 1 serving
- Calories: 400
- Sugar: 5g
- Sodium: 600mg
- Fat: 15g
- Saturated Fat: 7g
- Unsaturated Fat: 6g
- Trans Fat: 0g
- Carbohydrates: 50g
- Fiber: 4g
- Protein: 15g
- Cholesterol: 40mg
Keywords: veggie mac and cheese, comfort food, one pot meal

Sweet Potato Taco Bowl
Sweet Potato Taco Bowl: A Cozy Culinary Journey
Hello, my fellow foodies! Today, I’m inviting you into my kitchen to whip up a delightful Sweet Potato Taco Bowl that’s not just delicious but also packed with vibrancy and texture. Whether you’re looking to impress guests or treat yourself to a satisfying weeknight dinner, this recipe is the perfect go-to. Imagine a warm, inviting bowl filled with roasted sweet potatoes, fluffy rice, creamy avocado, and a sprinkle of your favorite toppings—all coming together for a truly unforgettable meal.
This dish embodies the spirit of cozy gatherings around the dinner table; it’s bright, colorful, and just the right amount of comforting. I remember when I first served a version of this bowl to a group of friends during a chilly evening gathering. As the fragrant sweet potatoes roasted in the oven, the lively chatter around my dining table filled the air with warmth. Could it be the delicious aroma or the clinking of glasses? Perhaps a bit of both! I can’t help but smile remembering how we savored our creations; the sweet potatoes were the star of the show, and the camaraderie was the icing on the cake.
Not only is this taco bowl easy to prepare, but it’s also versatile. You can adjust the seasonings, mix in your favorite veggies, or dress it up with toppings galore. It’s all about what you love and what inspires you! Join me as I take you through the journey of creating this Sweet Potato Taco Bowl, sprinkled with personal stories, tips, and a few chef hacks along the way. Ready? Let’s get cooking!
Personal Story
When it comes to sweet potatoes, I have a vivid memory that warms my heart. It was during a family gathering a few years back when my Aunt Lucy first introduced the idea of a sweet potato taco bowl. She was known for her zesty personality and her vibrant cooking style, often throwing impromptu dinner parties that felt like mini festivals. One cozy autumn evening, she set out various bowls filled with toppings and let each of us build our own taco bowls. The delicious aroma of paprika, cumin, and roasted sweet potatoes wafted through the house as we assembled our dishes.
As I piled on black beans, corn, and a drizzle of salsa, I felt a rush of creativity. Grabbing a generous avocado slice, I garnished my bowl and proudly presented it to my family. The laughter, the sharing—I realized that cooking isn’t just about making food; it’s about creating memories. Aunt Lucy’s simple yet gorgeous sweet potato taco bowls have since become a staple in my kitchen, and every time I make them, I feel connected to that moment. Just like the vibrant colors of the dish, life is all about those vibrant moments shared at the table.
Ingredients
To create your Sweet Potato Taco Bowl, you’ll need the following ingredients:
-
2 medium sweet potatoes (cubed)
Sweet potatoes bring natural sweetness and a rich, earthy flavor to the bowl. If you don’t have sweet potatoes, you can use regular potatoes or even butternut squash for a different texture and flavor. -
2 tablespoons olive oil
Olive oil helps to achieve that crispy-roasted texture for the sweet potatoes. Alternatively, you can use avocado oil or melted coconut oil. -
1 teaspoon paprika
Paprika adds a beautiful smokiness to the sweet potatoes. If you’re looking for a little kick, you could substitute smoked paprika or cayenne pepper. -
1 teaspoon ground cumin
Cumin brings warmth and depth of flavor. If you’re not a fan, coriander or taco seasoning can work instead. -
½ teaspoon chili powder
A sprinkle of chili powder adds a gentle heat that complements the sweetness of the potatoes. Adjust to your preference or skip it for a milder dish. -
Salt & pepper to taste
Seasoning enhances every component of the bowl; don’t skimp on it! You can also use garlic powder or onion powder for additional depth. -
Cooked rice or quinoa
This forms the hearty base of your taco bowl. Choose your favorite grain—brown rice, wild rice, or even cauliflower rice for a lighter option! -
Black beans (rinsed)
These provide protein and a creamy texture. You can substitute with pinto beans or chickpeas if you prefer. -
Corn kernels
Sweet corn adds a crunch and pops of sweetness. Canned, frozen, or fresh corn works perfectly here. -
Avocado slices
Creamy avocado balances the flavors beautifully. If you’re out of avocado, Greek yogurt or sour cream could provide a similar creaminess. -
Salsa or sour cream (optional)
Dress your taco bowl with salsa for zest or sour cream for richness. Fresh pico de gallo or guacamole can elevate your bowl even more.
Step-by-Step Instructions
Now, let’s dive into the cooking process! Follow these steps, and your Sweet Potato Taco Bowl will be ready to impress:
-
Preheat Your Oven
Preheat your oven to 425°F (220°C). A hot oven means crispy sweet potatoes! -
Prepare Your Sweet Potatoes
Start by peeling and cubing your sweet potatoes. Aim for about 1-inch cubes; they’ll roast evenly and get beautifully caramelized. -
Season the Sweet Potatoes
In a large bowl, toss the cubed sweet potatoes with olive oil, paprika, cumin, chili powder, and a generous sprinkle of salt and pepper. Make sure every cube is coated; this is where the flavor magic happens!Chef Tip: Instead of tossing them in a bowl, you can spread everything on a baking sheet lined with parchment for easy cleanup.
-
Roast the Sweet Potatoes
Spread the seasoned sweet potatoes in a single layer on a baking sheet. Roast for about 25–30 minutes, turning them halfway through. You want them golden and tender!Little Chef Hack: For super crispiness, turn on the broiler for the last 2–3 minutes of cooking! Just keep an eye on them to prevent burning.
-
Prepare Your Bases
While the sweet potatoes are roasting, cook your rice or quinoa according to package instructions. This will ensure you have a fluffy base for your taco bowl. -
Warm the Black Beans and Corn
In a small saucepan over medium heat, warm the black beans and corn together. Just a few minutes should do the trick, allowing the flavors to mingle. Season lightly with a pinch of salt. -
Slice the Avocado
While the beans and corn warm up, slice your ripe avocado. Aim for thin, beautiful slices that will add a lovely creamy texture. Sprinkle a dash of lemon or lime juice on the slices to keep them from browning. -
Assemble Your Taco Bowl
Once everything is cooked and ready, it’s time to assemble! In a bowl, start with a generous scoop of rice or quinoa. Layer on the roasted sweet potatoes, followed by the warm black beans and corn. Finish with avocado slices, a dollop of salsa or sour cream, and maybe some fresh herbs if you’re feeling fancy.Presentation Hack: Place each ingredient in sections to create a colorful visual appeal, making it as much a feast for the eyes as it is for the palate!
-
Enjoy!
Grab your fork, dig in, and savor every bite of your Sweet Potato Taco Bowl! I recommend sharing it with friends or family—there’s something truly special about a meal enjoyed together.
Serving Suggestions
When it comes to plating, remember that appealing to the eye is half the fun! Use a wide, shallow bowl to showcase the vibrant colors of the sweet potatoes, black beans, corn, and fresh avocado. Drizzle hot sauce or a squeeze of lime over the top for an extra zesty finish.
Fun Fact:
Adding a sprinkle of crumbled feta or fresh cilantro can turn your taco bowls into a picnic-worthy feast! Pair it with a light salad or tortilla chips for a complete meal.
Recipe Variations
To keep things exciting, here are some fun variations to try with your Sweet Potato Taco Bowl:
-
Spicy Kick: Add some diced jalapeños for an extra layer of heat.
-
Southwestern Twist: Mix in roasted bell peppers and serve with chipotle crema for a smoky flavor.
-
Vegetable Medley: Add sautéed onions, zucchini, or other seasonal veggies to enrich the bowl.
-
Protein Boost: Top your bowl with shredded chicken, grilled shrimp, or even a poached egg for added protein.
-
Gluten-Free: Swap rice for quinoa or cauliflower rice to make it gluten-free while keeping it packed with flavor.
Chef’s Notes
This Sweet Potato Taco Bowl has evolved over time in my kitchen. I started with basic flavors, but as I experimented more, I discovered the joy of layering different components. Initially, I was daunted by the thought of roasting sweet potatoes, fearing they wouldn’t be fluffy or flavorful. But after many trials (and a few burnt batches!), I learned how to get the perfect roast.
Funny Kitchen Memory: One time, I forgot to turn on the oven while preparing for a dinner party! As my friends waited, I panicked and threw together a makeshift raw veggie platter that turned out to be a hit. Now we joke that I could host a party with only sweet potatoes and still have a good time!
FAQs and Troubleshooting
1. My sweet potatoes are mushy instead of crispy. What went wrong?
This could be due to overcrowding the baking sheet. Ensure your sweet potatoes are placed in a single layer with some space in between, allowing them to roast evenly.
2. Can I prep this dish in advance?
Absolutely! You can roast the sweet potatoes a day ahead and store them in the fridge. Just warm them up before serving.
3. How do I keep my avocado from browning?
Squeeze some lemon or lime juice on your avocado slices just before serving. This natural acid helps slow down the oxidation process.
4. Can I make this vegan?
Yes! This recipe is already vegan-friendly. Just ensure your rice or quinoa is also vegan, and enjoy away!
Nutritional Info (Optional)
A single serving of this Sweet Potato Taco Bowl contains approximately:
- Calories: 400
- Protein: 12g
- Carbohydrates: 60g
- Fat: 15g
- Fiber: 12g
Please note that these values can vary based on ingredient choices and portion sizes!
And there you have it! A delicious, colorful, and wholesome Sweet Potato Taco Bowl that celebrates the art of easy cooking with elegance. I hope this recipe finds a cherished place in your kitchen, just as it has in mine. Happy cooking, and may your table always be filled with laughter and good food!
PrintSweet Potato Taco Bowl

A delightful bowl filled with roasted sweet potatoes, fluffy rice, creamy avocado, and your favorite toppings; perfect for a cozy dinner.
- Prep Time: 15 minutes
- Cook Time: 30 minutes
- Total Time: 45 minutes
- Yield: 4 servings 1x
- Category: Main Course
- Method: Baking
- Cuisine: Mexican
- Diet: Vegan
Ingredients
- 2 medium sweet potatoes, cubed
- 2 tablespoons olive oil
- 1 teaspoon paprika
- 1 teaspoon ground cumin
- ½ teaspoon chili powder
- Salt & pepper to taste
- Cooked rice or quinoa
- Black beans, rinsed
- Corn kernels
- Avocado slices
- Salsa or sour cream (optional)
Instructions
- Preheat your oven to 425°F (220°C).
- Prepare your sweet potatoes by peeling and cubing them into 1-inch pieces.
- Season the sweet potatoes with olive oil, paprika, cumin, chili powder, salt, and pepper.
- Roast the sweet potatoes in a single layer on a baking sheet for 25–30 minutes, turning halfway.
- Prepare your rice or quinoa according to package instructions.
- Warm the black beans and corn together in a small saucepan over medium heat.
- Slice your avocado and sprinkle with lemon or lime juice.
- Assemble the taco bowl starting with a scoop of rice, then layer roasted sweet potatoes, warm black beans and corn, and avocado slices.
- Finish with salsa, sour cream, or additional toppings of your choice.
- Enjoy your delicious Sweet Potato Taco Bowl!
Notes
You can easily customize this bowl with additional toppings or veggie variations.
Nutrition
- Serving Size: 1 serving
- Calories: 400
- Sugar: 6g
- Sodium: 300mg
- Fat: 15g
- Saturated Fat: 2g
- Unsaturated Fat: 10g
- Trans Fat: 0g
- Carbohydrates: 60g
- Fiber: 12g
- Protein: 12g
- Cholesterol: 0mg
Keywords: sweet potato, taco bowl, vegan recipe, healthy dinner, gluten-free, vegetarian