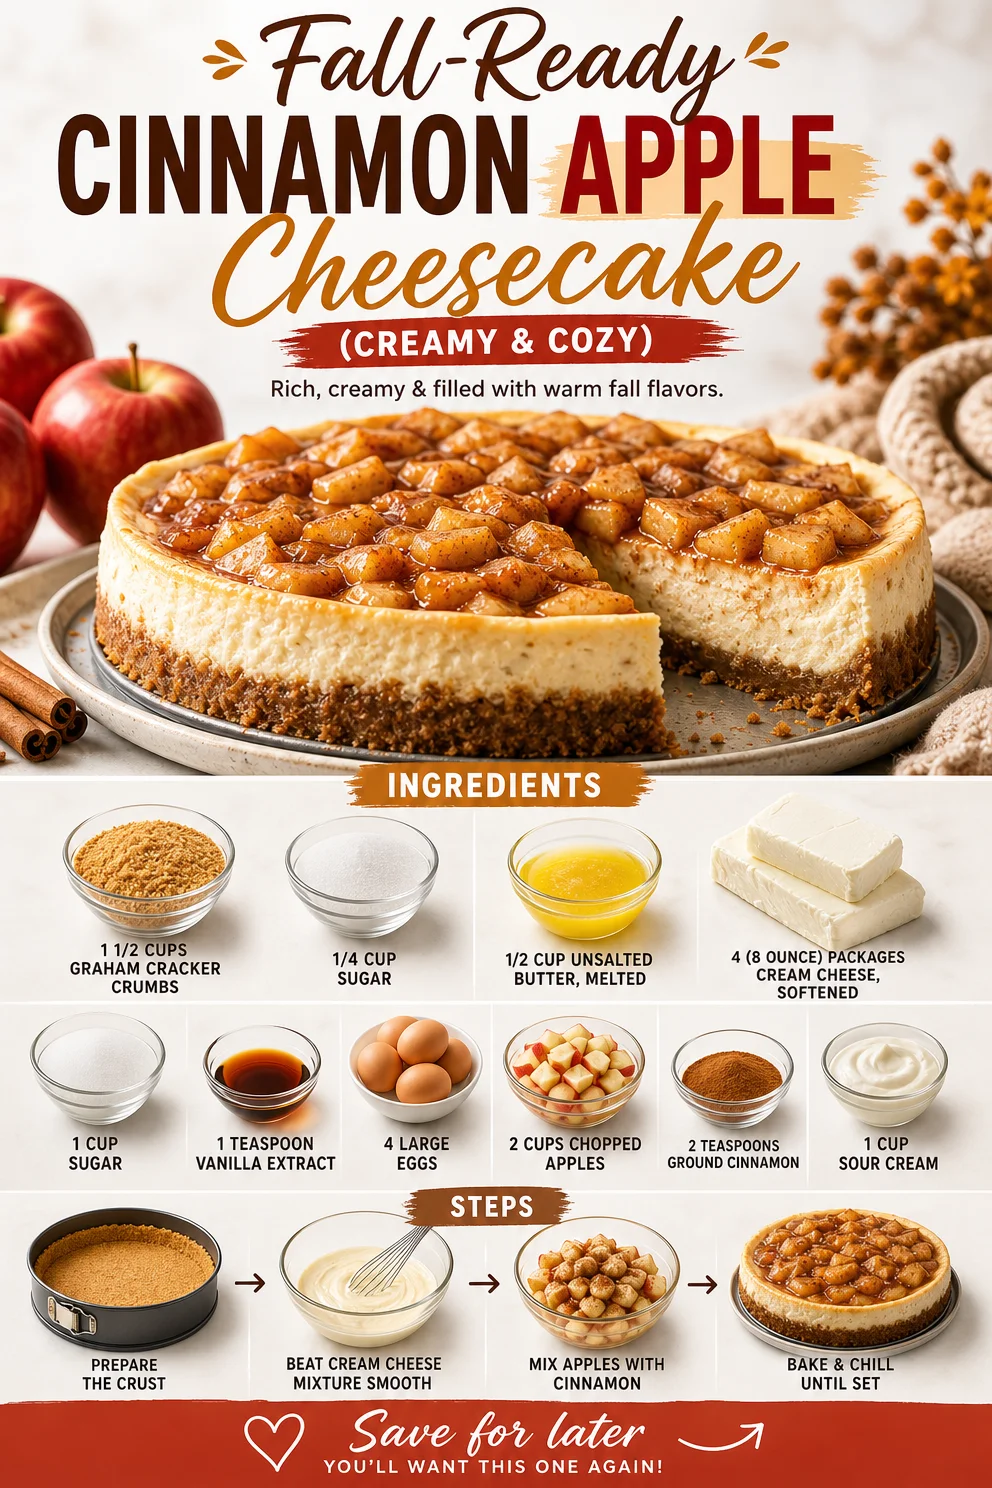
Fall-Ready Cinnamon Apple Cheesecake (Creamy & Cozy)
The Comfort of Home: A Slice of Cinnamon Apple Cheesecake
Let’s talk about one of my all-time favorite desserts: Cinnamon Apple Cheesecake. Picture this: you’re on a crisp autumn day, the smell of cinnamon wafting through your kitchen, and the sound of laughter and conversation fills your home. This cheesecake isn’t just a dessert; it’s an experience, a hug for your taste buds, and the perfect centerpiece for gatherings, from cozy family dinners to festive holiday celebrations.
Growing up, my grandmother was the queen of baking, especially when apples were in season. I often spent afternoons in her kitchen, standing on a stool so I could reach the counter, marveling as she turned simple ingredients into magic. One blustery October day, she decided we were making her famous apple cheesecake. I can still hear her chuckling as she tossed in a generous sprinkle of cinnamon, claiming it was “the secret to my success.” We layered thick creamy cheesecake over a crisp graham cracker crust, adorned with tender, spiced apples. Each bite was like tasting a slice of home, and I became convinced that this dessert held a touch of magic.
Years later, I’ve made this cherished recipe my own, adding my touch while cherishing my grandmother’s essence in every slice. Each time I share this cheesecake, I’m inviting you into that sweet memory. So, gather your ingredients, preheat your oven, and let’s create something that’s not just about food—it’s about love, laughter, and those small moments around the table that matter most.
Ingredients
Before we dive into making this decadent dessert, let’s gather our ingredients. Here’s what you’ll need:
-
1 1/2 cups graham cracker crumbs
This will serve as the base of your cheesecake. If you can’t find graham crackers, try digestive biscuits or vanilla wafer cookies for a unique twist. -
1/4 cup sugar
A little sweetness to enhance the crust. You can swap it for brown sugar for a deeper flavor or even coconut sugar for a more natural sweetener. -
1/2 cup unsalted butter, melted
Butter brings richness to the crust. If you’re looking for a dairy-free option, coconut oil works beautifully here. -
4 (8-ounce) packages cream cheese, softened
The star of the dessert, making it creamy and rich. For a lower-fat option, you can use reduced-fat cream cheese, though it may slightly change the texture. -
1 cup sugar
This will sweeten the cheesecake filling. Once again, feel free to experiment with brown sugar or a sugar substitute if you’re watching your intake. -
1 teaspoon vanilla extract
Just a smidgen of vanilla enhances all the flavors. Make sure you use pure vanilla extract if you can; it makes a world of difference. -
4 large eggs
Eggs provide structure and stability to your cheesecake. If you want to make it egg-free, consider using a flax egg mixture or unsweetened applesauce per egg. -
2 cups chopped apples
Fresh apples for that delightful texture and flavor! I love Granny Smith for their tartness, but Honeycrisp or Fuji can add a lovely sweetness. -
2 teaspoons ground cinnamon
Cinnamon is the spice that gives this dish its warm, comforting flavor. Feel free to add a pinch of nutmeg for extra warmth! -
1 cup sour cream
This adds a tangy richness to the filling. You can substitute plain Greek yogurt for a healthier alternative that maintains creaminess.
Step-by-Step Instructions
Ready to get started? Let’s go through this process together. This cheesecake may take a little time, but trust me, every moment will be worth it.
-
Preheat your oven to 325°F (160°C).
Begin by preheating your oven. This ensures that your cheesecake bakes evenly. Make sure to adjust your oven racks to the middle position, allowing the cheesecake to cook evenly without browning too much on the top. -
Prepare the crust.
In a mixing bowl, combine the graham cracker crumbs, sugar, and melted butter. Stir until the mixture resembles wet sand. Here’s a pro tip: use a fork or your hands to make sure the crumbs are well coated—this will help your crust hold together beautifully once baked! -
Press the crust into a springform pan.
Firmly press the crumb mixture into the base of your springform pan, creating an even layer. You can use the bottom of a measuring cup to pack it down, ensuring it’s compact for a sturdy base. -
Bake the crust.
Pop the crust into your preheated oven and bake for about 10 minutes. This step not only sets the base but also gives it a delightful crunch. Let it cool slightly on a wire rack while we prepare the filling. -
Make the cheesecake batter.
In your stand mixer (or a large bowl with a hand mixer), beat the softened cream cheese and sugar on medium speed until smooth and creamy. This should take about 2-3 minutes. Make sure there are no lumps; you want it silky! -
Add in the vanilla and eggs.
Add the vanilla extract, then one by one, add the eggs, mixing well after each addition. Here’s a chef hack: scrape down the sides of the bowl to ensure all ingredients are well combined. -
Stir in the apples and cinnamon.
Gently fold in the chopped apples and ground cinnamon into the cream cheese mixture. Be careful not to over-mix; you want the apples evenly distributed without breaking them down too much! -
Pour the filling into the crust.
Carefully pour the cheesecake batter onto your cooled crust, smoothing the top with a spatula. Don’t worry if it’s not perfect—the cheesecake will set beautifully in the oven. -
Bake the cheesecake.
Bake in the oven for about 50-60 minutes, or until the edges are set but the center still has a slight jiggle. The jiggle is normal; it will continue to firm up as it cools. -
Cool and chill.
Once out of the oven, let the cheesecake cool in the pan on a wire rack for about an hour. This slow cooling prevents cracks. Then, refrigerate it for at least 4 hours, or preferably overnight. Patience, my friend; good things come to those who wait!
Serving Suggestions
Now comes the best part—serving! When you’re ready to indulge, carefully remove the cheesecake from the springform pan. I recommend serving it with a dollop of whipped cream, a sprinkle of cinnamon, or a drizzle of caramel sauce for that extra touch of elegance. You can slice it up neatly, revealing the creamy filling and those delightful bits of spiced apples peeking through.
Recipe Variations
Want to mix things up a bit? Here are a few creative twists on this classic recipe:
-
Nutty Crust: Add 1/2 cup of finely chopped nuts (like pecans or walnuts) to the graham cracker crust for an extra crunch and depth of flavor.
-
Flavor Flair: Experiment with flavors by adding a tablespoon of lemon zest for brightness or swapping out cinnamon for pumpkin pie spice.
-
Fruit Fusion: Consider using different fruits like pears or berries in place of apples for a unique take each season.
-
Chocolate Drizzle: Drizzle melted chocolate over the cheesecake before serving for a delightful contrast to the spiced apples.
-
Dairy-Free Option: Substitute the cream cheese and sour cream with vegan alternatives made from cashews or tofu to cater to dietary preferences.
Chef’s Notes
Every recipe tells a story—this cheesecake is no exception. When I first adapted my grandmother’s recipe, I had a kitchen disaster that left me giggling more than I should have. I accidentally used salt instead of sugar in the filling. Let’s just say the look on my friend’s face when she took a bite was priceless! From that day on, I became the ‘sugar fairy’ of the kitchen, double-checking my ingredients. Thankfully, this cheesecake has since become a staple at family gatherings and a go-to recipe for entertaining friends.
FAQs and Troubleshooting
1. Why did my cheesecake crack?
Cracking is often due to sudden temperature changes. To prevent this, bake at a low temperature and avoid opening the oven door frequently. Additionally, cooling the cheesecake gradually will help.
2. How do I know when my cheesecake is done?
Look for the edges to be set, and the center should still have a slight jiggle. It will firm up as it cools, so don’t worry if it seems a bit soft.
3. Can I freeze cheesecake?
Yes! Once cooled and set, wrap it tightly in plastic wrap and then in aluminum foil. It should keep well in the freezer for up to 3 months. Thaw it in the fridge overnight when you’re ready to enjoy!
4. What if my cheesecake doesn’t set?
If the cheesecake hasn’t set after baking, it may need more baking time. Make sure to check again in 10-minute increments until it firms up!
Nutritional Info (Optional)
While this recipe is a delightful treat to enjoy occasionally, here’s a rough nutritional breakdown per slice (based on 12 slices):
- Calories: 350
- Total Fat: 25g
- Saturated Fat: 15g
- Sodium: 200mg
- Total Carbohydrate: 30g
- Sugars: 20g
- Protein: 6g
Indulge in a slice, savor the warmth, and take a moment to appreciate the love that fills your kitchen. Now, it’s time to tie on that apron, gather your loved ones, and create your own memories with this Cinnamon Apple Cheesecake. Bon appétit!
PrintCinnamon Apple Cheesecake
A delightful cheesecake layered with creamy filling and spiced apples, perfect for autumn gatherings.
- Prep Time: 20 minutes
- Cook Time: 60 minutes
- Total Time: 80 minutes
- Yield: 12 servings 1x
- Category: Dessert
- Method: Baking
- Cuisine: American
- Diet: Vegetarian
Ingredients
- 1 1/2 cups graham cracker crumbs
- 1/4 cup sugar
- 1/2 cup unsalted butter, melted
- 4 (8-ounce) packages cream cheese, softened
- 1 cup sugar
- 1 teaspoon vanilla extract
- 4 large eggs
- 2 cups chopped apples
- 2 teaspoons ground cinnamon
- 1 cup sour cream
Instructions
- Preheat your oven to 325°F (160°C).
- Prepare the crust by combining graham cracker crumbs, sugar, and melted butter.
- Press the crust into a springform pan.
- Bake the crust for about 10 minutes and let it cool.
- Make the cheesecake batter by beating cream cheese and sugar until smooth.
- Add in the vanilla and eggs one by one, mixing well.
- Stir in the chopped apples and cinnamon.
- Pour the filling into the crust.
- Bake for about 50-60 minutes, until edges are set.
- Cool and chill for at least 4 hours before serving.
Notes
Serve with whipped cream and a sprinkle of cinnamon for a delightful touch.
Nutrition
- Serving Size: 1 slice
- Calories: 350
- Sugar: 20g
- Sodium: 200mg
- Fat: 25g
- Saturated Fat: 15g
- Unsaturated Fat: 8g
- Trans Fat: 0g
- Carbohydrates: 30g
- Fiber: 1g
- Protein: 6g
- Cholesterol: 90mg
Keywords: cheesecake, apple dessert, autumn recipes
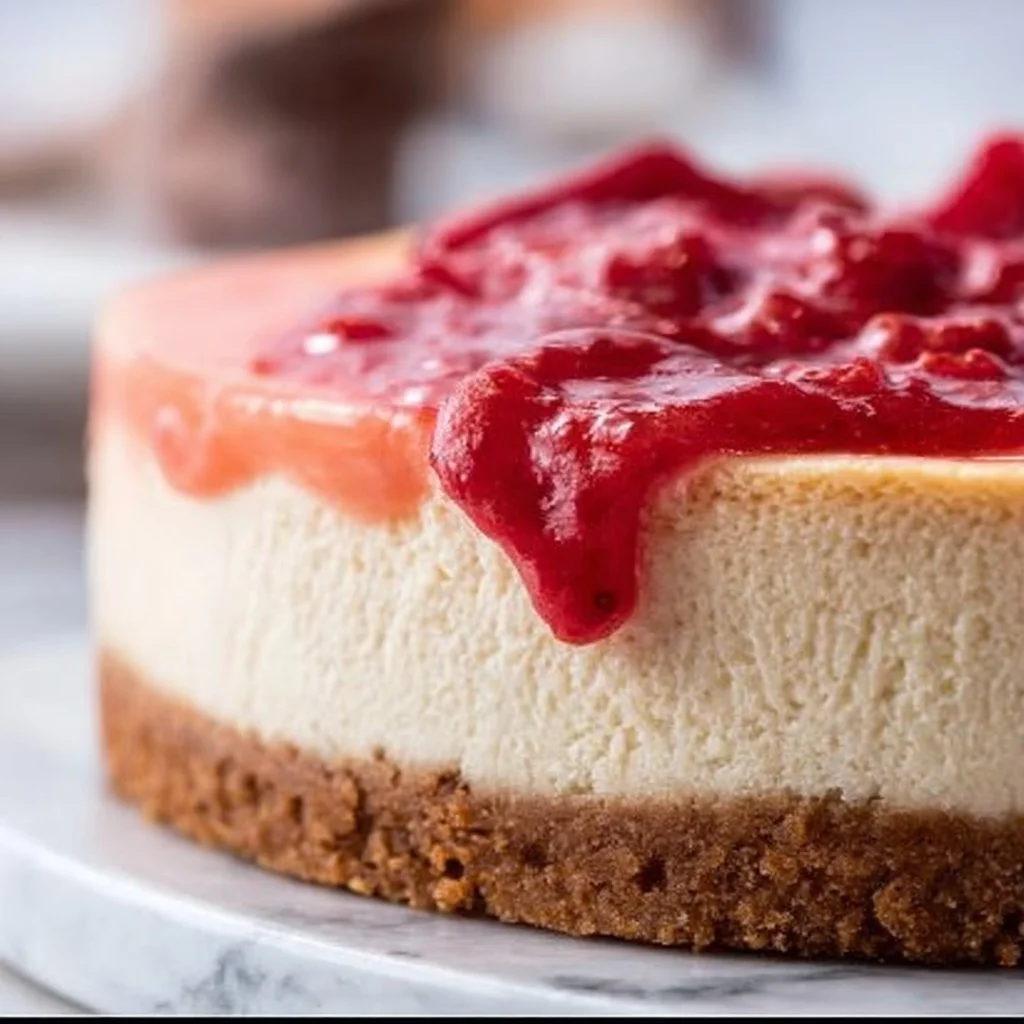
Guava Cheesecake
Indulging in a Tropical Delight: Guava Cheesecake
Hello, fellow food lovers! Today, I’m bursting with excitement to share a recipe that not only tickles your taste buds but also whisks you away to tropical paradise—Guava Cheesecake! Think creamy, dreamy cheesecake united with the sweet, fragrant notes of guava. It’s the kind of dessert that makes you feel fancy without the fuss. Now, I don’t know about you, but when I think of cheesecake, I’m transported to sun-drenched afternoons, laughter ringing in the air, and that wonderful feeling that life is truly delightful.
Guava cheesecake is a tropical twist on a classic favorite, and if you’ve never had the pleasure of biting into a slice, oh buddy, you’re in for a treat! This dessert is smooth, rich, and oh-so-decadent, yet it carries that lively essence of guavas—perfectly balancing sweetness and a touch of tang. Whether it’s for a summer gathering, a cozy dinner party, or just a self-indulgent weekend treat, this cheesecake is sure to impress.
What I love about this recipe is how it encapsulates memories of my childhood. I can vividly remember sitting around the table with family, sharing stories while savoring the velvety goodness of guava cheesecake. It’s comforting, nostalgic, and surely something that I want you to experience! So grab your aprons and let’s get cooking!
Personal Story
I still vividly remember the first time I tasted guava cheesecake. It was at a friend’s birthday party in a small, sunlit café filled with the fragrant scent of fresh flowers and baked goods. The moment I took that first bite, it felt as if I was biting into a piece of sunshine! The creamy filling coupled with the tropical sweetness of guava danced on my palate, and my taste buds sang.
After that day, I was hooked! I began experimenting with recipes, trying to recreate that doughy, luscious feeling I experienced. Over the years, I tinkered and mastered the perfect guava cheesecake that embodies that joyful memory, adding my unique twist here and there. Each slice is like a little love letter to that sunny afternoon—a reminder to gather with loved ones and enjoy the sweetness of life. It’s amazing how food can evoke such beautiful memories, isn’t it?
Ingredients
Now, let’s dive into the flavorful world of guava cheesecake. Here’s what you’ll need:
-
300 g Tennis biscuits
- A delightful South African treat made of coconut, perfect for the crust. If you can’t find these, replace them with Graham crackers or digestive biscuits for that crunchy foundation.
-
150 g unsalted butter (melted)
- This brings richness and helps bind your crust. Always use unsalted to control the saltiness; you can use coconut oil as a dairy-free alternative if desired.
-
700 g cream cheese
- The star of the show! It creates that signature creamy texture. A full-fat version is recommended for the best results. If you prefer a lighter option, use Neufchâtel cheese.
-
250 g castor sugar
- Adds sweetness and contributes to the creamy consistency. If you’d like it less sweet, reducing the sugar to 200 g won’t hurt at all.
-
4 eggs (extra large)
- Provides structure and richness. You can substitute eggs with 1/2 cup of unsweetened applesauce or silken tofu for a vegan option.
-
1 tsp vanilla extract
- For that warm, lovely aroma! If you’re feeling adventurous, almond extract can add a wonderful twist.
-
200 ml whipping cream
- Optional for decadence! It adds richness. If you want a lighter option, substitute it with whipped coconut cream.
-
200 g guavas (for decorating)
- Fresh guavas will make your cheesecake pop with color and flavor! They’re tart yet sweet. If guavas are out of season, consider using strawberries or passion fruit.
-
500 g guavas (fresh, chopped, and peeled)
- For the filling, these are the key flavor component! Be sure they’re ripe for the best taste.
-
80 g sugar (white granulated)
- This will sweeten the guava mixture. You can also experiment with brown sugar for an interesting caramel flavor.
-
1 tbsp lime juice
- Adds a zesty kick that compliments the guava beautifully! If you don’t have limes, fresh lemon juice works as a great substitute.
Step-by-Step Instructions
Let’s gather our ingredients and get started on this tropical masterpiece!
Step 1: Prepare the Crust
-
Crush the Tennis biscuits. Use a food processor to pulse the biscuits into fine crumbs. If you don’t have one, place the biscuits in a ziplock bag and crush them with a rolling pin.
- Chef hack: The finer the crumbs, the better the crust will hold together!
-
Mix with melted butter. In a bowl, combine the crushed biscuits and melted butter until well mixed. It should resemble wet sand.
- Chef tip: If it’s too dry, add a touch more melted butter. If too wet, add a little more biscuit crumbs.
-
Press into a springform pan. Take the mixture and press it evenly into the bottom of a 9-inch springform pan. Use the back of a measuring cup to pack it tightly.
- Tip: To prevent sticking, line the bottom of the pan with parchment paper!
Step 2: Prepare the Cheesecake Filling
-
Preheat your oven to 160°C (320°F). This ensures your cheesecake bakes evenly without a crack top.
-
Blend cream cheese and sugar. In a large mixing bowl, beat the cream cheese and castor sugar until smooth and creamy. This may take about 3-5 minutes.
- Recipe hack: Be sure to scrape down the sides to incorporate all ingredients!
-
Add eggs one at a time. Beat in each egg slowly, ensuring they are fully incorporated before adding the next one.
- Chef tip: This method helps to introduce air into the batter, leading to a lighter cheesecake.
-
Mix in vanilla extract and whipping cream. Incorporate the vanilla and whipping cream into the mixture, beating gently.
- Pro tip: The whipped cream adds a luscious texture, so give it a nice fold to keep it airy!
Step 3: Incorporate the Guava
-
Prepare the guava puree. In a blender, combine the 500 g of freshly chopped guavas, 80 g of sugar, and lime juice. Blend until smooth.
- Tip: If the guavas aren’t very sweet, taste the puree first. You may need to add a little more sugar!
-
Fold in the guava puree. Gently combine the guava puree into the cream cheese mixture. You want to maintain the airiness!
- Chef insight: A marbled effect can be beautiful! Just swirl a few spoonfuls back through the batter for a lovely look.
Step 4: Bake!
-
Pour the filling into the crust. Carefully pour the cheesecake filling over the prepared biscuit crust. Smooth the top with a spatula if needed.
- Tip: Tap the pan gently on the counter to remove any air bubbles.
-
Bake the cheesecake. Place the springform pan into the preheated oven and bake for 45-55 minutes, or until the center is just slightly jiggly.
- Chef hack: For a water bath, place the pan in a larger dish filled with boiling water. This prevents cracking and ensures even baking.
Step 5: Cool and Serve
-
Cool in the oven. Turn off the oven and crack the door open slightly, letting the cheesecake cool gradually for about an hour. This helps prevent cracking.
- Tip: After it’s cool, chill it in the refrigerator for at least 4 hours, but overnight is best.
-
Decorate with guavas. Once fully chilled, carefully remove the cheesecake from the springform pan, slice it, and decorate the top with fresh guava slices for that beautiful finish.
- Pro tip: Add a sprinkle of lime zest for an extra burst of flavor!
-
Slice and enjoy! Each slice is a taste of tropical bliss!
Serving Suggestions
Plate your guava cheesecake on a beautiful platter, and garnish with fresh mint leaves and some colorful edible flowers if you feel fancy! Serve it with a dollop of whipped cream on the side, and if you’re feeling adventurous, a drizzle of passionfruit sauce can elevate the tropical vibes even more.
Recipe Variations
Want to switch it up a bit? Here are some variations:
-
Passionfruit Guava Cheesecake: Replace some or all of the guava puree with fresh passionfruit for a tangy twist.
-
Chocolate Swirl Guava Cheesecake: Drizzle melted dark chocolate into the filling for a decadent chocolate guava creation.
-
Lemon Guava Cheesecake Bars: Transform the cheesecake into portable bars by baking it in a rectangular dish and cutting it into squares.
-
Vegan Guava Cheesecake: Replace the cream cheese with cashew cream and eggs with flax eggs (1 tbsp flax mixed with 3 tbsp water), combined with a splash of coconut cream for richness.
-
Gluten-Free Version: Use gluten-free biscuits for the crust and enjoy this delightful treat without compromise.
Chef’s Notes
Over the years, this recipe has become a cherished staple in my kitchen. Each time I prepare it, I can’t help but think about that sunny gathering with friends and family. There was this one time when I accidentally burnt the crust because I got lost in a riveting kitchen tale (don’t worry, I just scraped it off!). It taught me to always keep an eye on the oven and, more importantly, to enjoy the journey—mistakes and all. Cooking is about connection and creating memories, and I hope this cheesecake helps you make some of your own.
FAQs and Troubleshooting
Q: My cheesecake cracked on top. What happened?
A: This may occur due to rapid temperature changes. To avoid cracks, let it cool gradually in the oven and avoid overbaking.
Q: How do I know when my cheesecake is done?
A: The center should be slightly jiggly; it will set as it cools in the fridge.
Q: Can I make this cheesecake in advance?
A: Absolutely! The cheesecake can be made a day or two ahead. Just keep it well covered in the fridge.
Q: Can I freeze the cheesecake?
A: Yes! You can freeze your cheesecake for up to a month. Just be sure to wrap it tightly in plastic wrap and then in foil.
Nutritional Info (Optional)
Serving Size: 1 slice (1/12th of cake)
- Calories: 350
- Total Fat: 22g
- Saturated Fat: 12g
- Cholesterol: 88mg
- Sodium: 200mg
- Total Carbohydrates: 30g
- Dietary Fiber: 1g
- Sugars: 18g
- Protein: 5g
And there you have it—your gateway to a beautiful guava cheesecake that’ll have your friends and family raving. Remember, it’s all about enjoying the process—so tie on that apron, pour yourself something refreshing, and let’s make memories that’ll last a lifetime. Happy baking! 🍰💖
PrintGuava Cheesecake
A tropical twist on a classic favorite, this Guava Cheesecake features a creamy texture balanced with the sweet and tangy notes of guava for an indulgent dessert.
- Prep Time: 20 minutes
- Cook Time: 55 minutes
- Total Time: 75 minutes
- Yield: 12 servings 1x
- Category: Dessert
- Method: Baking
- Cuisine: Tropical
- Diet: Vegetarian
Ingredients
- 300 g Tennis biscuits
- 150 g unsalted butter (melted)
- 700 g cream cheese
- 250 g castor sugar
- 4 eggs (extra large)
- 1 tsp vanilla extract
- 200 ml whipping cream
- 200 g guavas (for decorating)
- 500 g guavas (fresh, chopped, and peeled)
- 80 g sugar (white granulated)
- 1 tbsp lime juice
Instructions
- Prepare the crust: Crush the Tennis biscuits into fine crumbs. Mix with melted butter. Press into a springform pan.
- Preheat your oven to 160°C (320°F).
- Blend cream cheese and sugar until smooth. Add eggs one at a time, incorporating fully.
- Mix in vanilla extract and whipping cream.
- Prepare the guava puree: Blend guavas, sugar, and lime juice until smooth.
- Fold in the guava puree into the cream cheese mixture.
- Pour the filling into the crust and bake for 45-55 minutes.
- Cool in the oven, then chill in the refrigerator for at least 4 hours.
- Decorate with fresh guava slices.
- Slice and enjoy!
Notes
For a lighter option, substitute cream cheese with Neufchâtel cheese and use whipped coconut cream instead of whipping cream. Leave room for creativity with flavors like passionfruit or chocolate.
Nutrition
- Serving Size: 1 slice
- Calories: 350
- Sugar: 18g
- Sodium: 200mg
- Fat: 22g
- Saturated Fat: 12g
- Unsaturated Fat: 10g
- Trans Fat: 0g
- Carbohydrates: 30g
- Fiber: 1g
- Protein: 5g
- Cholesterol: 88mg
Keywords: cheesecake, guava, tropical dessert, summer dessert, baking