
Creamy Vegan Mango Cheesecake Bars
Creamy Vegan Mango Cheesecake Bars
Hello, fellow foodies! 🌟 Today, we’re diving into a deliciously dreamy treat that’s perfect for just about any occasion. If you’re looking for something to impress your guests, elevate your gatherings, or simply pamper yourself during a quiet night in, I’ve got just the recipe for you: Creamy Vegan Mango Cheesecake Bars!
Now, you may be wondering, “How can cheesecake be vegan?” Well, let me tell you, the magic of plant-based ingredients allows for a creamy texture and delightful flavor that’ll have you coming back for seconds—and maybe thirds! These bars are not only decadent and delicious but also light and refreshing thanks to the tropical notes of luscious mango. And the best part? They’re super easy to whip up. Grab your apron, and let’s get started!
I created these bars because I believe dessert should be an experience—something that makes you nostalgic while also making you feel good. Just imagine biting into that velvety mango goodness, the creamy cashew filling melting in your mouth, with a hint of coconut that makes you feel like you’re on a sunny beach far away. Whether you’re planning a picnic, a summer party, or just a cozy night in, these bars are here to bring a bit of sunshine to your day. Let’s bring some tropical vibes to the kitchen!
Personal Story
I often think back to my childhood summers spent in my grandmother’s kitchen. She had this magical ability to turn the simplest ingredients into unforgettable treats. One of my favorites was her classic cheesecake; the way it would set just right in the fridge, creating that perfect blend of rich creaminess—something about it felt like home. Fast forward to adulthood, and I was craving that nostalgic taste, but with a twist that aligns with my plant-forward lifestyle.
The first time I made these mango cheesecake bars, I was struck by memories of those bright, sunny days. The vibrant yellow mango puree brought back the sweet essence of summer, almost like a sunny hug. I remember biting into one of those first bars, and I was immediately transported back to my grandmother’s kitchen. It’s a beautiful reminder of how food connects us to our past while allowing us to craft new experiences. From one nostalgia-filled dessert to another, this recipe is a celebration of flavor and memory. 🎉
Ingredients
-
2 cups cashews, soaked
Cashews provide a creamy texture and serve as the base for our cheesecake filling. Make sure to soak them in water for at least 4 hours (or overnight) to ensure they’re soft and blend easily. If you’re short on time, you can use boiling water for a quick soak (about an hour). -
1 cup mango puree
Mango brings that tropical sweetness and vibrant color. You can buy canned mango puree or blend fresh mango until smooth. If you’re looking for alternatives, try using other fruit purees like passionfruit or even banana for a different take! -
1/2 cup coconut milk
Coconut milk lends rich creaminess while adding a lovely subtle flavor. Use full-fat for extra richness, or if you’re looking for a lighter feel, opt for light coconut milk. Unsweetened almond milk can also work here, but you may want to compensate with a bit more fat from the cashews. -
1/4 cup agave syrup or maple syrup
This sweetener balances the richness of the cheesecake with a gentle sweetness. Maple syrup adds a delightful earthy note, while agave has a neutral flavor. Either option works wonderfully, so choose based on your personal preference! -
1/4 cup lemon juice
Fresh lemon juice brightens up the flavors and provides that classic cheesecake tang. For a different twist, try lime juice for a zesty variation. -
1 teaspoon vanilla extract
Vanilla is the secret ingredient that ties everything together, adding warmth to our cheesecake filling. Use pure vanilla extract for the best flavor—homemade vanilla bean paste can also add a delightful touch! -
1 cup almond flour (for the crust)
Almond flour gives the crust a nutty flavor while keeping things gluten-free. If you don’t have almond flour, you can use finely ground oats or a gluten-free flour blend as an alternative. -
2 tablespoons coconut oil (melted)
Coconut oil helps to bind the crust together and solidifies as it cools, creating that perfect texture. If you’re looking for a nut-free option, vegan margarine can work, too. -
2 tablespoons agave syrup or maple syrup (for the crust)
Just like in the filling, we’ll use some sweetener in our crust to tie the flavors together. This will help it firm up nicely while adding a touch of sweetness.
Step-by-Step Instructions
Step 1: Prepare the Cashews
Start by soaking your cashews in water for at least 4 hours (or overnight, if you have the time!). Once they’re nice and soft, drain and rinse them well. This step is crucial; it ensures our “cheese” filling blends smoothly into a creamy, dreamy mixture without any grit.
Step 2: Make the Crust
In a medium bowl, combine 1 cup of almond flour, 2 tablespoons melted coconut oil, and 2 tablespoons agave (or maple syrup). Mix until you have a crumbly texture that sticks together when pressed. If it feels too dry, add a tiny splash of water or more coconut oil.
Chef Tip: Line your baking dish with parchment paper for easy removal later on! Press the crust mixture firmly into the bottom of an 8-inch square pan to create an even layer. Use the back of a measuring cup to get it nice and compact.
Step 3: Blend the Filling
In a high-speed blender, combine the soaked cashews, 1 cup mango puree, 1/2 cup coconut milk, 1/4 cup agave, 1/4 cup lemon juice, and 1 teaspoon vanilla extract. Blend until completely smooth and creamy, scraping down the sides as needed.
Little Chef Hack: Taste the filling! Don’t be afraid to adjust sweetness or acidity to your preference. If you love more tanginess, add a bit more lemon juice. Prefer it sweeter? Toss in another drizzle of agave!
Step 4: Pour It All Together
Once the filling is smooth, pour it over the prepared crust in the baking dish. Gently spread it out to ensure it’s even.
Step 5: Chill, Chill, Chill!
Cover the dish with plastic wrap or a lid and place it in the freezer for at least 4 hours to set. For best results, chill overnight. This will help the bars firm up beautifully!
Step 6: Slice and Serve
Once fully set, remove the dish from the freezer and let it soften out for about 10 minutes before slicing. Use a sharp knife to cut it into squares or bars—dipping the knife in warm water first makes clean cuts easier!
Step 7: Final Touches
Feel free to garnish with extra mango slices, a sprinkle of shredded coconut, or even a drizzle of coconut cream for an added touch of elegance.
Serving Suggestions
When it’s time to serve these delightful mango cheesecake bars, plating matters! Arrange them on a beautiful platter, and consider adding edible flowers or fresh mint leaves for color. Pair with a light, sparkling beverage, like a fruity spritzer, to create an inviting atmosphere. These bars are perfect for sharing, so be sure to slice them nicely for your guests to enjoy!
Recipe Variations
-
Berry Swirl Variation: Add a berry swirl to the mango filling. Simply blend a cup of your favorite berries with a touch of sweetener and drop spoonfuls into the filling before freezing. Swirl gently with a knife to create a marbled effect.
-
Chocolate Crust: For a decadent twist, mix in 2 tablespoons of cocoa powder into the almond flour crust for a chocolatey base.
-
Spiced Version: Add warmth to the filling by incorporating a pinch of cinnamon or nutmeg. This will give it a cozy feel perfect for fall!
-
Nut-Free Alternative: Substitute almond flour with sunflower seed flour to make the crust nut-free, for those with allergies.
Chef’s Notes
I absolutely love how this vegan mango cheesecake bars recipe has evolved over time. I once tried using different tropical fruits, such as pineapple and passionfruit, and they all brought a unique twist to the classic flavor! Just the other day, I caught my niece trying to sneak a bite before dinner—clearly, these treats have a way of making themselves known. 😄
Also, I fondly remember the time I brought these to a picnic. They were a hit! People were raving and asking for the recipe, which is always such a flattering moment for a chef. Remember, food has a way of fostering connections, sparking joy, and creating memories, just as it did for me around Grandma’s table.
FAQs and Troubleshooting
1. Why are my cheesecake bars not setting?
Ensure you’ve allowed enough chilling time. If you’re still finding the texture is not firming up, it may be due to too much coconut milk. In future batches, cut back on the liquid a little more if needed.
2. Can I make these without refined sugar?
Absolutely! Both agave and maple syrup are natural sweeteners. You can also try using other alternatives like dates or monk fruit sweetener, just adjust the measurement and blend properly.
3. My crust is too crumbly – what went wrong?
This can happen if there isn’t enough wet ingredient to bind it together. Try adding a little more melted coconut oil or sweetener to hold things together.
4. How do I store leftovers?
These bars can be stored in an airtight container in the freezer for up to 3 months, or in the refrigerator for about a week. Just remember to slice them before freezing!
Of course, as with all recipes, feel free to get a little creative and make them your own. Cooking is about love, joy, and sharing those beautiful moments with those around you. So tie on that apron, gather your ingredients, and let’s make these Creamy Vegan Mango Cheesecake Bars together! 🍰✨
PrintCreamy Vegan Mango Cheesecake Bars

Deliciously creamy and refreshing vegan cheesecake bars made with luscious mango and a nutty crust, perfect for any occasion.
- Prep Time: 15 minutes
- Cook Time: 0 minutes
- Total Time: 240 minutes
- Yield: 16 servings 1x
- Category: Dessert
- Method: Chilling
- Cuisine: Vegan
- Diet: Vegan
Ingredients
- 2 cups cashews, soaked
- 1 cup mango puree
- 1/2 cup coconut milk
- 1/4 cup agave syrup or maple syrup
- 1/4 cup lemon juice
- 1 teaspoon vanilla extract
- 1 cup almond flour (for the crust)
- 2 tablespoons coconut oil, melted
- 2 tablespoons agave syrup or maple syrup (for the crust)
Instructions
- Prepare the cashews by soaking them in water for at least 4 hours. Drain and rinse well.
- Make the crust by combining almond flour, melted coconut oil, and agave in a bowl. Press into an 8-inch square pan.
- Blend the soaked cashews, mango puree, coconut milk, agave, lemon juice, and vanilla extract in a high-speed blender until smooth.
- Pour the filling over the prepared crust and spread evenly.
- Chill in the freezer for at least 4 hours or overnight.
- Slice the bars once set, allowing them to soften for 10 minutes before cutting.
- Serve garnished with mango slices or shredded coconut, if desired.
Notes
These bars can be stored in an airtight container in the freezer for up to 3 months, or in the refrigerator for about a week.
Nutrition
- Serving Size: 1 bar
- Calories: 200
- Sugar: 10g
- Sodium: 5mg
- Fat: 12g
- Saturated Fat: 6g
- Unsaturated Fat: 6g
- Trans Fat: 0g
- Carbohydrates: 24g
- Fiber: 3g
- Protein: 3g
- Cholesterol: 0mg
Keywords: vegan cheesecake, mango dessert, no-bake dessert, healthy sweet treat, dairy-free cheesecake

Mango Cheesecake
Mango Cheesecake: A Slice of Bright Paradise
Hello, fellow foodies! Grab your apron and get ready for a culinary adventure that will transport your taste buds straight to a tropical paradise. Today, we’re whipping up a delightful Mango Cheesecake that’s as luscious as a sun-drenched beach and as refreshing as a gentle ocean breeze.
This cheesecake combines the creamy richness of classic cheesecake with the vibrant sweetness of ripe mangoes, creating a dessert that feels elegant yet is surprisingly easy to make. Whether you’re planning a gathering, celebrating a special occasion, or simply in need of a little indulgence after a long week, this mango cheesecake is the perfect answer. It’s a show-stopper that impresses, yet it holds a special place in anyone’s heart who loves the simple joys of cooking and sharing delicious food.
What I adore about this dessert is its versatility; it can be a comforting after-dinner delight or a dazzling centerpiece for your dessert table. Plus, the process of making it— from crushing those graham crackers for the crust to swirling in that glorious mango purée— feels rewarding in every sense. Best of all, whether you’re an experienced home cook or just starting, I promise you’ll feel like a kitchen rockstar!
So, lean in, and let’s dive into the world of flavors, memories, and of course, a delicious mango cheesecake that will have your friends asking for seconds!
Personal Story
Growing up, one of my fondest memories revolves around family gatherings at my grandmother’s house. Every summer, my cousins and I would gather around her kitchen while she whipped up her splendid cheesecakes—each one more decadent than the last. Among them, her mango cheesecake became a family favorite.
I vividly remember the bright yellow color of the mango swirl as it danced atop the creamy filling, so inviting that a slice seemed impossible to decline. As the sunlight poured through the kitchen window, we waited impatiently for it to chill in the fridge, giggling and sharing stories while our impatient stomachs grumbled.
One detail that always stood out was Grandma’s joyful spirit, which filled the air as she shared tips and secrets about the cheesecake. “It’s all about using fresh fruit, sweethearts!” she’d say with a wink. Inspired by those cherished moments, I’ve added my little spin, making this mango cheesecake a personal tribute to her love for cooking, family, and the power of coming together over good food.
Ingredients
To embark on our mango cheesecake journey, here’s what you’ll need:
-
2 cups graham cracker crumbs
A classic base for cheesecakes, they provide that delightful crunch! If you’re feeling adventurous, try using crushed vanilla wafers or gingersnaps for a unique twist. -
1/2 cup unsalted butter, melted
This is the glue that holds your crust together. Prefer a dairy-free option? Try coconut oil—it adds a subtle tropical flavor! -
1 cup sugar, divided
Sweetness is essential! Use granulated sugar for the filling, and consider using brown sugar for an earthier flavor in the crust. -
4 (8-ounce) packages cream cheese, softened
The star of the show! Ensure it’s softened to room temperature; this makes mixing smoother. If you want a lighter version, opt for Neufchâtel cheese. -
1 teaspoon vanilla extract
This enhances flavor while bringing warmth to the cheesecake. Pure vanilla extract delivers the best flavor, but imitation works too in a pinch. -
4 large eggs
Eggs create the rich, custardy texture. If you need an egg-free option, consider using flax eggs (1 tablespoon flaxseed meal mixed with 3 tablespoons of water per egg). -
1 cup pureed mango
The key ingredient! Aim for ripe, fresh mangoes for optimum flavor. In a hurry? Use store-bought mango purée! -
1/4 cup sour cream
Adds tanginess and richness. Greek yogurt is a great substitute if you’re looking for a healthier option.
Step-by-Step Instructions
Let’s dive right into creating this delightful mango cheesecake! Gather your ingredients and let’s get cooking.
-
Preheat Your Oven: Begin by preheating your oven to 325°F (160°C). Preheating is an essential step to ensure your cheesecake sets beautifully.
-
Make the Crust: In a medium bowl, combine the graham cracker crumbs with melted butter and 1/4 cup of sugar. Mix until the crumbs are well-coated and the mixture resembles wet sand. Here’s a little tip: pressing the mixture firmly into the bottom of your springform pan creates a deliciously crunchy base. Use a measuring cup to press the crust down evenly!
-
Bake the Crust: Once your mixture is well-formed, pop it into the oven and bake for about 8-10 minutes, until it’s lightly browned. The aroma filling your kitchen will have your mouth watering—trust me! Allow it to cool as you prepare the filling.
-
Prepare the Cream Cheese Mixture: In a large mixing bowl, use a hand mixer or stand mixer to beat the softened cream cheese until it’s creamy and smooth. Dump in the remaining 3/4 cup of sugar and vanilla, mixing until fully combined. This is where the magic begins!
-
Add the Eggs: One at a time, add in the eggs, mixing well after each addition. Take care not to overmix; we want to keep the batter light and airy. An over-mixed batter can lead to a cheesecake that cracks when it bakes—nobody wants that!
-
Incorporate Mango: Gently fold in the mango puree and sour cream into the cream cheese mixture. Make sure it’s all well combined but be careful not to deflate the batter! The vibrant color of the mango is just stunning, isn’t it?
-
Pour and Smooth: Pour the cheesecake filling over the cooled crust, spreading it evenly. Now, here’s a pro tip: tap the pan gently on the countertop before baking to release any air bubbles that might be lurking in there.
-
Bake It: Bake your cheesecake in the preheated oven for about 60-70 minutes. The edges should be set, while the center has a slight jiggle—don’t worry, it will firm up as it cools! Place a shallow pan with water on the lower rack of the oven to create steam, helping to prevent cracks.
-
Cool Down: Once baked, turn off the oven and crack the door open—let the cheesecake cool gently for about an hour. This gradual cooling helps prevent cracks, so patience is key!
-
Chill: After it’s cooled, cover the cheesecake and pop it in the fridge for at least 4 hours or overnight for the best flavor. Trust me; good things come to those who wait!
Serving Suggestions
When you’re ready to serve your glorious mango cheesecake, take a moment to appreciate its beauty. I like to garnish mine with a sprinkle of crushed graham crackers on top and a few slices of fresh mango. For an extra pop of flavor, drizzle a little honey or a sprinkle of fresh mint leaves around the edges.
Slice it up, and serve each piece on a chilled plate. Your guests will be in for a treat, and if you’re hosting a gathering, just watch their smiles light up the room!
Recipe Variations
Want to get creative with your mango cheesecake? Here are some delicious twists and substitutions to consider:
-
Passion Fruit Mango Delight: Swirl in some passion fruit purée alongside the mango for an exotic flavor boost!
-
Chocolate Graham Crust: Mix cocoa powder into your graham cracker crust for a delightful chocolatey base, pairing well with the mango.
-
Coconut Cream Cheesecake: Fold in coconut cream into the batter and top with toasted coconut flakes for a tropical vibe—paradise on a plate!
-
Vegan Version: Substitute cream cheese with your favorite vegan cream cheese product, eggs with aquafaba (the water from chickpeas), and use coconut yogurt instead of sour cream for a plant-based delight.
-
Spiced Mango Cheesecake: Add a dash of cinnamon or nutmeg to the filling for a warm spice that complements the natural sweetness of the mango.
Chef’s Notes
This mango cheesecake holds a special place in my heart—like a canvas for creativity. Over the years, I’ve tinkered with spices, trying out fresh fruit variations, and even taming the sweetness to cater to different preferences. Each iteration taught me something new about balancing flavors and textures.
One time, in a rush to make this for a family gathering, I accidentally grabbed salt instead of sugar! Let’s just say, desserts and salty surprises don’t mix well… But every mistake turned out to be a lesson, reminding me that mistakes can lead to moments of joy and creativity in the kitchen.
Today, the mango cheesecake stands as a testament to loving not just the outcome, but the process! So, feel free to let your imagination run wild on this one.
FAQs and Troubleshooting
-
Why did my cheesecake crack?
Cracks often occur when the batter is overmixed or due to rapid temperature changes. To prevent this, always mix just until incorporated, and allow gradual cooling in the oven when done baking. -
Can I use frozen mango?
Absolutely! Just be sure to thaw and drain any excess liquid before puréeing. Fresh mango yields a brighter flavor, but frozen works well in a pinch. -
How do I know when my cheesecake is done?
The edges should be set, and the center should have a slight jiggle. It will firm up nicely during cooling, so trust your instincts! -
How do I store leftovers?
Cover any uneaten cheesecake and store it in the refrigerator for up to 5 days. If you’re feeling inventive, try using leftovers in a smoothie or parfait the next day!
Nutritional Info
(Insert optional nutritional info if desired. For example: A slice contains approximately 350 calories, 22g fat, 30g carbs, and 5g protein.)
Well, there you have it! A scrumptious and inviting mango cheesecake that’s sure to bring a smile to your face and those you love. It’s all about enjoying the little moments—from mixing, baking, and sharing this delightful dessert. So, tie on that apron, get to the kitchen, and create some beautiful memories with this incredible recipe. Happy baking, friends! 🍰🌞
PrintMango Cheesecake

A delightful mango cheesecake that combines creamy richness with vibrant mango sweetness, perfect for gatherings or as a comforting dessert.
- Prep Time: 30 minutes
- Cook Time: 70 minutes
- Total Time: 100 minutes
- Yield: 12 servings 1x
- Category: Dessert
- Method: Baking
- Cuisine: American
- Diet: Vegetarian
Ingredients
- 2 cups graham cracker crumbs
- 1/2 cup unsalted butter, melted
- 1 cup sugar, divided
- 4 (8-ounce) packages cream cheese, softened
- 1 teaspoon vanilla extract
- 4 large eggs
- 1 cup pureed mango
- 1/4 cup sour cream
Instructions
- Preheat your oven to 325°F (160°C).
- Make the crust by combining graham cracker crumbs, melted butter, and 1/4 cup of sugar.
- Bake the crust for about 8-10 minutes until lightly browned. Allow it to cool.
- Prepare the cream cheese mixture by beating cream cheese until creamy, then mixing in 3/4 cup of sugar and vanilla extract.
- Add in the eggs one at a time, mixing well after each addition.
- Incorporate the mango puree and sour cream into the mixture gently.
- Pour the filling over the cooled crust, smoothing it out.
- Bake for 60-70 minutes until the edges are set and the center has a slight jiggle.
- Cool the cheesecake in the oven with the door cracked for about an hour.
- Chill in the refrigerator for at least 4 hours or overnight.
Notes
For best results, let the cheesecake cool gradually and chill overnight for optimal flavor.
Nutrition
- Serving Size: 1 slice
- Calories: 350
- Sugar: 22g
- Sodium: 300mg
- Fat: 22g
- Saturated Fat: 12g
- Unsaturated Fat: 8g
- Trans Fat: 0g
- Carbohydrates: 30g
- Fiber: 1g
- Protein: 5g
- Cholesterol: 100mg
Keywords: cheesecake, mango dessert, tropical cheesecake, summer dessert, easy cheesecake

Guava Cheesecake
Indulging in a Tropical Delight: Guava Cheesecake
Hello, fellow food lovers! Today, I’m bursting with excitement to share a recipe that not only tickles your taste buds but also whisks you away to tropical paradise—Guava Cheesecake! Think creamy, dreamy cheesecake united with the sweet, fragrant notes of guava. It’s the kind of dessert that makes you feel fancy without the fuss. Now, I don’t know about you, but when I think of cheesecake, I’m transported to sun-drenched afternoons, laughter ringing in the air, and that wonderful feeling that life is truly delightful.
Guava cheesecake is a tropical twist on a classic favorite, and if you’ve never had the pleasure of biting into a slice, oh buddy, you’re in for a treat! This dessert is smooth, rich, and oh-so-decadent, yet it carries that lively essence of guavas—perfectly balancing sweetness and a touch of tang. Whether it’s for a summer gathering, a cozy dinner party, or just a self-indulgent weekend treat, this cheesecake is sure to impress.
What I love about this recipe is how it encapsulates memories of my childhood. I can vividly remember sitting around the table with family, sharing stories while savoring the velvety goodness of guava cheesecake. It’s comforting, nostalgic, and surely something that I want you to experience! So grab your aprons and let’s get cooking!
Personal Story
I still vividly remember the first time I tasted guava cheesecake. It was at a friend’s birthday party in a small, sunlit café filled with the fragrant scent of fresh flowers and baked goods. The moment I took that first bite, it felt as if I was biting into a piece of sunshine! The creamy filling coupled with the tropical sweetness of guava danced on my palate, and my taste buds sang.
After that day, I was hooked! I began experimenting with recipes, trying to recreate that doughy, luscious feeling I experienced. Over the years, I tinkered and mastered the perfect guava cheesecake that embodies that joyful memory, adding my unique twist here and there. Each slice is like a little love letter to that sunny afternoon—a reminder to gather with loved ones and enjoy the sweetness of life. It’s amazing how food can evoke such beautiful memories, isn’t it?
Ingredients
Now, let’s dive into the flavorful world of guava cheesecake. Here’s what you’ll need:
-
300 g Tennis biscuits
- A delightful South African treat made of coconut, perfect for the crust. If you can’t find these, replace them with Graham crackers or digestive biscuits for that crunchy foundation.
-
150 g unsalted butter (melted)
- This brings richness and helps bind your crust. Always use unsalted to control the saltiness; you can use coconut oil as a dairy-free alternative if desired.
-
700 g cream cheese
- The star of the show! It creates that signature creamy texture. A full-fat version is recommended for the best results. If you prefer a lighter option, use Neufchâtel cheese.
-
250 g castor sugar
- Adds sweetness and contributes to the creamy consistency. If you’d like it less sweet, reducing the sugar to 200 g won’t hurt at all.
-
4 eggs (extra large)
- Provides structure and richness. You can substitute eggs with 1/2 cup of unsweetened applesauce or silken tofu for a vegan option.
-
1 tsp vanilla extract
- For that warm, lovely aroma! If you’re feeling adventurous, almond extract can add a wonderful twist.
-
200 ml whipping cream
- Optional for decadence! It adds richness. If you want a lighter option, substitute it with whipped coconut cream.
-
200 g guavas (for decorating)
- Fresh guavas will make your cheesecake pop with color and flavor! They’re tart yet sweet. If guavas are out of season, consider using strawberries or passion fruit.
-
500 g guavas (fresh, chopped, and peeled)
- For the filling, these are the key flavor component! Be sure they’re ripe for the best taste.
-
80 g sugar (white granulated)
- This will sweeten the guava mixture. You can also experiment with brown sugar for an interesting caramel flavor.
-
1 tbsp lime juice
- Adds a zesty kick that compliments the guava beautifully! If you don’t have limes, fresh lemon juice works as a great substitute.
Step-by-Step Instructions
Let’s gather our ingredients and get started on this tropical masterpiece!
Step 1: Prepare the Crust
-
Crush the Tennis biscuits. Use a food processor to pulse the biscuits into fine crumbs. If you don’t have one, place the biscuits in a ziplock bag and crush them with a rolling pin.
- Chef hack: The finer the crumbs, the better the crust will hold together!
-
Mix with melted butter. In a bowl, combine the crushed biscuits and melted butter until well mixed. It should resemble wet sand.
- Chef tip: If it’s too dry, add a touch more melted butter. If too wet, add a little more biscuit crumbs.
-
Press into a springform pan. Take the mixture and press it evenly into the bottom of a 9-inch springform pan. Use the back of a measuring cup to pack it tightly.
- Tip: To prevent sticking, line the bottom of the pan with parchment paper!
Step 2: Prepare the Cheesecake Filling
-
Preheat your oven to 160°C (320°F). This ensures your cheesecake bakes evenly without a crack top.
-
Blend cream cheese and sugar. In a large mixing bowl, beat the cream cheese and castor sugar until smooth and creamy. This may take about 3-5 minutes.
- Recipe hack: Be sure to scrape down the sides to incorporate all ingredients!
-
Add eggs one at a time. Beat in each egg slowly, ensuring they are fully incorporated before adding the next one.
- Chef tip: This method helps to introduce air into the batter, leading to a lighter cheesecake.
-
Mix in vanilla extract and whipping cream. Incorporate the vanilla and whipping cream into the mixture, beating gently.
- Pro tip: The whipped cream adds a luscious texture, so give it a nice fold to keep it airy!
Step 3: Incorporate the Guava
-
Prepare the guava puree. In a blender, combine the 500 g of freshly chopped guavas, 80 g of sugar, and lime juice. Blend until smooth.
- Tip: If the guavas aren’t very sweet, taste the puree first. You may need to add a little more sugar!
-
Fold in the guava puree. Gently combine the guava puree into the cream cheese mixture. You want to maintain the airiness!
- Chef insight: A marbled effect can be beautiful! Just swirl a few spoonfuls back through the batter for a lovely look.
Step 4: Bake!
-
Pour the filling into the crust. Carefully pour the cheesecake filling over the prepared biscuit crust. Smooth the top with a spatula if needed.
- Tip: Tap the pan gently on the counter to remove any air bubbles.
-
Bake the cheesecake. Place the springform pan into the preheated oven and bake for 45-55 minutes, or until the center is just slightly jiggly.
- Chef hack: For a water bath, place the pan in a larger dish filled with boiling water. This prevents cracking and ensures even baking.
Step 5: Cool and Serve
-
Cool in the oven. Turn off the oven and crack the door open slightly, letting the cheesecake cool gradually for about an hour. This helps prevent cracking.
- Tip: After it’s cool, chill it in the refrigerator for at least 4 hours, but overnight is best.
-
Decorate with guavas. Once fully chilled, carefully remove the cheesecake from the springform pan, slice it, and decorate the top with fresh guava slices for that beautiful finish.
- Pro tip: Add a sprinkle of lime zest for an extra burst of flavor!
-
Slice and enjoy! Each slice is a taste of tropical bliss!
Serving Suggestions
Plate your guava cheesecake on a beautiful platter, and garnish with fresh mint leaves and some colorful edible flowers if you feel fancy! Serve it with a dollop of whipped cream on the side, and if you’re feeling adventurous, a drizzle of passionfruit sauce can elevate the tropical vibes even more.
Recipe Variations
Want to switch it up a bit? Here are some variations:
-
Passionfruit Guava Cheesecake: Replace some or all of the guava puree with fresh passionfruit for a tangy twist.
-
Chocolate Swirl Guava Cheesecake: Drizzle melted dark chocolate into the filling for a decadent chocolate guava creation.
-
Lemon Guava Cheesecake Bars: Transform the cheesecake into portable bars by baking it in a rectangular dish and cutting it into squares.
-
Vegan Guava Cheesecake: Replace the cream cheese with cashew cream and eggs with flax eggs (1 tbsp flax mixed with 3 tbsp water), combined with a splash of coconut cream for richness.
-
Gluten-Free Version: Use gluten-free biscuits for the crust and enjoy this delightful treat without compromise.
Chef’s Notes
Over the years, this recipe has become a cherished staple in my kitchen. Each time I prepare it, I can’t help but think about that sunny gathering with friends and family. There was this one time when I accidentally burnt the crust because I got lost in a riveting kitchen tale (don’t worry, I just scraped it off!). It taught me to always keep an eye on the oven and, more importantly, to enjoy the journey—mistakes and all. Cooking is about connection and creating memories, and I hope this cheesecake helps you make some of your own.
FAQs and Troubleshooting
Q: My cheesecake cracked on top. What happened?
A: This may occur due to rapid temperature changes. To avoid cracks, let it cool gradually in the oven and avoid overbaking.
Q: How do I know when my cheesecake is done?
A: The center should be slightly jiggly; it will set as it cools in the fridge.
Q: Can I make this cheesecake in advance?
A: Absolutely! The cheesecake can be made a day or two ahead. Just keep it well covered in the fridge.
Q: Can I freeze the cheesecake?
A: Yes! You can freeze your cheesecake for up to a month. Just be sure to wrap it tightly in plastic wrap and then in foil.
Nutritional Info (Optional)
Serving Size: 1 slice (1/12th of cake)
- Calories: 350
- Total Fat: 22g
- Saturated Fat: 12g
- Cholesterol: 88mg
- Sodium: 200mg
- Total Carbohydrates: 30g
- Dietary Fiber: 1g
- Sugars: 18g
- Protein: 5g
And there you have it—your gateway to a beautiful guava cheesecake that’ll have your friends and family raving. Remember, it’s all about enjoying the process—so tie on that apron, pour yourself something refreshing, and let’s make memories that’ll last a lifetime. Happy baking! 🍰💖
PrintGuava Cheesecake

A tropical twist on a classic favorite, this Guava Cheesecake features a creamy texture balanced with the sweet and tangy notes of guava for an indulgent dessert.
- Prep Time: 20 minutes
- Cook Time: 55 minutes
- Total Time: 75 minutes
- Yield: 12 servings 1x
- Category: Dessert
- Method: Baking
- Cuisine: Tropical
- Diet: Vegetarian
Ingredients
- 300 g Tennis biscuits
- 150 g unsalted butter (melted)
- 700 g cream cheese
- 250 g castor sugar
- 4 eggs (extra large)
- 1 tsp vanilla extract
- 200 ml whipping cream
- 200 g guavas (for decorating)
- 500 g guavas (fresh, chopped, and peeled)
- 80 g sugar (white granulated)
- 1 tbsp lime juice
Instructions
- Prepare the crust: Crush the Tennis biscuits into fine crumbs. Mix with melted butter. Press into a springform pan.
- Preheat your oven to 160°C (320°F).
- Blend cream cheese and sugar until smooth. Add eggs one at a time, incorporating fully.
- Mix in vanilla extract and whipping cream.
- Prepare the guava puree: Blend guavas, sugar, and lime juice until smooth.
- Fold in the guava puree into the cream cheese mixture.
- Pour the filling into the crust and bake for 45-55 minutes.
- Cool in the oven, then chill in the refrigerator for at least 4 hours.
- Decorate with fresh guava slices.
- Slice and enjoy!
Notes
For a lighter option, substitute cream cheese with Neufchâtel cheese and use whipped coconut cream instead of whipping cream. Leave room for creativity with flavors like passionfruit or chocolate.
Nutrition
- Serving Size: 1 slice
- Calories: 350
- Sugar: 18g
- Sodium: 200mg
- Fat: 22g
- Saturated Fat: 12g
- Unsaturated Fat: 10g
- Trans Fat: 0g
- Carbohydrates: 30g
- Fiber: 1g
- Protein: 5g
- Cholesterol: 88mg
Keywords: cheesecake, guava, tropical dessert, summer dessert, baking
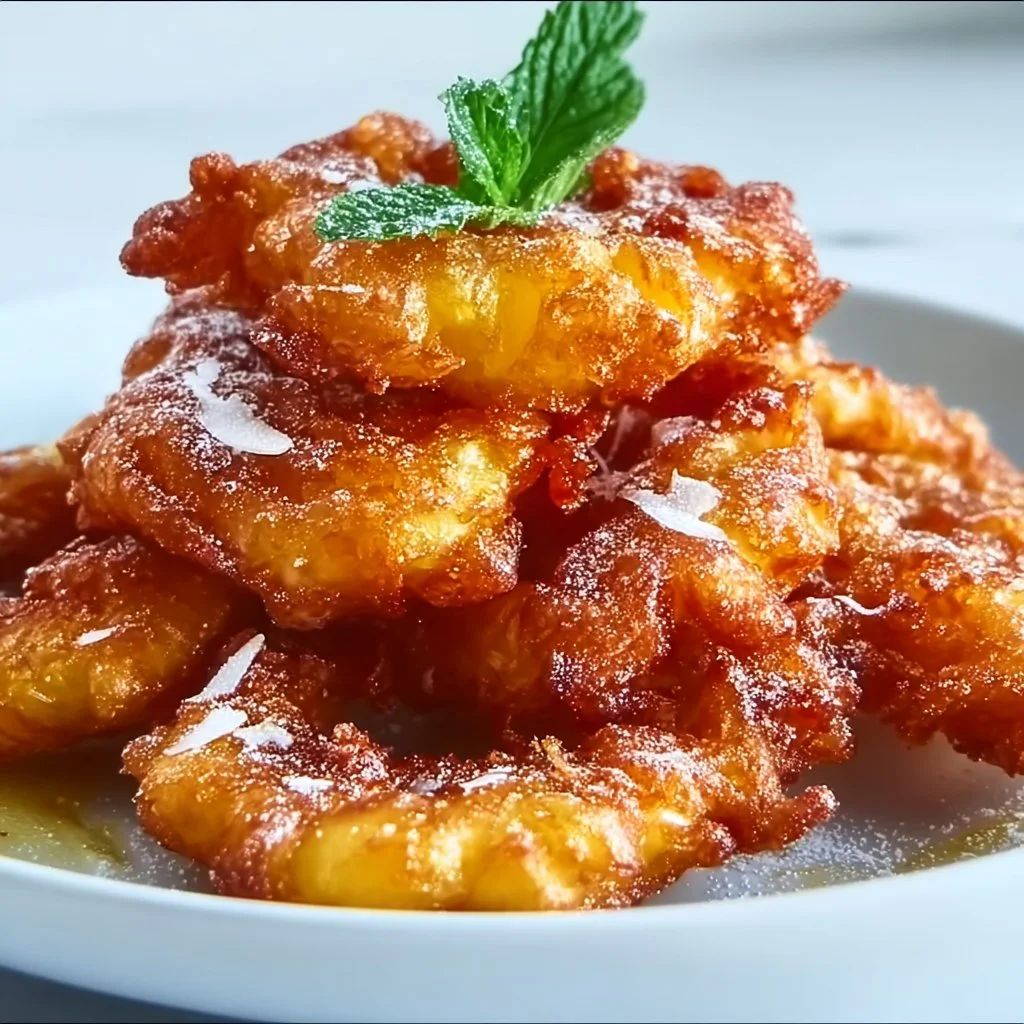
Heavenly Pineapple Fritters That Bring Tropical Joy
# Heavenly Pineapple Fritters That Bring Tropical Joy

## Introduction

Hello, my fellow food enthusiasts! Gather around because today we’re whisking you away to a sun-soaked paradise with one of my absolute favorite recipes — **Heavenly Pineapple Fritters**! These little bites of sweetness are not only a nod to tropical vibes but also remind us of carefree childhood days spent lounging by the pool, savoring each mouthful, and perhaps even a bit of sunshine on our skin.

Imagine it: the first bite of a warm, crispy fritter, giving way to the juicy sweetness of pineapple, all wrapped in a light, fluffy batter that's just the right amount of crispy. Does it get any better? I think not! Whether you're planning a tropical-themed brunch, looking for a delicious weekend treat, or just seeking a flavor explosion to brighten your day, these fritters are sure to bring a smile to your face.

They're incredibly easy to whip up and will fill your kitchen with a delightful aroma that mimics dining in a beachside café. Plus, you’ll love how versatile this recipe is — it welcomes both unique twists and dietary swaps effortlessly, making it a hit for everyone around the table. So, tie on your apron and get ready to dive into this tropical adventure!

## Personal Story

Let me take you back to a balmy summer afternoon when I was a child. My family and I hosted our annual summer gather where laughter floated effortlessly in the warm breeze and delicious aromas filled the air. We were in our backyard, surrounded by luscious greenery and colorful flowers, and, of course, a massive table laden with food.

That year, my aunt decided to showcase her newly discovered recipe for pineapple fritters. Much like a magician revealing a trick, she showed us how to perfectly batter and fry fresh pineapple rings until they were golden and crisp. That memory has since etched itself into my heart, from the way my cousins and I eagerly dipped the warm fritters into creamy coconut yogurt to the sheer delight everyone felt with each bite. **Those fritters were a highlight** of our gathering, and the joy they brought us reminded me of the magic food can create. Fast forward to today, and here I am, ready to share my twist on that beloved family recipe with you!

## Ingredients

To embark on this culinary adventure, you’ll need the following ingredients:

- **1 cup All-purpose flour**
  This serves as the base for the batter. If you’re looking for a gluten-free option, you can easily substitute it with a 1:1 gluten-free flour blend!

- **1/4 cup Granulated sugar**
  This adds just the right amount of sweetness. If you're feeling adventurous, try using coconut sugar instead for a touch of caramel flavor and a less refined option.

- **1 tablespoon Baking powder**
  This gives our fritters that airy fluffiness. Avoid substituting it with baking soda directly as it may lead to overly dense fritters.

- **1/4 teaspoon Salt**
  A pinch of salt enhances the flavors. Don’t skip it; even sweet recipes need that little kick!

- **1 teaspoon Ground cinnamon**
  For that warm, cozy flavor that feels like a hug in each bite. If you have it on hand, a dash of nutmeg can elevate the warm spices even more.

- **1 large Egg**
  This helps bind the mixture together. If you’re going for a vegan option, a flax egg will work perfectly!

- **1/2 cup Milk**
  It creates the desired consistency in the batter. Feel free to swap this out for dairy-free milk like almond or coconut milk if that suits your dietary needs.

- **1 whole Fresh pineapple**
  The star of the recipe! Sliced into rings, these juicy gems will offer bursts of flavor in every bite. If fresh pineapple isn’t available, canned pineapple (in juice, not syrup) may work as a last resort.

- **2 cups Vegetable oil**
  For frying; you can use canola or coconut oil, depending on your preference and what you have on hand. Coconut oil will give a slight tropical essence!

- **1 tablespoon Additional cinnamon and sugar**
  This is for dusting the finished fritters. Adjust to your liking, adding more or less according to your sweet tooth!

## Step-by-Step Instructions

Now, let’s get to the fun part — cooking these luscious fritters!

1. **Prep the Pineapple:**
   First, slice your fresh pineapple into rings, about 1/2 inch thick. If you have a core remover, this makes it breeze! If not, a knife will do just fine. And hey, no pressure! If some slices are not perfect circles, that's what makes home cooking homely!

2. **Make the Batter:**
   In a large mixing bowl, whisk together the all-purpose flour, granulated sugar, baking powder, salt, and ground cinnamon. Give it a little whirl until everything is nicely combined. This is where the magic begins!

3. **Incorporate Wet Ingredients:**
   In a separate bowl, beat the egg and then combine it with the milk. Pour this mixture into the dry ingredients, and stir until just incorporated. Do not overmix! It's okay if it’s a little lumpy — those lumps will dissolve while cooking, resulting in fluffy fritters.

4. **Heat the Oil:**
   In a deep skillet or heavy-bottomed pot, heat the vegetable oil over medium-high heat. You want enough oil to submerge at least half of the fritters. To test if the oil is ready, drop a small spoonful of batter into it. If it bubbles all around and rises to the surface, you’re good to go!

5. **Fry the Fritters:**
   Carefully dip each pineapple ring into the batter, allowing any excess to drip off, and gently place it into the hot oil. Don’t overcrowd the pan — work in batches if you need to! Fry each side for about 2-3 minutes until they turn golden brown.

6. **Drain and Dust:**
   Once fried, remove the fritters from the oil and place them on a paper towel-lined plate to absorb any excess oil. While they’re still warm, sprinkle them generously with your cinnamon and sugar mix. Watch how that sugar sparkles in the light — isn’t it beautiful?

And just like that, your heavenly pineapple fritters are ready to shine!

## Serving Suggestions

These fritters are best served warm, and the toppings are endless! I love plating them with a scoop of creamy coconut yogurt on the side for dipping or drizzling a little honey over them. If you’re feeling fancy, a dust of powdered sugar or even a sprinkle of toasted coconut can take the presentation up a notch. Serve them on a rustic wooden board or a beautiful platter, and let everyone dive in together!

## Recipe Variations

Feel free to have fun with these fritters! Here are some creative variations to keep things fresh:

1. **Coconut Fritters:** Mix shredded coconut into your batter for a tropical twist that'll send your tastebuds straight to a beach vacation!

2. **Chocolate-Dipped:** After frying, dip the fritters in melted dark chocolate and roll them in chopped nuts for an irresistible treat.

3. **Spiced Version:** Add a pinch of cayenne or chili powder to the batter for a sweet-savory experience that'll tickle your fancy. A little heat lifts the sweetness beautifully!

4. **Vegan Option:** Swap the egg for a flax egg and use unsweetened almond milk or coconut milk for a completely plant-based treat.

5. **Fruit Medley:** Mix in other fruits like banana or blueberries to the batter. The possibilities are endless — it’s all about what you love!

## Chef’s Notes

Oh, the stories these fritters have brought to my kitchen! I remember the very first time I made them for a brunch gathering. The moment I pulled the first batch out of the oil, a sense of anticipation filled the air, and you could hear the ooohs and aaahs as everyone bit into them. I even added a playful coconut sauce to the mix, which became an instant fan favorite!

Through experimentation, I learned that the key to perfect fritters is precision in the oil temperature; too cool, and they’ll be greasy, while too hot will burn them. It’s all about that magic sweet spot.

## FAQs and Troubleshooting

1. **Why are my fritters soggy?**
   This usually means your oil wasn’t hot enough. Make sure to keep the oil at a consistent temperature — a good thermometer can help here!

2. **Can I prepare the batter ahead of time?**
   It’s best served fresh, but you can prep the dry ingredients in advance. Just mix them with wet ingredients right before frying to maintain that fluffy texture.

3. **What if I don't have fresh pineapple?**
   Canned pineapple can work in a pinch! Just make sure to pat it dry to reduce excess moisture, which can make your batter soggy.

4. **How do I store leftover fritters?**
   Store them in an airtight container in the fridge for up to 2 days. Reheat them in the oven or an air fryer for that crispy finish!

## Nutritional Info

*Note: Nutritional values may vary based on specific ingredient brands and types used.*

- Calories per fritter (without additional toppings): approximately 150-200
- Total fat: 9g
- Saturated fat: 2g
- Carbohydrates: 18g
- Protein: 2g
- Fiber: 1g
- Sugar: 6g

There you have it, dear friends! **Heavenly Pineapple Fritters** that not only tantalize the tongue but also tug at the heartstrings, serving up nostalgia and flavor in every bite. Whether you're hosting friends or enjoying a little indulgence on your own, these fritters are sure to bring a slice of tropical joy to your kitchen. Happy cooking!
Heavenly Pineapple Fritters

Delicious, crispy fritters made with fresh pineapple, perfect for any tropical-themed brunch or treat.
- Prep Time: 15 minutes
- Cook Time: 15 minutes
- Total Time: 30 minutes
- Yield: 4 servings 1x
- Category: Dessert
- Method: Frying
- Cuisine: Tropical
- Diet: Vegetarian
Ingredients
- 1 cup All-purpose flour
- 1/4 cup Granulated sugar
- 1 tablespoon Baking powder
- 1/4 teaspoon Salt
- 1 teaspoon Ground cinnamon
- 1 large Egg
- 1/2 cup Milk
- 1 whole Fresh pineapple, sliced into rings
- 2 cups Vegetable oil, for frying
- 1 tablespoon Additional cinnamon and sugar for dusting
Instructions
- Prep the Pineapple: Slice your fresh pineapple into rings, about 1/2 inch thick.
- Make the Batter: In a large mixing bowl, whisk together the all-purpose flour, granulated sugar, baking powder, salt, and ground cinnamon.
- Incorporate Wet Ingredients: In a separate bowl, beat the egg and then combine it with the milk. Pour this mixture into the dry ingredients.
- Heat the Oil: In a deep skillet or heavy-bottomed pot, heat the vegetable oil over medium-high heat.
- Fry the Fritters: Carefully dip each pineapple ring into the batter and gently place it into the hot oil.
- Drain and Dust: Remove the fritters from the oil and place them on a paper towel-lined plate to absorb any excess oil, then sprinkle with cinnamon and sugar.
Notes
Serve warm with coconut yogurt or honey. Experiment with toppings like powdered sugar or toasted coconut for extra flair.
Nutrition
- Serving Size: 1 fritter
- Calories: 180
- Sugar: 6g
- Sodium: 150mg
- Fat: 9g
- Saturated Fat: 2g
- Unsaturated Fat: 5g
- Trans Fat: 0g
- Carbohydrates: 22g
- Fiber: 1g
- Protein: 2g
- Cholesterol: 30mg
Keywords: fritters, pineapple, dessert, tropical, brunch