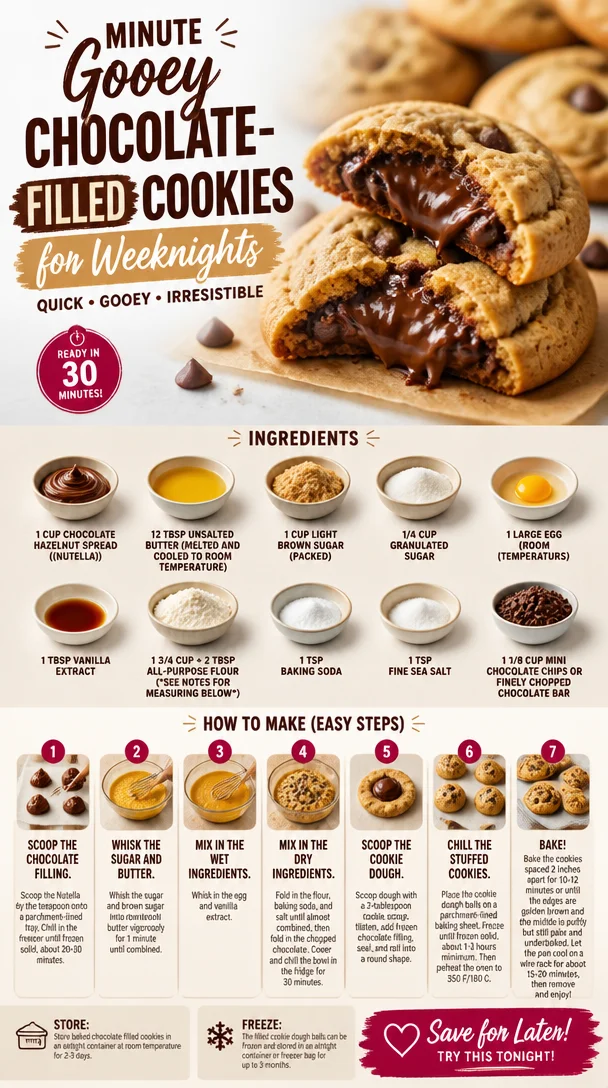
Minute Gooey Chocolate-Filled Cookies for Weeknights
Indulge in Chocolate Heaven: The Ultimate Chocolate Filled Cookies Recipe
Hello, fellow foodies! I’m so excited to have you here today at Ivory Apron, where the kitchen is buzzing with creativity and the air is filled with the sweet aroma of deliciousness. Today, we’re diving into a recipe that produces cookies so good they’ll make you weak in the knees: Chocolate Filled Cookies! These delightful treats are not only filled with smooth chocolate hazelnut goodness but also boast that perfect balance of crispy edges and a gooey center. So, tie on your apron, and let’s get baking!
A Sweet Memory
Every time I whip up a batch of Chocolate Filled Cookies, I can’t help but take a stroll down memory lane. Picture this: a rainy Saturday afternoon, the kind where you’re cozied up inside, and the world outside feels a little grey. My sister and I were tasked with preparing a treat for our family game night, and chocolate was the only requirement on our list. Enter our trusty jar of chocolate hazelnut spread. We slathered it over everything, from toast to spoonfuls straight from the jar (because who can resist, really?).
As we would bake our cookies, the kitchen would fill with laughter, playful arguments over which cookie shape was best, and the dreamy scent of melting chocolate. Those cookies became the highlight of our game nights, bringing our family together surrounded by laughter and love. Now, every time I make these cookies, I’m reminded of how food can create bonds and weave little moments of joy.
Ingredients
Let’s gather our ingredients! Each one plays a crucial role in achieving cookie perfection.
-
1 cup chocolate hazelnut spread (Nutella)
This golden ingredient adds a rich, creamy chocolate flavor. If you’re on the hunt for substitutions, try almond butter or any nutty spread. Just ensure it’s smooth for that dreamy filling! -
12 tbsp unsalted butter (melted and cooled to room temperature)
Butter gives our cookies richness and a tender crumb. If you want to make it dairy-free, coconut oil works like a charm (just solidify it before mixing). -
1 cup light brown sugar (packed)
This sweetener adds depth and moisture to our cookies. If you prefer a less sugary bite, swap with coconut sugar for a healthier sweet fix. -
1/4 cup granulated sugar
For added sweetness and a slight crunch! You can use coconut sugar here as well; it’ll offer a lovely caramel flavor. -
1 large egg (room temperature)
The egg binds everything together. If you’re looking for an eggless version, try replacing it with 1/4 cup unsweetened applesauce. -
1 tbsp vanilla extract
A must-have ingredient that enriches flavors and amplifies the chocolate notes. Homemade vanilla extract? Even better! -
1 3/4 cup + 2 tbsp all-purpose flour
This is the backbone of our cookies. Make sure to spoon and level the flour for accuracy, as too much can lead to dry cookies. For a gluten-free option, oat flour works great! -
1 tsp baking soda
This helps our cookies rise and become light. If you’re out, cream of tartar or baking powder can serve as substitutes, just in different amounts. -
1 tsp fine sea salt
Salt elevates flavors, making the sweetness pop. If you prefer a finer taste, use kosher salt. -
1 1/8 cup mini chocolate chips or finely chopped chocolate bar
These little gems will add delightful pockets of melty chocolate throughout your cookies. You can replace them with white chocolate chips for a fun flavor twist!
Step-by-Step Instructions
Ready to bake? Let’s jump into the nitty-gritty. These steps are designed to make your baking adventure smooth and, dare I say, enjoyable!
-
Preheat the Oven
Preheat your oven to 350°F (175°C). This is the secret to getting those cookies nice and golden. Make sure to preheat for at least 10 minutes for an even bake! -
Prep Your Baking Sheet
Line a baking sheet with parchment paper. This helps prevent sticking and makes cleanup a breeze. If you run out of parchment, you can lightly grease the pan with some butter or cooking spray. -
Mix the Wet Ingredients
In a large bowl, mix the melted butter with chocolate hazelnut spread using a whisk. We’re looking for a homogenized mixture that’s silky smooth. If you find the spread is stubborn, warm it slightly in the microwave to make it easier to combine. Then, add in the brown sugar and granulated sugar. Whisk until well combined. Blend in the egg and vanilla extract until the mixture is glossy and lovely. -
Combine the Dry Ingredients
In another bowl, whisk together the flour, baking soda, and salt. This step is crucial for even distribution of the leavening agents and ensures our cookies bake evenly. Little chef hack: sift the flour directly into the dry mix to eliminate any lumps. -
Merge Wet and Dry
Gradually add the dry mixture into the wet one, stirring gently until just combined. Be careful not to overmix; we want tender cookies, not chewy ones! Fold in the mini chocolate chips or chopped chocolate for those delicious melty pockets. -
Scoop and Chill
Here’s where the magic happens! Using a cookie scoop or two spoons, drop generous tablespoons of dough onto the prepared baking sheet, leaving enough space in between for spreading (about 2 inches apart). Pro tip: For extra flavor, chill the dough in the fridge for 30 minutes—this enhances the cookies’ flavors and helps them hold shape! -
Bake
Bake these beauties in your preheated oven for 10–12 minutes or until the edges are set, and the centers look slightly underbaked (they’ll firm up as they cool). It’s a true test of patience (but you can always sneak a taste while they’re baking!). -
Cool
Allow the cookies to cool on the baking sheet for about 5–10 minutes before transferring them to a wire rack. This helps them retain their chewy center while still crisping up on the outside.
Serving Suggestions
These Chocolate Filled Cookies are best served warm, straight from the oven! Consider stacking them on a beautiful plate, adorned with a dusting of powdered sugar. For an extra touch, drizzle them with melted chocolate or serve them alongside a scoop of vanilla ice cream for a delightful dessert experience. Trust me; your friends will be raving!
Recipe Variations
Why not get a little adventurous with your cookies? Here are some fun variations to try:
-
Nutty Twist: Add chopped nuts like hazelnuts or walnuts for a satisfying crunch.
-
Spicy Kick: Mix in a pinch of cayenne or ground cinnamon for unexpected warmth.
-
Stuffed Surprises: Try filling the cookies with caramel or a tangy fruit jam instead of chocolate hazelnut spread.
-
Dairy-Free Delight: Substitute the butter with vegan butter and use dairy-free chocolate chips for a vegan version.
-
Double Chocolate: Replace a portion of the flour with unsweetened cocoa powder for a more intense chocolate experience.
Chef’s Notes
This recipe has evolved over the years in my kitchen. I remember my early attempts were always a bit too flat (I might have been a little heavy-handed with the flour!). But with practice, these cookies became my go-to treat for any occasion. Whenever I feel the need for a little comfort or just want to impress some guests, I reach for this recipe. Plus, no matter how many times I share it, the joy of seeing friends and family bite into a warm, gooey cookie never gets old!
FAQs and Troubleshooting
Q: Why did my cookies spread too much?
A: Overmixing or not chilling the dough can cause excess spreading. Ensure you mix just until combined and allow the dough to chill for at least 30 minutes.
Q: Can I freeze the cookie dough?
A: Absolutely! Just scoop the dough onto a baking sheet, freeze until solid, then transfer them to a zip-top bag. Frozen dough can be baked directly from the freezer, just add a couple of additional minutes to the baking time.
Q: My cookies came out too dry. What happened?
A: This could be due to the flour measurement. Make sure to spoon and level your flour instead of packing it in! Also, be careful not to overbake; those cookies should have a soft center.
Q: How can I tell when the cookies are done?
A: The edges should be set and slightly golden, while the centers may look a tad underbaked—that’s okay! They’ll continue cooking on the baking sheet after you take them out.
Nutritional Info (Optional)
While I always encourage savoring every bite, here’s a general idea per cookie (this can vary based on ingredient brands):
- Calories: 200
- Total Fat: 10g
- Saturated Fat: 4g
- Carbohydrates: 25g
- Sugars: 14g
- Protein: 2g
Final Thoughts
Making these Chocolate Filled Cookies is more than just baking; it’s about creating moments that matter and sharing joy with those you love. I hope you bring your own memories into the kitchen as you bake these sweet delights. Remember, there’s no perfect cookie—just delicious ones made with intention and love!
Thanks for joining me today at Ivory Apron! May your kitchen be filled with warmth, laughter, and, of course, the aroma of freshly baked cookies. Happy baking, my friends!
PrintChocolate Filled Cookies

Indulge in these delightful Chocolate Filled Cookies, featuring a rich chocolate hazelnut filling surrounded by crispy edges and a gooey center.
- Prep Time: 15 minutes
- Cook Time: 12 minutes
- Total Time: 27 minutes
- Yield: 24 cookies 1x
- Category: Dessert
- Method: Baking
- Cuisine: American
- Diet: Vegetarian
Ingredients
- 1 cup chocolate hazelnut spread (Nutella)
- 12 tbsp unsalted butter (melted and cooled to room temperature)
- 1 cup light brown sugar (packed)
- 1/4 cup granulated sugar
- 1 large egg (room temperature)
- 1 tbsp vanilla extract
- 1 3/4 cup + 2 tbsp all-purpose flour
- 1 tsp baking soda
- 1 tsp fine sea salt
- 1 1/8 cup mini chocolate chips or finely chopped chocolate bar
Instructions
- Preheat your oven to 350°F (175°C) for at least 10 minutes.
- Line a baking sheet with parchment paper.
- Mix the melted butter with chocolate hazelnut spread using a whisk until smooth. Add the brown sugar and granulated sugar; whisk until well combined. Blend in the egg and vanilla extract.
- Whisk together the flour, baking soda, and salt in another bowl.
- Gradually add the dry mixture to the wet mixture, stirring gently until just combined. Fold in the mini chocolate chips.
- Scoop generous tablespoons of dough onto the prepared baking sheet, spacing them about 2 inches apart. Chill in the fridge for 30 minutes.
- Bake for 10–12 minutes until edges are set and centers are slightly underbaked.
- Cool on the baking sheet for 5–10 minutes before transferring to a wire rack.
Notes
For extra flavor, chill the dough before baking. These cookies can be served warm with a dusting of powdered sugar or alongside vanilla ice cream.
Nutrition
- Serving Size: 1 cookie
- Calories: 200
- Sugar: 14g
- Sodium: 200mg
- Fat: 10g
- Saturated Fat: 4g
- Unsaturated Fat: 6g
- Trans Fat: 0g
- Carbohydrates: 25g
- Fiber: 1g
- Protein: 2g
- Cholesterol: 30mg
Keywords: chocolate cookies, dessert, baking, chocolate hazelnut, cookies recipe
Ingredient Cinnamon Roll Bites: Quick Gooey Snack
Quick Cinnamon Roll Bites: A Deliciously Easy Treat
Hello, fellow food lovers! If you’re anything like me, there’s something simply magical about the aroma of cinnamon filling the kitchen. It evokes a sense of warmth and nostalgia that wraps around you like a cozy blanket on a chilly evening. Today, I’m excited to introduce you to one of my favorite cozy treats: Quick Cinnamon Roll Bites.
These delightful little morsels are perfect for breakfast, snacking, or even a sweet treat after dinner. They embody all the flavors of traditional cinnamon rolls but come together in a snap, making them a fantastic choice for busy days when you still want to serve something homemade. With hardly any fuss, these bites will transform your kitchen into a bakery filled with heavenly scents — and trust me, everyone will be asking for seconds!
A Sweet Memory to Share
I vividly remember my grandmother’s kitchen, where the delicious scent of cinnamon wafted through the air every Saturday morning. She’d gather us around the table as she rolled out dough and sprinkled it with your classic cinnamon-sugar mixture. It was less about the recipe and more about the experience — the laughter, the spilled flour, and those tiny little hands helping to knead the dough just a bit too hard.
One particular Saturday, I was tasked with mixing the filling. I added an extra pinch of cinnamon because, why not? I thought it was a genius move until I realized we couldn’t taste anything but spice! We all had a good laugh, and my grandma never let me live it down. She said, “You can’t overpower sweetness with spice, dear!” Since then, I learned how to strike that precious balance, and today, I promise you’ll find just that in these Quick Cinnamon Roll Bites. Let’s dive into making a batch that will create sweet memories of your own!
Ingredients You’ll Need
-
1 can refrigerated crescent dough: This handy ingredient makes everything super quick and easy! You can substitute with any flaky dough or puff pastry if you’re feeling adventurous. Just keep in mind that cooking times may vary slightly.
-
1/4 cup melted butter: This adds richness and helps the sugar stick. You can replace it with coconut oil for a dairy-free option.
-
1/2 cup brown sugar: This sweet ingredient melts beautifully while baking, creating a luscious caramel flavor. If you’re out of brown sugar, you can simply mix white sugar with a spoonful of molasses for a quick substitute.
-
1 tablespoon ground cinnamon: The star of the show! Cinnamon brings that warm, sweet flavor that’s essential for any cinnamon roll. If you’re looking for a twist, try cardamom or pumpkin spice for a unique flavor.
-
1/2 cup powdered sugar: This is for our quick glaze! It creates that sweet finish to our bites. You can use agave syrup or honey instead if you prefer something less processed.
-
1-2 tablespoons milk or cream: Just enough to thin out the glaze to your desired consistency. You can use any plant-based milk as an alternative!
-
1/2 teaspoon vanilla extract: A splash of vanilla adds depth to the glaze. Feel free to get creative here and swap it out with almond extract for a different dimension.
Step-by-Step Instructions
-
Preheat the Oven: Let’s get that oven heated to 375°F (190°C). This step is crucial for that perfectly golden pastry outcome. While the oven preheats, you’ll have time to prep everything!
-
Prep the Dough: Open the can of refrigerated crescent dough and unroll it on a clean surface. It can be a little tricky, but simply press together any perforations to create a single sheet. This will be your canvas for creativity!
-
Make the Filling: In a small bowl, mix together the melted butter, brown sugar, and cinnamon until well combined. This mixture will act as your sweet glue, so make sure everything is thoroughly mixed!
-
Spread the Filling: Use a spatula to spread the cinnamon-sugar mixture evenly over your crescent dough. Go all the way to the edges — you don’t want to miss any delicious bites!
-
Roll It Up: Starting from the widest end of the dough, roll it up tightly into a log. Feel free to channel your inner pastry chef here! Once rolled, cut it into bite-sized pieces — about 1 inch thick. You should get around 12-15 bites from this one roll.
-
Transfer to Baking Sheet: Line a baking sheet with parchment paper or a silicone mat for easy cleanup. Place your little bites on the sheet, giving them some space to spread out while baking.
-
Bake Them Up: Pop those adorable morsels in the preheated oven and bake for about 12-15 minutes, or until they turn golden brown and the kitchen starts smelling heavenly. Keep an eye on them! Since ovens vary, you don’t want to overdo it.
-
Make the Glaze: While they’re baking, whisk together your powdered sugar, milk (or cream), and vanilla extract until smooth. If it’s too thick, add a splash more milk until you achieve that drizzly consistency we love.
-
Glaze and Enjoy: As soon as the bites come out of the oven, give them a generous drizzle with your sweet glaze while they’re still warm. This step is crucial for maximum gooey goodness!
Serving Suggestions
To serve, simply arrange the Cinnamon Roll Bites on a beautiful cake stand or a rustic wooden platter. You could even sprinkle a pinch of cinnamon or extra powdered sugar on top for a touch of elegance! Let guests help themselves, and watch those bites disappear in no time.
Recipe Variations
-
Fruity Twist: Add sliced bananas or apples to the filling for a fruity kick.
-
Nutty Delight: Toss in some chopped pecans or walnuts into the cinnamon mixture for added crunch.
-
Pumpkin Spice: Trade out some of the cinnamon for pumpkin spice for an autumnal flair.
-
Chocolate Drizzle: Drizzle some melted chocolate over your glaze for an indulgent touch.
-
Cream Cheese Icing: Mix cream cheese with powdered sugar and a splash of milk for a richer topping instead of glaze.
Chef’s Notes
These Quick Cinnamon Roll Bites have become a go-to recipe in my kitchen — especially when unexpected guests drop by or when I need a sweet fix. They are forgiving, fun to make, and so versatile! Plus, they remind me of those kitchen adventures with my grandmother, where food was never just about the final dish but the joy in creating something special together.
One time, I hosted a brunch and made these bites with a variety of fillings, from whipped cream cheese with lemon zest to spiced apple butter. It was a hit! Guests loved choosing their own fillings and really made the experience enjoyable.
FAQs and Troubleshooting
1. Why did my cinnamon bites flatten out?
If your bites flatten out during baking, it might be due to using a soft dough or not wrapping them tightly enough. Make sure to roll them firmly and use cold dough for better shape retention.
2. Can I make these ahead?
Absolutely! You can prepare the rolls, cut them, and refrigerate them overnight. Just add a few extra minutes to the baking time.
3. How do I know when they’re done?
Your bites should be golden brown on top and firm to the touch. If they’re still doughy, give them a couple more minutes in the oven.
4. What do I do with leftovers?
They’re best eaten fresh, but if you have leftovers, store them in an airtight container in the refrigerator for up to 2 days. You can reheat them in the microwave or oven until warm.
Nutritional Info
(Optional, but here’s a rough estimate if you want to include it!)
- Serving Size: 1 bite
- Calories: ~150
- Total Fat: 7g
- Saturated Fat: 4g
- Carbohydrates: 22g
- Sugars: 10g
- Protein: 2g
And there you have it — a fabulous recipe for Quick Cinnamon Roll Bites that should take you right back to those cozy kitchen moments! I hope you enjoy making these as much as I do, and I can’t wait to hear your own stories as you gather friends and family around your table. Let’s keep the tradition of love and warmth alive through our kitchen creations! Happy baking!
PrintQuick Cinnamon Roll Bites
Easy and delightful cinnamon roll bites perfect for breakfast or snacking, embodying the flavors of traditional cinnamon rolls.
- Prep Time: 10 minutes
- Cook Time: 15 minutes
- Total Time: 25 minutes
- Yield: 12-15 servings 1x
- Category: Dessert
- Method: Baking
- Cuisine: American
- Diet: Vegetarian
Ingredients
- 1 can refrigerated crescent dough
- 1/4 cup melted butter
- 1/2 cup brown sugar
- 1 tablespoon ground cinnamon
- 1/2 cup powdered sugar
- 1–2 tablespoons milk or cream
- 1/2 teaspoon vanilla extract
Instructions
- Preheat the oven to 375°F (190°C).
- Open the can of refrigerated crescent dough and unroll it on a clean surface.
- Mix together the melted butter, brown sugar, and cinnamon in a small bowl.
- Spread the cinnamon-sugar mixture evenly over your crescent dough.
- Roll it up tightly from the widest end into a log and cut into bite-sized pieces (about 1 inch thick).
- Line a baking sheet with parchment paper and place the bites on it.
- Bake for 12-15 minutes or until golden brown.
- Whisk together powdered sugar, milk, and vanilla extract until smooth to make the glaze.
- Drizzle the glaze over the bites while they’re still warm.
Notes
These bites can be prepared in advance and refrigerated before baking. Customize with various fillings or toppings as desired!
Nutrition
- Serving Size: 1 bite
- Calories: 150
- Sugar: 10g
- Sodium: 200mg
- Fat: 7g
- Saturated Fat: 4g
- Unsaturated Fat: 2g
- Trans Fat: 0g
- Carbohydrates: 22g
- Fiber: 1g
- Protein: 2g
- Cholesterol: 20mg
Keywords: cinnamon rolls, quick dessert, easy recipe, baking, sweet snacks