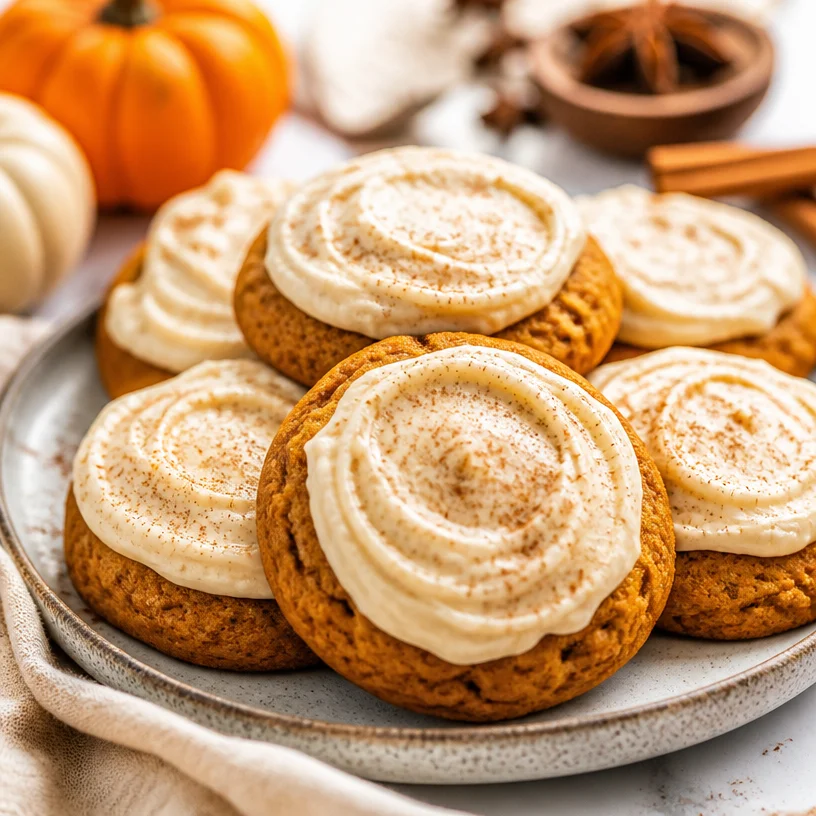
Minute Fall Pumpkin Cookies with Cream Cheese Frosting
The Ultimate Pumpkin Cookies with Cream Cheese Frosting Recipe
Hello, fellow food enthusiasts! If there’s one thing I adore about the changing seasons, it’s the beautiful way they influence our cooking and baking. With fall in full swing, the vibrant colors of leaves and the comforting aroma of pumpkin spice fill the air. Today, I’m excited to share one of my all-time favorite fall treats: Pumpkin Cookies with Cream Cheese Frosting! These cookies are an absolute delight—soft, fluffy, and wonderfully spiced, topped with a luscious cream cheese frosting that is simply to die for. So, tie on your apron, grab your mixing bowls, and let’s create something delightful together.
A Taste of Nostalgia
I can still picture my grandmother in her sunny kitchen, clad in her well-loved apron, bringing magic to life during the fall season. One of my fondest memories is when she introduced me to pumpkin cookies. Every year, as soon as the leaves began to crunch underfoot, we would set aside an entire afternoon to bake and create. The scent of cinnamon and nutmeg wafting through the air filled our home with warmth and happiness. She taught me that cooking is as much about the ingredients as it is about the love and joy that you infuse into the process.
Her secret ingredient? Laughter. She would always say that a little giggle while mixing the flour made the cookies extra special. I guess that’s why every time I bake these pumpkin cookies, I feel her presence in my kitchen. They stir up wonderful memories of time spent together, showcasing how food can create lasting bonds.
Ingredients
Here’s what you need to whip up these scrumptious cookies:
-
2 1/2 cups (312 g) all-purpose flour
A key ingredient, this will help give structure to your cookies. If you’re looking for gluten-free options, you can substitute a 1:1 gluten-free baking flour mix. -
1 teaspoon baking powder
This helps your cookies rise, creating that lovely, fluffy texture. Make sure it’s fresh for the best results! -
1 teaspoon baking soda
It works in tandem with the baking powder to achieve that perfect lift. If you run out, you can use another teaspoon of baking powder instead. -
1 tablespoon pumpkin pie spice (plus extra for sprinkling)
A glorious mix of cinnamon, nutmeg, ginger, and cloves that will instantly transport you to a cozy autumn day. Feel free to adjust the spice level according to your taste. -
1/2 teaspoon salt
Balances the sweetness and enhances the flavors in your cookies. Even if you’re cutting back on salt, a pinch can go a long way here. -
3/4 cup (170 g) unsalted butter (room temperature)
Softened butter is a must for creaming with sugar! You can use coconut oil for a dairy-free version; just melt it slightly before mixing. -
3/4 cup (150 g) granulated sugar
Sweetness! You can substitute part of it with brown sugar for a deeper, molasses-like flavor. -
1/2 cup (100 g) packed light brown sugar
This adds moisture and a subtle caramel flavor that’s just perfect for these cookies. -
1 1/4 cups (305 g) canned pumpkin puree
Pure pumpkin goodness! Always opt for pure pumpkin and not pumpkin pie filling, which has extra sugar and spices. -
1 large egg (room temperature)
Offers richness; it helps bind the mixture. If you’re looking for an egg substitute, you can use a mashed banana or 1/4 cup of unsweetened applesauce. -
1 teaspoon pure vanilla extract
Adds a wonderful depth of flavor to the cookies. Homemade vanilla extract is an absolute treat! -
8 ounces (1 brick or 226 g) block-style cream cheese (softened but still cool)
This is the star of the frosting! You can use Greek yogurt for a healthier twist, but it won’t be quite as creamy. -
¼ cup (56 g) unsalted butter (softened but still cool)
This gives the frosting a beautiful texture. Just as with the cream cheese, you could substitute this with coconut cream for a dairy-free option. -
1 teaspoon pure vanilla extract
For that delicious pop of flavor in your frosting. -
1 3/4 cups (210 g) confectioners’ sugar (sifted)
This ensures your frosting is smooth and sweet! You can whisk in a little cocoa powder for a chocolatey twist.
Step-by-Step Instructions
Now that we have our ingredients lined up, let’s start baking these beauties!
Step 1: Preheat Your Oven
Start by preheating your oven to 350°F (175°C). This is a crucial step! An appropriately heated oven ensures your cookies rise beautifully.
Step 2: Mix Your Dry Ingredients
In a medium bowl, whisk together the flour, baking powder, baking soda, pumpkin pie spice, and salt. This little mixture will combine all those dry goods nicely, ensuring they distribute evenly in the cookie dough. Tip: Sift the flour and powdered sugar to avoid any lumps in your cookies or frosting.
Step 3: Cream the Butter and Sugars
In your mixing bowl, add the unsalted butter, granulated sugar, and light brown sugar. Beat with a hand mixer or stand mixer on medium speed until it’s light and fluffy—about 2-3 minutes. This step is where the magic begins! The air you incorporate here will give your cookies that delightful texture.
Step 4: Add Egg, Vanilla, and Pumpkin Purée
Next, add the egg, vanilla extract, and pumpkin puree to the mixture. Mix until everything is well combined, scraping down the sides of the bowl as needed. You’ll love how the pumpkin puree gives it a beautiful color!
Step 5: Gradually Add the Dry Ingredients
Lower the mixer speed and gradually fold in your dry ingredients. Mix just until combined; your batter should be thick and slightly sticky. Chef’s Note: Over-mixing can lead to chewy cookies, which we definitely don’t want.
Step 6: Scoop and Shape the Cookies
Using a cookie scoop (or a tablespoon), drop rounded balls of dough onto parchment-lined baking sheets, leaving enough space between each cookie to allow for spreading. You can sprinkle a little extra pumpkin spice on top of each cookie for a lovely finish before they go into the oven.
Step 7: Bake
Bake in the preheated oven for 10-12 minutes, or until the edges are set but the centers appear soft. Remember, they will continue to cook a bit as they cool. Tip: For a lovely golden edge, keep an eye on your cookies—the dark chocolate color of the pumpkin can make it harder to tell when they’re done.
Step 8: Cool the Cookies
Let them cool on the baking sheet for a few minutes before transferring them to wire racks. This allows them to firm up a little without becoming too hard.
Step 9: Make the Cream Cheese Frosting
In a medium bowl, combine cream cheese, unsalted butter, and vanilla extract. Beat until it’s wonderfully smooth and creamy. Gradually add the confectioners’ sugar, mixing until everything is well combined. If your frosting is too thin, add more sugar until you reach your desired consistency.
Step 10: Frost Those Cookies!
Once the cookies are completely cool, frost each one generously with your cream cheese frosting. You can also pipe it on for a little extra flair!
Serving Suggestions
These pumpkin cookies are lovely on their own, but they can also be paired with a hot cup of chai tea or an aromatic pumpkin spice latte. For an added touch, you can garnish with a sprinkle of pumpkin pie spice or even some toasted pecans for a delightful crunch.
Recipe Variations
- Choco-Pumpkin Delight: Add a sprinkle of chocolate chips into the cookie batter for a deliciously sweet twist!
- Nuts About It: Fold in some finely chopped walnuts or pecans for added texture and richness.
- Spiced Just Right: Swap out the pumpkin pie spice for a chai spice mix for a unique flavor experience!
- Gluten-Free Option: Replace the all-purpose flour with a gluten-free blend to make these cookies suitable for gluten-sensitive friends.
Chef’s Notes
These pumpkin cookies have come a long way since my grandmother’s kitchen. The original recipe was simple, but over the years, I’ve made small tweaks that allow me to showcase seasonal flavors while ensuring they’re easy to whip up for any gathering. There’s nothing like seeing friends and family enjoy a homemade treat, especially when it conjures up such sweet memories.
FAQs and Troubleshooting
1. Why are my cookies flat?
Cookies could flatten due to warm butter or overmixing. Ensure your butter is at room temperature and try to mix just until combined.
2. Can I freeze the dough?
Absolutely! You can scoop the cookie dough onto a baking tray, freeze until solid, then transfer to a freezer bag for up to 2 months. When ready, bake straight from the freezer; just add a couple of extra minutes to the baking time.
3. How do I know when they’re done baking?
The edges will set while the centers may still look soft. A light golden color around the edges is a great indicator that they’re ready!
4. Can I use fresh pumpkin puree instead of canned?
Sure thing! Just make sure to cook and drain any excess moisture from fresh pumpkin before using it in the recipe.
Nutritional Info (Optional)
Caloric value, fat content, sugars, and other nutritional information can be added here depending on the user’s preferences.
So there you have it—my cherished recipe for Pumpkin Cookies with Cream Cheese Frosting! As you whisk and bake your way through this recipe, remember that the best ingredients are the stories and laughter you bring to your kitchen. Whether it’s autumn or a warm evening any other time of the year, these cookies are sure to delight your taste buds and those of everyone gathered around your table. Enjoy baking, and remember—good food isn’t just about what’s on your plate; it’s about the love and joy that comes with it. Happy baking!
PrintThe Ultimate Pumpkin Cookies with Cream Cheese Frosting
Delightful, soft pumpkin cookies topped with luscious cream cheese frosting – a perfect fall treat!
- Prep Time: 15 minutes
- Cook Time: 12 minutes
- Total Time: 27 minutes
- Yield: 24 servings 1x
- Category: Dessert
- Method: Baking
- Cuisine: American
- Diet: Vegetarian
Ingredients
- 2 1/2 cups (312 g) all-purpose flour
- 1 teaspoon baking powder
- 1 teaspoon baking soda
- 1 tablespoon pumpkin pie spice (plus extra for sprinkling)
- 1/2 teaspoon salt
- 3/4 cup (170 g) unsalted butter (room temperature)
- 3/4 cup (150 g) granulated sugar
- 1/2 cup (100 g) packed light brown sugar
- 1 1/4 cups (305 g) canned pumpkin puree
- 1 large egg (room temperature)
- 1 teaspoon pure vanilla extract
- 8 ounces (1 brick or 226 g) block-style cream cheese (softened but still cool)
- 1/4 cup (56 g) unsalted butter (softened but still cool)
- 1 teaspoon pure vanilla extract
- 1 3/4 cups (210 g) confectioners’ sugar (sifted)
Instructions
- Preheat your oven to 350°F (175°C).
- Mix your dry ingredients in a medium bowl.
- Cream the butter and sugars in a mixing bowl until light and fluffy.
- Add the egg, vanilla, and pumpkin puree to the mixture.
- Gradually add the dry ingredients to the wet mixture.
- Scoop rounded balls of dough onto parchment-lined baking sheets.
- Bake for 10-12 minutes or until edges are set.
- Cool the cookies on the baking sheet for a few minutes.
- Make the cream cheese frosting in a medium bowl.
- Frost each cookie generously with the frosting.
Notes
These cookies pair wonderfully with chai tea or pumpkin spice lattes. Try adding nuts or chocolate chips for variation!
Nutrition
- Serving Size: 1 cookie
- Calories: 180
- Sugar: 10g
- Sodium: 150mg
- Fat: 8g
- Saturated Fat: 4g
- Unsaturated Fat: 3g
- Trans Fat: 0g
- Carbohydrates: 24g
- Fiber: 1g
- Protein: 2g
- Cholesterol: 20mg
Keywords: pumpkin cookies, cream cheese frosting, fall dessert, autumn baking
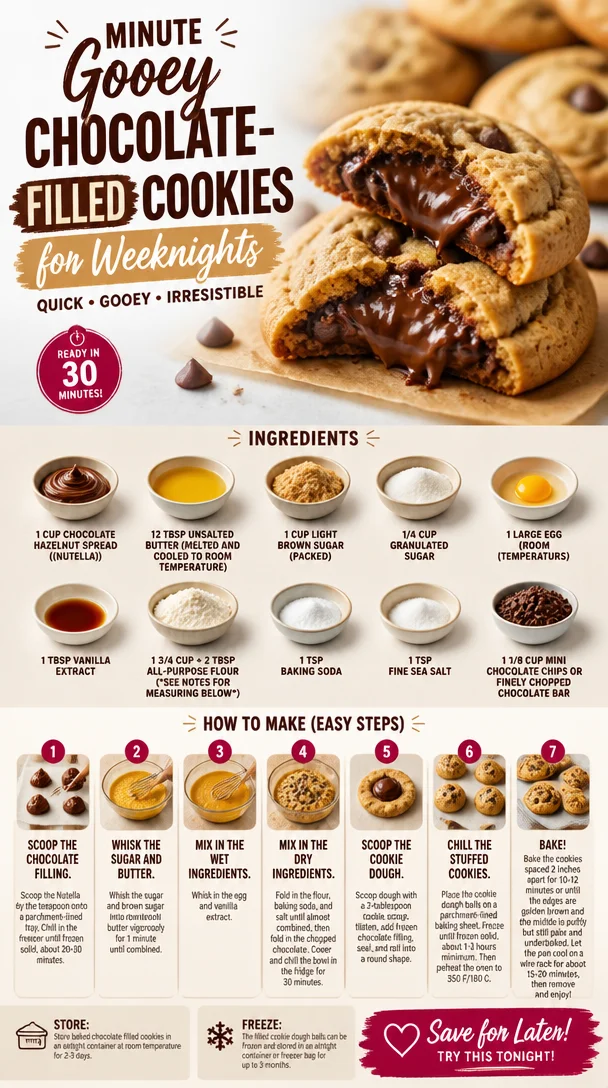
Minute Gooey Chocolate-Filled Cookies for Weeknights
Indulge in Chocolate Heaven: The Ultimate Chocolate Filled Cookies Recipe
Hello, fellow foodies! I’m so excited to have you here today at Ivory Apron, where the kitchen is buzzing with creativity and the air is filled with the sweet aroma of deliciousness. Today, we’re diving into a recipe that produces cookies so good they’ll make you weak in the knees: Chocolate Filled Cookies! These delightful treats are not only filled with smooth chocolate hazelnut goodness but also boast that perfect balance of crispy edges and a gooey center. So, tie on your apron, and let’s get baking!
A Sweet Memory
Every time I whip up a batch of Chocolate Filled Cookies, I can’t help but take a stroll down memory lane. Picture this: a rainy Saturday afternoon, the kind where you’re cozied up inside, and the world outside feels a little grey. My sister and I were tasked with preparing a treat for our family game night, and chocolate was the only requirement on our list. Enter our trusty jar of chocolate hazelnut spread. We slathered it over everything, from toast to spoonfuls straight from the jar (because who can resist, really?).
As we would bake our cookies, the kitchen would fill with laughter, playful arguments over which cookie shape was best, and the dreamy scent of melting chocolate. Those cookies became the highlight of our game nights, bringing our family together surrounded by laughter and love. Now, every time I make these cookies, I’m reminded of how food can create bonds and weave little moments of joy.
Ingredients
Let’s gather our ingredients! Each one plays a crucial role in achieving cookie perfection.
-
1 cup chocolate hazelnut spread (Nutella)
This golden ingredient adds a rich, creamy chocolate flavor. If you’re on the hunt for substitutions, try almond butter or any nutty spread. Just ensure it’s smooth for that dreamy filling! -
12 tbsp unsalted butter (melted and cooled to room temperature)
Butter gives our cookies richness and a tender crumb. If you want to make it dairy-free, coconut oil works like a charm (just solidify it before mixing). -
1 cup light brown sugar (packed)
This sweetener adds depth and moisture to our cookies. If you prefer a less sugary bite, swap with coconut sugar for a healthier sweet fix. -
1/4 cup granulated sugar
For added sweetness and a slight crunch! You can use coconut sugar here as well; it’ll offer a lovely caramel flavor. -
1 large egg (room temperature)
The egg binds everything together. If you’re looking for an eggless version, try replacing it with 1/4 cup unsweetened applesauce. -
1 tbsp vanilla extract
A must-have ingredient that enriches flavors and amplifies the chocolate notes. Homemade vanilla extract? Even better! -
1 3/4 cup + 2 tbsp all-purpose flour
This is the backbone of our cookies. Make sure to spoon and level the flour for accuracy, as too much can lead to dry cookies. For a gluten-free option, oat flour works great! -
1 tsp baking soda
This helps our cookies rise and become light. If you’re out, cream of tartar or baking powder can serve as substitutes, just in different amounts. -
1 tsp fine sea salt
Salt elevates flavors, making the sweetness pop. If you prefer a finer taste, use kosher salt. -
1 1/8 cup mini chocolate chips or finely chopped chocolate bar
These little gems will add delightful pockets of melty chocolate throughout your cookies. You can replace them with white chocolate chips for a fun flavor twist!
Step-by-Step Instructions
Ready to bake? Let’s jump into the nitty-gritty. These steps are designed to make your baking adventure smooth and, dare I say, enjoyable!
-
Preheat the Oven
Preheat your oven to 350°F (175°C). This is the secret to getting those cookies nice and golden. Make sure to preheat for at least 10 minutes for an even bake! -
Prep Your Baking Sheet
Line a baking sheet with parchment paper. This helps prevent sticking and makes cleanup a breeze. If you run out of parchment, you can lightly grease the pan with some butter or cooking spray. -
Mix the Wet Ingredients
In a large bowl, mix the melted butter with chocolate hazelnut spread using a whisk. We’re looking for a homogenized mixture that’s silky smooth. If you find the spread is stubborn, warm it slightly in the microwave to make it easier to combine. Then, add in the brown sugar and granulated sugar. Whisk until well combined. Blend in the egg and vanilla extract until the mixture is glossy and lovely. -
Combine the Dry Ingredients
In another bowl, whisk together the flour, baking soda, and salt. This step is crucial for even distribution of the leavening agents and ensures our cookies bake evenly. Little chef hack: sift the flour directly into the dry mix to eliminate any lumps. -
Merge Wet and Dry
Gradually add the dry mixture into the wet one, stirring gently until just combined. Be careful not to overmix; we want tender cookies, not chewy ones! Fold in the mini chocolate chips or chopped chocolate for those delicious melty pockets. -
Scoop and Chill
Here’s where the magic happens! Using a cookie scoop or two spoons, drop generous tablespoons of dough onto the prepared baking sheet, leaving enough space in between for spreading (about 2 inches apart). Pro tip: For extra flavor, chill the dough in the fridge for 30 minutes—this enhances the cookies’ flavors and helps them hold shape! -
Bake
Bake these beauties in your preheated oven for 10–12 minutes or until the edges are set, and the centers look slightly underbaked (they’ll firm up as they cool). It’s a true test of patience (but you can always sneak a taste while they’re baking!). -
Cool
Allow the cookies to cool on the baking sheet for about 5–10 minutes before transferring them to a wire rack. This helps them retain their chewy center while still crisping up on the outside.
Serving Suggestions
These Chocolate Filled Cookies are best served warm, straight from the oven! Consider stacking them on a beautiful plate, adorned with a dusting of powdered sugar. For an extra touch, drizzle them with melted chocolate or serve them alongside a scoop of vanilla ice cream for a delightful dessert experience. Trust me; your friends will be raving!
Recipe Variations
Why not get a little adventurous with your cookies? Here are some fun variations to try:
-
Nutty Twist: Add chopped nuts like hazelnuts or walnuts for a satisfying crunch.
-
Spicy Kick: Mix in a pinch of cayenne or ground cinnamon for unexpected warmth.
-
Stuffed Surprises: Try filling the cookies with caramel or a tangy fruit jam instead of chocolate hazelnut spread.
-
Dairy-Free Delight: Substitute the butter with vegan butter and use dairy-free chocolate chips for a vegan version.
-
Double Chocolate: Replace a portion of the flour with unsweetened cocoa powder for a more intense chocolate experience.
Chef’s Notes
This recipe has evolved over the years in my kitchen. I remember my early attempts were always a bit too flat (I might have been a little heavy-handed with the flour!). But with practice, these cookies became my go-to treat for any occasion. Whenever I feel the need for a little comfort or just want to impress some guests, I reach for this recipe. Plus, no matter how many times I share it, the joy of seeing friends and family bite into a warm, gooey cookie never gets old!
FAQs and Troubleshooting
Q: Why did my cookies spread too much?
A: Overmixing or not chilling the dough can cause excess spreading. Ensure you mix just until combined and allow the dough to chill for at least 30 minutes.
Q: Can I freeze the cookie dough?
A: Absolutely! Just scoop the dough onto a baking sheet, freeze until solid, then transfer them to a zip-top bag. Frozen dough can be baked directly from the freezer, just add a couple of additional minutes to the baking time.
Q: My cookies came out too dry. What happened?
A: This could be due to the flour measurement. Make sure to spoon and level your flour instead of packing it in! Also, be careful not to overbake; those cookies should have a soft center.
Q: How can I tell when the cookies are done?
A: The edges should be set and slightly golden, while the centers may look a tad underbaked—that’s okay! They’ll continue cooking on the baking sheet after you take them out.
Nutritional Info (Optional)
While I always encourage savoring every bite, here’s a general idea per cookie (this can vary based on ingredient brands):
- Calories: 200
- Total Fat: 10g
- Saturated Fat: 4g
- Carbohydrates: 25g
- Sugars: 14g
- Protein: 2g
Final Thoughts
Making these Chocolate Filled Cookies is more than just baking; it’s about creating moments that matter and sharing joy with those you love. I hope you bring your own memories into the kitchen as you bake these sweet delights. Remember, there’s no perfect cookie—just delicious ones made with intention and love!
Thanks for joining me today at Ivory Apron! May your kitchen be filled with warmth, laughter, and, of course, the aroma of freshly baked cookies. Happy baking, my friends!
PrintChocolate Filled Cookies

Indulge in these delightful Chocolate Filled Cookies, featuring a rich chocolate hazelnut filling surrounded by crispy edges and a gooey center.
- Prep Time: 15 minutes
- Cook Time: 12 minutes
- Total Time: 27 minutes
- Yield: 24 cookies 1x
- Category: Dessert
- Method: Baking
- Cuisine: American
- Diet: Vegetarian
Ingredients
- 1 cup chocolate hazelnut spread (Nutella)
- 12 tbsp unsalted butter (melted and cooled to room temperature)
- 1 cup light brown sugar (packed)
- 1/4 cup granulated sugar
- 1 large egg (room temperature)
- 1 tbsp vanilla extract
- 1 3/4 cup + 2 tbsp all-purpose flour
- 1 tsp baking soda
- 1 tsp fine sea salt
- 1 1/8 cup mini chocolate chips or finely chopped chocolate bar
Instructions
- Preheat your oven to 350°F (175°C) for at least 10 minutes.
- Line a baking sheet with parchment paper.
- Mix the melted butter with chocolate hazelnut spread using a whisk until smooth. Add the brown sugar and granulated sugar; whisk until well combined. Blend in the egg and vanilla extract.
- Whisk together the flour, baking soda, and salt in another bowl.
- Gradually add the dry mixture to the wet mixture, stirring gently until just combined. Fold in the mini chocolate chips.
- Scoop generous tablespoons of dough onto the prepared baking sheet, spacing them about 2 inches apart. Chill in the fridge for 30 minutes.
- Bake for 10–12 minutes until edges are set and centers are slightly underbaked.
- Cool on the baking sheet for 5–10 minutes before transferring to a wire rack.
Notes
For extra flavor, chill the dough before baking. These cookies can be served warm with a dusting of powdered sugar or alongside vanilla ice cream.
Nutrition
- Serving Size: 1 cookie
- Calories: 200
- Sugar: 14g
- Sodium: 200mg
- Fat: 10g
- Saturated Fat: 4g
- Unsaturated Fat: 6g
- Trans Fat: 0g
- Carbohydrates: 25g
- Fiber: 1g
- Protein: 2g
- Cholesterol: 30mg
Keywords: chocolate cookies, dessert, baking, chocolate hazelnut, cookies recipe
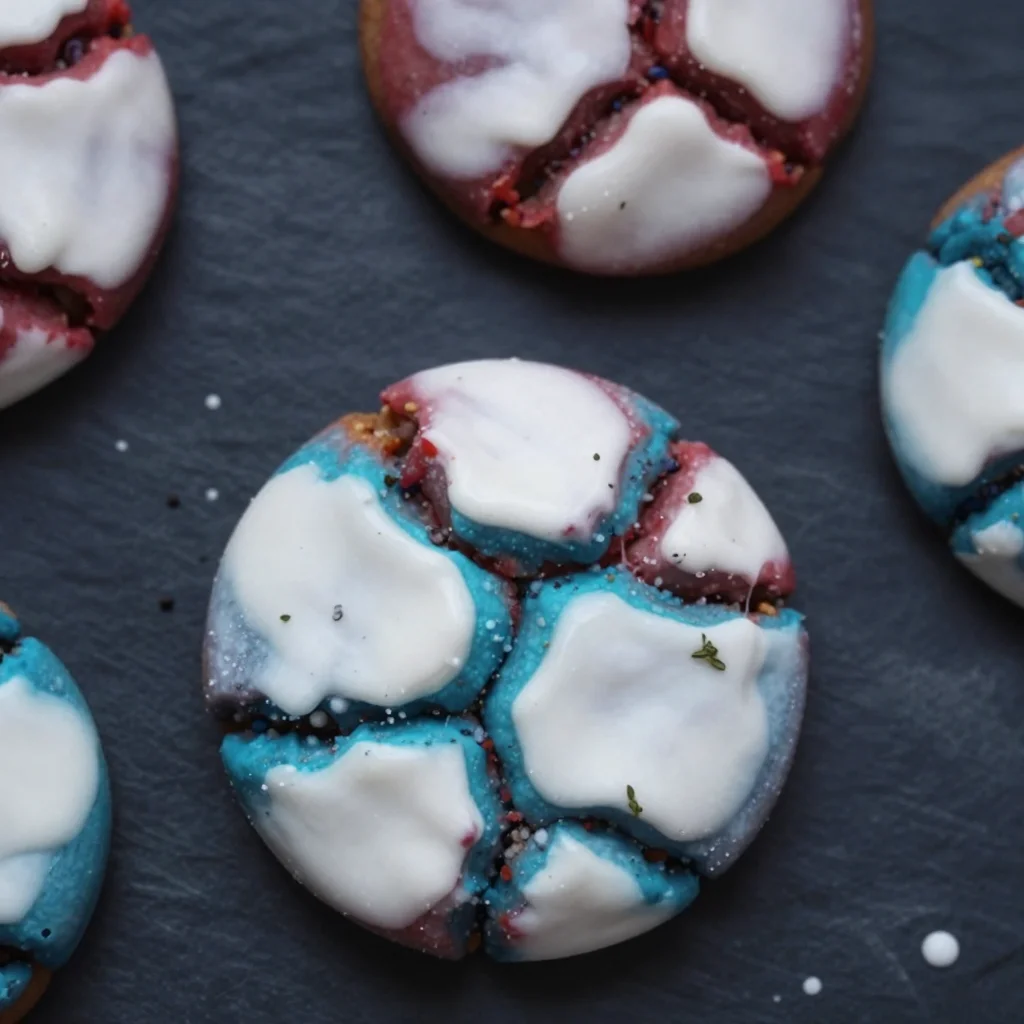
Patriotic Crinkle Cookies: 4th of July Treats in 30 Minutes
Patriotic Crinkle Cookies: A Celebration of Flavor and Fun!
Hello, fellow foodies! 🎉 Today, I’m super excited to share a delightful recipe that’s perfect for any festive gathering, especially those that celebrate our great nation! We’re diving into the world of Patriotic Crinkle Cookies — a whimsical treat that brings a splash of color and loads of flavor to your dessert table. These cookies are not just a feast for the eyes; they’re also incredibly easy to whip up and make a stunning statement at your next barbecue, picnic, or family gathering.
Introduction
Imagine a beautifully sunny day, the sound of laughter filling the air, and the aroma of grilling burgers wafting through the neighborhood. It’s a day to celebrate, to come together with friends and family, and what better way to do that than with some irresistible cookies? Patriotic Crinkle Cookies are not only deliciously chewy and soft but they come dressed up in vibrant red, white, and blue, making them the perfect sweet treat for holidays like the Fourth of July, Memorial Day, or Labor Day celebrations!
What’s great about crinkle cookies is their unique appearance — the way they crack and form lovely fissures as they bake. It’s like they’ve got a story to tell with every bite! They’re also incredibly versatile, allowing you to whip them up with kids or impress even the most discerning cookie lover at your gathering. Trust me when I say, you’ll have people asking for the recipe!
So, grab your apron, preheat that oven, and let’s get cooking! 🎉
Personal Story
As a child, I remember all the excitement that came with holiday celebrations. The sky filled with fireworks, the scent of delicious food wafting from the kitchen, and my mom bustling around, preparing everything to perfection. One of my fondest memories was the first time I helped her bake cookies for a Fourth of July barbecue. We made a simple sugar cookie dough, but with a twist of colors! That day was filled with laughter, flour fights, and the unmistakable joy of creating something scrumptious together.
I loved rolling the dough into balls and watching with glee as they baked, transforming into fluffy bites of happiness. Those cookies became the star of the dessert table, all colorful and crackly, just like our excitement. Fast forward to today, and I still savor that joy with each batch of Patriotic Crinkle Cookies I make, creating new memories while honoring those special times spent in the kitchen.
Ingredients
Let’s get everything you need to create these colorful cookies:
For the Dough:
- 2 cups (240g) all-purpose flour: The foundation of your cookies! All-purpose flour gives the right structure for that soft, chewy texture.
- 2 teaspoons baking powder: This helps your cookies rise and ensures they’re nice and fluffy.
- 1/2 teaspoon salt: Elevates the flavors and balances the sweetness.
- 1/2 cup (113g) unsalted butter, room temperature: Adds richness. If you don’t have unsalted butter, you can use salted butter; just cut back on the added salt.
- 1 cup (200g) granulated sugar: Sweetens the dough and gives that lovely crunch when you coat them in powdered sugar later.
- 2 large eggs, room temperature: Binds everything together. If you need an egg substitute, you can use flax eggs (1 tablespoon flaxseed meal + 2.5 tablespoons water = 1 egg).
- 2 teaspoons vanilla extract: A must for that warm, comforting flavor!
For the Coloring:
- Red gel food coloring: This is what gives our cookies their festive red hue. Gel food coloring is better than liquid because it won’t add extra moisture to the dough.
- Blue gel food coloring: Adds the patriotic pop of blue! Feel free to experiment with other colors for different themes.
For Coating:
- 1 cup (120g) powdered sugar: Creates that delightful, snowy coating that crinkles beautifully as the cookies bake.
Step-by-Step Instructions
Alright, let’s get to it! Here’s how to create these eye-catching cookies just like a pro.
-
Preheat the Oven and Prep: Preheat your oven to 350°F (175°C). Line two baking sheets with parchment paper. This ensures your cookies don’t stick and helps with even baking.
-
Combine the Dry Ingredients: In a medium bowl, whisk together the flour, baking powder, and salt. This combines the ingredients well and gets rid of any lumps. Set aside; we’ll come back to it shortly.
-
Cream the Butter and Sugar: In a large mixing bowl, using a hand mixer or a stand mixer fitted with a paddle attachment, beat the room temperature butter and granulated sugar until the mixture is light and fluffy, about 3-4 minutes. This step is crucial as it incorporates air into the batter, giving your cookies that perfect rise!
-
Add Eggs and Vanilla: Next, add the eggs one at a time, mixing well after each addition. Stir in the vanilla extract. This will create a creamy, smooth batter. A tip here: make sure your eggs are at room temperature for better emulsification!
-
Incorporate the Dry Mix: Slowly add your dry ingredient mixture to the butter mixture; mix until just combined. Overmixing will lead to dense cookies, so stop mixing as soon as you see no dry streaks.
-
Divide and Color: Now, here comes the fun part! Divide the dough equally into three bowls. In one bowl, add red gel food coloring until you reach your desired shade, in the second bowl, add blue gel color. Leave the third bowl plain. This is where the magic happens!
-
Form the Cookie Balls: Using a cookie scoop or your hands, form balls of dough, about 1 tablespoon each. Roll each ball in powdered sugar, ensuring they’re generously coated. This helps create that beautiful crinkled effect while baking.
-
Baking Time: Place the cookie balls onto your prepared baking sheets, arranging them a few inches apart to allow for spreading. Bake in the preheated oven for 10-12 minutes or until they are lightly golden around the edges. They may look underbaked, but they’ll continue to cook slightly on the baking sheet!
-
Cool Down: Allow the cookies to cool on the baking sheets for 5 minutes before transferring them to a wire rack to cool completely. Enjoy the aroma wafting through your kitchen; it’s heavenly!
Serving Suggestions
To serve your Patriotic Crinkle Cookies in style, stack them up on a joyful dessert platter or arrange them in a mason jar tied with a cute ribbon. Garnish with fresh berries or edible flowers for an extra touch of elegance. Pair them with a scoop of vanilla ice cream or serve with cold beverages like lemonade or iced tea for a delightful contrast of flavors.
Recipe Variations
Here are some fun variations to switch things up while keeping that patriotic spirit alive:
- Chocolate Chip Twist: Add a handful of semi-sweet chocolate chips to each dough color for an irresistible chocolatey burst!
- Nuts About It: Fold in chopped pecans or walnuts into the vanilla batter for an extra crunch.
- Sprinkled with Joy: Top each cookie ball with red, white, and blue sprinkles before baking for a festive touch!
- Vegan Option: Substitute butter with vegan butter and use flax eggs for a plant-based version.
- Gluten-Free Delight: Swap all-purpose flour for a 1:1 gluten-free baking blend to cater to gluten-free friends.
Chef’s Notes
Over the years, I’ve played with the original crinkle cookie recipe, experimenting with different flavors and colors. It’s incredible how a little twist can create something extraordinary! One of my favorite kitchen mishaps happened when I grabbed the wrong canister for flour — it was powdered sugar! Thanks to my curiosity, I made an accidental dessert that turned out to be surprisingly delightful! These memorable moments in the kitchen are what make cooking so much fun! It’s about experimenting, learning, and enjoying the process.
FAQs and Troubleshooting
Q1: My cookies turned out flat. What happened?
A1: Flat cookies can occur if your butter was too warm or melted before mixing. Make sure to use room temperature butter, not melted. Also, ensure you’re measuring the flour correctly (spoon and level method) to avoid using too little.
Q2: Can I freeze the dough for later use?
A2: Absolutely! You can freeze the dough balls before baking. Just wrap them tightly in plastic wrap and store in an airtight container for up to 3 months. Just add a couple of extra minutes to the baking time when you’re ready to bake them!
Q3: How can I store these cookies?
A3: Keep your cookies in an airtight container at room temperature for up to a week. If you want to keep them longer, consider freezing them in an airtight container or sealed plastic bag.
Q4: The coating is too thick. What can I do?
A4: If the powdered sugar coating seems excessive, try rolling the cookies a little less or simply brush off the excess sugar after coating. You want a dusting, not a thick layer.
Nutritional Info
(Per cookie, assuming 24 cookies):
- Calories: 110
- Carbs: 15g
- Protein: 1g
- Fat: 5g
- Sugar: 6g
Remember, these are just estimates; it’s always best to calculate your nutritional value based on specific brands and quantities!
And just like that, you’ve created delicious Patriotic Crinkle Cookies that are sure to steal the spotlight at your next gathering! Thanks for joining me in this culinary adventure. I can’t wait to hear how your cookies turn out! Happy baking and let’s keep celebrating with good food and great company! 🍪🎆
PrintPatriotic Crinkle Cookies

Delightful and colorful cookies perfect for celebrating patriotic holidays with a fun twist.
- Prep Time: 15 minutes
- Cook Time: 12 minutes
- Total Time: 27 minutes
- Yield: 24 cookies 1x
- Category: Dessert
- Method: Baking
- Cuisine: American
- Diet: Vegetarian
Ingredients
- 2 cups (240g) all-purpose flour
- 2 teaspoons baking powder
- 1/2 teaspoon salt
- 1/2 cup (113g) unsalted butter, room temperature
- 1 cup (200g) granulated sugar
- 2 large eggs, room temperature
- 2 teaspoons vanilla extract
- Red gel food coloring
- Blue gel food coloring
- 1 cup (120g) powdered sugar
Instructions
- Preheat the oven to 350°F (175°C) and line two baking sheets with parchment paper.
- Combine the flour, baking powder, and salt in a medium bowl and set aside.
- Cream the butter and sugar in a large mixing bowl until light and fluffy, about 3-4 minutes.
- Add the eggs one at a time, mixing well, then stir in the vanilla extract.
- Incorporate the dry mixture to the butter mixture until just combined.
- Divide the dough into three bowls, coloring one red, one blue, and leaving one plain.
- Form balls of dough, about 1 tablespoon each, and roll in powdered sugar.
- Bake for 10-12 minutes or until lightly golden around the edges.
- Cool on the baking sheets for 5 minutes before transferring to a wire rack to cool completely.
Notes
For variations, consider adding chocolate chips or nuts. The dough can be frozen for later use.
Nutrition
- Serving Size: 1 cookie
- Calories: 110
- Sugar: 6g
- Sodium: 50mg
- Fat: 5g
- Saturated Fat: 3g
- Unsaturated Fat: 2g
- Trans Fat: 0g
- Carbohydrates: 15g
- Fiber: 0g
- Protein: 1g
- Cholesterol: 20mg
Keywords: cookies, patriotic cookies, Fourth of July, dessert, baking
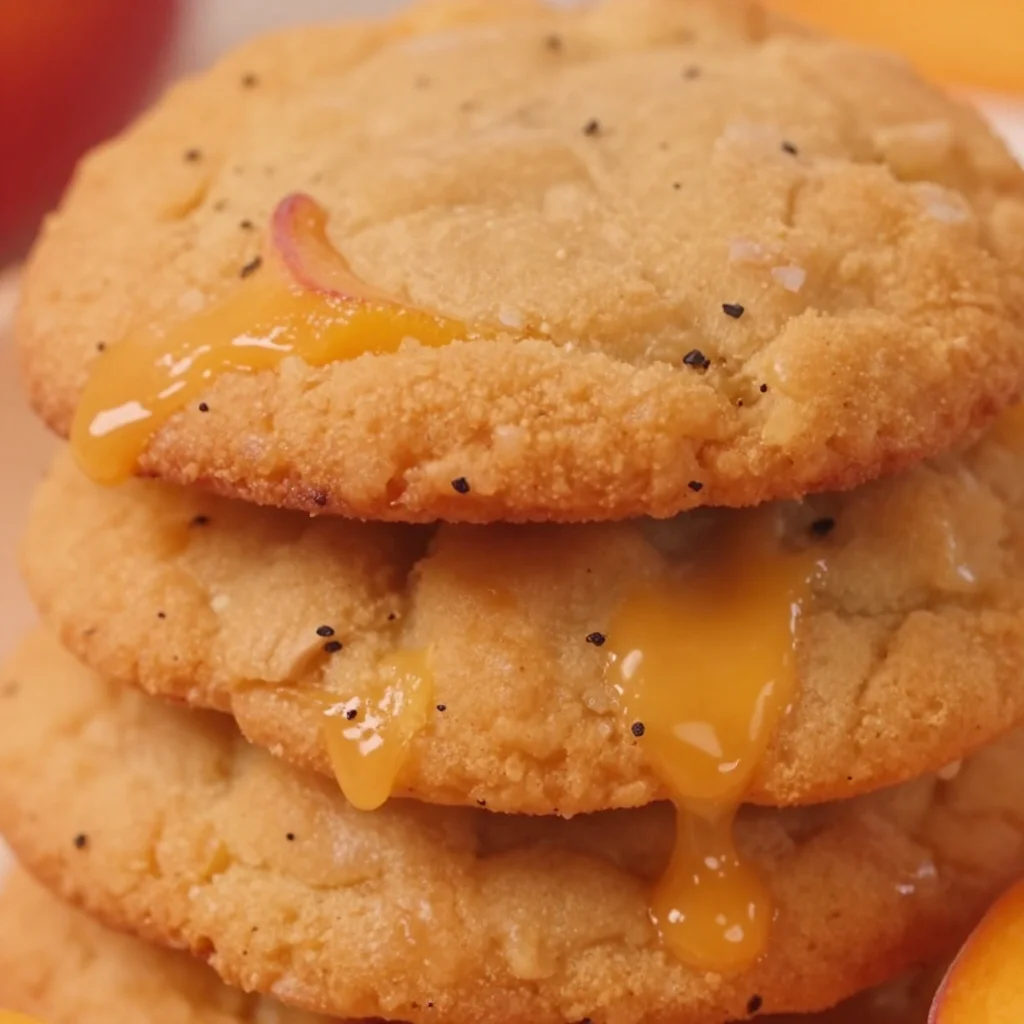
Peach Cookies
The Sweetest Peach Cookies: A Taste of Summer
Hello, dear food lovers! Today, we’re diving into a deliciously unique treat that brings a burst of summer to your kitchen — Peach Cookies! If you’re like me, you have a sweet spot (pun absolutely intended) for all things peachy. Whether you relish a juicy slice eaten right over the sink or revel in peach cobbler, there’s magic in the flavor of this succulent fruit, and these cookies are no exception!
Imagine a warm afternoon, the scent of freshly baked cookies wafting through the air, and the laughter of friends gathered around your table. There’s something so delightful about sharing baked goods with the people you love. And that’s exactly the vibe I want to achieve with these Peach Cookies! They’re inviting, mildly sweet, and just perfect for any occasion. So, grab your apron, and let’s get baking!
My Peachy Memory
Let me take you back to my childhood, a time when summer meant my grandmother’s backyard, a large wooden picnic table, and the sweetest, juiciest peaches you can imagine. Every summer, my family would gather for our annual peach-picking adventure. We’d arrive at the orchard, sun hats on, laughter filling the air, and carts ready to be filled. I can still picture my grandmother, a basket in one hand, a peach in the other, proclaiming that you couldn’t find a better peach than the ones right from the tree!
Once our baskets were filled to the brim, we’d head home, and that’s where the magic happened. Grandma would whip up her famous peach cobbler, but she always kept a secret stash of fresh peaches for her cookies. Those peach cookies were a staple at every family gathering, and they quickly became my favorite treat. The memories of those hot summer days, mingled with the sweet aroma of cookies baking in the oven, are forever etched in my heart. Now, I can’t help but recreate those moments, blending nostalgia with new culinary adventures.
Ingredients to Get You Started
To make these delightful Peach Cookies, you’ll need the following ingredients:
-
2 1/8 cups all-purpose flour: This is your base ingredient. For a gluten-free option, try using almond flour or a 1:1 gluten-free flour blend.
-
3/4 teaspoon salt: Just a pinch of salt enhances the sweetness and balances the flavors.
-
1/2 teaspoon baking soda: This will help your cookies rise perfectly. Don’t skip it!
-
1/2 cup unsalted butter (softened): The creaminess from butter gives the cookies their rich flavor. If you want to cut back on dairy, coconut oil can work well!
-
1/2 cup granulated sugar: This will keep your cookies sweet and give them a delightful crunch.
-
1/2 cup firmly packed light brown sugar: Brown sugar adds depth and moisture. If you don’t have it, you can substitute with more granulated sugar, but the flavor won’t be as rich.
-
1 large egg: This is essential for binding the ingredients together. For a vegan version, use a flax egg (1 tablespoon ground flaxseed mixed with 2.5 tablespoons water).
-
1/2 teaspoon vanilla extract: Vanilla brings out the sweetness and enhances the peach flavor.
-
2 large ripe peaches (peeled, pitted, and cut into 1/4-inch pieces; about 1 to 1 1/2 cups): Fresh peaches are the star of this recipe! If peaches are out of season, you can use canned peaches, just drain them well.
-
1/3 cup peach preserves: This adds a lovely sweetness and texture. You can substitute with apricot or raspberry preserves for a twist.
-
3 tablespoons sanding sugar: Use this for a sparkly finish on your cookies. Turbinado sugar works too!
-
1/4 teaspoon ground cinnamon: A hint of cinnamon elevates the overall flavor. If you’re a cinnamon lover, feel free to add more!
Step-by-Step Instructions
Now that we have our ingredients laid out, let’s get cooking! Here’s how to craft these Peach Cookies from scratch:
-
Preheat Your Oven: Start by preheating your oven to 350°F (175°C). This little step is essential for successful baking!
-
Prepare Your Baking Sheet: Line a baking sheet with parchment paper. This prevents the cookies from sticking and makes cleanup a breeze.
-
Mix Dry Ingredients: In a medium bowl, whisk together the all-purpose flour, salt, baking soda, and ground cinnamon until well combined. The simple act of whisking aerates the flour, making for lighter cookies!
-
Cream Butter and Sugars: In a large mixing bowl, beat the softened butter, granulated sugar, and brown sugar together until the mixture is light and fluffy (about 3–4 minutes). This is where the magic begins — it’s all about that air incorporated into the butter!
-
Add Egg and Vanilla: Next, add the egg and vanilla extract to the butter mixture. Beat until fully combined. Don’t rush this part; it’s key to creating that creamy texture!
-
Combine Wet and Dry Ingredients: Gradually add the dry ingredients to the wet ingredients. Mix until just combined; overmixing can lead to tough cookies.
-
Fold in Peaches and Preserves: Gently fold in the peach pieces and peach preserves. Watching those luscious chunks of peach tumble into the dough is part of the fun!
-
Scoop and Shape: Using a cookie scoop or tablespoon, drop rounds of dough onto the prepared baking sheet, leaving space between each cookie. Sprinkle a little sanding sugar on top for that extra sparkle!
-
Bake: Pop your baking sheet into the preheated oven and bake for 10–12 minutes, or until the edges are lightly golden. The center may look a little soft, but don’t worry! They will firm up as they cool.
-
Cool and Serve: After baking, let the cookies cool on the sheet for a few minutes before transferring them to a wire rack to cool completely.
Serving Suggestions
These Peach Cookies are delightful on their own, but if you want to elevate the experience, serve them warm alongside a scoop of vanilla ice cream. Trust me, there’s something magical about the combination of warm cookies and cold ice cream that creates a little party in your mouth! You can also drizzle them with honey or a light glaze for extra sweetness!
Recipe Variations
Here are a few fun twists you can try with this recipe:
-
Berry Peach Fusion: Add 1/2 cup of diced strawberries or blueberries to the peach mixture for a mixed berry version.
-
Nuts for Peaches: Incorporate chopped pecans or walnuts for some crunch.
-
Herbal Peach Twist: Add a teaspoon of fresh mint or basil to the dough for a refreshing herbaceous note.
-
Spicy Peaches: Want a zesty kick? Mix in a sprinkle of cayenne pepper with your dry ingredients for a sweet-and-spicy combo!
-
Vegan Delight: Utilize a flax egg in place of the regular egg, and switch the butter for coconut oil for a fantastic vegan treat.
Chef’s Notes
Creating these cookies has been a delightful journey for me. I often think about the time my kitchen became a mini peach paradise, with sticky fingers and laughter filling the air. And I remember the time I accidentally added too much cinnamon — I was worried my cookies would taste like Christmas rather than summer. But guess what? They turned out to be a surprising hit, and now, sometimes I throw in a bit extra just for fun! It’s all about experimenting and letting your kitchen adventures unfold.
FAQs and Troubleshooting
1. My cookies spread too much! What did I do wrong?
- If your cookies spread too much, it could be due to too warm butter or not enough flour. Make sure your butter is softened but not melted and be sure to measure your flour accurately.
2. Can I use frozen peaches?
- Yes! You can use frozen peaches. Just make sure to thaw them and drain any excess moisture before folding them into the dough.
3. My cookies burned on the bottom! How can I prevent that?
- Always check your oven’s temperature with an oven thermometer; it could be running hotter than the dial reads. Also, if your baking sheet isn’t insulated, consider placing it on top of another baking sheet.
4. Can I make the dough ahead of time?
- Absolutely! You can prepare the dough, wrap it well, and store it in the refrigerator for up to 2 days — just make sure to let it sit at room temperature for a bit before scooping and baking.
Nutritional Info (per cookie, estimated)
- Calories: 150
- Total Fat: 7g
- Saturated Fat: 4g
- Cholesterol: 20mg
- Sodium: 90mg
- Total Carbohydrates: 21g
- Dietary Fiber: 1g
- Sugars: 9g
- Protein: 2g
With that, your Peach Cookies are ready! I hope you enjoy these as much as I do. There’s nothing quite like a home-baked treat to sweeten up your day, and sharing them with your loved ones makes it all the more special. Now, wipe your hands, tie that apron string a little tighter, and let’s create more timeless moments in the kitchen together! Happy baking! 🍑✨
PrintSweet Peach Cookies

Delicious and inviting peach cookies that bring a taste of summer to any occasion.
- Prep Time: 15 minutes
- Cook Time: 12 minutes
- Total Time: 27 minutes
- Yield: 24 cookies 1x
- Category: Dessert
- Method: Baking
- Cuisine: American
- Diet: Vegetarian
Ingredients
- 2 1/8 cups all-purpose flour
- 3/4 teaspoon salt
- 1/2 teaspoon baking soda
- 1/2 cup unsalted butter (softened)
- 1/2 cup granulated sugar
- 1/2 cup firmly packed light brown sugar
- 1 large egg
- 1/2 teaspoon vanilla extract
- 2 large ripe peaches (peeled, pitted, and cut into 1/4-inch pieces)
- 1/3 cup peach preserves
- 3 tablespoons sanding sugar
- 1/4 teaspoon ground cinnamon
Instructions
- Preheat your oven to 350°F (175°C).
- Prepare a baking sheet lined with parchment paper.
- Mix together the flour, salt, baking soda, and cinnamon in a medium bowl.
- Cream the butter, granulated sugar, and brown sugar until light and fluffy.
- Add the egg and vanilla extract; mix until combined.
- Combine the dry ingredients with the wet ingredients until just combined.
- Fold in the peaches and peach preserves.
- Scoop rounds of dough onto the prepared baking sheet, spacing them apart.
- Bake for 10-12 minutes or until edges are lightly golden.
- Cool on the baking sheet for a few minutes before transferring to a wire rack.
Notes
Serve warm with a scoop of vanilla ice cream for an extra treat!
Nutrition
- Serving Size: 1 cookie
- Calories: 150
- Sugar: 9g
- Sodium: 90mg
- Fat: 7g
- Saturated Fat: 4g
- Unsaturated Fat: 2g
- Trans Fat: 0g
- Carbohydrates: 21g
- Fiber: 1g
- Protein: 2g
- Cholesterol: 20mg
Keywords: peach cookies, summer dessert, baking