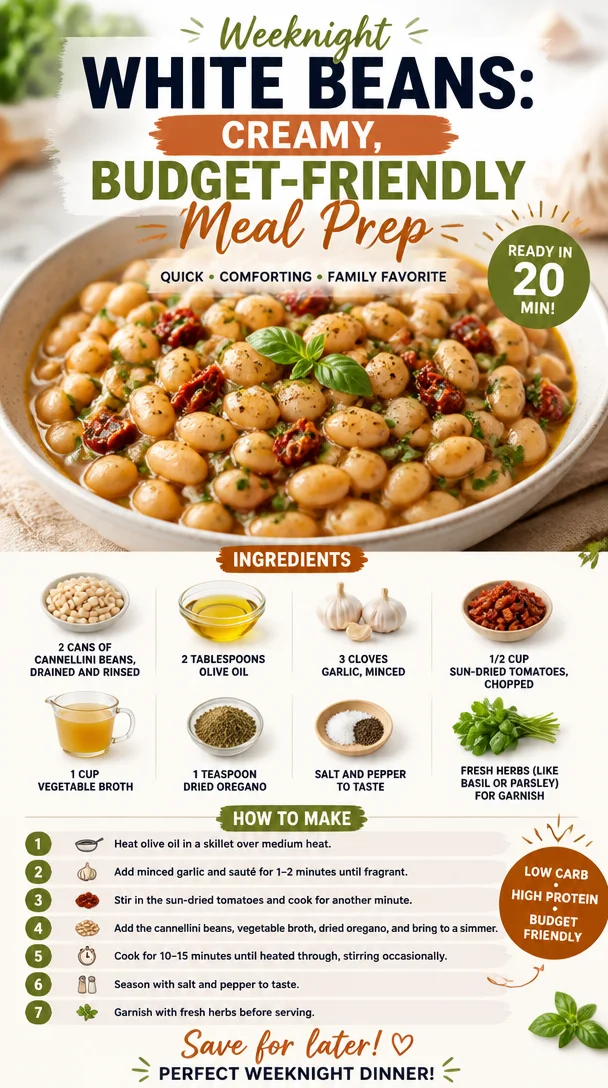
Weeknight White Beans: Creamy, Budget-Friendly Meal Prep
Marry Me White Beans: A Recipe Worth a Proposal
Welcome back, fellow food lovers! Today I am excited to share a dish that not only warms the heart but also has a way of creeping its way into conversations about love and commitment. Yes, you guessed it—today we’re diving into the irresistible, luscious world of Marry Me White Beans. This dish is inspired by my own kitchen adventures, and I promise it’s a game changer, whether you’re trying to impress a date or just craving a comforting bowl of goodness on a chilly afternoon.
A Cozy Love Story in a Bowl
Let me take you back to a summer night, a time filled with laughter, twinkling fairy lights, and the intoxicating scent of garlic wafting through the air. It was one of those dinner parties where friends turned into family, and we all gathered around the table, sharing stories, bold flavors, and a dash of whimsy.
That evening, I decided to experiment with what I had on hand—cannellini beans, sun-dried tomatoes, and an assortment of fresh herbs from my patio garden. Little did I know that this haphazard concoction would spark a culinary love story that would soon spread beyond my kitchen. Each bite was met with “Mmm”s and “Oh wow!”s, and by the end of the meal, a dear friend declared, “If food could propose, these white beans would marry me!”
From that night forward, Marry Me White Beans officially entered the culinary hall of fame in my circle—a dish that not only satisfies the palate but also makes memories that linger long after the plates are cleared. Now it’s time for you to create your own love affair with this dish!
Ingredients
Let’s gather the stars of our flavorful show:
-
2 cans of cannellini beans, drained and rinsed
These creamy beans are buttery and delicate—perfect for soaking up all the lovely flavors we’ll create. If you’re looking for a substitution, navy beans or great northern beans work wonderfully as well! -
2 tablespoons olive oil
A staple in any kitchen, olive oil adds richness. If you’re on a health kick, feel free to swap in avocado oil—it’s just as delightful! -
3 cloves garlic, minced
Garlic is the heart of this dish, imparting aromatics that are simply enchanting. Don’t skimp on it! For those who enjoy a milder flavor, roasted garlic is a fantastic alternative. -
1/2 cup sun-dried tomatoes, chopped
These little gems bring a burst of concentrated flavor and color. If you can’t find them, fresh tomatoes can be used—just add them a bit earlier during the cooking process to let their juices infuse the dish! -
1 cup vegetable broth
A must for added depth and richness. Chicken broth is also a fine choice if you’re not catering to strict vegetarians. Want to make your own? Just simmer a medley of veggies for a lovely homemade option! -
1 teaspoon dried oregano
This herb introduces warmth and earthiness. If you’re feeling adventurous, try substituting it with Italian seasoning for a more complex flavor profile. -
Salt and pepper to taste
Essential for balancing and bringing out all the flavors—adjust according to your preference! -
Fresh herbs (like basil or parsley) for garnish
Finishing with fresh herbs elevates every dish. You could also use chives or even arugula for a peppery twist!
Step-by-Step Instructions
Now that we have our ingredients ready, let’s get cooking! Follow along closely, and I promise you’ll have everyone swooning over your culinary magic.
-
Prep Your Kitchen: Start by gathering all your ingredients and utensils. This way, you’ll be organized and ready to roll. Have a pot, cutting board, knife, and a wooden spoon on hand.
-
Sauté the Garlic: In a medium-sized pot, heat the olive oil over medium heat. Once it shimmers, add the minced garlic and sauté for about 1-2 minutes until it becomes fragrant but not brown. Chef’s Tip: Keep stirring to prevent burning! We want sweet, aromatic garlic, not bitter.
-
Add Sun-Dried Tomatoes: Toss in the chopped sun-dried tomatoes. Cook for another 2 minutes, allowing their essence to blend beautifully with the garlic. Here’s a fun fact—sun-dried tomatoes can soak up a lot of flavor, making them a fantastic addition to various dishes!
-
Gently Fold in Cannellini Beans: Next, add the drained and rinsed cannellini beans to the pot. Use your wooden spoon to fold them in gently, careful not to mash the beans. We want them whole for texture!
-
Pour in the Broth: Time to add the vegetable broth! Pour it in and give everything a good stir. Bring the mixture to a gentle simmer and let it bubble away for about 10 minutes. This allows the beans to absorb all those beautiful flavors. Little Chef Hack: Taste the broth as it simmers; if you feel it needs more seasoning, don’t hesitate to sprinkle in a pinch of salt or pepper!
-
Season with Oregano: After 10 minutes, sprinkle in the dried oregano. Give everything one final stir! Let it simmer for another 5 minutes so that the flavors can deepen beautifully.
-
Finish with Fresh Herbs: Before serving, taste one last time to adjust the seasoning. Once satisfied, remove the pot from the heat and stir in fresh herbs for that final flourish.
And voilà! Your Marry Me White Beans are ready for their moment in the spotlight!
Serving Suggestions
Serve these lovely beans in warm bowls, drizzled with a touch of extra virgin olive oil for that finishing touch. A generous sprinkle of freshly chopped basil or parsley not only looks beautiful but adds a pop of freshness that will make your heart sing. Pair your beans with crusty bread for that added comfort, or serve them over a bed of fluffy rice for a heartier meal.
Recipe Variations
Feeling adventurous? Here are some creative twists on the original recipe:
-
Spicy Kick: Add a pinch of red pepper flakes while sautéing the garlic for a delightful kick. Perfect for those who like a little heat!
-
Lemon Zest: Brighten the dish with a touch of fresh lemon zest added just before serving. It’ll elevate the flavors to a whole new level.
-
Creamy Addition: For a richer dish, stir in a spoonful of cream or a dollop of ricotta cheese just before serving.
-
Protein Boost: Toss in some cooked sausage or shredded chicken for added protein and heartiness.
-
Herb Swap: Experiment with different fresh herbs based on what you have, such as dill or cilantro, for a unique twist!
Chef’s Notes
You know, Marry Me White Beans has become a staple in my go-to repertoire. Each time I make it, I’m reminded of that fun summer evening filled with laughter and love. It always brings my friends and family together, reminding me that food truly has a magical ability to create connections. It’s fascinating how an experiment in the kitchen can spawn a dish that resonates so deeply with people. It’s these moments that inspire me to keep cooking, creating, and sharing with all of you.
Oh, and just a heads up: while this dish is creamy and comforting, it thickens quite nicely as it cools. So if you happen to have leftovers (if that’s possible!), add a splash of water or broth when reheating for that perfect consistency.
FAQs and Troubleshooting
1. Can I use dried beans instead of canned?
Absolutely! If you prefer to use dried beans, soak and cook them ahead of time according to package instructions. About 2 cups of cooked beans will work perfectly in this recipe.
2. The dish seems too thick; how can I fix it?
If your beans turned out thicker than desired, simply add a bit more vegetable broth or water while reheating to achieve your preferred consistency.
3. I don’t like sun-dried tomatoes; what can I substitute?
No worries! You can use roasted peppers, fresh tomatoes, or even sautéed mushrooms for depth and flavor.
4. How do I store leftovers?
Store any leftover beans in an airtight container in the fridge for up to 4 days. They also freeze well if you want to save some for later!
Nutritional Info
While the main focus of this dish is the love and joy it brings to your table, here’s a quick nutritional scoop:
- Calories: Approximately 230-250 calories per serving
- Protein: 12g
- Carbohydrates: 34g
- Fat: 7g
- Fiber: 8g
Whether you’re celebrating a newfound romance or cherishing a delicious meal solo, Marry Me White Beans is sure to become a beloved dish in your home. So, tie on that apron and get cooking; love is just a spoonful away! Happy cooking!
PrintMarry Me White Beans
A heartwarming dish featuring creamy cannellini beans, sun-dried tomatoes, and fresh herbs, perfect for impressing a date or enjoying on a cozy afternoon.
- Prep Time: 10 minutes
- Cook Time: 20 minutes
- Total Time: 30 minutes
- Yield: 4 servings 1x
- Category: Main Course
- Method: Stovetop
- Cuisine: Italian
- Diet: Vegetarian
Ingredients
- 2 cans of cannellini beans, drained and rinsed
- 2 tablespoons olive oil
- 3 cloves garlic, minced
- 1/2 cup sun-dried tomatoes, chopped
- 1 cup vegetable broth
- 1 teaspoon dried oregano
- Salt and pepper to taste
- Fresh herbs (like basil or parsley) for garnish
Instructions
- Prep your kitchen: Start by gathering all your ingredients and utensils.
- Sauté the garlic: In a medium-sized pot, heat the olive oil over medium heat. Add minced garlic and sauté for about 1-2 minutes until fragrant.
- Add sun-dried tomatoes: Toss in the chopped sun-dried tomatoes and cook for another 2 minutes.
- Gently fold in cannellini beans: Add the drained and rinsed beans to the pot and fold them in gently.
- Pour in the broth: Add the vegetable broth and bring the mixture to a gentle simmer for about 10 minutes.
- Season with oregano: After 10 minutes, sprinkle in the dried oregano and let it simmer for another 5 minutes.
- Finish with fresh herbs: Taste and adjust seasoning; then stir in fresh herbs before serving.
Notes
This dish thickens as it cools, so add a splash of water or broth when reheating to maintain consistency.
Nutrition
- Serving Size: 1 serving
- Calories: 250
- Sugar: 4g
- Sodium: 350mg
- Fat: 9g
- Saturated Fat: 1g
- Unsaturated Fat: 6g
- Trans Fat: 0g
- Carbohydrates: 34g
- Fiber: 8g
- Protein: 12g
- Cholesterol: 0mg
Keywords: white beans, casseroles, vegetarian, comforting, easy recipe
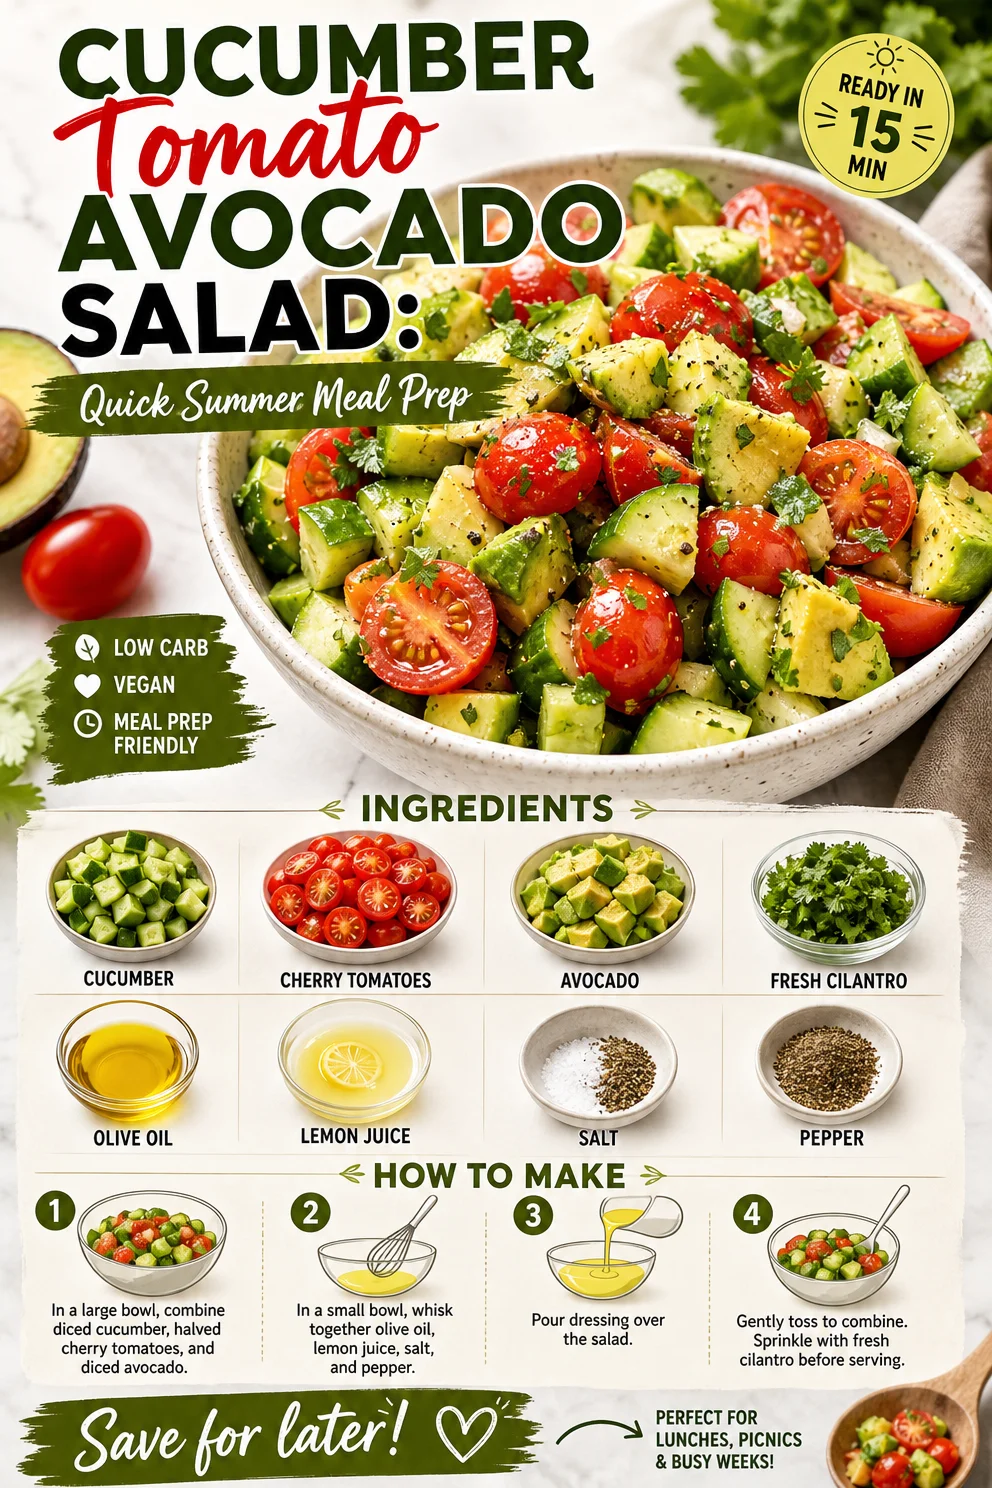
Cucumber Tomato Avocado Salad: Quick Summer Meal Prep
The Ultimate Cucumber Tomato Avocado Salad: Fresh, Flavorful, and Fabulous!
Hello, food lovers! Welcome back to Ivory Apron! Today, we’re diving into a dish that truly captures the essence of summer — the refreshing Cucumber Tomato Avocado Salad! This vibrant salad is a burst of colors and flavors, perfect for any occasion, whether you’re hosting friends, having a family barbecue, or enjoying a cozy dinner at home.
Ah, salads—often overlooked yet deserving of love! This particular salad is a canvas where fresh ingredients shine, bringing out the best in one another. It’s incredibly simple yet bursting with flavor, and the best part? You can whip it up in no time! Trust me; this salad will soon become a staple in your kitchen repertoire. So, grab your apron, and let’s get started on this delightful culinary journey together!
A Memorable Summer Day
Before we get into the nitty-gritty of the recipe, let me share a personal story that perfectly captures the joy of this dish. A few summers ago, I hosted a gathering for some of my closest friends. We talked, laughed, and shared stories while standing outside under twinkling fairy lights, the scent of fresh herbs dancing in the air. As we enjoyed grilled kebabs sizzling on the barbecue, I served this Cucumber Tomato Avocado Salad as the refreshing counterpart.
The colorful salad complemented the smoky flavors from the grill perfectly! I remember one of my friends taking a bite and exclaiming, “This tastes like summer in a bowl!” We all couldn’t help but agree as we marveled at how something so simple could be so delicious. Moments like these remind me why I started Ivory Apron: to create spaces where people can connect over good food and shared experiences.
Ingredients: What You’ll Need
Now, let’s gather our ingredients. Here’s what you’ll need to create this refreshing salad, along with some insights and substitution tips:
-
1 cucumber, diced
Choose a firm cucumber without any soft spots for the best crunch. If you’re feeling adventurous, try a Persian cucumber for a sweeter flavor! -
1 cup cherry tomatoes, halved
Look for vibrant, juicy tomatoes. Grape tomatoes work well too, and you can even mix different colors for a more eye-catching dish. -
1 avocado, diced
Opt for a ripe avocado (it should give slightly when pressed). If you’re not planning to serve the salad right away, you can add the avocado just before serving to prevent browning! -
1/4 cup fresh cilantro, chopped
This adds a fresh zing! If cilantro isn’t your thing, feel free to substitute with parsley or basil for a different flavor. -
2 tablespoons olive oil
Extra virgin olive oil adds depth. If you prefer, avocado oil is a fantastic substitute for a more neutral flavor. -
2 tablespoons lemon juice
Fresh is always best! The acidity brightens the salad. If lemons are scarce, lime juice does the trick, too! -
Salt and pepper to taste
A simple seasoning, but don’t skip it! It enhances all the flavors. You can also finish with a sprinkle of sea salt for a bit of crunch.
Step-by-Step Instructions: Let’s Get Cooking!
Now onto the fun part! Here’s how to make your Cucumber Tomato Avocado Salad in just a few simple steps:
-
Prep Your Ingredients
Start by washing all your veggies under cold water. This not only freshens them up but also helps remove any residual dirt. As you’re washing, think about the flavors and textures you love; prepping is the foundation of good cooking! -
Dice the Cucumber
Take your cucumber and cut both ends off. Slice it in half lengthwise, then dice it into bite-sized pieces. If you enjoy a bit of texture, leaving the skin on adds a wonderfully crunchy contrast! -
Halve the Cherry Tomatoes
Grab your cherry tomatoes and slice them in half. This not only makes them easier to eat but also allows their juices to mingle beautifully with the other ingredients. Pro tip: if you layer them cut-side up in your serving dish, it looks stunning! -
Dice the Avocado Carefully
Cut the avocado in half, removing the pit with a swift twist of your knife (careful not to cut yourself!). Scoop the flesh out with a spoon and dice it in the shell before transferring it to a bowl. This method saves you from mashing it up while getting perfect cubes! -
Chop Fresh Cilantro
Take your freshly washed cilantro and chop it finely. If you love the flavor, add a little extra! Just remember, a little goes a long way—balancing the herbaceousness with the other fresh ingredients is key! -
Combine the Salad
In a large bowl, combine all your prepped vegetables. This is where the fun begins! Toss them gently to ensure everything is well distributed without mashing the avocado. -
Dress the Salad
Drizzle the olive oil and lemon juice over the salad. Season generously with salt and pepper. This is your moment to dress it up! Toss everything gently but thoroughly to ensure the dressing coats every ingredient like a warm hug. -
Taste and Adjust
Before serving, give it a taste! If it needs a little more salt or a extra squeeze of lemon, now’s the time to polish it to perfection. Remember, cooking is all about adjustments! -
Chill if You Have Time
If you can, pop the salad in the fridge for 15-20 minutes before serving. It gives the flavors a chance to meld, making every bite a burst of bright freshness.
Serving Suggestions: How to Plate It Up
When it comes to presenting your salad, remember: a little goes a long way! Serve your Cucumber Tomato Avocado Salad in a beautiful serving bowl, or for individual servings, layer it neatly on plates. Drizzle a bit of extra olive oil on top and a squeeze of lemon on the finished dish for that extra touch. You can also sprinkle a few whole cilantro leaves or pomegranate seeds on top for a pop of color. Remember, we eat with our eyes first!
Recipe Variations: Get Creative!
Feeling adventurous? Here are some fun variations to try with this Cucumber Tomato Avocado Salad:
- Add Protein: Toss in some chickpeas, crumbled feta, or grilled shrimp for a heartier version.
- Spice It Up: Try adding diced jalapeños or a sprinkle of chili flakes for a kick!
- Make It a Grain Bowl: Serve the salad over a bed of quinoa or farro for a filling meal.
- Herb Swap: Experiment with different herbs like dill or mint for a completely new flavor profile.
- Zesty Twist: Instead of lemon, try lime juice or even a splash of apple cider vinegar for a tangy finish!
Chef’s Notes: A Reflection
This salad has been a staple in my kitchen for quite some time now. It started as a simple side dish but evolved into a main event over the years! I love how adaptable it is—every season offers a new opportunity to change up the ingredients depending on what’s fresh and available. I’ve even made a version with grilled peaches in the summer, and it was a game-changer!
Another fond memory is making this dish with my grandmother, who always insisted on adding a pinch of sugar to the dressing to balance the acidity. It’s a small tip that stuck with me, ensuring every salad feels rounded out.
FAQs and Troubleshooting
-
What if my avocado is too firm to dice?
If your avocado isn’t ripe enough, try placing it in a brown paper bag at room temperature for a day or so. This helps speed up the ripening process! If you’re in a hurry, just prepare the salad without it and add it just before serving. -
Can I make this salad ahead of time?
To maintain freshness, it’s best to prepare this salad just before serving. If you do need to prep ahead, you can chop all the vegetables and store them separately in the fridge. Mix them with the dressing right before you’re ready to serve! -
How can I store leftovers?
Store any leftovers in an airtight container in the fridge for 1-2 days. Just keep in mind that the avocado may brown a bit, so it’s best enjoyed fresh! -
Can I add other vegetables?
Absolutely! Feel free to throw in other favorites like bell peppers, radishes, or even corn for added sweetness and crunch.
Nutritional Info
While exact nutritional values can vary, this salad is packed with vitamins and minerals. It’s low in calories while providing healthy fats from the avocado and plenty of fiber from the veggies. It’s a great option to enjoy guilt-free!
So there you have it, my friends! Your very own Cucumber Tomato Avocado Salad, ready to brighten up any table. Remember, cooking is about sharing and enjoying the process. So, tie on that apron, gather your loved ones, and let this salad be a delicious centerpiece for your next meal!
Happy cooking, and I can’t wait to hear about your culinary adventures! Let’s create some beautiful moments together around the table!
PrintCucumber Tomato Avocado Salad
A refreshing and colorful salad ideal for summer gatherings, made with diced cucumber, cherry tomatoes, avocado, cilantro, and a light dressing.
- Prep Time: 15 minutes
- Cook Time: 0 minutes
- Total Time: 15 minutes
- Yield: 4 servings 1x
- Category: Salad
- Method: No Cooking
- Cuisine: American
- Diet: Vegetarian
Ingredients
- 1 cucumber, diced
- 1 cup cherry tomatoes, halved
- 1 avocado, diced
- 1/4 cup fresh cilantro, chopped
- 2 tablespoons olive oil
- 2 tablespoons lemon juice
- Salt and pepper to taste
Instructions
- Prep your ingredients by washing all veggies under cold water.
- Dice the cucumber into bite-sized pieces.
- Halve the cherry tomatoes.
- Dice the avocado carefully.
- Chop the fresh cilantro.
- Combine all your prepped vegetables in a large bowl.
- Dress the salad with olive oil and lemon juice, then season.
- Taste and adjust the seasoning if necessary.
- Chill in the fridge for 15-20 minutes if time allows.
Notes
Serve in a beautiful bowl and drizzle with extra olive oil for a finishing touch.
Nutrition
- Serving Size: 1 serving
- Calories: 180
- Sugar: 3g
- Sodium: 100mg
- Fat: 15g
- Saturated Fat: 2g
- Unsaturated Fat: 10g
- Trans Fat: 0g
- Carbohydrates: 10g
- Fiber: 5g
- Protein: 3g
- Cholesterol: 0mg
Keywords: salad, cucumber, avocado, summer dish, healthy recipe
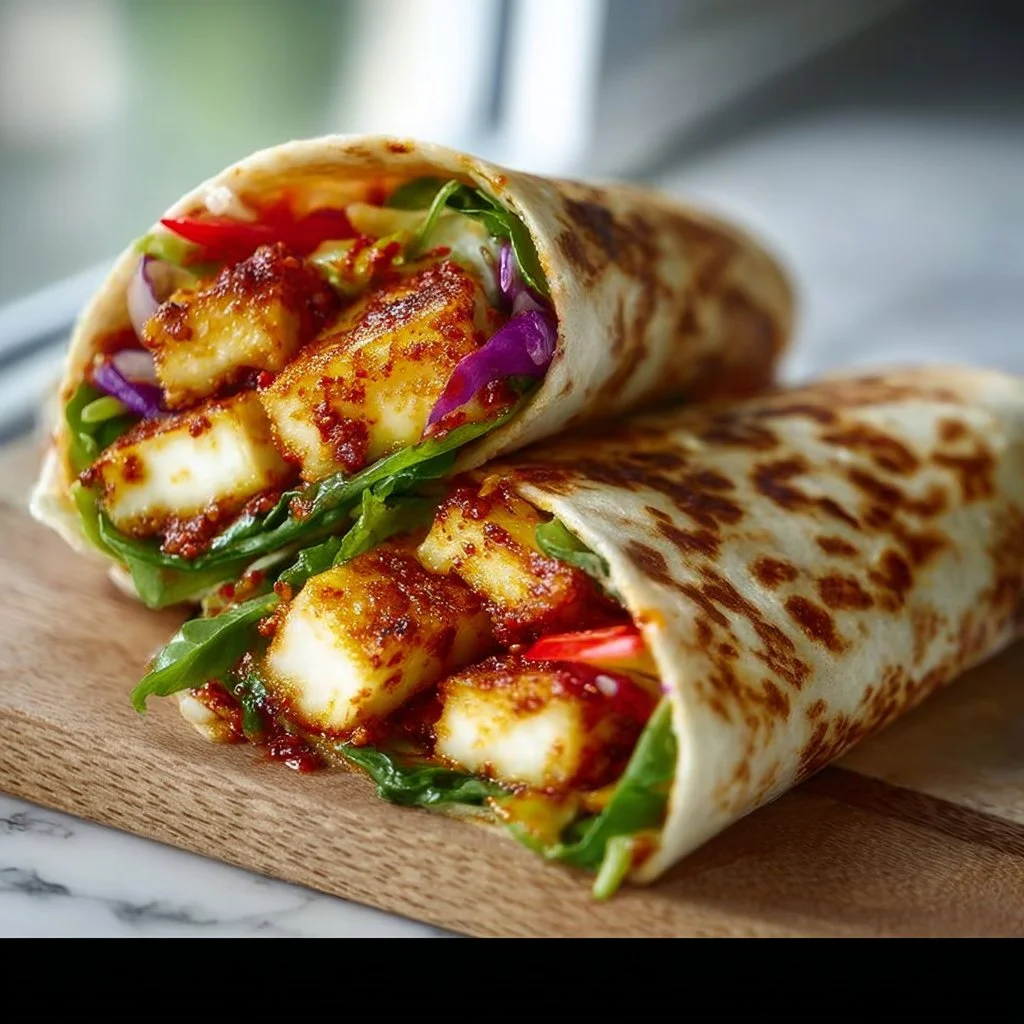
Sweet Chili Halloumi Wraps | Easy Vegetarian Lunch
Sweet Chili Halloumi Wraps: Your New Favorite Easy Vegetarian Lunch
Hello there, fellow food lovers! Today, I’m so excited to share a dish that’s become a regular in my lunch rotation — Sweet Chili Halloumi Wraps. They’re quick to prepare, visually delightful, and—most importantly—absolutely delicious. Whether you’re looking for a light meal, a satisfying lunch, or a fun way to use up vegetables in your fridge, these wraps have got you covered!
Gathering Around the Table with Sweet Chili Halloumi
Before we dive into the recipe, let me share a delightful little story from my kitchen. Many years ago, I was hosting my first ever dinner party—filled with excitement and, admittedly, a little anxiety. As the clock ticked down, I felt determined to impress my friends. I had planned an elaborate menu, but you know what? It was the simpler dishes that stole the show! My friend Lily brought over some grilled halloumi and tossed it with sweet chili sauce, fresh veggies, and soft tortillas. I can still hear the laughter and the sound of wraps being filled, rolled, and devoured around my dining table.
We devoured those wraps and shared memories, which made the food taste even better! That evening inspired me to create my own version of these wraps, and sweet chili halloumi has since become a staple in my kitchen, a dish that reminds me to keep things simple and focused on good ingredients and great company.
Ingredients You’ll Need
Let’s get ready to make some delicious Sweet Chili Halloumi Wraps! Here’s what you’ll need:
-
8 oz halloumi cheese (sliced ½-inch thick)
- Chef Insight: Halloumi is a semi-hard cheese made from sheep’s milk (or a mixture of goat and sheep), known for its superb grilling qualities. If you don’t have halloumi, try using feta for a crumble over the wrap after grilling.
-
2–4 tortilla wraps (flour, flatbread, or gluten-free)
- Substitution Tips: Use your favorite type of wrap! If you want a gluten-free option, look for brown rice or corn tortillas.
-
1 red bell pepper (thinly sliced)
- Quick Tip: The sweetness of the red bell pepper pairs perfectly with the saltiness of the halloumi. Feel free to swap it for a yellow or orange pepper for a sweeter touch.
-
1 cucumber (julienned)
- Chef Insight: Cucumber adds a refreshing crunch. If you want an extra zing, try pickled cucumbers!
-
½ red onion (thinly sliced)
- Substitution Tips: Red onion adds beautiful color and flavor. If it’s too strong for your taste, go with green onions or the milder white onion.
-
1–2 lettuce leaves
- Quick Tip: Crisp greens like romaine or butterhead add a fresh contrast; they’re not just a garnish!
-
3 tablespoons sweet chili sauce
- Tips: You can find sweet chili sauce in the international aisle of your grocery store. For an extra kick, sprinkle in some crushed red pepper flakes!
-
1 tablespoon olive oil
- Chef Insight: A drizzle of good olive oil enhances the flavor of your cheese when grilling.
-
Optional toppings:
- Avocado (sliced): Adds creaminess and healthy fats.
- Fresh herbs (like cilantro or parsley): Brightens up the dish.
- Pickled vegetables: For a delicious tang!
Step-by-Step Instructions
Now that we have everything prepped, it’s time to get cooking! Here’s how to make your Sweet Chili Halloumi Wraps.
-
Prepare Your Ingredients
- Start by slicing your halloumi, bell pepper, cucumber, and red onion. Spend a moment to admire those vibrant colors—it’s going to make your wraps visually stunning!
-
Grill the Halloumi
- Heat a non-stick skillet over medium heat and add the olive oil.
- Once hot, place the halloumi slices in the skillet. Let them grill for about 2-3 minutes on each side, or until they develop a beautiful golden-brown crust. Chef Hack: If you have a grill pan or an actual grill, go for it! The charred flavor is unbeatable.
-
Combine the Sweet Chili Sauce
- While the halloumi cooks, in a small bowl, mix your sweet chili sauce with a splash of water to ease the pourability—this makes it easier to drizzle over later.
-
Warm Up the Tortillas
- In a separate, dry skillet, lightly warm the tortillas to make them pliable. Just a minute on each side does the trick. Tip: Wrap them in a clean kitchen towel to keep them warm.
-
Assemble Your Wraps
- On each tortilla, layer some greens along with grilled halloumi, red bell pepper slices, julienned cucumbers, and red onion.
- Drizzle your sweet chili sauce generously over the top. If you’re adding avocado or herbs, now’s the time!
-
Wrap It Up
- Fold in the sides of the tortilla and then roll it up tightly from the bottom. Make sure all those beautiful fillings stay tucked in. Tip: Use a toothpick to hold it all together for serving or cut them in half for easy eating!
Serving Suggestions
To plate your Sweet Chili Halloumi Wraps, slice them in half diagonally and arrange them on a colorful platter. Serve with a side of extra sweet chili sauce for dipping and perhaps a light salad to balance the meal. Pro tip: A sprinkle of sesame seeds or a few fresh herbs on top can elevate the presentation beautifully.
Recipe Variations
-
Spicy Twist: Add sliced jalapeños for an extra kick or mix Sriracha into your sweet chili sauce!
-
Mediterranean: Swap halloumi for grilled eggplant or zucchini; add olives and feta cheese for that Mediterranean flare.
-
Crunchy Add-In: Toss in some shredded carrots or a handful of sunflower seeds for additional crunch.
-
Breakfast Wrap: Add scrambled eggs or a fried egg on top of the fillings for a satisfying breakfast option.
Chef’s Notes
I can’t tell you how many times I’ve switched up ingredients or adaptively responded to what I had in my fridge. I remember one day, I wanted to make these wraps but realized I was out of halloumi. Panic? Not quite! I used tofu instead; I marinated it in sweet chili sauce and then grilled it to achieve some beautiful caramelization. Sometimes the best recipes emerge from improvisation!
Never hesitate to play around with this dish. Cooking is all about exploration, and I promise you’ll find your own perfect combo!
FAQs and Troubleshooting
1. Why is my halloumi sticking to the pan?
- Make sure your skillet is hot enough and well-oiled before adding your cheese. A non-stick skillet works best for grill cheese!
2. Can I make this ahead of time?
- Absolutely! You can prepare individual components the night before, but I suggest assembling the wraps right before serving for the freshest taste.
3. What if my wraps fall apart?
- If it’s too full, gently squeeze your wraps together to seal them up while eating! Or, use larger tortillas to hold all those fillings.
4. What can I do with leftovers?
- Try tossing the fillings into a salad the next day for a refreshing lunch or make a halloumi bowl with rice or quinoa!
Nutritional Info
This dish is a great source of protein from the halloumi and offers a healthy dose of fresh veggies! Each wrap packs a flavorful punch while providing some satiety from the cheese and crunch from the vegetables.
Conclusion: Time to Celebrate
Ready to embark on your journey with these delightful Sweet Chili Halloumi Wraps? Embrace the vibrant flavors and colorful ingredients while sharing with loved ones. Tie on that apron, tune into your favorite playlist, and cook joyfully—you’ve got this, and I’m excited for you! Let’s keep the kitchen the heart of the home, where delicious meals come to life and nourish both body and spirit.
Happy cooking, my friend—let’s create something magical together!
PrintSweet Chili Halloumi Wraps

Delicious and quick Sweet Chili Halloumi Wraps made with grilled halloumi, fresh vegetables, and a kick of sweet chili sauce.
- Prep Time: 15 minutes
- Cook Time: 10 minutes
- Total Time: 25 minutes
- Yield: 4 servings 1x
- Category: Main Course
- Method: Grilling
- Cuisine: Mediterranean
- Diet: Vegetarian
Ingredients
- 8 oz halloumi cheese (sliced ½-inch thick)
- 2–4 tortilla wraps (flour, flatbread, or gluten-free)
- 1 red bell pepper (thinly sliced)
- 1 cucumber (julienned)
- ½ red onion (thinly sliced)
- 1–2 lettuce leaves
- 3 tablespoons sweet chili sauce
- 1 tablespoon olive oil
- Optional toppings: Avocado (sliced), Fresh herbs (like cilantro or parsley), Pickled vegetables
Instructions
- Prepare Your Ingredients: Start by slicing your halloumi, bell pepper, cucumber, and red onion.
- Grill the Halloumi: Heat a non-stick skillet over medium heat and add the olive oil. Once hot, place the halloumi slices in the skillet and grill for 2-3 minutes on each side.
- Combine the Sweet Chili Sauce: In a small bowl, mix your sweet chili sauce with a splash of water.
- Warm Up the Tortillas: In a separate, dry skillet, lightly warm the tortillas to make them pliable.
- Assemble Your Wraps: On each tortilla, layer some greens along with grilled halloumi, red bell pepper slices, julienned cucumbers, and red onion. Drizzle with the sweet chili sauce.
- Wrap It Up: Fold in the sides of the tortilla and roll it up tightly from the bottom.
Notes
Feel free to customize the toppings and variations according to your taste; this recipe is versatile!
Nutrition
- Serving Size: 1 wrap
- Calories: 400
- Sugar: 6g
- Sodium: 600mg
- Fat: 18g
- Saturated Fat: 7g
- Unsaturated Fat: 9g
- Trans Fat: 0g
- Carbohydrates: 42g
- Fiber: 4g
- Protein: 18g
- Cholesterol: 30mg
Keywords: sweet chili, halloumi, wraps, vegetarian lunch, quick meal, grilling
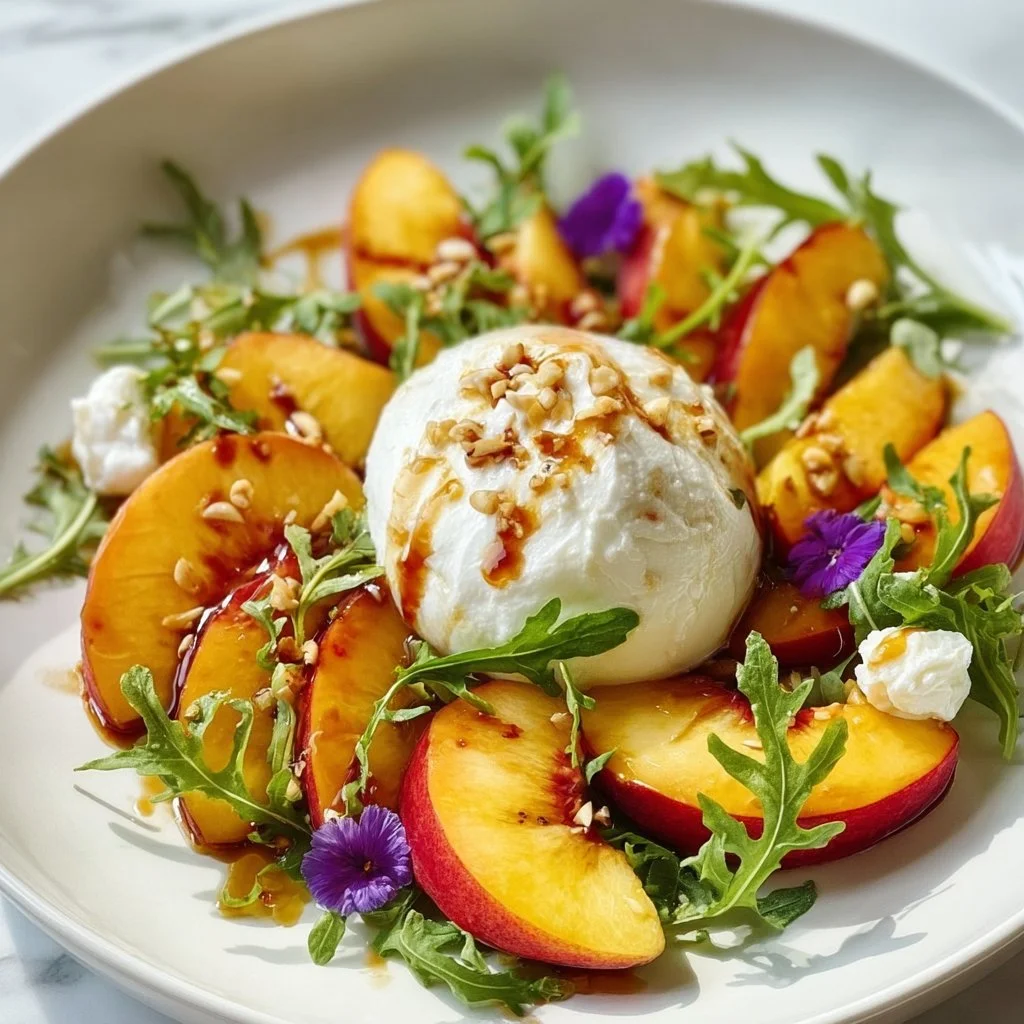
Peach Burrata Salad
A Summer Delight: Peach Burrata Salad Recipe
Hello, lovely food lovers! Today, we’re diving into a dish that beautifully captures the essence of summer—the Peach Burrata Salad. This is not just a salad; it’s a celebration of vibrant flavors and textures that dance together to create something truly special. If you’re ready to impress your guests or simply treat yourself to a delightful meal, grab those aprons and let’s get cooking!
Introduction
There’s just something magical about peaches in the summer. Their sweet, juicy goodness brings a burst of sunshine to any dish. And when combined with the creamy decadence of burrata, you’ve got a match made in culinary heaven! This Peach Burrata Salad is a feast for the senses—visually stunning, texturally pleasing, and oh-so-delicious. It’s perfect for a light summer lunch, a fancy dinner party, or even as a side for your next barbecue.
Imagine biting into a perfectly ripe peach, followed by the luscious creaminess of burrata melting in your mouth, complemented by the peppery bite of arugula and the crunch of toasted almonds. It’s a delight that will leave your taste buds dancing!
As I reflect on my cooking journey, I’m reminded of those sun-kissed summer days spent gathering around the table with family and friends, enjoying nature’s bounty. Each bite of this salad is a reminder of those warm days, moments filled with laughter, and the joy of sharing meals. So, let’s get started, and I’ll walk you through how to create this delightful dish that’s sure to become a summertime favorite!
Personal Story
I’ll never forget the first time I tasted a peach burrata salad. It was on a warm July afternoon at a friend’s garden party, the sun filtering through the leaves of the trees above. We sat at a long table draped in a linen cloth, and the air buzzed with laughter and the smell of grilled veggies. My friend served this stunning salad as a starter, and I was immediately taken by its beauty.
The juicy peaches gleamed under the sun, and the burrata looked almost like a cloud on the plate. One bite, and I was hooked! The harmonious blend of flavors was so delightful that I knew I had to recreate it in my own kitchen. Little did I know back then that it would soon become a staple on my summer menus. It’s funny how certain dishes can transport you back to a moment in time, isn’t it? That first experience fuels my passion for cooking even more, inspiring me to share this recipe with you all.
Ingredients
Here’s what you’ll need to whip up this incredible Peach Burrata Salad:
-
Fresh Burrata Cheese
- The star of the show! Burrata is creamy and rich, offering that perfect melt-in-your-mouth texture. If you can’t find burrata, fresh mozzarella works as a great substitute—just look for the soft kind that oozes a little when you slice into it.
-
Ripe Peaches
- Go for juicy, peachy perfection! In-season peaches are sweet and flavorful. If you can’t find peaches, nectarines can serve as a fantastic alternative—they provide a similar flavor and texture.
-
Arugula
- This peppery green adds a layer of complexity to the dish. If arugula isn’t your thing, feel free to swap in baby spinach or mixed greens for a milder taste.
-
Sliced Almonds
- These add a lovely crunch and nuttiness. You can toast them for an extra depth of flavor, or substitute with walnuts or pecans for a different nutty profile.
-
Balsamic Glaze
- A drizzle of balsamic glaze ties everything together with its sweet and tangy notes. If you don’t have glaze, a splash of balsamic vinegar will work too; just consider adding a touch of honey to mimic the sweetness of the glaze.
-
Olive Oil
- A quality olive oil enhances the salad with its rich flavor. Use extra virgin for the best results!
-
Salt and Pepper
- These simple seasonings elevate all the flavors in your dish. Freshly cracked black pepper is best, and don’t shy away from a pinch of sea salt.
Now that we have our ingredients ready, let’s move on to the fun part—cooking!
Step-by-Step Instructions
-
Prep the Ingredients:
- Start by washing and drying your fresh produce. Slice your peaches into wedges, making sure to remove the pit. If they’re ripe enough, they should slice easily. Set them aside!
- Tear your burrata gently into smaller pieces, letting it rest on a plate. This will make it easier to distribute throughout the salad.
-
Toast the Almonds:
- In a dry skillet over medium heat, add the sliced almonds. Toast them for about 2-3 minutes until they’re golden brown and fragrant. Keep an eye on them; nuts can go from beautifully toasted to burnt in seconds! Once toasted, remove them from the pan and set aside to cool.
-
Assemble the Base:
- Grab a large serving platter or individual plates if you prefer to serve them separately. Begin by laying down a generous handful of arugula as your base. Its peppery taste will contrast beautifully with the sweetness of the peaches.
-
Add the Peaches:
- Arrange the peach slices aesthetically over the arugula. Play around with the layout—this is your edible artwork!
-
Layer on the Burrata:
- Now it’s time to place the burrata. Nestle the creamy pieces throughout the salad. The burrata should look like fluffy clouds on a beautiful summer day.
-
Drizzle with Olive Oil and Balsamic Glaze:
- Take your extra virgin olive oil and drizzle it generously over the salad, followed by the balsamic glaze. Aim for an even coating; this will enhance each bite!
-
Season to Perfection:
- Finally, sprinkle a pinch of salt and freshly cracked black pepper over the entire salad. This step is crucial for bringing out the flavors of the ingredients.
-
Add the Crunch:
- Toss those toasted almonds on top for that satisfying crunch! They’ll add texture and a nutty flavor that perfectly complements the creaminess of the burrata and the sweetness of the peaches.
-
Serve Immediately:
- This salad is best enjoyed fresh. Serve it immediately to savor the glorious combination of flavors!
Serving Suggestions
To plate, serve your salad in a large bowl or on individual plates for a more elegant presentation. Finish with a final drizzle of balsamic glaze and a light sprinkle of salt. If you want to take it up a notch, consider pairing your Peach Burrata Salad with a crisp white wine, like a Sauvignon Blanc, which will perfectly complement the flavors of this dish.
Recipe Variations
This Peach Burrata Salad is incredibly versatile! Here are a few creative twists you can try:
-
Herb Infusion: Add fresh basil or mint for a fragrant touch. This pair wonderfully with the peaches and enhance the freshness of the salad.
-
Add Some Protein: Grilled chicken or shrimp can turn this salad into a heartier meal. Just season your protein well and grill it before slicing it and adding to your salad.
-
Stone Fruit Medley: Play with different fruits! Substitute peaches with plums, apricots, or cherries for a delightful flavor surprise.
-
Vegan Version: Swap burrata for extra-firm tofu marinated in a balsamic reduction to maintain the creamy texture without the cheese.
-
Spicy Kick: Add a touch of chili flakes or slices of jalapeño for a spicy kick that melds beautifully with the sweet and creamy elements.
Chef’s Notes
This Peach Burrata Salad is one of those recipes that’s simple yet profound in flavor. What I love most about it is how it evolves with the seasons. In the fall, I might swap the peaches for roasted butternut squash or apples. As for the burrata, I’ve tried adding a sprinkle of truffle oil on special occasions, which really elevates the whole experience. Cooking should be an adventure—don’t be afraid to make this salad your own!
And let me tell you a little kitchen story—once, I attempted to make this salad for a picnic and accidentally brought balsamic vinegar instead of glaze. I panicked when I realized this at the park! But guess what? It still turned out delicious! Sometimes, mistakes lead to unexpected flavor discoveries, and that’s the beauty of cooking.
FAQs and Troubleshooting
1. The peaches aren’t sweet enough. What can I do?
- If your peaches aren’t as sweet as you’d hoped, consider drizzling a little honey over them to enhance their sweetness.
2. What if I can’t find burrata?
- No worries! Fresh mozzarella or even ricotta can work as substitutes. Just aim for a creamy texture to balance the salad.
3. Can I make this salad ahead of time?
- To maintain freshness, I recommend assembling it just before serving. Prep the ingredients in advance and toss them together when you’re ready!
4. What’s the best way to store leftovers?
- If you have any leftovers, store the salad components separately in airtight containers. Combine when you’re ready to enjoy again, but keep in mind that the textures may vary a bit after refrigeration.
Nutritional Info
For those keeping an eye on their nutritional intake, this salad is packed with nutrients! Each serving provides a good source of vitamins A and C, healthy fats from the olive oil and almonds, and protein from the burrata. The fresh produce also contributes fiber, making it a light yet satisfying option.
And there you have it—my delightful Peach Burrata Salad recipe! I hope you enjoy making it as much as I do. It’s a dish that brings together the beauty of seasonal ingredients and perfect for sharing with loved ones. Happy cooking! 🍑✨
PrintPeach Burrata Salad

A vibrant summer salad featuring ripe peaches, creamy burrata, peppery arugula, and toasted almonds drizzled with balsamic glaze.
- Prep Time: 15 minutes
- Cook Time: 5 minutes
- Total Time: 20 minutes
- Yield: 4 servings 1x
- Category: Salad
- Method: No Cooking
- Cuisine: American
- Diet: Vegetarian
Ingredients
- 8 oz Fresh Burrata Cheese
- 2 Ripe Peaches, sliced
- 4 cups Arugula
- 1/2 cup Sliced Almonds
- 2 tbsp Balsamic Glaze
- 2 tbsp Olive Oil
- Salt and Pepper to taste
Instructions
- Prep the ingredients: Wash and dry your fresh produce. Slice your peaches into wedges, removing the pit. Tear the burrata into smaller pieces.
- Toast the almonds: In a dry skillet over medium heat, toast the sliced almonds for 2-3 minutes until golden brown.
- Assemble the base: Lay down a generous handful of arugula on a serving platter.
- Add the peaches: Arrange the peach slices aesthetically over the arugula.
- Layer on the burrata: Place the burrata pieces throughout the salad.
- Drizzle with olive oil and balsamic glaze.
- Season to perfection: Sprinkle salt and freshly cracked black pepper over the salad.
- Add the crunch: Toss the toasted almonds on top.
- Serve immediately to enjoy fresh.
Notes
This salad is best enjoyed fresh. Consider pairing with a crisp white wine like Sauvignon Blanc.
Nutrition
- Serving Size: 1 serving
- Calories: 300
- Sugar: 10g
- Sodium: 200mg
- Fat: 18g
- Saturated Fat: 5g
- Unsaturated Fat: 10g
- Trans Fat: 0g
- Carbohydrates: 30g
- Fiber: 4g
- Protein: 8g
- Cholesterol: 25mg
Keywords: peach salad, burrata salad, summer salad, vegetarian salad, healthy salad
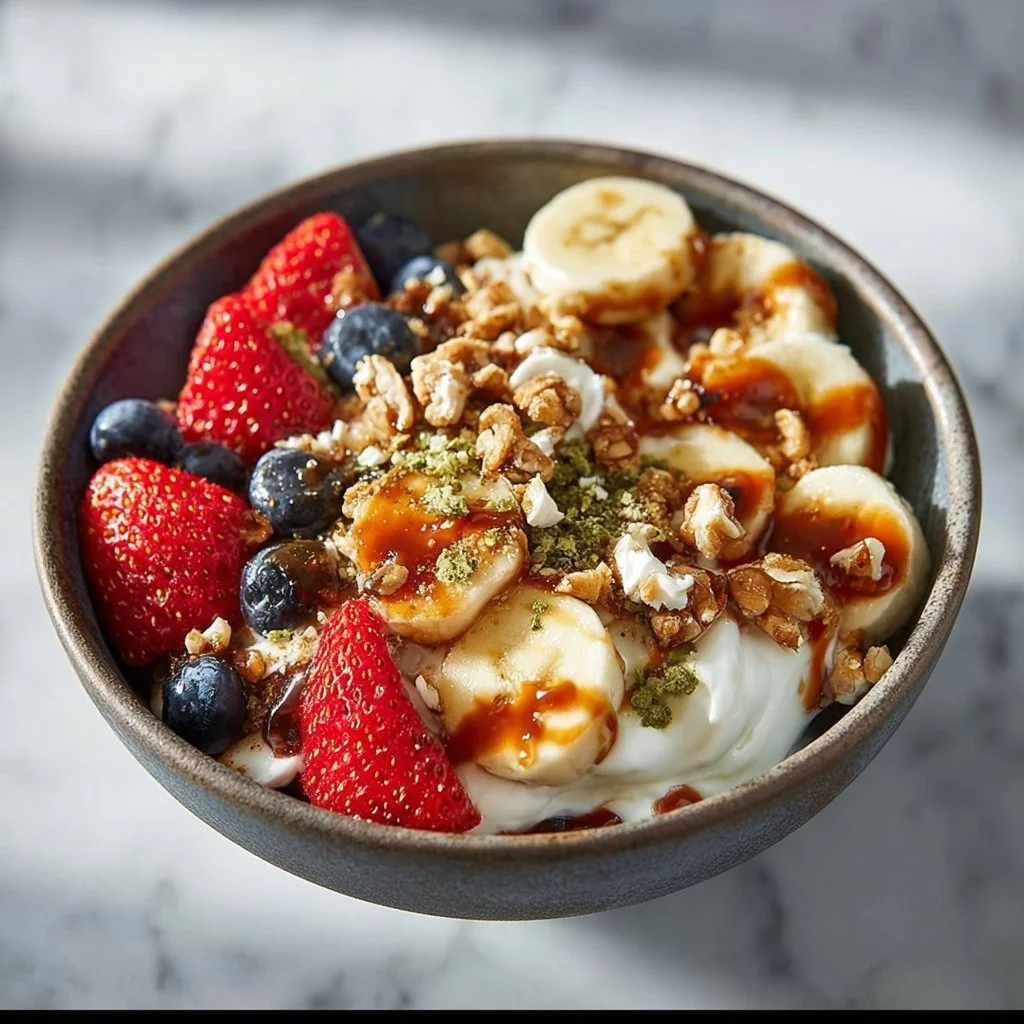
Hearty Breakfast Power Bowl
Hearty Breakfast Power Bowl: A Vibrant Start to Your Day!
Hey there! I’m so excited to share one of my favorite ways to kick off the day with you—a Hearty Breakfast Power Bowl! This isn’t just any breakfast; it’s a colorful, nutrient-packed mélange of flavors and textures that will fuel you for whatever the day throws at you. You know those mornings when you wake up feeling like you need something extra to jump-start your energy? Well, this bowl is my secret weapon.
Imagine starting your morning with a delightful blend of fluffy eggs, vibrant veggies, creamy Greek yogurt, and a medley of fresh berries. It’s like a party in a bowl! The beauty of this dish lies in its versatility—whether you’re whipping it up on a leisurely weekend or prepping it for a hectic weekday, it’s your canvas to create.
I also love that you can tailor this breakfast to suit your mood or whatever ingredients you have on hand. Are you craving a little crunch? Toss in some nuts! Want a hint of sweetness? Drizzle on some honey or maple syrup! This bowl screams “you” and is perfect for gathering around the table with loved ones or just treating yourself to a well-deserved breakfast.
So, grab your apron, and let’s dive into this wholesome journey. Trust me, once you try this Hearty Breakfast Power Bowl, you’ll want to bring it into your regular breakfast rotation!
Personal Story
I still remember the first time I crafted my ultimate breakfast bowl. It was a chilly Saturday morning, and my kitchen was filled with the warm, welcoming aromas of sautéed vegetables and eggs. I had a couple of friends over for a brunch gathering, and I wanted to create something that felt hearty yet colorful. I pulled out all my favorite ingredients: bright bell peppers, fresh spinach, and those sweet, succulent berries.
As I prepped everything, laughter and stories floated around the kitchen, and I felt a wave of contentment wash over me. When we finally sat down to dig in, it wasn’t just the food that was nourishing; it was the connection we shared. We piled our bowls high, adding dollops of Greek yogurt and a drizzle of honey, transforming each bite into a delightful explosion of flavor. It became a cherished ritual among my friends and me—this vibrant breakfast bowl became more than just a dish; it became a symbol of togetherness and those precious moments shared over good food. It’s a little tradition I look forward to every season, reminding me that the simplest ingredients can create beautiful memories.
Ingredients
Here’s what you’ll need to create your Hearty Breakfast Power Bowl:
-
Eggs (2 per serving)
Eggs are the stars of the show! Packed with protein and healthy fats, they keep you energized. If you prefer a plant-based option, you could whisk up a tofu scramble instead! -
Spinach (1 cup)
This leafy green adds a lovely earthy flavor and a punch of vitamins! If you don’t have spinach, kale or Swiss chard are great substitutes. -
Bell Peppers (1/2 cup, diced)
Bright and crunchy, bell peppers add a nice sweetness and pop of color. Feel free to mix colors like red, yellow, or orange for a rainbow effect! You could also swap these for zucchini or asparagus depending on what you have. -
Tomatoes (1/2 cup, diced)
Fresh and juicy tomatoes add a refreshing burst. You can use grape tomatoes or even sun-dried tomatoes if you want a deeper flavor. -
Greek Yogurt (1/4 cup)
This creamy addition not only balances the dish but also provides probiotics for gut health. If dairy-free, you can opt for coconut yogurt or almond-based yogurt. -
Berries (1/2 cup mixed)
Strawberries, blueberries, raspberries—these sweet gems bring a touch of indulgence! Frozen berries work well too if fresh isn’t available. -
Oats (1/2 cup) or Quinoa (1/2 cup cooked)
Both options serve as hearty bases for your bowl, providing fiber and whole grains. Quinoa is gluten-free and offers a nutty flavor, but feel free to use brown rice if you prefer that consistency. -
Nuts (1/4 cup, chopped)
Almonds and walnuts add crunch and healthy fats. You can substitute with seeds like sunflower or pumpkin seeds for extra variety! -
Honey or Maple Syrup (to taste)
A drizzle adds just the right amount of sweetness. If you’re on a sugar-free diet, consider using stevia or agave syrup instead. -
Salt and Pepper (to taste)
Essential for bringing out the flavors!
Step-by-Step Instructions
-
Prep Your Ingredients: Begin your power bowl adventure by washing and dicing your vegetables. Chop the spinach, bell peppers, and tomatoes into bite-sized pieces. This prep not only speeds up the cooking process but also makes your workspace look colorful and inviting!
-
Cook the Oats or Quinoa: In a medium saucepan, bring water to a boil. If you’re cooking oats, use a 2:1 water-to-oat ratio. For quinoa, the ratio is 2:1 as well. Add a pinch of salt for flavor, and cook until fluffy—about 5-10 minutes for oats or 15 minutes for quinoa. Fluff with a fork when done!
Chef Tip: Cooking in vegetable broth instead of water can elevate the flavor of the grains—trust me, it’s worth it!
-
Sauté the Vegetables: In a skillet, heat up a drizzle of olive oil over medium heat. Add the diced bell peppers and cook for 2-3 minutes until they start to soften. Next, toss in the spinach and tomatoes, cooking for an additional 2-3 minutes until the spinach wilts and everything combines nicely. Season with salt and pepper!
Chef Hack: Don’t toss the veggies around too much! Let them sit for a minute or two to get a nice char that enhances the flavor.
-
Cook the Eggs: In a bowl, whisk your eggs with a splash of milk (or water for fluffiness). Heat a non-stick skillet over medium-low, add butter or oil, and pour in the eggs, stirring gently until they’re just set to your liking. While I love them scrambled, you can also opt for poached eggs for a classy touch!
Chef’s Insight: Don’t overcook your eggs! They should be creamy and soft. If you prefer a breakfast with more texture, try making them into an omelet stuffed with veggies.
-
Assemble Your Power Bowl: Grab your favorite bowl (or try mixing and matching bowls for a fancy touch). Start by laying down a base of your cooked oats or quinoa, then layer on your sautéed veggies and the fluffy scrambled eggs.
-
Add the Finishing Touches: Spoon on your creamy Greek yogurt, scatter fresh berries, and sprinkle with chopped nuts. Drizzle with honey or maple syrup, adding an even sweeter touch!
-
Enjoy: Sit down at your table (or outside if the weather’s nice!), take a moment to appreciate your colorful creation, and dig in! Remember, food tastes best when enjoyed slowly and shared with friends or family.
Serving Suggestions
To plate your Hearty Breakfast Power Bowl, I love the idea of using a wide, shallow bowl to showcase the colorful layers. Arrange the sautéed vegetables and eggs so that they peek out invitingly, and create little piles of berries and nuts on top for added texture. You can even garnish the dish with a sprinkle of fresh herbs like basil or parsley for an extra pop!
Recipe Variations
-
Veggie Twist: Swap out the bell peppers and tomatoes for roasted sweet potatoes or seasonal veggies like butternut squash.
-
Global Flair: Add some chopped avocado and a sprinkle of feta cheese for a Mediterranean twist or top with a spicy salsa for a Southwestern flair.
-
Sweet Tooth Option: Use almond butter instead of Greek yogurt and mix in some banana slices for an indulgent yet healthy alternative.
-
Protein-Packed Swaps: Swap out the eggs for cooked chicken or turkey sausage to boost protein intake.
Chef’s Notes
Every time I make this breakfast bowl, it reminds me of my early cooking days when I experimented with various combinations in my tiny apartment kitchen. I’ll never forget the first time I made this for my family during a holiday gathering. My mom was skeptical, thinking breakfast should always be traditional, but as she took her first bite, her expression transformed—that warm, satisfied smile lets me know that I hit a home run. Now, it’s become a staple for our brunches! Over the years, I’ve added different ingredients based on seasonal produce, discovering unique flavors in every batch.
FAQs and Troubleshooting
How can I make this recipe ahead of time?
You can prep your ingredients the night before—chop veggies, cook grains, and even scramble your eggs. Store everything separately in the fridge, and simply heat it up together in the morning!
Can I use frozen vegetables or fruits?
Absolutely! Frozen veggies can be a great timesaver—just sauté them a little longer until they are heated through. For berries, let them thaw a bit before adding to your bowl for the best taste.
What if my eggs turn out rubbery?
This usually happens when eggs are cooked over too high a heat. Stick to medium-low heat, and stir gently for creamy, fluffy eggs.
How can I make this recipe vegetarian?
Simply skip the eggs for a more substantial portion of veggies, add plant-based protein sources like chickpeas, or increase the amount of nuts and seeds for added nutrition!
Nutritional Info
While specifics can vary based on your ingredient choices and portion sizes, a standard serving of this Hearty Breakfast Power Bowl is roughly:
- Calories: 400-500
- Protein: 20g
- Carbohydrates: 45g
- Fat: 15g
- Fiber: 10g
Whether you’re brunching with friends or making breakfast just for yourself, the Hearty Breakfast Power Bowl will always have a place on my table. Cheers to good food and the memories it creates! Enjoy every bite, and don’t forget to savor those little moments in the kitchen. Happy cooking!
PrintHearty Breakfast Power Bowl
A colorful, nutrient-packed breakfast bowl featuring fluffy eggs, vibrant veggies, creamy Greek yogurt, and fresh berries, perfect for jump-starting your day.
- Prep Time: 15 minutes
- Cook Time: 15 minutes
- Total Time: 30 minutes
- Yield: 1 serving 1x
- Category: Breakfast
- Method: Stovetop
- Cuisine: American
- Diet: Vegetarian
Ingredients
- 2 Eggs per serving
- 1 cup Spinach
- 1/2 cup Bell Peppers, diced
- 1/2 cup Tomatoes, diced
- 1/4 cup Greek Yogurt
- 1/2 cup mixed Berries
- 1/2 cup Oats or 1/2 cup Quinoa, cooked
- 1/4 cup Nuts, chopped
- Honey or Maple Syrup, to taste
- Salt and Pepper, to taste
Instructions
- Prep Your Ingredients: Wash and dice your vegetables, chopping the spinach, bell peppers, and tomatoes into bite-sized pieces.
- Cook the Oats or Quinoa: In a medium saucepan, bring water to a boil, add oats or quinoa with a pinch of salt, and cook until fluffy.
- Sauté the Vegetables: Heat olive oil in a skillet, add diced bell peppers, and cook for 2-3 minutes; then toss in spinach and tomatoes for another 2-3 minutes until wilted.
- Cook the Eggs: Whisk eggs with a splash of milk, heat a non-stick skillet, and scramble the eggs until just set.
- Assemble Your Power Bowl: Start with a base of cooked oats or quinoa, then layer sautéed veggies and scrambled eggs.
- Add the Finishing Touches: Spoon Greek yogurt on top, scatter berries, sprinkle nuts, and drizzle with honey or maple syrup.
- Enjoy: Sit down, appreciate your colorful creation, and dig in!
Notes
This power bowl is versatile; feel free to substitute ingredients based on your preferences and dietary needs.
Nutrition
- Serving Size: 1 serving
- Calories: 450
- Sugar: 10g
- Sodium: 300mg
- Fat: 15g
- Saturated Fat: 4g
- Unsaturated Fat: 8g
- Trans Fat: 0g
- Carbohydrates: 45g
- Fiber: 10g
- Protein: 20g
- Cholesterol: 186mg
Keywords: breakfast, power bowl, healthy, nutritious, vegetarian

Chicken Bacon Wraps
# Irresistible Chicken Bacon Wraps: Your New Go-To Recipe

## Introduction

Hello, culinary adventurers! Today, I’m thrilled to share a recipe that’s not only delicious but also brings an element of comfort to the table: **Chicken Bacon Wraps**. Imagine tender chicken enveloped in savory bacon, a creamy layer of cheese, and a burst of freshness from veggies. It’s a dish that brings smiles, sparks conversation, and—dare I say—it might just become a staple in your recipe repertoire!

I remember the first time I whipped up these wraps for a cozy gathering with friends. The kitchen was filled with delightful aromas, and the laughter that flowed was as plentiful as the food on the table. I had decided to make them on a whim, using whatever ingredients I had on hand. They turned out so scrumptious that I knew I was onto something special. The beauty of Chicken Bacon Wraps is they strike the perfect balance between indulgent and approachable; they're a celebration of flavors and textures that will leave your guests wanting more.

Whether you’re hosting a casual dinner or simply want to elevate your weeknight meal, this recipe is here for you. So, tie on that apron, pour yourself a lovely glass of something refreshing, and let’s get cooking!

---

## Personal Story

One of my fondest kitchen memories revolves around these Chicken Bacon Wraps. It was a crisp autumn evening, and I had invited my closest friends over for a cozy dinner party. The mood was electrified by fragrant candles and a hint of pumpkin spice in the air, setting the perfect backdrop for connection.

I rummaged through my fridge and, realizing I had chicken, bacon, and all the good stuff, I decided to create something delightful. As I crafted these wraps, my friends mingled in the living room, laughter underscoring the clinking of glasses. When it came time to serve the Chicken Bacon Wraps, you could see the intrigue on their faces; they practically devoured them! Seeing the joy on their faces as they took their first bites made every minute spent in the kitchen worthwhile. Those wraps became a staple at our gatherings, a symbol of friendship and fond memories—all created around a table filled with delicious food.

---

## Ingredients

Let’s gather all the good stuff! Here are the ingredients you’ll need to create these mouthwatering Chicken Bacon Wraps, including some tips and tricks along the way:

- **Chicken Breasts (2-3, boneless and skinless)**
  The star of the show! Aim for organic or free-range chicken for the best flavor. If you’re short on chicken breasts, feel free to use thighs for a juicier bite.

- **Bacon (6-8 strips)**
  Ah, bacon! It adds a delicious crunch and savory smokiness. For a healthier twist, turkey bacon is a great substitute, though it may not crisp up as much.

- **Cream Cheese (4 oz, softened)**
  This creamy goodness adds a rich texture and flavor. You can use herbed cream cheese for an extra flavor punch or even Greek yogurt if you're looking for a lighter option.

- **Cheddar Cheese (1 cup, shredded)**
  A classic pairing that melts beautifully. If you prefer a sharper taste, use aged cheddar, or mix it up with pepper jack for a spicy kick!

- **Spinach or Lettuce (1 cup, chopped)**
  Adding greens brings some freshness and color! Swap spinach for arugula for peppery notes, or go with romaine for a nice crunch.

- **Salt and Pepper (to taste)**
  Always season to your preference! Feel free to explore spicier seasonings like paprika or garlic powder for an added depth of flavor.

---

## Step-by-Step Instructions

Let’s get down to it! Follow these steps to make your Chicken Bacon Wraps:

1. **Preparation Time**
   Begin by preheating your oven to 400°F (200°C). This ensures that the bacon crisps up perfectly while the chicken cooks through nicely—my golden rule of oven culinary magic!

2. **Pound the Chicken**
   Place your chicken breasts between two sheets of plastic wrap or parchment paper. Using a meat mallet or rolling pin, gently pound them to an even thickness of about 1 inch. This ensures even cooking, and it’s a wonderful stress reliever—give it a little extra “love” if you need to!

3. **Season the Chicken**
   Season both sides of the chicken breasts with salt and pepper. Don’t be shy—this chicken will be the canvas for all that yummy flavor. If you like, sprinkle on any spices that you fancy!

4. **Spread the Cream Cheese**
   In a small bowl, soften the cream cheese in the microwave for about 15 seconds until spreadable. Add in some herbs or spices if you’re feeling creative! Now, spread a generous layer on one side of each chicken breast, followed by a sprinkle of shredded cheddar cheese.

5. **Add Spinach and Bacon**
   Top the cheese with a layer of chopped spinach or lettuce. Now, here comes the smoky goodness! Lay 2-3 strips of bacon over the greens. The bacon adds flavor and essential moisture to your wraps. It’s a game changer—trust me!

6. **Roll It Up**
   Carefully roll the chicken tightly, starting from the edge with the cream cheese. Tuck in the sides as you go to keep the filling in. Secure them with toothpicks or wrap them tightly in kitchen twine for that fancy flair!

7. **Wrap with Bacon**
   Here’s where it gets savory! Wrap additional bacon strips around each chicken roll, ensuring they’re well covered. Secure with toothpicks if necessary, so they maintain their shape while baking.

8. **Bake to Perfection**
   Place the wrapped chicken in a greased baking dish. Bake in your preheated oven for about 25-30 minutes or until the chicken reaches an internal temperature of 165°F (74°C). The bacon should be perfectly crispy. Check halfway through: if bacon is getting too crispy, shield it with aluminum foil!

9. **Rest and Slice**
   Once baked, let the chicken rest for about 5 minutes before slicing. This helps retain those juicy flavors. Serve whole or slice to showcase all that deliciousness inside.

---

## Serving Suggestions

To plate your Chicken Bacon Wraps, arrange them artfully on a rustic wooden board or a lovely white platter for that elegant contrast. Drizzle a tangy dipping sauce like ranch or honey mustard for an added punch! You can garnish with freshly chopped herbs or a sprinkle of cracked pepper. Serve these wraps alongside a simple salad or roasted veggies for a complete meal that looks as stunning as it tastes.

---

## Recipe Variations

Feeling adventurous? Here are some tasty twists to personalize your Chicken Bacon Wraps:

- **Spicy Kick**: Add jalapeños or Sriracha to the cream cheese for an extra spicy layer.
- **Mediterranean Delight**: Include feta cheese and sun-dried tomatoes instead of cheddar for a Mediterranean flair.
- **BBQ Bliss**: Brush BBQ sauce over the chicken before rolling for a smoky, tangy finish!
- **Vegetarian Version**: Swap chicken for thick slices of eggplant or tofu that have been marinated and grilled.
- **Sweet & Savory**: Add a layer of apricot or peach preserves beneath the cream cheese for a sweet contrast!

---

## Chef’s Notes

As I reminisce about the evolution of these Chicken Bacon Wraps, I can’t help but smile. There have been countless iterations, ranging from spicy to sweet. Each time I make them, I tweak ingredients and experiment with different flavors. Food is all about creativity, and I encourage you to embrace the process! The best recipes come from a space of joy and discovery. And remember, if you have leftovers (which is rare!), they make for a killer lunch the next day!

---

## FAQs and Troubleshooting

### Q: Why is my bacon not crispy?
A: If your bacon isn’t crisping up, it could be because the chicken was rolled too tightly. Allow some space for the bacon to cook. You can always broil the wraps for a minute or two at the end for extra crispiness.

### Q: Can I make these wraps ahead of time?
A: Absolutely! You can prepare and assemble the wraps, refrigerate them, and bake when ready. Just increase the cooking time slightly if they’re cold from the fridge.

### Q: What’s the best way to store leftovers?
A: Store any leftovers in an airtight container in the refrigerator for up to 3 days. Reheat in the oven at 350°F until warmed through for the best results!

### Q: Can I freeze these wraps?
A: Yes! Assemble, wrap tightly in foil and plastic wrap, and freeze. When ready to enjoy, bake from frozen, adding extra time until fully cooked.

---

## Nutritional Info

While I’m not a nutritionist, a single serving of these Chicken Bacon Wraps generally contains a hearty dose of protein, healthy fats, and essential vitamins from the greens. Enjoy in moderation as a part of a balanced diet.

---

There you have it! Delicious, crowd-pleasing Chicken Bacon Wraps that will undoubtedly become a cherished recipe in your kitchen. I can’t wait for you all to try these, make them your own, and create memories just like I did. Happy cooking, friends!
Irresistible Chicken Bacon Wraps

Delicious Chicken Bacon Wraps featuring tender chicken, crispy bacon, creamy cheese, and fresh veggies.
- Prep Time: 15 minutes
- Cook Time: 30 minutes
- Total Time: 45 minutes
- Yield: 4 servings 1x
- Category: Main Course
- Method: Baking
- Cuisine: American
- Diet: Paleo
Ingredients
- 2–3 boneless, skinless Chicken Breasts
- 6–8 strips of Bacon
- 4 oz Cream Cheese, softened
- 1 cup Cheddar Cheese, shredded
- 1 cup Spinach or Lettuce, chopped
- Salt and Pepper, to taste
Instructions
- Preheat your oven to 400°F (200°C).
- Place your chicken breasts between two sheets of plastic wrap or parchment paper and pound to an even thickness.
- Season both sides of the chicken breasts with salt and pepper.
- In a small bowl, soften the cream cheese in the microwave and spread it on one side of each chicken breast.
- Add a layer of chopped spinach or lettuce over the cheese, then 2-3 strips of bacon.
- Roll the chicken tightly starting from the edge with the cream cheese, tucking in the sides.
- Wrap each roll with additional bacon strips and secure with toothpicks.
- Place in a greased baking dish and bake for 25-30 minutes or until the chicken is cooked through.
- Let rest for 5 minutes before slicing.
Notes
Try adding jalapeños for a spicy kick or feta cheese for a Mediterranean twist!
Nutrition
- Serving Size: 1 wrap
- Calories: 400
- Sugar: 2g
- Sodium: 600mg
- Fat: 28g
- Saturated Fat: 10g
- Unsaturated Fat: 13g
- Trans Fat: 0g
- Carbohydrates: 3g
- Fiber: 1g
- Protein: 30g
- Cholesterol: 90mg
Keywords: chicken, bacon, wraps, easy dinner, comfort food