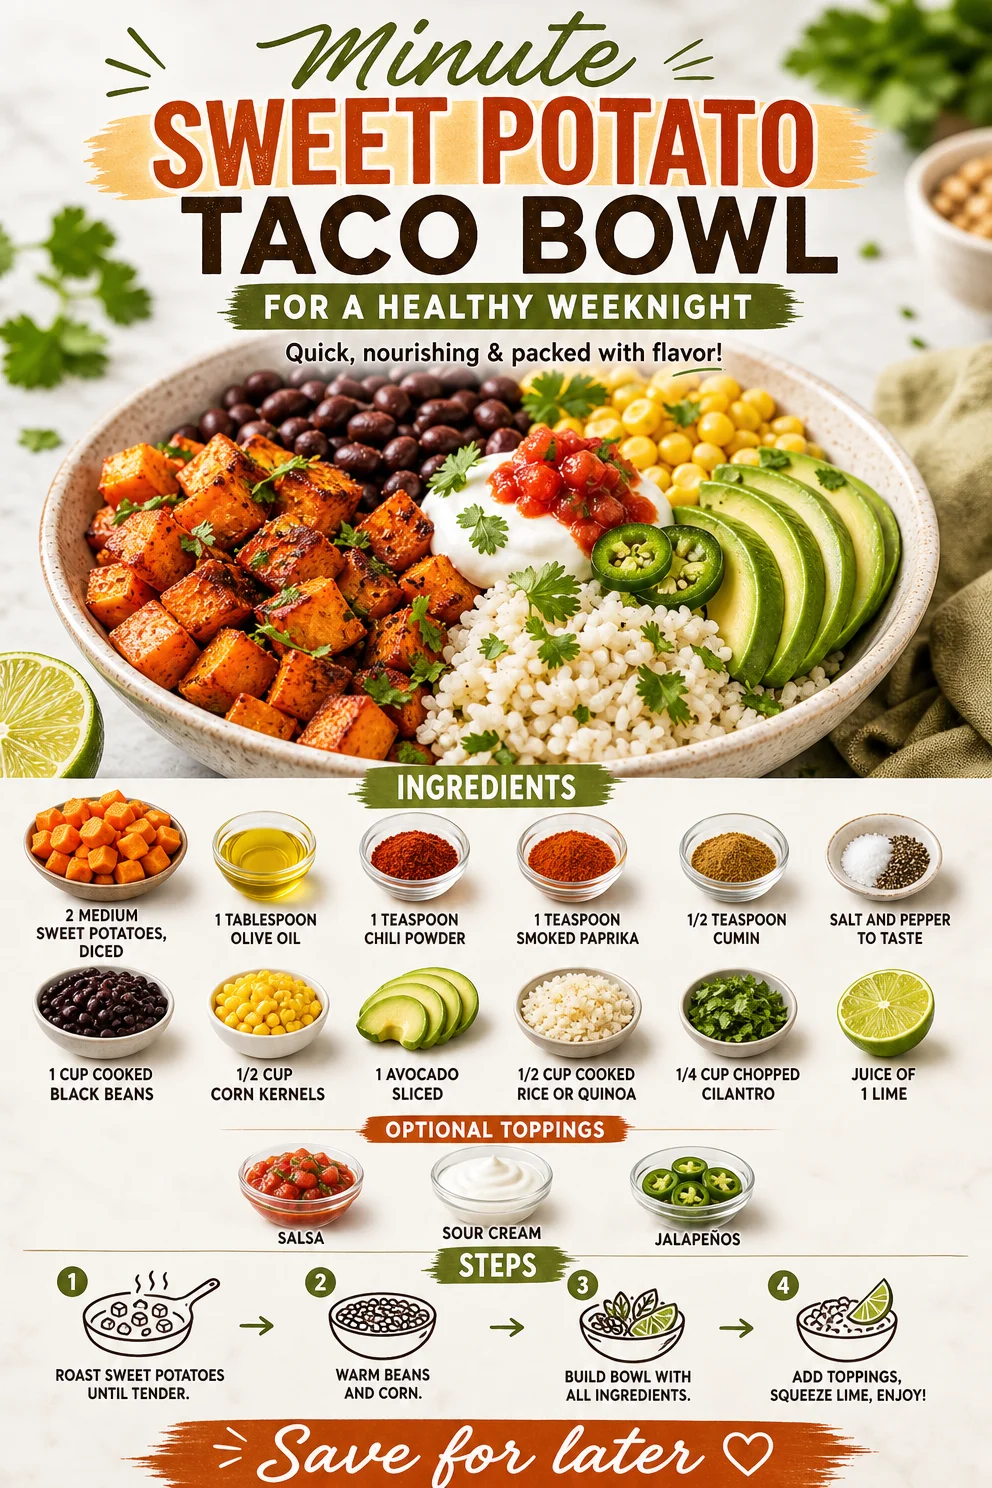
Minute Sweet Potato Taco Bowl for a Healthy Weeknight
A Flavorful Journey: Sweet Potato Taco Bowl Recipe
Hello, fellow food lovers! Today, I’m excited to share a scrumptious and vibrant Sweet Potato Taco Bowl recipe that’s perfect for healthy dinners or casual gatherings. Not only is this dish packed with flavor, but it’s also nourishing and simple to whip up, making it a great choice for a weeknight meal.
So pull up a chair, tie on that apron, and let’s dive into the delightful world of sweet potatoes, spices, and fresh toppings that will leave your taste buds cheering!
A Taste of Home: My Sweet Potato Memories
Let me take you back to a crisp autumn evening a few years ago. The smell of spices danced through my kitchen as I played with what would become my first sweet potato-based recipe. A close friend of mine was coming over for dinner, and I wanted to impress her with something creative but comforting.
I still remember peeling those sweet potatoes — their rich orange hue reminded me of golden leaves falling outside. I seasoned them with a blend of spices I had cobbled together, echoing the warmth of my childhood flavors and my family’s love for vibrant, wholesome meals. As I mixed everything together, I felt transported back to family gatherings where the kitchen acted as the heart of our home. We laughed, caught up, and formed those precious moments while sharing a good meal.
Fast forward a few years, and this Sweet Potato Taco Bowl has become a staple in my entertaining arsenal. Every time I prepare it, I feel that same warmth, and I hope it brings you the same joy that it has brought to me and my loved ones.
Ingredients
Here’s what you’ll need to create this delightful dish:
-
2 medium sweet potatoes (diced)
Sweet potatoes are packed with vitamins A and C, fiber, and antioxidants. Need a substitution? You can swap them with butternut squash or regular potatoes for a different texture or flavor. -
1 tablespoon olive oil
A heart-healthy fat that helps enhance flavors and aids in absorption of fat-soluble vitamins. Avocado oil or melted coconut oil also work wonderfully. -
1 teaspoon chili powder
This gives our bowl a lovely kick! If you prefer less heat, use smoked paprika or omit it altogether. -
1 teaspoon smoked paprika
It adds depth and a cozy smokiness that pairs perfectly with the sweet potatoes. If unavailable, regular paprika will still create a delightful outcome. -
1/2 teaspoon cumin
An earthy spice that brings warmth to the dish. If cumin’s not your thing, try coriander for a brighter flavor. -
Salt and pepper to taste
Fundamental seasonings that can be adjusted based on your preference. Feel free to sprinkle in some garlic powder for an additional flavor punch. -
1 cup cooked black beans
A fantastic source of protein and fiber, black beans lend creaminess to the bowl. If you’re not a black bean fan, try pinto beans or chickpeas. -
1/2 cup corn kernels
Sweet and crunchy, corn adds a burst of color and taste. Frozen or fresh corn works well, and you can omit it if you’d like. -
1 avocado (sliced)
Creamy avocado brings richness to the dish, making it even more satisfying. Don’t have one? A dollop of sour cream or Greek yogurt is a great alternative. -
1/2 cup cooked rice or quinoa
A lovely base to soak up all those delectable flavors. Use any grain you like or opt for a cauliflower rice for a lower-carb option. -
1/4 cup chopped cilantro
Adds a fresh, herbaceous note that brightens the entire meal. If cilantro isn’t your favorite, fresh parsley or scallions can be used instead. -
Juice of 1 lime
A spritz of acidity brightens even the heartiest of dishes. If you don’t have limes, lemon juice can be a fine substitute. -
Optional toppings: salsa, sour cream, jalapeños
These add extra dimensions to your delicious bowl! Go as wild as you want with toppings — top with your favorites.
Step-by-Step Instructions
Ready to cook? Let’s jump into the kitchen and make magic happen!
-
Preheat your oven: Begin by preheating your oven to 400°F (200°C). This will ensure that your sweet potatoes roast to perfection, yielding that golden exterior and soft interior.
-
Prep the sweet potatoes: Rinse and peel the sweet potatoes, then dice them into approximately 1-inch cubes. This size allows them to cook evenly. Channel your inner chef and have fun with your knife skills; it’s all part of the experience!
-
Season the sweet potatoes: In a mixing bowl, toss the diced sweet potatoes with olive oil, chili powder, smoked paprika, cumin, salt, and pepper. Make sure every piece is coated evenly — this is key to ensuring they develop great flavor in the oven.
-
Roast away: Spread the seasoned sweet potatoes on a baking sheet lined with parchment paper (for easy clean-up) in a single layer. Roast them in the oven for about 25–30 minutes, flipping them halfway through to achieve even browning. Keep an eye on them — you want a beautiful caramelization.
-
Heat the black beans: While the sweet potatoes are roasting, take a small saucepan and add your cooked black beans. Heat them over low-medium heat until warm, stirring occasionally. Sprinkle in a touch of cumin and a squeeze of lime juice if you’re feeling adventurous!
-
Prepare the rice/quinoa: Cook your rice or quinoa according to package instructions. Using a rice cooker makes this easy-peasy, but you can also do it on the stove. Both options work just fine!
-
Build your bowl: Once the sweet potatoes are done, it’s time to assemble! Start with a base of rice or quinoa, followed by a generous portion of black beans and roasted sweet potatoes. Top it all off with sliced avocado, corn, and bright cilantro — the freshness here is divine!
-
Finish with flair: Don’t forget about that lime juice! A sprinkle of fresh lime juice just before serving ties everything together beautifully. If you’re using optional toppings, now’s the time to get creative and add your favorite salsas, jalapeños, or sour cream!
Serving Suggestions
To present this dish, consider using a large shallow bowl to create an inviting look. Start with a scoop of your rice or quinoa at the bottom, then artfully arrange the roasted sweet potatoes, black beans, corn, and avocado on top. A sprinkle of fresh cilantro adds that pop of color. Feel free to drizzle any remaining lime juice and a touch of salsa right on top as a finishing touch. Voilà! Your Sweet Potato Taco Bowl is ready to impress.
Recipe Variations
-
Spicy Southwest Bowl: Add diced jalapeños to the mix for added heat, and top with spicy salsa for a kick.
-
Taco-inspired: Mix in taco seasoning with the sweet potatoes and serve with a dollop of sour cream or Greek yogurt for a creamy contrast.
-
Mediterranean Twist: Substitute sweet potatoes for roasted eggplant or zucchini and add feta cheese for a tangy flavor.
-
Vegan Delight: For a completely plant-based option, skip the sour cream and use cashew cream instead — it’s heavenly!
-
Cheesy Goodness: Top with a sprinkle of shredded cheese before serving, letting it melt into the warmth of the sweet potatoes and beans.
Chef’s Notes
I’ve had my fair share of kitchen “oops” moments with this recipe, specifically when I got a little excited with the chili powder — whoops! Take it from me; moderation is key unless you’re aiming for a fiery feast. Over time, this recipe has evolved from a simple weeknight dinner to a versatile dish I can dress up for gatherings or scale down for quiet nights at home. It’s one of those meals that everyone loves, and I never tire of tweaking it to suit different guest preferences.
FAQs and Troubleshooting
-
What if my sweet potatoes aren’t cooking evenly?
Make sure you spread them out on the baking sheet in a single layer to allow proper airflow. If they’re overcrowded, they’ll steam rather than roast. -
Can I make this bowl ahead of time?
Absolutely! Prepare the sweet potatoes and black beans ahead of time and reheat them just before serving. The flavors will meld beautifully! -
How do I store leftovers?
Store any leftovers in airtight containers in the refrigerator for up to three days. Reheat in the microwave, and feel free to freshen it up with a squeeze of lime. -
What can I use instead of rice/quinoa?
Look into cauliflower rice for a low-carb option or even farro or bulgur for a unique grainy alternative.
Nutritional Info
While I won’t delve into numbers here, let’s just say this dish is a nutritional powerhouse! Sweet potatoes deliver ample vitamins A and C, fiber content is boosted with black beans, and avocado contributes healthy fats. Did I mention it’s beautiful food that makes you feel great too? Win-win!
As we embark on our culinary adventures together, remember this: good food isn’t just about what’s on the table. It’s about the moments you create while enjoying it. I can’t wait to see you in your kitchen with this Sweet Potato Taco Bowl! So gather your ingredients, ready your apron, and let the cooking begin!
PrintSweet Potato Taco Bowl
A vibrant and flavorful sweet potato taco bowl, packed with nutrients and perfect for healthy dinners or casual gatherings.
- Prep Time: 15 minutes
- Cook Time: 30 minutes
- Total Time: 45 minutes
- Yield: 4 servings 1x
- Category: Main Course
- Method: Baking
- Cuisine: Mexican
- Diet: Vegetarian
Ingredients
- 2 medium sweet potatoes (diced)
- 1 tablespoon olive oil
- 1 teaspoon chili powder
- 1 teaspoon smoked paprika
- 1/2 teaspoon cumin
- Salt and pepper to taste
- 1 cup cooked black beans
- 1/2 cup corn kernels
- 1 avocado (sliced)
- 1/2 cup cooked rice or quinoa
- 1/4 cup chopped cilantro
- Juice of 1 lime
- Optional toppings: salsa, sour cream, jalapeños
Instructions
- Preheat your oven: Begin by preheating your oven to 400°F (200°C).
- Prep the sweet potatoes: Rinse and peel the sweet potatoes, then dice them into approximately 1-inch cubes.
- Season the sweet potatoes: In a mixing bowl, toss the diced sweet potatoes with olive oil, chili powder, smoked paprika, cumin, salt, and pepper.
- Roast away: Spread the seasoned sweet potatoes on a baking sheet lined with parchment paper in a single layer. Roast them for about 25–30 minutes, flipping halfway through.
- Heat the black beans: In a small saucepan, heat your cooked black beans over low-medium heat until warm.
- Prepare the rice/quinoa: Cook your rice or quinoa according to package instructions.
- Build your bowl: Start with a base of rice or quinoa, then add black beans and roasted sweet potatoes, topped with sliced avocado, corn, and cilantro.
- Finish with flair: Sprinkle fresh lime juice over the bowl and add your choice of optional toppings.
Notes
This bowl can be customized with various toppings and is easy to prepare ahead of time. Perfect for meal prep!
Nutrition
- Serving Size: 1 serving
- Calories: 350
- Sugar: 5g
- Sodium: 400mg
- Fat: 12g
- Saturated Fat: 4g
- Unsaturated Fat: 6g
- Trans Fat: 0g
- Carbohydrates: 45g
- Fiber: 10g
- Protein: 15g
- Cholesterol: 0mg
Keywords: sweet potato, taco bowl, healthy dinner, vegetarian recipe
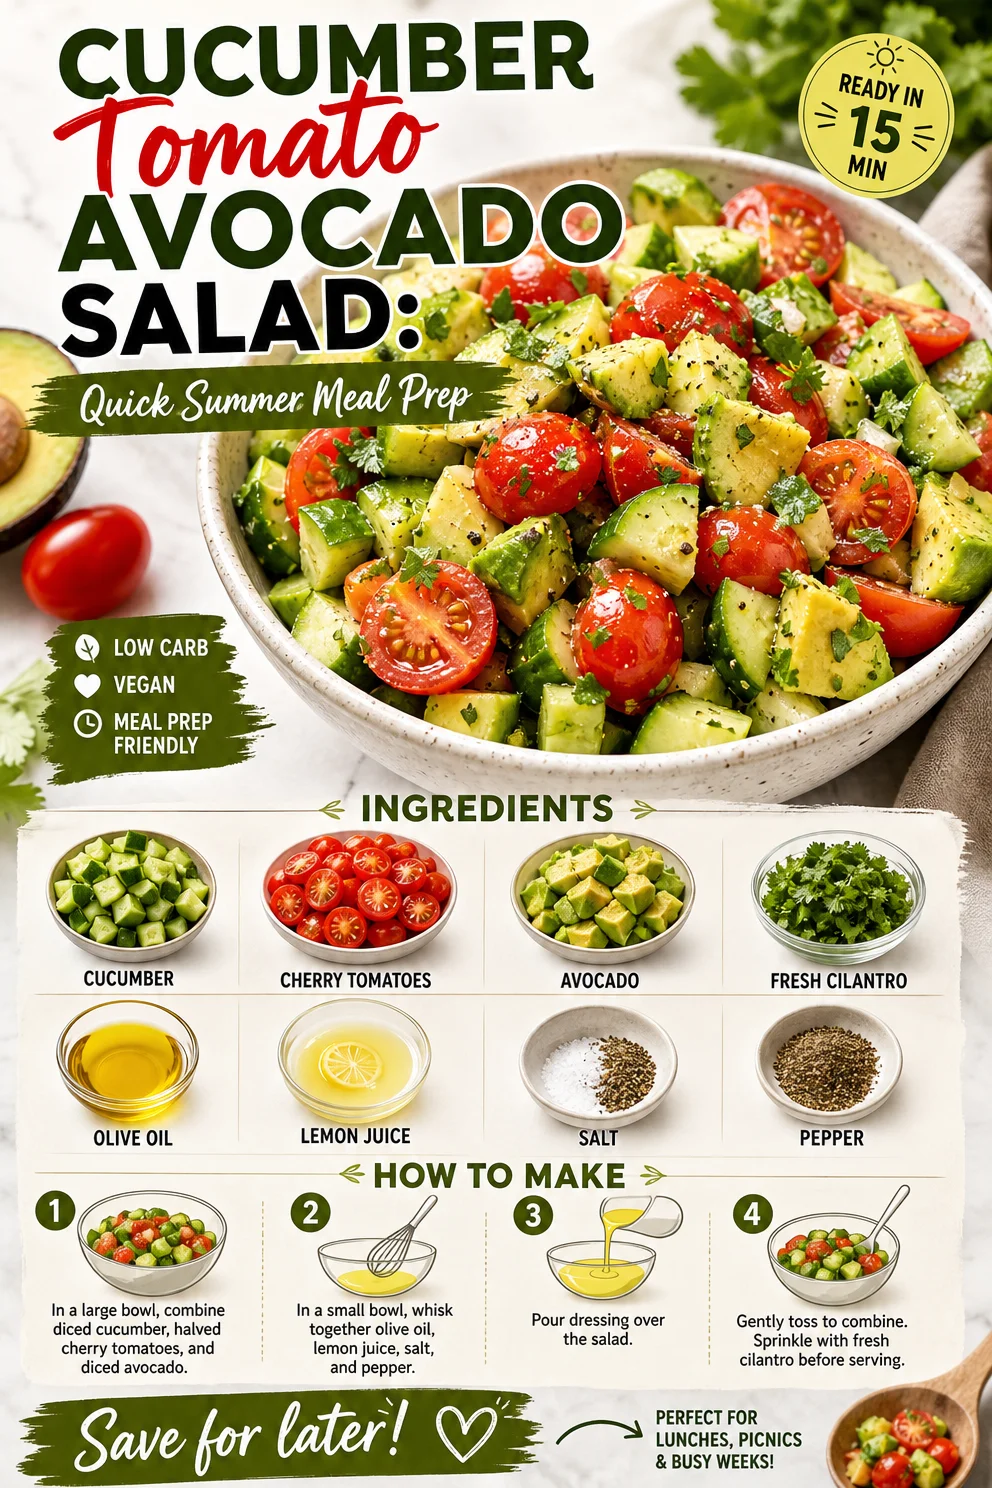
Cucumber Tomato Avocado Salad: Quick Summer Meal Prep
The Ultimate Cucumber Tomato Avocado Salad: Fresh, Flavorful, and Fabulous!
Hello, food lovers! Welcome back to Ivory Apron! Today, we’re diving into a dish that truly captures the essence of summer — the refreshing Cucumber Tomato Avocado Salad! This vibrant salad is a burst of colors and flavors, perfect for any occasion, whether you’re hosting friends, having a family barbecue, or enjoying a cozy dinner at home.
Ah, salads—often overlooked yet deserving of love! This particular salad is a canvas where fresh ingredients shine, bringing out the best in one another. It’s incredibly simple yet bursting with flavor, and the best part? You can whip it up in no time! Trust me; this salad will soon become a staple in your kitchen repertoire. So, grab your apron, and let’s get started on this delightful culinary journey together!
A Memorable Summer Day
Before we get into the nitty-gritty of the recipe, let me share a personal story that perfectly captures the joy of this dish. A few summers ago, I hosted a gathering for some of my closest friends. We talked, laughed, and shared stories while standing outside under twinkling fairy lights, the scent of fresh herbs dancing in the air. As we enjoyed grilled kebabs sizzling on the barbecue, I served this Cucumber Tomato Avocado Salad as the refreshing counterpart.
The colorful salad complemented the smoky flavors from the grill perfectly! I remember one of my friends taking a bite and exclaiming, “This tastes like summer in a bowl!” We all couldn’t help but agree as we marveled at how something so simple could be so delicious. Moments like these remind me why I started Ivory Apron: to create spaces where people can connect over good food and shared experiences.
Ingredients: What You’ll Need
Now, let’s gather our ingredients. Here’s what you’ll need to create this refreshing salad, along with some insights and substitution tips:
-
1 cucumber, diced
Choose a firm cucumber without any soft spots for the best crunch. If you’re feeling adventurous, try a Persian cucumber for a sweeter flavor! -
1 cup cherry tomatoes, halved
Look for vibrant, juicy tomatoes. Grape tomatoes work well too, and you can even mix different colors for a more eye-catching dish. -
1 avocado, diced
Opt for a ripe avocado (it should give slightly when pressed). If you’re not planning to serve the salad right away, you can add the avocado just before serving to prevent browning! -
1/4 cup fresh cilantro, chopped
This adds a fresh zing! If cilantro isn’t your thing, feel free to substitute with parsley or basil for a different flavor. -
2 tablespoons olive oil
Extra virgin olive oil adds depth. If you prefer, avocado oil is a fantastic substitute for a more neutral flavor. -
2 tablespoons lemon juice
Fresh is always best! The acidity brightens the salad. If lemons are scarce, lime juice does the trick, too! -
Salt and pepper to taste
A simple seasoning, but don’t skip it! It enhances all the flavors. You can also finish with a sprinkle of sea salt for a bit of crunch.
Step-by-Step Instructions: Let’s Get Cooking!
Now onto the fun part! Here’s how to make your Cucumber Tomato Avocado Salad in just a few simple steps:
-
Prep Your Ingredients
Start by washing all your veggies under cold water. This not only freshens them up but also helps remove any residual dirt. As you’re washing, think about the flavors and textures you love; prepping is the foundation of good cooking! -
Dice the Cucumber
Take your cucumber and cut both ends off. Slice it in half lengthwise, then dice it into bite-sized pieces. If you enjoy a bit of texture, leaving the skin on adds a wonderfully crunchy contrast! -
Halve the Cherry Tomatoes
Grab your cherry tomatoes and slice them in half. This not only makes them easier to eat but also allows their juices to mingle beautifully with the other ingredients. Pro tip: if you layer them cut-side up in your serving dish, it looks stunning! -
Dice the Avocado Carefully
Cut the avocado in half, removing the pit with a swift twist of your knife (careful not to cut yourself!). Scoop the flesh out with a spoon and dice it in the shell before transferring it to a bowl. This method saves you from mashing it up while getting perfect cubes! -
Chop Fresh Cilantro
Take your freshly washed cilantro and chop it finely. If you love the flavor, add a little extra! Just remember, a little goes a long way—balancing the herbaceousness with the other fresh ingredients is key! -
Combine the Salad
In a large bowl, combine all your prepped vegetables. This is where the fun begins! Toss them gently to ensure everything is well distributed without mashing the avocado. -
Dress the Salad
Drizzle the olive oil and lemon juice over the salad. Season generously with salt and pepper. This is your moment to dress it up! Toss everything gently but thoroughly to ensure the dressing coats every ingredient like a warm hug. -
Taste and Adjust
Before serving, give it a taste! If it needs a little more salt or a extra squeeze of lemon, now’s the time to polish it to perfection. Remember, cooking is all about adjustments! -
Chill if You Have Time
If you can, pop the salad in the fridge for 15-20 minutes before serving. It gives the flavors a chance to meld, making every bite a burst of bright freshness.
Serving Suggestions: How to Plate It Up
When it comes to presenting your salad, remember: a little goes a long way! Serve your Cucumber Tomato Avocado Salad in a beautiful serving bowl, or for individual servings, layer it neatly on plates. Drizzle a bit of extra olive oil on top and a squeeze of lemon on the finished dish for that extra touch. You can also sprinkle a few whole cilantro leaves or pomegranate seeds on top for a pop of color. Remember, we eat with our eyes first!
Recipe Variations: Get Creative!
Feeling adventurous? Here are some fun variations to try with this Cucumber Tomato Avocado Salad:
- Add Protein: Toss in some chickpeas, crumbled feta, or grilled shrimp for a heartier version.
- Spice It Up: Try adding diced jalapeños or a sprinkle of chili flakes for a kick!
- Make It a Grain Bowl: Serve the salad over a bed of quinoa or farro for a filling meal.
- Herb Swap: Experiment with different herbs like dill or mint for a completely new flavor profile.
- Zesty Twist: Instead of lemon, try lime juice or even a splash of apple cider vinegar for a tangy finish!
Chef’s Notes: A Reflection
This salad has been a staple in my kitchen for quite some time now. It started as a simple side dish but evolved into a main event over the years! I love how adaptable it is—every season offers a new opportunity to change up the ingredients depending on what’s fresh and available. I’ve even made a version with grilled peaches in the summer, and it was a game-changer!
Another fond memory is making this dish with my grandmother, who always insisted on adding a pinch of sugar to the dressing to balance the acidity. It’s a small tip that stuck with me, ensuring every salad feels rounded out.
FAQs and Troubleshooting
-
What if my avocado is too firm to dice?
If your avocado isn’t ripe enough, try placing it in a brown paper bag at room temperature for a day or so. This helps speed up the ripening process! If you’re in a hurry, just prepare the salad without it and add it just before serving. -
Can I make this salad ahead of time?
To maintain freshness, it’s best to prepare this salad just before serving. If you do need to prep ahead, you can chop all the vegetables and store them separately in the fridge. Mix them with the dressing right before you’re ready to serve! -
How can I store leftovers?
Store any leftovers in an airtight container in the fridge for 1-2 days. Just keep in mind that the avocado may brown a bit, so it’s best enjoyed fresh! -
Can I add other vegetables?
Absolutely! Feel free to throw in other favorites like bell peppers, radishes, or even corn for added sweetness and crunch.
Nutritional Info
While exact nutritional values can vary, this salad is packed with vitamins and minerals. It’s low in calories while providing healthy fats from the avocado and plenty of fiber from the veggies. It’s a great option to enjoy guilt-free!
So there you have it, my friends! Your very own Cucumber Tomato Avocado Salad, ready to brighten up any table. Remember, cooking is about sharing and enjoying the process. So, tie on that apron, gather your loved ones, and let this salad be a delicious centerpiece for your next meal!
Happy cooking, and I can’t wait to hear about your culinary adventures! Let’s create some beautiful moments together around the table!
PrintCucumber Tomato Avocado Salad
A refreshing and colorful salad ideal for summer gatherings, made with diced cucumber, cherry tomatoes, avocado, cilantro, and a light dressing.
- Prep Time: 15 minutes
- Cook Time: 0 minutes
- Total Time: 15 minutes
- Yield: 4 servings 1x
- Category: Salad
- Method: No Cooking
- Cuisine: American
- Diet: Vegetarian
Ingredients
- 1 cucumber, diced
- 1 cup cherry tomatoes, halved
- 1 avocado, diced
- 1/4 cup fresh cilantro, chopped
- 2 tablespoons olive oil
- 2 tablespoons lemon juice
- Salt and pepper to taste
Instructions
- Prep your ingredients by washing all veggies under cold water.
- Dice the cucumber into bite-sized pieces.
- Halve the cherry tomatoes.
- Dice the avocado carefully.
- Chop the fresh cilantro.
- Combine all your prepped vegetables in a large bowl.
- Dress the salad with olive oil and lemon juice, then season.
- Taste and adjust the seasoning if necessary.
- Chill in the fridge for 15-20 minutes if time allows.
Notes
Serve in a beautiful bowl and drizzle with extra olive oil for a finishing touch.
Nutrition
- Serving Size: 1 serving
- Calories: 180
- Sugar: 3g
- Sodium: 100mg
- Fat: 15g
- Saturated Fat: 2g
- Unsaturated Fat: 10g
- Trans Fat: 0g
- Carbohydrates: 10g
- Fiber: 5g
- Protein: 3g
- Cholesterol: 0mg
Keywords: salad, cucumber, avocado, summer dish, healthy recipe

Sweet Chili Halloumi Wraps | Easy Vegetarian Lunch
Sweet Chili Halloumi Wraps: Your New Favorite Easy Vegetarian Lunch
Hello there, fellow food lovers! Today, I’m so excited to share a dish that’s become a regular in my lunch rotation — Sweet Chili Halloumi Wraps. They’re quick to prepare, visually delightful, and—most importantly—absolutely delicious. Whether you’re looking for a light meal, a satisfying lunch, or a fun way to use up vegetables in your fridge, these wraps have got you covered!
Gathering Around the Table with Sweet Chili Halloumi
Before we dive into the recipe, let me share a delightful little story from my kitchen. Many years ago, I was hosting my first ever dinner party—filled with excitement and, admittedly, a little anxiety. As the clock ticked down, I felt determined to impress my friends. I had planned an elaborate menu, but you know what? It was the simpler dishes that stole the show! My friend Lily brought over some grilled halloumi and tossed it with sweet chili sauce, fresh veggies, and soft tortillas. I can still hear the laughter and the sound of wraps being filled, rolled, and devoured around my dining table.
We devoured those wraps and shared memories, which made the food taste even better! That evening inspired me to create my own version of these wraps, and sweet chili halloumi has since become a staple in my kitchen, a dish that reminds me to keep things simple and focused on good ingredients and great company.
Ingredients You’ll Need
Let’s get ready to make some delicious Sweet Chili Halloumi Wraps! Here’s what you’ll need:
-
8 oz halloumi cheese (sliced ½-inch thick)
- Chef Insight: Halloumi is a semi-hard cheese made from sheep’s milk (or a mixture of goat and sheep), known for its superb grilling qualities. If you don’t have halloumi, try using feta for a crumble over the wrap after grilling.
-
2–4 tortilla wraps (flour, flatbread, or gluten-free)
- Substitution Tips: Use your favorite type of wrap! If you want a gluten-free option, look for brown rice or corn tortillas.
-
1 red bell pepper (thinly sliced)
- Quick Tip: The sweetness of the red bell pepper pairs perfectly with the saltiness of the halloumi. Feel free to swap it for a yellow or orange pepper for a sweeter touch.
-
1 cucumber (julienned)
- Chef Insight: Cucumber adds a refreshing crunch. If you want an extra zing, try pickled cucumbers!
-
½ red onion (thinly sliced)
- Substitution Tips: Red onion adds beautiful color and flavor. If it’s too strong for your taste, go with green onions or the milder white onion.
-
1–2 lettuce leaves
- Quick Tip: Crisp greens like romaine or butterhead add a fresh contrast; they’re not just a garnish!
-
3 tablespoons sweet chili sauce
- Tips: You can find sweet chili sauce in the international aisle of your grocery store. For an extra kick, sprinkle in some crushed red pepper flakes!
-
1 tablespoon olive oil
- Chef Insight: A drizzle of good olive oil enhances the flavor of your cheese when grilling.
-
Optional toppings:
- Avocado (sliced): Adds creaminess and healthy fats.
- Fresh herbs (like cilantro or parsley): Brightens up the dish.
- Pickled vegetables: For a delicious tang!
Step-by-Step Instructions
Now that we have everything prepped, it’s time to get cooking! Here’s how to make your Sweet Chili Halloumi Wraps.
-
Prepare Your Ingredients
- Start by slicing your halloumi, bell pepper, cucumber, and red onion. Spend a moment to admire those vibrant colors—it’s going to make your wraps visually stunning!
-
Grill the Halloumi
- Heat a non-stick skillet over medium heat and add the olive oil.
- Once hot, place the halloumi slices in the skillet. Let them grill for about 2-3 minutes on each side, or until they develop a beautiful golden-brown crust. Chef Hack: If you have a grill pan or an actual grill, go for it! The charred flavor is unbeatable.
-
Combine the Sweet Chili Sauce
- While the halloumi cooks, in a small bowl, mix your sweet chili sauce with a splash of water to ease the pourability—this makes it easier to drizzle over later.
-
Warm Up the Tortillas
- In a separate, dry skillet, lightly warm the tortillas to make them pliable. Just a minute on each side does the trick. Tip: Wrap them in a clean kitchen towel to keep them warm.
-
Assemble Your Wraps
- On each tortilla, layer some greens along with grilled halloumi, red bell pepper slices, julienned cucumbers, and red onion.
- Drizzle your sweet chili sauce generously over the top. If you’re adding avocado or herbs, now’s the time!
-
Wrap It Up
- Fold in the sides of the tortilla and then roll it up tightly from the bottom. Make sure all those beautiful fillings stay tucked in. Tip: Use a toothpick to hold it all together for serving or cut them in half for easy eating!
Serving Suggestions
To plate your Sweet Chili Halloumi Wraps, slice them in half diagonally and arrange them on a colorful platter. Serve with a side of extra sweet chili sauce for dipping and perhaps a light salad to balance the meal. Pro tip: A sprinkle of sesame seeds or a few fresh herbs on top can elevate the presentation beautifully.
Recipe Variations
-
Spicy Twist: Add sliced jalapeños for an extra kick or mix Sriracha into your sweet chili sauce!
-
Mediterranean: Swap halloumi for grilled eggplant or zucchini; add olives and feta cheese for that Mediterranean flare.
-
Crunchy Add-In: Toss in some shredded carrots or a handful of sunflower seeds for additional crunch.
-
Breakfast Wrap: Add scrambled eggs or a fried egg on top of the fillings for a satisfying breakfast option.
Chef’s Notes
I can’t tell you how many times I’ve switched up ingredients or adaptively responded to what I had in my fridge. I remember one day, I wanted to make these wraps but realized I was out of halloumi. Panic? Not quite! I used tofu instead; I marinated it in sweet chili sauce and then grilled it to achieve some beautiful caramelization. Sometimes the best recipes emerge from improvisation!
Never hesitate to play around with this dish. Cooking is all about exploration, and I promise you’ll find your own perfect combo!
FAQs and Troubleshooting
1. Why is my halloumi sticking to the pan?
- Make sure your skillet is hot enough and well-oiled before adding your cheese. A non-stick skillet works best for grill cheese!
2. Can I make this ahead of time?
- Absolutely! You can prepare individual components the night before, but I suggest assembling the wraps right before serving for the freshest taste.
3. What if my wraps fall apart?
- If it’s too full, gently squeeze your wraps together to seal them up while eating! Or, use larger tortillas to hold all those fillings.
4. What can I do with leftovers?
- Try tossing the fillings into a salad the next day for a refreshing lunch or make a halloumi bowl with rice or quinoa!
Nutritional Info
This dish is a great source of protein from the halloumi and offers a healthy dose of fresh veggies! Each wrap packs a flavorful punch while providing some satiety from the cheese and crunch from the vegetables.
Conclusion: Time to Celebrate
Ready to embark on your journey with these delightful Sweet Chili Halloumi Wraps? Embrace the vibrant flavors and colorful ingredients while sharing with loved ones. Tie on that apron, tune into your favorite playlist, and cook joyfully—you’ve got this, and I’m excited for you! Let’s keep the kitchen the heart of the home, where delicious meals come to life and nourish both body and spirit.
Happy cooking, my friend—let’s create something magical together!
PrintSweet Chili Halloumi Wraps

Delicious and quick Sweet Chili Halloumi Wraps made with grilled halloumi, fresh vegetables, and a kick of sweet chili sauce.
- Prep Time: 15 minutes
- Cook Time: 10 minutes
- Total Time: 25 minutes
- Yield: 4 servings 1x
- Category: Main Course
- Method: Grilling
- Cuisine: Mediterranean
- Diet: Vegetarian
Ingredients
- 8 oz halloumi cheese (sliced ½-inch thick)
- 2–4 tortilla wraps (flour, flatbread, or gluten-free)
- 1 red bell pepper (thinly sliced)
- 1 cucumber (julienned)
- ½ red onion (thinly sliced)
- 1–2 lettuce leaves
- 3 tablespoons sweet chili sauce
- 1 tablespoon olive oil
- Optional toppings: Avocado (sliced), Fresh herbs (like cilantro or parsley), Pickled vegetables
Instructions
- Prepare Your Ingredients: Start by slicing your halloumi, bell pepper, cucumber, and red onion.
- Grill the Halloumi: Heat a non-stick skillet over medium heat and add the olive oil. Once hot, place the halloumi slices in the skillet and grill for 2-3 minutes on each side.
- Combine the Sweet Chili Sauce: In a small bowl, mix your sweet chili sauce with a splash of water.
- Warm Up the Tortillas: In a separate, dry skillet, lightly warm the tortillas to make them pliable.
- Assemble Your Wraps: On each tortilla, layer some greens along with grilled halloumi, red bell pepper slices, julienned cucumbers, and red onion. Drizzle with the sweet chili sauce.
- Wrap It Up: Fold in the sides of the tortilla and roll it up tightly from the bottom.
Notes
Feel free to customize the toppings and variations according to your taste; this recipe is versatile!
Nutrition
- Serving Size: 1 wrap
- Calories: 400
- Sugar: 6g
- Sodium: 600mg
- Fat: 18g
- Saturated Fat: 7g
- Unsaturated Fat: 9g
- Trans Fat: 0g
- Carbohydrates: 42g
- Fiber: 4g
- Protein: 18g
- Cholesterol: 30mg
Keywords: sweet chili, halloumi, wraps, vegetarian lunch, quick meal, grilling

Creamy Spinach and Mushroom Lasagna
Creamy Spinach and Mushroom Lasagna: A Culinary Journey
Welcome back to the kitchen, my fellow foodies! Today, we’re embarking on a delicious adventure with a dish that has a wealth of flavor and tradition: Creamy Spinach and Mushroom Lasagna. This comforting dish is not just a favorite for vegetarians; it’s a vibrant centerpiece for family dinners, casual gatherings, or even a cozy night in with a loved one.
Lasagna often conjures memories of family, warmth, and those heavenly layers of ricotta, cheese, and sauce bubbling away in the oven. While it can seem a bit intimidating, I promise you that with the right approach and a sprinkle of care, it can be as simple as pie (or should I say pasta?). This Creamy Spinach and Mushroom Lasagna is all about layering in fresh, wholesome ingredients with flavors that meld together beautifully.
As we dive into this culinary creation, I want you to think of it as a canvas—each ingredient a brushstroke contributing to a masterpiece. And the best part? This dish is perfect for cozy weeknight dinners and grand celebrations alike. So grab your apron and let’s transform your kitchen into a warm, welcoming space where amazing meals come to life!
Personal Story
Growing up, Sundays were sacred in my house. The soft sounds of classical music filled the air as my mom whipped up a myriad of dishes—each more comforting than the next. It was her ritual to make homemade lasagna on Sunday afternoons. I still remember the intoxicating aroma of garlic and sautéed mushrooms, mingling with the freshness of basil, wafting through the house.
One particular Sunday stands out to me—my mom had invited a few of our family friends over. As she layered the lasagna with precision, I insisted on helping. I remember her patiently showing me how to spoon the creamy ricotta mixture between the sheets of pasta, teaching me that cooking could be both an art and a shared experience.
That day, we laughed, accidentally dropped a few bits of cheese, and made wonderful memories. The moment that cheesy, golden-brown dish made its way to the table, all the laughter and love poured into it filled our hearts. This Creamy Spinach and Mushroom Lasagna carries that nostalgia, and I hope to pass that joy of shared meals into your kitchen today!
Ingredients
Let’s gather all the necessary ingredients to create this creamy delight. Here’s what you’ll need:
-
3 Garlic cloves
Minced for a robust flavor. If you’re short on fresh garlic, garlic powder (1/4 teaspoon per clove) can work in a pinch. -
2 cups Mushrooms
Sliced—choose your favorite variety! Button mushrooms are classic, but feel free to experiment with cremini or portobello for a deeper flavor. -
3 cups Spinach, fresh
Wash and chop. Fresh spinach gives that earthy flavor and vibrant color. Frozen spinach can also work, just be sure to thaw and drain it well before using. -
3 tbsp All-purpose flour
This will help thicken your creamy sauce. You can substitute with a gluten-free flour blend if you’re keeping it gluten-free! -
1/2 tsp Nutmeg, ground
A dash of nutmeg elevates your dish with warmth. If you’re not a fan, you can leave it out without losing the essence. -
Salt and pepper to taste
Essential for seasoning. Always taste as you go! -
2 tbsp Olive oil
For sautéing. Extra virgin adds richness, but any quality olive oil will do. -
3 tbsp Butter
Enhances the creaminess of your sauce. You can replace it with more olive oil if you prefer a dairy-free version. -
3 cups Milk
The base of our creamy sauce. You can use whole, 2%, or even an alternative like almond milk, but make sure it’s unsweetened. -
2 cups Mozzarella cheese
Shredded for that perfect gooey melty layer. Feel free to mix shredded cheeses such as provolone or fontina for a twist. -
1/2 cup Parmesan cheese, grated
Provides that salty, sharp kick. Reggiano is wonderful if you want to splurge! -
1 cup Ricotta cheese
Creamy, smooth, and a must for lasagna. For a lighter option, cottage cheese can work—but blend it for a smoother texture!
Step-by-Step Instructions
-
Prep Your Ingredients: Start by mincing the garlic and slicing the mushrooms. Rinse and chop the spinach. Having all your ingredients ready will make the cooking process smooth and enjoyable.
-
Sauté the Vegetables: In a large skillet, heat the olive oil over medium heat. Add the minced garlic and sauté for about a minute until fragrant. Be careful not to burn it! Your kitchen should smell divine by now.
-
Add Mushrooms: Toss the sliced mushrooms into the skillet. Sauté them for about 4-5 minutes until they are tender and release their juices. This is where flavor starts building—you can add a pinch of salt at this stage to enhance their natural sweetness.
-
Incorporate Spinach: Gradually add the chopped spinach, stirring until it wilts—around 2-3 minutes. You might feel like it’s a mountain at first, but it cooks down beautifully. Once wilted, remove the skillet from heat and set aside.
-
Make the Creamy Sauce: In a saucepan, melt the butter over medium heat. Whisk in the flour to create a roux, stirring constantly for about 2 minutes until it’s lightly golden and bubbling.
-
Add Milk: Gradually pour in the milk, whisking continuously to prevent lumps. Cook until the sauce thickens—about 5-7 minutes. You’re looking for a creamy consistency that coats the back of a spoon.
-
Season It Up: Sprinkle in nutmeg, salt, and pepper. Give it a taste and adjust if necessary. This is your chance to make it just right.
-
Cheese It Up: Turn off the heat and stir in the ricotta cheese until creamy. Reserve a bit of mozzarella for topping later. This adds an extra layer of creaminess to our exciting layered marvel.
-
Layer the Lasagna: Preheat your oven to 375°F (190°C). In a baking dish, start by spreading a spoonful of the creamy sauce on the bottom. This helps prevent sticking. Layer cooked lasagna noodles (you can use no-boil noodles for convenience), add a portion of the spinach and mushroom mixture, followed by a spoonful of the creamy sauce, and top with mozzarella and Parmesan.
-
Repeat the Layers: Continue layering the ingredients—noodle, vegetable mixture, creamy sauce, and cheese—until you’ve used up all the fillings. End with a final layer of noodles topped with the remaining sauce and cheese.
-
Bake: Cover with foil and bake in the preheated oven for 25 minutes. Remove the foil and bake for an additional 15-20 minutes until golden and bubbly. Pro tip: watch towards the end to make sure it doesn’t brown too much!
-
Rest Before Serving: Allow the lasagna to rest for about 10 minutes before slicing—this lets everything settle and makes for cleaner slices.
Serving Suggestions
When it comes to serving this Creamy Spinach and Mushroom Lasagna, presentation is key. A simple sprinkle of freshly chopped parsley or basil on top adds a beautiful pop of color. Serve it alongside a simple arugula salad dressed with lemon vinaigrette for a refreshing contrast, or crusty garlic bread to mop up every delightful morsel. Either way, your guests will be singing your praises!
Recipe Variations
-
Add Protein: For a non-vegetarian twist, add cooked chicken or Italian sausage between the layers. Just be sure to season well!
-
Cheese Swap: Try using goat cheese or feta for a tangy twist. This elevates the flavor profile and adds a nice creaminess.
-
Herb Infusion: Add fresh herbs such as basil or thyme to the ricotta mixture for an aromatic experience.
-
Veggie Boost: Layer in more veggies like zucchini or roasted red peppers for added texture and sweetness.
-
Vegan Option: Substitute the ricotta with blended silken tofu or cashew cream, and use vegan cheese for a delicious dairy-free version.
Chef’s Notes
Let me tell you, lasagna holds a special place in my heart. The first time I attempted to make it on my own, I was a college student who could barely boil water. My attempt at a classic meat lasagna resulted in a bit of a slide-off disaster when I reached for the final layer—but boy, did I learn a lot that day! Over the years, I’ve adapted this recipe to make it my own, leaning into the kind of flavors I love.
Cooking is about evolving—and every recipe tells a story! This lasagna has transformed from the traditional meaty variant to the creamy, earthy vegetarian delight you see today.
FAQs and Troubleshooting
1. Why does my lasagna seem watery?
If your sauce is too thin, try letting it simmer a bit longer to thicken. Also, make sure any vegetables are well-drained to avoid excess moisture!
2. Can I freeze lasagna?
Absolutely! This dish freezes beautifully. Just be sure to wrap it tightly before placing it in an airtight container.
3. Can I make this ahead of time?
Yes! You can assemble it a day in advance and keep it in the fridge until you’re ready to bake it. Just make sure to cover with foil to keep it from drying out.
4. How do I know when it’s done cooking?
Look for a golden brown top and bubbling edges—that’s a sign of goodness! You can also insert a knife in the center; it should come out hot with melting cheese.
Nutritional Info
(For an approximate serving size of 1 piece, nutritional values may vary)
- Calories: 450
- Protein: 25g
- Fat: 25g
- Carbohydrates: 40g
- Fiber: 3g
Conclusion
Cooking is such a joyous, creative endeavor, and this Creamy Spinach and Mushroom Lasagna is the perfect dish to showcase that. With layers of rich cheese, hearty vegetables, and a creamy sauce, you have a meal that is as delightful to make as it is to eat. So gather your loved ones, put on some music, and enjoy the process of creating something delicious together.
Happy cooking, my friends! Let me know how your lasagna turns out!
PrintCreamy Spinach and Mushroom Lasagna

A comforting, creamy lasagna with layers of spinach, mushrooms, and rich cheeses, perfect for family dinners.
- Prep Time: 15 minutes
- Cook Time: 40 minutes
- Total Time: 55 minutes
- Yield: 6 servings 1x
- Category: Main Course
- Method: Baking
- Cuisine: Italian
- Diet: Vegetarian
Ingredients
- 3 Garlic cloves, minced
- 2 cups Mushrooms, sliced
- 3 cups Spinach, fresh, washed and chopped
- 3 tbsp All-purpose flour
- 1/2 tsp Nutmeg, ground
- Salt and pepper to taste
- 2 tbsp Olive oil
- 3 tbsp Butter
- 3 cups Milk
- 2 cups Mozzarella cheese, shredded
- 1/2 cup Parmesan cheese, grated
- 1 cup Ricotta cheese
Instructions
- Prep your ingredients: Start by mincing the garlic and slicing the mushrooms. Rinse and chop the spinach.
- Sauté the vegetables: Heat the olive oil over medium heat in a large skillet. Add the minced garlic and sauté for about a minute.
- Add mushrooms: Toss the sliced mushrooms into the skillet and sauté for about 4-5 minutes.
- Incorporate spinach: Gradually add the chopped spinach, stirring until it wilts, around 2-3 minutes.
- Make the creamy sauce: In a saucepan, melt the butter over medium heat and whisk in the flour to create a roux.
- Add milk: Gradually pour in the milk, whisking continuously to prevent lumps and cook until thickened, about 5-7 minutes.
- Season it up: Sprinkle in nutmeg, salt, and pepper, and adjust to taste.
- Cheese it up: Stir in the ricotta cheese until creamy.
- Layer the lasagna: Spread a spoonful of creamy sauce in a baking dish, layer with noodles, spinach-mushroom mixture, creamy sauce, and cheeses.
- Repeat the layers until all ingredients are used, finishing with sauce and cheese on top.
- Bake: Cover with foil and bake in a preheated oven at 375°F (190°C) for 25 minutes, then remove foil to bake an additional 15-20 minutes.
- Rest before serving: Allow the lasagna to rest for about 10 minutes before slicing.
Notes
For a deeper flavor, experiment with different mushroom varieties. You can make ahead and freeze for later.
Nutrition
- Serving Size: 1 serving
- Calories: 450
- Sugar: 5g
- Sodium: 600mg
- Fat: 25g
- Saturated Fat: 15g
- Unsaturated Fat: 8g
- Trans Fat: 0g
- Carbohydrates: 40g
- Fiber: 3g
- Protein: 25g
- Cholesterol: 70mg
Keywords: spinach lasagna, vegetarian lasagna, creamy pasta
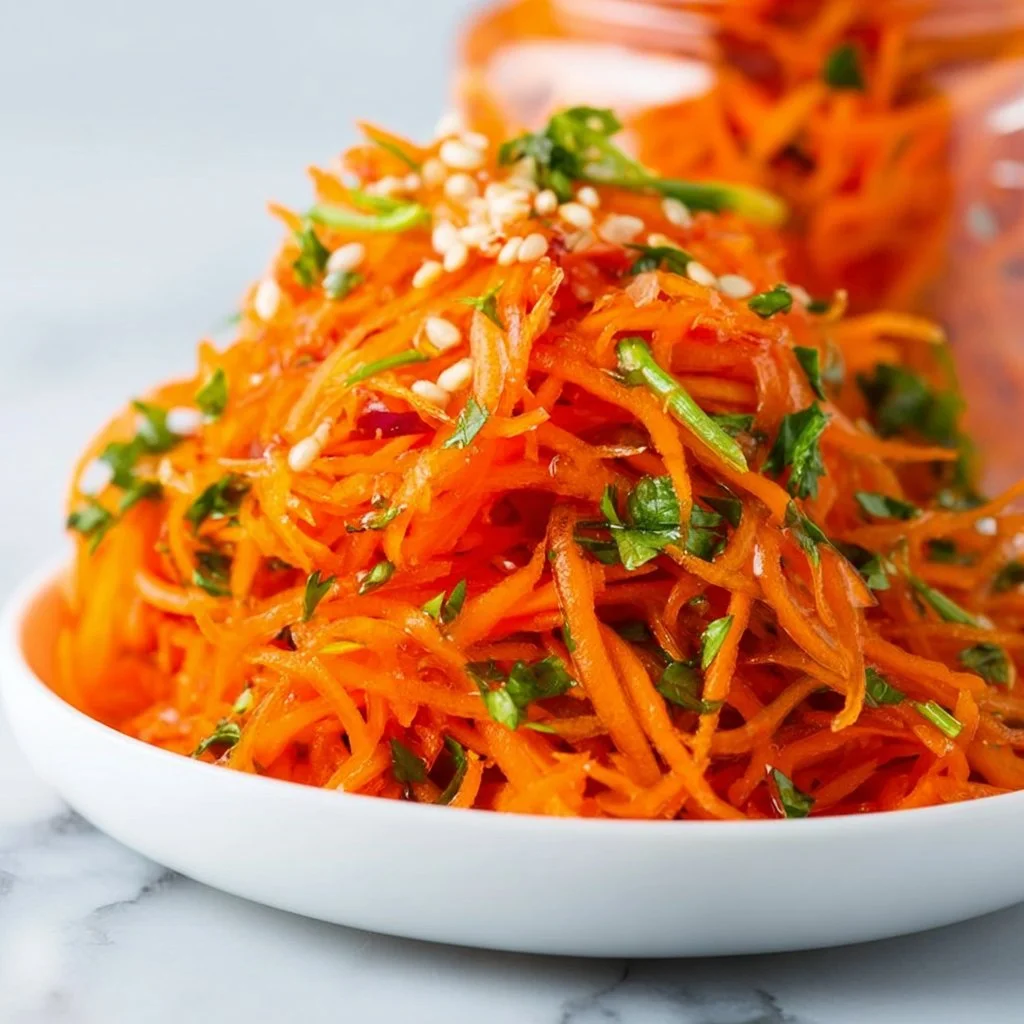
Best Korean Carrot Salad (Korean Carrot)
The Best Korean Carrot Salad: A Colorful Crunch of Flavor
Hello, food lovers! Welcome back to Ivory Apron, your go-to spot for delicious, elegant recipes that are easy to recreate right in your own kitchen. Today, I’m excited to share a vibrant dish that perfectly balances crunch, zing, and tons of flavor: the Best Korean Carrot Salad, affectionately known as Korean Carrot. This salad is not only a feast for the eyes but also a wholesome side that can elevate any meal, making it perfect for gatherings or even a casual weeknight dinner.
The beauty of this Korean Carrot Salad lies in its simplicity and freshness. Picture this: you step into your kitchen, and the earthy aroma of fresh carrots wafts through the air. You julienne those bright orange beauties, then combine them with a medley of spices, garlic, and herbs to create a salad that has both tradition and flair. The delightful crunch paired with the zesty dressing will have everyone reaching for seconds, and maybe even thirds!
Korean Carrot is not just a salad; it’s a lively nod to Korean cuisine and its incredible depth. Whether you’re serving it alongside your favorite grilled meats, using it as a vibrant nacho topper, or simply munching on it as a snack, this salad delivers both flavor and flair. So, roll up your sleeves, tie on your apron, and join me as we embark on a delicious culinary adventure!
Personal Story
Korean Carrot Salad holds a special place in my heart. It takes me back to my childhood, where my parents would host lively dinner parties. The kitchen bustled with laughter and delicious aromas, and everyone would gather around the table, eager to try each dish that had been lovingly prepared.
One evening, my friend’s older sister made her own version of Korean Carrot Salad. I remember watching her as she julienned the carrots with a masterful flick of her wrist—every slice was precise and beautiful. She mixed in a rainbow of spices and herbs, and as the bowl filled with brilliant colors, my mouth watered in anticipation.
When I finally took a bite, it was a revelation! The crunch of the carrots mingled with the garlic and spices in a way that danced on my palate. I realized then that salads could be exciting and delicious! Fast forward to today, as I adapted her recipe to share with all of you, I can’t help but feel that same sense of joy and nostalgia. Let’s create some beautiful memories together in the kitchen!
Ingredients
Here’s what you’ll need to make the Best Korean Carrot Salad, along with some helpful tips for each ingredient:
-
2 pounds carrots (peeled and julienned on a mandolin)
- Fresh carrots are the star of this dish! Choosing organic carrots can enhance flavor and reduce pesticide exposure. If you don’t have a mandolin, a sharp knife works just fine, albeit with a little more time and precision.
-
1 small onion (finely diced)
- Sweet onions like Vidalia add a gentle sweetness that compliments the carrots. Yellow onions are a great substitute, while green onions can bring a nice crunch and color if you prefer a milder flavor.
-
¾ cup avocado oil
- A healthy fat that enhances the overall flavor without overpowering it. You can substitute with extra virgin olive oil or grape seed oil if your pantry needs a shake-up!
-
1 teaspoon kosher salt (or more to taste)
- Salt is essential for bringing out all the flavors! Remember, adjustments can be made based on personal preference or dietary restrictions.
-
1 ½ teaspoons sugar (or more to taste)
- Sugar balances the acidity of vinegar. If you’re looking for a healthier option, consider using honey or agave syrup as alternatives.
-
2 teaspoons smoked paprika
- This smoky spice adds depth and complexity. Regular paprika can be used, but keep in mind you’ll lose a bit of that delightful smokiness.
-
2 ½ teaspoons ground coriander
- Earthy and warm, coriander brings an incredible richness to this salad. If you’re a fan of cumin, feel free to experiment with a small amount for an added layer of flavor.
-
½ teaspoon cayenne pepper (or more to taste)
- For those who like it spicy, cayenne adds a kick! Adjust the quantity based on your heat preference, or leave it out entirely for a milder version.
-
6 cloves garlic (minced)
- Fresh garlic provides an aromatic punch. For a nuttier flavor, consider roasting the garlic first, but be aware that it will lose some of its sharpness!
-
¼ cup cilantro (finely chopped)
- This herb adds freshness and color! If cilantro isn’t your thing, try swapping it with fresh parsley or mint for a different herbaceous note.
-
3 tablespoons white vinegar (or more to taste)
- This ingredient gives the salad a tangy kick. Apple cider vinegar is a wonderful substitute if you’re looking for something with a bit more fruity flavor.
Step-by-Step Instructions
Now that you have your ingredients ready, let’s dive into the cooking! Here’s how to create the Best Korean Carrot Salad, step by step:
-
Prep Your Veggies
Start by washing and peeling your carrots. Then, using a mandolin (watch your fingers!) or a sharp knife, julienne the carrots into matchstick-sized pieces that will soak up the flavorful dressing. Aim for about 2-3 inches in length! -
Chop the Onion
Finely dice the small onion. This step is crucial because fine pieces will blend beautifully with the carrots, ensuring every bite is packed with flavor. If you’re sensitive to onions, consider soaking them in cold water for a few minutes before adding them to the salad—a nifty hack to mellow the flavor! -
Create the Dressing
In a large mixing bowl, whisk together the avocado oil, kosher salt, sugar, smoked paprika, ground coriander, cayenne pepper, minced garlic, and white vinegar. Taste it! This is your chance to adjust any seasonings to your liking. Remember, the flavors will meld together as the salad sits. -
Combine All Ingredients
Once the dressing is to your liking, add the julienned carrots and diced onion to the bowl. Mix everything together using your hands or a spatula. Don’t be afraid to get in there—this is your chance to ensure every piece of carrot is coated in that delicious dressing! -
Rest It
Cover the bowl with plastic wrap or a lid, and let the salad sit in the refrigerator for at least 30 minutes. This resting time allows the flavors to mingle beautifully. If you can let it rest longer, even better! -
Finish with Cilantro
Just before serving, add the chopped cilantro and toss gently to combine. This fresh herb really elevates the overall flavor profile! It’s like adding a final touch of sunshine to your salad. -
Taste Again!
Take a moment to taste your creation again before serving. You may want to add a sprinkle more salt, sugar, or acidity depending on your palate. Remember, cooking is all about adjusting to your taste!
Serving Suggestions
Plating is an art, and the Best Korean Carrot Salad deserves a beautiful presentation. I suggest serving it in a clear glass bowl to showcase its vibrant colors! You can also mound it onto a large platter and sprinkle it with some extra cilantro for that beautiful finishing touch. If you want to elevate it further, serve alongside grilled meats or use it as a filling in lettuce wraps for an extra crunch.
Recipe Variations
Feel free to get creative with this Korean Carrot Salad! Here are some fun variations:
-
Add Nuts or Seeds: Toss in some toasted sesame seeds or finely chopped walnuts for added crunch.
-
Spicy Mango Twist: Add diced mango for a sweet contrast and a splash of lime juice for extra brightness.
-
Cabbage Kick: Mix in some shredded cabbage for additional crunch and nutrition.
-
Herb Swap: If cilantro isn’t your favorite, swap it with basil or mint for a different herbaceous tone.
-
Vegan Variation: Make this salad vegan-friendly by swapping out the sugar for a plant-based sweetener like maple syrup.
Chef’s Notes
This recipe has evolved beautifully over time. I originally stumbled upon a version while experimenting with various salads at a friend’s potluck. What started as a simple starter then transformed into a staple for gatherings and celebrations. The beauty of the salad is that it’s highly customizable—taste the dressing and change things to fit your personal flavor profile!
A funny kitchen story comes to mind when I think of Korean Carrot Salad—it was a hectic dinner party, and as I was rushing to finish the salad, I mistakenly grabbed cayenne instead of ground coriander! Let’s just say the recipe took an unexpected spicy turn, and people were fanning their mouths while enjoying what they thought was a unique take on the dish!
FAQs and Troubleshooting
Here are some common questions and potential hiccups you might encounter while making Korean Carrot Salad:
1. Can I use pre-cut carrots?
- While pre-cut carrots can save time, I recommend freshly julienned carrots for the best flavor and texture. They really shine in this salad!
2. What if my salad is too salty?
- If you find your salad too salty, add a pinch of sugar to balance the flavor. You can also add more carrots to dilute the saltiness.
3. Can I make this salad in advance?
- Absolutely! In fact, the flavors improve after sitting! I’d recommend storing it in the fridge for up to three days for optimal freshness.
4. What can I do if my salad is too tangy?
- If you find your dressing too acidic, balance it out by adding a bit of sugar or honey to mellow the tanginess.
Nutritional Info (Optional)
If you’re curious about the nutritional content, here’s a rough estimate (per serving, assuming 8 servings):
- Calories: Approximately 150
- Total Fat: 12g
- Saturated Fat: 1.5g
- Carbohydrates: 15g
- Sugar: 3g
- Protein: 1g
- Fiber: 3g
And there you have it! A beautiful, vibrant, and flavorful dish that embodies the spirit of togetherness and hospitality. This Best Korean Carrot Salad is all about celebrating the joy of good food and wonderful company. I hope you enjoy every bite as much as I do! Tie your apron, pour something sparkling, and let’s create delicious memories together! Thank you for being here at Ivory Apron!
PrintBest Korean Carrot Salad
A vibrant Korean Carrot Salad that balances crunch, zing, and flavor, perfect for any meal.
- Prep Time: 15 minutes
- Cook Time: 0 minutes
- Total Time: 30 minutes
- Yield: 8 servings 1x
- Category: Salad
- Method: No Cooking
- Cuisine: Korean
- Diet: Vegetarian
Ingredients
- 2 pounds carrots (peeled and julienned)
- 1 small onion (finely diced)
- ¾ cup avocado oil
- 1 teaspoon kosher salt (or more to taste)
- 1 ½ teaspoons sugar (or more to taste)
- 2 teaspoons smoked paprika
- 2 ½ teaspoons ground coriander
- ½ teaspoon cayenne pepper (or more to taste)
- 6 cloves garlic (minced)
- ¼ cup cilantro (finely chopped)
- 3 tablespoons white vinegar (or more to taste)
Instructions
- Prep your veggies: Wash and peel the carrots, then julienne them into matchstick-sized pieces.
- Chop the onion: Finely dice the onion and soak in cold water if you prefer a milder flavor.
- Create the dressing: In a large mixing bowl, whisk together avocado oil, kosher salt, sugar, smoked paprika, ground coriander, cayenne pepper, minced garlic, and white vinegar.
- Combine all ingredients: Add the julienned carrots and diced onion to the bowl, mixing everything together.
- Rest it: Cover the bowl and let the salad sit in the refrigerator for at least 30 minutes.
- Finish with cilantro: Add the chopped cilantro and toss gently just before serving.
- Taste again: Adjust seasonings to your liking before serving.
Notes
This salad improves with time as the flavors meld. Serve in a clear bowl to showcase the vibrant colors.
Nutrition
- Serving Size: 1 serving
- Calories: 150
- Sugar: 3g
- Sodium: 400mg
- Fat: 12g
- Saturated Fat: 1.5g
- Unsaturated Fat: 10g
- Trans Fat: 0g
- Carbohydrates: 15g
- Fiber: 3g
- Protein: 1g
- Cholesterol: 0mg
Keywords: Korean salad, carrot salad, healthy side dish, vibrant salad
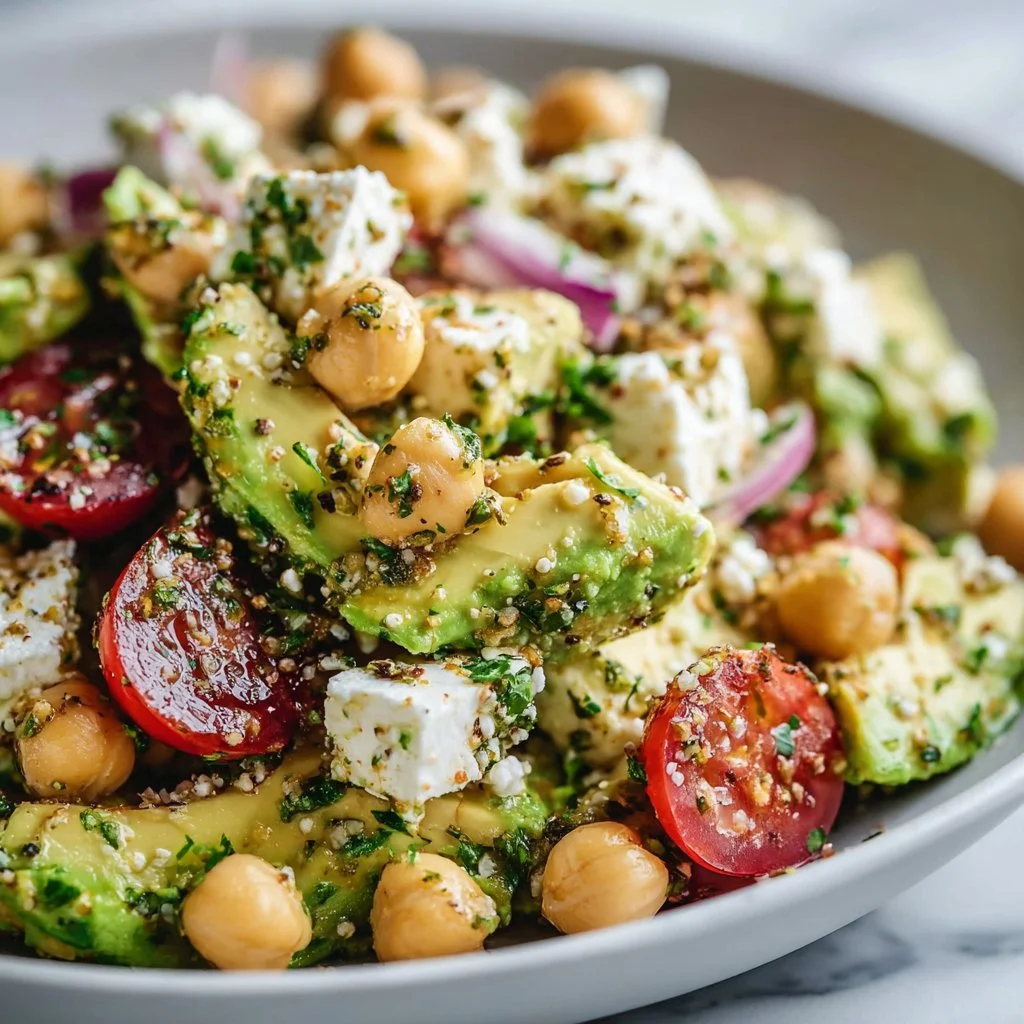
Chickpea Feta Avocado Salad
# Unleashing Flavor: Chickpea Feta Avocado Salad

## Introduction

Hello, lovely food enthusiasts! Today, we’re diving into a dish that’s as vibrant as it is delicious—Chickpea Feta Avocado Salad. This dish captures the essence of fresh ingredients exploding with flavor, and trust me, it’s the kind of salad that will make your taste buds dance with joy!

What’s not to love about the creamy texture of avocado paired with the savory crumbles of feta? The chickpeas add a hearty bite, while fresh herbs and a zesty dressing bring everything together in a delightful embrace. This salad is perfect as a light lunch, a refreshing side for dinner, or even as a delightful centerpiece for your next gathering.

I adore this salad because it’s the epitome of what I believe cooking should be—simple, elegant, and entirely approachable. You don’t need fancy kitchen gadgets or exhaustive culinary training to whip up this beautiful mix. Just those cherished ingredients and a bit of love sprinkled in!

So, roll up your sleeves, tie on your apron, and let’s get cooking. Prepare to impress yourself and everyone around your table without breaking a sweat!

## Personal Story

Ah, salads—often perceived as the “sidekick” to the main course. But for me, they’ve always held a special place at our family dinners. I remember many summer evenings when my mom would invite friends and family over, and we’d gather around the table, full of laughter and stories. One dish that made regular appearances was her chickpea salad, which she had adapted from the Mediterranean recipes she discovered during her travels.

Her version was tangy, colorful, and absolutely refreshing, brightened by whatever seasonal ingredients she had on hand. It was never just about the taste; it was about the entire experience—sitting around the table, relishing the flavors together, sharing recipes, and creating memories.

That’s why this Chickpea Feta Avocado Salad has become a staple in my kitchen. It’s not just a dish; it’s a homage to those balmy nights filled with good food and even better company. Every time I serve it, I can hear echoes of those laughter-filled dinners—truly a testament to how food can turn ordinary moments into precious memories.

## Ingredients

Here’s what you'll need to create this incredible salad:

- **1 (15-ounce / 425g) can chickpeas:**
  Chickpeas offer a protein-packed vegetarian base. If you don’t have canned chickpeas, feel free to use dried ones—just soak and cook them first!

- **1 avocado, pitted and diced:**
  Avocado brings creaminess to the dish and adds healthy fats. If you’re not an avocado lover, you can substitute it with diced cucumber for crunch!

- **4 ounces / 115g feta cheese, crumbled:**
  Feta goes hand-in-hand with the other ingredients. If you want a dairy-free option, try using crumbled tofu with a splash of lemon juice for flavor.

- **1/2 cup / 75g red onion, thinly sliced:**
  The red onion adds a zesty punch. If it’s too strong for your taste, soak the slices in cold water for about 10 minutes to mellow them out.

- **1/2 cup / 50g fresh parsley, chopped:**
  Parsley adds freshness and brightness. You can easily swap it with cilantro if you’d like a different herbal twist.

- **1/4 cup / 25g fresh mint, chopped:**
  Mint complements the flavors beautifully, but feel free to skip it if you're not a fan. Fresh basil can create a different but equally delightful profile.

- **3 tablespoons / 45ml olive oil:**
  Good quality olive oil enhances flavor and brings richness! You could use avocado oil if you prefer.

- **2 tablespoons / 30ml lemon juice, freshly squeezed:**
  Fresh lemon juice is key for brightening the salad! Lime juice works too if you’re looking for a citrus change.

- **1 clove garlic, minced:**
  Garlic adds a savory depth. If raw garlic isn’t your thing, roasted garlic can provide a mellower flavor.

- **1/2 teaspoon / 2.5ml dried oregano:**
  Oregano adds a Mediterranean flair. If you want a bolder taste, try using Italian seasoning instead.

- **Salt and pepper to taste:**
  Adjust to your liking! A sprinkle of smoked salt can add a lovely dimension.

## Step-by-Step Instructions

Let’s get down to the nitty-gritty of creating your fabulous Chickpea Feta Avocado Salad. Follow these steps, and soon you’ll have a bowl full of goodness that looks as good as it tastes!

1. **Prepare the Ingredients:**
   Begin by draining and rinsing your chickpeas in a colander under cold water. This not only removes any excess sodium but also gives a fresher taste. Give them a little shake to remove any excess water, and set them aside.

2. **Dice the Avocado:**
   Slice the avocado in half, remove the pit, and scoop out the flesh. Dice it into bite-sized pieces, but go easy because over-mashing will lead to a guacamole effect rather than chunks in your salad! If you want to prevent browning, squeeze a little extra lemon juice over the diced avocado.

3. **Slice the Red Onion:**
   Thinly slice the red onion and pop it in a small bowl filled with cold water while you prepare the rest of the ingredients. This soaking will reduce the sharpness and make them gentler on the palate when served.

4. **Chop the Fresh Herbs:**
   Chop the parsley and mint leaves. I love using kitchen scissors to snip the herbs directly into the bowl. It saves time and leaves the herbs looking bright and fresh!

5. **Whisk the Dressing:**
   In a small bowl, whisk together the olive oil, lemon juice, minced garlic, dried oregano, salt, and pepper. Taste as you whisk—you want it to feel zesty yet balanced. If the dressing feels thick, add a tad more olive oil or lemon juice to reach your desired consistency.

6. **Combine the Ingredients:**
   In a large mixing bowl, add the chickpeas, diced avocado, crumbled feta, onions (now drained), chopped herbs, and drizzle the dressing over the top. Gently toss everything together, taking care not to mash the avocado too much. You want to hear that little crunch of chickpeas and see the vibrant colors!

7. **Adjust Seasoning:**
   Taste your salad and adjust seasoning as necessary. If you're feeling adventurous, toss in a sprinkle of chili flakes for a spicy kick or a pinch of smoked paprika for an earthier note.

8. **Let it Marinate:**
   For the flavors to meld beautifully, let your salad sit for about 10-15 minutes at room temperature. But if you can’t wait that long, don’t stress—it’s delicious right away!

## Serving Suggestions

Now let’s talk presentation! Transfer the salad to a beautiful bowl, and if you desire, add a few extra feta crumbles or a handful of fresh herbs on top for that visual pop. Serve with a rustic wooden spoon or some cute salad tongs. This dish pairs beautifully with grilled chicken, pita bread, or just on its own as a light, refreshing meal!

## Recipe Variations

Want to switch things up? Here are a few ideas:

- **Mediterranean Twist:** Add diced sun-dried tomatoes and black olives for an extra Mediterranean flair.
- **Spicy Kick:** Toss in some diced jalapeño or a spoonful of harissa if you like heat.
- **Quinoa Boost:** Mix in a cup of cooked quinoa for added fiber and a nutritious boost.
- **Swap the Greens:** Use arugula or baby spinach instead of the herbs for a bed of flavor.
- **Creamy Upgrade:** For an extra creamy texture, mix in a dollop of Greek yogurt!

## Chef’s Notes

Every recipe has a story, and this one is no different! What I love about this salad is its evolution. While my mom’s version was filled with seasonal vegetables, I’ve added ingredients based on my own experiences and tastes, gradually simplifying it to let the beauty of each component shine through. The balance of flavors is what keeps me coming back for more. And with every new twist, I’m reminded of those lovely summer nights spent around the dinner table, creating cherished moments.

So, while you gather your ingredients and get ready to mix, remember that the heart of this salad lies in the act of coming together, whether that’s with family, friends, or simply enjoying a moment alone with good food.

## FAQs and Troubleshooting

1. **Can I make this salad in advance?**
   Absolutely! While it's best enjoyed fresh, you can prepare most components ahead of time. I suggest storing the dressing separately and adding the avocado just before serving to keep it from turning brown.

2. **What if I don't have feta cheese?**
   No worries! You can substitute it with goat cheese or any mild cheese you prefer. For a vegan option, try a crumbly nut cheese or nutritional yeast.

3. **Is this salad gluten-free?**
   Yes! All the ingredients are naturally gluten-free, making it a fantastic choice for various dietary needs.

4. **My salad turned out too salty. What can I do?**
   If you find the salad a bit salty, add more chickpeas or avocado to balance the flavors. A bit of lemon juice can also help cut through the saltiness!

## Nutritional Info

- **Calories:** Approximately 350 per serving (varies with serving size and additional ingredients)
- **Protein:** 10g
- **Carbohydrates:** 25g
- **Fats:** 25g
- **Fiber:** 10g

So, there you have it! This Chickpea Feta Avocado Salad is not just a feast for the eyes; it’s a delightful explosion of flavors that come together to create something truly special. With memories baked into every bite and endless possibilities for customization, I can’t wait for you to gather around your table and savor every moment. Let's set the table and celebrate good food, together!
Chickpea Feta Avocado Salad
A vibrant and delicious salad made with chickpeas, feta cheese, and avocado, bringing together fresh ingredients in a delightful mix.
- Prep Time: 15 minutes
- Cook Time: 0 minutes
- Total Time: 15 minutes
- Yield: 4 servings 1x
- Category: Salad
- Method: Mixing
- Cuisine: Mediterranean
- Diet: Vegetarian
Ingredients
- 1 (15-ounce / 425g) can chickpeas, drained and rinsed
- 1 avocado, pitted and diced
- 4 ounces / 115g feta cheese, crumbled
- 1/2 cup / 75g red onion, thinly sliced
- 1/2 cup / 50g fresh parsley, chopped
- 1/4 cup / 25g fresh mint, chopped
- 3 tablespoons / 45ml olive oil
- 2 tablespoons / 30ml lemon juice, freshly squeezed
- 1 clove garlic, minced
- 1/2 teaspoon / 2.5ml dried oregano
- Salt and pepper to taste
Instructions
- Prepare the ingredients by draining and rinsing your chickpeas in a colander.
- Dice the avocado and squeeze some lemon juice over it to prevent browning.
- Slice the red onion and soak it in cold water to mellow the taste.
- Chop the parsley and mint leaves.
- Whisk together the olive oil, lemon juice, minced garlic, oregano, salt, and pepper in a small bowl.
- Combine the chickpeas, avocado, feta, onions, and herbs in a large mixing bowl and drizzle with the dressing.
- Adjust seasoning as necessary and add optional chili flakes for heat.
- Let the salad sit for 10-15 minutes to allow flavors to meld before serving.
Notes
This salad can be prepared ahead of time. Store the dressing separately and add avocado just before serving to prevent browning.
Nutrition
- Serving Size: 1 serving
- Calories: 350
- Sugar: 3g
- Sodium: 400mg
- Fat: 25g
- Saturated Fat: 6g
- Unsaturated Fat: 15g
- Trans Fat: 0g
- Carbohydrates: 25g
- Fiber: 10g
- Protein: 15g
- Cholesterol: 30mg
Keywords: chickpea salad, vegetarian salad, Mediterranean salad, healthy salad, avocado salad
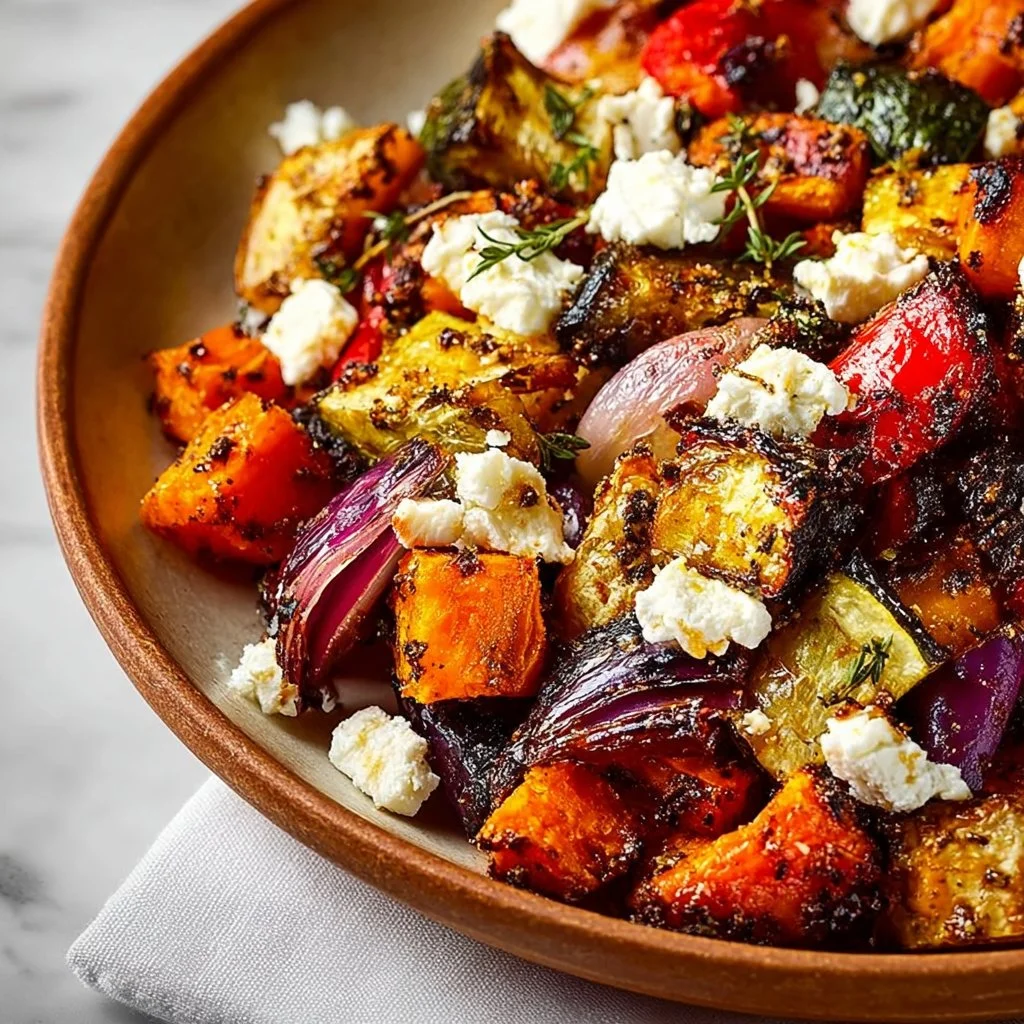
Sweet Potato Roasted Vegetables with Feta
Sweet Potato Roasted Vegetables with Feta: A Comforting Delight
Hey there, fellow foodies! Today, we’re diving into a cozy recipe that’s not only a feast for the eyes but gloriously flavorful too. Let me introduce you to my vibrant Sweet Potato Roasted Vegetables with Feta. This colorful dish is like a warm hug on a plate, brimming with the rich, sweet earthiness of roasted sweet potatoes and the delightful crunch of seasonal vegetables—all topped off with a burst of salty, creamy feta.
Picture this: the golden sun dipping below the horizon, your kitchen filled with the intoxicating aroma of gently caramelizing veggies, and the soft hum of laughter as friends or family linger around your table. That’s the magic I want to share with you — a recipe that’s elegant, healthy, and utterly achievable. This stuffed bake is perfect for date nights, casual dinners, or any gathering where you want to impress without fuss.
Why are roasted vegetables so special? Well, roasting brings out their natural sweetness while enhancing their flavors, creating a comforting, deeply satisfying dish. Plus, the vibrant colors make you feel good about what you’re eating. You know what they say: you eat with your eyes first! Ready to tie on your apron and get cooking? Let’s jump in!
Personal Story
One of my fondest kitchen memories is tied to the very first dinner party I ever hosted. I decided early on that I wanted to impress my friends, so I went all out—homemade pasta, fancy cocktails, and, of course, a spectacular vegetable side. I vividly remember dicing sweet potatoes, filling my kitchen with their warm aroma as they roared in the oven. I had invited all my closest friends, eager to showcase my culinary prowess.
But here’s where the magic happened: I took my roasted sweet potatoes and mixed them with some colorful veggies I had on hand, like bright bell peppers and crispy zucchini. I let them mingle together in a big bowl and thought, “What’s missing?” Enter the star of the show: crumbled feta cheese! It not only added a salty kick but made everything look stunning. That night was pure joy; we laughed, savored every bite, and shared stories that turned into cherished memories. This dish has since become a staple in my home, and I’m thrilled to share it with you!
Ingredients
Here’s what you’ll need for your Sweet Potato Roasted Vegetables with Feta:
-
2 large sweet potatoes, peeled and cubed
Sweet potatoes are the sweet, starchy heroes of this dish. They’re rich in vitamins A and C and will caramelize beautifully in the oven. If you can’t find sweet potatoes, feel free to swap in butternut squash for a similar flavor. -
2 cups mixed vegetables (e.g., bell peppers, zucchini, carrots)
A colorful combination is key! Choose any mix of seasonal veggies you love. Don’t have zucchini? Eggplant would work wonders too. The idea is to embrace vegetables that play well together and deliver texture and flavor. -
1/2 cup crumbled feta cheese
Feta adds a tangy creaminess that balances the sweetness of the potatoes. If you’re not a fan of feta, goat cheese or ricotta can be excellent substitutes, lending their own unique twist. -
3 tablespoons olive oil
You can’t go wrong with good-quality olive oil! It’ll help your veggies roast beautifully and add a delicious depth of flavor. If you prefer, avocado oil is a fantastic alternative. -
1 teaspoon garlic powder
Garlic powder is a chef’s best friend for sheer convenience! It offers sweetness and warmth without the fuss of chopping. Feel free to use minced fresh garlic if you’re in the mood. -
1 teaspoon paprika
Paprika is great for adding a bit of smokiness and color. You can also experiment with smoked paprika for a deeper flavor or even a sprinkle of chili powder for a spicy kick! -
Salt and pepper to taste
Don’t underestimate the power of seasoning! A dash of salt and pepper will elevate the dish’s overall flavors, ensuring everything sings together. -
Fresh herbs for garnish (optional)
A touch of fresh herbs like parsley or dill brings a burst of freshness and brightness to the platter. It’s an optional but lovely touch!
Step-by-Step Instructions
Alright, let’s get this oven heating up and those veggies roasting! Follow these steps to create your delicious Sweet Potato Roasted Vegetables with Feta:
-
Preheat the Oven
Start by preheating your oven to 425°F (220°C). We’re aiming for a hot environment to get those sweet potatoes crisp and caramelized. It’s a crucial step, so don’t skip it! -
Prep Your Vegetables
While the oven heats up, peel and cube your sweet potatoes into roughly 1-inch pieces. You want them uniform for even cooking. As you chop, toss in any mixed veggies you choose—bell peppers, zucchini, and carrots will work beautifully. -
Toss with Olive Oil and Seasonings
In a large bowl, combine your cubed sweet potatoes and mixed vegetables. Drizzle with olive oil, garlic powder, paprika, salt, and pepper. Now for a little chef hack: use your hands! Get in there and mix everything well, ensuring each piece is coated in that glorious olive oil and seasoning. -
Spread on the Baking Sheet
Spread the mixture evenly across a large baking sheet. Make sure the veggies have plenty of space; overcrowding will steam them instead of roasting. An even layer is essential for that caramelized goodness! -
Roast to Perfection
Pop that baking sheet into your preheated oven. Roast for about 25-30 minutes or until the sweet potatoes are fork-tender and golden. Halfway through, give everything a good toss to ensure even cooking—don’t let those gorgeous caramelization moments hide! -
Add the Feta
When the veggies are almost done, take the baking sheet out and sprinkle the crumbled feta over your beautiful medley. Return it to the oven for an additional 5 minutes. This will allow the feta to melt and slightly brown, creating a divine cheesy topping. -
Serve and Garnish
Once out of the oven, you should see beautiful roasted vegetables with a gorgeous blush of melted feta. Garnish with fresh herbs, if using, for that final touch, then serve warm and enjoy!
Serving Suggestions
To plate your Sweet Potato Roasted Vegetables with Feta, consider using a wide, shallow bowl. Scoop a generous portion onto the plate, allowing the vibrant colors to shine. For an added touch of elegance, drizzle a bit more olive oil on top and sprinkle with freshly cracked pepper or a dash of chili flakes. This would impress even the most discerning guests while still keeping it homey!
Recipe Variations
-
Italian Style
Add Italian seasoning, such as dried oregano and basil, to give your vegetables a lovely Mediterranean flair. Toss in some cherry tomatoes for extra color and sweetness! -
Spicy Kick
If you love heat, add sliced jalapeños or a sprinkle of red pepper flakes before roasting. The heat will beautifully contrast with the sweetness of the veggies. -
Sweet and Mellow
Mix in chunks of apple or pear—sweet fruits that caramelize nicely with the veggies. They’ll add an unexpected sweet note that works wonderfully! -
Grains Galore
Create a delightful grain bowl by serving your roasted veggies over a bed of quinoa or farro. Add a drizzle of tahini or a yogurt sauce for extra creaminess. -
Pasta Delight
Toss your roasted vegetables into cooked pasta, add a splash of lemon juice, and you’ve got a quick weeknight dinner! The feta complements the pasta perfectly!
Chef’s Notes
One of my favorite things about this dish is its versatility. Over the years, I’ve played with different seasonal vegetables, using whatever’s fresh and available. Sometimes I sneak in a handful of greens like spinach or kale right at the end to add more color and nutrition. And let me share a funny kitchen story—the first time I made this, I was so excited to impress my friends that I realized too late I had forgotten the feta in the fridge. Thankfully, I had a container of creamy goat cheese, and it turned out absolutely delicious! The beauty of cooking is being adaptable and creative—it’s all about the journey!
FAQs and Troubleshooting
-
What if my veggies aren’t roasting evenly?
Make sure you use a large enough baking sheet so the veggies aren’t crowded. If they touch, they steam rather than roast. Give them a good toss halfway to promote even cooking. -
Can I prepare this dish ahead of time?
Absolutely! You can chop the sweet potatoes and veggies in advance, toss them in oil and seasoning, and store them in the refrigerator for up to 24 hours. Just pop them in the oven when you’re ready! -
How do I know when the sweet potatoes are done?
They should be tender when pierced with a fork and have golden edges. A little caramelization is what you want—don’t be afraid of those beautiful brown spots! -
What if we have leftovers?
Lucky you! The sweet potato roasted vegetables store well in an airtight container in the fridge for 3-4 days. Reheat in the oven or microwave—perfect for easy lunches or side dishes throughout the week!
Nutritional Info (if applicable)
While the nutritional values can vary based on specific ingredients used and their quantities, here’s a rough estimate per serving (assuming 6 servings):
- Calories: 220
- Protein: 5g
- Fat: 10g
- Carbohydrates: 30g
- Fiber: 6g
- Sugar: 5g
Cooking can be as delightful as it is nourishing; this Sweet Potato Roasted Vegetables with Feta dish embodies that philosophy perfectly. I hope you enjoy making and sharing this recipe as much as I have. Let’s elevate your kitchen adventures one bite at a time! Happy cooking!
PrintSweet Potato Roasted Vegetables with Feta
A colorful and flavorful dish featuring roasted sweet potatoes and seasonal vegetables topped with creamy feta cheese.
- Prep Time: 15 minutes
- Cook Time: 30 minutes
- Total Time: 45 minutes
- Yield: 4 servings 1x
- Category: Side Dish
- Method: Roasting
- Cuisine: Mediterranean
- Diet: Vegetarian
Ingredients
- 2 large sweet potatoes, peeled and cubed
- 2 cups mixed vegetables (e.g., bell peppers, zucchini, carrots)
- 1/2 cup crumbled feta cheese
- 3 tablespoons olive oil
- 1 teaspoon garlic powder
- 1 teaspoon paprika
- Salt and pepper to taste
- Fresh herbs for garnish (optional)
Instructions
- Preheat the oven to 425°F (220°C).
- Prep your sweet potatoes into roughly 1-inch pieces and toss in mixed veggies.
- Toss with olive oil, garlic powder, paprika, salt, and pepper in a large bowl.
- Spread the mixture evenly across a large baking sheet.
- Roast for about 25-30 minutes or until fork-tender and golden, tossing halfway through.
- Add the feta cheese and return to the oven for an additional 5 minutes.
- Serve warm, garnished with fresh herbs if desired.
Notes
This dish can be prepared ahead of time and stored in the fridge for up to 24 hours before roasting.
Nutrition
- Serving Size: 1 serving
- Calories: 220
- Sugar: 5g
- Sodium: 200mg
- Fat: 10g
- Saturated Fat: 3g
- Unsaturated Fat: 7g
- Trans Fat: 0g
- Carbohydrates: 30g
- Fiber: 6g
- Protein: 5g
- Cholesterol: 10mg
Keywords: Sweet Potato, Roasted Vegetables, Feta, Vegetarian Recipe, Comfort Food

Easy Yogurt Granola Bowls (4 Ways!)
Easy Yogurt Granola Bowls (4 Ways!)
Hey friends! Welcome back to my kitchen! Today, we’re diving into a delightful and versatile breakfast option that’s the epitome of elegance meeting ease—Easy Yogurt Granola Bowls! Whether you need a quick bite before heading out to conquer the day or a leisurely brunch with friends, these bowls have got you covered. They’re not just tasty; they’re a canvas for your culinary creativity!
I love yogurt bowls because they embody the spirit of improvisation in cooking. There’s no right or wrong way to build one, and the combinations are endless! You can wake up each day, peek into your fridge, and whip up something new that’s both nutritious and satisfying. Plus, who doesn’t love a meal that’s as pretty as it is delicious? Trust me; once you get the hang of these yogurt bowls, you’ll find yourself excitedly creating different combinations for any occasion!
Today, I’ll share four distinct ways to craft these yogurt bowls, showcasing various flavors, textures, and seasonal ingredients. So, grab your favorite bowl and let’s get started on this tasty journey!
Personal Story
Growing up, breakfast was a big deal in my family. My mom had this knack for transforming simple ingredients into a feast that everyone would rush to the table for. I remember Saturday mornings, the smell of fresh pancakes wafting through the house while we all debated which toppings to pile on (hello, whipped cream and sprinkles!). But as much as I adored pancakes, I also loved the simplicity of yogurt bowls. They were my go-to for when I needed something quick yet packed with flavor.
I vividly recall one sunny morning in high school, opening the fridge and discovering a stash of fresh berries from the farmer’s market. I grabbed a big bowl, some yogurt, and let my creativity flow—bananas, granola, a drizzle of honey… it was a perfect blend! My dad walked in and raised an eyebrow, surprised that a simple breakfast could look so gourmet. And that’s what these yogurt bowls are all about—they’re beautiful, vibrant, and bursting with flavor, yet approachable for everyone, regardless of culinary skills.
So, let’s celebrate this easy-going dish that gives you room to play in the kitchen while feeling like you’ve hit a home run!
Ingredients
For each of the yogurt granola bowls, the foundation is the same: delicious Greek yogurt and crunchy granola. Below are the essentials and a few fun insights to inspire your bowl-making today!
Basic Ingredients for All Bowls:
-
1 cup plain or vanilla Greek yogurt
A creamy base full of protein that makes each bite satisfying. You can use regular yogurt but Greek offers that extra richness! -
1/3 cup granola
This adds a delightful crunch and is the perfect contrast to the creaminess of yogurt. Feel free to swap in your favorite flavor, whether it’s honey-nut or chocolate chip—just make sure it’s crunchy!
Toppings for Each Bowl:
-
Classic Banana and Peanut Butter Bowl:
- 1/2 banana, sliced
Bananas add natural sweetness and a creamy texture. You can swap with any other fruit or skip if you’re not a fan! - 1 tablespoon peanut butter
A hearty addition that pairs beautifully with banana. Swap it for almond butter if you prefer, just keep the creaminess! - A few chocolate chips
Because who doesn’t love chocolate in the morning? Substitute with nuts for a healthier crunch.
- 1/2 banana, sliced
-
Tropical Mango Coconut Bowl:
- 3/4 cup fresh mango, diced
Brings a burst of sunny flavor! If mango isn’t in season, opt for pineapple or papaya for a tropical twist. - 1 tablespoon shredded coconut
Adds a lovely texture and delightful sweetness. You can switch to chopped nuts if you’re looking for less sweetness!
- 3/4 cup fresh mango, diced
-
Berry Bliss Bowl:
- 1 cup blueberries or sliced strawberries
Packed with antioxidants, they’re fresh and flavorful. Swap berries for peaches or apples if those are your favorites! - 1 tablespoon almond butter or sliced almonds
Almonds provide crunch and a dose of healthy fats. You can also use walnuts for another nutty alternative—just watch those allergies!
- 1 cup blueberries or sliced strawberries
-
Raspberry Peanut Butter Bowl:
- 1 cup raspberries or sliced strawberries
Raspberries add a tart kick that balances out the sweetness of yogurt. Strawberries work beautifully if you want a sweeter option! - A drizzle of honey (optional)
This is more about personal taste—add to satisfy that sweet tooth or leave it out for a healthier version!
- 1 cup raspberries or sliced strawberries
Step-by-Step Instructions
To put together these beautiful yogurt bowls, simply follow these easy steps! Let’s whip up a few flavors together:
1. Prepare the Base
- Scoop Your Yogurt:
Begin by selecting your chosen yogurt—plain, vanilla, coconut—whatever gets your taste buds tingling! Scoop it into your bowl (or if you’re feeling adventurous, a mason jar for that Instagram-worthy look).
Chef’s Tip: If you use plain yogurt, consider adding a touch of honey or maple syrup to sweeten it up! Just start with a teaspoon and adjust to taste.
2. Choose Your Fruits
- Chop and Slice:
Now it’s time to prepare your fruits. Depending on which bowl you’re creating, either slice your banana, dice your mango, rinse your berries, or chop up those raspberries.
Chef’s Hack: Ensure fruits are fresh and in season for maximum flavor! Frozen fruits can also be used; just let them thaw slightly before adding.
3. Add the Granola
- Sprinkle the Crunch:
Grab your granola and sprinkle a hefty 1/3 cup over the yogurt base. This is where the texture comes alive!
Tip: If you’re making these for kids or guests, consider layering the granola to create a “surprise” crunch with every bite!
4. Layer Those Toppings
- Finish It Off:
Top your bowl with the chosen fruits and any additional toppings—peanut butter, honey, or shredded coconut. The fun part here is to arrange everything beautifully; this is where your creativity shines!
Chef’s Tip: Create visual contrast—if using chocolate chips, place a few on top! Spread out the colorful fruits evenly over the yogurt; it becomes a work of art. Plus, it makes for great photos!
5. Serve & Enjoy!
- Dig In with Style:
Grab your favorite spoon, take a moment to admire your creation (yes, food should always be appreciated), and then dig in!
Chef’s Note: These bowls are versatile and can be prepped in advance! Just keep the granola separate until you’re ready to eat to maintain that crunch.
Serving Suggestions
Presentation can make your yogurt bowl even more enjoyable! Consider serving it in clear glass bowls or jars to showcase the colors. A sprinkle of fresh herbs like mint can add a pop of color and freshness. And for those who like a bit of fun, gather small bowls with various toppings so everyone can customize their own yogurt bowl at brunch gatherings!
Recipe Variations
Here are a few clever twists on the basic yogurt granola bowl that you might enjoy:
-
Choco-Peanut Delight:
Mix in cocoa powder into the yogurt for a chocolatey base. Top with sliced bananas, whipped cream, and chocolate granola! -
Savory Yogurt Bowl:
Swap out granola for crunchy chickpeas or seeds, and add roasted veggies, herbs, and feta on top of the yogurt. -
Nutty Oats Bowl:
Instead of opting for yogurt, make a base of overnight oats with almond milk, then top with your favorite granola! -
Fruit Compote Bowl:
Cook down assorted fruits like blueberries and raspberries into a quick compote, and drizzle over your yogurt for an extra fruit punch. -
Overnight Yogurt Bowl:
Mix yogurt with your granola and let it sit in the fridge overnight for a ready-made breakfast!
Chef’s Notes
Yogurt bowls have been a staple in my kitchen for years, but they’ve certainly evolved! I’ve experimented with countless ingredients, and it never ceases to amaze me how versatile they can be. One day, I might throw in some basil or mint for a herbaceous kick, while another day it could be a sprinkle of cinnamon for warmth.
I’ve even created a DIY bar at brunch events, letting guests use their imagination to craft their own perfect bowl! It’s like a little food art project before diving into deliciousness. Plus, who doesn’t love a bit of creativity alongside their breakfast?
FAQs and Troubleshooting
1. Can I use regular yogurt instead of Greek?
Absolutely! Regular yogurt will yield a slightly thinner consistency but will still taste delightful. For a creamier texture, you could strain it a bit to more closely resemble Greek yogurt.
2. How long do these bowls stay fresh?
Prepared yogurt bowls can last about a day in the fridge. It’s best to keep granola separate until it’s time to eat to maintain that delightful crunch!
3. I don’t like granola; what can I use instead?
No worries! You can use any crunchy toppings like chopped nuts, seeds, or even crunchy cereal for that same textural element. Go for what you love!
4. How can I make this bowl more filling?
For a heartier option, add a scoop of nut butter into the yogurt or layer in some chia seeds. These additions will increase protein and fiber, keeping you satisfied longer!
Nutritional Info
(Displayed as a general guide—depending on the specific ingredients and amounts used)
- Calories: 350-500 per bowl, depending on toppings
- Protein: 20-30g (high depending on Greek yogurt)
- Fiber: 5-10g (depending on fruits and granola)
Thanks for joining me on this delicious journey of Easy Yogurt Granola Bowls! I hope this inspires you to get creative and have fun in your kitchen. Dare to mix and match different flavors and toppings, and remember that the best meals are the ones made with love. Happy cooking, and until next time—let’s keep celebrating good food together!
PrintEasy Yogurt Granola Bowls (4 Ways!)

A delightful and versatile breakfast option featuring Greek yogurt and crunchy granola, perfect for any occasion.
- Prep Time: 10 minutes
- Cook Time: 0 minutes
- Total Time: 10 minutes
- Yield: 4 servings 1x
- Category: Breakfast
- Method: No Cooking Required
- Cuisine: Modern American
- Diet: Vegetarian
Ingredients
- 1 cup plain or vanilla Greek yogurt
- 1/3 cup granola
- 1/2 banana, sliced (for Classic Banana and Peanut Butter Bowl)
- 1 tablespoon peanut butter (for Classic Banana and Peanut Butter Bowl)
- A few chocolate chips (for Classic Banana and Peanut Butter Bowl)
- 3/4 cup fresh mango, diced (for Tropical Mango Coconut Bowl)
- 1 tablespoon shredded coconut (for Tropical Mango Coconut Bowl)
- 1 cup blueberries or sliced strawberries (for Berry Bliss Bowl)
- 1 tablespoon almond butter or sliced almonds (for Berry Bliss Bowl)
- 1 cup raspberries or sliced strawberries (for Raspberry Peanut Butter Bowl)
- A drizzle of honey (optional, for Raspberry Peanut Butter Bowl)
Instructions
- Scoop Your Yogurt: Start by selecting your yogurt and scooping it into a bowl.
- Chop and Slice: Prepare your fruits for the selected bowl.
- Sprinkle the Crunch: Add granola over the yogurt.
- Top your bowl: Arrange fruits and toppings beautifully.
- Grab your spoon: Admire your creation and dig in!
Notes
Keep granola separate until ready to eat to maintain its crunch. Experiment with flavors and toppings for variety!
Nutrition
- Serving Size: 1 serving
- Calories: 400
- Sugar: 15g
- Sodium: 50mg
- Fat: 14g
- Saturated Fat: 3g
- Unsaturated Fat: 9g
- Trans Fat: 0g
- Carbohydrates: 54g
- Fiber: 7g
- Protein: 22g
- Cholesterol: 5mg
Keywords: yogurt bowl, breakfast, granola, healthy recipe, easy breakfast
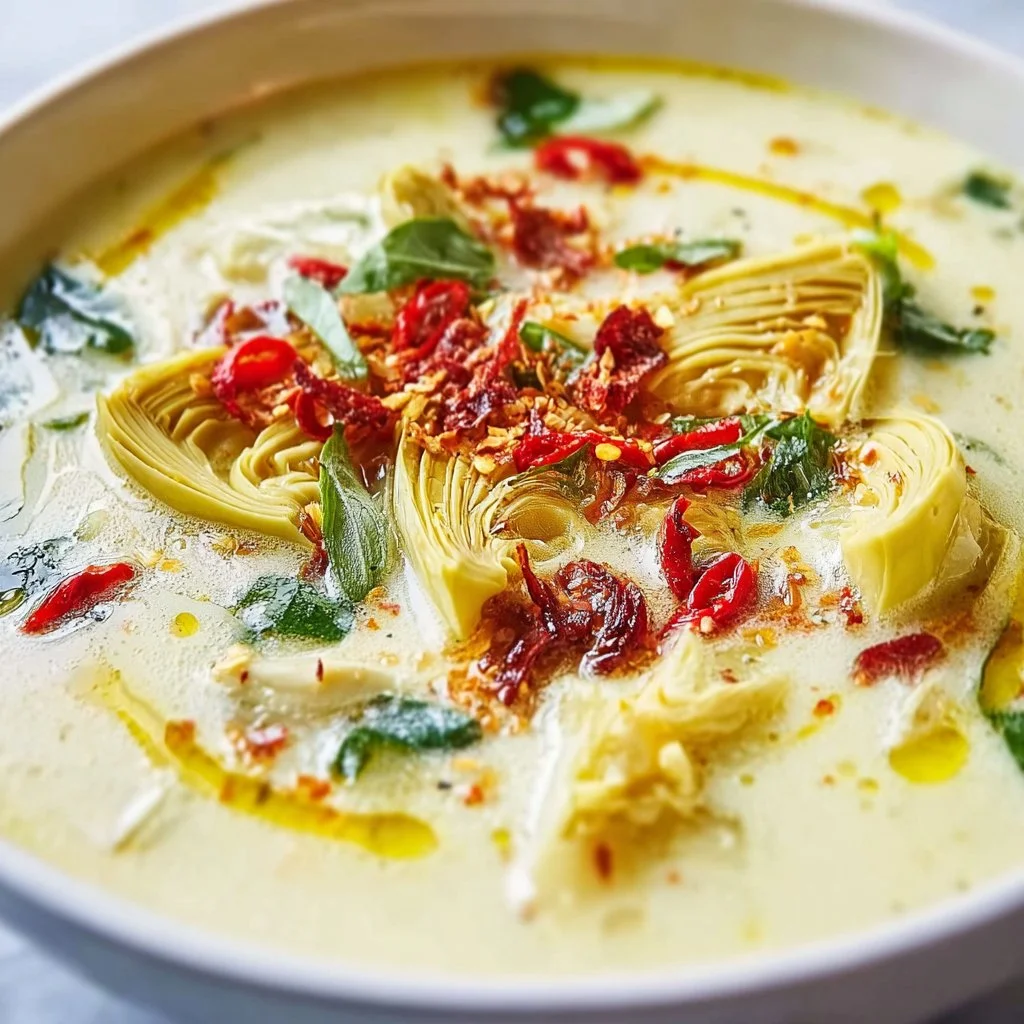
Creamy Lemony Tuscan Artichoke Soup for Ultimate Comfort
Creamy Lemony Tuscan Artichoke Soup for Ultimate Comfort
Hello, fellow food enthusiasts! Today, we’re diving into a bowl of warm and deliciousness that’s perfect for those chilly evenings or whenever you’re in need of a little culinary comfort. Trust me, there’s something utterly magical about a creamy soup that envelops you in warmth and love, and this Creamy Lemony Tuscan Artichoke Soup is no exception.
Imagine walking into a cozy kitchen, the ambiance filled with the rich aroma of sautéed vegetables mingling perfectly with the zestiness of lemon. You close your eyes, take a deep breath, and instantly feel transported to a sun-kissed Italian villa, surrounded by lush greenery and the sweet sound of laughter echoing around the dinner table. Yep, that’s the kind of vibe we’re going for today!
I created this recipe to capture that essence — the elegance of Tuscan flavors balanced with a creamy, comforting finish. The creamy texture is so satisfying, and the tang of lemon brightens everything up, leaving you feeling refreshed and delighted.
Gathering around the table with friends and family over a steaming bowl of this artichoke soup creates a beautiful moment, reminding us how food brings us together. And don’t worry — you don’t need any fancy culinary skills to make this dish shine! With a few simple ingredients and a bit of love, you’ll have a stunning centerpiece worthy of any dinner party or cozy family meal.
So, grab your apron, and let’s embark on this culinary adventure together! Trust me, once you try this soup, it’ll become a beloved staple in your kitchen.
Personal Story
This soup recipe takes me back to my childhood, where my grandmother would whip up her version of creamy soup during the colder months. She was a master at combining flavors, and her kitchen was the heart of the home. I remember sneaking in while she was fussing over the stove, the delightful smell wrapping around me like a warm hug.
One chilly autumn afternoon, I asked her how she made her soup so comforting. She simply smiled and whispered, "It’s all about the love and good ingredients, dear." Those words have stuck with me, and I try to infuse them into everything I create in the kitchen.
Fast forward to today, and I’ve taken inspiration from her comforting techniques and my love for Tuscan cuisine. This Creamy Lemony Tuscan Artichoke Soup is my tribute to her culinary wisdom. Each spoonful feels like a warm embrace, reminiscent of those simple moments spent in her kitchen. I hope it brings you as much joy as it continues to bring me when I serve it to friends and family!
Ingredients
Here’s what you’ll need to create this delightful soup:
-
2 tablespoons Extra-Virgin Olive Oil
A key player for its rich flavor, but feel free to swap it out with avocado oil if you prefer a neutral taste. -
1 large Yellow Onion, diced
Adds a sweet base flavor. If you want a milder profile, you can use shallots instead. -
2 stalks Celery, sliced
Provides a lovely crunch and freshness. If you’re not a fan of celery, feel free to substitute it with bell peppers for a sweet flavor! -
2 medium Carrots, peeled and sliced
They lend a subtle sweetness. Alternatively, feel free to experiment with parsnips for a slightly earthier taste. -
3 cloves Fresh Garlic, chopped
A must-have for that aromatic kick! Garlic powder works in a pinch, but nothing beats fresh garlic’s vibrant flavor. -
1/2 teaspoon Red Pepper Flakes
A little heat to elevate the flavors! Adjust it to your liking, or omit it if you’d prefer a milder soup. -
2 medium Potatoes, peeled and diced into 1/2-inch cubes
Yukon Gold gives a creamy texture, but sweet potatoes can add a unique sweetness if that’s more your style. -
1 can Artichoke Hearts, drained
These beauties add that distinct, tangy flavor. Frozen artichoke hearts are a great substitute if you can’t find canned. -
1/2 cup Sun-Dried Tomatoes, chopped
They bring an intense burst of flavor. In a pinch, you can also use tomato paste for simplicity. -
2 tablespoons Capers, drained
For a briny kick! If you’re looking for a subtler flavor, skip them altogether. -
4 cups Chicken Bone Broth
A rich base that adds depth. If you need a vegetarian option, vegetable broth works beautifully, too. -
1/2 cup Milk of Choice
Regular or plant-based milk works here. Coconut milk adds a delightful creaminess too if you want a tropical twist. -
2 tablespoons Arrowroot Powder
This acts as a thickening agent. Cornstarch is an effective alternative in most cases. -
1 tablespoon Fresh Lemon Juice
Brightens up the flavor! Lime juice can work as a lovely substitute if you’re feeling adventurous. -
1 teaspoon Lemon Zest
For that extra zing! Orange zest can be a nice alternative if you’re in the mood for something a bit different. -
to taste Sea Salt
Salt is essential for enhancing flavors, adjust based on your dietary needs. -
to taste Black Pepper
A little spice! Again, adjust this to your preference. -
1 cup Freshly Chopped Kale or Spinach
Tons of nutrients packed into this leafy goodness! If you aren’t a fan, Swiss chard can serve as a great alternative. -
1/4 cup Freshly grated Parmesan cheese
It’s the perfect finishing touch! For a dairy-free option, vegan cheese alternatives work great. -
1 whole Lemon wedges (for serving)
A zesty accent when it’s time to dig in! -
to taste Red pepper flakes (for added flavor and presentation)
Step-by-Step Instructions
Now that we have our ingredients prepped, it’s time to cook! Here’s how to create this creamy masterpiece step-by-step:
-
Sauté the Base
In a large pot, heat the olive oil over medium heat. Once it’s shimmering, add the onion and cook until it’s translucent, about 5 minutes. This will create a sweet aromatic base for your soup! You want to soften the onions beautifully without browning them. Stir occasionally, and let that aroma fill your kitchen! -
Add Aroma Builders
Toss in the celery, carrots, and garlic. Cook for an additional 5-7 minutes until the vegetables have softened, and your kitchen smells divine! Here’s a pro tip: when you add the garlic, stir continuously for about 1 minute. Garlic can burn quickly; we want that perfect fragrant golden hue. -
Spice It Up
Sprinkle in the red pepper flakes and stir for about 30 seconds — it’s just enough time for the spices to bloom and infuse their flavors into the veggies. Don’t shy away if you love heat; feel free to add a tad more! -
Include the Potatoes
Dump in your diced potatoes and give it a good stir. Let everything combine beautifully for a minute. This will help the potatoes soak up all those delightful flavors. -
Artichokes and Tomatoes, Oh My!
Next up, your artichoke hearts and sun-dried tomatoes! Stir them into the mixture and let them mingle for just a couple of minutes. They will add that essential Tuscan flair to the soup. -
Pour in the Broth
Now it’s time for the main liquid star — the chicken bone broth! Pour it in, turn the heat to high, and bring it to a gentle boil. Once boiling, reduce it to a simmer and cover the pot. Let that soup bubble away for about 15-20 minutes until the potatoes are tender. Here’s a little chef hack: poke a potato cube with a fork; if it slides off easily, it’s ready! -
Blend It Up
Once all the veggies are soft, remove the pot from the heat. If you want a creamy consistency, use an immersion blender directly in the pot to blend everything together until smooth. If you don’t have an immersion blender, carefully transfer the soup (in batches) to a regular blender. Just ensure you don’t fill it to the brim as it can get a little messy! Return it to the pot afterward. -
Finishing Touches
Stir in the milk of your choice, and let the soup heat over low heat for a few minutes while you whisk in the arrowroot powder mixed with a splash of water. This will help thicken the soup and give it that luxurious, creamy texture. Season with the lemon juice, lemon zest, sea salt, and black pepper to taste. Taste test — this is when you can adjust those flavor profiles; maybe you want it zippier with more lemon juice or saltier with a pinch more! -
Greens Galore
Finally, fold in the chopped kale or spinach until it wilts. It adds a lovely brightness to the soup, making it feel fresh and vibrant! -
Serve and Enjoy
Ladle the soup into bowls, sprinkle with Parmesan cheese, and add a squeeze of fresh lemon for that zesty punch. Finish it off with a sprinkle of red pepper flakes for extra flair. Voila! You have a warm bowl of creamy Tuscan artichoke soup that’s ready to impress.
Serving Suggestions
When it comes to plating your soup, simplicity is key! Serve it in colorful bowls that accentuate the beautiful creamy hue of the soup. You can add some crusty bread for dipping alongside it — think garlic bread or a freshly baked sourdough loaf. The contrast of the warm, crusty bread and the smooth soup makes for an unbeatable combo. Don’t forget the lemon wedges on the side for that extra zest when serving!
Recipe Variations
Want to mix things up a bit? Here are some creative twists on this classic recipe:
-
Spicy Spin
Add diced jalapeños or a few dashes of hot sauce in with the garlic for a spicy kick. -
Herbaceous Delight
Fresh herbs like rosemary or thyme can enhance the flavors beautifully. Toss in some chopped herbs towards the end of cooking for a burst of freshness. -
Proteins Galore
Want to make it heartier? Add shredded rotisserie chicken or white beans for added protein to make it even more filling. -
Dairy-Free Dreams
Substitute the milk with coconut milk for a richer flavor, perfect for tropical vibes. -
Cheesy Goodness
Stir in some cream cheese or a splash of heavy cream before blending for an extra creamy soup.
Chef’s Notes
As I’ve worked on perfecting this recipe, I’ve discovered it’s all about layering flavors and keeping it simple yet elegant. The first time I made this soup for a gathering, I was nervous about whether it would impress my guests. But watching them savor each bite and hearing the compliments was priceless! It’s that delightful feeling of knowing you’ve created something truly special from simple ingredients.
And hey, if you ever find yourself with extra soup, no worries! This soup freezes beautifully, so it’s a perfect meal prep option for hectic weeks. Just seal it in an airtight container, and you’ll have a comforting meal waiting for you.
FAQs and Troubleshooting
1. Can I make this soup ahead of time?
Absolutely! This soup tastes even better the next day after the flavors have had time to meld. Store it in an airtight container in the fridge for up to 4 days or freeze for longer storage.
2. What if my soup is too thick?
If you find your soup has thickened too much while storing or cooking, just add a bit of broth or water while reheating to reach your desired consistency!
3. Can I blend the soup if I like some texture?
Of course! If you prefer a chunky soup, blend only half of it and leave the other half intact. This way, you can enjoy both a creamy base and the texture of the veggies.
4. What can I serve alongside the soup?
You can pair this soup with a light salad, a simple cheese platter, or that glorious crusty bread we talked about. It’s versatile, satisfying, and oh-so-delicious!
Nutritional Info (Optional)
While nutritional values may vary based on ingredient choices, here’s a rough breakdown per serving of this delightful soup (based on six servings):
- Calories: 250
- Protein: 6g
- Carbohydrates: 34g
- Fat: 10g
- Fiber: 5g
Enjoying what’s good for you while also indulging in flavor? Now, that’s a win-win!
And there you have it — your ultimate guide to making a delicious Creamy Lemony Tuscan Artichoke Soup full of flavor and warmth. Grab that apron, summon your inner chef, and let’s create some culinary magic in the kitchen! Happy cooking!
PrintCreamy Lemony Tuscan Artichoke Soup

A warm and delicious creamy soup infused with the flavors of Tuscany and a hint of lemon, perfect for chilly evenings.
- Prep Time: 15 minutes
- Cook Time: 30 minutes
- Total Time: 45 minutes
- Yield: 6 servings 1x
- Category: Soup
- Method: Stovetop
- Cuisine: Italian
- Diet: Vegetarian
Ingredients
- 2 tablespoons Extra-Virgin Olive Oil
- 1 large Yellow Onion, diced
- 2 stalks Celery, sliced
- 2 medium Carrots, peeled and sliced
- 3 cloves Fresh Garlic, chopped
- 1/2 teaspoon Red Pepper Flakes
- 2 medium Potatoes, peeled and diced into 1/2-inch cubes
- 1 can Artichoke Hearts, drained
- 1/2 cup Sun-Dried Tomatoes, chopped
- 2 tablespoons Capers, drained
- 4 cups Chicken Bone Broth
- 1/2 cup Milk of Choice
- 2 tablespoons Arrowroot Powder
- 1 tablespoon Fresh Lemon Juice
- 1 teaspoon Lemon Zest
- to taste Sea Salt
- to taste Black Pepper
- 1 cup Freshly Chopped Kale or Spinach
- 1/4 cup Freshly grated Parmesan cheese
- 1 whole Lemon wedges (for serving)
- to taste Red pepper flakes (for added flavor and presentation)
Instructions
- Sauté the Base: In a large pot, heat the olive oil over medium heat. Add the onion and cook until it’s translucent, about 5 minutes.
- Add Aroma Builders: Toss in the celery, carrots, and garlic. Cook for an additional 5-7 minutes.
- Spice It Up: Sprinkle in the red pepper flakes and stir for about 30 seconds to bloom the spices.
- Include the Potatoes: Dump in your diced potatoes and stir well.
- Artichokes and Tomatoes: Stir in the artichoke hearts and sun-dried tomatoes, cooking for a couple of minutes.
- Pour in the Broth: Add the chicken bone broth and bring it to a gentle boil. Reduce to a simmer and cover, cooking for about 15-20 minutes until the potatoes are tender.
- Blend It Up: Remove from heat and blend until smooth using an immersion blender or regular blender.
- Finishing Touches: Stir in the milk and arrowroot powder mixed with water, season with lemon juice, lemon zest, salt, and black pepper.
- Greens Galore: Fold in the chopped kale or spinach until wilted.
- Serve and Enjoy: Ladle into bowls, sprinkle with Parmesan cheese, and add a squeeze of fresh lemon.
Notes
This soup freezes beautifully, making it a great meal prep option.
Nutrition
- Serving Size: 1 serving
- Calories: 250
- Sugar: 4g
- Sodium: 600mg
- Fat: 10g
- Saturated Fat: 2g
- Unsaturated Fat: 5g
- Trans Fat: 0g
- Carbohydrates: 34g
- Fiber: 5g
- Protein: 6g
- Cholesterol: 5mg
Keywords: artichoke soup, creamy soup, Italian soup, vegetarian, comfort food

Creamy Cabbage Carbonara
# Creamy Cabbage Carbonara: A Twist on Tradition

**Introduction**

Hello, my lovely food enthusiasts! Today, I’m super excited to share a recipe that beautifully blends comfort with creativity: Creamy Cabbage Carbonara. If you've ever made a classic carbonara, you know just how luxurious that dish can be. But what if we could give it a little twist that brings a burst of freshness, and makes it even more approachable for weeknight dinners? Enter cabbage! It's often overlooked when crafting pasta dishes, but I promise, this leafy green packs a delicious punch, turning a traditional carbonara into something exciting and new!

Picture this: a creamy, hearty bowl of pasta brought to life with the subtle sweetness of sauteed cabbage and the savory goodness of crispy bacon. You get that rich, silky sauce coating every strand of pasta, while the cabbage adds a bit of crunch and flavor that's simply irresistible. It's one of those meals that will not only fill your belly but also warm your heart. Plus, it's a great way to sneak in some veggies without losing out on the comfort factor we all love in our pasta dishes!

As we delve into this delicious recipe, I've got some fun stories and tips to share that’ll make your cooking experience smooth and enjoyable. Whether you're hosting friends or just cooking for yourself, this dish is a perfect addition to your weeknight repertoire. So grab your apron, perhaps pour yourself a glass of something sparkling, and let’s dive into the world of Creamy Cabbage Carbonara!

---

**Personal Story**

I remember a time, not too long ago, when I had a few friends over for an impromptu dinner. The kind of gathering that happens spontaneously over a glass of wine. As we chatted and caught up, I realized I was missing a main course. Down to the kitchen I dashed, rifling through my cabinets. I had some spaghetti, bacon on hand, and a head of cabbage that had been sitting in the fridge quietly, hoping for its moment in the limelight.

With a sprinkle of this and a dash of that, I created a creamy pasta dish that, believe it or not, left everyone asking for the recipe. It was a hit! That lovely evening sparked the idea for this very dish. It’s amazing how the simplest ingredients can whip up an unforgettable meal and create lasting memories. Ever since, it’s been a staple in my kitchen, a trusty dish that never fails to impress!

---

**Ingredients**

Let’s gather our ingredients! You’ll need a few simple components for this delicious Creamy Cabbage Carbonara. Here’s what you’ll need:

- **1 small head of cabbage, chopped**
  Cabbage is the star of this dish! You can use green or savoy cabbage for a slightly different texture. If you're in a pinch, collard greens or kale can work too.

- **4 slices of bacon, diced**
  Bacon adds that delicious smoky flavor! If you're looking for a lighter option, turkey bacon or even crispy pancetta can be a great option.

- **1 cup grated Parmesan cheese**
  This cheesy goodness is what makes the sauce creamy and rich. Pecorino Romano is a fantastic substitute if you're after a sharper flavor.

- **2 eggs**
  The eggs give the carbonara its luscious creaminess. You can use just the yolks for a richer dish, or heavy cream for a different twist.

- **Salt and pepper to taste**
  Essential for seasoning. I recommend using sea salt and freshly ground black pepper for optimal flavor.

- **Olive oil**
  A good drizzle helps sauté the cabbage and bacon. For a change, you could use avocado oil or even a flavored olive oil for an added twist.

- **Garlic, minced (optional)**
  Garlic adds that beautiful aromatic touch. For a milder taste, consider using roasted garlic instead.

- **Red pepper flakes (optional)**
  If you like a bit of heat, throw in some red pepper flakes! This is entirely up to your spice preference.

---

**Step-by-Step Instructions**

Ready to whip up this delicious Creamy Cabbage Carbonara? Let’s get cooking! Follow these steps, and trust me, you’ll have a meal that’s not just pleasing to the eye but also to the palate.

1. **Cook the Bacon**:
   In a large skillet, heat a drizzle of olive oil over medium heat. Add the diced bacon and cook until crispy, about 5–7 minutes. Keep an eye on it; we want it crispy but not burnt! Once it’s done, use a slotted spoon to transfer the bacon to a plate lined with paper towels. This allows it to drain excess fat while maintaining its crispiness.

2. **Sauté Cabbage**:
   With the bacon fat still in the skillet for flavor, add your chopped cabbage to the pan. Stir it around, allowing the cabbage to cook for about 5–7 minutes until it softens and gets a lovely golden color. If you’re using garlic, toss that in during the last minute! The aroma will be divine!

3. **Cook the Pasta**:
   While the cabbage is cooking, bring a large pot of salted water to a boil. Add your pasta (spaghetti or fettuccine works beautifully here) and cook according to package instructions until al dente. Don’t forget to stir occasionally! Reserve about a cup of pasta water before draining—this liquid is liquid gold for your sauce.

4. **Prepare the Sauce**:
   In a mixing bowl, whisk together the eggs and Parmesan cheese until well combined. Now’s the time to season this mixture with salt and cracked black pepper. Remember, the cheese will add some saltiness, so go easy!

5. **Combine Everything**:
   Drain the pasta and return it to the pot (off the heat!). Quickly toss in the sautéed cabbage and crispy bacon. Pour in the egg and cheese mixture, using a pair of tongs or a fork to toss everything together swiftly. The residual heat from the pasta will cook the eggs, creating that creamy sauce we love! If it looks a bit too thick, gradually add the reserved pasta water until you reach your desired consistency.

6. **Final Touches**:
   Give everything another good mix. Taste for seasoning and adjust as needed, adding more cheese, cracked pepper, or red pepper flakes if you’re feeling adventurous!

---

**Serving Suggestions**

To plate your Creamy Cabbage Carbonara, simply twirl the pasta onto a beautiful plate or into pasta bowls. Top with a generous sprinkle of extra Parmesan and a crack of fresh pepper. For a pop of color, consider adding a sprig of fresh parsley or basil as a garnish. It’s all about making it look inviting and delicious!

---

**Recipe Variations**

1. **Vegetarian Delight**: Skip the bacon altogether and use sautéed mushrooms for an earthy taste. Simply use a splash of soy sauce to help deepen the flavor.

2. **Cheesy Twist**: Swap out some or all of the Parmesan for a mix of Gruyère or aged cheddar for a richer taste and an exquisite cheese pull.

3. **Spicy Kick**: Add in some diced jalapeños or a splash of hot sauce to the sauce while whisking for that added kick.

4. **Herb Infusion**: Toss in some fresh spinach or kale alongside the cabbage for a nutrient boost. Chopped fresh herbs like basil or parsley can enhance flavor too!

5. **Creamier Version**: For an ultra-creamy sauce, add a few tablespoons of heavy cream to the egg mixture before combining with the pasta.

---

**Chef’s Notes**

It’s funny how a dish can evolve over time. When I first made this Creamy Cabbage Carbonara, it was truly a “what-do-I-have-on-hand” secret. I remember being nervous letting my friends try it, thinking it wouldn’t hold up to the traditional version. But after their rave reviews, I realized cooking is all about being creative and using what you have.

Now, I often find myself gravitating toward seasonal ingredients, and cabbage fits the bill perfectly—available year-round and oh-so-versatile. I think we sometimes underestimate how lovely humble ingredients can be; they have a charm and story of their own.

---

**FAQs and Troubleshooting**

**1. Why did my sauce curdle?**
If your sauce curdles, it’s likely that the heat was too high when adding the egg mixture. Make sure to toss the pasta off the heat or very low heat as you integrate the eggs to achieve that creamy texture.

**2. How can I store leftovers?**
Store the leftover pasta in an airtight container in the fridge for up to 3 days. Reheat on the stove with a splash of water to avoid it drying out.

**3. Can I make this dish ahead of time?**
This dish is best enjoyed fresh, but you can prep the cabbage and bacon in advance. Just combine everything right before serving for best results.

**4. What can I substitute for pasta?**
You can use zoodles (zucchini noodles) or spaghetti squash for a low-carb alternative! Just adjust cooking times as needed.

---

**Nutritional Info (Optional)**

While I believe in enjoying every delicious bite, here’s a rough nutritional breakdown per serving (not including additional garnishes or variations):
- Calories: ~550
- Protein: ~20g
- Carbohydrates: ~46g
- Fat: ~30g

---

Thank you for joining me on this culinary adventure! I hope you feel inspired to try making this Creamy Cabbage Carbonara at home. Remember, cooking is about joy, creativity, and gathering around the table with loved ones. Can’t wait to hear how it turns out for you!
Creamy Cabbage Carbonara

A creative twist on traditional carbonara featuring sautéed cabbage, crispy bacon, and a rich creamy sauce.
- Prep Time: 15 minutes
- Cook Time: 30 minutes
- Total Time: 45 minutes
- Yield: 4 servings 1x
- Category: Main Course
- Method: Baking
- Cuisine: Italian
- Diet: Vegetarian option available
Ingredients
- 1 small head of cabbage, chopped
- 4 slices of bacon, diced
- 1 cup grated Parmesan cheese
- 2 eggs
- Salt and pepper to taste
- Olive oil
- Garlic, minced (optional)
- Red pepper flakes (optional)
Instructions
- Cook the bacon: In a large skillet, heat a drizzle of olive oil over medium heat. Add the diced bacon and cook until crispy, about 5–7 minutes. Transfer to a paper towel-lined plate.
- Sauté cabbage: With the bacon fat still in the skillet, add chopped cabbage and cook for about 5–7 minutes until softened and golden.
- Cook the pasta: In a large pot of salted boiling water, add pasta and cook until al dente. Reserve about a cup of pasta water before draining.
- Prepare the sauce: In a bowl, whisk together eggs and Parmesan cheese. Season with salt and pepper.
- Combine everything: Drain pasta, return it to the pot (off the heat), and toss in the sautéed cabbage and bacon. Pour in the egg mixture and toss quickly to create a creamy sauce.
- Final touches: Mix well, adjust seasoning if needed, and serve hot with extra cheese and pepper on top.
Notes
Store leftovers in an airtight container in the fridge for up to 3 days. Reheat with a splash of water to prevent drying.
Nutrition
- Serving Size: 1 serving
- Calories: 550
- Sugar: 3g
- Sodium: 800mg
- Fat: 30g
- Saturated Fat: 10g
- Unsaturated Fat: 15g
- Trans Fat: 0g
- Carbohydrates: 46g
- Fiber: 4g
- Protein: 20g
- Cholesterol: 150mg
Keywords: carbonara, creamy pasta, cabbage, bacon, weeknight dinner