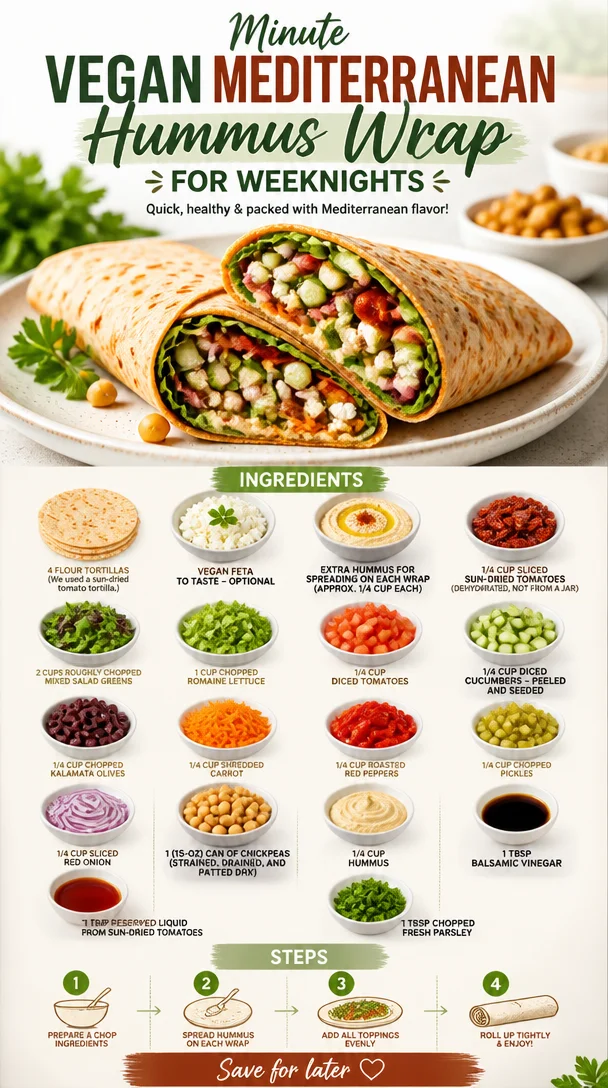
Minute Vegan Mediterranean Hummus Wrap for Weeknights
Vegan Mediterranean Hummus Wrap: A Flavorful Journey
Hello and welcome back to my kitchen! Today, we’re venturing into the vibrant world of Mediterranean cuisine with a recipe that’s as colorful as it is delicious: Vegan Mediterranean Hummus Wraps! If you’ve been looking for a dish that marries simplicity and flavor while embracing the bounties of fresh ingredients, this one’s for you.
These wraps are loaded with fresh veggies, hearty chickpeas, and that creamy, dreamy hummus we all know and love. Not only is this recipe vegan, but it’s also perfect for meal prep, lunchboxes, or a quick and satisfying dinner after a busy day. Let’s dive into this enchanting recipe and I promise, you’ll leave feeling inspired!
My Mediterranean Memory
Let me take you on a little trip down memory lane. I still remember the first time I tasted Mediterranean cuisine. I was at a quaint little café with a friend who raved about their wraps. With each bite, I was transported! The harmonious blend of flavors—crunchy vegetables, rich spices, and that velvety hummus—was absolutely mesmerizing.
I remember how we lingered over our plates, laughing and sharing stories about our day, all while sipping on bright, refreshing lemonade. That experience ignited my passion for cooking and brought me to create comforting yet elegant dishes that celebrate such rich culinary experiences. And now, I want to share that joy with you through these Vegan Mediterranean Hummus Wraps. Let’s create our own beautiful moments around the table!
Ingredients
Here’s what you’ll need to make these vibrant wraps:
-
4 large flour tortillas (Tip: I used a sun-dried tomato tortilla for added flavor, but feel free to choose your favorite!)
-
Vegan feta to taste (optional) (If you want that cheesy burst, this adds a wonderful salty bite, but it’s great without it too!)
-
Extra hummus for spreading (Approx. 1/4 cup for each wrap; because, honestly, who doesn’t love hummus?)
-
1/4 cup sliced sun-dried tomatoes (Opt for dehydrated for deeper flavor; if you’re using those from a jar, just drain them well.)
-
2 cups roughly chopped mixed salad greens (Get creative here! Spinach, arugula, and kale are all great options.)
-
1 cup chopped romaine lettuce (Adds that delightful crunch we all crave.)
-
1/4 cup diced tomatoes (Use fresh tomatoes for a burst of juiciness; cherry tomatoes make a wonderful substitute!)
-
1/4 cup diced cucumbers (Peeled and seeded; for an extra crunch. If you love texture, leave the skin on!)
-
1/4 cup chopped kalamata olives (For those briny, bold flavors; if you’re not a fan of olives, capers work well too.)
-
1/4 cup shredded carrot (Adds sweetness and color. Pre-shredded options are available if you’re in a rush!)
-
1/4 cup roasted red peppers (They bring smoky depth. You can roast your own or buy them jarred—just be sure to drain well.)
-
1/4 cup chopped pickles (Adds a zingy crunch that elevates the dish.)
-
1/4 cup sliced red onion (A little punch of flavor; soak them in cold water for 10 minutes to mellow if you like.)
-
1 15-oz can of chickpeas (Strained, drained, and patted dry; make sure to pat them well to avoid soggy wraps.)
-
1/4 cup hummus (Use your favorite store-bought or homemade for full control over flavors.)
-
1 Tbsp balsamic vinegar (For that sweet tang. A splash of lemon juice would work too!)
-
1 Tbsp reserved liquid from sun-dried tomatoes (Enhances flavor—don’t skip this part!)
-
1 Tbsp chopped fresh parsley (For a fresh, herbaceous finish; basil or dill would also be fantastic!)
Step-by-Step Instructions
Let’s walk through this delightful recipe, step by step, so you can nail it right in your own kitchen!
-
Prep Your Ingredients: Start by gathering all your veggies and equipment. Clean and chop your tomatoes, cucumbers, olives, and any other veggies you’re using. Remember, a sharp knife does wonders! Plus, it’s safer.
-
Make the Filling: In a mixing bowl, combine your chickpeas, diced cucumbers, diced tomatoes, kalamata olives, shredded carrots, roasted red peppers, pickles, and red onion. Drizzle in 1 tablespoon of balsamic vinegar and 1 tablespoon of the reserved liquid from the sun-dried tomatoes. Gently mix, and here’s the fun part—get in there with your hands! This ensures everything is coated evenly. If you want a little more zest, toss in some lemon juice or even a splash of your favorite hot sauce for a kick.
-
Prepare Your Tortillas: Lay your tortillas flat on a clean surface. Spread about 1/4 cup of your favorite hummus across each tortilla. Remember, this is where the flavor begins! Feel free to use a butter knife or even the back of a spoon for an even spread.
-
Layer on the Goodness: Now it’s time to assemble! Start with a generous handful of mixed greens, followed by a cup of your chickpea filling. If you’re adding vegan feta, sprinkle it on top now. Pro tip: don’t overstuff! You want to be able to roll them up neatly without any filling escaping.
-
Rolling Your Wrap: Fold the sides in towards your filling, then roll from the bottom up, tucking in as you go. It might take a little practice, but you’ll get the hang of it! If you find your tortillas tearing too easily, just give them a quick zap in the microwave (about 10-15 seconds) to soften.
-
Cut and Serve: Once rolled tightly, cut each wrap in half diagonally. Voilà! You have beautiful, colorful wraps ready for plating.
-
Presentation Tip: Serve these delightful wraps with an extra dollop of hummus on the side, a sprinkle of fresh parsley, and maybe even a few extra olives for garnish on a rustic wooden board. Your guests will think you’re a culinary magician!
Recipe Variations
Feel like switching things up? Here are some fun twists to make this recipe your own:
- Spicy Kick: Add sliced jalapeños or a spicy hummus variant to bring the heat.
- Mediterranean Grain Bowl: Skip the wraps and serve everything over a bed of quinoa or farro for a nutritious bowl option.
- Herbed Avocado: Swap your hummus with a smooth avocado spread and sprinkle everything with fresh dill or cilantro.
- Crunchy Nuts: Toss in some chopped almonds or walnuts for a satisfying crunch.
- Seasonal Twist: Use roasted seasonal vegetables like zucchini or bell peppers for a fresh twist based on what’s in season.
Chef’s Notes
This recipe has been a constant in my kitchen for years! I love how versatile it is and how it can evolve with seasonal ingredients. One time, I added roasted sweet potatoes on a whim, and let me tell you, it was a game-changer! Also, if you ever have leftover filling, use it as a salad topping or even in a grain bowl the next day—it’s a great way to minimize waste and keep your meals exciting.
FAQs and Troubleshooting
1. My wraps keep unrolling; what do I do?
- A tight roll is key! Make sure to tuck in the sides while rolling and not to overfill. If you’re still having trouble, secure with a toothpick or parchment paper.
2. Can I make this wrap ahead of time?
- Absolutely! Assemble your wraps, wrap them tightly in foil or parchment, and store them in the fridge for up to 2 days. Just know that the veggies may release some moisture, so it’s best enjoyed fresh.
3. What if I want to make these gluten-free?
- It’s easy! Just swap out the flour tortillas for gluten-free wraps, and you’re good to go.
4. I’m not a fan of chickpeas; what can I use instead?
- No problem! Try black beans, lentils, or edamame for a protein-packed twist.
Nutritional Info (Optional)
While I won’t harp on numbers too much, each wrap generally yields a balanced mix of protein, healthy fats, and tons of vitamins from those lovely fresh vegetables. A great meal option for anyone looking to enjoy delicious and nourishing food!
So there you have it—a fantastic, versatile, and scrumptious Vegan Mediterranean Hummus Wrap! I hope you take a moment to gather your ingredients, tie on your apron, and create this with your loved ones. Remember, cooking is about bringing joy, love, and a touch of elegance to the everyday. Happy cooking, friends!
PrintVegan Mediterranean Hummus Wrap
A vibrant wrap filled with fresh veggies, hearty chickpeas, and creamy hummus, perfect for meal prep or a quick lunch.
- Prep Time: 15 minutes
- Cook Time: 0 minutes
- Total Time: 15 minutes
- Yield: 4 servings 1x
- Category: Main Course
- Method: No Cooking
- Cuisine: Mediterranean
- Diet: Vegan
Ingredients
- 4 large flour tortillas
- Vegan feta to taste (optional)
- Extra hummus for spreading (Approx. 1/4 cup for each wrap)
- 1/4 cup sliced sun-dried tomatoes
- 2 cups roughly chopped mixed salad greens
- 1 cup chopped romaine lettuce
- 1/4 cup diced tomatoes
- 1/4 cup diced cucumbers
- 1/4 cup chopped kalamata olives
- 1/4 cup shredded carrot
- 1/4 cup roasted red peppers
- 1/4 cup chopped pickles
- 1/4 cup sliced red onion
- 1 15-oz can of chickpeas
- 1/4 cup hummus
- 1 Tbsp balsamic vinegar
- 1 Tbsp reserved liquid from sun-dried tomatoes
- 1 Tbsp chopped fresh parsley
Instructions
- Prep your ingredients: Start by gathering all your veggies and equipment. Clean and chop your tomatoes, cucumbers, olives, and any other veggies you’re using.
- Make the filling: In a mixing bowl, combine your chickpeas, diced cucumbers, diced tomatoes, kalamata olives, shredded carrots, roasted red peppers, pickles, and red onion. Drizzle in balsamic vinegar and reserved liquid from sun-dried tomatoes.
- Prepare your tortillas: Lay your tortillas flat and spread about 1/4 cup of hummus across each tortilla.
- Layer on the goodness: Start with a handful of mixed greens, followed by a cup of chickpea filling. If using vegan feta, sprinkle it on top.
- Rolling your wrap: Fold the sides in towards your filling and roll from the bottom up, tucking in as you go.
- Cut and serve: Once rolled tightly, cut each wrap in half diagonally.
Notes
For added flavor, use sun-dried tomato tortillas. Enjoy with extra hummus on the side.
Nutrition
- Serving Size: 1 wrap
- Calories: 280
- Sugar: 4g
- Sodium: 350mg
- Fat: 10g
- Saturated Fat: 1g
- Unsaturated Fat: 8g
- Trans Fat: 0g
- Carbohydrates: 40g
- Fiber: 8g
- Protein: 10g
- Cholesterol: 0mg
Keywords: vegan, mediterranean, wraps, healthy lunch, meal prep
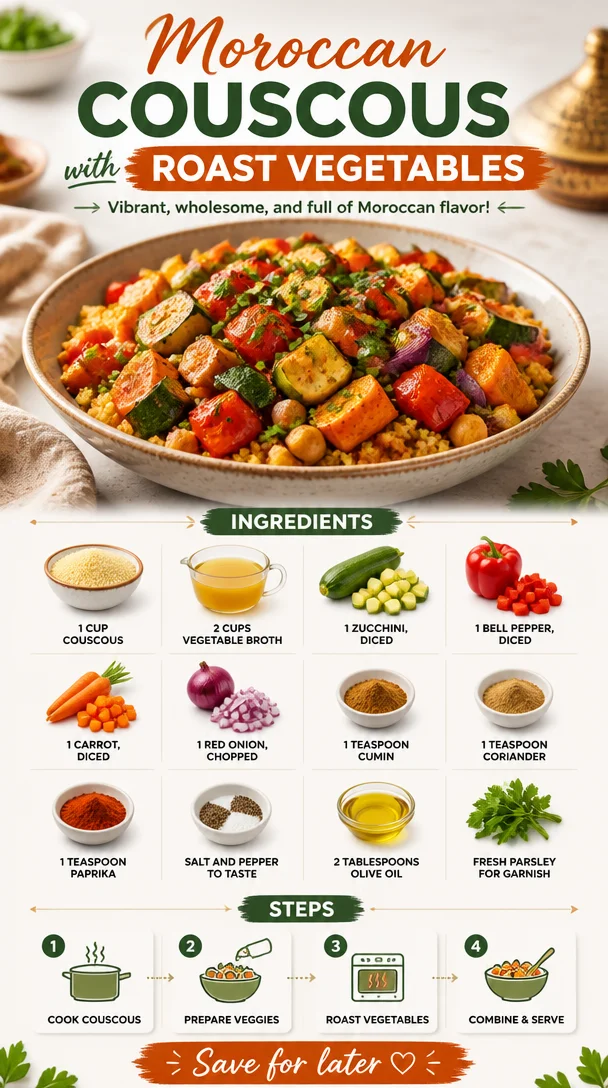
Moroccan Couscous with Roast Vegetables
Moroccan Couscous with Roast Vegetables: A Flavorful Journey
Hello, fellow foodies! Let’s embark on a delightful culinary adventure today! A dish that captures the vibrant spirit of Moroccan cuisine is none other than Moroccan Couscous with Roast Vegetables. It’s not just a meal; it’s an experience, a celebration of flavors, colors, and warmth that beckons you to the table. I’m excited to share this recipe with you today, filled with stories, tips, and all the love that goes into making it.
Introduction
Growing up, our kitchen was always bursting with life. The aroma of spices wafted through the air as my family gathered for dinner each night. One of my dear friends, a remarkable cook, introduced me to Moroccan cuisine during our college days. I remember stepping into her cozy apartment, where the scent of cinnamon and cumin welcomed us. She’d prepared a vibrant Moroccan feast, and I was instantly captivated.
Now, I want to replicate that nostalgia for you with this Moroccan Couscous recipe. Picture this: golden, fluffy couscous nestled under a heap of roasted vegetables, all coated in aromatic spices. It’s a colorful dish that feels festive yet comforting — ideal for weeknight dinners or special occasions. You don’t need a ticket to Marrakech to enjoy its flavors; we can create that magic right here! Let’s tie our aprons, put on some music, and dive into this dish together.
Personal Story
One of my fondest memories related to Moroccan Couscous involves a chilly winter evening a few years back. I had invited a few close friends over for an impromptu dinner. With busy lives and schedules, we often found it hard to come together, so I wanted this meal to feel special. While browsing through my pantry, I stumbled upon a bag of couscous and a bounty of seasonal vegetables from the local farmer’s market, and a delicious idea sparked!
I roasted the veggies until they were beautifully caramelized, infused them with spices, and piled them atop a bed of fluffy couscous. As the evening unfolded, our laughter filled the room, and we savored every bite of the meal. It was a reminder of how food has the magical ability to bring people together, creating unforgettable moments around the table. That dinner not only presented a beautiful dish but also reignited a deeper appreciation for how sharing food nurtures connection.
Ingredients
Here’s what you’ll need for this mouthwatering Moroccan Couscous with Roast Vegetables:
-
1 cup couscous
Couscous is the heart of this dish! It’s quick to prepare, light, and incredibly versatile. -
2 cups vegetable broth
Using vegetable broth instead of water adds rich flavor to the couscous. Feel free to use chicken broth for a non-vegetarian option! -
1 zucchini, diced
Zucchini adds a subtle sweetness and crisp texture. You can substitute it with yellow squash if you prefer. -
1 bell pepper, diced
I recommend using a red or yellow bell pepper for a pop of color and a mild, sweet taste. Green peppers will work, too, but they’re more bitter. -
1 carrot, diced
The natural sweetness of carrots enhances the overall flavor. You can also use parsnips for a different twist. -
1 red onion, chopped
The sweetness of roasted red onion rounds out the dish beautifully. White or yellow onions can serve as a substitute. -
1 teaspoon cumin
Cumin is a warm spice that adds depth. If you’re looking for a milder flavor, try ground coriander. -
1 teaspoon coriander
This herb brings in a citrusy, fresh flavor. Fennel seeds can work in a pinch, offering a different, yet delightful essence. -
1 teaspoon paprika
Sweet paprika elevates the dish with a smoky flavor. You can kick it up a notch with smoked paprika for extra depth. -
Salt and pepper to taste
Always remember to season your dishes! This enhances all the vibrant flavors. -
2 tablespoons olive oil
Olive oil not only helps roast the veggies beautifully but also adds healthy fats. Avocado or grapeseed oil can be substituted if desired. -
Fresh parsley for garnish
A sprinkle of fresh parsley adds a lovely touch, brightening the dish visually and flavor-wise. Mint can offer a refreshing alternative.
Step-by-Step Instructions
-
Preheat the Oven
Begin by preheating your oven to 400°F (200°C). A hot oven is key to achieving perfectly roasted vegetables with a lovely caramelization. -
Prepare the Vegetables
In a large bowl, combine the diced zucchini, bell pepper, carrot, and chopped red onion. Add the olive oil, cumin, coriander, paprika, salt, and pepper. Toss the vegetables until they are evenly coated. Here’s a hack: use your hands to mix them – it’s more effective! Just don’t forget to wash them afterward. -
Roast the Vegetables
Spread the vegetable mixture on a baking sheet in a single layer. This helps them roast evenly and achieve that gorgeous golden edge. Roast for 25–30 minutes, or until the vegetables are tender and caramelized. You might want to flip them halfway through for an even roast. -
Prepare the Couscous
In a medium saucepan, bring the vegetable broth to a boil. Once boiling, remove from heat and stir in the couscous. Cover it with a lid and let it sit for about 5 minutes. The couscous will absorb the broth and become fluffy! A tricky way to check for doneness: use a fork to fluff it up after resting. -
Combine the Flavors
After the vegetables are done roasting and the couscous is ready, combine them in a large serving bowl. Fluff the couscous with a fork, and gently fold in the roasted veggies. It’s key to be gentle here so you don’t mash the vegetables. -
Garnish and Serve
Top with fresh parsley for an extra pop of color. Just the thought of that contrast brings a smile to my face! Optional: Drizzle a bit more olive oil over the top for a lovely finish.
Serving Suggestions
For a beautiful presentation, serve your Moroccan Couscous in a large bowl, allowing everyone to help themselves. You can even present it on a rustic wooden board, surrounded by small bowls of additional garnishes, like toasted almonds or crumbled feta cheese for those who’d like to add a touch of creaminess. Perfect for family-style dining!
Recipe Variations
- Add Protein: For a heartier dish, toss in chickpeas for a vegetarian protein boost, or grilled chicken or shrimp for a non-vegetarian option.
- Spice it Up: Add a pinch of cayenne pepper or red pepper flakes if you enjoy some heat.
- Switch it Up: Substitute quinoa for couscous for a gluten-free twist, or use different seasonal vegetables like eggplant or butternut squash.
- Go Green: Mix in some spinach or kale right before serving for an added boost of greens.
Chef’s Notes
One of the best things about this recipe is its versatility. I’ve experimented with various vegetable combinations over the years, often depending on what’s in season or what I have in the fridge. You’ll find that this dish is forgiving, encouraging creativity. I once made a batch with an accidental sprinkle of cinnamon — it was a delightful surprise that became a new favorite!
FAQs and Troubleshooting
-
What if my couscous is clumpy?
No worries! Fluff it with a fork after it’s cooked. If it’s still clumpy, try adding a touch of olive oil to separate the grains. -
Can I prepare this dish in advance?
Absolutely! You can roast the veggies and prepare the couscous in advance. Mix them just before serving to avoid sogginess. -
What if I don’t have vegetable broth?
You can use water in a pinch, but for added flavor, try using a combination of half water and half white wine. -
How can I store leftovers?
Keep the couscous and vegetables in an airtight container in the fridge for up to three days. Reheat gently on the stovetop or in the microwave, adding a little splash of vegetable broth if needed to revive the dish.
Nutritional Info
While I typically leave nutritional details optional based on preferences, a serving of this Moroccan Couscous with Roast Vegetables offers a great balance of carbs, fiber, and healthy fats, making it a comforting yet nutritious choice!
To wrap up, cooking is all about discovering flavors, sharing joy, and creating memories. I hope this Moroccan Couscous with Roast Vegetables brings warmth and delight to your table. Enjoy the process, invite loved ones, and let’s keep celebrating the beauty of good food together. Happy cooking, my friends!
PrintMoroccan Couscous with Roast Vegetables
A flavorful Moroccan dish featuring golden couscous topped with beautifully roasted vegetables and aromatic spices.
- Prep Time: 15 minutes
- Cook Time: 30 minutes
- Total Time: 45 minutes
- Yield: 4 servings 1x
- Category: Main Course
- Method: Roasting
- Cuisine: Moroccan
- Diet: Vegan
Ingredients
- 1 cup couscous
- 2 cups vegetable broth
- 1 zucchini, diced
- 1 bell pepper, diced
- 1 carrot, diced
- 1 red onion, chopped
- 1 teaspoon cumin
- 1 teaspoon coriander
- 1 teaspoon paprika
- Salt and pepper to taste
- 2 tablespoons olive oil
- Fresh parsley for garnish
Instructions
- Preheat the oven to 400°F (200°C).
- Combine the diced zucchini, bell pepper, carrot, and chopped red onion in a large bowl with olive oil and spices.
- Spread the vegetable mixture on a baking sheet.
- Roast for 25–30 minutes until tender and caramelized.
- Bring the vegetable broth to a boil in a medium saucepan.
- Stir in the couscous, cover, and let it sit for 5 minutes.
- Fluff the couscous with a fork and combine it with the roasted vegetables in a large serving bowl.
- Garnish with fresh parsley and serve.
Notes
This dish is versatile; try adding chickpeas or different seasonal vegetables. For gluten-free, substitute quinoa for couscous.
Nutrition
- Serving Size: 1 serving
- Calories: 350
- Sugar: 5g
- Sodium: 400mg
- Fat: 12g
- Saturated Fat: 2g
- Unsaturated Fat: 10g
- Trans Fat: 0g
- Carbohydrates: 45g
- Fiber: 6g
- Protein: 10g
- Cholesterol: 0mg
Keywords: Moroccan, Couscous, Vegetarian, Roasted Vegetables, Healthy Dinner
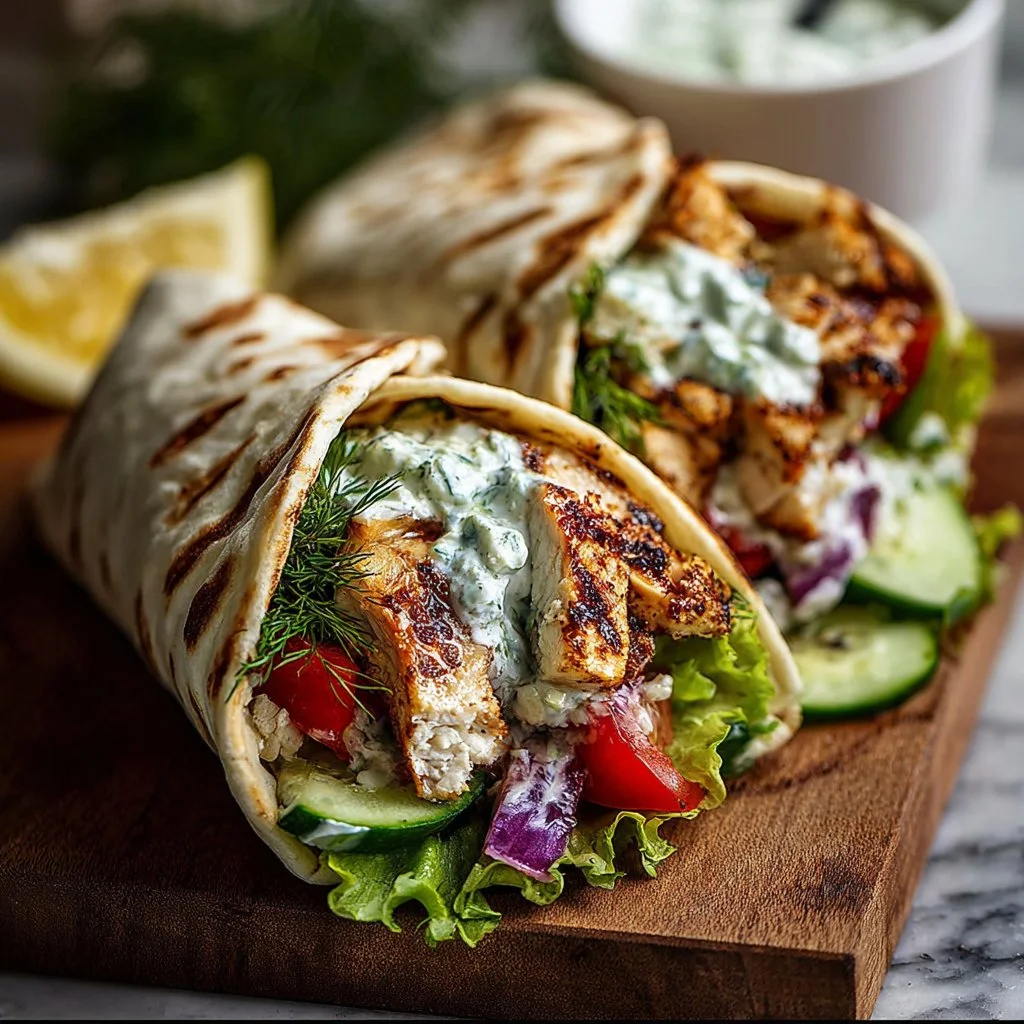
Simple Mediterranean Greek Chicken Wraps with Cucumber Sauce
Greek Chicken Wraps with Cucumber Sauce – Fresh, Flavorful, and Perfect for Easy Mediterranean Lunches or Dinners
Hello, fellow food lovers! I’m thrilled to share one of my absolute favorite recipes that exudes sunshine and Mediterranean charm—Greek Chicken Wraps with Cucumber Sauce! These wraps are not only fresh and flavorful, but they also make for an effortlessly delightful lunch or dinner option. Whether you’re hosting a casual gathering or simply want to elevate your weeknight meal, this recipe has got you covered!
Introduction
Imagine this: golden brown chicken sizzling in olive oil, infused with zesty lemon and fragrant garlic, sending the most delicious aromas wafting through your kitchen. Now picture wrapping all of that goodness in a warm pita, topped with a homemade cucumber sauce that brings all the flavors together. Sounds heavenly, doesn’t it?
Whenever I make these Greek Chicken Wraps, I’m transported back to those sun-drenched summer days spent in quaint little tavernas along the Aegean coast. The vibrant flavors, paired with the warmth and hospitality of the locals, make Greek cuisine so special. It’s this very experience that inspired me to create my own version of Greek chicken wraps, perfect for any setting—be it a relaxed lunch at home or a lively dinner gathering.
What I adore about this dish is how it’s packed with fresh ingredients and bright flavors yet comes together so effortlessly. The grilled chicken is marinated to perfection, and the cucumber sauce is a refreshing accompaniment that adds a burst of flavor. Plus, it’s highly customizable! You can make it your own by adding extra veggies or swapping ingredients based on what you’ve got on hand. Trust me, once you give this recipe a try, you’ll be dreaming of Greek islands and starry nights!
Personal Story
Growing up, my family had a tradition of hosting Mediterranean-themed dinner parties every summer. My parents would put together a spread that included everything from crispy spanakopita to juicy lamb skewers. But the star of the show was always the chicken wraps. I remember being a little girl, helping my mom in the kitchen, chopping veggies, and watching her whip up that creamy cucumber sauce. It felt like magic as she transformed simple ingredients into something that not only tantalized our taste buds but also brought everyone together around the table.
One summer night, my parents decided to take their wrap-making skills to another level. We transformed our backyard into a mini Greek taverna with twinkling lights, colorful tablecloths, and, of course, lots of delicious food. I can still picture the laughter and joy as we gathered to share stories and indulge in those wraps, each bite bursting with flavor. Years later, those moments inspired me to recreate my parents’ magic and share it through Ivory Apron.
Ingredients
Here’s what you’ll need to make these delightful Greek Chicken Wraps:
-
1 lb boneless, skinless chicken breast or thighs, cut into strips
Chicken thighs provide a juicier option, while breasts are leaner. You can also use tofu or grilled veggies for a vegetarian delight! -
2 tbsp olive oil
Our hero ingredient! Opt for extra virgin olive oil for a richer flavor, but any good quality olive oil will do. -
2 tbsp lemon juice
Freshly squeezed lemon juice brightens up the dish! If you’re in a pinch, bottled lemon juice works, but fresh is best. -
2 garlic cloves, minced
Garlic is essential for that bold Mediterranean flavor! If you prefer milder garlic, roasting it beforehand can soften its bite. -
1 tsp dried oregano
An aromatic herb that screams Mediterranean. Substitute with thyme or Italian seasoning if you’re in a bind! -
½ tsp smoked paprika
Adds depth and complexity. Paprika pairs fabulously with chicken, but cayenne pepper can work for some heat! -
Salt & black pepper, to taste
Seasoning is key! Always taste as you go to find your perfect balance. -
½ cup Greek yogurt
This will form the base of our luscious cucumber sauce. You can substitute with regular yogurt or plant-based options for a dairy-free wrap. -
½ cup cucumber, finely grated and squeezed dry
Fresh cucumber adds crunch and freshness to our sauce. Make sure to squeeze out excess water to avoid a watery dip! -
1 tbsp lemon juice (for the sauce)
Ties the sauce together and brightens flavors—use the squeeze from the same lemon for efficiency! -
1 tbsp olive oil (for the sauce)
Maybe we should just call this dish a “celebration of olive oil!” -
1 garlic clove, minced (for the sauce)
A hint of garlic in the cucumber sauce enhances the overall flavor profile! -
1 tbsp chopped fresh dill or mint
Opt for fresh herbs to elevate that Greek flavor! Both dill and mint bring a refreshing touch—use one or the other based on your preference. -
Salt & pepper, to taste (for the sauce)
Always season your sauce to perfection! -
4 pita breads or flatbreads
You can use whole wheat, gluten-free, or even lettuce wraps as a low-carb alternative! -
½ cup chopped tomatoes
Vibrant and juicy, tomatoes are a must! Cherry tomatoes work too; just halve them for an easy addition! -
½ cup chopped cucumber
A little extra crunch to complement the chicken! -
¼ cup sliced red onion
Gives a sharp flavor that balances well with the creamy sauce; if it’s too pungent for you, soak slices in cold water for a milder bite! -
¼ cup crumbled feta cheese
Feta adds creaminess and tanginess. If you’re dairy-free, consider marinated olives or nutritional yeast as alternatives! -
Fresh parsley or dill, for garnish
Presentation matters! A sprinkle of fresh herbs makes your dish pop!
Step-by-Step Instructions
Ready to make these Greek Chicken Wraps? Let’s dive right in, and I’ll walk you through the process step by step:
-
Marinate the Chicken
In a large bowl, combine the olive oil, lemon juice, minced garlic, dried oregano, smoked paprika, salt, and black pepper. Add in the chicken strips and mix until well coated. Let it marinate for at least 30 minutes, or even better, an hour! This allows the flavors to penetrate the chicken. (Tip: If you’re short on time, marinating for just 15 minutes still adds a nice punch!) -
Prepare the Cucumber Sauce
While the chicken is marinating, let’s whip up our creamy cucumber sauce. In a medium bowl, combine the Greek yogurt, grated cucumber, lemon juice, olive oil, minced garlic, fresh dill (or mint), salt, and pepper. Mix everything until well combined, and set aside in the fridge to chill. This gives the flavors time to meld together, which is essential for a refreshing sauce! -
Grill the Chicken
Preheat your grill or grill pan over medium-high heat. Once it’s hot, throw in the marinated chicken strips. Grill for about 5-7 minutes per side, or until the chicken is fully cooked and has nice grill marks. (Remember: you can cut one piece in half to check doneness; the juices should run clear!) If you’re using a pan, just ensure it’s nicely oiled and heated before adding the chicken to avoid sticking. -
Warm the Pita
As the chicken cooks, you can heat your pita or flatbreads. You can do this on the grill for about a minute on each side (or in a warm pan) until they’re soft and warm. This will make the wraps ever so delightful! -
Assemble Your Wraps
Now comes the fun part! Take a warm pita and layer on the grilled chicken followed by chopped tomatoes, cucumber, sliced red onion, and crumbled feta cheese. Don’t forget to drizzle on that heavenly cucumber sauce! (Pro tip: feel free to lay everything in the center so that you can wrap them up like little presents!) -
Garnish and Serve
Sprinkle some fresh parsley or dill on top for that added touch of vibrancy! Serve your Greek Chicken Wraps immediately with extra cucumber sauce on the side—perfect for those who like a little more!
Serving Suggestions
When it comes to plating, simplicity is key. Arrange your wraps on a vibrant platter, and complement them with small bowls of extra cucumber sauce, alongside a little bowl of olives and maybe even a side salad for a complete meal. You could present these wraps in a casual way or make it a bit more elegant by stacking them high and garnishing with fresh herbs. Either way, your table will be full of life and flavor!
Recipe Variations
Looking to mix things up? Here are some fun variations for your Greek Chicken Wraps:
-
Spicy Kick: Add a dash of cayenne pepper to the marinade for a kick of heat, or include some sliced jalapeños inside the wrap!
-
Mediterranean Veggie Wraps: Swap the chicken for grilled vegetables like zucchini, bell peppers, and mushrooms for a vegetarian twist!
-
Avocado Delight: Add slices of ripe avocado for extra creaminess and healthy fats. Trust me; you won’t regret it.
-
Greek Quinoa Bowl: Toss all your ingredients over a bed of cooked quinoa for a nutritious and hearty meal that’s still packed with flavor!
-
Herbed Yogurt Swap: Experiment with flavored or herbed yogurt for the cucumber sauce to change up the taste profile.
Chef’s Notes
As with any recipe, don’t be afraid to make it your own! I’ve toyed with the ingredients over time to find just the right balance. One evening, while hosting a dinner party, I even spiced things up by adding some citrus zest to the cucumber sauce! It was a hit! The key to making this recipe truly shine is to cook with intention and let your personality seep into your cooking.
Remember, cooking doesn’t have to be perfect. It’s about creativity, family, and joy. Just like my childhood experiences gathering around the table, these chicken wraps are about connection—each bite is a bridge to family dinners and laughter!
FAQs and Troubleshooting
1. Can I make this recipe ahead of time?
Absolutely! You can marinate the chicken a day in advance, and prepare the cucumber sauce a few hours early. Just store everything in airtight containers in the fridge!
2. How do I prevent my chicken from being dry?
Make sure to marinate your chicken for long enough to absorb moisture. Also, avoid overcooking—it should reach an internal temperature of 165°F. Using thighs instead of breasts can also keep your chicken juicier!
3. Can I use store-bought tzatziki instead of making my own sauce?
Of course! If time is tight, a store-bought tzatziki or cucumber sauce can save the day. Just ensure it has quality ingredients to keep the taste authentic!
4. What do I do with leftovers?
Leftover chicken wraps can be stored in the refrigerator for up to 2 days. Rewarm them gently in a pan or microwave, but be cautious not to dry them out!
Nutritional Info (if applicable)
While I believe that food is meant to be enjoyed rather than meticulously measured, here’s a rough nutritional breakdown for each wrap:
- Calories: Approximately 400-500, depending on ingredients used
- Protein: 30g
- Carbohydrates: 30g
- Fat: 20g
Remember, these wraps are not only wholesome but also pack a great punch of nutrients. Each wrap is loaded with proteins, healthy fats, and a bounty of vegetables, making them both nutritious and satisfying.
There you have it! A delightful, easy-to-make recipe that’s bursting with flavor and nostalgia. I’m so excited for you to try these Greek Chicken Wraps with Cucumber Sauce. Don’t forget to gather your loved ones around the table and share the joy! Happy cooking, and welcome to the world of Ivory Apron!
PrintGreek Chicken Wraps with Cucumber Sauce
Fresh, flavorful Greek chicken wraps drizzled with a refreshing cucumber sauce, perfect for lunches or dinners.
- Prep Time: 15 minutes
- Cook Time: 15 minutes
- Total Time: 30 minutes
- Yield: 4 servings 1x
- Category: Main Course
- Method: Grilling
- Cuisine: Mediterranean
- Diet: Mediterranean Diet
Ingredients
- 1 lb boneless, skinless chicken breast or thighs, cut into strips
- 2 tbsp olive oil
- 2 tbsp lemon juice
- 2 garlic cloves, minced
- 1 tsp dried oregano
- ½ tsp smoked paprika
- Salt & black pepper, to taste
- ½ cup Greek yogurt
- ½ cup cucumber, finely grated and squeezed dry
- 1 tbsp lemon juice (for the sauce)
- 1 tbsp olive oil (for the sauce)
- 1 garlic clove, minced (for the sauce)
- 1 tbsp chopped fresh dill or mint
- Salt & pepper, to taste (for the sauce)
- 4 pita breads or flatbreads
- ½ cup chopped tomatoes
- ½ cup chopped cucumber
- ¼ cup sliced red onion
- ¼ cup crumbled feta cheese
- Fresh parsley or dill, for garnish
Instructions
- Marinate the chicken by combining olive oil, lemon juice, minced garlic, oregano, smoked paprika, salt, and pepper. Mix in the chicken strips and let marinate for at least 30 minutes.
- Prepare the cucumber sauce by mixing Greek yogurt, grated cucumber, lemon juice, olive oil, minced garlic, dill (or mint), salt, and pepper in a bowl. Chill in the fridge.
- Grill the chicken on a preheated grill or grill pan for 5-7 minutes per side until fully cooked.
- Warm the pita or flatbreads on the grill for about one minute on each side.
- Assemble the wraps by layering grilled chicken, chopped tomatoes, cucumber, red onion, and feta inside the warmed pita.
- Garnish with fresh parsley or dill and serve immediately with extra cucumber sauce on the side.
Notes
Feel free to customize with extra veggies or swap ingredients based on what you have!
Nutrition
- Serving Size: 1 wrap
- Calories: 450
- Sugar: 6g
- Sodium: 600mg
- Fat: 24g
- Saturated Fat: 6g
- Unsaturated Fat: 14g
- Trans Fat: 0g
- Carbohydrates: 30g
- Fiber: 3g
- Protein: 30g
- Cholesterol: 80mg
Keywords: Greek, Chicken Wraps, Cucumber Sauce, Mediterranean, Healthy Lunch
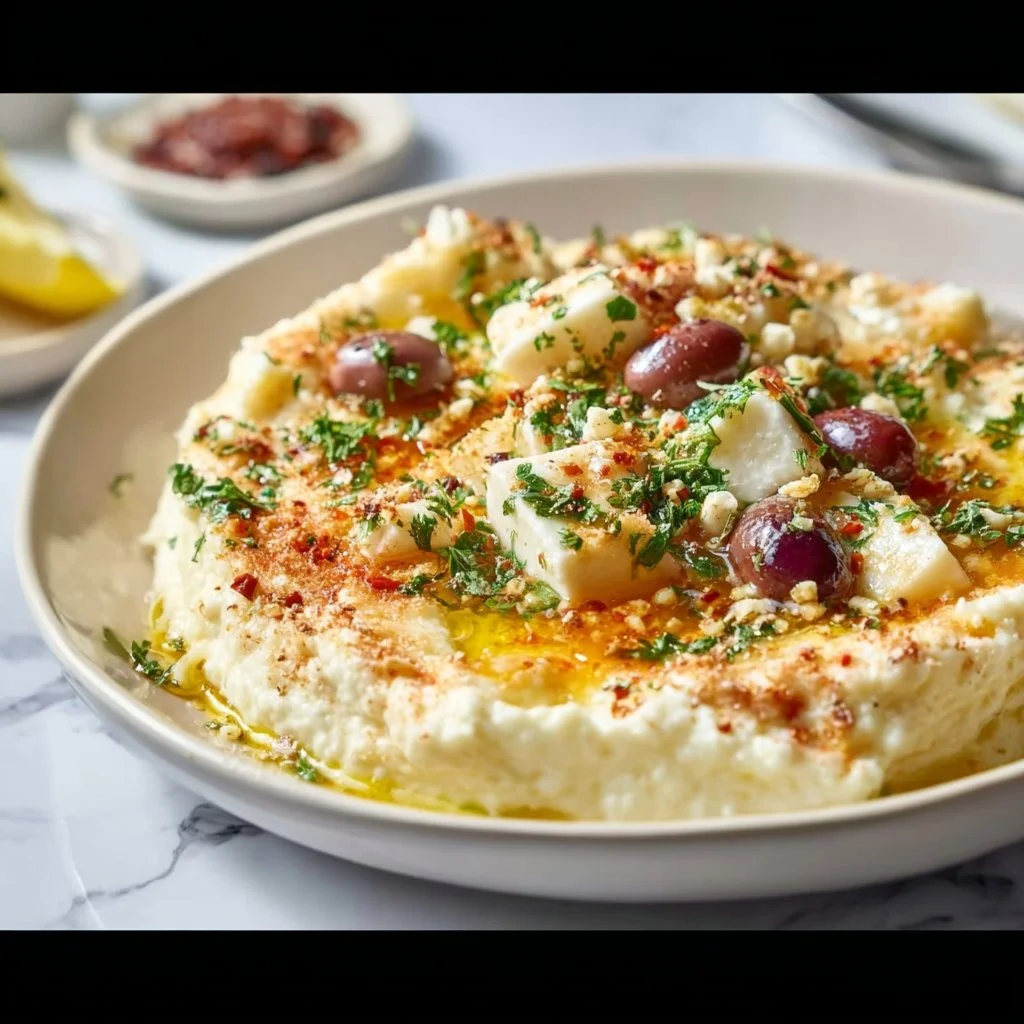
Skordalia
Skordalia: A Mediterranean Delight to Elevate Your Table
Hey there, food lovers! Today, we’re stepping into the vibrant and flavorful world of Mediterranean cuisine to whip up a timeless classic — Skordalia. If you’ve never encountered this delicious garlic and potato dip, you’re in for a treat! It’s creamy, tangy, and has just the right amount of garlic punch to liven up any meal. Skordalia is often served at Greek feasts and is perfect for spreading on warm bread, dolloping on roasted veggies, or even using as a zesty sauce for grilled meats. Trust me, it’s a crowd-pleaser!
When I first learned about Skordalia, my mind was blown. A blend of straightforward ingredients turns into something that feels truly luxurious. Plus, it’s a reminder that cooking doesn’t have to be complicated to be impressive. Growing up, family dinners were often about gathering around the table and sharing food that brought everyone together. Skordalia embodies that spirit — each scoop is a hug for your taste buds, a celebration of simple yet quality ingredients, and a testament to the beauty of sharing food with loved ones.
So, whether you’re planning an intimate dinner for two or a lively gathering with friends, this Skordalia recipe can take center stage on your table. Let’s roll up our sleeves, tie on our aprons, and get cooking together!
Personal Story
The first time I had Skordalia, it was at my friend Maria’s family gathering. I remember walking into her home, the air thick with laughter, warmth, and the irresistible aroma of garlicky goodness wafting through the kitchen. Maria’s grandmother was the culinary matriarch of the family, and boy, did she know how to entertain!
As dinner commenced, Maria’s family surrounded the table, and Skordalia was the first dish to grab my attention. Served in a beautiful bowl, drizzled with olive oil and topped with chopped parsley, it looked stunning. I took a scoop onto my plate and was instantly hooked. The texture was creamy, yet featherlight, and the garlic flavor was bold but balanced with a hint of lemon. That evening, I not only savored the food but also soaked in the essence of togetherness.
From that moment on, Skordalia became a staple in my cooking repertoire. It reminds me of that joyful evening filled with love, laughter, and a table full of cherished stories — and I can’t wait for you to experience that same connection with this dish!
Ingredients
To whip up your batch of Skordalia, here’s what you’ll need:
-
2 large potatoes, peeled and cubed
Potatoes give Skordalia its creamy texture. For a twist, you can use sweet potatoes for a natural sweetness or cauliflower for a lighter version. -
4-6 cloves of garlic, minced
Garlic is the star here! Adjust the quantity based on your personal taste. If you’re garlic-averse, try roasting the cloves first for a milder flavor. -
1/2 cup olive oil
Use high-quality extra virgin olive oil for rich flavor. If you prefer a lighter oil, avocado oil can be a great substitute. -
2 tablespoons lemon juice
Freshly squeezed lemon juice adds brightness and balances the dip. You can also experiment with white wine vinegar for a different tang. -
Salt to taste
Always taste as you go! Sea salt or flaky salt works best, giving your Skordalia that perfect savory edge.
With these pantry staples in hand, you’re ready to create something truly special!
Step-by-Step Instructions
Let’s jump into the kitchen! Here’s how you’ll prepare your Skordalia step by step:
-
Boil the Potatoes
Begin by placing your cubed potatoes in a large pot and covering them with cold water. Add a generous pinch of salt. Bring to a boil over medium-high heat. This step ensures that the potatoes cook evenly and get nice and tender. Once boiling, reduce the heat, and let them simmer for about 15 minutes or until easily pierced with a fork. -
Prep the Garlic
While the potatoes are cooking, finely mince your garlic. The smell of fresh garlic will fill your kitchen and get everyone excited! If you’re feeling adventurous, try slicing the garlic instead — it will give the dip a unique texture. -
Drain and Mash
Once your potatoes are tender, drain them well in a colander and return them to the pot. Let them steam for a minute or two to remove any excess moisture. You want them as dry as possible for a fluffier result. Use a potato masher or a fork to mash them into a smooth purée. -
Incorporate the Ingredients
To the mashed potatoes, add minced garlic, olive oil, and lemon juice. Using a spatula or a whisk, mix until velvety and seamless. The key is to add the olive oil gradually to achieve a creamy consistency. If it feels too thick, add a splash of warm water or more olive oil until you reach your desired thickness. -
Season to Taste
Once your Skordalia is well mixed, sprinkle in salt to taste. Give it a good stir and taste. This is your moment to adjust; feel free to add more garlic or lemon to suit your preferences! -
Serve with Style
Transfer your Skordalia to a serving bowl. Drizzle with a bit of extra olive oil on top and sprinkle with freshly chopped parsley or even a pinch of paprika for color. Serve it warm, at room temperature, or chilled — all options are delicious!
Remember, each step is an opportunity to infuse it with your personal touch. Don’t rush through; cooking is about enjoying the journey as much as the destination!
Serving Suggestions
Skordalia can be served in many fun and fabulous ways! Here are a few ideas:
-
With Warm Bread: Grab a loaf of crusty, warm bread, and let guests dip straight into the bowl. Think of it as a Mediterranean fondue!
-
As a Side Dish: Serve Skordalia alongside grilled meats, roasted veggies, or fish. It’s the perfect sauce that complements hearty flavors.
-
On Veggie Platters: Add it to your charcuterie board as a beautiful dip. Surround it with sliced cucumbers, bell peppers, and crunchy carrots for a colorful spread.
-
With Grains: Drizzle Skordalia over a bowl of quinoa or couscous for a delightful flavor boost.
No matter how you choose to serve it, Skordalia will surely be a hit at any gathering!
Recipe Variations
Feeling creative? Here are some fun variations on classic Skordalia:
-
Add Herbs: Mix in fresh herbs like dill, basil, or parsley for a fresh twist. They add an incredible aroma and depth of flavor.
-
Nuts and Seeds: Blend in walnuts or almonds for added crunch and nutrition. Toasting them a bit beforehand enhances their flavors too!
-
Roasted Garlic: Roast your garlic instead of using it raw for a mellower, sweeter flavor that blends beautifully with the potatoes.
-
Spices: Consider adding a hint of cumin or smoked paprika for a unique flavor profile. This can transport your Skordalia from Mediterranean to more exotic realms.
-
Dairy-Free: For a vegan option, you’re already there! Just ensure your olive oil is high quality to make up for any richness from butter.
Chef’s Notes
I must confess, the evolution of my Skordalia recipe has been a journey. When I first attempted it, I was terrified that I’d overpower the dish with too much garlic or not enough seasoning. It took me a few tries to find that perfect balance, but hey, what’s cooking without a few experiments along the way?
Sometimes, I even add a splash of soy sauce or tahini for an unexpected umami hit. It’s those quirky twists that can make a recipe uniquely your own! As a fun kitchen story, I remember one adventure where a family member got extra enthusiastic with the garlic (we’re talking a full head instead of a few cloves!). The results were potent but our laughter filled the kitchen that day — that’s what cooking is all about!
FAQs and Troubleshooting
Can I use different potatoes?
Absolutely! While russets or Yukon Golds are traditional, any variety will do. Just ensure they are starchy for that creamy texture.
My Skordalia is too runny. What can I do?
If your Skordalia ends up too watery, try adding more mashed potatoes to thicken it up. You can also give it a quick whip to incorporate air back into the mixture, making it lighter.
How do I store leftovers?
Store any leftover Skordalia in an airtight container in the refrigerator for up to 3 days. It can also be frozen, but the texture may change slightly upon thawing.
Can I make Skordalia in advance?
Yes! Skordalia actually tastes better the next day as the flavors meld together. Prepare it a day in advance, and let it chill in the fridge until you’re ready to serve!
Nutritional Info (Optional)
- Serving Size: 1/2 cup
- Calories: Approximately 200
- Fat: 10g
- Carbohydrates: 28g
- Protein: 3g
- Fiber: 3g
While this is a loved comfort dish, remember to enjoy it in moderation and incorporate it into a balanced diet!
So there you have it, friends! A delicious journey into the world of Skordalia. I hope you feel inspired to tie on your apron, gather your ingredients, and create your own memories around the dining table. Let’s continue to enjoy the beauty of good food — because at the end of the day, it’s all about connecting with one another through the joy of cooking. Happy cooking!
PrintSkordalia

A creamy, tangy garlic and potato dip from Mediterranean cuisine that elevates any meal.
- Prep Time: 15 minutes
- Cook Time: 15 minutes
- Total Time: 30 minutes
- Yield: 4 servings 1x
- Category: Appetizer
- Method: Boiling
- Cuisine: Mediterranean
- Diet: Vegetarian
Ingredients
- 2 large potatoes, peeled and cubed
- 4–6 cloves of garlic, minced
- 1/2 cup olive oil
- 2 tablespoons lemon juice
- Salt to taste
Instructions
- Boil the potatoes by placing them in a large pot, covering with cold water, and adding a pinch of salt. Bring to a boil and simmer for about 15 minutes or until tender.
- Prep the garlic by mincing it finely.
- Drain the tender potatoes in a colander, return to the pot, and mash them into a smooth purée.
- Incorporate the minced garlic, olive oil, and lemon juice into the mashed potatoes, mixing until smooth.
- Season to taste with salt, adjusting ingredients as desired.
- Serve in a bowl, drizzled with olive oil and garnished with parsley or paprika.
Notes
For creamier consistency, add warm water or more olive oil as necessary. Can be served warm, at room temperature, or chilled.
Nutrition
- Serving Size: 1/2 cup
- Calories: 200
- Sugar: 1g
- Sodium: 300mg
- Fat: 10g
- Saturated Fat: 1.5g
- Unsaturated Fat: 8.5g
- Trans Fat: 0g
- Carbohydrates: 28g
- Fiber: 3g
- Protein: 3g
- Cholesterol: 0mg
Keywords: skordalia, garlic dip, Mediterranean appetizer