
Greek Salmon
Savor the Mediterranean with Easy Greek Salmon
Hello, friends! Let’s talk about a dish that’s as captivating as the azure waters of the Aegean Sea: Greek Salmon. This recipe combines the rich flavors of fresh herbs, zesty lemon, and the delightful taste of salmon, creating a meal that feels like a warm hug from the Mediterranean. As we dive into this culinary adventure, you’ll discover just how simple it is to bring a little bit of Greece to your kitchen. So, grab your apron, and let’s get cooking!
A Fond Memory
I’ll never forget the first time I had salmon prepared with a Greek twist. It was a beautiful summer evening, and we gathered around a rustic wooden table in my friend’s backyard. The sun was setting, casting a golden hue over everything and filling the air with a sweet warmth. My friend’s father was grilling salmon, marinated in olive oil, garlic, and fresh herbs right in front of us. The sizzle from the grill matched the laughter and conversation fluttering around the table.
As the salmon cooked, the aroma wafted through the air, dancing with hints of lemon and garlic. When it was served with a side of grilled vegetables and some fluffy rice, it was like a celebration of summer on a plate. We devoured the meal, and every bite transported me back to that magical evening. It was then I realized how food not only nourishes our bodies but also feeds our souls.
Fast forward to today, this Greek Salmon recipe is one of my go-tos when I want to summon that nostalgic feeling! Join me as we explore how to recreate this delicious dish at home.
Ingredients
Here’s what you’ll need to whip up your own Greek Salmon:
-
4 salmon fillets: Look for fresh, skin-on fillets for that crispy texture! If you can’t find salmon, feel free to substitute with trout or even chicken for a different protein experience.
-
3 tablespoons olive oil: A staple in Mediterranean cooking! It adds flavor and helps to keep the salmon moist. If you’re out of olive oil, canola or avocado oil can work just as well.
-
3 cloves garlic, minced: Garlic adds a punch! If you prefer a milder flavor, you can reduce the amount or use garlic powder as a substitute.
-
1 lemon, zested and juiced: This citrus gem brightens up the entire dish. Don’t have a lemon? Lime or even orange zest and juice can provide a delightful variation.
-
2 tablespoons fresh dill, chopped: An essential herb in Greek cuisine that enhances the fish with its fresh taste. If you’re not a fan of dill, parsley or even thyme can make excellent substitutes.
-
Salt and pepper to taste: Basic yet crucial — ensuring the dish is well-seasoned is key! Use sea salt or even pink Himalayan salt for a little extra flair.
Step-by-Step Instructions
Let’s get down to the fun part — cooking! Ready? Here we go:
-
Prep Your Ingredients: Start by gathering all your ingredients and prepping the salmon. Pat the fillets dry with paper towels — this helps achieve that delightful golden crisp when searing. Place them on a plate and sprinkle with a little salt and pepper to season.
-
Make the Marinade: In a small bowl, whisk together your olive oil, minced garlic, lemon zest, and half of the lemon juice (save the other half for finishing!). Add your chopped dill to the mix, and give it a good stir. Don’t be shy — this combination is where the magic happens!
-
Marinate the Salmon: Pour the marinade over the salmon fillets and let them soak up all those flavors for at least 15-20 minutes. If you’re short on time, just a quick drizzle will still add a delightful touch, but giving it time to marinate is truly best!
-
Preheat the Grill or Pan: While your salmon marinates, heat a grill or skillet over medium-high heat. If you’re grilling, make sure to oil the grates slightly to prevent sticking. For a skillet, adding a tiny drizzle of oil can help keep that salmon from clinging on.
-
Cook the Salmon: Place the fillets skin-side down if using skin-on salmon. Cook for about 5-6 minutes on the first side, without moving them. This helps to develop a beautiful crust. If you’re using skinless fillets, carefully flip them after 4-5 minutes.
-
Flip and Finish: Once a lovely crust has formed, gently flip the salmon using a spatula. Cook for another 3-4 minutes until the salmon is opaque and flakes easily with a fork. It should still be moist inside — overcooking can lead to dryness, so watch closely!
-
Add the Final Touch: Squeeze the remaining lemon juice over the salmon just before serving for that extra pop of flavor!
-
Rest and Serve: Let the salmon rest for a minute or two. This brief pause allows the flavors to settle and the juices to redistribute.
Serving Suggestions
To make the meal feel complete, serve your Greek Salmon over a bed of fluffy rice or alongside roasted vegetables. I love plating it with a sprinkle of extra dill and a lemon wedge for a fresh presentation. Don’t forget to pour yourself a glass of chilled white wine or sparkling water with a slice of lemon for that authentic Mediterranean feel!
Recipe Variations
Feeling a little adventurous? Here are some fun twists you can put on this Greek Salmon:
-
Mediterranean Herb Mix: Swap out dill for a herby blend of oregano and thyme for a different flavor profile.
-
For a Spicy Kick: Add a pinch of crushed red pepper flakes to the marinade for a delightful heat that complements the salmon beautifully.
-
Citrus Variety: Experiment with grapefruit or blood orange juice and zest instead of lemon. It adds a unique sweetness and tang.
-
Honey Glaze: Drizzle a bit of honey over the salmon just before serving for a lovely sweet contrast to the savory flavors.
-
Dairy-Free Option: Try serving the salmon over a bed of quinoa mixed with diced cucumber and tomatoes for a refreshing grain salad.
Chef’s Notes
Every kitchen experience is a chance to learn! I once confidently attempted to flip a fillet without my trusty spatula in sight, only to have it splatter everywhere. The kitchen was an absolute mess, but boy, did we laugh! It’s those delightful little blunders that keep cooking enjoyable and remind us that perfection is not the goal, just the joy of creating together.
This Greek Salmon recipe has evolved with me — particularly as I’ve honed in on the importance of flavors marrying over time. I encourage you to play with it, adding your personality along the way!
FAQs and Troubleshooting
1. What if my salmon sticks to the grill?
- This sometimes happens if the grill isn’t hot enough or not oiled properly. Preheating is a must! If it does stick, don’t panic; just use a spatula gently to loosen it.
2. How can I tell when the salmon is done?
- Perfectly cooked salmon flakes easily with a fork and should be opaque in color. If you have an instant-read thermometer, aim for 145°F (63°C) for perfectly cooked salmon.
3. Can I use frozen salmon?
- Absolutely! Just ensure it’s completely thawed before cooking. You can soak it in cold water for a quicker thawing process.
4. What’s a good side dish to serve with this?
- Consider a fresh Greek salad, roasted vegetables, or even a light pasta dish tossed in olive oil and garlic. These all pair wonderfully with the salmon!
Nutritional Info
While I always advocate for enjoying food without much worry, if you’d like to know, a standard salmon fillet (approximately 4 oz) contains around 200 calories, with plenty of heart-healthy omega-3s, protein, and vitamins. Paired with veggies or a healthy grain, you’re treating yourself to a wholesome meal!
Friends, I hope you’re as excited to create this Greek Salmon as I am to share it with you! Remember, cooking is about connecting, nourishing, and celebrating — so shine your light in the kitchen, and enjoy every bite. Happy cooking from my kitchen to yours!
PrintEasy Greek Salmon

A delightful recipe for Greek Salmon infused with fresh herbs, zesty lemon, and garlic, perfect for a taste of the Mediterranean.
- Prep Time: 15 minutes
- Cook Time: 15 minutes
- Total Time: 30 minutes
- Yield: 4 servings 1x
- Category: Main Course
- Method: Grilling
- Cuisine: Mediterranean
- Diet: Paleo
Ingredients
- 4 salmon fillets (fresh, skin-on for crispiness)
- 3 tablespoons olive oil
- 3 cloves garlic, minced
- 1 lemon, zested and juiced
- 2 tablespoons fresh dill, chopped
- Salt and pepper to taste
Instructions
- Prep your ingredients by patting the salmon dry with paper towels.
- Make the marinade by whisking together olive oil, garlic, lemon zest, and half of the lemon juice.
- Marinate the salmon fillets for at least 15-20 minutes.
- Preheat your grill or pan over medium-high heat.
- Cook the salmon skin-side down for about 5-6 minutes without moving.
- Flip the salmon and cook for another 3-4 minutes until opaque.
- Add the remaining lemon juice just before serving.
- Rest for a couple of minutes before serving.
Notes
For a fruity twist, try using lime or orange instead of lemon. Serve with grilled vegetables or over rice.
Nutrition
- Serving Size: 1 fillet
- Calories: 350
- Sugar: 0g
- Sodium: 250mg
- Fat: 20g
- Saturated Fat: 3g
- Unsaturated Fat: 15g
- Trans Fat: 0g
- Carbohydrates: 3g
- Fiber: 0g
- Protein: 35g
- Cholesterol: 60mg
Keywords: Greek salmon, Mediterranean recipes, healthy salmon, easy fish recipes, grilled salmon
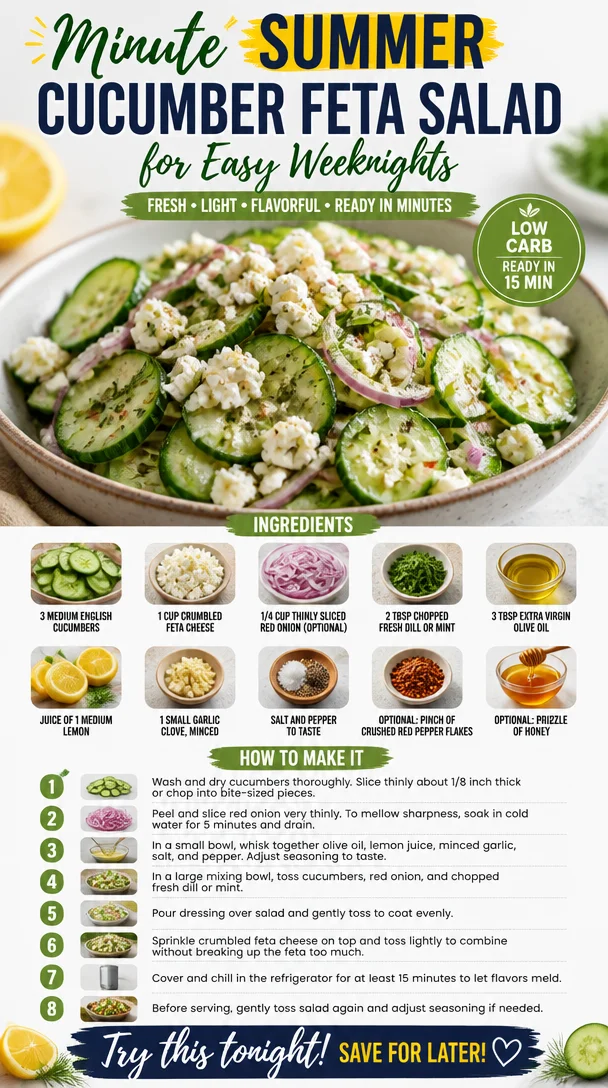
Minute Summer Cucumber Feta Salad for Easy Weeknights
The Ultimate Classic Cucumber Feta Salad Recipe: A Refreshing Summer Delight
Hello there, fellow food lovers! Today, we’re diving into a recipe that’s one of my all-time favorites: the Classic Cucumber Feta Salad. Not only is this dish a vibrant celebration of fresh ingredients, but it’s also incredibly simple to make. Perfect for summer picnics, effortless dinners, or just to brighten up your weeknight meals, this salad is sure to impress. So grab your apron and let’s get started on this tasty journey!
A Taste of Nostalgia
Growing up, summer weekends at my grandmother’s house were sacred. The sun would shine brightly, the garden was bursting with life, and the air was filled with laughter and the sizzling sounds of the grill. One particularly vivid memory is of my grandmother whipping up her famous cucumber salad. She’d take the freshest cucumbers from her garden, paired with a sprinkling of salty feta cheese and a drizzle of good olive oil. The combination was simple yet delightful, and it embodied everything great about summer—the warmth, the sunshine, and the joy of being together.
Now, every time I make this Classic Cucumber Feta Salad, I’m transported back to those carefree days, sharing stories and enjoying the simple flavors of fresh ingredients. It’s more than just a salad; it’s a reminder to cherish those moments spent around the table. Plus, it’s a recipe that anyone can make, and I’m excited to help you recreate this summer staple.
Ingredients
Here’s a list of all the ingredients you’ll need for this refreshing salad, along with some helpful notes:
-
3 medium English cucumbers: English cucumbers are perfect for this salad because they have a thinner skin and fewer seeds, making them ideal for slicing. If you can’t find them, you can use regular cucumbers; just peel them if the skin is too thick.
-
1 cup crumbled feta cheese: Feta adds a creamy and salty kick to the salad. You can substitute it with goat cheese or even a dairy-free cheese option if you want to keep it vegan.
-
1/4 cup thinly sliced red onion (optional): Red onion offers a mild, sweet crunch. If you’re not a fan of onion, feel free to leave it out, or replace it with green onions for a milder flavor.
-
2 tablespoons chopped fresh dill or mint: Fresh herbs elevate this salad beautifully. Dill adds a classic flavor reminiscent of summertime, while mint brings a refreshing twist. Use whatever you have on hand or prefer!
-
3 tablespoons extra virgin olive oil: This will serve as the base of your dressing. A good-quality olive oil will enhance the flavors and add richness. If you prefer, you can substitute with avocado oil for a different taste.
-
Juice of 1 medium lemon (about 2 tablespoons): Fresh lemon juice brightens the salad and balances the creaminess of the feta. If you’re in a pinch, bottled lemon juice will work, but fresh is always best!
-
1 small garlic clove, minced: Garlic adds wonderful flavor. If you’re sensitive to raw garlic, you can reduce the amount or omit it altogether.
-
Salt and pepper to taste: Seasoning is essential! Don’t forget to taste as you go.
-
Optional: pinch of crushed red pepper flakes: If you like a little heat, this is a perfect addition!
-
Optional: drizzle of honey: For those who enjoy a sweet twist, a bit of honey can offset the saltiness of the feta beautifully.
Step-by-Step Instructions
Now that we have our ingredients ready, let’s jump into making this gorgeous salad! Follow these steps, and I promise you’ll surprise yourself with your kitchen prowess.
-
Prepare the cucumbers: Start by washing your cucumbers thoroughly. Slice them thinly using a sharp knife or a mandolin for uniformity. If you prefer, you can also chop them into bite-size pieces for a more casual vibe. Set them aside in a large mixing bowl.
-
Add the onion (if using): If you opted for red onion, add the thinly sliced pieces to the bowl with the cucumbers. This adds a lovely crunch and sweetness. If the flavor is too strong for your taste, soaking the onion slices in water for a few minutes can help mellow them out!
-
Mix in the feta: Crumble the feta cheese over the cucumbers and onion. The creamy texture of the cheese will blend wonderfully with the other ingredients, providing that signature salty flavor.
-
Chop the herbs: Roughly chop the fresh dill or mint (or both!). Add the herbs to the salad mix, giving it that colorful burst of green while infusing fresh flavors.
-
Make the dressing: In a small bowl, whisk together the extra virgin olive oil, lemon juice, minced garlic, salt, and pepper. If you’re feeling adventurous, you can also mix in the crushed red pepper flakes and honey at this stage.
-
Combine everything: Drizzle the dressing over the cucumber mixture and gently toss until everything is evenly coated. Be careful not to mash the feta; you still want those lovely crumbles to shine through!
-
Taste and adjust: Now’s your chance to taste your salad! Add more salt, pepper, or lemon juice as needed. It should be a delightful balance of fresh, crunchy, salty, and savory.
-
Chill: For the best flavor, let the salad sit in the fridge for about 30 minutes. This allows all the flavors to meld beautifully.
Serving Suggestions
Once your salad has chilled and is ready to serve, it’s time to plate! This Cucumber Feta Salad is as beautiful as it is delicious. Serve it in a large bowl for family-style dining or portion it into individual servings for a more formal gathering. Drizzle with a little extra olive oil and sprinkle some fresh herbs on top for a lovely presentation. It pairs wonderfully with grilled meats, crusty bread, or even as a stand-alone light lunch!
Recipe Variations
Now that you know the classic recipe, why not get a bit creative? Here are a few fun variations you can try:
-
Mediterranean Twist: Add kalamata olives and cherry tomatoes for a colorful Mediterranean vibe.
-
Spicy Kick: Toss in some sliced jalapeños or a diced red chili for a spicy twist!
-
Fruit Fusion: Add diced watermelon or strawberries for a sweet and refreshing take.
-
Quinoa Boost: Mix in some cooked quinoa for added texture and heartiness.
-
Vegan Delight: Swap feta for soaked cashews blended with nutritional yeast, lemon juice, and a pinch of salt for a vegan-friendly version.
Chef’s Notes
Every recipe has its journey, and this Cucumber Feta Salad has evolved over the years. Initially, I kept it super simple, just cucumbers and feta. But as I’ve grown to appreciate the flavors and textures that different ingredients bring, I’ve added herbs, spices, and even fruits to make this dish my own. One of my kitchen stories involves an impromptu summer barbecue where I forgot the lemon! Instead, I used some balsamic vinegar—totally unexpected, yet surprisingly delightful. Cooking is all about the spirit of experimentation, so don’t shy away from making this salad your own.
FAQs and Troubleshooting
-
Can I make this salad ahead of time?
Absolutely! This salad can be made a day in advance. Just make sure to store it in an airtight container in the fridge. The flavors will deepen, but be cautious with cucumbers as they may release water, making the salad a bit soggy. -
What if my cucumbers are bitter?
If your cucumbers taste bitter, it could be due to a harsh skin. Peeling them before using can help reduce bitterness. Also, scrubbing them under cold water before slicing can improve flavor! -
How long will this salad last?
This salad is best enjoyed fresh but can typically last 2-3 days in the fridge. Just remember that the cucumbers will lose some of their crunch over time. -
What can I serve with this salad?
This cucumber feta salad is incredibly versatile! It pairs well with grilled chicken, steak, seafood, or even some hearty pasta dishes. Perfect alongside anything hot off the grill!
Nutritional Information
While this recipe is also about flavor, it’s good to know what you’re enjoying! Each serving of this Classic Cucumber Feta Salad is packed with refreshing veggies and heart-healthy fats from olive oil. It’s low in calories, making it a guilt-free addition to any meal!
There you have it, my dear friends! The Classic Cucumber Feta Salad is not just a dish; it’s a summer experience waiting to happen. I hope you try this recipe and make your own cherished memories around the table. Remember, cooking should be fun and fulfilling, so enjoy every moment in your kitchen. Happy cooking! 🍽️
PrintClassic Cucumber Feta Salad
A refreshing summer salad made with fresh cucumbers, crumbled feta cheese, and herbs.
- Prep Time: 15 minutes
- Cook Time: 0 minutes
- Total Time: 30 minutes
- Yield: 4 servings 1x
- Category: Salad
- Method: No-Cook
- Cuisine: Mediterranean
- Diet: Vegetarian
Ingredients
- 3 medium English cucumbers
- 1 cup crumbled feta cheese
- 1/4 cup thinly sliced red onion (optional)
- 2 tablespoons chopped fresh dill or mint
- 3 tablespoons extra virgin olive oil
- Juice of 1 medium lemon (about 2 tablespoons)
- 1 small garlic clove, minced
- Salt and pepper to taste
- Optional: pinch of crushed red pepper flakes
- Optional: drizzle of honey
Instructions
- Prepare the cucumbers: Start by washing your cucumbers thoroughly. Slice them thinly using a sharp knife or a mandolin for uniformity. Set them aside in a large mixing bowl.
- Add the onion (if using) to the bowl with the cucumbers.
- Mix in the feta cheese over the cucumbers and onion.
- Chop the fresh dill or mint and add to the salad.
- Make the dressing by whisking together olive oil, lemon juice, minced garlic, salt, and pepper.
- Combine everything by drizzling the dressing over the salad and gently tossing.
- Taste and adjust seasoning as needed.
- Chill in the fridge for about 30 minutes.
Notes
Great for summer picnics and pairs well with grilled meats.
Nutrition
- Serving Size: 1 serving
- Calories: 200
- Sugar: 3g
- Sodium: 450mg
- Fat: 15g
- Saturated Fat: 4g
- Unsaturated Fat: 10g
- Trans Fat: 0g
- Carbohydrates: 10g
- Fiber: 2g
- Protein: 6g
- Cholesterol: 15mg
Keywords: cucumber, salad, feta, summer, healthy

Moroccan Couscous with Roast Vegetables
Moroccan Couscous with Roast Vegetables: A Flavorful Journey
Hello, fellow foodies! Let’s embark on a delightful culinary adventure today! A dish that captures the vibrant spirit of Moroccan cuisine is none other than Moroccan Couscous with Roast Vegetables. It’s not just a meal; it’s an experience, a celebration of flavors, colors, and warmth that beckons you to the table. I’m excited to share this recipe with you today, filled with stories, tips, and all the love that goes into making it.
Introduction
Growing up, our kitchen was always bursting with life. The aroma of spices wafted through the air as my family gathered for dinner each night. One of my dear friends, a remarkable cook, introduced me to Moroccan cuisine during our college days. I remember stepping into her cozy apartment, where the scent of cinnamon and cumin welcomed us. She’d prepared a vibrant Moroccan feast, and I was instantly captivated.
Now, I want to replicate that nostalgia for you with this Moroccan Couscous recipe. Picture this: golden, fluffy couscous nestled under a heap of roasted vegetables, all coated in aromatic spices. It’s a colorful dish that feels festive yet comforting — ideal for weeknight dinners or special occasions. You don’t need a ticket to Marrakech to enjoy its flavors; we can create that magic right here! Let’s tie our aprons, put on some music, and dive into this dish together.
Personal Story
One of my fondest memories related to Moroccan Couscous involves a chilly winter evening a few years back. I had invited a few close friends over for an impromptu dinner. With busy lives and schedules, we often found it hard to come together, so I wanted this meal to feel special. While browsing through my pantry, I stumbled upon a bag of couscous and a bounty of seasonal vegetables from the local farmer’s market, and a delicious idea sparked!
I roasted the veggies until they were beautifully caramelized, infused them with spices, and piled them atop a bed of fluffy couscous. As the evening unfolded, our laughter filled the room, and we savored every bite of the meal. It was a reminder of how food has the magical ability to bring people together, creating unforgettable moments around the table. That dinner not only presented a beautiful dish but also reignited a deeper appreciation for how sharing food nurtures connection.
Ingredients
Here’s what you’ll need for this mouthwatering Moroccan Couscous with Roast Vegetables:
-
1 cup couscous
Couscous is the heart of this dish! It’s quick to prepare, light, and incredibly versatile. -
2 cups vegetable broth
Using vegetable broth instead of water adds rich flavor to the couscous. Feel free to use chicken broth for a non-vegetarian option! -
1 zucchini, diced
Zucchini adds a subtle sweetness and crisp texture. You can substitute it with yellow squash if you prefer. -
1 bell pepper, diced
I recommend using a red or yellow bell pepper for a pop of color and a mild, sweet taste. Green peppers will work, too, but they’re more bitter. -
1 carrot, diced
The natural sweetness of carrots enhances the overall flavor. You can also use parsnips for a different twist. -
1 red onion, chopped
The sweetness of roasted red onion rounds out the dish beautifully. White or yellow onions can serve as a substitute. -
1 teaspoon cumin
Cumin is a warm spice that adds depth. If you’re looking for a milder flavor, try ground coriander. -
1 teaspoon coriander
This herb brings in a citrusy, fresh flavor. Fennel seeds can work in a pinch, offering a different, yet delightful essence. -
1 teaspoon paprika
Sweet paprika elevates the dish with a smoky flavor. You can kick it up a notch with smoked paprika for extra depth. -
Salt and pepper to taste
Always remember to season your dishes! This enhances all the vibrant flavors. -
2 tablespoons olive oil
Olive oil not only helps roast the veggies beautifully but also adds healthy fats. Avocado or grapeseed oil can be substituted if desired. -
Fresh parsley for garnish
A sprinkle of fresh parsley adds a lovely touch, brightening the dish visually and flavor-wise. Mint can offer a refreshing alternative.
Step-by-Step Instructions
-
Preheat the Oven
Begin by preheating your oven to 400°F (200°C). A hot oven is key to achieving perfectly roasted vegetables with a lovely caramelization. -
Prepare the Vegetables
In a large bowl, combine the diced zucchini, bell pepper, carrot, and chopped red onion. Add the olive oil, cumin, coriander, paprika, salt, and pepper. Toss the vegetables until they are evenly coated. Here’s a hack: use your hands to mix them – it’s more effective! Just don’t forget to wash them afterward. -
Roast the Vegetables
Spread the vegetable mixture on a baking sheet in a single layer. This helps them roast evenly and achieve that gorgeous golden edge. Roast for 25–30 minutes, or until the vegetables are tender and caramelized. You might want to flip them halfway through for an even roast. -
Prepare the Couscous
In a medium saucepan, bring the vegetable broth to a boil. Once boiling, remove from heat and stir in the couscous. Cover it with a lid and let it sit for about 5 minutes. The couscous will absorb the broth and become fluffy! A tricky way to check for doneness: use a fork to fluff it up after resting. -
Combine the Flavors
After the vegetables are done roasting and the couscous is ready, combine them in a large serving bowl. Fluff the couscous with a fork, and gently fold in the roasted veggies. It’s key to be gentle here so you don’t mash the vegetables. -
Garnish and Serve
Top with fresh parsley for an extra pop of color. Just the thought of that contrast brings a smile to my face! Optional: Drizzle a bit more olive oil over the top for a lovely finish.
Serving Suggestions
For a beautiful presentation, serve your Moroccan Couscous in a large bowl, allowing everyone to help themselves. You can even present it on a rustic wooden board, surrounded by small bowls of additional garnishes, like toasted almonds or crumbled feta cheese for those who’d like to add a touch of creaminess. Perfect for family-style dining!
Recipe Variations
- Add Protein: For a heartier dish, toss in chickpeas for a vegetarian protein boost, or grilled chicken or shrimp for a non-vegetarian option.
- Spice it Up: Add a pinch of cayenne pepper or red pepper flakes if you enjoy some heat.
- Switch it Up: Substitute quinoa for couscous for a gluten-free twist, or use different seasonal vegetables like eggplant or butternut squash.
- Go Green: Mix in some spinach or kale right before serving for an added boost of greens.
Chef’s Notes
One of the best things about this recipe is its versatility. I’ve experimented with various vegetable combinations over the years, often depending on what’s in season or what I have in the fridge. You’ll find that this dish is forgiving, encouraging creativity. I once made a batch with an accidental sprinkle of cinnamon — it was a delightful surprise that became a new favorite!
FAQs and Troubleshooting
-
What if my couscous is clumpy?
No worries! Fluff it with a fork after it’s cooked. If it’s still clumpy, try adding a touch of olive oil to separate the grains. -
Can I prepare this dish in advance?
Absolutely! You can roast the veggies and prepare the couscous in advance. Mix them just before serving to avoid sogginess. -
What if I don’t have vegetable broth?
You can use water in a pinch, but for added flavor, try using a combination of half water and half white wine. -
How can I store leftovers?
Keep the couscous and vegetables in an airtight container in the fridge for up to three days. Reheat gently on the stovetop or in the microwave, adding a little splash of vegetable broth if needed to revive the dish.
Nutritional Info
While I typically leave nutritional details optional based on preferences, a serving of this Moroccan Couscous with Roast Vegetables offers a great balance of carbs, fiber, and healthy fats, making it a comforting yet nutritious choice!
To wrap up, cooking is all about discovering flavors, sharing joy, and creating memories. I hope this Moroccan Couscous with Roast Vegetables brings warmth and delight to your table. Enjoy the process, invite loved ones, and let’s keep celebrating the beauty of good food together. Happy cooking, my friends!
PrintMoroccan Couscous with Roast Vegetables

A flavorful Moroccan dish featuring golden couscous topped with beautifully roasted vegetables and aromatic spices.
- Prep Time: 15 minutes
- Cook Time: 30 minutes
- Total Time: 45 minutes
- Yield: 4 servings 1x
- Category: Main Course
- Method: Roasting
- Cuisine: Moroccan
- Diet: Vegan
Ingredients
- 1 cup couscous
- 2 cups vegetable broth
- 1 zucchini, diced
- 1 bell pepper, diced
- 1 carrot, diced
- 1 red onion, chopped
- 1 teaspoon cumin
- 1 teaspoon coriander
- 1 teaspoon paprika
- Salt and pepper to taste
- 2 tablespoons olive oil
- Fresh parsley for garnish
Instructions
- Preheat the oven to 400°F (200°C).
- Combine the diced zucchini, bell pepper, carrot, and chopped red onion in a large bowl with olive oil and spices.
- Spread the vegetable mixture on a baking sheet.
- Roast for 25–30 minutes until tender and caramelized.
- Bring the vegetable broth to a boil in a medium saucepan.
- Stir in the couscous, cover, and let it sit for 5 minutes.
- Fluff the couscous with a fork and combine it with the roasted vegetables in a large serving bowl.
- Garnish with fresh parsley and serve.
Notes
This dish is versatile; try adding chickpeas or different seasonal vegetables. For gluten-free, substitute quinoa for couscous.
Nutrition
- Serving Size: 1 serving
- Calories: 350
- Sugar: 5g
- Sodium: 400mg
- Fat: 12g
- Saturated Fat: 2g
- Unsaturated Fat: 10g
- Trans Fat: 0g
- Carbohydrates: 45g
- Fiber: 6g
- Protein: 10g
- Cholesterol: 0mg
Keywords: Moroccan, Couscous, Vegetarian, Roasted Vegetables, Healthy Dinner
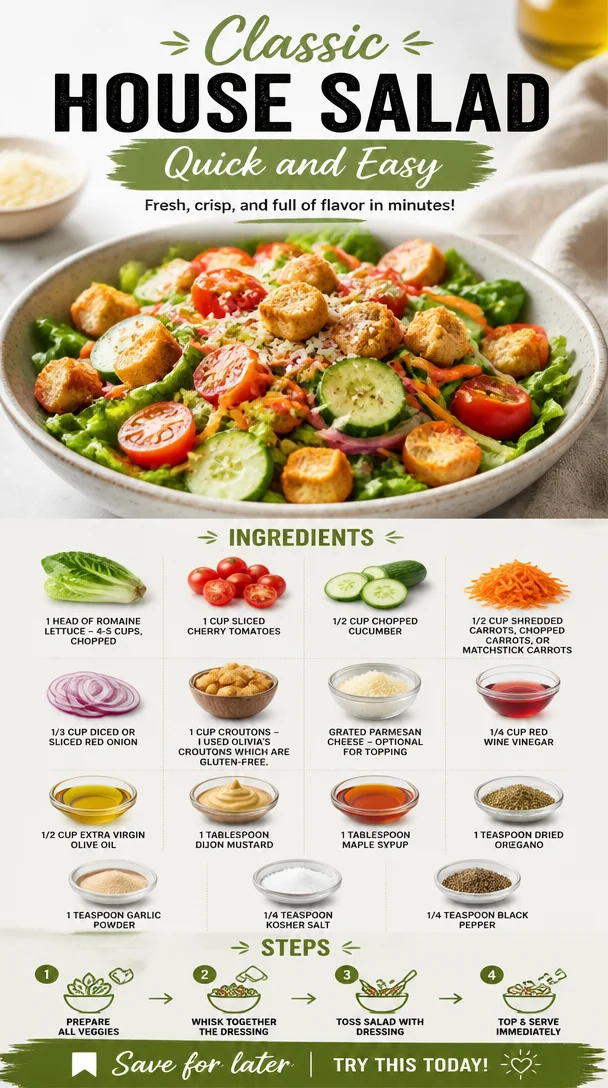
Classic House Salad – Quick and Easy
The Ultimate Classic House Salad: Quick and Easy
Hello, fellow food lovers! Today, I’m so excited to share with you one of my go-to recipes that embodies everything I love about cooking: it’s fresh, vibrant, and downright delicious! Introducing the classic house salad—a dish that feels both wonderfully nostalgic and absolutely essential in any kitchen.
Salads can sometimes get a bad rap, often deemed as boring or uninspired. But I promise you, that’s not the case here! The beauty of a classic house salad is in its simplicity and versatility. This marvelous medley of fresh greens and crispy veggies is not only easy to whip up, but it can also serve as a cornerstone for countless meals. Best of all, it’s a dish that can spark joy around any table.
I vividly remember the first time I realized that salads could be so much more than just a side dish. It was at my grandmother’s house in summer, where she would pick fresh romaine from her garden—talk about the ultimate farm-to-table experience! She’d toss together her beautiful salad with whatever veggies were ripe and seasonal. The memory of that meal, with laughter echoing around the table and warmth from the sun dipping low in the sky, has stuck with me. It’s remarkable how something as simple as a salad can bring people together and foster a sense of community.
So, let’s dive into creating your very own classic house salad that’s quick, easy, and packed with flavor!
Ingredients
Here’s what you’ll need to create this vibrant house salad:
-
1 head of romaine lettuce (4-5 cups, chopped)
Crisp, refreshing, and full of nutrients. You can substitute with other greens like spinach or mixed greens if you prefer! -
1 cup sliced cherry tomatoes
Bursting with sweetness, cherry tomatoes add a pop of color. If you don’t have these on hand, regular diced tomatoes work just as well. -
1/2 cup chopped cucumber
For that refreshing crunch! English cucumbers or even Persian cucumbers are excellent substitutes. -
1/2 cup shredded carrots or matchstick carrots
A hint of sweetness and vibrant color—I always keep pre-shredded carrots in my fridge. You can skip them if you’re feeling lazy or substitute with bell pepper strips for a crunchier experience. -
1/3 cup diced or sliced red onion
Adds a zingy bite. If you’re sensitive to raw onion, soak them in cold water for 10 minutes before using to tone down the flavor. -
1 cup croutons
I used Olivia’s croutons, which are gluten-free. You can make your own from stale bread or use store-bought alternatives—anything that adds fabulous crunch! -
Grated parmesan cheese (optional)
A sprinkle of this Parm adds a pinch of sophistication. Feel free to leave it out for a dairy-free version.
For the Dressing:
-
1/4 cup red wine vinegar
Zesty and tangy, it perfectly compliments the veggies. Apple cider vinegar or balsamic vinegar are great alternatives. -
1/2 cup extra virgin olive oil
Rich and flavorful, olive oil enhances every bite. If you’re looking for a lighter version, feel free to reduce the amount. -
1 tablespoon Dijon mustard
Adds depth to the dressing. You can use whole grain mustard for a different twist. -
1 tablespoon maple syrup
A pinch of sweetness balances the acidity. Honey works beautifully here too! -
1 teaspoon dried oregano
A touch of herbaceousness—fresh oregano is lovely for an elevated flavor. -
1 teaspoon garlic powder
This brings a warm, savory note. If you want a sharper kick, use fresh minced garlic. -
1/4 teaspoon kosher salt & 1/4 teaspoon black pepper
Seasoning is everything! Adjust according to your taste preferences.
Step-by-Step Instructions
Now, let’s get you started on this delightful salad! Follow these steps for a quick and hassle-free creation:
-
Prepare the Greens
Start by washing your romaine lettuce under cold water to remove any dirt. Pat it dry with a kitchen towel or use a salad spinner—because who likes soggy greens? Chop or tear the lettuce into bite-sized pieces and place them into your largest salad bowl. -
Slice and Dice the Veggies
Next, grab your trusty knife and chop those vibrant veggies. Halve the cherry tomatoes, cut the cucumber into half-moons or cubes, and slice the red onion thinly. If you’re using matchstick carrots, add them straight to the bowl—they’re so cute and colorful! -
Whisk Together the Dressing
In a small bowl or jar, combine red wine vinegar, olive oil, Dijon mustard, maple syrup, oregano, garlic powder, salt, and pepper. Whisk it up until emulsified or shake it in the jar like a pro! You want a smooth, cohesive dressing that hugs your salad. -
Assemble the Salad
Time to bring it all together! Toss the chopped romaine with your sliced veggies in that big bowl. Pour in the dressing and give it a gentle toss—enough to coat every leaf but not so much that everything gets soggy. -
Finish with Toppings
Just before serving, sprinkle those glorious croutons over the top and, if you’re feeling fancy, add the grated parmesan. Give it another light toss to incorporate everything beautifully. -
Serve
That’s it! Your classic house salad is ready to be devoured. But don’t rush—take a moment to admire the colorful masterpiece you’ve created.
Serving Suggestions
For a beautiful presentation, serve your salad in wide, shallow bowls to showcase the colorful ingredients. Drizzle a little extra dressing on top or even place the croutons in the center to create a stunning effect. Garnish with a few sprigs of fresh herbs like basil or parsley for an extra touch of elegance.
Recipe Variations
Want to mix it up? Here are a few creative twists to elevate your salad game:
-
Add some Protein: Toss in grilled chicken, chickpeas, or shrimp to turn your salad into a more filling meal.
-
Fruity Flair: Include slices of strawberries, diced apples, or even dried cranberries for a touch of sweetness.
-
Nutty Crunch: A handful of toasted nuts such as walnuts, pecans, or pine nuts can add a delightful texture.
-
Cheese Lovers Delight: Try crumbled feta or goat cheese instead of parmesan for a tangy twist.
-
Herb Infusion: Experiment with fresh herbs—add basil, cilantro, or dill to brighten up your salad even more.
Chef’s Notes
This classic house salad is a staple for a reason! It’s adaptable and delicious, and it can easily fit different occasions—from casual weeknight dinners to elegant gatherings. I’ve even themed salads based on seasonal produce or international cuisines—think Mediterranean with olives and feta or a fall vibe with roasted butternut squash.
And let me tell you, salad nights have led to some of my best memories in the kitchen. I once had a salad contest among friends, and it was hilarious to see the outrageous combinations everyone came up with. Who knew kale could be paired with gummy bears!?
FAQs and Troubleshooting
1. My salad dressing is too tangy! What can I do?
If your dressing is a bit sharp, just whisk in a tad more olive oil or a touch more maple syrup to balance it out.
2. How long can I store the salad?
If you keep the dressing separate, the salad will stay fresh for about 2 days in the fridge. However, if mixed, it’s best to enjoy it the same day to prevent sogginess.
3. How do I make it vegan-friendly?
It’s easy! Just skip the parmesan cheese, ensure your croutons are vegan, and stick with maple syrup for sweetness.
4. What can I do if I have leftover dressing?
Leftover dressing can be stored in the refrigerator for up to a week. Use it on other salads, as a marinade for veggies, or even drizzled over grilled meats!
Nutritional Info
While it’s always great to focus on taste, I know many of you appreciate nutritional info! This classic house salad is packed with vitamins, minerals, and beneficial fats, making it a healthful addition to your meal. Each serving is roughly:
- Calories: 150-200 (depending on dressing)
- Protein: 3g
- Fats: 12g
- Carbohydrates: 10g
So, there you have it—a quick and easy classic house salad that’s just begging to grace your dinner table. I can’t wait for you to try it, so roll up those sleeves and get to work! Remember, cooking is all about enjoying the process and sharing good food with loved ones. Happy cooking, my friends!
PrintThe Ultimate Classic House Salad: Quick and Easy

A fresh and vibrant classic house salad that’s quick to prepare and perfect for any meal.
- Prep Time: 10 minutes
- Cook Time: 0 minutes
- Total Time: 10 minutes
- Yield: 4 servings 1x
- Category: Salad
- Method: No Cooking
- Cuisine: American
- Diet: Vegetarian
Ingredients
- 1 head of romaine lettuce (4–5 cups, chopped)
- 1 cup sliced cherry tomatoes
- 1/2 cup chopped cucumber
- 1/2 cup shredded carrots or matchstick carrots
- 1/3 cup diced or sliced red onion
- 1 cup croutons
- Grated parmesan cheese (optional)
- 1/4 cup red wine vinegar
- 1/2 cup extra virgin olive oil
- 1 tablespoon Dijon mustard
- 1 tablespoon maple syrup
- 1 teaspoon dried oregano
- 1 teaspoon garlic powder
- 1/4 teaspoon kosher salt
- 1/4 teaspoon black pepper
Instructions
- Prepare the greens by washing your romaine lettuce under cold water. Pat it dry and chop or tear it into bite-sized pieces.
- Slice and dice the veggies; halve the cherry tomatoes, cut the cucumber, and slice the red onion thinly.
- Whisk together the dressing by combining red wine vinegar, olive oil, Dijon mustard, maple syrup, oregano, garlic powder, salt, and pepper until emulsified.
- Assemble the salad by tossing the chopped romaine with the sliced veggies in a large bowl. Pour in the dressing and toss gently.
- Finish with toppings like croutons and grated parmesan (if using) before serving.
- Serve the salad in wide, shallow bowls for a beautiful presentation.
Notes
You can add proteins like grilled chicken or chickpeas for a heartier salad. Experiment with fruits, nuts, or herbs to customize your salad.
Nutrition
- Serving Size: 1 serving
- Calories: 200
- Sugar: 5g
- Sodium: 400mg
- Fat: 12g
- Saturated Fat: 2g
- Unsaturated Fat: 10g
- Trans Fat: 0g
- Carbohydrates: 10g
- Fiber: 2g
- Protein: 3g
- Cholesterol: 5mg
Keywords: salad, house salad, quick salad, vegetarian recipe, healthy salad

Minute Broccoli Pasta Salad for Weeknight Meal-Prep
The Best Broccoli Pasta Salad Recipe: A Vibrant Twist on a Classic Dish
Hello, fellow food enthusiasts! Today, I’m thrilled to share a gem from my kitchen: the Best Broccoli Pasta Salad. This dish is a show-stopper in its simplicity, bursting with flavors and colorful ingredients that make it perfect for summer gatherings or cozy weeknight meals. If you’re looking for a recipe that’s as easy to prepare as it is delightful to eat, you’ve hit the jackpot!
Why I Love This Broccoli Pasta Salad
Picture this: the sweet smell of fresh broccoli mingling with the nuttiness of pasta, bright cherry tomatoes, and the sprinkle of crumbled feta cheese. Each bite of this salad takes me back to sunny afternoons spent in my backyard garden, surrounded by friends and laughter. I remember the first time I whipped up this dish for a summer BBQ. My friends arrived with their usual favorites—burgers and hot dogs—but when they tasted my broccoli pasta salad, they were taken aback. “Wow, you need to keep this on rotation!” they said, and with that, a star was born!
This dish is not just a pasta salad; it’s a celebration of fresh ingredients that come together effortlessly. It’s packed with nutrients, flavor, and color, making it a feast for the eyes as much as for the tastebuds. Trust me, this is one recipe you’ll want to keep in your culinary arsenal!
Ingredients
Let’s dive into what you’ll need to whip up this delightful salad. Here’s the ingredient list, along with a few insights on each!
-
2 cups broccoli florets
Fresh broccoli adds a nice crunch and a bright green color. If you don’t have fresh, you can use frozen florets—but be sure to thaw and drain them! -
8 ounces pasta (e.g., rotini or penne)
Whole-grain pasta is a fantastic option if you’re looking for something healthier. Gluten-free pasta works too! -
1 cup cherry tomatoes, halved
These little gems add sweetness and juiciness. Feel free to use grape tomatoes or even diced regular tomatoes in a pinch. -
1/2 cup red onion, diced
Red onion offers a sharp, slightly sweet crunch. If you prefer something milder, sweet onions or green onions are great substitutes. -
1/2 cup shredded carrots
For a pop of color and a hint of sweetness, shredded carrots are just the ticket! If you’re short on time, pre-packaged shredded carrots work perfectly. -
1/2 cup feta cheese, crumbled
Feta’s tang complements the salad beautifully. If you want to make it dairy-free, you can substitute with a vegan cheese or simply leave it out. -
1/4 cup olive oil
Use high-quality extra virgin olive oil for the best flavor. Avocado oil is a wonderful alternative if you’re looking for something more neutral. -
2 tablespoons lemon juice
Freshly squeezed lemon juice brightens up the salad. For a zesty twist, try lime juice instead! -
Salt and pepper to taste
A must! Freshly cracked pepper adds a lovely kick. Don’t shy away from seasoning; it can transform your dish.
Step-by-Step Instructions
Now, let’s get cooking! Follow these detailed steps, and you’ll whip up this Broccoli Pasta Salad in no time.
-
Cook the Pasta
Start by bringing a large pot of salted water to a boil. Add your pasta and cook according to the package directions until al dente. This usually takes about 8–10 minutes. Remember, you want a little bite to your pasta, as it will absorb some of the dressing later. -
Blanch the Broccoli
While your pasta is cooking, grab a separate pot of boiling water and add the broccoli florets. Blanch them for about 2 minutes until they turn bright green. This keeps them crisp and vibrant! Remove the broccoli from the hot water and plunge it into an ice bath immediately to halt the cooking process. This trick will keep your broccoli crunchy. -
Prepare the Vegetables
In a large bowl, combine the halved cherry tomatoes, diced red onion, and shredded carrots. The combination of these fresh ingredients will create a beautiful rainbow effect within your salad. -
Mix the Dressing
In a small bowl, whisk together the olive oil and lemon juice. Season with salt and pepper to taste. I like to add a pinch of garlic powder for an extra flavor burst—totally optional, but delicious! Set the dressing aside for later. -
Combine It All
Drain your pasta and rinse it under cool water to stop the cooking. This helps to prevent the pasta from getting mushy. In your large bowl with the vegetables, add the cooked pasta and blanched broccoli. Gently toss everything together. -
Add Feta and Dressing
Now it’s time to bring everything together! Sprinkle the crumbled feta cheese on top, and drizzle your dressing over the mixture. Gently toss again until it’s all well combined. This is where the magic happens as the flavors mingle together! -
Taste and Adjust
Give it a taste and adjust the seasoning if needed. This salad is all about your preferences! You can add more lemon juice for tartness or more salt if you like it a little zingier.
Serving Suggestions
To serve your Broccoli Pasta Salad, try a beautiful large serving bowl to showcase its vibrant colors! I love to garnish it with extra feta and a sprinkle of fresh herbs like basil or parsley for that restaurant-style touch. This salad can be served chilled or at room temperature, making it a versatile option for any occasion. It pairs perfectly with grilled meats or as a standalone dish at a picnic!
Recipe Variations
Want to mix things up? Here are some fun variations to try with your Broccoli Pasta Salad:
- Add Protein: Toss in some grilled chicken, shrimp, or even chickpeas for a heartier meal.
- Swap the Cheese: Experiment with mozzarella pearls or grated Parmesan for a different flavor profile.
- Spice It Up: Add a pinch of red pepper flakes or diced jalapeño for a spicy kick!
- Herb It Up: Fresh dill or mint can add a refreshing twist to the flavor.
- Nutty Crunch: Sprinkle in some toasted walnuts or almonds to give an extra crunchy texture.
Chef’s Notes
This recipe has evolved over time from a simple idea to a colorful medley of my favorite summer ingredients. I even once made this salad while camping, improvising with canned vegetables and a squeeze of lemon from my cooler. It reminded me that cooking doesn’t need to be complicated to be delicious! The beauty of this dish is in its adaptability—if you have extra veggies in your fridge, throw them in!
FAQs and Troubleshooting
-
What if my pasta is overcooked?
If you accidentally overcook your pasta, don’t worry! Just add an extra splash of dressing to help rejuvenate it, and mix in plenty of crunchy veggies. -
How long can I store leftovers?
This salad keeps well in the fridge for about 3–4 days. Just keep in mind the broccoli can lose its crunch over time. -
Can I make this salad vegan?
Absolutely! Just omit the feta cheese or replace it with a dairy-free version. You can also amp up the flavors with nutritional yeast for a cheesy taste. -
How can I prevent my pasta from sticking?
Make sure to rinse the pasta under cold water before mixing it with the other ingredients, and toss it with a bit of olive oil after draining.
Nutritional Info
While calorie counts can differ based on specific ingredients, a generous serving of this Broccoli Pasta Salad typically contains about 350 calories. It’s a great source of fiber, vitamins, and healthy fats from the olive oil and veggies!
So there you have it, my lovely foodies! The Best Broccoli Pasta Salad is not just a dish; it’s a blend of memories, creativity, and comfort. Whether you’re hosting friends or simply enjoying a quiet evening at home, this salad is sure to impress. Tie on your apron, gather your ingredients, and let’s create something timeless together! Happy cooking!
PrintThe Best Broccoli Pasta Salad

A vibrant twist on a classic dish, this Broccoli Pasta Salad is bursting with flavors and colorful ingredients, perfect for summer gatherings or weeknight meals.
- Prep Time: 15 minutes
- Cook Time: 10 minutes
- Total Time: 25 minutes
- Yield: 4 servings 1x
- Category: Salad
- Method: Mixing
- Cuisine: American
- Diet: Vegetarian
Ingredients
- 2 cups broccoli florets
- 8 ounces pasta (e.g., rotini or penne)
- 1 cup cherry tomatoes, halved
- 1/2 cup red onion, diced
- 1/2 cup shredded carrots
- 1/2 cup feta cheese, crumbled
- 1/4 cup olive oil
- 2 tablespoons lemon juice
- Salt and pepper to taste
Instructions
- Cook the pasta by bringing a large pot of salted water to a boil, adding the pasta, and cooking according to package directions until al dente (about 8–10 minutes).
- Blanch the broccoli in a separate pot of boiling water for about 2 minutes, then plunge it into an ice bath to keep it crisp and vibrant.
- Prepare the vegetables by combining halved cherry tomatoes, diced red onion, and shredded carrots in a large bowl.
- Mix the dressing by whisking together olive oil and lemon juice, seasoning with salt and pepper to taste.
- Combine the cooked pasta and blanched broccoli with the vegetables in the large bowl and toss gently.
- Add the crumbled feta and drizzle the dressing over the mixture, tossing gently to combine.
- Taste and adjust seasoning as needed.
Notes
This salad can be served chilled or at room temperature, making it versatile for any occasion. Garnish with extra feta and fresh herbs for a restaurant-style touch.
Nutrition
- Serving Size: 1 serving
- Calories: 350
- Sugar: 5g
- Sodium: 400mg
- Fat: 12g
- Saturated Fat: 4g
- Unsaturated Fat: 6g
- Trans Fat: 0g
- Carbohydrates: 45g
- Fiber: 3g
- Protein: 15g
- Cholesterol: 30mg
Keywords: broccoli pasta salad, vegetarian salad, summer salad

Simple Mediterranean Greek Chicken Wraps with Cucumber Sauce
Greek Chicken Wraps with Cucumber Sauce – Fresh, Flavorful, and Perfect for Easy Mediterranean Lunches or Dinners
Hello, fellow food lovers! I’m thrilled to share one of my absolute favorite recipes that exudes sunshine and Mediterranean charm—Greek Chicken Wraps with Cucumber Sauce! These wraps are not only fresh and flavorful, but they also make for an effortlessly delightful lunch or dinner option. Whether you’re hosting a casual gathering or simply want to elevate your weeknight meal, this recipe has got you covered!
Introduction
Imagine this: golden brown chicken sizzling in olive oil, infused with zesty lemon and fragrant garlic, sending the most delicious aromas wafting through your kitchen. Now picture wrapping all of that goodness in a warm pita, topped with a homemade cucumber sauce that brings all the flavors together. Sounds heavenly, doesn’t it?
Whenever I make these Greek Chicken Wraps, I’m transported back to those sun-drenched summer days spent in quaint little tavernas along the Aegean coast. The vibrant flavors, paired with the warmth and hospitality of the locals, make Greek cuisine so special. It’s this very experience that inspired me to create my own version of Greek chicken wraps, perfect for any setting—be it a relaxed lunch at home or a lively dinner gathering.
What I adore about this dish is how it’s packed with fresh ingredients and bright flavors yet comes together so effortlessly. The grilled chicken is marinated to perfection, and the cucumber sauce is a refreshing accompaniment that adds a burst of flavor. Plus, it’s highly customizable! You can make it your own by adding extra veggies or swapping ingredients based on what you’ve got on hand. Trust me, once you give this recipe a try, you’ll be dreaming of Greek islands and starry nights!
Personal Story
Growing up, my family had a tradition of hosting Mediterranean-themed dinner parties every summer. My parents would put together a spread that included everything from crispy spanakopita to juicy lamb skewers. But the star of the show was always the chicken wraps. I remember being a little girl, helping my mom in the kitchen, chopping veggies, and watching her whip up that creamy cucumber sauce. It felt like magic as she transformed simple ingredients into something that not only tantalized our taste buds but also brought everyone together around the table.
One summer night, my parents decided to take their wrap-making skills to another level. We transformed our backyard into a mini Greek taverna with twinkling lights, colorful tablecloths, and, of course, lots of delicious food. I can still picture the laughter and joy as we gathered to share stories and indulge in those wraps, each bite bursting with flavor. Years later, those moments inspired me to recreate my parents’ magic and share it through Ivory Apron.
Ingredients
Here’s what you’ll need to make these delightful Greek Chicken Wraps:
-
1 lb boneless, skinless chicken breast or thighs, cut into strips
Chicken thighs provide a juicier option, while breasts are leaner. You can also use tofu or grilled veggies for a vegetarian delight! -
2 tbsp olive oil
Our hero ingredient! Opt for extra virgin olive oil for a richer flavor, but any good quality olive oil will do. -
2 tbsp lemon juice
Freshly squeezed lemon juice brightens up the dish! If you’re in a pinch, bottled lemon juice works, but fresh is best. -
2 garlic cloves, minced
Garlic is essential for that bold Mediterranean flavor! If you prefer milder garlic, roasting it beforehand can soften its bite. -
1 tsp dried oregano
An aromatic herb that screams Mediterranean. Substitute with thyme or Italian seasoning if you’re in a bind! -
½ tsp smoked paprika
Adds depth and complexity. Paprika pairs fabulously with chicken, but cayenne pepper can work for some heat! -
Salt & black pepper, to taste
Seasoning is key! Always taste as you go to find your perfect balance. -
½ cup Greek yogurt
This will form the base of our luscious cucumber sauce. You can substitute with regular yogurt or plant-based options for a dairy-free wrap. -
½ cup cucumber, finely grated and squeezed dry
Fresh cucumber adds crunch and freshness to our sauce. Make sure to squeeze out excess water to avoid a watery dip! -
1 tbsp lemon juice (for the sauce)
Ties the sauce together and brightens flavors—use the squeeze from the same lemon for efficiency! -
1 tbsp olive oil (for the sauce)
Maybe we should just call this dish a “celebration of olive oil!” -
1 garlic clove, minced (for the sauce)
A hint of garlic in the cucumber sauce enhances the overall flavor profile! -
1 tbsp chopped fresh dill or mint
Opt for fresh herbs to elevate that Greek flavor! Both dill and mint bring a refreshing touch—use one or the other based on your preference. -
Salt & pepper, to taste (for the sauce)
Always season your sauce to perfection! -
4 pita breads or flatbreads
You can use whole wheat, gluten-free, or even lettuce wraps as a low-carb alternative! -
½ cup chopped tomatoes
Vibrant and juicy, tomatoes are a must! Cherry tomatoes work too; just halve them for an easy addition! -
½ cup chopped cucumber
A little extra crunch to complement the chicken! -
¼ cup sliced red onion
Gives a sharp flavor that balances well with the creamy sauce; if it’s too pungent for you, soak slices in cold water for a milder bite! -
¼ cup crumbled feta cheese
Feta adds creaminess and tanginess. If you’re dairy-free, consider marinated olives or nutritional yeast as alternatives! -
Fresh parsley or dill, for garnish
Presentation matters! A sprinkle of fresh herbs makes your dish pop!
Step-by-Step Instructions
Ready to make these Greek Chicken Wraps? Let’s dive right in, and I’ll walk you through the process step by step:
-
Marinate the Chicken
In a large bowl, combine the olive oil, lemon juice, minced garlic, dried oregano, smoked paprika, salt, and black pepper. Add in the chicken strips and mix until well coated. Let it marinate for at least 30 minutes, or even better, an hour! This allows the flavors to penetrate the chicken. (Tip: If you’re short on time, marinating for just 15 minutes still adds a nice punch!) -
Prepare the Cucumber Sauce
While the chicken is marinating, let’s whip up our creamy cucumber sauce. In a medium bowl, combine the Greek yogurt, grated cucumber, lemon juice, olive oil, minced garlic, fresh dill (or mint), salt, and pepper. Mix everything until well combined, and set aside in the fridge to chill. This gives the flavors time to meld together, which is essential for a refreshing sauce! -
Grill the Chicken
Preheat your grill or grill pan over medium-high heat. Once it’s hot, throw in the marinated chicken strips. Grill for about 5-7 minutes per side, or until the chicken is fully cooked and has nice grill marks. (Remember: you can cut one piece in half to check doneness; the juices should run clear!) If you’re using a pan, just ensure it’s nicely oiled and heated before adding the chicken to avoid sticking. -
Warm the Pita
As the chicken cooks, you can heat your pita or flatbreads. You can do this on the grill for about a minute on each side (or in a warm pan) until they’re soft and warm. This will make the wraps ever so delightful! -
Assemble Your Wraps
Now comes the fun part! Take a warm pita and layer on the grilled chicken followed by chopped tomatoes, cucumber, sliced red onion, and crumbled feta cheese. Don’t forget to drizzle on that heavenly cucumber sauce! (Pro tip: feel free to lay everything in the center so that you can wrap them up like little presents!) -
Garnish and Serve
Sprinkle some fresh parsley or dill on top for that added touch of vibrancy! Serve your Greek Chicken Wraps immediately with extra cucumber sauce on the side—perfect for those who like a little more!
Serving Suggestions
When it comes to plating, simplicity is key. Arrange your wraps on a vibrant platter, and complement them with small bowls of extra cucumber sauce, alongside a little bowl of olives and maybe even a side salad for a complete meal. You could present these wraps in a casual way or make it a bit more elegant by stacking them high and garnishing with fresh herbs. Either way, your table will be full of life and flavor!
Recipe Variations
Looking to mix things up? Here are some fun variations for your Greek Chicken Wraps:
-
Spicy Kick: Add a dash of cayenne pepper to the marinade for a kick of heat, or include some sliced jalapeños inside the wrap!
-
Mediterranean Veggie Wraps: Swap the chicken for grilled vegetables like zucchini, bell peppers, and mushrooms for a vegetarian twist!
-
Avocado Delight: Add slices of ripe avocado for extra creaminess and healthy fats. Trust me; you won’t regret it.
-
Greek Quinoa Bowl: Toss all your ingredients over a bed of cooked quinoa for a nutritious and hearty meal that’s still packed with flavor!
-
Herbed Yogurt Swap: Experiment with flavored or herbed yogurt for the cucumber sauce to change up the taste profile.
Chef’s Notes
As with any recipe, don’t be afraid to make it your own! I’ve toyed with the ingredients over time to find just the right balance. One evening, while hosting a dinner party, I even spiced things up by adding some citrus zest to the cucumber sauce! It was a hit! The key to making this recipe truly shine is to cook with intention and let your personality seep into your cooking.
Remember, cooking doesn’t have to be perfect. It’s about creativity, family, and joy. Just like my childhood experiences gathering around the table, these chicken wraps are about connection—each bite is a bridge to family dinners and laughter!
FAQs and Troubleshooting
1. Can I make this recipe ahead of time?
Absolutely! You can marinate the chicken a day in advance, and prepare the cucumber sauce a few hours early. Just store everything in airtight containers in the fridge!
2. How do I prevent my chicken from being dry?
Make sure to marinate your chicken for long enough to absorb moisture. Also, avoid overcooking—it should reach an internal temperature of 165°F. Using thighs instead of breasts can also keep your chicken juicier!
3. Can I use store-bought tzatziki instead of making my own sauce?
Of course! If time is tight, a store-bought tzatziki or cucumber sauce can save the day. Just ensure it has quality ingredients to keep the taste authentic!
4. What do I do with leftovers?
Leftover chicken wraps can be stored in the refrigerator for up to 2 days. Rewarm them gently in a pan or microwave, but be cautious not to dry them out!
Nutritional Info (if applicable)
While I believe that food is meant to be enjoyed rather than meticulously measured, here’s a rough nutritional breakdown for each wrap:
- Calories: Approximately 400-500, depending on ingredients used
- Protein: 30g
- Carbohydrates: 30g
- Fat: 20g
Remember, these wraps are not only wholesome but also pack a great punch of nutrients. Each wrap is loaded with proteins, healthy fats, and a bounty of vegetables, making them both nutritious and satisfying.
There you have it! A delightful, easy-to-make recipe that’s bursting with flavor and nostalgia. I’m so excited for you to try these Greek Chicken Wraps with Cucumber Sauce. Don’t forget to gather your loved ones around the table and share the joy! Happy cooking, and welcome to the world of Ivory Apron!
PrintGreek Chicken Wraps with Cucumber Sauce

Fresh, flavorful Greek chicken wraps drizzled with a refreshing cucumber sauce, perfect for lunches or dinners.
- Prep Time: 15 minutes
- Cook Time: 15 minutes
- Total Time: 30 minutes
- Yield: 4 servings 1x
- Category: Main Course
- Method: Grilling
- Cuisine: Mediterranean
- Diet: Mediterranean Diet
Ingredients
- 1 lb boneless, skinless chicken breast or thighs, cut into strips
- 2 tbsp olive oil
- 2 tbsp lemon juice
- 2 garlic cloves, minced
- 1 tsp dried oregano
- ½ tsp smoked paprika
- Salt & black pepper, to taste
- ½ cup Greek yogurt
- ½ cup cucumber, finely grated and squeezed dry
- 1 tbsp lemon juice (for the sauce)
- 1 tbsp olive oil (for the sauce)
- 1 garlic clove, minced (for the sauce)
- 1 tbsp chopped fresh dill or mint
- Salt & pepper, to taste (for the sauce)
- 4 pita breads or flatbreads
- ½ cup chopped tomatoes
- ½ cup chopped cucumber
- ¼ cup sliced red onion
- ¼ cup crumbled feta cheese
- Fresh parsley or dill, for garnish
Instructions
- Marinate the chicken by combining olive oil, lemon juice, minced garlic, oregano, smoked paprika, salt, and pepper. Mix in the chicken strips and let marinate for at least 30 minutes.
- Prepare the cucumber sauce by mixing Greek yogurt, grated cucumber, lemon juice, olive oil, minced garlic, dill (or mint), salt, and pepper in a bowl. Chill in the fridge.
- Grill the chicken on a preheated grill or grill pan for 5-7 minutes per side until fully cooked.
- Warm the pita or flatbreads on the grill for about one minute on each side.
- Assemble the wraps by layering grilled chicken, chopped tomatoes, cucumber, red onion, and feta inside the warmed pita.
- Garnish with fresh parsley or dill and serve immediately with extra cucumber sauce on the side.
Notes
Feel free to customize with extra veggies or swap ingredients based on what you have!
Nutrition
- Serving Size: 1 wrap
- Calories: 450
- Sugar: 6g
- Sodium: 600mg
- Fat: 24g
- Saturated Fat: 6g
- Unsaturated Fat: 14g
- Trans Fat: 0g
- Carbohydrates: 30g
- Fiber: 3g
- Protein: 30g
- Cholesterol: 80mg
Keywords: Greek, Chicken Wraps, Cucumber Sauce, Mediterranean, Healthy Lunch
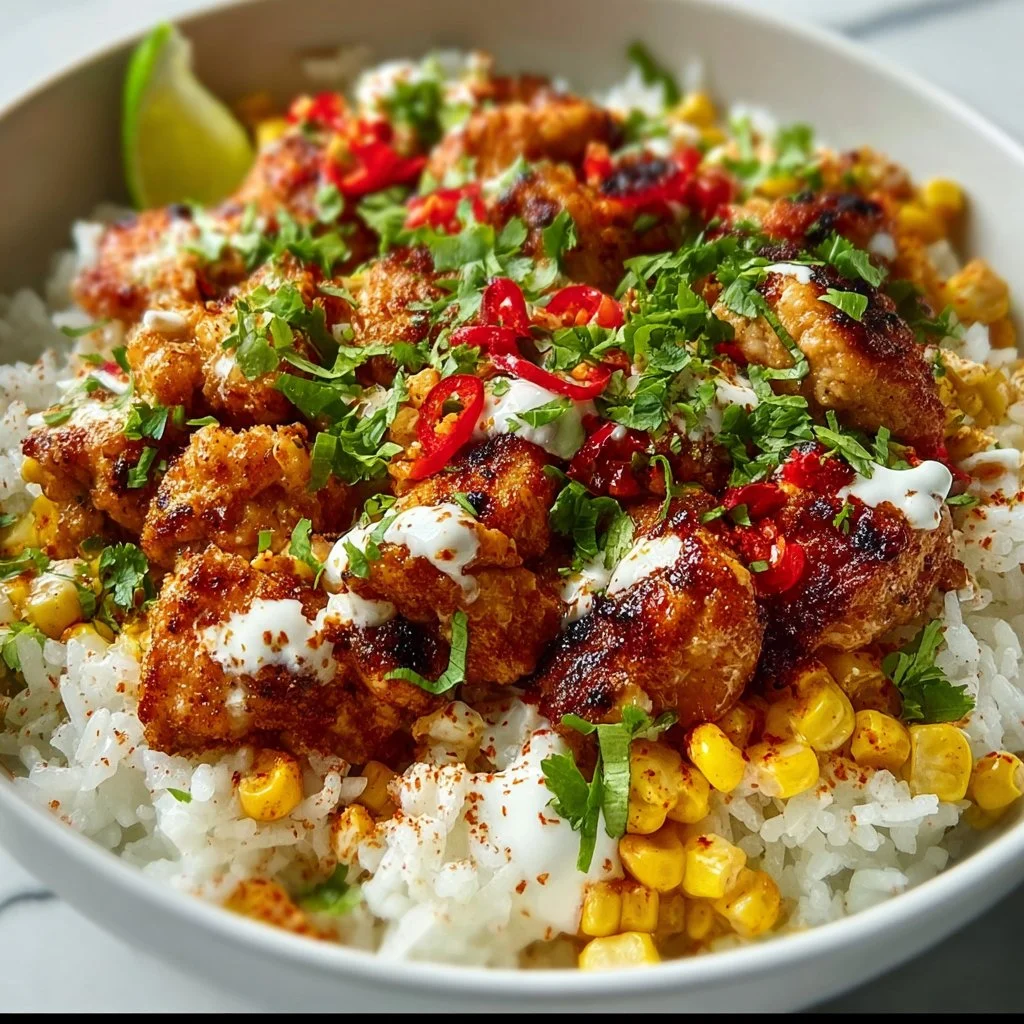
Street Corn Chicken Rice Bowl
Street Corn Chicken Rice Bowl: A Flavorful Journey in a Bowl
Hello there, fellow food lover! Are you ready to embark on an unforgettable culinary adventure? Today, we’re diving into the vibrant, zesty, and absolutely mouthwatering world of the Street Corn Chicken Rice Bowl. This dish is not only a feast for the taste buds; it’s also a celebration of fresh ingredients and easy cooking techniques. So, grab your apron, and let’s dive in!
Picture this: It’s a sultry summer evening, and the air is thick with the aroma of spices and the delightful sizzle of food cooking on the street. Street vendors are bustling, and the sound of laughter mingles with the tantalizing scents wafting through the air. This is the heart of street food culture, and it’s where our dish finds its inspiration.
The Street Corn Chicken Rice Bowl captures the colorful, lively essence of street corn—a beloved Mexican street food. With a base of fluffy rice, grilled chicken, and an array of fresh toppings, this dish brings all the joys of street food right to your dinner table. Think: creamy, cheesy goodness mingling with smoky spices and pops of sweetness from corn. It’s summer vibes in a bowl, and truly, who wouldn’t want that?
I love this recipe because it’s endlessly customizable, making it perfect for a casual weeknight dinner or an impressive gathering with friends. And believe me when I say, once you set this dish on the table, it will steal the spotlight! As we say here at Ivory Apron, cooking should be elegant yet approachable—so let’s create something together that you’ll be proud to serve!
Personal Story
I remember the first time I tasted street corn. It was during a summer festival in my hometown, where food trucks lined the streets, boldly showcasing mouthwatering treats. One warm evening, I spotted a vendor with corn on the cob, generously slathered in mayonnaise and then dusted with cotija cheese, chili powder, and a squeeze of lime. As it touched my lips, I swear I could feel the sun set with every bite. That unforgettable burst of flavors became a source of inspiration for me as I began crafting this recipe.
The idea of bringing that glorious street food experience home was thrilling! What could be better than recreating those vibrant flavors in a dish that feels both comforting and elevated? So, after experimenting and tweaking, I finally landed on this Street Corn Chicken Rice Bowl—a recipe that captures all those street-side vibes while being beautifully simple to prepare.
Ingredients
Let’s gather our ingredients! Here’s what you’ll need to create your Street Corn Chicken Rice Bowl:
-
2 cups cooked rice
- You can use white rice, brown rice, or even cilantro-lime rice for an extra zing! If you’re short on time, store-bought cooked rice works, too.
-
2 chicken breasts (grilled and sliced)
- Boneless, skinless chicken is a favorite here, but feel free to switch it up with grilled shrimp or cooked chickpeas for a meat-free option.
-
1 cup corn kernels
- Fresh corn off the cob is the gold standard, but frozen or canned corn works beautifully in a pinch. Make sure to drain and rinse the canned variety!
-
1/2 cup black beans
- Black beans are a protein-packed powerhouse. If you’re not a fan, kidney beans or pinto beans can make a great alternative.
-
1/4 cup diced red onion
- Red onion adds a sweet crunch. For a milder flavor, consider using green onions or shallots instead.
-
1/4 cup diced tomatoes
- Fresh tomatoes brighten up the dish, but you can use tomatillos for a more vibrant kick.
-
1/4 cup crumbled cotija cheese
- This crumbly cheese brings a creamy, salty punch! Feta or ricotta salata can be used as excellent stand-ins.
-
2 tablespoons chopped fresh cilantro
- Cilantro adds a fresh note and is key to that authentic flavor. If cilantro isn’t your thing, fresh parsley is a great substitute.
-
1 tablespoon olive oil
- A drizzle of olive oil enhances the dish’s richness; avocado oil is another wonderful option!
-
1 teaspoon chili powder
- This spice brings warmth and robust flavors. If you prefer heat, cayenne pepper is a fantastic alternative.
-
1/2 teaspoon smoked paprika
- Smoky paprika transports you right back to that street-side grill! For something milder, regular paprika works beautifully.
-
1/2 teaspoon cumin
- Earthy and warm, cumin balances out the flavors. Caraway seeds in a pinch can lend a different twist.
-
1/4 teaspoon salt
- Always adjust to taste, and remember that the cheese will add saltiness too!
-
1/4 teaspoon black pepper
- Freshly ground black pepper is ideal, but pre-ground will work in a pinch.
-
1/2 cup sour cream or Greek yogurt
- Both options provide creaminess. Greek yogurt gives you a protein boost; feel free to use a dairy-free substitute if needed.
-
Juice of 1 lime
- Fresh lime juice adds brightness and acidity, brightening all the flavors. Bottled lime juice works if you’re in a hurry, but fresh is always best!
-
1/2 teaspoon garlic powder
- Garlic powder provides a mellow garlic flavor. Fresh chopped garlic can elevate this if that’s your style.
-
1/4 teaspoon salt (for the sour cream/yogurt mix)
- Perfect for enhancing the creamy topping!
Step-by-Step Instructions
Ready to get cooking? Let’s bring all those vibrant flavors together!
-
Cook Your Rice:
- Begin by cooking your rice according to package instructions. If you want to amp up the flavor, substitute half of the water with chicken broth. This small step will take your rice from ordinary to extraordinary!
-
Prepare the Chicken:
- While your rice is cooking, season the chicken breasts with olive oil, chili powder, smoked paprika, cumin, salt, and pepper. Let these flavors meld by marinating for at least 15 minutes (or even overnight if you have the time).
- Preheat your grill or a grill pan over medium-high heat. Cook the chicken for about 6–7 minutes on each side or until fully cooked through (internal temperature should reach 165°F or 75°C). Let the chicken rest for a few minutes before slicing it into thin strips.
-
Sauté the Corn:
- In a separate skillet, add a drizzle of olive oil over medium heat. Throw in your corn and cook for about 5 minutes, stirring occasionally, until it begins to char slightly. This step adds an authentic depth of flavor, reminiscent of those street vendors!
-
Prepare the Black Beans and Toppings:
- In a small saucepan, warm the black beans over low heat, seasoning them with a pinch of cumin and a sprinkle of salt. Meanwhile, chop your red onion, tomatoes, and cilantro.
-
Create the Sour Cream Sauce:
- In a small bowl, combine sour cream or Greek yogurt with lime juice, garlic powder, and salt. This creamy topping is the perfect finishing touch to your bowl, providing a cool contrast to the savory elements.
-
Assemble the Bowls:
- Once everything is ready, it’s time to assemble! Take your cooked rice and place a generous scoop in the base of a serving bowl. Layer the sliced chicken, sautéed corn, black beans, diced red onion, diced tomatoes, and crumbled cotija on top.
-
Finish it Off with Flavor:
- Drizzle your sour cream sauce over the entire bowl. Sprinkle fresh cilantro on top and maybe an extra squeeze of lime juice for that signature brightness.
-
Presentation Matters:
- Don’t forget to step back and admire your beautiful creation! A well-presented dish always makes the meal feel more special.
Serving Suggestions
For an inviting presentation, use shallow bowls and add all the components in a colorful, layered fashion. Start with a base of rice, then artfully arrange the chicken and assorted toppings. For that final touch, garnish with cilantro and a sprinkle of cotija. Trust me, your guests will be snapping pictures before they even take a bite!
Pair this bowl with a refreshing drink—perhaps a sparkling limeade or a nice chilled glass of rosé—to elevate your dining experience even further.
Recipe Variations
Love to get creative? Here are some fun twists you can try on this dish:
- Taco Twist: Add taco seasoning to your chicken for a flavor-packed twist reminiscent of your favorite taco shop.
- Veggie Delight: Replace chicken with grilled zucchinis for a wonderful vegetarian alternative; you can also add bell peppers for crunch!
- Spicy Kick: Mix in a fresh diced jalapeño for an added kick that’s sure to satisfy spice lovers!
- Cheesy Goodness: Incorporate a sprinkle of shredded Monterey Jack or pepper jack cheese for an added cheesy layer.
- Chili Beans: Swap out the black beans for spicy chili beans for a heartier, more robust dish!
Chef’s Notes
This Street Corn Chicken Rice Bowl has become a staple in my kitchen, evolving with every new creation I try. The base flavors stay true, while toppings or proteins change depending on what I have on hand. A fond memory attached to this dish was a fun dinner party with friends where we made a ‘create your own bowl’ station, and everyone had a blast customizing their meals! So, get creative and make it your own. That’s what cooking is all about—joy, laughter, and connection around the table.
FAQs and Troubleshooting
1. Can I make this dish in advance?
Absolutely! You can prep the components ahead of time. Just store each component separately in airtight containers, and assemble just before serving to keep everything fresh.
2. How do I store leftovers?
Keep any leftovers in the fridge for up to 3 days. Heat them up gently on the stove to maintain that delicious flavor for another meal!
3. My corn isn’t charring; how can I improve that?
If your corn isn’t getting that lovely char, make sure your skillet is hot enough before adding it. You can also roast the corn in the oven on high heat if you’re looking for a caramelized flavor.
4. Can I use a different protein?
Absolutely! Feel free to experiment with grilled shrimp, tofu, or even seasoned ground beef. Each alternative will bring a unique spin to this dish!
Nutritional Info
For those interested in nutritional values, here’s a rough breakdown per serving (this can vary based on exact ingredients used):
- Calories: ~550
- Protein: ~40g
- Carbohydrates: ~60g
- Fat: ~15g
- Fiber: ~10g
(Always adjust based on your specific ingredients and serving sizes!)
Conclusion
As we wrap up this delicious journey, I hope you’re inspired to create your own Street Corn Chicken Rice Bowl. Remember, it’s all about enjoying the process and savoring those beautiful moments around your table. Cooking doesn’t have to be intimidating—it can be joyous, sharing, and filled with laughter. So, tie on that ivory apron and let’s celebrate the magic of home-cooked meals together, one delightful bowl at a time!
Thank you for cooking alongside me today, and happy eating!
PrintStreet Corn Chicken Rice Bowl

A vibrant and customizable bowl featuring grilled chicken, fluffy rice, and a medley of fresh toppings inspired by the beloved Mexican street corn.
- Prep Time: 20 minutes
- Cook Time: 20 minutes
- Total Time: 40 minutes
- Yield: 4 servings 1x
- Category: Main Course
- Method: Grilling
- Cuisine: Mexican
- Diet: Gluten-Free
Ingredients
- 2 cups cooked rice
- 2 chicken breasts (grilled and sliced)
- 1 cup corn kernels
- 1/2 cup black beans
- 1/4 cup diced red onion
- 1/4 cup diced tomatoes
- 1/4 cup crumbled cotija cheese
- 2 tablespoons chopped fresh cilantro
- 1 tablespoon olive oil
- 1 teaspoon chili powder
- 1/2 teaspoon smoked paprika
- 1/2 teaspoon cumin
- 1/4 teaspoon salt
- 1/4 teaspoon black pepper
- 1/2 cup sour cream or Greek yogurt
- Juice of 1 lime
- 1/2 teaspoon garlic powder
- 1/4 teaspoon salt (for the sour cream/yogurt mix)
Instructions
- Cook your rice according to package instructions, using chicken broth for extra flavor if desired.
- Prepare the chicken by marinating it in olive oil, chili powder, smoked paprika, cumin, salt, and pepper for at least 15 minutes. Grill until cooked through.
- Sauté the corn in olive oil over medium heat for about 5 minutes until charred.
- Warm the black beans in a small saucepan with a pinch of cumin and salt.
- Create the sour cream sauce by combining sour cream or Greek yogurt with lime juice, garlic powder, and salt.
- Assemble the bowls by placing a scoop of rice at the base, followed by chicken, corn, black beans, red onion, tomatoes, and cotija cheese.
- Drizzle with sour cream sauce and garnish with cilantro and extra lime juice.
- Serve and enjoy your beautifully crafted bowls!
Notes
Customize this dish with different proteins or toppings based on preference. Store leftovers in the fridge for up to 3 days.
Nutrition
- Serving Size: 1 bowl
- Calories: 550
- Sugar: 6g
- Sodium: 500mg
- Fat: 15g
- Saturated Fat: 4g
- Unsaturated Fat: 8g
- Trans Fat: 0g
- Carbohydrates: 60g
- Fiber: 10g
- Protein: 40g
- Cholesterol: 75mg
Keywords: street corn, chicken bowl, Mexican food, summer recipes, customizable meals

Burger Bowls
Burger Bowls: A Delectable Twist on Classic Burgers
If you’re anything like me, you love charming meals that pack flavor and fun without the fuss. Enter Burger Bowls — the delightful culmination of everything you love about a juicy burger, but without the bun mess. I can practically hear the happy voices echoing around your dinner table as everyone digs in. Picture this: a colorful bowl brimming with perfectly seasoned beef, golden crispy potatoes, and all of your favorite burger toppings. Who can resist that?
Today, I’m thrilled to share with you my beloved Burger Bowls recipe, which goes beyond the typical burger experience. It’s a wholesome meal that invites creativity and can even accommodate dietary preferences! The beauty of Burger Bowls is that they feel elegant while being incredibly simple to prepare. So grab your apron, pour something sparkling, and let’s get started!
Personal Story
My love affair with burgers dates back to summer barbecues at my grandparents’ house. I remember that mouthwatering scent wafting through the air as my grandfather fired up the grill, marinating and flipping patties with the kind of flair that only comes from years of practice. We kids would chase each other around, waiting impatiently for the first batch to come off the grill. My grandmother would stand ready with her homemade pickles, glistening under the golden afternoon sun, and heaps of freshly sliced tomatoes and crisp lettuce.
As I grew older, I realized my fondness for burgers went beyond the taste; it was about connection — the gathering of loved ones and shared laughter. So, when I created these Burger Bowls, I wanted to capture that spirit of joy and togetherness without losing the essence of flavor and satisfaction. Now, you can whip them up any night of the week or for elegant dinner parties, and still create that same warm atmosphere.
Ingredients
Here’s what you’ll need for these scrumptious Burger Bowls:
-
1 ½ teaspoons smoked paprika
A wonderful spice that adds warmth and a subtle smoky flavor. If you’re in a pinch, regular paprika works too! -
1 teaspoon garlic powder
Perfect for an easy burst of garlic flavor. Want to swap it out? Fresh minced garlic can add a delightful kick (just use about 2 cloves). -
1 teaspoon onion powder
This adds sweetness and earthiness. Can’t find it? Finely chopped fresh onions will do the trick! -
1 teaspoon dried oregano or mixed herbs
They brighten up the flavor like a sunny afternoon. Feel free to use Italian seasoning or even fresh herbs if you have them on hand. -
½ teaspoon salt
Enhances all your other flavors. Sea salt or kosher salt works best! -
¼ teaspoon black pepper
For an aromatic touch. Cracked black peppercorns will add even more depth. -
2-3 medium potatoes
These will transform into crispy, golden bites. Sweet potatoes also make a lovely swap for a sweeter, creamier base. -
2 tablespoons olive oil (divided)
This helps in achieving that crispy golden texture. Avocado oil can be a great alternative if you prefer it. -
500 grams lean beef mince
A classic choice for protein-packed goodness. If you’d like a leaner option, ground turkey works well too. -
Lettuce (shredded)
Offers freshness and crunch. I recommend romaine or iceberg, but mixed greens are delightful as well! -
Cheese (dairy-free or regular)
Adds a creamy, rich element. Feel free to experiment with cheese types — cheddar, mozzarella, or even vegan cheese — the sky’s the limit! -
Pickle slices
Essential for that tangy, crunchy finish. Any type of pickle will do, but dill adds a nice zest. -
4 tablespoons mayonnaise
For that irresistible creaminess. Consider swapping with Greek yogurt for a lighter option! -
1 tablespoon ketchup
A classic burger condiment. If you’re not a ketchup fan, look for spicy sauces for a zingy upgrade. -
1 teaspoon mustard (Dijon or yellow)
Adds a lovely sharpness. You could also try spicy mustard for extra bite! -
1 teaspoon pickle juice (from the jar of pickles)
A nifty way to infuse all that pickle flavor into your sauce. You can also use lemon juice for a zesty twist. -
½ teaspoon garlic powder
(for the dressing) — a double feature! Garlic lovers rejoice! -
½ teaspoon smoked paprika
A repeat here to keep the flavor consistent across the dish!
Step-by-Step Instructions
Let’s get cooking! You’ll find that the steps are straightforward and full of cooking tips to elevate your Burger Bowls to new heights.
-
Preheat Your Oven: Begin by preheating your oven to 425°F (220°C). A hot oven is key for crispy potatoes that rival any burger joint!
-
Prepare the Potatoes:
- Wash and cube the potatoes into bite-sized pieces. Uniform sizes ensure even cooking.
- In a bowl, drizzle 1 tablespoon of olive oil over your cubed potatoes. Sprinkle with smoked paprika, salt, and black pepper.
- Toss until evenly coated. This will give you that beautiful golden hue and flavor when roasted.
-
Roast the Potatoes:
- Spread the seasoned potato cubes onto a baking sheet lined with parchment paper. Make sure they have some space between them for optimal crisping.
- Roast in the oven for about 25-30 minutes, flipping them halfway through. Keep an eye out during the last few minutes to ensure they don’t burn!
-
Cook the Beef:
- While the potatoes are roasting, take a large skillet and heat the remaining tablespoon of olive oil over medium-high heat.
- Add the lean beef mince and sprinkle with garlic powder, onion powder, oregano, and salt.
- Break up the meat with a spatula as it cooks. Sauté until browned, about 7-10 minutes. I recommend using a meat thermometer to ensure it reaches an internal temperature of 160°F (71°C) for safety.
-
Make the Sauce:
- In a small bowl, mix together the mayonnaise, ketchup, mustard, pickle juice, ½ teaspoon garlic powder, and ½ teaspoon smoked paprika. Taste and adjust seasoning if necessary. This creamy sauce is what brings your Burger Bowl all together!
-
Assemble the Bowls:
- Grab your favorite bowl and start layering! Begin with a bed of shredded lettuce, followed by the cooked beef.
- Next, add a generous scoop of those crispy potatoes, some shredded cheese, and finish with pickle slices on top.
-
Drizzle & Enjoy:
- Finally, drizzle your sauce across the top of your masterpiece. Feel free to add any additional toppings or garnishes you love!
-
Take a Moment to Admire Your Work:
- Don’t forget to snap a picture! These bowls are not only incredibly tasty but stunning to look at.
Serving Suggestions
To plate these Burger Bowls beautifully, consider using clear or colorful bowls that highlight all of the vibrant ingredients. Drizzle the dressing generously on top, and for an extra touch, add a sprinkle of fresh herbs like parsley or chives.
If you want to take it a step further, serve with crispy onion rings on the side for that classic burger feel or even homemade fries for some extra carb love!
Recipe Variations
Here are some fun ways to customize your Burger Bowls:
-
Veggie Burger Bowls: Swap the beef for a plant-based protein (like lentils, chickpeas, or a premade veggie burger). It’s delicious and can accommodate your vegetarian friends!
-
Spicy Twist: Add minced jalapeños or a splash of hot sauce to your beef as it cooks for an added kick!
-
Bacon Lovers: Crumble some crispy bacon on top for an extra layer of flavor.
-
Keto-Friendly: Skip the potatoes and replace them with roasted cauliflower for a low-carb delight.
-
Buffalo Style: Toss your cooked beef in buffalo sauce before assembling your bowl for an extra spicy treat!
Chef’s Notes
These Burger Bowls have become a staple in my kitchen. I love how easily they adapt to whatever ingredients I have on hand! I often swap out toppings based on the season — for instance, during the summer, adding fresh tomatoes and grilled corn puts a vibrant twist on this dish.
And let’s chat about those crispy potatoes! One time, I didn’t cut them small enough, and it turned into a funny mishap in my kitchen. But those crispy chunks danced with flavor, and now I lean into them being a little thicker. Cooking is an adventure!
FAQs and Troubleshooting
-
What can I use instead of beef?
You can substitute it with ground turkey, chicken, or even crumbled tofu for a vegetarian option. -
How do I prevent my potatoes from getting soggy?
Be sure to spread them evenly on the baking sheet and avoid overcrowding. This ensures they roast rather than steam. -
How can I store leftovers?
Store the components separately in airtight containers in the fridge for up to three days. Reheat the beef and potatoes in the oven for optimum crispness. -
What should I do if my sauce is too thick?
You can thin it out with a splash of water or milk (dairy or plant-based depending on preference). Adjust seasonings afterward!
Nutritional Info
Approximate Per Serving:
- Calories: 450
- Protein: 28g
- Fat: 25g
- Carbohydrates: 35g
- Fiber: 4g
- Sugar: 3g
(Note: Adjust depending on specific ingredient brands and serving sizes.)
I hope you’re as excited as I am to make these Burger Bowls in your kitchen! Share your creations and tag me; I’d love to see how your dishes turn out. Sit back, enjoy the company, and as always, remember that good food is about bringing people together. Happy cooking! 🍔🥗
PrintBurger Bowls

A delightful twist on classic burgers that brings together juicy beef, crispy potatoes, and all your favorite toppings without the bun mess.
- Prep Time: 15 minutes
- Cook Time: 30 minutes
- Total Time: 45 minutes
- Yield: 4 servings 1x
- Category: Main Course
- Method: Baking
- Cuisine: American
- Diet: Gluten Free
Ingredients
- 1 ½ teaspoons smoked paprika
- 1 teaspoon garlic powder
- 1 teaspoon onion powder
- 1 teaspoon dried oregano or mixed herbs
- ½ teaspoon salt
- ¼ teaspoon black pepper
- 2–3 medium potatoes
- 2 tablespoons olive oil (divided)
- 500 grams lean beef mince
- Lettuce (shredded)
- Cheese (dairy-free or regular)
- Pickle slices
- 4 tablespoons mayonnaise
- 1 tablespoon ketchup
- 1 teaspoon mustard (Dijon or yellow)
- 1 teaspoon pickle juice
- ½ teaspoon garlic powder (for the dressing)
- ½ teaspoon smoked paprika (for the dressing)
Instructions
- Preheat your oven to 425°F (220°C).
- Wash and cube the potatoes into bite-sized pieces.
- Drizzle 1 tablespoon of olive oil over your cubed potatoes and sprinkle with smoked paprika, salt, and black pepper.
- Toss until evenly coated.
- Spread the seasoned potato cubes onto a baking sheet lined with parchment paper.
- Roast in the oven for about 25-30 minutes, flipping them halfway through.
- Heat the remaining tablespoon of olive oil in a large skillet over medium-high heat.
- Add the lean beef mince and sprinkle with garlic powder, onion powder, oregano, and salt.
- Break up the meat with a spatula and sauté until browned, about 7-10 minutes.
- Mix together the mayonnaise, ketchup, mustard, pickle juice, ½ teaspoon garlic powder, and ½ teaspoon smoked paprika in a small bowl.
- Grab your favorite bowl and layer with shredded lettuce, cooked beef, crispy potatoes, shredded cheese, and pickle slices on top.
- Drizzle your sauce across the top and enjoy!
- Snap a picture of your beautiful bowl!
Notes
These Burger Bowls can be customized to accommodate dietary preferences, making them versatile for any occasion.
Nutrition
- Serving Size: 1 serving
- Calories: 450
- Sugar: 3g
- Sodium: 500mg
- Fat: 25g
- Saturated Fat: 8g
- Unsaturated Fat: 12g
- Trans Fat: 0g
- Carbohydrates: 35g
- Fiber: 4g
- Protein: 28g
- Cholesterol: 70mg
Keywords: burger bowls, easy dinner, comfort food, family meal, customizable recipe
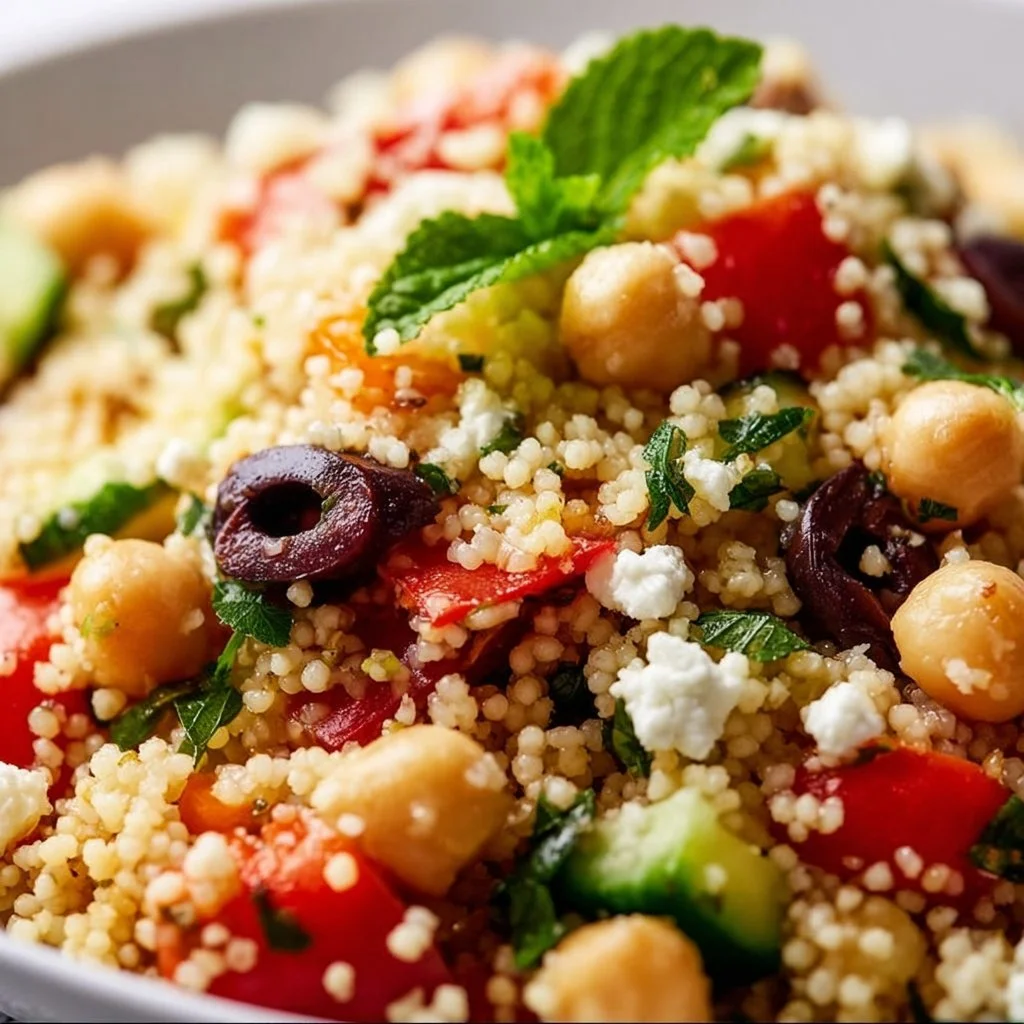
Healthy Mediterranean Couscous Salad
Healthy Mediterranean Couscous Salad: A Flavorful Journey to the Mediterranean
Introduction
Welcome back, dear foodies! Today, we’re going to whip up something that not only delights the taste buds but also brings a splash of Mediterranean sun to your dining table. Yes, I’m talking about a deliciously vibrant Healthy Mediterranean Couscous Salad! This dish is packed with fresh ingredients and bold flavors, making it perfect for those warm evenings when you want something light yet satisfying.
Couscous is one of those magical ingredients that bring a cozy atmosphere to any gathering. It’s quick to prepare, pairs well with just about anything, and its fluffy texture is simply irresistible. Whether you’re looking for a side dish for your next barbecue, a wholesome lunch, or a highlight for your weeknight dinner, this salad checks all the boxes. The best part? Making it is a breeze, and you’ll be rocking those flavors in less time than it takes to find your favorite playlist!
So, grab your apron, pour yourself a refreshing drink (maybe something citrusy!), and let’s dive into this culinary adventure. I promise you’ll have a delightful meal that’s not only healthy but also evokes the sunny vibes of the Mediterranean coast.
Personal Story
Whenever I think of Mediterranean cuisine, I’m transported back to a family vacation on the Greek islands. I remember wandering through picturesque villages, the warm sun kissing my skin, and the tantalizing aroma of roasted vegetables and spices wafting through the air. One unforgettable evening, we stopped at a small taverna where a charming old chef served us a beautiful couscous dish drizzled with olive oil and dotted with vibrant veggies. It was so simple yet bursting with flavor. The joy of sharing that meal with my loved ones—sinking into hearty conversation while relishing every bite—remains etched in my memory.
That night ignited my passion for Mediterranean flavors—fresh herbs, the zing of lemons, and the richness of olive oil. Now, whenever I make couscous salad, I sprinkle it with the same love and sunshine I felt on that unforgettable trip. Join me in crafting this salad, and let’s recreate our own Mediterranean moment right in your kitchen!
Ingredients
Here’s what you’re going to need for this delightful salad:
-
1 cup couscous
Couscous is a versatile grain that’s quick to prepare. If you can’t find couscous, you can substitute with quinoa or bulgur wheat for a different flavor and texture. -
1 1/4 cups vegetable broth
Using broth instead of water adds depth to the couscous. You can use chicken broth too, or for a lighter option, stick with water if you prefer. -
1 cup cherry tomatoes, halved
These little gems add sweetness and color. If you have regular tomatoes on hand, diced ones will work just as well! -
1 cucumber, diced
Crisp and refreshing, cucumbers provide a lovely crunch. Feel free to swap in zucchini if you’re looking for a change. -
1/2 red onion, finely chopped
Red onions bring a sweet bite to the dish. If they’re a bit too strong for your taste, milder green onions would also be fantastic. -
1 cup canned chickpeas, rinsed and drained
Chickpeas are the protein powerhouse here! If you want to keep it vegetarian, they’re perfect. For added flavor, roast them before adding, which gives a wonderful crunch. -
1/2 cup feta cheese, crumbled
Feta adds a creamy, tangy saltiness. If you’re dairy-free, try using a vegan feta or a sprinkle of nutritional yeast for a cheesy flavor. -
1/4 cup Kalamata olives, sliced
These olives add a briny punch. You can substitute black olives or omit them if they’re not your thing. -
2 tablespoons olive oil
Go for high-quality extra-virgin olive oil for the best flavor. You might want to drizzle a bit more on top before serving; it’s totally worth it! -
2 tablespoons lemon juice
Freshly squeezed lemon juice brightens up the whole dish. Limes can work in a pinch if you don’t have any lemons. -
Salt and pepper to taste
Essential for enhancing all those lovely flavors! -
Fresh parsley for garnish
Parsley not only looks beautiful but also adds freshness to the dish. You can swap it with any fresh herb you love, such as basil or mint!
Step-by-Step Instructions
Alright, let’s get cooking! Follow these steps, and you’ll have a fabulous Mediterranean Couscous Salad in no time.
-
Cook the Couscous
In a medium saucepan, bring the vegetable broth to a boil. Once it’s bubbling, add the couscous, give it a gentle stir, and then remove it from heat. Cover the pan with a lid and let it sit for about 5 minutes—this allows the couscous to absorb the broth and the flavors to mingle wonderfully.Chef Tip: Fluff your couscous with a fork before adding in the other ingredients. This keeps it light and prevents clumping!
-
Prepare Your Veggies
While the couscous is resting, let’s chop up those vibrant vegetables! Halve the cherry tomatoes, dice the cucumber into bite-sized pieces, and finely chop the red onion. Rinse and drain the chickpeas; you want them nice and clean.Chef Hack: A flexible cutting board is your best friend here! It makes transferring veggies from the board to the bowl so much easier.
-
Mix Everything Together
In a large mixing bowl, combine the fluffed couscous, cherry tomatoes, diced cucumber, red onion, chickpeas, crumbled feta, and sliced olives.Commentary: Don’t be shy when mixing; you want everything to get all cozy together!
-
Dress It Up
Drizzle in the olive oil and lemon juice, then sprinkle with salt and pepper to taste. Give everything a good toss until the ingredients are well coated.Tip: Taste as you go! This is a great way to find that perfect balance of flavors.
-
Final Touch and Garnishing
Once mixed, sprinkle fresh parsley on top for that finishing touch. It adds not only color but also a fresh bite that brightens the dish.Chef Note: If you want to use this salad for meal prep, consider adding the feta and olives just before serving to keep everything fresh!
Serving Suggestions
To serve, spoon the couscous salad onto a lovely plate or in a large serving bowl. A crisp white dish really lets the colors pop! You can also serve it in individual bowls for a more personal touch. Drizzle a bit more olive oil on top and perhaps a sprinkle of additional feta or olives for that gourmet look.
Recipe Variations
The beauty of this Mediterranean Couscous Salad is its versatility! Here are some creative twists you might consider:
-
Add Grilled Chicken or Shrimp: For a heartier meal, add in some grilled chicken or shrimp. They pair beautifully with the fresh flavors.
-
Spicy Kick: Incorporate sliced jalapeños or a dash of red pepper flakes to bring some heat.
-
Roasted Veggies: Try adding roasted bell peppers or eggplant for a deeper flavor profile.
-
Different Grains: Swap couscous for farro or orzo for a different texture and flavor.
-
Herb Explosion: Mix in other fresh herbs like mint or dill for a unique twist.
Chef’s Notes
As I developed this recipe over time, I discovered that the magic truly lies in the quality of your ingredients. Fresh produce makes a world of difference! I remember one time I rushed through a trip to the grocery store and picked up wilted tomatoes, and the salad just didn’t resonate the same way. Lesson learned: fresher is always better!
Another fun kitchen story involves a dinner party where I made this salad for friends. I accidentally grabbed a bottle of sake instead of olive oil. Let’s just say, they had quite a confused expression as I showcased my "special" dressing. Rest assured, it was a gift that kept on giving in laughs!
FAQs and Troubleshooting
-
Can I make this salad ahead of time?
Absolutely! Make it a day in advance for the flavors to meld even more. Just remember to keep the feta and olives separate if you want those to stay fresh. -
Why is my couscous sticky?
If your couscous gets sticky, it’s often due to too much moisture. Make sure to fluff it with a fork after it absorbs the broth, and consider reducing the liquid next time. -
How can I make this salad gluten-free?
You can replace couscous with quinoa or millet, which are both gluten-free grains that absorb flavors beautifully. -
What can I substitute for feta?
You can try using goat cheese for a creamier texture, or you might use marinated tofu for a vegan option without compromising on taste!
Nutritional Info
While I didn’t provide precise nutritional information, this salad is packed with plant-based protein from chickpeas, healthy fats from olives and olive oil, and a variety of vitamins from fresh vegetables. It’s a well-balanced dish that supports an active lifestyle!
And there you have it, my lovely friends—a Healthy Mediterranean Couscous Salad that fills your kitchen with flavor, brings people together, and best of all, makes your everyday dining feel special. I can’t wait for you to create this delightful dish and share the experience with those you cherish most. Happy cooking, and bon appétit! 🍽️
PrintHealthy Mediterranean Couscous Salad

A vibrant and refreshing salad packed with fresh vegetables, chickpeas, and couscous, perfect for a light meal or side dish.
- Prep Time: 10 minutes
- Cook Time: 5 minutes
- Total Time: 15 minutes
- Yield: 4 servings 1x
- Category: Salad
- Method: Mixing
- Cuisine: Mediterranean
- Diet: Vegetarian
Ingredients
- 1 cup couscous
- 1 1/4 cups vegetable broth
- 1 cup cherry tomatoes, halved
- 1 cucumber, diced
- 1/2 red onion, finely chopped
- 1 cup canned chickpeas, rinsed and drained
- 1/2 cup feta cheese, crumbled
- 1/4 cup Kalamata olives, sliced
- 2 tablespoons olive oil
- 2 tablespoons lemon juice
- Salt and pepper to taste
- Fresh parsley for garnish
Instructions
- Cook the couscous: In a medium saucepan, bring the vegetable broth to a boil. Add the couscous, stir gently, and remove from heat. Cover and let sit for 5 minutes.
- Prepare your veggies: While the couscous rests, chop the cherry tomatoes, cucumber, and red onion. Rinse and drain the chickpeas.
- Mix everything together: In a large bowl, combine the fluffed couscous, tomatoes, cucumber, onion, chickpeas, feta, and olives.
- Dress it up: Drizzle with olive oil and lemon juice, sprinkle with salt and pepper, and toss to combine.
- Final touch: Sprinkle fresh parsley on top to garnish.
Notes
For meal prep, consider adding feta and olives just before serving to maintain freshness. Use high-quality ingredients for best flavor.
Nutrition
- Serving Size: 1 serving
- Calories: 300
- Sugar: 4g
- Sodium: 300mg
- Fat: 14g
- Saturated Fat: 3g
- Unsaturated Fat: 8g
- Trans Fat: 0g
- Carbohydrates: 35g
- Fiber: 8g
- Protein: 10g
- Cholesterol: 15mg
Keywords: couscous salad, Mediterranean, healthy salad, vegetarian recipe, fresh ingredients
Beef and Pepper Rice Bowl
# Savory Beef and Pepper Rice Bowl: A Heartwarming Family Classic

## Introduction

Welcome back, culinary friends! Today, we’re diving into one of my all-time favorite comfort dishes: the Beef and Pepper Rice Bowl. This recipe is all about bringing together flavors that make your taste buds dance while keeping things simple. Trust me, this colorful, hearty dish is perfect for any night of the week, especially when you’re craving something that feels like a warm hug.

What I love most about this dish is how it effortlessly combines textures and tastes. The ground beef adds a rich, satisfying heartiness, while the bell peppers and jalapeño bring a burst of freshness and a hint of spicy zing. And don’t get me started on the fluffy rice—it serves as the ideal canvas for all those vibrant flavors.

This recipe is not just about feeding the belly; it’s about feeding the soul. I distinctly remember the first time I made this dish for a gathering at my home. Everyone was raving about how delicious it was, and I felt an overwhelming sense of joy knowing I created something everyone loved. So let’s get cooking and bring that same joy to your table!

## Personal Story

As I sit here reminiscing, I can clearly picture the vibrant kitchen of my childhood home. My mom would whip up a wonderful Beef and Pepper dish that would fill the entire house with a mouthwatering aroma. Growing up, it was a staple on our dinner table. The sounds of sizzling beef and chopping veggies would spark our family gatherings—the essence of togetherness that I still cherish.

After school, I often found myself lingering in the kitchen, helping her chop bell peppers while she shared the stories of her day. Those moments made me appreciate not just the meal but also the love that went into it. Years later, when I moved into my first apartment, I knew I had to recreate this dish. With every bite, it felt like I was wrapped in the comfort of home. Fast forward to now, and I’m thrilled to be sharing this hearty Beef and Pepper Rice Bowl with you, so you can create similar memories with your loved ones!

## Ingredients

Before we jump into the cooking, let’s gather our ingredients. Here’s what you’ll need for the Beef and Pepper Rice Bowl:

- **1 lb ground beef**
  - *Chef Insight:* Feel free to substitute with ground turkey or chicken for a leaner option or go vegetarian with lentils!

- **1 onion, diced**
  - *Substitution Tip:* Any onion will do, but yellow onions offer a balanced sweetness that complements the dish beautifully.

- **1 bell pepper, diced**
  - *Quick Tip:* Use any color you like—red, yellow, or green—to add a pop of color and different sweetness levels.

- **1 jalapeño, diced**
  - *Substitution Tips:* If you prefer a milder flavor, remove the seeds and membranes, or swap it out for a chopped poblano pepper.

- **3 cups cooked rice**
  - *Chef Insight:* Leftover rice works like a charm! You can also use quinoa or cauliflower rice for a gluten-free or lower-carb option.

- **2 tablespoons soy sauce**
  - *Quick Tip:* Low-sodium soy sauce is a great option if you’re watching your salt intake. For a gluten-free version, use tamari.

- **1 teaspoon garlic powder**
  - *Chef Insight:* Fresh garlic lends a brighter taste if you have it; just use 2-3 minced cloves instead!

- **1 teaspoon ground black pepper**
  - *Quick Tip:* Freshly cracked pepper elevates the flavor, but powdered works just fine if that’s all you have on hand.

- **1 tablespoon olive oil**
  - *Chef Insight:* Feel free to use avocado, canola, or even sesame oil for a different flavor twist.

## Step-by-Step Instructions

Now that we’ve got everything prepped, let’s get cooking! Follow these detailed steps to create your delectable Beef and Pepper Rice Bowl.

1. **Heat the Oil:**
   - In a large skillet over medium heat, drizzle in the olive oil. Let it warm for about 1 minute. This helps to create a nice sear on your beef and brings out its flavor.

2. **Cook the Onion:**
   - Add the diced onion to the skillet. Sauté for about 3-4 minutes until it becomes translucent and fragrant. Pro tip: For extra flavor, throw in a pinch of salt while cooking the onion.

3. **Brown the Beef:**
   - Next, add in the ground beef. Use a spatula to break it apart as it cooks. Continue cooking for about 5-7 minutes until it’s fully browned. Make sure to drain off excess fat, but don’t worry about getting every drop! That little bit of grease adds flavor.

4. **Add the Peppers:**
   - Once the beef is browned, stir in the diced bell pepper and jalapeño. Cook for about 3-4 minutes until they soften up. The colors will start blending, and your kitchen will smell absolutely divine!

5. **Seasoning Time:**
   - Sprinkle garlic powder and ground black pepper over the mixture. Pour in the soy sauce—this is where the magic happens! Stir everything thoroughly to ensure even flavor distribution. Let it cook together for another 2-3 minutes so the rice can soak up those delicious juices.

6. **Mix in the Rice:**
   - Gently fold in your cooked rice. I like to use a spatula to carefully mix it—this keeps the rice from breaking apart too much. Cook for an additional 2-3 minutes until everything is heated through.

7. **Final Taste Test:**
   - Before serving, take a little taste! If it needs a little more oomph, go ahead and sprinkle in more soy sauce or a dash of salt.

## Serving Suggestions

Now that your Beef and Pepper Rice Bowl is ready, let’s talk presentation! To serve, scoop generous portions into bowls. For an extra touch, I love to garnish with fresh cilantro, sliced green onions, or a drizzle of tangy lime juice on top. A squeeze of fresh lime brightens the dish and elevates those flavors even more!

## Recipe Variations

Get creative with this Beef and Pepper Rice Bowl! Here are some fun twists you can try:

- **Spicy Sriracha Kick:** Drizzle a little Sriracha on top for an extra punch.
- **Tex-Mex Version:** Swap out the bell peppers for corn and black beans, and serve with avocado slices.
- **Curry Flavor:** Stir in a tablespoon of curry powder for a warm, exotic twist.
- **Low-carb Option:** Substitute rice with cauliflower rice, and load it up with extra veggies.
- **More Veggies:** Add in zucchini or carrots for added nutrition and color.

## Chef’s Notes

What I love about this recipe is how it’s evolved over time. Growing up, my mom often added her own twists, and I’ve carried that tradition forward. Sometimes, if I have it on hand, I toss in a handful of spinach or kale for that pop of green!

Funny enough, one time, I completely forgot to buy bell peppers, so I had to use up some leftover frozen mixed veggies. It was a hit! So don’t be afraid to switch things up or use what you already have. Let your creativity flow!

## FAQs and Troubleshooting

**1. My dish came out too salty. What can I do?**
Don’t worry! Add a little more cooked rice or a splash of water to dilute the saltiness. It helps balance the flavors.

**2. Can I make this dish ahead of time?**
Absolutely! It stores well in the fridge for up to 3 days. Reheat on the stovetop or in the microwave before serving.

**3. What can I substitute for ground beef?**
Aside from ground turkey or chicken, consider using plant-based meat alternatives or lentils for a vegetarian option.

**4. My rice turned mushy. What happened?**
Mushy rice can result from overcooking. For next time, ensure your rice is cooked al dente before mixing it into the dish. If you have leftover rice, make sure it’s cooled properly before using it.

## Nutritional Info

While I encourage you to enjoy this comforting dish, I understand many of you can appreciate nutritional details too! Typically, this hearty bowl offers:

- **Calories:** Approximately 450 per serving
- **Protein:** About 25g
- **Carbohydrates:** Around 45g
- **Fat:** Roughly 15g

Feel free to adjust the ingredients and portion sizes according to your dietary needs!

---

So there you have it, my friends! A Beef and Pepper Rice Bowl that’s not only delicious but also filled with love and memories. I hope you enjoy making this recipe as much as I do. So, tie on your apron, gather your loved ones, and let’s make magic happen in our kitchens. Happy cooking!
Savory Beef and Pepper Rice Bowl

A heartwarming Beef and Pepper Rice Bowl that combines ground beef, vibrant vegetables, and fluffy rice for a comforting family meal.
- Prep Time: 10 minutes
- Cook Time: 20 minutes
- Total Time: 30 minutes
- Yield: 4 servings 1x
- Category: Main Course
- Method: Sautéing
- Cuisine: American
- Diet: None
Ingredients
- 1 lb ground beef
- 1 onion, diced
- 1 bell pepper, diced
- 1 jalapeño, diced
- 3 cups cooked rice
- 2 tablespoons soy sauce
- 1 teaspoon garlic powder
- 1 teaspoon ground black pepper
- 1 tablespoon olive oil
Instructions
- Heat the oil in a large skillet over medium heat, drizzling in the olive oil and letting it warm for about 1 minute.
- Cook the onion by adding it to the skillet and sauté for about 3-4 minutes until translucent and fragrant.
- Brown the beef by adding in the ground beef, breaking it apart as it cooks, and continue cooking for about 5-7 minutes until fully browned.
- Add the diced bell pepper and jalapeño, cooking for about 3-4 minutes until softened.
- Season by sprinkling garlic powder and black pepper over the mixture, pouring in the soy sauce, and letting it cook together for another 2-3 minutes.
- Mix in the cooked rice gently, cooking for an additional 2-3 minutes until everything is heated through.
- Taste before serving and add more soy sauce or salt if needed.
Notes
Garnish with fresh cilantro, sliced green onions, or a drizzle of lime juice for extra flavor.
Nutrition
- Serving Size: 1 serving
- Calories: 450
- Sugar: 5g
- Sodium: 800mg
- Fat: 15g
- Saturated Fat: 5g
- Unsaturated Fat: 7g
- Trans Fat: 0g
- Carbohydrates: 45g
- Fiber: 3g
- Protein: 25g
- Cholesterol: 70mg
Keywords: beef, rice bowl, comfort food, dinner recipe, family meal