
Sheet Pan Chicken Pitas with Herby Ranch
# Sheet Pan Chicken Pitas with Herby Ranch: A Flavorful Family Favorite

## Introduction

Hey there, fellow food enthusiasts! I’m so delighted to have you here at Ivory Apron, where cooking is all about elegance without the intimidation factor. Today, we’re turning up the flavor and ease with a dish that’s perfect for weeknight dinners or casual gatherings: **Sheet Pan Chicken Pitas with Herby Ranch.**

Imagine this: it’s a bustling Wednesday evening, and the clock is ticking down to family dinner time. You want something delicious, healthy, and quick — something that fills the house with a mouthwatering aroma as it roasts away in the oven. You’re in luck because this recipe promises just that and more! With perfectly seasoned chicken, colorful roasted veggies, and a creamy herby ranch sauce nestled inside soft pitas, you’ve got a meal that is not only satisfying but also visually stunning.

But before we dive into the nitty-gritty of cooking, let’s chat about why pitas are such a great choice. Pitas are like little edible pockets of joy, ready to be filled with all the goodness we can muster. And trust me, there's nothing quite like a warm pita bursting with juicy chicken and fresh veggies. So grab your cutting boards and let’s create a dinner that will make your kitchen the star of the evening!

## Personal Story

You know, some of my fondest memories revolve around simple yet comforting meals that brought our family together. I remember one summer when my grandma invited us all over for a backyard barbecue. It was that perfect blend of laughter, warmth, and the tantalizing scent of grilled goodies wafting through the air. She made these chicken pitas that she had marinated overnight, filling them to the brim with the freshest veggies and the most delectable sauce. We sat around the picnic table, devouring our creations and giggling at the ridiculous amounts of ranch dressing we were all dousing on top.

That night, something clicked for me; it wasn't just about the food but about the atmosphere, the connections, and the joy of sharing a meal. It’s moments like these that inspire my recipes and my mission here at Ivory Apron — to make cooking accessible and enjoyable for everyone. So, let’s keep that spirit alive as we dive into our Sheet Pan Chicken Pitas with Herby Ranch!

## Ingredients

Here’s what you’ll need to whip up these delicious pitas:

- **2 boneless, skinless chicken breasts**
  Perfectly tender and quick to cook, these beauties slice beautifully for easy stuffing. Feel free to substitute with turkey or any other lean protein if you're looking for alternatives.

- **1 tablespoon olive oil**
  This gem of an ingredient not only adds flavor but helps everything brown beautifully and keeps your dish juicy. Avocado oil works well too!

- **Salt and pepper, to taste**
  These seasoning staples are crucial for enhancing the natural flavors of the chicken and veggies. Don’t shy away — season generously!

- **1 teaspoon garlic powder**
  A fantastic way to pack in savory flavor with minimal effort. You can substitute with fresh minced garlic if you prefer a punchier taste.

- **1 teaspoon paprika**
  Not just for color; this spice adds a subtle smoky sweetness. You can try smoked paprika for an extra depth of flavor.

- **1 cup mixed vegetables (bell peppers, onions, zucchini)**
  A colorful blend that caramelizes beautifully in the oven. Feel free to use whatever you have on hand; broccoli, cherry tomatoes, or carrots work great too!

- **1/2 cup Greek yogurt**
  The creamy base for our herby ranch sauce, it’s tangy and smooth. If lactose is a concern, dairy-free yogurt can be a great substitute.

- **1 tablespoon ranch seasoning mix**
  This handy blend is packed with flavors you adore, making it easy to achieve that classic ranch taste. You can make your own if you're feeling adventurous!

- **Fresh herbs, to taste (parsley, dill)**
  These beauties will brighten up your dish with aromatic freshness. Use whatever herbs you have handy — cilantro or chives can also add a delightful kick.

- **4 pitas**
  Whether you prefer them soft or slightly toasted, these will cradle the filling beautifully. Whole wheat or gluten-free variants can work too!

## Step-by-Step Instructions

Now, let’s get cooking! We’ll create a dish that’s as fun to make as it is to eat. Here’s the step-by-step breakdown:

### 1. Prepping the Chicken and Veggies
   **Tip:** Start by preheating your oven to 425°F (220°C). It’s all about timing! As it warms, you can prep your ingredients.
   Slice the chicken breasts into bite-sized pieces or strips. This not only helps them cook faster but also makes for easy stuffing later. Place the chicken in a mixing bowl and add the olive oil, salt, pepper, garlic powder, and paprika. Use your hands to massage the spices into the chicken — it’s messy, but that's where the fun is!

### 2. Chopping the Vegetables
   While you’re marinating the chicken, chop up your mixed veggies into similar-sized pieces. You want them to cook evenly and caramelize nicely. Toss them with a pinch of salt, pepper, and a drizzle of olive oil. The goal is to enhance their natural sweetness and prevent drying out!

### 3. Roasting on the Sheet Pan
   **Chef Hack:** Line your sheet pan with parchment paper for easy cleanup!
   Spread the marinated chicken and mixed vegetables evenly on the sheet pan. Ensuring they’re in a single layer allows for that golden-brown crispiness we all love. Pop it into your preheated oven and roast for about 20-25 minutes. You’ll want to stir halfway through to ensure even cooking. The chicken should be fully cooked (165°F internally) and the veggies fork-tender.

### 4. Making the Herby Ranch Sauce
   While everything is roasting, let’s whip up that creamy herby ranch! In a small bowl, combine the Greek yogurt and ranch seasoning mix. Add a sprinkle of fresh herbs to brighten it up — the more, the merrier! Taste it and adjust with more herbs or seasoning as necessary. The key is to balance that creaminess with a bright, herby punch.

### 5. Assembling the Pitas
   **Fun Fact:** You can warm your pitas in the oven for a couple of minutes or in a skillet over medium heat for extra softness.
   Once everything is ready, it’s time to assemble! Open your pitas and stuff them generously with the roasted chicken and veggies. Drizzle with that luscious herby ranch sauce and finish with a sprinkle of extra fresh herbs for a pop of color.

## Serving Suggestions

Serve your stuffed pitas on a lovely platter with a few additional sprigs of herbs peeking out. You can accompany them with some extra herby ranch for dipping on the side or a simple green salad dressed in olive oil and lemon for a bright contrast. Add some crunchy potato chips or roasted chickpeas for an extra crunch, and you have a delightful spread ready to impress!

## Recipe Variations

- **Spicy Kick:** Add a pinch of cayenne pepper or a sprinkle of red pepper flakes to the chicken marinade for a little heat.
- **Mediterranean Twist:** Swap out traditional ranch ingredients for hummus and roasted eggplant for a Mediterranean feel!
- **Veggie-Packed:** Load up on more veggies like spinach or kale, or even swap the chicken for chickpeas for a vegetarian option.
- **Herb Swap:** Use basil or mint in place of dill or parsley for a completely new flavor profile.
- **Whole Grain Pitas:** Try whole wheat or even a flavored pita (like garlic or spinach) for added depth.

## Chef’s Notes

This recipe has evolved beautifully in my kitchen over the years. Originally, I started with a simple chicken and veggie combo, but after countless family dinners, I realized that adding the herby ranch sauce elevated it from great to absolutely unforgettable. This dish is inspired by my love for simple ingredients that create warm memories and joyful gatherings. It’s incredibly versatile, allowing you to mix and match flavors based on what you’ve got at home!

Oh, and I’ll let you in on a little secret: sometimes I roast up extra chicken and veggies so I have leftovers for wraps or salads throughout the week. It’s a total game-changer!

## FAQs and Troubleshooting

### 1. **What if my chicken is dry?**
   If your chicken turns out dry, it might be overcooked. Using a meat thermometer can help ensure you hit that sweet 165°F mark.

### 2. **Can I make this ahead of time?**
   Absolutely! You can marinate the chicken the night before and chop the veggies in advance. Just assemble and roast right before serving.

### 3. **What if my pitas crack when I stuff them?**
   This can happen if the pitas are cold. Warming them thoroughly beforehand will make them more pliable and less likely to crack!

### 4. **How do I store leftovers?**
   Store any leftovers in an airtight container in the fridge for up to three days. Just reheat in the oven for the best results!

## Nutritional Info

**(Per Serving)**
Calories: 370
Protein: 30g
Fat: 12g
Carbohydrate: 40g
Fiber: 5g
Sugar: 4g

And there you have it — Sheet Pan Chicken Pitas with Herby Ranch, a meal that’s not just about the food; it’s about creating beautiful moments around your table. Let’s embrace the joy of cooking together, and don’t forget to share your creations with me! Happy cooking!
Sheet Pan Chicken Pitas with Herby Ranch

A flavorful and easy recipe for sheet pan chicken pitas filled with seasoned chicken, colorful roasted veggies, and a creamy herby ranch sauce.
- Prep Time: 15 minutes
- Cook Time: 25 minutes
- Total Time: 40 minutes
- Yield: 4 servings 1x
- Category: Main Course
- Method: Baking
- Cuisine: Mediterranean
- Diet: Healthy
Ingredients
- 2 boneless, skinless chicken breasts
- 1 tablespoon olive oil
- Salt and pepper, to taste
- 1 teaspoon garlic powder
- 1 teaspoon paprika
- 1 cup mixed vegetables (bell peppers, onions, zucchini)
- 1/2 cup Greek yogurt
- 1 tablespoon ranch seasoning mix
- Fresh herbs, to taste (parsley, dill)
- 4 pitas
Instructions
- Preheat your oven to 425°F (220°C). Slice the chicken breasts into bite-sized pieces or strips. Place the chicken in a mixing bowl and add the olive oil, salt, pepper, garlic powder, and paprika. Massage the spices into the chicken.
- Chop your mixed veggies into similar-sized pieces. Toss them with a pinch of salt, pepper, and a drizzle of olive oil.
- Spread the marinated chicken and mixed vegetables evenly on a sheet pan. Roast for about 20-25 minutes, stirring halfway through, until chicken is cooked and veggies are tender.
- Combine the Greek yogurt and ranch seasoning mix in a small bowl. Add fresh herbs and adjust seasoning as necessary.
- Stuff the pitas generously with the roasted chicken and veggies. Drizzle with the herby ranch sauce and garnish with extra herbs.
Notes
For added flavor, consider marinating the chicken overnight. Leftovers can be stored in an airtight container for up to three days.
Nutrition
- Serving Size: 1 pita
- Calories: 370
- Sugar: 4g
- Sodium: 450mg
- Fat: 12g
- Saturated Fat: 3g
- Unsaturated Fat: 7g
- Trans Fat: 0g
- Carbohydrates: 40g
- Fiber: 5g
- Protein: 30g
- Cholesterol: 70mg
Keywords: chicken pitas, sheet pan dinner, herby ranch, quick dinner, Mediterranean recipes
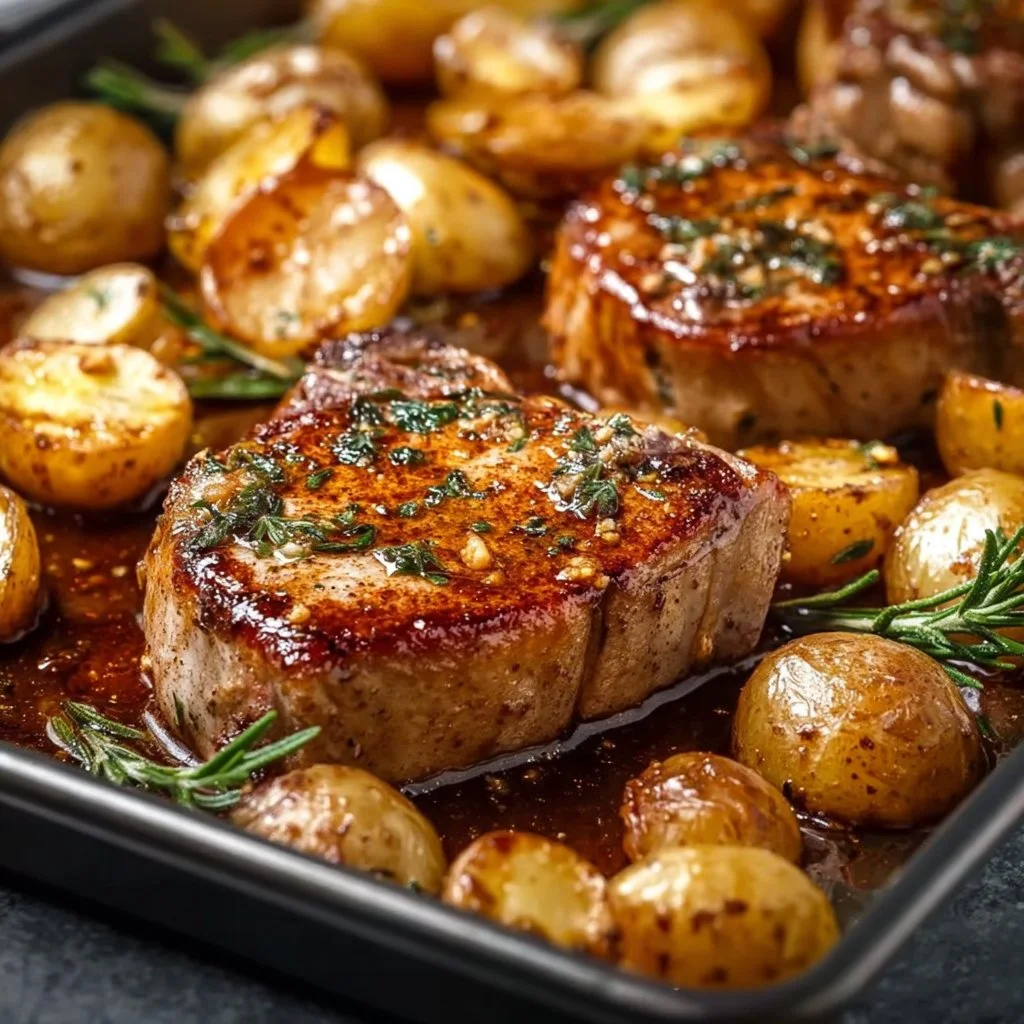
Sheet Pan Pork Chops and Potatoes
The Ultimate Sheet Pan Pork Chops and Potatoes: A Friendly Culinary Adventure
Welcome to my cozy kitchen! If you’re looking for a delicious, hearty dish that brings the family together while requiring minimal cleanup — boy, do I have a treat for you! Picture this: succulent pork chops, golden-brown potatoes, and aromatic herbs sizzling together in harmony on one very convenient sheet pan. Grab your apron and let’s dive into one of my favorite weeknight dinners that feels fancy without fuss.
Cooking should be a joyful experience, and one of the greatest joys I’ve discovered is creating beautiful meals using just one pan — minimal mess but maximum flavor. Trust me when I say that this Sheet Pan Pork Chops and Potatoes recipe is going to become a staple in your home. With every bite, you’ll be reminded that dinner can feel both elevated and uncomplicated. Ready? Let’s lay down the culinary groundwork!
A Personal Culinary Memory
As I stepped into my grandmother’s kitchen as a child, the first thing that welcomed me was the delightful aroma of her cooking. She had a knack for making simple ingredients taste gourmet. One of my fondest memories is watching her prepare scrumptious pork chops in her vintage oven, always paired with roasted vegetables. We gathered around the table, where laughter mixed with the aroma of herbs and spices, making ordinary nights feel special.
Her secret? It was all about the love and simplicity she infused into every dish. She believed that the best meals didn’t require complicated techniques but rather a thoughtful approach to flavors. That same philosophy is what inspired this sheet pan recipe — marrying sorts of tenderness, juicy flavors, and crispy textures, all while putting minimal burden on the cook.
The Ingredients You’ll Need
Let’s break down the ingredients, shall we?
-
4 Pork Chops: Select bone-in or boneless according to your preference! Bone-in carries more flavor and remains juicier, while boneless cooks a bit faster. If you’re in the mood for a lighter option, feel free to swap with chicken breasts.
-
1 Pound of Potatoes (diced): For this recipe, I suggest using Yukon Gold or red potatoes. Their natural creaminess keeps them tender when roasted. Couldn’t find those? Sweet potatoes work perfectly, lending a wonderful sweetness and vibrant color.
-
2 Tablespoons Olive Oil: A heart-healthy fat that adds flavor and helps with browning. If you’re after a different flavor profile, try using avocado oil or melted butter for a richer taste.
-
1 Teaspoon Garlic Powder: For that aromatic kick! Feel free to use fresh minced garlic instead (about 3 cloves), which brings a fresher punch to the dish.
-
1 Teaspoon Paprika: This will give a beautiful depth and reddish hue. For a smoky twist, opt for smoked paprika or even a pinch of cayenne if you’re feeling adventurous.
-
Salt and Pepper to taste: Essential for enhancing flavors! I always recommend using kosher salt for a well-rounded seasoning.
-
Fresh herbs (like rosemary or thyme) for garnish: Fresh herbs elevate the dish with aromatic flavors. Dried herbs work too, but fresh is best when you want to impress!
Cooking Up a Storm: Step-by-Step Instructions
Now, let’s get to the fun part — cooking this delightful dish! Follow along as we create a wonderfully easy meal that’s packed with flavor.
Step 1: Preheat Your Oven
Preheat your oven to 400°F (200°C). This ensures that the pork chops and potatoes roast to crispy perfection. The magic truly happens in a hot oven!
Step 2: Season the Pork Chops
While the oven warms up, let’s season our pork chops! Pat them dry with paper towels (this helps achieve a beautiful sear later). Drizzle half of the olive oil on the chops, then sprinkle with garlic powder, paprika, salt, and pepper. Give those babies a good rub to coat all sides evenly. Allow them to marinate in those flavors for about 10 minutes while you prep the potatoes.
Step 3: Prepare the Potatoes
In a mixing bowl, add the diced potatoes and the remaining olive oil. Toss them around and add a pinch of salt, pepper, and a sprinkle of paprika for added flavor. You want the potatoes to shine against the pork chops!
Step 4: Arrange Everything on a Sheet Pan
Grab a large rimmed baking sheet and spread the seasoned potatoes evenly across it. Make sure to carve out space for the pork chops! Next, arrange the pork chops on top of the potatoes. The drippings from the pork will flavor the potatoes beautifully, so this step is crucial!
Step 5: Roast in the Oven
Slide the sheet pan into the preheated oven and roast for 25-30 minutes, or until the pork reaches an internal temperature of 145°F (63°C). If you like a crispy exterior, broil for an additional 2-3 minutes at the end. Just keep an eye on it to avoid burning!
Step 6: Garnish and Serve
Once the chops and potatoes are cooked to perfection, remove the pan from the oven. Let it rest for about 5 minutes — this ensures all the juices stay locked in. Sprinkle freshly chopped herbs on top for that inviting, aromatic finish.
Serving Suggestions
Now, plate up your delectable dish! Consider serving your Sheet Pan Pork Chops and Potatoes on a rustic wooden board, garnished with lemon wedges and a sprinkle of extra herbs for a pop of color. Pair it with a simple green salad drizzled with vinaigrette to balance the richness of the pork and potatoes — take your meal to the next level!
Recipe Variations
This recipe is quite versatile! Here are some twists you might enjoy:
-
Add Veggies: Toss in some seasonal vegetables like Brussels sprouts, carrots, or bell peppers alongside the potatoes for a complete one-pan meal.
-
Switch Up the Herbs: Try fresh sage or oregano for an entirely different flavor profile.
-
Marinate Overnight: For pork chops that are extra flavorful, marinate them overnight in your favorite marinade. Soy sauce, honey, and garlic make a delightful combo.
-
Spicy Kick: Add a sprinkle of red pepper flakes over the pork chops before roasting for some heat.
-
Different Protein: Swap the pork for chicken thighs or salmon fillets for a totally new taste!
Chef’s Notes
This recipe has evolved over the years. I remember my first attempt at sheet pan cooking; let’s just say it was an edible but chaotic explosion of flavors! Over time, I learned to be mindful of how flavors interact and balanced cooking times. The beauty of sheet pan cooking is learning to let go of noise and focus on simplicity — which fits perfectly into my cooking ethos.
My grandmother’s comforting memories linger in this dish, always reminding me that cozy family meals needn’t be overwhelming to create. As you cook, infuse your unique touches and make this dish your own!
FAQs and Troubleshooting
1. What if my pork chops are tough?
Tough pork can result from overcooking. Always use a meat thermometer and cook until the internal temperature reaches 145°F (63°C). Also, allow it to rest after cooking; this helps the meat stay juicy.
2. Can I use frozen pork chops?
Yes! If using frozen pork chops, make sure to thaw them completely before prepping and seasoning them. This ensures even cooking.
3. My potatoes didn’t cook through. What happened?
If your potatoes are diced too large, they may require more time to cook. Ensuring uniform, small pieces will help them cook evenly and quickly.
4. How do I store leftovers?
Once cooled, store leftovers in an airtight container in the fridge for up to 3 days. Reheat in the oven to maintain that wonderful crispy texture, or microwave when in a hurry.
Nutritional Info (Optional)
This dish offers a balanced meal with protein, healthy fats, and carbohydrates. Here’s a quick nutritional estimate per serving (based on the entire dish serving four):
- Calories: Approximately 350
- Protein: 30g
- Fat: 18g
- Carbohydrates: 20g
- Fiber: 3g
Now that you have all the info you need, it’s time to roll up those sleeves and get cooking! As you embark on this culinary adventure, remember—the kitchen is your playground, and the heart of your home. With each dish you create, you’re not just cooking; you’re making lasting memories. Happy cooking, and enjoy those lovely moments around your table with family and friends!
PrintUltimate Sheet Pan Pork Chops and Potatoes
A delicious, hearty dish featuring succulent pork chops, golden-brown potatoes, and aromatic herbs, all cooked together on one convenient sheet pan.
- Prep Time: 15 minutes
- Cook Time: 30 minutes
- Total Time: 45 minutes
- Yield: 4 servings 1x
- Category: Main Course
- Method: Baking
- Cuisine: American
- Diet: Paleo
Ingredients
- 4 Pork Chops (bone-in or boneless)
- 1 Pound of Potatoes (diced, preferably Yukon Gold or red)
- 2 Tablespoons Olive Oil
- 1 Teaspoon Garlic Powder
- 1 Teaspoon Paprika
- Salt and Pepper to taste
- Fresh herbs (like rosemary or thyme) for garnish
Instructions
- Preheat your oven to 400°F (200°C).
- Season the pork chops by patting them dry, drizzling with half of the olive oil, and sprinkling with garlic powder, paprika, salt, and pepper. Marinate for 10 minutes.
- Prepare the diced potatoes by tossing them with the remaining olive oil, salt, pepper, and paprika in a mixing bowl.
- Arrange the seasoned potatoes on a large rimmed baking sheet, leaving space for the pork chops, which should be placed on top of the potatoes.
- Roast in the oven for 25-30 minutes or until the pork reaches an internal temperature of 145°F (63°C). Optionally, broil for an additional 2-3 minutes for a crispy exterior.
- Garnish with freshly chopped herbs and let it rest for 5 minutes before serving.
Notes
For a complete meal, consider adding seasonal vegetables. You can also marinate the pork chops overnight for more flavor.
Nutrition
- Serving Size: 1 serving
- Calories: 350
- Sugar: 2g
- Sodium: 400mg
- Fat: 18g
- Saturated Fat: 6g
- Unsaturated Fat: 10g
- Trans Fat: 0g
- Carbohydrates: 20g
- Fiber: 3g
- Protein: 30g
- Cholesterol: 80mg
Keywords: pork chops, sheet pan, easy dinner, family meal, one pan recipe
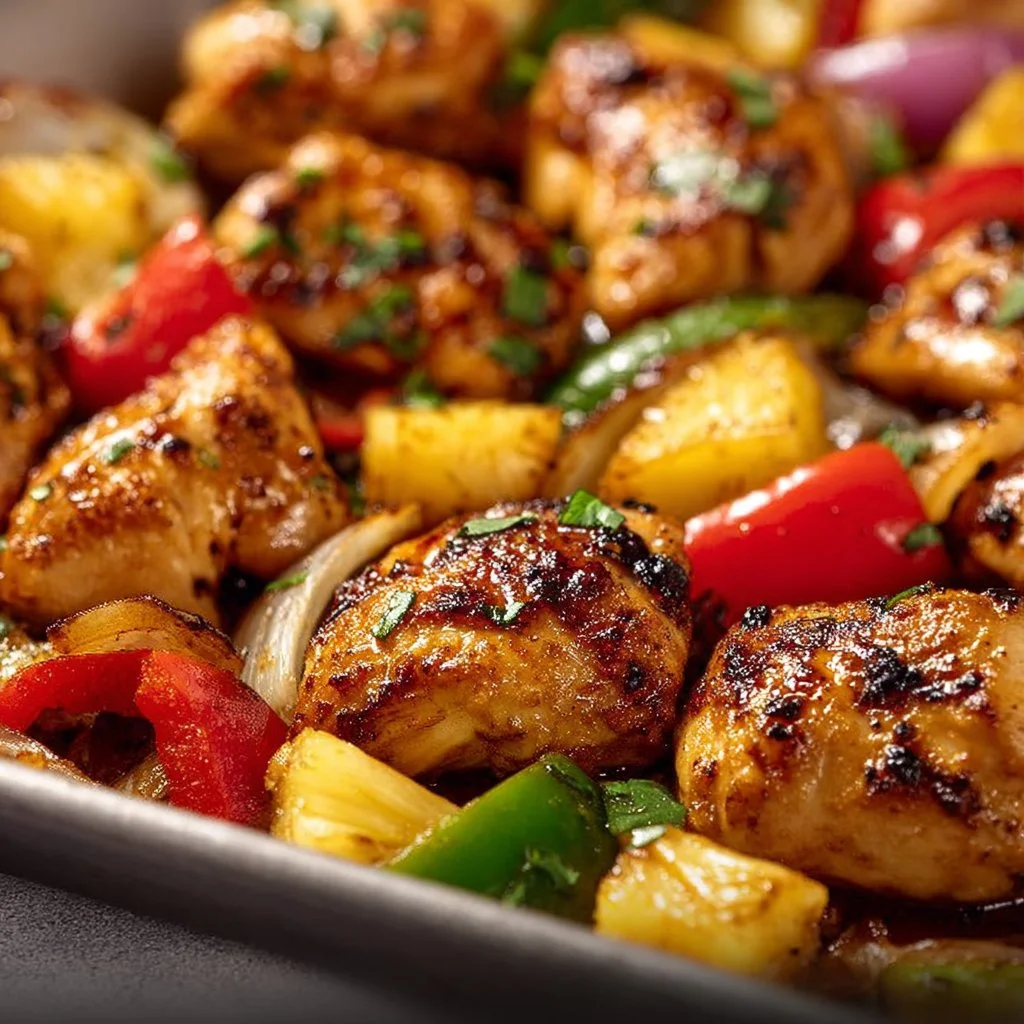
Hawaiian Chicken Sheet Pan
Aloha to Flavor: Hawaiian Chicken Sheet Pan Recipe
Introduction
Aloha and welcome to my kitchen, where the sun is always shining, and flavors are as vibrant as a Hawaiian sunset! Today, we’re diving into a dish that perfectly captures the spirit of the islands — Hawaiian Chicken Sheet Pan. This recipe is your ticket to a tropical paradise, one bite at a time, and trust me, it’s just as effortless as it is delicious!
Picture this: you’re at a luau, the warm breeze softly rustling your hair, the aroma of grilled chicken and sweet pineapple wafting through the air, and the sound of laughter echoing all around you. That’s the essence I wanted to bottle up with this recipe. It’s a dish that evokes nostalgia and happiness, making it perfect for weeknights or gatherings with friends.
Cooking should be an experience, a delightful journey filled with color, laughter, and, of course, great food. The best part? This Hawaiian Chicken Sheet Pan is not only a feast for the senses but also incredibly easy to whip up. It’s all about bringing together perfectly seasoned chicken, fresh veggies, and juicy pineapple, roasted to perfection on one pan. Let’s roll up our sleeves and get cooking, shall we?
Personal Story
I remember the first time I tried a similar dish at a summer BBQ in my friend’s backyard. The sun was setting behind the palm trees, and my heart was as leaping as the flames on the grill. The sweet and tangy pineapple mixed with perfectly grilled chicken made every bite an instant favorite. I could hardly wait for the next BBQ, and that dish became my absolute go-to request for summer parties.
Years later, as I found my way into the world of recipe creation at Ivory Apron, I knew I wanted to bring that very same joy to your kitchens. So, I crafted this sheet pan version, making it accessible for every home chef. The charm of Hawaiian Chicken Sheet Pan is not just in the flavors, but also in the shared memories it creates around the table. Cooking should always feel like a celebration, and I hope this recipe helps you make many beautiful moments!
Ingredients
Here’s what you need to gather for your Hawaiian Chicken Sheet Pan:
-
1 ½ lbs (700 g) boneless skinless chicken breasts, cut into 1-inch pieces
- The star of our dish! Boneless, skinless chicken breasts are super versatile and cook evenly. Feel free to substitute with thighs for a richer flavor or even tofu for a plant-based take.
-
1 red bell pepper (chopped)
- Sweet and crunchy, this pepper adds color and nutrition. You can swap it with orange or green bell peppers according to your taste!
-
1 yellow bell pepper (chopped)
- Bringing in a burst of sunshine! Yellow bell peppers are also sweeter than their green cousins. Use any color you prefer, just keep the sweetness in mind.
-
1 small red onion (cut into wedges)
- Onions are essential for depth of flavor. If you’re not a fan, try shallots or even spring onions for a milder taste.
-
1 ½ cups fresh pineapple chunks (or canned, drained)
- Pineapple is the tropical superstar! Fresh is great, but canned works too—just ensure it’s well-drained. You can also use mango for a spin on flavors.
-
2 tbsp olive oil
- Great for flavor and ensuring even cooking. You can substitute it with avocado oil if you want a higher smoke point.
-
2 cloves garlic (minced)
- Garlic brings everything together! If you’re short on fresh garlic, garlic powder works in a pinch—about ½ teaspoon should do it.
-
½ tsp salt
- Essential for flavor enhancement! Adjust based on your dietary needs or preference.
-
½ tsp black pepper
- A dash of black pepper adds subtle heat; feel free to increase this for more kick.
-
½ tsp paprika
- This adds a lovely smokiness! Smoked paprika would give an additional depth of flavor.
-
¼ tsp chili flakes (optional)
- If you like it spicy, add these! Otherwise, you can leave them out for a milder dish.
Sauce (for tossing & drizzling)
-
⅓ cup low-sodium soy sauce
- A salty, umami-rich base. You can substitute with tamari for gluten-free or coconut aminos for a sweeter profile.
-
¼ cup pineapple juice (from the can or fresh)
- The sweet and tangy element that balances flavors.
-
3 tbsp honey (or brown sugar)
- For that touch of sweetness which caramelizes beautifully in the oven! Use maple syrup for a vegan alternative.
-
2 tbsp rice vinegar (or apple cider vinegar)
- Adds a zesty kick! You can also try white vinegar or even lemon juice.
-
1 tbsp cornstarch + 2 tbsp water (slurry, optional for thickening)
- Cornstarch will help thicken the sauce if you prefer a glaze. It’s totally optional; just mix it with water until smooth before adding to the sauce.
Step-by-Step Instructions
Now that we’ve got everything prepped and ready, let’s get cooking! Here’s how to whip up this delightful dish in just a few simple steps:
-
Preheat Your Oven:
- Start by preheating your oven to 400°F (200°C). This will ensure everything bakes evenly.
-
Prepare the Chicken:
- In a large mixing bowl, toss the cut chicken pieces with olive oil, minced garlic, salt, black pepper, paprika, and chili flakes (if using). Make sure every piece of chicken is coated well. This seasoning is key to infusing glorious flavor; use your hands and get in there!
-
Chop Your Veggies:
- While the chicken is getting cozy with those spices, chop your bell peppers and onion. The goal is to have them in bite-sized pieces so they mix beautifully with the chicken and roast uniformly. Think of colorful confetti — it makes a happy dish!
-
Mix Everything on a Sheet Pan:
- Line a large baking sheet with parchment paper or aluminum foil for easy cleanup — kitchen happiness starts with less mess! Spread the seasoned chicken across the pan, followed by the chopped veggies and pineapple. Try to arrange them in a single layer for even cooking.
-
Make the Sauce:
- In a bowl, whisk together the soy sauce, pineapple juice, honey, and rice vinegar. If you’re using the cornstarch, mix it with water until smooth and add it to the sauce. This is your flavor enhancer! Drizzle most of this delightful mixture evenly over the chicken and veggies but save a bit for drizzling before serving!
-
Bake Away!
- Slide your beautiful sheet pan into the oven and let everything bake for about 20-25 minutes, or until the chicken reaches an internal temperature of 165°F (74°C) and is cooked through! Keep an eye after 20 minutes — you want everything to be golden and slightly caramelized.
-
Drizzle and Serve:
- Just before serving, drizzle your reserved sauce over the dish for an extra splash of flavor. It’ll make the whole meal sing!
-
Watch as Everyone Flocks to the Table:
- Pull it out of the oven, let that warm, inviting aroma fill your kitchen, and watch your friends and family flock to your table. The colorful, exuberant display will have everyone excited.
Serving Suggestions
Plating is an art, but remember, perfection isn’t the goal – joy is! Serve your Hawaiian Chicken straight from the pan for a rustic, family-style meal, or plate it individually with a scoop of rice or quinoa and garnish with sliced green onions or sesame seeds for that extra flair. A lime wedge on the side adds a nice pop of freshness!
Recipe Variations
Feel free to play around with this dish! Here are a few delightful variations you can try:
- Tropical Twist: Add mango slices for an added layer of sweetness and flavor.
- Spicy Hawaiian Chicken: Incorporate jalapeños for that extra kick!
- Veggie Boost: Throw in some snap peas, zucchini, or broccoli for a nutrition-packed update.
- Grain-Free Darling: Serve over cauliflower rice for a lighter, veggie-based option.
- Meal Prep Hero: Double the recipe and save half for later! It keeps beautifully in the fridge for a couple of days and makes for an easy lunch.
Chef’s Notes
I adore how flexible this Hawaiian Chicken Sheet Pan dish is! Over the years, I’ve swapped out ingredients based on what I had on hand and it’s always turned out fantastic. One memorable experiment was using roasted veggies that were still in my fridge — talk about “zero waste” cooking! And speaking of stories, I once had an impromptu dinner party where I confidently threw everything onto the pan, and it was a smashing success! That’s the magic of this recipe: it welcomes your creativity and turns quick meals into memorable feasts.
FAQs and Troubleshooting
-
Can I use frozen chicken?
- While fresh is best for uniform cooking, you can use frozen chicken! Just make sure to thaw it correctly before cooking to avoid uneven cooking.
-
My chicken is not cooking evenly.
- Ensure that you’re cutting your chicken and veggies into similar-sized pieces. This allows for even cooking time.
-
What if my veggies are overcooked?
- If they’re starting to char too much, simply take them out of the oven while the chicken continues cooking. You can also add them halfway through for more steaming.
-
How do I store leftovers?
- Store them in an airtight container in the fridge for up to 4 days. Reheat in the oven or microwave, adding a splash of water to keep it moist.
Nutritional Info (optional)
(Nutritional values may vary; the following estimation provides a general idea.)
- Servings: 4
- Calories: 350
- Protein: 30g
- Carbs: 28g
- Fat: 15g
Cooking should be fun and filled with flavor and laughter! This Hawaiian Chicken Sheet Pan recipe is the perfect way to bring a piece of the islands to your home without the fuss. With fresh ingredients, vibrant flavors, and the joy of sharing it with loved ones, you are well on your way to becoming everyone’s go-to chef.
So tie on that apron, grab a drink, and let’s get cooking! Welcome to your kitchen adventure. 🍍🥥🌺
PrintHawaiian Chicken Sheet Pan
A vibrant and flavorful Hawaiian Chicken Sheet Pan recipe, combining chicken, fresh veggies, and sweet pineapple, roasted to perfection.
- Prep Time: 15 minutes
- Cook Time: 25 minutes
- Total Time: 40 minutes
- Yield: 4 servings 1x
- Category: Main Course
- Method: Baking
- Cuisine: Hawaiian
- Diet: Gluten-Free, Dairy-Free
Ingredients
- 1 ½ lbs (700 g) boneless skinless chicken breasts, cut into 1-inch pieces
- 1 red bell pepper, chopped
- 1 yellow bell pepper, chopped
- 1 small red onion, cut into wedges
- 1 ½ cups fresh pineapple chunks (or canned, drained)
- 2 tbsp olive oil
- 2 cloves garlic, minced
- ½ tsp salt
- ½ tsp black pepper
- ½ tsp paprika
- ¼ tsp chili flakes (optional)
- ⅓ cup low-sodium soy sauce
- ¼ cup pineapple juice
- 3 tbsp honey (or brown sugar)
- 2 tbsp rice vinegar (or apple cider vinegar)
- 1 tbsp cornstarch + 2 tbsp water (slurry, optional for thickening)
Instructions
- Preheat your oven to 400°F (200°C).
- Toss the cut chicken pieces with olive oil, minced garlic, salt, black pepper, paprika, and chili flakes in a large mixing bowl.
- Chop your bell peppers and onion into bite-sized pieces.
- Line a large baking sheet with parchment paper or aluminum foil. Spread the seasoned chicken, chopped veggies, and pineapple on the pan.
- Whisk together the soy sauce, pineapple juice, honey, and rice vinegar in a bowl, adding cornstarch slurry if desired.
- Drizzle most of the sauce evenly over the chicken and veggies, reserving some for serving.
- Bake for about 20-25 minutes, or until the chicken reaches an internal temperature of 165°F (74°C).
- Drizzle the reserved sauce over the dish just before serving.
- Serve warm and enjoy with family and friends!
Notes
This dish is flexible; feel free to substitute ingredients or add more veggies. It pairs beautifully with rice or quinoa.
Nutrition
- Serving Size: 1 serving
- Calories: 350
- Sugar: 12g
- Sodium: 600mg
- Fat: 15g
- Saturated Fat: 2g
- Unsaturated Fat: 10g
- Trans Fat: 0g
- Carbohydrates: 28g
- Fiber: 3g
- Protein: 30g
- Cholesterol: 70mg
Keywords: Hawaiian Chicken, Sheet Pan Dinner, Easy Chicken Recipe, Tropical Cuisine, Quick Meal