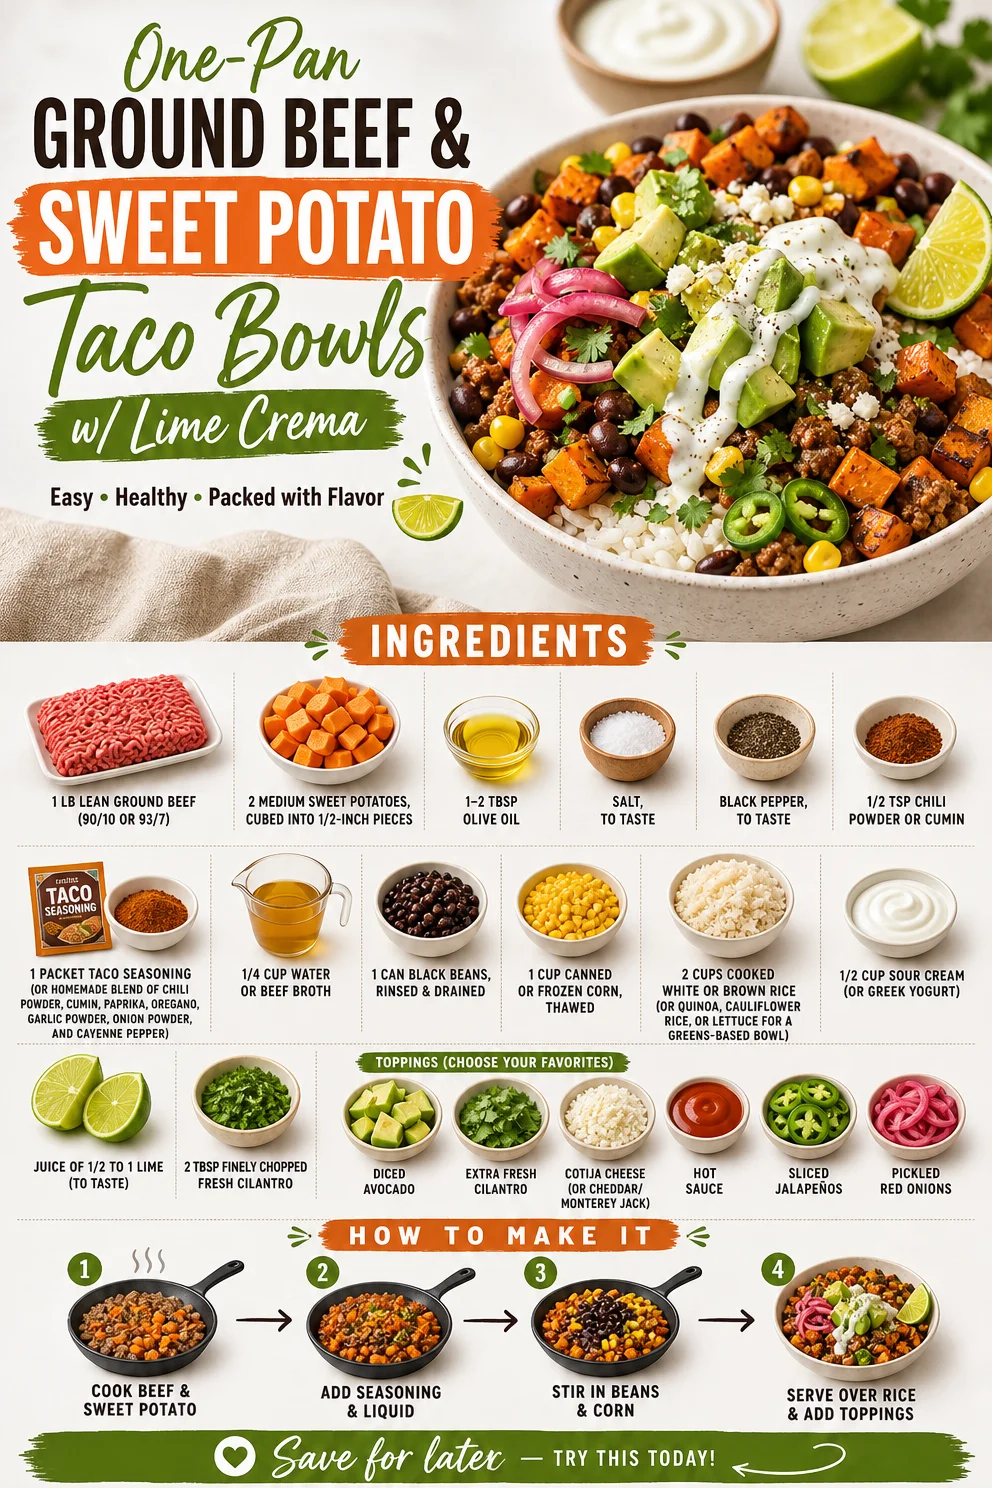
One-Pan Ground Beef & Sweet Potato Taco Bowls w/ Lime Crema
Delicious Ground Beef Sweet Potato Taco Bowl with Lime Crema
Introduction
Hello, my fellow food lovers! If you’re looking for a dish that’s bursting with flavor, easy to prepare, and perfect for a weeknight dinner or a fun gathering with friends, then this Ground Beef Sweet Potato Taco Bowl with Lime Crema is just the ticket. Picture this: flavorful, seasoned ground beef, tender roasted sweet potatoes, and creamy lime-infused goodness all piled into a bowl and topped with vibrant fixings. Sounds inviting, doesn’t it?
As we embark on this culinary adventure together, rest assured that every bite of this taco bowl invites warmth and comfort into your home. With just the right balance of spices and textures, this dish is as lovely to look at as it is to eat. Your dinner guests will be raving, and you’ll be the star of the night, all without the slightest hint of kitchen intimidation!
Before we dive into the details, let’s take a moment to appreciate how a simple bowl of food can foster connections and create memories. Food has an incredible way of bringing us together, sparking laughter, and igniting conversations that linger far beyond the meal itself. So, grab your apron and let’s bring some magic to your table with this scrumptious Ground Beef Sweet Potato Taco Bowl!
Personal Story
Let me take you back to one of my early cooking escapades. It was a rainy afternoon, and my best friend Anna and I decided to host an impromptu taco night. With only a few ingredients on hand, we scavenged through the pantry and discovered some lean ground beef, a couple of sweet potatoes, and a nearly empty taco seasoning packet hiding in the back. Challenge accepted!
As we chopped, sautéed, and seasoned, the sweet aroma of caramelizing sweet potatoes filled the kitchen, weaving its way through my home, creating an atmosphere filled with warmth and excitement. We added a dollop of sour cream and a squeeze of lime, and, oh my goodness, it was heavenly! We couldn’t believe how delightful a few simple ingredients could turn into such a feast. That night, we reminisced about childhood memories, shared dreams, and created new ones—all while enjoying our spontaneous creation. It’s moments like these that make me love cooking deeply; it’s not just about the food; it’s about the memories we create around the table.
Ingredients
-
1 lb lean ground beef (90/10 or 93/7)
Perfect for a flavorful base that’s not overly greasy. You can substitute with ground turkey or chicken for a lighter option. -
2 medium sweet potatoes, cubed into 1/2-inch pieces
Sweet potatoes add a natural sweetness and a boost of nutrients. Feel free to swap with regular potatoes or even butternut squash! -
1-2 tablespoons olive oil
A drizzle enhances the flavor of the sweet potatoes while helping them caramelize. Avocado oil or grapeseed oil work well too! -
Salt, to taste
Elevates all the flavors! Always season as you go for the best results. -
Black pepper, to taste
A sprinkle adds depth. Try using freshly cracked for an extra punch. -
1/2 teaspoon chili powder or cumin
Either spice ranks high in flavor. They add warmth; if you enjoy heat, consider adding some cayenne! -
1 packet taco seasoning (or homemade blend of chili powder, cumin, paprika, oregano, garlic powder, onion powder, and cayenne pepper)
Taco seasoning is a lifesaver for flavor! Homemade blends can be tailored to your taste. -
1/4 cup water or beef broth
This helps to combine the spices and beef, creating a sauce-like consistency. Use vegetable broth for a vegetarian option. -
1 can black beans, rinsed and drained
You can never go wrong with black beans! They’re rich in protein and fiber; kidney beans are also a good option. -
1 cup canned or frozen corn, thawed
Sweet corn adds pops of sweetness and color. Fresh corn can be used in season for extra flavor. -
2 cups cooked white or brown rice (or quinoa, cauliflower rice, or lettuce for a greens-based bowl)
Rice serves as the hearty base. Quinoa or cauliflower rice keeps it lighter; use crispy lettuce for a fresh crunch! -
1/2 cup sour cream (or Greek yogurt)
The creamy touch balances the dish beautifully. For a lighter alternative, try plain Greek yogurt! -
Juice of 1/2 to 1 lime (to taste)
Lime adds brightness. Adjust based on your preference! -
2 tablespoons finely chopped fresh cilantro
Fresh herbs create a lovely freshness; parsley can substitute if cilantro isn’t your thing. -
Toppings: diced avocado, extra fresh cilantro, cotija cheese (or cheddar/Monterey Jack), hot sauce, sliced jalapeños, pickled red onions
These toppings are all about personal preference and creativity! Customize your bowl with what you love.
Step-by-Step Instructions
-
Prepare the Sweet Potatoes
Preheat your oven to 425°F (220°C). While it heats, start peeling and chopping your sweet potatoes into 1/2-inch cubes. The uniform size ensures even cooking! Toss the cubes in a bowl with 1-2 tablespoons of olive oil, salt, black pepper, and chili powder or cumin. Spread them out on a baking sheet, making sure they’re not overcrowded. We want that gorgeous caramelization, so give them room to roast! Bake for about 20-25 minutes or until they’re golden and tender. Flip halfway through for the best results. -
Cook the Ground Beef
While the sweet potatoes roast, let’s get that delicious beef cooking! Heat a large skillet over medium heat. Add the lean ground beef and cook, breaking it apart with a spoon until browned, about 5-7 minutes. Use a slotted spoon to drain excess grease if needed. The key here is to let it develop those brown bits on the bottom of the pan for extra flavor—so don’t rush this step! -
Flavor the Beef
Once the beef is cooked, add your taco seasoning and stir it in. Pour in 1/4 cup of water or beef broth, and let it simmer for about 5 minutes. This step creates a thicker sauce—perfect for your bowls! Make sure it’s well combined, and if you feel fancy, taste and adjust the seasoning as necessary. -
Heat the Black Beans and Corn
In another pan or the same one if you prefer, toss in the drained black beans and thawed corn. Heat them over medium heat until warmed through, about 3-4 minutes. For extra flavor, add a pinch of salt and pepper! -
Make the Lime Crema
In a small bowl, whisk together the sour cream (or Greek yogurt) and lime juice. It should be smooth and creamy with a zesty kick! Adjust the lime juice according to your taste. You can even sprinkle some lime zest for an extra burst! -
Assemble Your Taco Bowls
Now for the fun part! Start with a base of warm, fluffy rice or your choice of grain in each bowl. Then pile on the seasoned ground beef, followed by the roasted sweet potatoes, black beans, and corn. -
Dress It Up
Drizzle that lime crema generously over the top, and don’t forget your toppings! A sprinkle of cilantro, a few slices of avocado, a handful of cotija cheese, and perhaps a dash of hot sauce or sliced jalapeños if you’re feeling adventurous!
Serving Suggestions
To plate, consider using shallow bowls or deep plates that allow you to layer the ingredients attractively. Start by creating a beautiful swirl of rice at the bottom, followed by the beef, and finish with a colorful display of sweet potatoes, beans, and corn. The dreamy lime crema can be artfully drizzled on top in a circular motion for that Instagram-worthy touch. For a finishing touch, bring the toppings to the side for a pop of color and a DIY feel!
Recipe Variations
- Vegetarian Twist: Swap out the ground beef for a mix of sautéed mushrooms, bell peppers, and zucchini for a veggie-packed bowl.
- Spicy Kick: Add diced chipotle peppers in adobo sauce to the beef for a smoky heat.
- Southwest Style: Mix in chopped bell peppers and diced tomatoes with the beef for added freshness and flavor.
- Quinoa Base: Use cooked quinoa instead of rice for a protein-packed alternative that’s also gluten-free.
- Sweetness and Heat: Drizzle sriracha or a sweet chili sauce for a unique sweet and spicy experience.
Chef’s Notes
This recipe is one of those lovely dishes that has evolved wonderfully over time. What started as a simple, on-the-fly dinner has blossomed into a beloved go-to for any occasion. I often recall that rainy afternoon spent laughing with Anna, and it warms my heart to see my family and friends enjoy bowls filled with love and flavor. The great thing about this taco bowl is that it’s incredibly adaptable! You can truly make it your own with endless combinations. Don’t hesitate to play around with the spices and toppings! After all, cooking should be a joyful experience.
FAQs and Troubleshooting
-
My sweet potatoes are soggy! What went wrong?
An overcrowded baking sheet can lead to steaming instead of roasting. Ensure that your sweet potatoes have enough space when baking! -
Can I use a different protein?
Absolutely! Ground turkey, chicken, or even tofu can be fantastic substitutes. Adjust cooking times as necessary. -
What if I don’t have taco seasoning?
Don’t fret! You can create a quick mix with chili powder, cumin, paprika, oregano, garlic powder, onion powder, and a pinch of cayenne pepper for some heat. -
How can I make this dish ahead of time?
You can prep the ingredients and roast the sweet potatoes in advance. Assemble the taco bowls just before serving, or store them separately in the fridge until you’re ready to enjoy!
Nutritional Info
This taco bowl is not only delicious but also packed with nutrients. With the lean beef providing protein, sweet potatoes offering fiber and vitamins, and beans contributing additional protein and nutrients, it’s a well-rounded meal. Each serving provides a hearty amount of energy with balanced macronutrients—making it perfect for fueling your busy days!
So there you have it, a delightful dining experience wrapped up in a bowl! Each component works in harmony, making your taste buds dance with joy while you and your loved ones share and create lasting memories around the table. Happy cooking, and I can’t wait to hear how your Ground Beef Sweet Potato Taco Bowls turn out!
PrintGround Beef Sweet Potato Taco Bowl with Lime Crema
A flavorful and easy-to-prepare taco bowl featuring seasoned ground beef, roasted sweet potatoes, and a creamy lime sauce, perfect for any weeknight dinner or gathering.
- Prep Time: 15 minutes
- Cook Time: 30 minutes
- Total Time: 45 minutes
- Yield: 4 servings 1x
- Category: Main Course
- Method: Baking, Sautéing
- Cuisine: Mexican
- Diet: Gluten-Free
Ingredients
- 1 lb lean ground beef (90/10 or 93/7)
- 2 medium sweet potatoes, cubed into 1/2-inch pieces
- 1–2 tablespoons olive oil
- Salt, to taste
- Black pepper, to taste
- 1/2 teaspoon chili powder or cumin
- 1 packet taco seasoning (or homemade blend)
- 1/4 cup water or beef broth
- 1 can black beans, rinsed and drained
- 1 cup canned or frozen corn, thawed
- 2 cups cooked white or brown rice (or quinoa, cauliflower rice, or lettuce for a greens-based bowl)
- 1/2 cup sour cream (or Greek yogurt)
- Juice of 1/2 to 1 lime (to taste)
- 2 tablespoons finely chopped fresh cilantro
- Toppings: diced avocado, extra fresh cilantro, cotija cheese (or cheddar/Monterey Jack), hot sauce, sliced jalapeños, pickled red onions
Instructions
- Preheat your oven to 425°F (220°C). Peel and chop sweet potatoes into 1/2-inch cubes. Toss with olive oil, salt, pepper, and chili powder or cumin. Spread on a baking sheet and bake for about 20-25 minutes.
- Heat a large skillet over medium heat and add the ground beef. Cook until browned, about 5-7 minutes.
- Add taco seasoning and water or beef broth, simmer for about 5 minutes until well combined.
- Toss the black beans and corn in a pan and heat for 3-4 minutes.
- Whisk together sour cream and lime juice to make the lime crema.
- Assemble the taco bowls starting with a base of rice, topped with ground beef, sweet potatoes, black beans, and corn.
- Drizzle lime crema over the top and add your choice of toppings.
Notes
Feel free to customize the toppings and spice levels to your preference. The recipe allows for plenty of variations for dietary needs.
Nutrition
- Serving Size: 1 serving
- Calories: 450
- Sugar: 6g
- Sodium: 600mg
- Fat: 18g
- Saturated Fat: 6g
- Unsaturated Fat: 10g
- Trans Fat: 0g
- Carbohydrates: 45g
- Fiber: 8g
- Protein: 25g
- Cholesterol: 70mg
Keywords: taco bowl, ground beef, sweet potato, lime crema, easy dinner
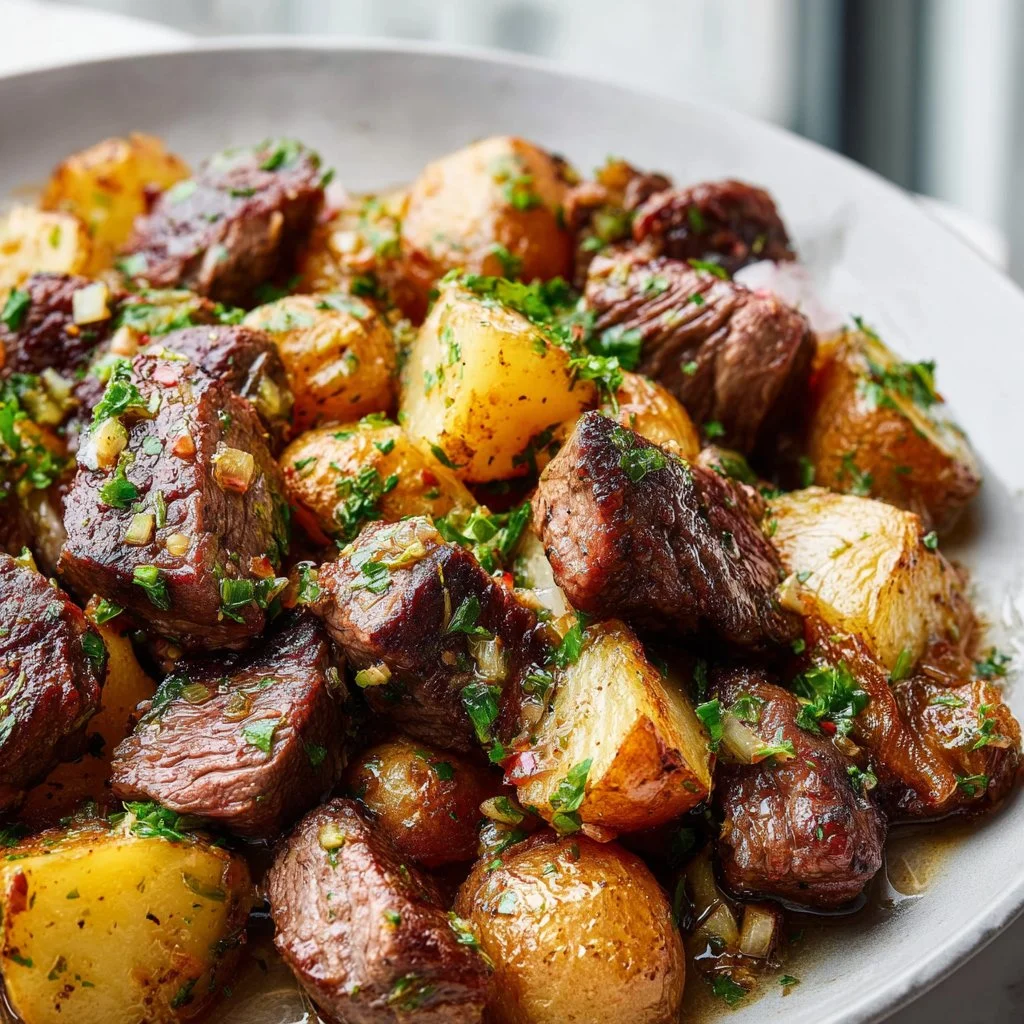
One-Pan Crispy Garlic Butter Steak Bites and Potatoes
Garlic Butter Steak Bites and Potatoes: A Flavorful Culinary Adventure
Welcome to the heart of flavor! I’m thrilled you’ve decided to join me on this delicious journey where we dive into a recipe that is not only easy to make but ridiculously satisfying: Garlic Butter Steak Bites and Potatoes. This dish checks all the boxes—it’s packed with flavor, feels elevated, and is perfect for those cozy weeknight dinners or when you’re ready to impress some guests. Grab your apron, and let’s cook something magical together!
A Personal Story: From Family Gatherings to Gourmet Plates
In my family, cooking was more than just a daily chore; it was a beautiful tradition that brought us together. My early memories are filled with the savory smell of garlic melting into butter on the stovetop, paired with joyous laughter echoing from the kitchen. I remember my father whipping up garlic butter steak bites on Sunday evenings, using the finest cuts available and always pairing them with a side of golden, crispy potatoes.
Excitement filled the air as my siblings and I anticipated the first bite. It was the kind of meal that made you want to savor every morsel. My father’s secret? A simple yet powerful combination of spices, care, and a generous dollop of love. As we enjoyed those weekend dinners, the kitchen became our sanctuary—a place where I discovered not just the joy of cooking but also the beauty of gathering together.
Today, I aim to bring that same warmth and flavor into your kitchen with this Garlic Butter Steak Bites and Potatoes recipe. Let’s recreate those cherished moments, creating new memories that will linger long after the last bite!
Ingredients
Here’s what you’ll need for this flavor-packed dish:
-
¼ cup ghee or butter, divided
Ghee is clarified butter with a rich flavor that’s perfect for cooking at high temperatures. If you prefer, you can easily substitute regular unsalted butter. -
1 tablespoon olive oil
Olive oil not only adds a lovely depth to the dish but also helps prevent the butter from burning. For a different flavor, you could try avocado oil instead. -
1 lb Yukon Gold potatoes, cut into ½ inch cubes
These potatoes are creamy and slightly sweet, making them ideal for roasting. If you don’t have Yukon Gold, feel free to swap them out for red potatoes or even sweet potatoes for a healthier twist! -
3 garlic cloves, minced
Garlic is the star of this dish, providing a fragrant and savory kick. If you’re a garlic lover, you can definitely add more! -
1 teaspoon dried thyme
Thyme pairs beautifully with both steak and potatoes. Fresh thyme is also an excellent substitute—just use about three times the amount! -
½ teaspoon dried oregano
Oregano adds a nice earthy tone. If you’re feeling adventurous, you could swap it for fresh rosemary or Italian seasoning! -
½ teaspoon sea salt, plus more to taste
Salt enhances flavor, so make sure to taste and adjust as needed! -
¼ teaspoon ground black pepper, plus more to taste
Freshly cracked black pepper elevates the dish, so don’t hesitate to adjust to your taste! -
1 ¼ lb sirloin steak, cut into ½ inch cubes
Sirloin is tender and flavorful, making it perfect for quick cooking. If you prefer a different cut, consider ribeye or tenderloin for a more luxurious bite!
Step-by-Step Instructions
Step 1: Preheat Your Oven
Start by preheating your oven to 425°F (220°C). This high temperature gives your potatoes that perfect crispy exterior while keeping them fluffy inside. A hot oven is a game-changer for these bites!
Step 2: Prepare the Potatoes
In a large bowl, toss your Yukon Gold potatoes with half of the ghee (or butter) and a drizzle of olive oil. Sprinkle in salt, black pepper, thyme, and oregano. This is your chance to flavor those potatoes! Ensure every little cube is coated evenly.
Chef Hack: Use your hands to mix. It’s the best way to feel how well everything is being combined! Just like kneading dough—it brings everything together beautifully.
Step 3: Roast the Potatoes
Spread the seasoned potatoes out in a single layer on a baking sheet. Roasting them will help achieve that crunchy texture we love. Bake for about 25–30 minutes, or until they’re golden brown and fork-tender, tossing them halfway through for even cooking.
Tip: If your oven has a convection mode, use it! It circulates the hot air for even browning.
Step 4: Searing the Steak
While your potatoes are roasting, let’s work on the steak bites. In a large skillet over medium-high heat, melt the remaining ghee (or butter) along with a splash of olive oil. Once hot, add the steak cubes in batches. Avoid overcrowding the pan; we want a beautiful sear!
Little Chef Insight: Patience is key! Allow the steak to brown without moving it for a minute or two. This creates a delicious crust!
Step 5: Add the Garlic
Once you’ve seared the steak bites to your desired doneness (about 2–3 minutes per side for medium-rare), sprinkle in the minced garlic. Toss everything together and let it cook for another minute. This is where the magic happens—the garlic will become fragrant and coat the steak in yummy goodness.
Pro Tip: If you want an extra flavor layer, add a splash of red wine or beef stock to deglaze the pan. Scrape all those golden bits off the bottom—they’re flavor gold!
Step 6: Combine and Serve
Once the potatoes are perfectly roasted, remove them from the oven and transfer them to the skillet with the steak. Toss gently to combine, allowing the garlic butter to coat everything evenly. Adjust seasoning with additional salt and pepper if needed.
Serving Idea: Thinly slice some fresh parsley for a pop of color and freshness before you serve!
Serving Suggestions
To serve, plate the Garlic Butter Steak Bites and Potatoes in a warm bowl, garnished with chopped parsley and a sprinkle of sea salt. Pair this dish with a side salad or steamed veggies for a well-rounded meal. For a special touch, you could even drizzle some balsamic reduction over the top—fancy and effortless!
Recipe Variations
- Herb Infusion: Swap out the thyme for fresh rosemary or tarragon for a different herbal note.
- Spice It Up: Add red pepper flakes for a kick or a dash of smoked paprika for a subtly smoky flavor.
- Saucy Delight: Try tossing in your favorite steak sauce or a splash of Worcestershire sauce for an extra layer of flavor.
- Vegetarian Option: Substitute the steak with portobello mushrooms for a hearty, umami-packed alternative.
- One-Pan Wonder: Add complementary veggies like asparagus or bell peppers right onto the baking sheet with your potatoes for a complete meal.
Chef’s Notes
This recipe has been a staple in my cooking repertoire for years. I love how versatile it is, and how it can adapt to various ingredients depending on what’s fresh and in season. One evening, while experimenting with this dish, I accidentally overdid the garlic—let’s just say, we ended up having garlic bread alongside it to balance things out! It turned out to be a happy accident, as the bread was a perfect vessel for the buttery, garlicky goodness.
Remember, it’s the small moments in the kitchen that count—so don’t fret over perfection. Cooking is an adventure, and it’s about creating joy and memories!
FAQs and Troubleshooting
1. My steak turned out tough. What did I do wrong?
This can happen if the steak is cooked for too long or at too high a temperature. Remember to sear quickly over high heat, and let the meat rest a few minutes before serving for tender bites!
2. How can I ensure my potatoes are crispy?
For truly crispy potatoes, make sure they are cut uniformly so they cook evenly. Also, avoid overcrowding on the baking sheet—give them room to breathe!
3. Can I use frozen steak or potatoes?
While fresh is always best, you can use frozen potatoes (no need to thaw; just add a few extra minutes to the cooking time). Frozen steak is doable but may not yield the same quality. Thaw it in the fridge overnight for better results.
4. Can I meal prep this dish?
Absolutely! Cook and combine everything, then store in airtight containers in the fridge for up to three days. Reheat in a skillet on low heat; just remember to add a splash of water or broth to keep it moist!
Nutritional Info
(Approximate per serving based on four servings):
- Calories: 450
- Fat: 30g
- Carbohydrates: 35g
- Protein: 25g
Note: Nutritional values will vary based on ingredient specifics and portion sizes.
And there you have it—a deliciously simple recipe for Garlic Butter Steak Bites and Potatoes that’s sure to impress! I hope this blog inspires you to create lovely meals in your kitchen. Remember, whether you’re cooking for one or gathering friends, the important part is to enjoy the process and cherish those special moments around the table. Happy cooking, my friends!
PrintGarlic Butter Steak Bites and Potatoes
A flavorful and easy recipe for garlic butter steak bites paired with crispy potatoes, perfect for weeknight dinners or impressing guests.
- Prep Time: 15 minutes
- Cook Time: 30 minutes
- Total Time: 45 minutes
- Yield: 4 servings 1x
- Category: Main Course
- Method: Baking and Searing
- Cuisine: American
- Diet: Non-Vegetarian
Ingredients
- ¼ cup ghee or butter, divided
- 1 tablespoon olive oil
- 1 lb Yukon Gold potatoes, cut into ½ inch cubes
- 3 garlic cloves, minced
- 1 teaspoon dried thyme
- ½ teaspoon dried oregano
- ½ teaspoon sea salt, plus more to taste
- ¼ teaspoon ground black pepper, plus more to taste
- 1 ¼ lb sirloin steak, cut into ½ inch cubes
Instructions
- Preheat your oven to 425°F (220°C).
- Prepare the Yukon Gold potatoes by tossing them with half of the ghee and a drizzle of olive oil, along with salt, black pepper, thyme, and oregano.
- Roast the seasoned potatoes on a baking sheet for about 25–30 minutes, or until golden brown, tossing halfway through.
- Sear the steak bites in a skillet with the remaining ghee and olive oil over medium-high heat, cooking in batches.
- Add the minced garlic to the skillet with the seared steak and cook for another minute.
- Combine the roasted potatoes with the steak and garlic butter in the skillet, toss gently, and season to taste.
Notes
For added flavor, splash some red wine or beef stock to deglaze the pan after searing the steak.
Nutrition
- Serving Size: 1 serving
- Calories: 450
- Sugar: 1g
- Sodium: 500mg
- Fat: 30g
- Saturated Fat: 10g
- Unsaturated Fat: 15g
- Trans Fat: 0g
- Carbohydrates: 35g
- Fiber: 4g
- Protein: 25g
- Cholesterol: 100mg
Keywords: steak bites, garlic butter, potatoes, easy recipe, dinner, comfort food
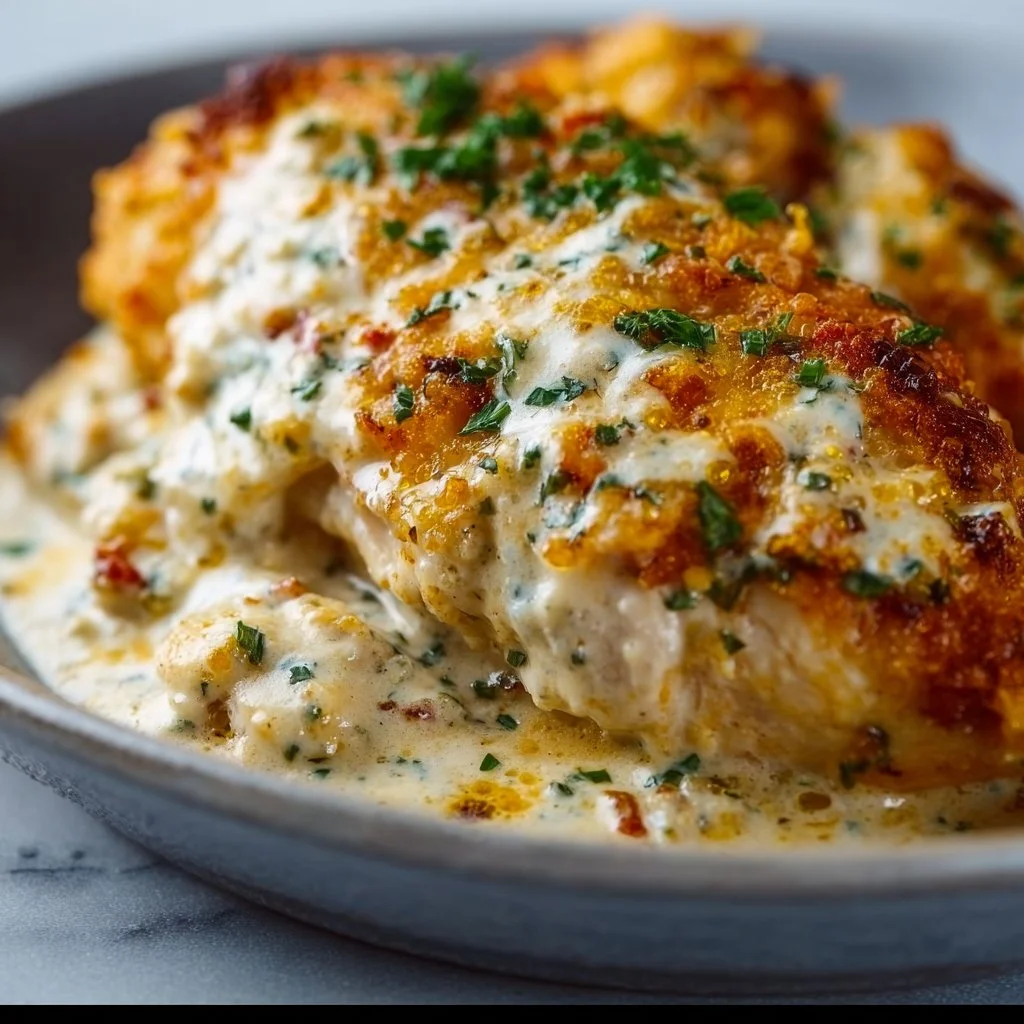
Creamy Sour Cream Chicken Bake
Creamy Sour Cream Chicken Bake: A Comforting Dish for Every Occasion
Hello, food lovers! Today, I’m excited to share one of my all-time favorite recipes that has graced my kitchen and dinner table countless times: Creamy Sour Cream Chicken Bake. If you’re looking for a dish that’s simple yet comforting, this is it! It’s a meal that never fails to impress guests or provide cozy dinners for your family. Grab your apron, and let’s dive into this creamy, cheesy delight!
A Memorable Kitchen Story
One of my earliest kitchen memories revolves around a family gathering where the star of the evening was a creamy chicken bake very similar to this one. I remember the kitchen filled with laughter, the tantalizing aroma of baked chicken wafting through the air, and my aunt’s playful banter as she worked her magic in the oven. As a child, I watched in awe as she effortlessly transformed humble ingredients into a crowd-pleasing dish.
My aunt served her creamy chicken bake with a crispy breadcrumb topping, which perfectly contrasted the richness of the dish. The way everyone gathered around the table, bubbling with laughter and anticipation, made me realize that food has the incredible power to bring people together. That evening, as we dipped into spoonfuls of comfort nestled in a cheesy blanket, I knew I wanted to recreate this kind of joy in my own kitchen someday. And here I am, passing it along to all of you!
Ingredients
Before we get into the cooking, let’s gather our ingredients:
-
4 chicken breasts: For this recipe, boneless, skinless chicken breasts work best, keeping things light and easy. You can substitute with thighs for a juicier option.
-
1 cup sour cream: This adds the creamy base for our dish. Greek yogurt can be a tangy alternative if you’re looking for a little twist.
-
1 cup shredded cheese (cheddar or mozzarella): I prefer sharp cheddar for its bold flavor, but mozzarella gives a lovely stretch. Feel free to mix or match!
-
1 can cream of chicken soup: This brings richness to our bake. If you’re going for a healthier option, look for a low-sodium or homemade version.
-
1 teaspoon garlic powder: Adds depth and flavor. Fresh garlic would work too; just mince one clove for a fresher essence.
-
1 teaspoon onion powder: A little sprinkle goes a long way! You can also use finely chopped fresh onion if you prefer.
-
Salt and pepper to taste: Essential for balancing flavors—don’t skip this step!
-
Optional: breadcrumbs for topping: Adding a crispy layer on top makes the dish extra special. You can use panko for a crunchier texture or seasoned crumbs for extra flavor.
Step-by-Step Instructions
Now that we have our ingredients, let’s get cooking! Here’s how to create this divine Creamy Sour Cream Chicken Bake:
-
Preheat Your Oven: Start by preheating your oven to 375°F (190°C). This step ensures that our chicken bakes evenly and beautifully.
-
Prepare the Chicken: Pat the chicken breasts dry with paper towels. This helps the seasonings stick better and ensures that the chicken browns nicely. Season both sides generously with salt and pepper.
-
Mix the Creamy Sauce: In a mixing bowl, toss together the sour cream, cream of chicken soup, garlic powder, onion powder, and a pinch of salt and pepper. This is where the magic happens; stir until everything is smooth and well-combined.
-
Layer the Chicken: In a greased 9×13-inch baking dish (don’t skip the grease!), place the seasoned chicken breasts in a single layer.
-
Pour the Sauce Over: Pour the creamy mixture over the chicken, ensuring every piece is nicely coated. You want that comforting goodness to envelop the chicken, creating a melt-in-your-mouth experience.
-
Add Cheese: Sprinkle your shredded cheese generously over the top of the creamy sauce. This creates a deliciously gooey layer that golden-browns beautifully in the oven.
-
Breadcrumb Topping (Optional): If you love that crunchy texture, sprinkle breadcrumbs over the cheese layer now. Just a light, even coating is all you need for that extra flair!
-
Bake: Pop your dish into the oven and bake for about 30-35 minutes, or until the chicken is cooked through (internal temperature should reach 165°F/75°C) and the cheese is bubbly and golden.
-
Rest Before Serving: Allow the dish to sit for about 5 minutes once it’s out of the oven. This helps the flavors meld together beautifully and makes it easier to serve!
Serving Suggestions
When it comes time to serve, you can keep it simple by plating the creamy chicken straight from the baking dish. Pair it with fluffy rice, creamy mashed potatoes, or a colorful mixed greens salad. A drizzle of fresh lemon juice over the top just before serving can add a nice brightness that contrasts wonderfully with the richness of the dish.
Recipe Variations
Now, if you want to mix things up a bit, here are some tasty variations to try:
-
Herbed Delight: Add fresh herbs like thyme, rosemary, or dill to your creamy mixture for a burst of flavor.
-
Spicy Kick: Toss in some diced jalapeños or a dash of hot sauce to the sauce mixture for those who love a little heat!
-
Veggie Boost: Mix in some steamed broccoli or spinach to the sauce for added nutrition and color.
-
Cheesy Options: Try a combination of different cheeses, such as pepper jack for a bit of spice or gouda for a smoky touch.
-
One-Pan Wonder: Add chopped potatoes and carrots around the chicken in the same baking dish. As they roast, they’ll soak up all those flavors, creating a complete meal in one pan!
Chef’s Notes
As with any recipe, this Creamy Sour Cream Chicken Bake has a special place in my heart but has also evolved over time. Initially, it was a go-to for family dinners, but then it became a staple for potluck gatherings where friends would insist on seconds!
One memorable moment occurred when I decided to experiment with a healthier twist by using Greek yogurt instead of sour cream. While my family initially hesitated, they didn’t notice the difference at all and happily devoured every last bite. That taught me that a little creativity can go a long way—never be afraid to make a recipe your own!
FAQs and Troubleshooting
-
What if my chicken is dry?
- Dry chicken could stem from overcooking. Always check the internal temperature and bake just until it reaches 165°F (75°C).
-
Can I freeze this dish?
- Absolutely! Just let it cool completely before covering it in an airtight container. It can be frozen for up to 3 months. Thaw in the fridge overnight before reheating.
-
Can I use frozen chicken?
- Yes, you can! Increase the baking time to ensure all the chicken is cooked through but be sure to still check the internal temperature.
-
What if I don’t have cream of chicken soup?
- You can make your own by mixing a tablespoon of butter, a tablespoon of flour, chicken broth, and cream until smooth.
Nutritional Info (Optional)
If you’re curious, this hearty dish provides a good balance of protein and fats, although please check specific nutritional databases for precise values depending on your ingredient choices!
I hope you embrace all the joy and warmth that this Creamy Sour Cream Chicken Bake brings. Enjoy making this dish and, more importantly, enjoy sharing it with your loved ones around the table. Here’s to elegant yet approachable cooking—happy baking!
PrintCreamy Sour Cream Chicken Bake

A comforting, creamy chicken bake that’s simple yet impressive, perfect for family dinners or gatherings.
- Prep Time: 15 minutes
- Cook Time: 35 minutes
- Total Time: 50 minutes
- Yield: 4 servings 1x
- Category: Main Course
- Method: Baking
- Cuisine: American
- Diet: Omnivore
Ingredients
- 4 boneless, skinless chicken breasts
- 1 cup sour cream
- 1 cup shredded cheese (cheddar or mozzarella)
- 1 can cream of chicken soup
- 1 teaspoon garlic powder
- 1 teaspoon onion powder
- Salt and pepper to taste
- Optional: breadcrumbs for topping
Instructions
- Preheat your oven to 375°F (190°C).
- Prepare the chicken by patting it dry with paper towels and seasoning with salt and pepper.
- Mix the sour cream, cream of chicken soup, garlic powder, onion powder, and a pinch of salt and pepper in a bowl.
- Layer the seasoned chicken breasts in a greased 9×13-inch baking dish.
- Pour the creamy mixture over the chicken, ensuring every piece is coated.
- Add shredded cheese generously over the top.
- Sprinkle breadcrumbs over the cheese layer (if using).
- Bake for about 30-35 minutes, or until the chicken reaches an internal temperature of 165°F (75°C) and the cheese is bubbly.
- Rest the dish for about 5 minutes before serving.
Notes
For added flavor, try incorporating fresh herbs or using different types of cheese. You can also mix in some vegetables for added nutrition.
Nutrition
- Serving Size: 1 serving
- Calories: 400
- Sugar: 4g
- Sodium: 600mg
- Fat: 20g
- Saturated Fat: 10g
- Unsaturated Fat: 8g
- Trans Fat: 0g
- Carbohydrates: 25g
- Fiber: 1g
- Protein: 30g
- Cholesterol: 90mg
Keywords: chicken, creamy, bake, comfort food, family dinner
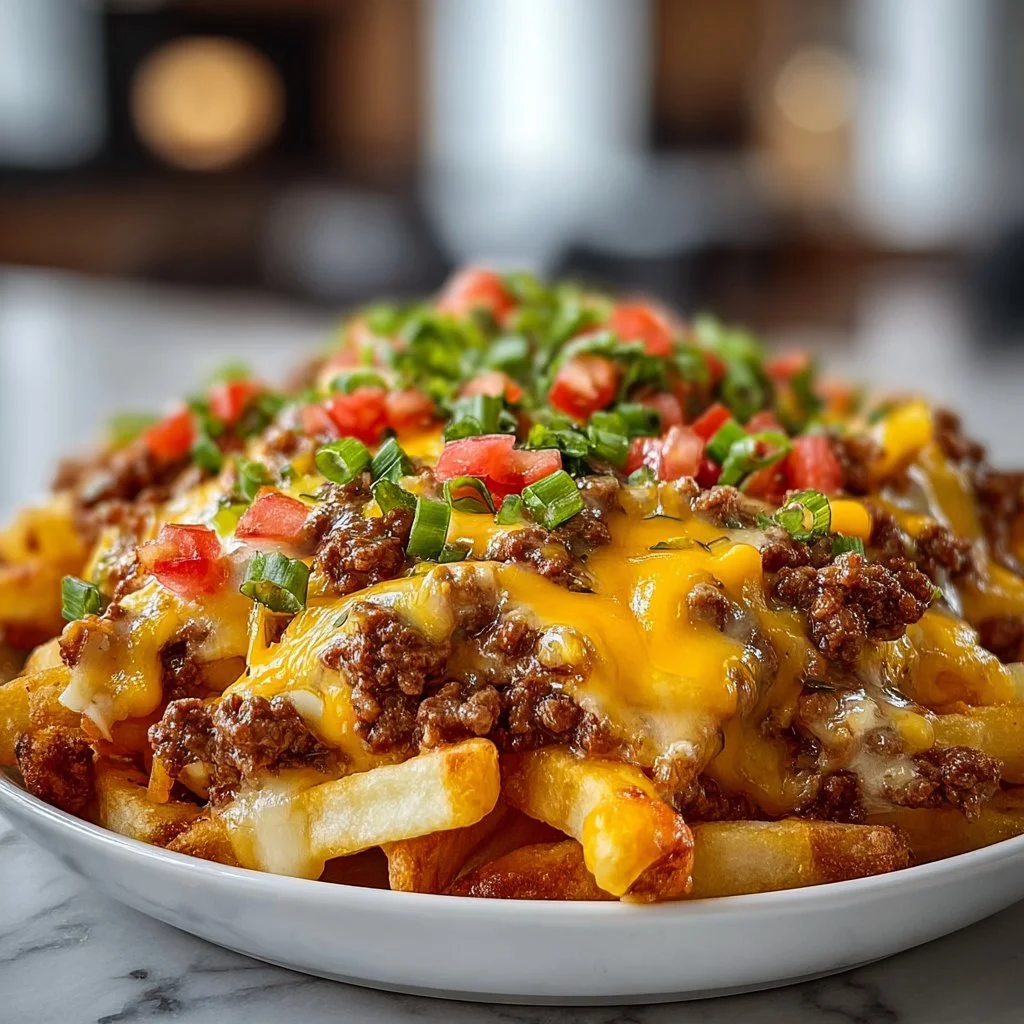
Cheeseburger French Fry Casserole
Cheeseburger French Fry Casserole: A Comfort Food Sensation
Welcome home, food lovers! Today, we’re diving into a dish that combines some of the best comfort foods out there: the Cheeseburger French Fry Casserole! If you’re looking for a hearty meal that’s easy to whip up and sure to please a crowd, you’ve hit the jackpot. Imagine biting into a savory blend of seasoned ground beef, crispy French fries, and ooey-gooey melted cheddar cheese—all baked into one glorious casserole! It’s like a hug in a dish and perfect for chilly evenings or weeknight meals that need to be on the table in a snap.
Now, I must share a little love story about this dish. The very first time I made this casserole, it was for my best friend’s birthday. After a long week filled with work pressures and adulting, we were craving a little nostalgia—and what could be better than classic cheeseburgers and fries? As I chopped the onions and sautéed the beef in my tiny kitchen, the scents transported me back to carefree summer barbecues from our childhood. That evening, as we huddled around the dinner table and dug into that cheesy casserole, let me tell you: laughter mingled with delight, and nostalgia swirled through every bite. Moments like these remind me why sharing a meal can be so meaningful.
So, let’s gather our ingredients and get to cooking this delicious casserole that will bring warmth to your table and a smile to your face!
Ingredients
Here’s what you’ll need for your Cheeseburger French Fry Casserole:
-
1 pound ground beef
A classic base for our casserole, the ground beef is seasoned to perfection. You can easily swap it for turkey or chicken if you prefer a leaner meat. If you’re craving a meatless option, try using lentils or a plant-based ground meat substitute! -
1 onion, chopped
The onion adds a sweet, aromatic flavor to our dish. If you’re sensitive to onions, feel free to swap in shallots, or omit them altogether. -
2 cups frozen French fries
Frozen French fries make this dish super easy! You can use crinkle-cut, straight-cut, or even sweet potato fries if you want a unique twist. Just keep in mind that cooking times may vary slightly! -
2 cups shredded cheddar cheese
Cheddar is a classic cheese choice, but feel free to mix it up! Pepper Jack adds a spicy kick, while mozzarella will give you that delightful stretch. -
1 can (10.5 oz) cream of mushroom soup
This ingredient adds creaminess and binds everything together. If you’re not a fan of mushrooms, you can use cream of chicken or even a homemade white sauce for a little twist. -
1/2 cup milk
A splash of milk will keep our casserole nice and creamy. Almond or oat milk can be great dairy-free alternatives. -
Salt and pepper to taste
These are essential for elevating the flavors in your dish. Don’t forget to adjust to your personal taste! -
Pickles and mustard (optional, for serving)
These are the finishing touches that bring out the classic cheeseburger vibe. I can’t resist a few dill pickle slices on mine!
Step-by-Step Instructions
Let’s get cooking this delicious casserole. Follow along, and remember: it’s all about having fun in the kitchen!
-
Preheat Your Oven
Preheat your oven to 350°F (175°C). A properly preheated oven ensures even cooking and that perfect cheese melt. -
Brown the Beef
In a large skillet over medium heat, add your ground beef and chopped onion. Cook until the beef is browned and the onions are translucent, about 5-7 minutes. Don’t forget to break the beef into small crumbles as it cooks—this helps distribute the flavor. If there’s excess grease (you usually don’t need it), drain it out before proceeding. -
Season It Up
Once your beef is browned, season the mixture generously with salt and pepper. Pro tip: Add a dash of garlic powder or paprika for an extra layer of flavor! -
Mix in the Soup and Milk
Lower the heat and stir in the can of cream of mushroom soup and the milk. Combine well until everything is nice and creamy. This mixture serves as the rich sauce that holds everything together. -
Layer It Up
In a greased 9×13 inch baking dish, spread half of the frozen French fries on the bottom. Pour the beef and soup mixture evenly over the fries, then sprinkle with a cup of cheddar cheese. Top it off with the remaining French fries and the rest of the cheese. Trust me, you want that cheesy goodness on top! -
Bake to Perfection
Place the casserole in the preheated oven and bake for about 30-35 minutes, or until the cheese is bubbly and golden brown, and the fries are starting to crisp up. Keep an eye on it to avoid over-browning! -
Cool and Serve
Once it’s baked, let the casserole cool for a few minutes. This time allows the flavors to meld together while you can decide whether to plate it (gorgeous presentation!) or serve family-style directly from the dish!
Serving Suggestions
To serve your Cheeseburger French Fry Casserole, consider garnishing it with a sprinkle of fresh parsley for a pop of color and freshness. If you’re feeling extra fancy, add a dollop of sour cream or some sliced green onions on top—these little extras take it to the next level! Of course, serve with your favorite pickle slices and a drizzle of mustard on the side for that authentic cheeseburger experience.
Recipe Variations
Don’t be afraid to get creative! Here are a few fun variations you can try:
-
BBQ Cheeseburger Version: Add a ¼ cup of your favorite BBQ sauce to the beef mixture for a delicious smoky flavor.
-
Ultimate Veggie Casserole: Swap the beef for sautéed bell peppers, zucchini, and mushrooms for a hearty vegetarian option.
-
Spicy Southwestern Twist: Mix in some diced jalapeños or green chilies to the beef for a kick, and try pepper jack cheese for that extra spice.
-
Loaded Nacho Casserole: Top the casserole with tortilla chips instead of fries and add some taco seasoning for a Tex-Mex vibe!
Chef’s Notes
This Cheeseburger French Fry Casserole has evolved in my kitchen over the years. Originally, I made it with leftover burger patties, which was delicious but often dry. So, I experimented with different ingredients until I found this delightful balance of creamy, cheesy, and crispy. Plus, it’s a fantastic way to make something that’s both nostalgic and comforting without breaking a sweat! I’ve served this up at gatherings, where it disappears faster than I can fill my plate.
Oh, and I must admit, I once had a minor mishap when I grabbed the wrong soup can and used cream of celery instead of mushroom. Surprisingly, it turned out delicious! So don’t be afraid to play with flavors—kitchen experiments can lead to delightful surprises!
FAQs and Troubleshooting
Q: My casserole turned out too dry. What happened?
A: This may have occurred if the meat mixture was overcooked or if you didn’t use enough moisture (like soup and milk). Always make sure your mixture is creamy before assembling!
Q: Can I freeze the leftovers?
A: Absolutely! This casserole freezes beautifully. Just let it cool, portion it into containers, and store in the freezer. When you’re ready to eat, defrost in the refrigerator overnight and reheat in the oven.
Q: What if I don’t have cream of mushroom soup?
A: No problem! You can use cream of chicken soup, or make a quick white sauce using butter, flour, and milk.
Q: How do I avoid soggy fries?
A: To ensure crispy fries, you can pre-bake the fries according to package instructions before layering them in the casserole. This way, they won’t absorb too much liquid!
Nutritional Info (Optional)
While I won’t get too hung up on specifics (because we all know comfort food is about enjoyment!), a typical serving of this Cheeseburger French Fry Casserole will have approximately 400-500 calories, depending on portion size and ingredient variations. It’s a filling dish with protein from the beef, and you’ll definitely feel like you’ve treated yourself with every cheesy bite!
There you have it! The ultimate Cheeseburger French Fry Casserole that brings joy, warmth, and laughter to every meal. So tie on your apron, roll up your sleeves, and let’s create some beautiful memories in your kitchen. Bon appétit!
PrintCheeseburger French Fry Casserole

A hearty casserole combining seasoned ground beef, crispy French fries, and melted cheddar cheese, perfect for weeknight meals.
- Prep Time: 15 minutes
- Cook Time: 35 minutes
- Total Time: 50 minutes
- Yield: 6 servings 1x
- Category: Main Course
- Method: Baking
- Cuisine: American
- Diet: Omnivore
Ingredients
- 1 pound ground beef
- 1 onion, chopped
- 2 cups frozen French fries
- 2 cups shredded cheddar cheese
- 1 can (10.5 oz) cream of mushroom soup
- 1/2 cup milk
- Salt and pepper to taste
- Pickles and mustard (optional, for serving)
Instructions
- Preheat your oven to 350°F (175°C).
- Brown the beef in a large skillet over medium heat, adding the chopped onion until browned and translucent (about 5-7 minutes).
- Season the mixture with salt and pepper to taste.
- Mix in the cream of mushroom soup and milk until combined.
- Layer half of the French fries in a greased baking dish, add the beef mixture, and top with a cup of cheddar cheese.
- Add the remaining French fries and the rest of the cheese on top.
- Bake for 30-35 minutes, until the cheese is bubbly and golden brown.
- Cool for a few minutes before serving.
Notes
Garnish with fresh parsley, sour cream, or green onions for an added touch. This casserole freezes well for leftovers.
Nutrition
- Serving Size: 1 serving
- Calories: 450
- Sugar: 2g
- Sodium: 600mg
- Fat: 24g
- Saturated Fat: 10g
- Unsaturated Fat: 10g
- Trans Fat: 1g
- Carbohydrates: 36g
- Fiber: 3g
- Protein: 22g
- Cholesterol: 70mg
Keywords: casserole, comfort food, cheeseburger, French fries, easy dinner
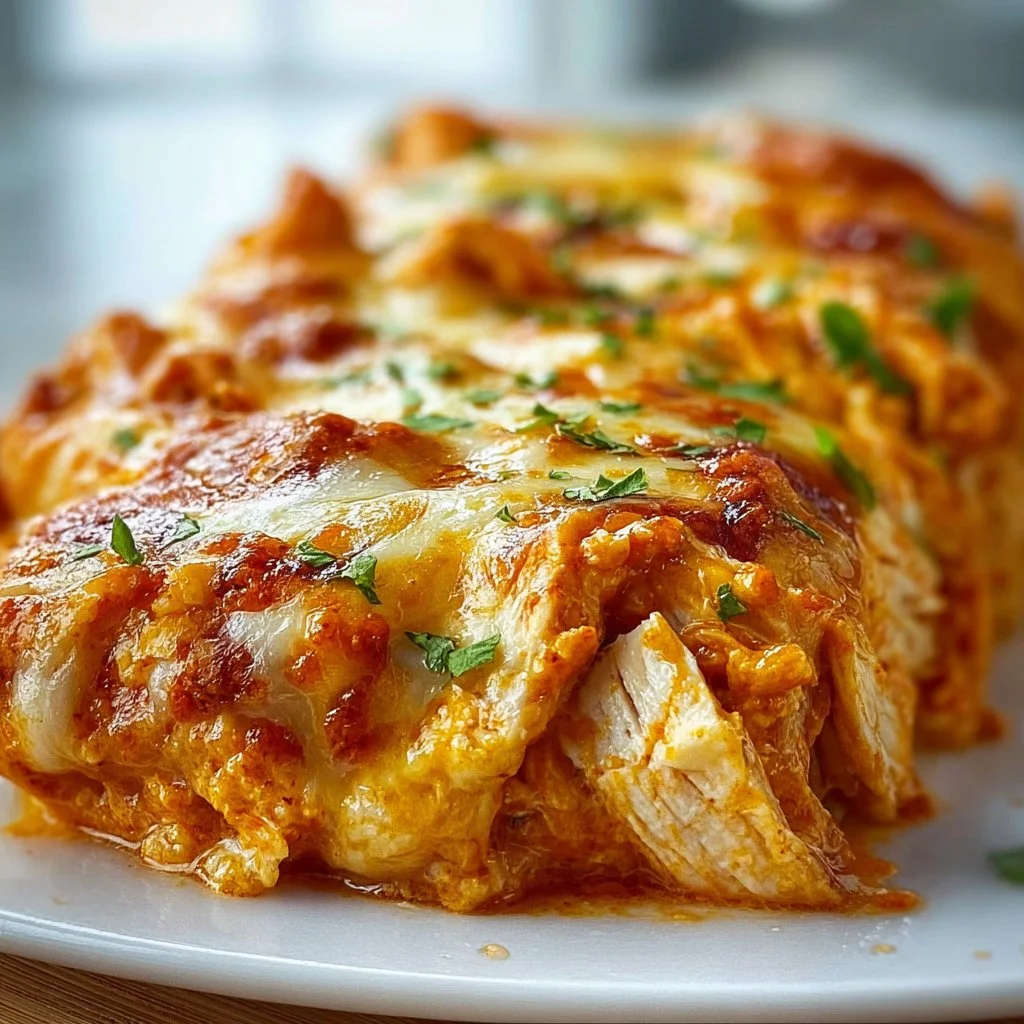
Buffalo Chicken Cheese Bake
Buffalo Chicken Cheese Bake: A Crowd-Pleasing Delight
Hello, food lovers! Today, we’re diving into a dish that’s near and dear to my heart—the Buffalo Chicken Cheese Bake. Imagine creamy, cheesy, spicy goodness all baked into one dish that’s perfect for any gathering. Picture this: you’re hosting a few friends for the big game or maybe a spontaneous movie night. You open your oven to unveil a bubbling, golden masterpiece that features the perfect blend of buffalo chicken and cheese. It’s comforting, it’s delicious, and it’s bound to impress!
The beauty of this dish lies not just in its flavor but also in its simplicity. It’s a recipe that encourages connection and sharing, making it perfect for any occasion—whether you’re celebrating a birthday, hosting a casual get-together, or just enjoying a relaxed evening at home. So, grab your apron, and let’s get cooking!
A Blast from the Past
I remember the first time I tried buffalo chicken dip at a friend’s gathering. It was love at first bite! The way the creamy cheese melded with the zesty buffalo sauce while the warmth enveloped me—it was the ultimate comfort food. My friend’s easy-going hosting style inspired me to experiment with this classic dish, transforming it from a dip into a hearty bake that brings a cozy vibe to any table.
Each time I prepare this Buffalo Chicken Cheese Bake, I conjure up memories of laughter filling the space, good-natured teasing over who will finish the last bite, and, of course, the inevitable debate about whether blue cheese or ranch dressing reigns supreme. This recipe captures all that nostalgia and delivers it in a comfort-filled casserole.
Ingredients
Here’s what you’ll need for this mouthwatering dish:
-
2 cups cooked chicken, shredded
Rotisserie chickens work like a charm here or simply boil or roast chicken breasts until cooked through. It can also be swapped with shredded turkey for a post-holiday twist! -
1 cup buffalo sauce
You can use your favorite brand or homemade buffalo sauce. If you prefer a milder flavor, whisk in a bit of sour cream to tone it down. -
2 cups cream cheese, softened
This is the secret to the dish’s creaminess! If you want a healthier option, you can substitute with Greek yogurt, though the texture will be a tad different. -
1 cup shredded cheddar cheese
Sharp cheddar provides a deeper flavor. If you’re feeling adventurous, try a pepper jack cheese for an extra kick! -
1 cup shredded mozzarella cheese
This cheese adds that gooey stretch we all love. Feel free to swap in provolone for a different flavor profile. -
1/2 cup ranch dressing
The coolness of ranch balances the heat perfectly. If you like blue cheese, go ahead and use that instead for a more traditional buffalo flavor. -
1/2 cup green onions, chopped
These add color and a fresh crunch. If green onions aren’t your favorite, finely chopped celery can make a great substitute. -
Salt and pepper to taste
Always taste your dish as you go! Feel free to adjust the seasoning to your liking. -
Tortilla chips or celery sticks for serving
Classic choices for dipping! You could also serve it with pita chips or sliced veggies for a crunchy bite.
Step-by-Step Instructions
Now that we have our ingredients ready, let’s get started on creating this fantastic dish!
-
Preheat Your Oven:
Preheat your oven to 350°F (175°C). This ensures that your dish gets all warm and bubbly, just like you want it. -
Mix the Creamy Base:
In a large mixing bowl, combine the softened cream cheese and ranch dressing. Use a hand mixer or a spatula to blend them together until they’re smooth and creamy. Probably one of the easiest steps, and you can already start smelling the creamy goodness. -
Add the Chicken and Sauce:
Toss in your shredded chicken and buffalo sauce. Stir until everything is well-combined. The chicken should be coated in the beautiful orange sauce. Oh, and don’t be afraid to taste it; you need to make sure it’s up to par! -
Cheesy Goodness:
Now fold in half of the shredded cheddar and half of the mozzarella cheese. This will make the filling incredibly cheesy and delicious. I like to save the other half for the top because who doesn’t love a golden, bubbly cheese layer? -
Transfer to Baking Dish:
Grease a 9×13 inch (or similar-sized) baking dish. Spread your cheesy, buffalo chicken mixture evenly across the dish. Smooth the top with a spatula for an even bake—this is your canvas! -
Top It Off:
Sprinkle the remaining cheddar and mozzarella cheese over the top. You want it to look cheesy, bubbly, and irresistible. If you’re feeling adventurous, throw in some extra green onions for garnish at this point too! -
Bake Time:
Pop it in the preheated oven and bake for about 25-30 minutes or until the cheese is melted and bubbly. Keep an eye on it; your kitchen will smell amazing, and you’ll want to dive in right away—it’s a tease! -
Cool and Serve:
Once baked, let it cool for a few minutes. This will allow the cheese to set slightly, making it easier to serve. Grab your tortilla chips or celery sticks and get ready to enjoy!
Serving Suggestions
When serving your Buffalo Chicken Cheese Bake, consider a rustic presentation. You could place it right in the center of your dining table as a communal dish, encouraging everyone to dig in. Pair it with a side of extra buffalo sauce or ranch dressing for dipping—because who doesn’t love extra sauce? Just sprinkle some extra chopped green onions on top to add a pop of color and freshness!
Recipe Variations
Here are a few creative twists and alternatives you can try:
-
Vegetarian Option: Swap shredded chicken with chickpeas or cauliflower. Add in some extra spices to replicate that buffalo flavor without the meat.
-
Spicy Twist: If you love heat, add chopped jalapeños or a dash of cayenne pepper to the mix.
-
BBQ Chicken Bake: Substitute buffalo sauce with your favorite BBQ sauce for a smoky flavor.
-
Add Veggies: Throw in some diced bell peppers or spinach for a bit of green, adding both nutrition and color to your dish.
-
Cheesy Mix: Use different types of cheese—try gouda or smoked cheddar for a unique flavor profile.
Chef’s Notes
I absolutely love how versatile this recipe can be! Over the years, I’ve adapted it based on whatever ingredients I have on hand. The best part is, no matter the variation, it’s always a hit! I remember one night making this for a last-minute get-together, and I only had cream cheese and cheddar left in my fridge. I swapped out ranch for a bit of sour cream and winged it. It turned out fantastic! That little adventure turned into one of my go-to quick recipes.
FAQs and Troubleshooting
1. My cheese isn’t melting properly; what did I do wrong?
This can happen if your cheese is too cold when you put it in the oven. Make sure to let your cream cheese come to room temperature and consider mixing in your cheese while the chicken mixture is warm.
2. Can I make this ahead of time?
Absolutely! You can prepare the dish up to the baking step, cover it tightly with plastic wrap, and store it in the fridge for up to 24 hours. Just add a few minutes to the baking time if it’s coming directly from the refrigerator.
3. What if it’s too spicy?
If you find that the buffalo sauce is too hot, mix in a touch of sour cream or an additional layer of cream cheese to tone it down. It won’t lose the flavor, just become milder.
4. How do I store leftovers?
Store any leftovers in an airtight container in the fridge for up to three days. To reheat, pop it back in the oven or microwave until warmed through, adding a splash of milk or cream to bring back the creamy texture.
Nutritional Info
Note: Nutritional values will vary based on specific ingredients used. This dish serves about 6-8 people, and each serving provides approximately:
- Calories: 450
- Protein: 28g
- Carbohydrates: 14g
- Fat: 32g
So there you have it—my Buffalo Chicken Cheese Bake recipe, packed with nostalgia and lots of melting cheese! I hope this brings as much joy to your table as it has to mine. Remember, good food isn’t just about the ingredients; it’s about the moments you create while enjoying it. So gather your friends, tie on your apron, and let’s make some delicious memories together! Enjoy, and happy cooking!
PrintBuffalo Chicken Cheese Bake

A creamy and cheesy buffalo chicken bake that’s perfect for gatherings, combining shredded chicken, spicy buffalo sauce, and melted cheese.
- Prep Time: 10 minutes
- Cook Time: 30 minutes
- Total Time: 40 minutes
- Yield: 6-8 servings 1x
- Category: Appetizer
- Method: Baking
- Cuisine: American
- Diet: None
Ingredients
- 2 cups cooked chicken, shredded
- 1 cup buffalo sauce
- 2 cups cream cheese, softened
- 1 cup shredded cheddar cheese
- 1 cup shredded mozzarella cheese
- 1/2 cup ranch dressing
- 1/2 cup green onions, chopped
- Salt and pepper to taste
- Tortilla chips or celery sticks for serving
Instructions
- Preheat your oven to 350°F (175°C).
- Mix the softened cream cheese and ranch dressing in a large mixing bowl until smooth and creamy.
- Add your shredded chicken and buffalo sauce, and stir until well combined.
- Fold in half of the shredded cheddar and half of the mozzarella cheese.
- Transfer the mixture to a greased 9×13 inch baking dish.
- Top with the remaining cheddar and mozzarella cheese.
- Bake for about 25-30 minutes or until the cheese is melted and bubbly.
- Cool for a few minutes before serving with tortilla chips or celery sticks.
Notes
For a vegetarian option, swap shredded chicken with chickpeas or cauliflower. For a spicy twist, add chopped jalapeños or cayenne pepper.
Nutrition
- Serving Size: 1 serving
- Calories: 450
- Sugar: 3g
- Sodium: 820mg
- Fat: 32g
- Saturated Fat: 18g
- Unsaturated Fat: 8g
- Trans Fat: 0g
- Carbohydrates: 14g
- Fiber: 1g
- Protein: 28g
- Cholesterol: 90mg
Keywords: buffalo chicken, cheese bake, comfort food, party recipe, appetizer

Pineapple Chicken Kabobs
# Pineapple Chicken Kabobs: A Taste of Sunshine on a Stick

## Introduction

Hello, fellow food lovers! Today, I’m excited to share a flavor-packed recipe that captures the essence of sunshine and joy: **Pineapple Chicken Kabobs**. These vibrant skewers are not just a feast for the eyes but a delightful combination of succulent chicken, juicy pineapple, and colorful bell peppers, all drizzled in a tangy-sweet marinade. Whether you're firing up the grill, hosting a casual summer gathering, or simply trying to make weeknight dinners a little more exciting, these kabobs will bring a burst of flavor that will have everyone asking for seconds!

What makes kabobs so special is their versatility. Imagine sitting around a warm flame, the sound of laughter mingling with the sizzling of those juicy bites. Cooking kabobs is a chance to get a little creative; you can mix and match your favorite ingredients and flavors. Plus, they’re fun to eat! There’s something inherently joyful about gnawing on tender chicken skewers, with the sweet tropical notes of pineapple dancing on your palate.

When I think of kabobs, I’m always reminded of one summer evening when my family gathered in the backyard for a barbecue. We spent the afternoon preparing our ingredients, marinating chicken, and chatting about our day. Those moments are priceless. Now, let’s gather our ingredients, roll up our sleeves, and create some culinary magic together.

## Personal Story

I’ll never forget the magical summers spent at my grandparents’ house, where the scent of grilled food seemed to linger in the air. My grandmother, a culinary wizard, would prepare her famous skewers, each one lovingly crafted with her hands. She taught me the art of marinating and the secret to perfectly grilled chicken — it was all about patience and a good dose of love (and maybe a splash of soy sauce!).

One evening, as we were assembling our skewers, my grandmother challenged me to create my own flavor combination. I paired sweet pineapple with savory chicken and a touch of honey to tie it all together. That night, surrounded by family and laughter, I savored my creation. It was one of those moments that solidified my love for cooking, where food became not just sustenance but a canvas for memories. Now, every time I grill pineapple chicken kabobs, I’m transported back to that summer evening, the taste of joy in every bite.

## Ingredients

To whip up your delicious Pineapple Chicken Kabobs, here’s what you’ll need:

- **2 chicken breasts, cut into chunks**
  A lean protein source, chicken breast soaks up marinades beautifully. You can also swap it out for boneless thighs for a juicier bite.

- **1 cup fresh pineapple, cut into pieces**
  These little morsels add sweetness and acidity, balancing the savory flavors perfectly. If fresh pineapple isn't available, canned works in a pinch, but be sure to drain it well!

- **1 bell pepper, cut into squares**
  Choose your favorite color — red, yellow, or green. Each brings a unique flavor and vibrancy. You could also toss in zucchini, mushrooms, or cherry tomatoes if you’re feeling adventurous!

- **1/4 cup soy sauce**
  This salty umami powerhouse acts as the backbone of our marinade. For a gluten-free version, opt for tamari or coconut aminos.

- **2 tablespoons olive oil**
  It adds richness and helps the marinade cling to the chicken. If you're looking for a different flavor profile, try sesame oil for an Asian twist.

- **2 tablespoons honey**
  A touch of sweetness that caramelizes beautifully on the grill. Maple syrup is a great substitute if you’re out of honey.

- **1 teaspoon garlic powder**
  For that classic garlicky punch! Fresh minced garlic is a nice swap but keep in mind it is stronger — start with a smaller amount.

- **1 teaspoon fresh ginger, grated**
  This adds a warm, zesty kick. Ground ginger can substitute in a pinch, but fresh is always best for that vibrant flavor.

- **Salt and pepper to taste**
  These essential seasonings elevate the dish, so don’t skimp. Remember, you can always adjust to your taste!

- **Skewers (wooden or metal)**
  Soak wooden skewers in water for 30 minutes prior to grilling to prevent burning. Metal skewers are great for reusability!

## Step-by-Step Instructions

Now that we have our ingredients prepped and ready, let’s dive into the cooking process and create some magic on those skewers!

**Step 1: Marinate the Chicken**
In a medium bowl, whisk together the soy sauce, olive oil, honey, garlic powder, and grated ginger. This will be our marinade. Add the chicken chunks, ensuring they are fully coated. Cover the bowl with plastic wrap and let it marinate in the refrigerator for at least 30 minutes, or up to four hours for optimal flavor.

> **Chef Hack:** If you’re short on time, even a quick 15-minute soak can make a difference. Just be cautious not to marinate too long, as the soy sauce can make the chicken a bit too salty.

**Step 2: Prepare Your Skewers**
While the chicken marinates, prep your vegetables! Chop the bell peppers and pineapple into even pieces. This will help them cook evenly on the grill.

> **Tip:** A serrated knife makes cutting through the tough skin of fresh pineapple a breeze!

**Step 3: Skewer the Ingredients**
Once the chicken has marinated, it’s time to assemble the kabobs! Thread the chicken, pineapple, and bell pepper onto the skewers, alternating them for a beautiful presentation. Aim for about 4-5 pieces of chicken per skewer for a good balance.

> **Chef Insight:** Ensure not to pack the ingredients too tightly; they need space to cook evenly and achieve that smoky char we all love.

**Step 4: Preheat the Grill**
Heat your grill to medium-high. If you’re using an outdoor grill, give it a few minutes to reach that perfect temperature. For indoor grills or grill pans, medium heat works great too.

**Step 5: Grill the Kabobs**
Place the skewers onto the grill and cook for about 10-15 minutes, turning occasionally. You want the chicken to reach an internal temperature of 165°F, while the pineapple gets that lovely caramelization.

> **Tip:** If you notice the edges of the pineapple starting to char too quickly, you can move them to a cooler part of the grill.

**Step 6: Rest and Serve**
Once the kabobs are cooked to perfection, remove them from the grill and let them rest for a few minutes. This allows the juices to redistribute throughout the chicken, making every bite juicy and flavorful.

## Serving Suggestions

To serve, place those dazzling kabobs on a beautiful platter. I love to drizzle a little extra honey or a splash of lime juice over the top to enhance the flavors. You could also sprinkle some chopped fresh herbs like cilantro or parsley for a pop of color and freshness. Pair with a side of fluffy rice, a vibrant salad, or your favorite dipping sauce for a complete meal that’s not just delicious but also beautifully presented!

## Recipe Variations

Feeling a bit adventurous? Here are some fun variations to switch things up:

1. **Tropical Twist**: Add chunks of mango or shrimp in place of some chicken or alongside for a fruity seafood delight!
2. **Spice It Up**: Toss in a few slices of jalapeño or sprinkle some red pepper flakes for a zesty kick.
3. **Veggie-Heavy**: Load the skewers with plenty of seasonal veggies like zucchini, cherry tomatoes, or red onion for a vegetarian kabob sensation.
4. **Herb-Infused**: Marinate the chicken with fresh herbs like basil or rosemary instead of ginger for a different flavor profile.
5. **Dijon Delight**: Replace honey with Dijon mustard for a tangy twist that pairs well with the sweetness of pineapple!

## Chef’s Notes

One of the things I love about kabobs is their ability to evolve. This recipe has gone through many iterations over the years as I explored different flavor profiles and ingredient pairings. I even crafted a “Mediterranean” version once with marinated eggplant and feta cheese, which was equally delicious!

And you know what? The joy of kabobs isn’t just in the flavor; it’s in the gathering. I've had friends over for kabob nights where everyone brings a different ingredient to contribute. We’ve not only created a meal, but we’ve also fostered connection and fun — and that’s what it’s all about!

## FAQs and Troubleshooting

**1. My chicken is dry! What went wrong?**
If your chicken turns out dry, it may have been overcooked. Always use a meat thermometer to check the internal temperature. For juicy bites, remove the kebabs immediately once they hit 165°F.

**2. Can I make these in the oven?**
Absolutely! Preheat your oven to 400°F and place the skewers on a baking sheet lined with parchment paper. Bake for about 15-20 minutes, turning halfway through for even cooking.

**3. What should I do if I don’t have skewers?**
No problem! You can grill the chicken and vegetables directly on a grill pan or use a baking dish in the oven. Just be sure to toss everything with the marinade!

**4. How do I store leftovers?**
Store any leftover kabobs in an airtight container in the fridge for up to three days. Reheat in the oven or on the grill for about 5-10 minutes to warm through.

## Nutritional Info

(If applicable, typical nutritional information could include calories, protein, fat, carbs, etc. This part is optional).

---

And there you have it—the ultimate guide to making Pineapple Chicken Kabobs! I hope this recipe inspires you to gather friends and family, put on that ivory apron, and create your own delicious memories together. Happy cooking!
Pineapple Chicken Kabobs

Delightful kabobs featuring succulent chicken, juicy pineapple, and colorful bell peppers, all drizzled with a tangy-sweet marinade.
- Prep Time: 30 minutes
- Cook Time: 15 minutes
- Total Time: 45 minutes
- Yield: 4 servings 1x
- Category: Main Course
- Method: Grilling
- Cuisine: American
- Diet: Gluten-Free
Ingredients
- 2 chicken breasts, cut into chunks
- 1 cup fresh pineapple, cut into pieces
- 1 bell pepper, cut into squares
- 1/4 cup soy sauce
- 2 tablespoons olive oil
- 2 tablespoons honey
- 1 teaspoon garlic powder
- 1 teaspoon fresh ginger, grated
- Salt and pepper to taste
- Skewers (wooden or metal)
Instructions
- Marinate the Chicken: In a medium bowl, whisk together the soy sauce, olive oil, honey, garlic powder, and grated ginger. Add the chicken chunks and let it marinate in the refrigerator for at least 30 minutes.
- Prepare Your Skewers: While the chicken marinates, chop the bell peppers and pineapple into even pieces.
- Skewer the Ingredients: Thread the chicken, pineapple, and bell pepper onto the skewers, alternating them for a beautiful presentation.
- Preheat the Grill: Heat your grill to medium-high.
- Grill the Kabobs: Place the skewers onto the grill and cook for about 10-15 minutes, turning occasionally, until the chicken is fully cooked.
- Rest and Serve: Remove the kabobs from the grill and let them rest for a few minutes before serving.
Notes
Consider drizzling with honey or lime juice before serving and garnishing with fresh herbs.
Nutrition
- Serving Size: 1 skewer
- Calories: 300
- Sugar: 8g
- Sodium: 600mg
- Fat: 10g
- Saturated Fat: 1.5g
- Unsaturated Fat: 8g
- Trans Fat: 0g
- Carbohydrates: 28g
- Fiber: 2g
- Protein: 25g
- Cholesterol: 70mg
Keywords: kabobs, chicken, pineapple, grilling, summer recipes, party food
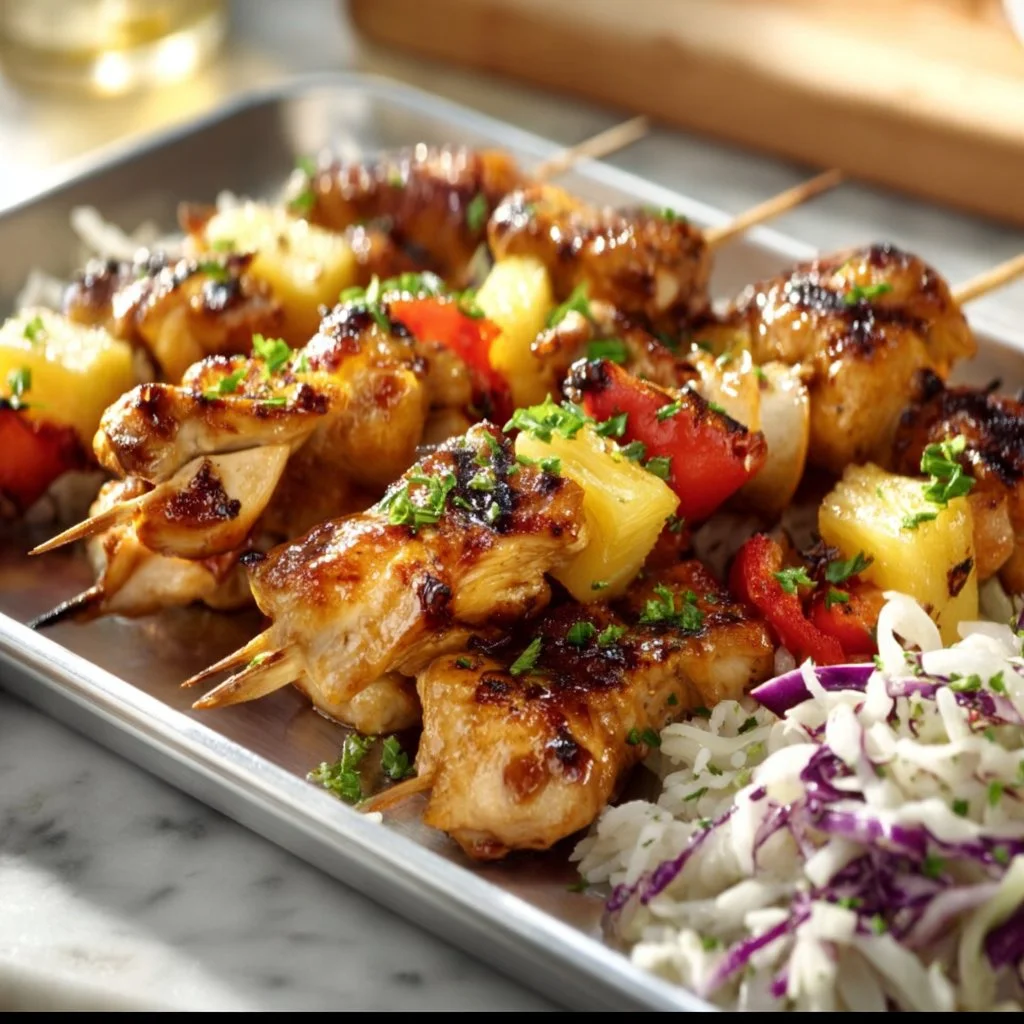
Easy Hawaiian Chicken Kabobs
# Easy Hawaiian Chicken Kabobs: A Tropical Escape on a Stick

## Introduction

Aloha, food friends! 🌺 If you’re in the mood to take your taste buds on a little tropical vacation, you’ve landed in the right place. Today, we’re diving into the delightful world of **Easy Hawaiian Chicken Kabobs**. These kabobs are not just a meal; they’re an experience. With a sweet and savory glaze that brings the flavors of the islands to your table, they’re perfect for summer barbecues, family dinners, or even a cozy nighttime grill session.

Picture this: the sun is setting, the smell of grilled chicken wafts through the air, mingling with juicy pineapple, and laughter fills the backyard. These kabobs are not just about food; they’re about creating beautiful moments with family and friends. The best part? They are oh-so-easy to whip up, so you can focus more on the company around your table and less on the kitchen chaos.

At Ivory Apron, we believe that cooking should feel elegant but never intimidating. With just a handful of ingredients and a few simple steps, you’ll be on your way to having a delicious feast that looks like you’ve been slaving away in the kitchen—without all the effort!

So, grab your apron and let’s get cooking. I promise you’ll be wanting to make these kabobs over and over again!

## Personal Story

I’ll never forget the summer of my ninth birthday. My parents threw a luau-themed party in our backyard, complete with hula decorations, grass skirts, and a whole lot of tropical flair. My favorite part? The food! We had a feast of grilled chicken marinated in pineapple juice and soy sauce, fresh fruit skewers, and a coconut cake that was to die for. I remember running around with my friends, our fingers sticky from juicy fruits and messy BBQ sauce, laughing and playing until the sun went down. It was the shining highlight of my childhood, a magical day where food and fun came together.

As I grew older and started hosting my own gatherings, I often looked back to that unforgettable birthday party for inspiration. Those kabobs became a staple in my recipe repertoire. They are just as vibrant and festive as I remember, and every bite takes me back to those carefree sunny days. The other goal? To recreate that feeling of joy and connection through food for those I host.

## Ingredients

Let’s talk about what you’ll need to create these Hawaiian Chicken Kabobs, and a few handy tips along the way:

- **3/4 cup pineapple juice**: This sweet nectar is the key to bringing that island vibe! You can use store-bought juice or, better yet, fresh juice for a more vibrant flavor. If you don’t have pineapple juice, orange juice works in a pinch.

- **1/2 cup coconut aminos**: A scrumptiously savory alternative to soy sauce, it provides a hint of sweetness and umami without soy. If you can’t find coconut aminos, low-sodium soy sauce or tamari will work, although the flavor profile will shift slightly.

- **1/2 cup ketchup**: This adds a rich sweetness and thickness to your sauce. If you’re looking for a healthier option, try substituting with a homemade tomato sauce or ketchup made with less sugar.

- **1/2 cup brown sugar**: Sweetness is essential for balance in this dish. You can substitute with honey or maple syrup, however, you may need to adjust the liquid ratios in your marinade.

- **2 tablespoons Frank’s Red Hot sauce**: This adds just a touch of heat and a tangy kick! For a milder flavor, you could use a little less or swap it with a sweet chili sauce.

- **1 tablespoon minced garlic**: Fresh garlic is always the way to go! If you’re in a hurry, you can use garlic powder, but fresh gives off a more vibrant aroma.

- **1 tablespoon minced ginger**: The fragrant and zesty punch of ginger enhances the flavor profile. You can use ground ginger as a substitute, but fresh is always preferred for that zing!

- **1 1/2 lbs chicken thighs (skinless and boneless)**: Chicken thighs are juicy and forgiving, making them perfect for grilling. If you prefer, chicken breasts can also be used, though they are leaner and might dry out more easily.

- **20 oz can pineapple chunks**: These not only add sweetness but juiciness to the kabobs. If fresh pineapple is available, feel free to use it! Just be sure to cut it into similar-sized chunks.

- **6 kabob skewers**: If you’re using wooden skewers, don’t forget to soak them in water for 30 minutes to prevent burning on the grill. Metal skewers are reusable and fit the eco-friendly bill!

- **Sea salt and black pepper (to taste)**: Essential seasonings for bringing out the best flavors in your dish.

## Step-by-Step Instructions

1. **Prepare the Marinade**: In a mixing bowl, whisk together the pineapple juice, coconut aminos, ketchup, brown sugar, Frank’s Red Hot sauce, minced garlic, and minced ginger until smooth. This is where the magic happens! You’re creating a balance of sweetness and zing that embodies tropical flavors.

2. **Marinate the Chicken**: Place the chicken thighs in a resealable plastic bag or a bowl. Pour about two-thirds of the marinade over the chicken, toss to coat, and seal the bag or cover the bowl. Let it marinate in the fridge for at least 30 minutes, but ideally, a couple of hours will let those flavors simmer through the chicken.

3. **Prep the Pineapple**: If you’re using canned pineapple, drain and pat the chunks dry with paper towels to avoid excess moisture. If you’re using fresh pineapple, cut it into bite-sized pieces to match the chicken.

4. **Skewering Time!**: Preheat your grill to medium-high heat. Thread the marinated chicken thighs and pineapple chunks alternately onto the skewers. Leave a little space between each piece for even cooking. I like to place a piece of chicken, then a chunk of pineapple, and repeat!

5. **Grilling**: Lightly oil the grill grates before placing your kabobs on. Grill the skewers for about 10-15 minutes, turning occasionally, until the chicken is cooked through and has beautiful grill marks. This is where you’ll want a basting brush handy to apply the reserved marinade for the last few minutes of grilling! This not only reinforces flavor but makes the kabobs shiny and appealing.

6. **Serve**: Once cooked, remove the kabobs from the grill and let them rest for a few minutes. This allows the juices to redistribute, making each bite succulent. Drizzle any remaining marinade over the kabobs for an extra layer of flavor.

## Serving Suggestions

When it comes to plating these Hawaiian Chicken Kabobs, let’s keep it fun and vibrant! Serve them on a large platter surrounded by fresh greenery like cilantro or mint for that tropical vibe. A bowl of extra pineapple chunks and lime wedges will add a refreshing touch on the side. You can also pair these kabobs with a coconut rice or a light salad to create a perfect meal that embodies the essence of summer!

## Recipe Variations

Feel like switching things up? Here are some delicious variations you can try:
1. **Veggie Kabobs**: Add bell peppers, red onions, and zucchini for a colorful vegetarian option. Marinate the veggies in the same sauce for a cohesive flavor.

2. **Teriyaki Twist**: Swap out the marinade for a teriyaki sauce for a different flavor profile. Just ensure to balance the sweetness with some lime juice!

3. **Pineapple Salsa Topping**: Top your kabobs with a fresh pineapple salsa made of diced pineapple, jalapeño, red onion, and cilantro for an explosion of freshness.

4. **Spicy Mango**: Spice things up by adding fresh mango chunks instead of pineapple. The sweet and spicy combo will leave your tastebuds dancing!

5. **Gluten-Free Option**: For a gluten-free rendition, simply substitute coconut aminos with tamari or a gluten-free soy sauce.

## Chef’s Notes

Over the years, my Hawaiian Chicken Kabobs have evolved into different variations, but the heart of the recipe remains the same—delicious, vibrant, and easy to make. I once made these for a potluck, and someone accidentally spilled half the marinade on one of the kabobs just before grilling. Rather than toss it, I grilled it anyway. And guess what? It turned out to be the star of the show! Sometimes, culinary accidents can create delightful surprises, so don’t be afraid to experiment!

The best tip? Always taste as you go. Cooking is an evolving art, and finding your flavor balance is part of the joy of being in the kitchen.

## FAQs and Troubleshooting

1. **What if my chicken is dry?**
   - Overcooking is often the culprit for dry chicken. Chicken thighs are more forgiving than breasts, but it’s always good to use a meat thermometer; aim for an internal temperature of 165°F for perfectly juicy chicken!

2. **Can I use frozen chicken?**
   - Yes, but you’ll want to fully thaw your chicken thighs first to ensure an even marinade and cooking. When in doubt, marinate overnight for the best flavor absorption!

3. **What sides pair well?**
   - Fresh coleslaw, grilled corn on the cob, or a cooling cucumber salad complement these kabobs beautifully. A tropical fruit salad makes a colorful and refreshing addition!

4. **How do I store leftovers?**
   - These kabobs can be stored in an airtight container in the fridge for up to 3 days. Simply reheat gently in the oven or on a stovetop grill for the best results.

## Nutritional Info (per serving)

- Calories: Approx. 280
- Total Fat: 7g
- Saturated Fat: 2g
- Cholesterol: 84mg
- Sodium: 640mg
- Total Carbohydrates: 27g
- Dietary Fiber: 1g
- Sugars: 15g
- Protein: 28g

---

Well, there you have it! A tropical delight that’s sure to impress—whether it’s at a family gathering or a cozy dinner for two. Let these Easy Hawaiian Chicken Kabobs take you on a flavorful journey to the islands, allowing you to connect over good food and even better company. Happy cooking, and remember, every meal is a chance to create memories!
Easy Hawaiian Chicken Kabobs
Delicious Hawaiian Chicken Kabobs with a sweet and savory glaze, perfect for summer gatherings.
- Prep Time: 15 minutes
- Cook Time: 15 minutes
- Total Time: 30 minutes
- Yield: 4 servings 1x
- Category: Main Course
- Method: Grilling
- Cuisine: Hawaiian
- Diet: Paleo
Ingredients
- 3/4 cup pineapple juice
- 1/2 cup coconut aminos
- 1/2 cup ketchup
- 1/2 cup brown sugar
- 2 tablespoons Frank’s Red Hot sauce
- 1 tablespoon minced garlic
- 1 tablespoon minced ginger
- 1 1/2 lbs chicken thighs (skinless and boneless)
- 20 oz can pineapple chunks
- 6 kabob skewers
- Sea salt and black pepper (to taste)
Instructions
- Prepare the Marinade: In a mixing bowl, whisk together the pineapple juice, coconut aminos, ketchup, brown sugar, Frank’s Red Hot sauce, minced garlic, and minced ginger until smooth.
- Marinate the Chicken: Place the chicken thighs in a resealable plastic bag or a bowl. Pour about two-thirds of the marinade over the chicken, toss to coat, and seal the bag or cover the bowl.
- Prep the Pineapple: If you’re using canned pineapple, drain and pat the chunks dry with paper towels.
- Skewering Time!: Preheat your grill to medium-high heat. Thread the marinated chicken thighs and pineapple chunks alternately onto the skewers.
- Grill: Lightly oil the grill grates before placing your kabobs on. Grill the skewers for about 10-15 minutes, turning occasionally.
- Serve: Once cooked, remove the kabobs from the grill and let them rest for a few minutes.
Notes
For best flavor, marinate the chicken for at least 30 minutes, ideally a couple of hours. Adjust the spices according to your taste.
Nutrition
- Serving Size: 2 skewers
- Calories: 280
- Sugar: 15g
- Sodium: 640mg
- Fat: 7g
- Saturated Fat: 2g
- Unsaturated Fat: 3g
- Trans Fat: 0g
- Carbohydrates: 27g
- Fiber: 1g
- Protein: 28g
- Cholesterol: 84mg
Keywords: kabobs, chicken, Hawaiian, summer recipes, grilling, easy recipes, tropical
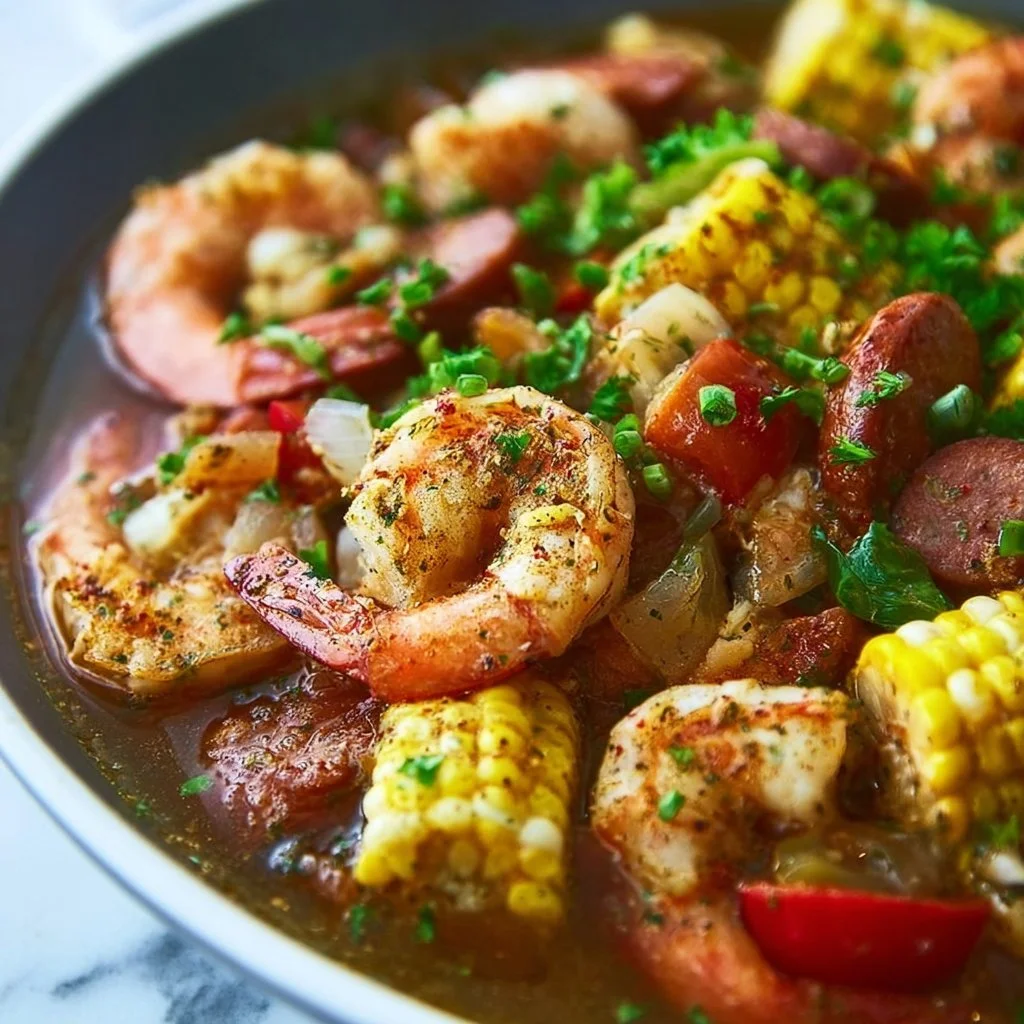
Slow Cooker Shrimp Boil
# Slow Cooker Shrimp Boil: An Effortless Feast

## Introduction

Hey, fellow food lovers! If you’re looking for a laid-back, crowd-pleasing dinner that has all your favorite flavors, you’ve landed in the right place. Today, we're diving into the world of a classic Southern tradition with a twist: a Slow Cooker Shrimp Boil! Picture this — succulent shrimp, tender potatoes, zesty sausage, and sweet corn all melting together in a symphony of flavors. Yep, it’s about to get delicious!

Now, I know what you might be thinking. "A shrimp boil? Isn’t that complicated?" Well, let me assure you, my friend, it doesn't have to be! With the trusty slow cooker, you can kick back and enjoy the aroma of the sea as it fills your kitchen while you prepare for a cozy dinner with friends or family. Plus, the most beautiful part of cooking is sharing a meal that bonds us together, so let’s make sure it’s a celebration worth remembering!

In this blog post, I'll guide you through my personal touch on the shrimp boil, along with stories that will make you smile, tips that’ll keep you cooking like a pro, and of course, that easy-breezy shine of effortless elegance that I strive for here at Ivory Apron. So, grab your apron, prepare to be whisked away to seaside vibes, and let’s get cooking!

## Personal Story

This shrimp boil holds a special place in my heart, just like the sun-drenched summer days spent at my grandparents' beach house. Every Fourth of July, the tradition was simple yet magical: a huge pot simmering outside, the sound of laughter floating through the salty air, and friends and family gathered around with makeshift tables made of picnic blankets.

I can still picture my uncle Mike proudly wearing his oversized bib, ready to tackle the feast. The dogs would trot around, hoping for a stray corn kernel, and my grandmother would squeeze lemon over the spicy, juicy shrimp, urging us all to dig in. There was something undeniably satisfying about the communal spirit of a shrimp boil — hands messy, laughter loud, and everyone instantly transformed into a family.

When I moved away and began hosting my own gatherings, I wanted to capture that same spontaneous joy. Thus, the slow cooker version was born! It allows me to recreate those cherished memories without the fuss of standing over a boiling pot in the heat. Plus, it gives me time to relax and mingle with my guests, just like those sunny days at the beach.

## Ingredients

Let’s make sure you have everything you need to whip up this delectable dish. Here’s your shopping list, along with some tips for each ingredient:

- **1 pound shrimp, deveined**
  - Fresh or frozen works great! If using frozen shrimp, just be sure to thaw them in the fridge overnight. Can't find shrimp? Try substituting with chicken or even lobster for a twist.

- **2 pounds potatoes, quartered**
  - I love using small baby potatoes — they cook evenly and are so tender! If you’re short on time, you can use pre-cut potatoes. Sweet potatoes can also add a lovely sweetness to the dish.

- **1 pound smoked sausage, sliced**
  - Andouille is classic, but don’t hesitate to explore! Turkey sausage is a lighter option, or you could even try chorizo for a spicy kick.

- **4 ears corn, halved**
  - Fresh corn brings a sweetness that’s hard to beat. Canned corn can substitute in a pinch, but it will lack that crunch. If you can’t find corn on the cob, frozen corn works beautifully too.

- **2 tablespoons Old Bay seasoning**
  - This iconic blend is a must! If you can’t find Old Bay, try a mix of paprika, garlic powder, and a hint of cayenne for heat.

- **4 cups water**
  - For the best flavor, consider using seafood stock or vegetable broth instead!

- **Salt and pepper to taste**
  - A little seasoning goes a long way. Start with a pinch and adjust as you go; you can always add more, but you can’t take it out!

- **Lemon wedges (for serving)**
  - Fresh lemon brightens up the dish, so don’t skip it! A twist of lime also offers a delightful twist.

## Step-by-Step Instructions

Alright, let’s roll up those sleeves and get to cooking. This slow cooker shrimp boil is as simple as it gets, and I’ll guide you through each step.

1. **Prepare Your Ingredients**: Start by washing your potatoes and corn. Quarter those potatoes and cut the corn in half. Give your shrimp a good rinse if they’re fresh. You want them sparkling clean!

2. **Layer the Ingredients**: In your slow cooker, begin by adding the quartered potatoes. They’ll need a little more time to cook than the other ingredients, so we’re giving them a head start. Next, layer on the sausage slices — this is where the flavor starts to build!

3. **Add Corn and Water**: Toss the corn halves into the pot, followed by the Old Bay seasoning and the water (or stock if you opted for that). Make sure to stir a little to evenly distribute the spices — we want every bite packed with flavor!

4. **Set the Slow Cooker**: Cover the slow cooker and set it on low for about 4 hours. This is the beauty of slow cooking — you can go about your day and let those flavors meld beautifully without any fuss.

5. **Check the Potatoes**: After 4 hours, take a quick peek and poke the potatoes with a fork. If they’re tender, it’s time to add in your shrimp. If they need more time, let them go for another half hour or so.

6. **Shrimp Power!**: When the potatoes are just right, stir in the shrimp. They cook quickly, so just let them simmer for about 15-20 minutes on low until they turn pink and opaque. This is where the magic happens — they soak up all those fantastic flavors from the broth!

7. **Season to Taste**: Before serving, taste a bite! Add salt or pepper if needed to elevate those flavors. You can always add more Old Bay if you’re feeling adventurous!

8. **Plate It Up**: Once everything is cooked just right, you’re ready to serve. Carefully scoop out the shrimp, potatoes, corn, and sausage into a large bowl or platter, letting that juicy broth pool around the bottom.

## Serving Suggestions

Here’s where the fun really begins! Serve your slow cooker shrimp boil family-style on a big, beautiful platter. Don’t forget to garnish with the lemon wedges — they’re an essential part of the whole experience. Encourage everyone to dig in with their hands, just like our beach gatherings. If you want to bring a touch of elegance, consider laying down some parchment paper on the table to catch those flavorful drips.

Pair it with a crisp green salad or some crusty bread to soak up the tasty broth. And don’t skimp on the drinks — sparkling lemonade or a chilled white wine would complement this dish beautifully!

## Recipe Variations

Feeling creative? Here are a few fun variations you can try:

1. **Spicy Kick**: Add sliced jalapeños or sprinkle with red pepper flakes for some extra heat.
2. **Herbed Delight**: Toss in freshly chopped parsley or dill right before serving for a fresh finish.
3. **Cajun Twist**: Swap Old Bay for a Cajun seasoning blend to give it that southern flair.
4. **Veggie Boost**: Add bell peppers, zucchini, or even artichokes for a pop of color and nutrition!
5. **Gluten-Free Twist**: Make sure to choose gluten-free sausage and paired ingredients, if required!

## Chef's Notes

I remember my first attempts at hosting a shrimp boil; I was so eager to impress! I barely sat down, running back and forth to the kitchen. One time, I accidentally sent a guest in search of napkins, but they came back with a family-sized pack of paper towels instead! We had a good laugh, and from that moment on, I learned to embrace the chaos of hosting. This shrink boil has evolved through the years — adding personal touches from each gathering and transforming into a staple on my dining table.

Oh, and a little tip: don’t forget to enjoy the process! If you find yourself feeling stressed, slow down and savor the moments. That’s what cooking is all about — creating spaces for connection, laughter, and joy.

## FAQs and Troubleshooting

1. **Why did my shrimp turn out rubbery?**
   - Overcooking is the culprit! Be sure to add the shrimp toward the end of the cooking time. They're quick to cook, so keep an eye on them.

2. **Can I make this ahead of time?**
   - Absolutely! Prep your potatoes and sausage, and layer everything in the slow cooker. Cook it when you’re ready, or put it in the fridge and reheat it on low when it’s party time!

3. **What can I do with leftovers?**
   - You’re in luck! Use leftover shrimp and sausage in a pasta dish, stir them into a rice bowl, or throw them in an omelet for a tasty breakfast!

4. **How can I make it spicier?**
   - If you like the heat, be bold! Add some cayenne pepper to the Old Bay, or toss in those jalapeños mentioned earlier to elevate the flavor profile.

## Nutritional Info

Although I refrain from being overly focused on numbers, here's an approximate breakdown per serving:

- **Calories**: 350
- **Protein**: 25g
- **Carbohydrates**: 45g
- **Fat**: 12g

Remember, this recipe is about enjoying good food and good company, so take the nutritional info lightly and delight in the flavors!

---

Now that you’ve got everything you need to recreate this Slow Cooker Shrimp Boil, I can’t wait for you to gather your loved ones and serve it up! Cooking is such a beautiful experience, and I hope this dish brings you as much joy as it brings me. Here’s to heartfelt gatherings, flavorful adventures, and making memories around the table. Happy cooking!
Slow Cooker Shrimp Boil

A classic Southern shrimp boil made easy in a slow cooker, featuring shrimp, potatoes, sausage, and corn with zesty flavors.
- Prep Time: 15 minutes
- Cook Time: 240 minutes
- Total Time: 255 minutes
- Yield: 4 servings 1x
- Category: Main Course
- Method: Slow Cooking
- Cuisine: Southern
- Diet: Seafood
Ingredients
- 1 pound shrimp, deveined
- 2 pounds potatoes, quartered
- 1 pound smoked sausage, sliced
- 4 ears corn, halved
- 2 tablespoons Old Bay seasoning
- 4 cups water
- Salt and pepper to taste
- Lemon wedges (for serving)
Instructions
- Prepare your ingredients by washing the potatoes and corn, quartering the potatoes, and cutting the corn in half.
- Layer the quartered potatoes in the slow cooker, followed by the sausage slices.
- Add the corn halves, Old Bay seasoning, and water, stirring to distribute the spices.
- Set the slow cooker on low for about 4 hours.
- Check the potatoes for tenderness after 4 hours, and adjust cooking time if necessary.
- Add the shrimp when potatoes are tender, and let them simmer for 15-20 minutes until cooked through.
- Season to taste with salt and pepper before serving.
- Plate the shrimp, potatoes, corn, and sausage into a serving dish, enjoying the broth.
Notes
Serve family-style with lemon wedges and encourage guests to eat with their hands for a communal experience.
Nutrition
- Serving Size: 1 serving
- Calories: 350
- Sugar: 5g
- Sodium: 400mg
- Fat: 12g
- Saturated Fat: 4g
- Unsaturated Fat: 6g
- Trans Fat: 0g
- Carbohydrates: 45g
- Fiber: 3g
- Protein: 25g
- Cholesterol: 130mg
Keywords: shrimp boil, slow cooker, Southern cuisine, seafood recipe, easy dinner

Crockpot BBQ Chicken
Slow Cooker BBQ Chicken: A Savory Sensation for Any Gathering
Hey there, fellow food lovers! Welcome back to Ivory Apron, where the kitchen feels like home and cooking feels like an art. Today, I’m beyond excited to share one of my go-to recipes for those busy weeknights or laid-back weekends—Crockpot BBQ Chicken! This dish is perfect for cozy family dinners, entertaining guests, or even as meal prep for the week.
Picture this: It’s a warm evening; the sun is setting, casting a beautiful golden glow in your kitchen. You’ve tied on your favorite apron, and the tantalizing aroma of BBQ chicken wafts through the air, promising deliciousness. Not only does this dish deliver that mouthwatering flavor, but it’s also incredibly easy to make—just toss everything into the crockpot and let it work its magic!
I’ll take you through every step from preparation to serving, ensuring that you feel like a pro—even if it’s your first time in the kitchen. Whether you’re hosting a backyard BBQ or simply craving some comforting chicken sandwiches, this recipe is your ticket to culinary bliss. So grab your apron, and let’s get cooking!
Personal Story
Ah, BBQ chicken! It takes me back to those long summer evenings at my grandparents’ backyard; the grill was always fired up, and the laughter of family sprinkled the air. My grandmother would marinate the chicken in her secret BBQ sauce, letting it soak in that smoky-sweet flavor. I can still see my younger self stealing bites as it grilled, trying to sneak a taste of that delicious sauce.
When we moved our gatherings inside for some reason—perhaps a sudden summer storm or an unexpected drop in temperature—the crockpot came to the rescue. My mom would whip up her version of BBQ chicken, letting it simmer away while we played board games. It became a family favorite—something that was equally perfect for game night as it was for Sunday dinners. Now I get to share the joys of this dish with you, blending nostalgia with practicality in the modern kitchen.
Ingredients
Here’s what you’ll need to prepare this delectable dish:
-
4 Boneless, Skinless Chicken Breasts
These beauties are the heart of the dish! They’re tender, juicy, and soak up every ounce of flavor from the BBQ sauce. You can easily substitute with thighs if you prefer dark meat; they’re a bit richer in flavor and won’t dry out as easily. -
1 Cup BBQ Sauce
Choose your favorite brand or homemade variety! I love a classic sauce that balances sweetness and tanginess. If you’re feeling adventurous, try a spicy or smoky BBQ sauce for a flavor twist. -
1/4 Cup Chicken Broth
This adds moisture and richness without overwhelming the BBQ flavor. If you don’t have broth on hand, water or even apple cider can work—though that may change the flavor profile a bit. -
1 Tablespoon Worcestershire Sauce
This umami-packed sauce enhances the overall flavor and gives a depth that’s simply divine. If you’re avoiding it, soy sauce is an excellent substitute, though it may alter the flavor slightly. -
1 Teaspoon Garlic Powder
Garlic lovers rejoice! This ingredient adds a savory kick. If you have fresh garlic, feel free to substitute 2-3 minced cloves for an even fresher taste. -
1 Teaspoon Onion Powder
A must-have for that deep, aromatic taste. In a pinch, finely chopped onions or shallots can do the trick! -
Salt and Pepper to Taste
Essential for bringing all the flavors together. I recommend starting with a bit and adding more as needed during cooking. -
Buns for Serving (Optional)
These are a great way to turn your BBQ chicken into delicious sandwiches! Opt for soft brioche buns for a little luxury, or use whole grain for a healthier twist.
Step-by-Step Instructions
Here’s how to get your Crockpot BBQ Chicken ready for a glorious feast!
1. Prep Your Chicken
Begin by rinsing your chicken breasts under cold water, then pat them dry with paper towels. Drying them ensures better seasoning absorption and browning. Trim off any excess fat for a leaner dish.
2. Season and Layer
Sprinkle the chicken breasts with salt, pepper, garlic powder, and onion powder. Don’t be shy—seasoning is where flavor starts! Lay them in the bottom of the crockpot, making sure they’re arranged neatly in a single layer.
3. Mix Your Sauces
In a separate bowl, whisk together the BBQ sauce, Worcestershire sauce, and chicken broth until it’s well combined. This is where you can taste-test and adjust—add a pinch of chili powder or honey if you like!
4. Pour and Cover
Pour the mixture over the seasoned chicken, making sure they’re well coated. Pop the lid on your crockpot, set it to low heat, and let it do its magic for 6-8 hours. Pro tip: avoid lifting the lid during cooking! Every time you check, you lose precious heat and extend the cooking time.
5. Shred and Serve
When you’re ready to eat, carefully insert a fork or two into the chicken and shred it right in the pot! It should fall apart easily if cooked correctly. If you want a thicker sauce, keep the lid off for the last half hour and let it reduce.
6. Toast Your Buns
For that extra touch, pop some buns under the broiler for a minute or two until they’re delightfully toasted. A little butter before toasting goes a long way for flavor!
Serving Suggestions
Now that your BBQ chicken is ready, it’s time to serve! Pile the juicy, shredded chicken onto toasted buns, adding coleslaw or pickle slices for crunch if you like. Arrange them on a wooden cutting board surrounded by napkins for a rustic touch. It’s perfect for feeding a crowd.
Recipe Variations
Want to shake things up? Here are a few creative twists you can make with this recipe:
-
Spicy BBQ Chicken: Mix in some cayenne pepper or hot sauce into the BBQ sauce for a kick!
-
Honey Mustard Flavor: Swap out the BBQ sauce for honey mustard for a sweet-savory experience!
-
Greek Inspired: Add some oregano, lemon juice, and serve it in pita bread with tzatziki.
-
Veggie Lovers Delight: Toss in some halved bell peppers or onions while cooking for added veggies and flavor.
-
Low-Carb Option: Serve over lettuce instead of buns for a refreshing, low-carb alternative.
Chef’s Notes
Every time I make this recipe, I’m reminded of family gatherings and the love that food brings us together. There was one summer where I overestimated how hungry we all were—I had made way too much chicken! But instead of leftovers, my friends and family made unforgettable memories, serving the BBQ chicken in tacos, nachos, and even pizzas! Creativity flourishes in the kitchen, and that’s what makes cooking so special. Trust me; this dish will cater to any occasion!
FAQs and Troubleshooting
1. What if my chicken is dry?
If your chicken turns out dry, make sure to season it adequately and check that your crockpot temperature is set correctly. Adding more liquid during cooking can help keep it moist.
2. How can I make this recipe ahead of time?
Prep everything the night before! Season the chicken and mix your sauces, storing it in the fridge. In the morning, toss it into the crockpot for effortless evening dinner!
3. Can I use frozen chicken?
Yes, you can use frozen chicken, but increase the cooking time to 8-10 hours. Always check to ensure the chicken is thoroughly cooked before serving.
4. How can I store leftovers?
Store any leftover BBQ chicken in an airtight container in the refrigerator for up to three days. You can also freeze portions for up to three months—perfect for a quick weeknight meal!
Nutritional Info (Optional)
While specific nutritional information can vary, here’s a general overview for this BBQ chicken recipe:
- Calories: Approximately 300 per serving (including a bun)
- Protein: 30g
- Carbohydrates: 30g
- Fat: 6g
Feel free to adapt the recipe’s elements to suit any dietary requirements!
I hope you’ll give this Crockpot BBQ Chicken recipe a try—it’s simplicity and delicious flavor are sure to impress any diners at your table. Remember, the best memories are made around the table, and I can’t wait to hear about your culinary adventures! Happy cooking, and let’s keep spreading the love of good food. 🌟
PrintSlow Cooker BBQ Chicken

A savory and easy slow cooker BBQ chicken dish perfect for any gathering.
- Prep Time: 15 minutes
- Cook Time: 480 minutes
- Total Time: 495 minutes
- Yield: 4 servings 1x
- Category: Main Course
- Method: Slow Cooking
- Cuisine: American
- Diet: None
Ingredients
- 4 Boneless, Skinless Chicken Breasts
- 1 Cup BBQ Sauce
- 1/4 Cup Chicken Broth
- 1 Tablespoon Worcestershire Sauce
- 1 Teaspoon Garlic Powder
- 1 Teaspoon Onion Powder
- Salt and Pepper to Taste
- Buns for Serving (Optional)
Instructions
- Prep Your Chicken: Rinse the chicken breasts under cold water, then pat them dry with paper towels.
- Season and Layer: Sprinkle the chicken with salt, pepper, garlic powder, and onion powder, then lay them in the crockpot.
- Mix Your Sauces: Whisk together the BBQ sauce, Worcestershire sauce, and chicken broth in a separate bowl.
- Pour and Cover: Pour the sauce mixture over the seasoned chicken, cover, and set to low for 6-8 hours.
- Shred and Serve: Shred the chicken in the pot with forks when ready to eat.
- Toast Your Buns: Toast the buns under the broiler if desired.
Notes
For extra flavor, consider adding some cayenne pepper or hot sauce to the BBQ sauce.
Nutrition
- Serving Size: 1 serving
- Calories: 300
- Sugar: 8g
- Sodium: 600mg
- Fat: 6g
- Saturated Fat: 1g
- Unsaturated Fat: 5g
- Trans Fat: 0g
- Carbohydrates: 30g
- Fiber: 1g
- Protein: 30g
- Cholesterol: 80mg
Keywords: BBQ chicken, slow cooker, easy chicken recipes, family dinner

Sheet Pan Chicken Pitas with Herby Ranch
# Sheet Pan Chicken Pitas with Herby Ranch: A Flavorful Family Favorite

## Introduction

Hey there, fellow food enthusiasts! I’m so delighted to have you here at Ivory Apron, where cooking is all about elegance without the intimidation factor. Today, we’re turning up the flavor and ease with a dish that’s perfect for weeknight dinners or casual gatherings: **Sheet Pan Chicken Pitas with Herby Ranch.**

Imagine this: it’s a bustling Wednesday evening, and the clock is ticking down to family dinner time. You want something delicious, healthy, and quick — something that fills the house with a mouthwatering aroma as it roasts away in the oven. You’re in luck because this recipe promises just that and more! With perfectly seasoned chicken, colorful roasted veggies, and a creamy herby ranch sauce nestled inside soft pitas, you’ve got a meal that is not only satisfying but also visually stunning.

But before we dive into the nitty-gritty of cooking, let’s chat about why pitas are such a great choice. Pitas are like little edible pockets of joy, ready to be filled with all the goodness we can muster. And trust me, there's nothing quite like a warm pita bursting with juicy chicken and fresh veggies. So grab your cutting boards and let’s create a dinner that will make your kitchen the star of the evening!

## Personal Story

You know, some of my fondest memories revolve around simple yet comforting meals that brought our family together. I remember one summer when my grandma invited us all over for a backyard barbecue. It was that perfect blend of laughter, warmth, and the tantalizing scent of grilled goodies wafting through the air. She made these chicken pitas that she had marinated overnight, filling them to the brim with the freshest veggies and the most delectable sauce. We sat around the picnic table, devouring our creations and giggling at the ridiculous amounts of ranch dressing we were all dousing on top.

That night, something clicked for me; it wasn't just about the food but about the atmosphere, the connections, and the joy of sharing a meal. It’s moments like these that inspire my recipes and my mission here at Ivory Apron — to make cooking accessible and enjoyable for everyone. So, let’s keep that spirit alive as we dive into our Sheet Pan Chicken Pitas with Herby Ranch!

## Ingredients

Here’s what you’ll need to whip up these delicious pitas:

- **2 boneless, skinless chicken breasts**
  Perfectly tender and quick to cook, these beauties slice beautifully for easy stuffing. Feel free to substitute with turkey or any other lean protein if you're looking for alternatives.

- **1 tablespoon olive oil**
  This gem of an ingredient not only adds flavor but helps everything brown beautifully and keeps your dish juicy. Avocado oil works well too!

- **Salt and pepper, to taste**
  These seasoning staples are crucial for enhancing the natural flavors of the chicken and veggies. Don’t shy away — season generously!

- **1 teaspoon garlic powder**
  A fantastic way to pack in savory flavor with minimal effort. You can substitute with fresh minced garlic if you prefer a punchier taste.

- **1 teaspoon paprika**
  Not just for color; this spice adds a subtle smoky sweetness. You can try smoked paprika for an extra depth of flavor.

- **1 cup mixed vegetables (bell peppers, onions, zucchini)**
  A colorful blend that caramelizes beautifully in the oven. Feel free to use whatever you have on hand; broccoli, cherry tomatoes, or carrots work great too!

- **1/2 cup Greek yogurt**
  The creamy base for our herby ranch sauce, it’s tangy and smooth. If lactose is a concern, dairy-free yogurt can be a great substitute.

- **1 tablespoon ranch seasoning mix**
  This handy blend is packed with flavors you adore, making it easy to achieve that classic ranch taste. You can make your own if you're feeling adventurous!

- **Fresh herbs, to taste (parsley, dill)**
  These beauties will brighten up your dish with aromatic freshness. Use whatever herbs you have handy — cilantro or chives can also add a delightful kick.

- **4 pitas**
  Whether you prefer them soft or slightly toasted, these will cradle the filling beautifully. Whole wheat or gluten-free variants can work too!

## Step-by-Step Instructions

Now, let’s get cooking! We’ll create a dish that’s as fun to make as it is to eat. Here’s the step-by-step breakdown:

### 1. Prepping the Chicken and Veggies
   **Tip:** Start by preheating your oven to 425°F (220°C). It’s all about timing! As it warms, you can prep your ingredients.
   Slice the chicken breasts into bite-sized pieces or strips. This not only helps them cook faster but also makes for easy stuffing later. Place the chicken in a mixing bowl and add the olive oil, salt, pepper, garlic powder, and paprika. Use your hands to massage the spices into the chicken — it’s messy, but that's where the fun is!

### 2. Chopping the Vegetables
   While you’re marinating the chicken, chop up your mixed veggies into similar-sized pieces. You want them to cook evenly and caramelize nicely. Toss them with a pinch of salt, pepper, and a drizzle of olive oil. The goal is to enhance their natural sweetness and prevent drying out!

### 3. Roasting on the Sheet Pan
   **Chef Hack:** Line your sheet pan with parchment paper for easy cleanup!
   Spread the marinated chicken and mixed vegetables evenly on the sheet pan. Ensuring they’re in a single layer allows for that golden-brown crispiness we all love. Pop it into your preheated oven and roast for about 20-25 minutes. You’ll want to stir halfway through to ensure even cooking. The chicken should be fully cooked (165°F internally) and the veggies fork-tender.

### 4. Making the Herby Ranch Sauce
   While everything is roasting, let’s whip up that creamy herby ranch! In a small bowl, combine the Greek yogurt and ranch seasoning mix. Add a sprinkle of fresh herbs to brighten it up — the more, the merrier! Taste it and adjust with more herbs or seasoning as necessary. The key is to balance that creaminess with a bright, herby punch.

### 5. Assembling the Pitas
   **Fun Fact:** You can warm your pitas in the oven for a couple of minutes or in a skillet over medium heat for extra softness.
   Once everything is ready, it’s time to assemble! Open your pitas and stuff them generously with the roasted chicken and veggies. Drizzle with that luscious herby ranch sauce and finish with a sprinkle of extra fresh herbs for a pop of color.

## Serving Suggestions

Serve your stuffed pitas on a lovely platter with a few additional sprigs of herbs peeking out. You can accompany them with some extra herby ranch for dipping on the side or a simple green salad dressed in olive oil and lemon for a bright contrast. Add some crunchy potato chips or roasted chickpeas for an extra crunch, and you have a delightful spread ready to impress!

## Recipe Variations

- **Spicy Kick:** Add a pinch of cayenne pepper or a sprinkle of red pepper flakes to the chicken marinade for a little heat.
- **Mediterranean Twist:** Swap out traditional ranch ingredients for hummus and roasted eggplant for a Mediterranean feel!
- **Veggie-Packed:** Load up on more veggies like spinach or kale, or even swap the chicken for chickpeas for a vegetarian option.
- **Herb Swap:** Use basil or mint in place of dill or parsley for a completely new flavor profile.
- **Whole Grain Pitas:** Try whole wheat or even a flavored pita (like garlic or spinach) for added depth.

## Chef’s Notes

This recipe has evolved beautifully in my kitchen over the years. Originally, I started with a simple chicken and veggie combo, but after countless family dinners, I realized that adding the herby ranch sauce elevated it from great to absolutely unforgettable. This dish is inspired by my love for simple ingredients that create warm memories and joyful gatherings. It’s incredibly versatile, allowing you to mix and match flavors based on what you’ve got at home!

Oh, and I’ll let you in on a little secret: sometimes I roast up extra chicken and veggies so I have leftovers for wraps or salads throughout the week. It’s a total game-changer!

## FAQs and Troubleshooting

### 1. **What if my chicken is dry?**
   If your chicken turns out dry, it might be overcooked. Using a meat thermometer can help ensure you hit that sweet 165°F mark.

### 2. **Can I make this ahead of time?**
   Absolutely! You can marinate the chicken the night before and chop the veggies in advance. Just assemble and roast right before serving.

### 3. **What if my pitas crack when I stuff them?**
   This can happen if the pitas are cold. Warming them thoroughly beforehand will make them more pliable and less likely to crack!

### 4. **How do I store leftovers?**
   Store any leftovers in an airtight container in the fridge for up to three days. Just reheat in the oven for the best results!

## Nutritional Info

**(Per Serving)**
Calories: 370
Protein: 30g
Fat: 12g
Carbohydrate: 40g
Fiber: 5g
Sugar: 4g

And there you have it — Sheet Pan Chicken Pitas with Herby Ranch, a meal that’s not just about the food; it’s about creating beautiful moments around your table. Let’s embrace the joy of cooking together, and don’t forget to share your creations with me! Happy cooking!
Sheet Pan Chicken Pitas with Herby Ranch

A flavorful and easy recipe for sheet pan chicken pitas filled with seasoned chicken, colorful roasted veggies, and a creamy herby ranch sauce.
- Prep Time: 15 minutes
- Cook Time: 25 minutes
- Total Time: 40 minutes
- Yield: 4 servings 1x
- Category: Main Course
- Method: Baking
- Cuisine: Mediterranean
- Diet: Healthy
Ingredients
- 2 boneless, skinless chicken breasts
- 1 tablespoon olive oil
- Salt and pepper, to taste
- 1 teaspoon garlic powder
- 1 teaspoon paprika
- 1 cup mixed vegetables (bell peppers, onions, zucchini)
- 1/2 cup Greek yogurt
- 1 tablespoon ranch seasoning mix
- Fresh herbs, to taste (parsley, dill)
- 4 pitas
Instructions
- Preheat your oven to 425°F (220°C). Slice the chicken breasts into bite-sized pieces or strips. Place the chicken in a mixing bowl and add the olive oil, salt, pepper, garlic powder, and paprika. Massage the spices into the chicken.
- Chop your mixed veggies into similar-sized pieces. Toss them with a pinch of salt, pepper, and a drizzle of olive oil.
- Spread the marinated chicken and mixed vegetables evenly on a sheet pan. Roast for about 20-25 minutes, stirring halfway through, until chicken is cooked and veggies are tender.
- Combine the Greek yogurt and ranch seasoning mix in a small bowl. Add fresh herbs and adjust seasoning as necessary.
- Stuff the pitas generously with the roasted chicken and veggies. Drizzle with the herby ranch sauce and garnish with extra herbs.
Notes
For added flavor, consider marinating the chicken overnight. Leftovers can be stored in an airtight container for up to three days.
Nutrition
- Serving Size: 1 pita
- Calories: 370
- Sugar: 4g
- Sodium: 450mg
- Fat: 12g
- Saturated Fat: 3g
- Unsaturated Fat: 7g
- Trans Fat: 0g
- Carbohydrates: 40g
- Fiber: 5g
- Protein: 30g
- Cholesterol: 70mg
Keywords: chicken pitas, sheet pan dinner, herby ranch, quick dinner, Mediterranean recipes