Minute Fruit Salad: 5-Ingredient Recipe for Meal Prep
Easy Fruit Salad: A Rainbow of Refreshment
Hello, lovely foodies! Welcome to another delicious corner of Ivory Apron, where cooking is as vibrant and joyful as the fresh ingredients we use. Today, we’re diving into a dish that sings with color, flavor, and simplicity: an Easy Fruit Salad.
Picture this: It’s a warm day, the sun is shining, and you want something refreshing but effortlessly delightful to serve — whether it’s for a picnic, a brunch gathering, or just because you deserve a treat! This Easy Fruit Salad is your perfect companion. With a mix of juicy fruits and a hint of lime to elevate the flavors, it’s not just a salad; it’s a celebration of nature’s bounty.
Gather your friends and family around the table, because this is one dish that invites connection and joy. It’s perfect for any occasion, whether it’s a birthday party, a casual weekday lunch, or a light dessert after a hearty meal. Let’s get started on creating this vibrant dish that celebrates fresh flavors and brings smiles all around!
A Slice of Nostalgia
As I reflect on my childhood summers, one particular memory shines bright amidst the joyful chaos of family gatherings. My grandmother used to whip up her famous fruit salad, a medley of whatever juicy fruits she could find at the farmer’s market. It was her special treat, served in a big glass bowl, and it was always about more than just the food.
I remember how we’d gather on her sun-drenched porch, laughter mingling with the sweet aromas of ripening fruit. The colorful salad became a centerpiece, accompanied by stories and memories like a warm blanket. My little fingers would dive into the bowl, eager to cut through the vibrant watermelon or pluck ripe strawberries. We’d argue over whose turn it was to pick from the assortment, all while sharing tales from our week.
That dish instilled in me not just a love for fruit, but a love for the moments shared around the table. So, as we create this Easy Fruit Salad, let’s channel that same warmth and joy, turn on some fun music, and make it a culinary adventure!
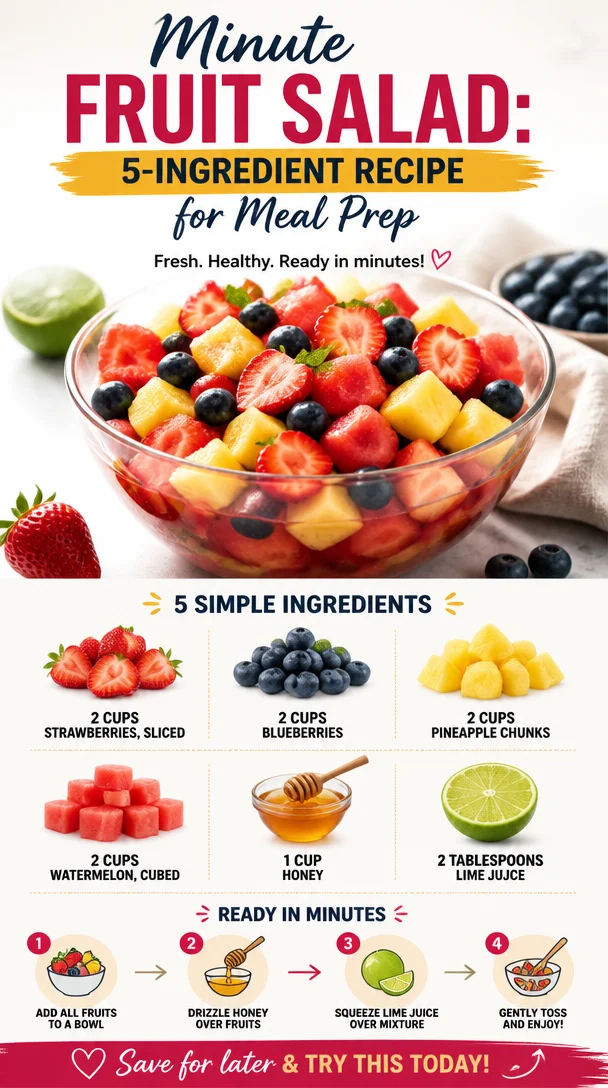
Ingredients
Here’s what you’ll need to create your stunning Easy Fruit Salad:
-
2 cups strawberries, sliced: Sweet, juicy, and bursting with flavor, strawberries are an absolute classic. If you can’t find fresh ones, frozen strawberries work too — just thaw and drain them!
-
2 cups blueberries: These little gems add a delightful pop of color and are packed with antioxidants. You can also swap them for blackberries or raspberries for a different flavor.
-
2 cups pineapple chunks: Pineapple brings a lovely tropical twist with its sweet and tangy notes. Using fresh pineapples is great, but canned chunks (in juice, not syrup) can save time!
-
2 cups watermelon, cubed: Nothing screams summer more than watermelon! It’s juicy and hydrating but also easy to swap out for cantaloupe or honeydew if you prefer.
-
1 cup honey: Adds natural sweetness and binds it all beautifully together. If you want a less sweet salad, feel free to reduce the honey or substitute it with agave syrup.
-
2 tablespoons lime juice: This is where the magic happens! Lime juice brightens the flavors and keeps the fruits fresh. If you’re fresh out, lemon juice works beautifully too.
Step-by-Step Instructions
Now, let’s get this fruity adventure underway! Follow these steps to create your Easy Fruit Salad:
-
Prep Your Workstation: Before diving into slicing and dicing, make sure your workspace is tidy and you have all your ingredients in front of you. A clean workspace not only inspires creativity but also keeps the process smooth!
-
Slice the Strawberries: Grab your fresh strawberries and slice off the green tops. Then, cut them into halves or quarters, depending on their size. I love to slice them thinly so they mix well with the other fruits and create a beautiful base.
-
Rinse the Blueberries: Place your blueberries in a colander and rinse under cold running water. Give them a gentle shake to remove excess moisture. No need to slice these — their little bursts of flavor are best enjoyed whole!
-
Cube the Pineapple: If you’re using a fresh pineapple, cut off the top, bottom, and the outer skin. Then, slice it into quarters, remove the core, and cut the fruit into bite-sized pieces. Canned pineapple, drained, can be added directly to the mix!
-
Cut the Watermelon: Watermelon can be a bit messy — a fun, juicy kind of mess! Cut it into half and then scoop out cubes using a sharp knife. Aim for about an inch in size; this helps to get a nice mix, and each bite is refreshing.
-
Combine the Fruits: In a large mixing bowl, toss together the strawberries, blueberries, pineapple chunks, and watermelon. Use gentle movements to avoid crushing the tender fruits.
-
Whisk the Honey and Lime Juice: In a smaller bowl, whisk together the honey and lime juice until they blend perfectly. The acidity from the lime will enhance the sweetness of the honey, creating a delightful dressing.
-
Dress the Salad: Pour the honey-lime mixture over your fruits. Gently toss them again to ensure every piece is coated with that zesty sweetness. It’s like giving your fruits a little spa treatment!
-
Chill and Serve: Cover the salad and let it chill in the refrigerator for about 30 minutes before serving. This allows the flavors to meld together, creating a medley of refreshing goodness.
Serving Suggestions
When serving your Easy Fruit Salad, consider using a gorgeous, large serving bowl to showcase the vibrant colors. You can garnish it with a sprinkle of fresh mint leaves or serve in individual cups for a fun, casual gathering. This not only elevates the dish but also adds an inviting and personal touch!
Recipe Variations
Get creative with your Easy Fruit Salad! Here are a few twists to inspire your culinary imagination:
- Tropical Fruit Fiesta: Swap the berries for mango chunks and add coconut flakes for a beach vacation vibe.
- Berry Medley: Use an assortment of berries—blackberries, raspberries, and strawberries—for a berry-packed treat that’s bursting with flavor.
- Savory Fruit Salad: Add a sprinkle of feta cheese and some chopped fresh basil for a savory twist that’s perfect as a side dish.
- Greek Yogurt Parfait: Layer your fruit salad with Greek yogurt and granola for a healthy breakfast or snack!
- Nutty Crunch: Toss in some chopped almonds or pecans for added texture and crunch — a hint of nuttiness elevates the fruit flavors beautifully.
Chef’s Notes
This Easy Fruit Salad is one of those recipes that feels like a canvas waiting for your personal touch! Over the years, I’ve mingled various fruits depending on the season, and it always turns out well. A funny kitchen story? I once accidentally added a splash of balsamic vinegar instead of the honey-lime mixture while experimenting — and let me tell you, it was an unexpectedly delicious mistake that’s still a favorite in our household!
Each time I make this fruit salad, I’m reminded of that sun-drenched porch with my grandmother. It evolves, just like memories do, but the essence remains — vibrant, joyous, and filled with love.
FAQs and Troubleshooting
1. Why is my fruit salad getting soggy?
- A common issue! Make sure you’re using truly ripe fruits, and avoid over-mixing once the dressing is added. If possible, serve the dressing on the side until ready to eat.
2. Can I make this salad ahead of time?
- Absolutely! You can prep the fruits a few hours in advance and combine them with the dressing right before you’re ready to serve.
3. My fruits are not sweet enough. What can I do?
- If your fruits lack sweetness, feel free to adjust the honey in the dressing. You can also add a sprinkle of sugar or another sweetener if needed.
4. Are there any fruits I should avoid in this salad?
- Fruits that brown quickly, like bananas or apples, should be added just before serving. They can still be great, but they’ll change the aesthetics!
Nutritional Info
While enjoying our Easy Fruit Salad, you’re delving into a healthy mix of vitamins, antioxidants, and fiber. The fruits provide a fair amount of natural sugars, but with the added benefit of essential nutrients. Incorporating this salad into your meals can contribute to a balanced and colorful plate!
In closing, I hope you feel inspired and excited to create your Easy Fruit Salad. Cooking is all about fun, creativity, and connection, and I can’t wait to hear your stories as you gather around your table. So tie on your apron, pour something sparkling, and let’s make beautiful moments together. Happy cooking!
PrintEasy Fruit Salad
A vibrant and refreshing Easy Fruit Salad featuring a delightful mix of juicy fruits and a hint of lime.
- Prep Time: 15 minutes
- Cook Time: 30 minutes
- Total Time: 45 minutes
- Yield: 6 servings 1x
- Category: Dessert
- Method: No-Cook
- Cuisine: American
- Diet: Vegan
Ingredients
- 2 cups strawberries, sliced
- 2 cups blueberries
- 2 cups pineapple chunks
- 2 cups watermelon, cubed
- 1 cup honey
- 2 tablespoons lime juice
Instructions
- Prep your workstation: Make sure your workspace is tidy and all ingredients are ready.
- Slice the strawberries: Remove the tops and cut them into halves or quarters.
- Rinse the blueberries: Rinse them under cold running water.
- Cube the pineapple: Cut the fresh pineapple into bite-sized pieces, or use canned pineapple.
- Cut the watermelon into cubes using a sharp knife.
- Combine the fruits in a large mixing bowl and toss gently.
- Whisk the honey and lime juice together until blended.
- Dress the salad with the honey-lime mixture and toss gently.
- Chill in the refrigerator for about 30 minutes before serving.
Notes
This salad is versatile; feel free to swap fruits based on availability and season. Avoid adding fruits that brown quickly until just before serving.
Nutrition
- Serving Size: 1 serving
- Calories: 210
- Sugar: 35g
- Sodium: 5mg
- Fat: 0g
- Saturated Fat: 0g
- Unsaturated Fat: 0g
- Trans Fat: 0g
- Carbohydrates: 54g
- Fiber: 4g
- Protein: 1g
- Cholesterol: 0mg
Keywords: fruit salad, easy dessert, summer salad, healthy snack

Creamy Homemade Orange Ice Cream (5-Ingredient Recipe)
Homemade Orange Ice Cream: A Zesty Delight
Hello and welcome to my kitchen! Today, you’re in for a real treat as we whip up some homemade orange ice cream that will not only cool you down but also transport you back to those sunny summer days of your childhood. There’s something magical about the rich, creamy texture combined with the zesty brightness of fresh oranges that makes this dessert a true delight.
Picture this: the sun casts its warm glow, the air is filled with laughter, and there you are, indulging in a scoop of the most refreshing ice cream. Every lick is a reminder of summers spent in the backyard, perhaps chasing after a soccer ball or lounging under a shady tree. Ice cream was the ultimate reward—nothing could beat the joy of savoring a treat that tasted like sunshine.
The beauty of making your own ice cream at home is that you can control the ingredients and customize the flavors to your heart’s content. My recipe for homemade orange ice cream is easy to follow and uses fresh ingredients that are not only delicious but good for you too. So, grab your apron and let’s get started!
My Ice Cream Memory
One summer evening, I remember sitting on the porch with my grandma, who had just finished churning a batch of her famous orange ice cream. The churning sound of the old machine was music to my ears. As we waited for those creamy dreams to solidify in the freezer, we shared stories about her childhood. That evening became one of my favorite memories, not only for the delicious treat but for the warmth of family stories and connection.
Grandma’s recipe had its quirks, and she always said the best part of making ice cream was tasting the mixture before it went into the churn. It felt like stealing a little secret. Now, I want to share that joy with you through this recipe. So let’s dive into the wonderful world of homemade ice cream!
Ingredients
Here’s what you’ll need to make this zesty delight:
-
2 cups heavy whipping cream: This gives the ice cream its rich, velvety texture. If you’re looking for a lighter version, you can use half and half.
-
1 ½ cups whole milk: Complements the cream for a perfectly smooth consistency. You can swap it out for low-fat milk or even a plant-based milk like coconut milk, but keep in mind the flavor may change slightly.
-
1 cup fresh orange juice (about 3 oranges): Freshly squeezed juice is a must for the bright, refreshing flavor! You can use bottled juice, but make sure it’s 100% orange juice without added sugars or preservatives.
-
1 tablespoon orange extract: This enhances the orange flavor and gives it an extra kick. If you want to tone it down, start with a teaspoon and adjust to taste.
-
2 teaspoons vanilla extract: Adds depth to the ice cream flavor and balances the citrus. Using homemade vanilla extract is a chef’s best-kept secret for an extra layer of warmth.
-
1 cup sugar: Sweetens the mixture perfectly. If you’re looking for a healthier alternative, you can use agave syrup or honey (and adjust the liquid content accordingly).
-
Pinch of salt: A little salt elevates the flavors, bringing out the sweetness and balancing the acidity of the oranges.
Step-by-Step Instructions
Ready to make some magic? Here’s how to create your homemade orange ice cream!
-
Juicing the Oranges (15 minutes): Start by juicing your fresh oranges. You’ll want about one cup of juice, so squeeze those beauties! This is the fun part; the fragrance of the freshly squeezed juice will fill your kitchen and bring a burst of sunshine. Tip: Use a citrus juicer or even a fork if you don’t have one handy. Don’t forget to strain out any seeds!
-
Mixing the Base (10 minutes): In a large mixing bowl, combine the heavy whipping cream, whole milk, fresh orange juice, orange extract, vanilla extract, sugar, and a pinch of salt. Chef Hack: Use a whisk to mix all the ingredients until the sugar is dissolved. This step is crucial because it ensures that your ice cream will be creamy and smooth without any gritty texture from undissolved sugar.
-
Chill the Mixture (1-2 hours): Cover the bowl with plastic wrap and place it in the refrigerator for at least one hour. Chilling the mixture will help it churn better, resulting in a creamier texture. Pro Tip: If you have time, letting it chill longer (even overnight) enhances the flavor!
-
Churning (20-30 minutes): Once chilled, pour the mixture into your ice cream maker and churn according to the manufacturer’s instructions. This process usually takes about 20-30 minutes. Tip: The mixture should thicken and double in size, becoming light and fluffy.
-
Freezing (4 hours or overnight): Transfer the churned ice cream into an airtight container and smooth the top with a spatula. Cover it with a piece of parchment paper before sealing the container to prevent ice crystals from forming. Freeze for at least four hours or overnight for best results.
-
Serve and Enjoy (5 minutes): Scoop your homemade orange ice cream into bowls or cones and savor the flavor! Serving Tip: Garnish with a few orange zest shavings or a sprig of mint to elevate the presentation.
Serving Suggestions
When it comes to serving your homemade orange ice cream, presentation is key! Use beautiful bowls or waffle cones to showcase your creation. Add an orange slice or a mint leaf on top for that extra touch of elegance!
For a more decadent dessert, serve it alongside a slice of warm chocolate cake or drizzle some melted dark chocolate over the top. The combination of sweet and tangy will make your taste buds dance!
Recipe Variations
Want to switch things up? Here are a few fun ideas to personalize your orange ice cream recipe:
-
Citrus Medley: Incorporate other citrus fruits like lemon or lime for a refreshing twist.
-
Creamy Sorbet: Substitute the cream with coconut milk for a dairy-free version that’s just as delicious.
-
Orange Creamsicle: Add a bit of zest and vanilla bean to replicate the classic summer treat.
-
Liqueur Infusion: For an adult version, consider adding a splash of triple sec or orange liqueur into the mix before churning.
-
Chocolate Chip: Stir in mini chocolate chips or candied orange peel just before transferring the mixture to the freezer for a delightful texture contrast.
Chef’s Notes
Creating this homemade orange ice cream has been a labor of love for me. Over time, I’ve experimented with different combinations and techniques. There was one particularly memorable concoction where I added in cardamom for a unique twist, which reminded me of my travels.
Also, I learned the hard way to always taste as you go. There was an unfortunate batch where I accidentally overdid the sugar, and I ended up with a soupy orange sugar syrup. It was still tasty, but you know—every error is just an opportunity to learn!
FAQs and Troubleshooting
1. My ice cream turned out hard! What did I do wrong?
- If your ice cream is too hard, it may have been frozen too long without being stirred. Allow it to sit at room temperature for a few minutes before scooping.
2. Can I make this without an ice cream maker?
- Yes! You can whip the mixture by hand or use a blender, pouring it into a container and mixing every 30 minutes for the first few hours to break up ice crystals.
3. Why is my ice cream grainy?
- This might happen if the sugar didn’t dissolve completely or if it froze too quickly. Make sure to mix well and chill before churning!
4. Can I add mix-ins?
- Absolutely! You can add in your favorite candies, nuts, or fruit chunks just before transferring to the freezer.
Making homemade orange ice cream is not just about whipping up a refreshing dessert; it’s about creating memories and enjoying the process in the kitchen. So tie on your apron, put on your favorite tunes, and let’s get to creating something delicious! I can’t wait for you to share your homemade creations—because good food isn’t just about the final product; it’s about the journey. Happy cooking!
PrintHomemade Orange Ice Cream

A refreshing homemade orange ice cream that combines rich creaminess with zesty brightness. Perfect for summer days!
- Prep Time: 15 minutes
- Cook Time: 30 minutes
- Total Time: 60 minutes
- Yield: 8 servings 1x
- Category: Dessert
- Method: Churning
- Cuisine: American
- Diet: Vegetarian
Ingredients
- 2 cups heavy whipping cream
- 1 ½ cups whole milk
- 1 cup fresh orange juice (about 3 oranges)
- 1 tablespoon orange extract
- 2 teaspoons vanilla extract
- 1 cup sugar
- Pinch of salt
Instructions
- Juicing the oranges: Start by juicing your fresh oranges. You’ll want about one cup of juice, so squeeze those beauties! Strain out any seeds.
- Mixing the base: In a large mixing bowl, combine the heavy whipping cream, whole milk, fresh orange juice, orange extract, vanilla extract, sugar, and a pinch of salt. Use a whisk to mix until the sugar is dissolved.
- Chill the mixture: Cover the bowl with plastic wrap and place it in the refrigerator for at least one hour.
- Churning: Once chilled, pour the mixture into your ice cream maker and churn according to the manufacturer’s instructions, usually taking about 20-30 minutes.
- Freezing: Transfer the churned ice cream into an airtight container, cover it with parchment paper, and freeze for at least four hours or overnight.
- Serve and enjoy: Scoop your homemade orange ice cream into bowls or cones and garnish as desired.
Notes
Feel free to customize with add-ins like chocolate chips or citrus zest. For a lighter version, use half and half instead of heavy cream.
Nutrition
- Serving Size: 1 serving
- Calories: 250
- Sugar: 25g
- Sodium: 80mg
- Fat: 15g
- Saturated Fat: 9g
- Unsaturated Fat: 3g
- Trans Fat: 0g
- Carbohydrates: 30g
- Fiber: 0g
- Protein: 3g
- Cholesterol: 60mg
Keywords: orange ice cream, homemade ice cream, summer dessert, citrus dessert