
Creamy Homemade Orange Ice Cream (5-Ingredient Recipe)
Homemade Orange Ice Cream: A Zesty Delight
Hello and welcome to my kitchen! Today, you’re in for a real treat as we whip up some homemade orange ice cream that will not only cool you down but also transport you back to those sunny summer days of your childhood. There’s something magical about the rich, creamy texture combined with the zesty brightness of fresh oranges that makes this dessert a true delight.
Picture this: the sun casts its warm glow, the air is filled with laughter, and there you are, indulging in a scoop of the most refreshing ice cream. Every lick is a reminder of summers spent in the backyard, perhaps chasing after a soccer ball or lounging under a shady tree. Ice cream was the ultimate reward—nothing could beat the joy of savoring a treat that tasted like sunshine.
The beauty of making your own ice cream at home is that you can control the ingredients and customize the flavors to your heart’s content. My recipe for homemade orange ice cream is easy to follow and uses fresh ingredients that are not only delicious but good for you too. So, grab your apron and let’s get started!
My Ice Cream Memory
One summer evening, I remember sitting on the porch with my grandma, who had just finished churning a batch of her famous orange ice cream. The churning sound of the old machine was music to my ears. As we waited for those creamy dreams to solidify in the freezer, we shared stories about her childhood. That evening became one of my favorite memories, not only for the delicious treat but for the warmth of family stories and connection.
Grandma’s recipe had its quirks, and she always said the best part of making ice cream was tasting the mixture before it went into the churn. It felt like stealing a little secret. Now, I want to share that joy with you through this recipe. So let’s dive into the wonderful world of homemade ice cream!
Ingredients
Here’s what you’ll need to make this zesty delight:
-
2 cups heavy whipping cream: This gives the ice cream its rich, velvety texture. If you’re looking for a lighter version, you can use half and half.
-
1 ½ cups whole milk: Complements the cream for a perfectly smooth consistency. You can swap it out for low-fat milk or even a plant-based milk like coconut milk, but keep in mind the flavor may change slightly.
-
1 cup fresh orange juice (about 3 oranges): Freshly squeezed juice is a must for the bright, refreshing flavor! You can use bottled juice, but make sure it’s 100% orange juice without added sugars or preservatives.
-
1 tablespoon orange extract: This enhances the orange flavor and gives it an extra kick. If you want to tone it down, start with a teaspoon and adjust to taste.
-
2 teaspoons vanilla extract: Adds depth to the ice cream flavor and balances the citrus. Using homemade vanilla extract is a chef’s best-kept secret for an extra layer of warmth.
-
1 cup sugar: Sweetens the mixture perfectly. If you’re looking for a healthier alternative, you can use agave syrup or honey (and adjust the liquid content accordingly).
-
Pinch of salt: A little salt elevates the flavors, bringing out the sweetness and balancing the acidity of the oranges.
Step-by-Step Instructions
Ready to make some magic? Here’s how to create your homemade orange ice cream!
-
Juicing the Oranges (15 minutes): Start by juicing your fresh oranges. You’ll want about one cup of juice, so squeeze those beauties! This is the fun part; the fragrance of the freshly squeezed juice will fill your kitchen and bring a burst of sunshine. Tip: Use a citrus juicer or even a fork if you don’t have one handy. Don’t forget to strain out any seeds!
-
Mixing the Base (10 minutes): In a large mixing bowl, combine the heavy whipping cream, whole milk, fresh orange juice, orange extract, vanilla extract, sugar, and a pinch of salt. Chef Hack: Use a whisk to mix all the ingredients until the sugar is dissolved. This step is crucial because it ensures that your ice cream will be creamy and smooth without any gritty texture from undissolved sugar.
-
Chill the Mixture (1-2 hours): Cover the bowl with plastic wrap and place it in the refrigerator for at least one hour. Chilling the mixture will help it churn better, resulting in a creamier texture. Pro Tip: If you have time, letting it chill longer (even overnight) enhances the flavor!
-
Churning (20-30 minutes): Once chilled, pour the mixture into your ice cream maker and churn according to the manufacturer’s instructions. This process usually takes about 20-30 minutes. Tip: The mixture should thicken and double in size, becoming light and fluffy.
-
Freezing (4 hours or overnight): Transfer the churned ice cream into an airtight container and smooth the top with a spatula. Cover it with a piece of parchment paper before sealing the container to prevent ice crystals from forming. Freeze for at least four hours or overnight for best results.
-
Serve and Enjoy (5 minutes): Scoop your homemade orange ice cream into bowls or cones and savor the flavor! Serving Tip: Garnish with a few orange zest shavings or a sprig of mint to elevate the presentation.
Serving Suggestions
When it comes to serving your homemade orange ice cream, presentation is key! Use beautiful bowls or waffle cones to showcase your creation. Add an orange slice or a mint leaf on top for that extra touch of elegance!
For a more decadent dessert, serve it alongside a slice of warm chocolate cake or drizzle some melted dark chocolate over the top. The combination of sweet and tangy will make your taste buds dance!
Recipe Variations
Want to switch things up? Here are a few fun ideas to personalize your orange ice cream recipe:
-
Citrus Medley: Incorporate other citrus fruits like lemon or lime for a refreshing twist.
-
Creamy Sorbet: Substitute the cream with coconut milk for a dairy-free version that’s just as delicious.
-
Orange Creamsicle: Add a bit of zest and vanilla bean to replicate the classic summer treat.
-
Liqueur Infusion: For an adult version, consider adding a splash of triple sec or orange liqueur into the mix before churning.
-
Chocolate Chip: Stir in mini chocolate chips or candied orange peel just before transferring the mixture to the freezer for a delightful texture contrast.
Chef’s Notes
Creating this homemade orange ice cream has been a labor of love for me. Over time, I’ve experimented with different combinations and techniques. There was one particularly memorable concoction where I added in cardamom for a unique twist, which reminded me of my travels.
Also, I learned the hard way to always taste as you go. There was an unfortunate batch where I accidentally overdid the sugar, and I ended up with a soupy orange sugar syrup. It was still tasty, but you know—every error is just an opportunity to learn!
FAQs and Troubleshooting
1. My ice cream turned out hard! What did I do wrong?
- If your ice cream is too hard, it may have been frozen too long without being stirred. Allow it to sit at room temperature for a few minutes before scooping.
2. Can I make this without an ice cream maker?
- Yes! You can whip the mixture by hand or use a blender, pouring it into a container and mixing every 30 minutes for the first few hours to break up ice crystals.
3. Why is my ice cream grainy?
- This might happen if the sugar didn’t dissolve completely or if it froze too quickly. Make sure to mix well and chill before churning!
4. Can I add mix-ins?
- Absolutely! You can add in your favorite candies, nuts, or fruit chunks just before transferring to the freezer.
Making homemade orange ice cream is not just about whipping up a refreshing dessert; it’s about creating memories and enjoying the process in the kitchen. So tie on your apron, put on your favorite tunes, and let’s get to creating something delicious! I can’t wait for you to share your homemade creations—because good food isn’t just about the final product; it’s about the journey. Happy cooking!
PrintHomemade Orange Ice Cream

A refreshing homemade orange ice cream that combines rich creaminess with zesty brightness. Perfect for summer days!
- Prep Time: 15 minutes
- Cook Time: 30 minutes
- Total Time: 60 minutes
- Yield: 8 servings 1x
- Category: Dessert
- Method: Churning
- Cuisine: American
- Diet: Vegetarian
Ingredients
- 2 cups heavy whipping cream
- 1 ½ cups whole milk
- 1 cup fresh orange juice (about 3 oranges)
- 1 tablespoon orange extract
- 2 teaspoons vanilla extract
- 1 cup sugar
- Pinch of salt
Instructions
- Juicing the oranges: Start by juicing your fresh oranges. You’ll want about one cup of juice, so squeeze those beauties! Strain out any seeds.
- Mixing the base: In a large mixing bowl, combine the heavy whipping cream, whole milk, fresh orange juice, orange extract, vanilla extract, sugar, and a pinch of salt. Use a whisk to mix until the sugar is dissolved.
- Chill the mixture: Cover the bowl with plastic wrap and place it in the refrigerator for at least one hour.
- Churning: Once chilled, pour the mixture into your ice cream maker and churn according to the manufacturer’s instructions, usually taking about 20-30 minutes.
- Freezing: Transfer the churned ice cream into an airtight container, cover it with parchment paper, and freeze for at least four hours or overnight.
- Serve and enjoy: Scoop your homemade orange ice cream into bowls or cones and garnish as desired.
Notes
Feel free to customize with add-ins like chocolate chips or citrus zest. For a lighter version, use half and half instead of heavy cream.
Nutrition
- Serving Size: 1 serving
- Calories: 250
- Sugar: 25g
- Sodium: 80mg
- Fat: 15g
- Saturated Fat: 9g
- Unsaturated Fat: 3g
- Trans Fat: 0g
- Carbohydrates: 30g
- Fiber: 0g
- Protein: 3g
- Cholesterol: 60mg
Keywords: orange ice cream, homemade ice cream, summer dessert, citrus dessert
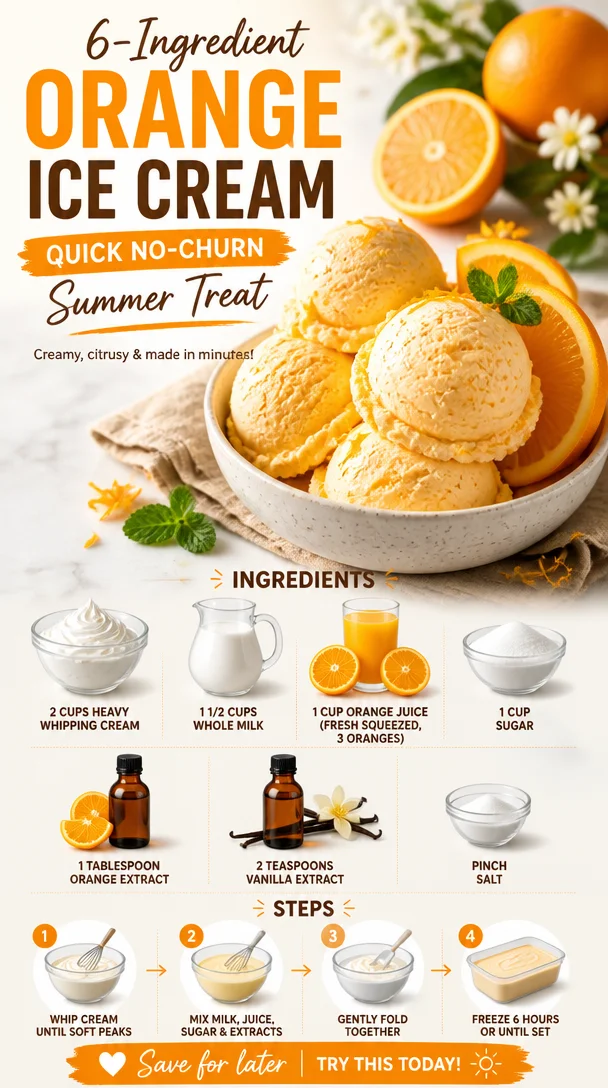
Ingredient Orange Ice Cream: Quick No-Churn Summer Treat
The Creamy Sunshine of Summer: Homemade Orange Ice Cream Recipe
There’s something magical about homemade ice cream that brings a smile to everyone’s face. It’s a simple pleasure, a labor of love, and a nostalgic taste of summer wrapped in a sweet, creamy dream. Today, I’m excited to share my Orange Ice Cream recipe with you – a vibrant, refreshing treat that’s perfect for warm days and a delightful way to gather family and friends around the table.
This Orange Ice Cream will not only cool you down but also evoke the joy of summer picnics and family gatherings. Imagine yourself lounging on the porch, the sun setting in a blaze of orange and pink, with a bowl of this luscious ice cream in hand. I still remember the first time I made this recipe; it was during a family barbecue, and everyone was so excited about the sweet citrus flavor that they couldn’t resist coming back for seconds (and thirds!).
This isn’t just any frozen dessert; it’s a creamy embrace, a scoop of sunshine to brighten your day. Ready to roll up your sleeves? Let’s dive into the delicious world of homemade Orange Ice Cream!
A Taste of Nostalgia
I can still picture it: a backyard full of laughter, the smell of grilled burgers wafting through the air, and my grandma pulling out the old ice cream maker from the back of the pantry. It had a few dents and a faded paint job, but to me, it was a treasure chest of sweet memories. Every summer, she’d gather the family for homemade ice cream day, a tradition we all eagerly anticipated. She’d mix the ingredients by hand, and I remember how the kitchen would be filled with the zesty aroma of fresh oranges.
As she patiently cranked away, we’d gather round, eyes wide with excitement, waiting for that delicious treat to reveal itself. When it finally emerged, creamy and perfectly orange, we knew it was worth the wait. Each scoop was a celebration of summer—the citrus notes bursting with flavor, each bite reminding us of sun-kissed days and carefree moments spent together.
Making this Orange Ice Cream transports me back to those cherished summers, and I love sharing this joyful recipe with friends and family. It’s not just about the ice cream; it’s about creating memories. So tie on your apron, and let’s make some of our own!
Ingredients
Here’s a list of everything you’ll need to create this delicious treat:
-
2 cups heavy whipping cream
The star of the show! This is what gives our ice cream that luxurious, creamy texture. If you want something lighter, you can substitute half-and-half, but the end result won’t be quite as rich. -
1 1/2 cups whole milk
This balances the creaminess and keeps the texture smooth. If you’re looking for a lower-fat version, you can use 2% milk, but it might be slightly less creamy. -
1 cup orange juice (fresh squeezed, about 3 oranges)
Fresh is key here! The bright flavor from freshly squeezed oranges can’t be beaten. If you’re short on time, use 100% pure orange juice without added sugars for a quicker option. -
1 cup sugar
This sweetens the deal! If you’re looking to cut down on sugar, you can try using agave syrup or honey, but keep in mind the balance of flavors may shift a bit. -
1 tablespoon orange extract
This boosts the orange flavor! If you find yourself without orange extract, vanilla extract can substitute, imparting a different kind of flavor but still very tasty. -
2 teaspoons vanilla extract
A classic addition that rounds out the flavors beautifully. You could also experiment with almond extract for a twist! -
Pinch of salt
A touch of salt enhances the sweetness and balances the flavors. Don’t skip it; it makes a difference!
Step-by-Step Instructions
Now that we’ve gathered our ingredients, let’s whip up this delicious Orange Ice Cream!
-
Mix the Base: In a large mixing bowl, whisk together the heavy whipping cream, whole milk, and granulated sugar. Keep whisking until the sugar fully dissolves. This step is crucial for a smooth finish—no one likes grainy ice cream!
-
Add the Citrus: Pour in the fresh orange juice, orange extract, vanilla extract, and a pinch of salt. Mix gently but thoroughly—this is where the flavor magic happens! Tasting your mixture at this point is key; it should be sweet and bursting with citrus goodness.
-
Chill the Mixture: Cover your bowl and place it in the fridge for at least one hour. This allows the flavors to meld beautifully! If you’re in a hurry, chilling for 30 minutes will work, but I promise the extra time is worth it.
-
Churn the Ice Cream: After chilling, pour the mixture into your ice cream maker and churn according to the manufacturer’s instructions. Most machines take about 20-30 minutes to churn to a soft-serve consistency. Pro tip: If you don’t have an ice cream maker, you can use a blender; just blend your mixture until smooth, pour it into a container, and freeze it, stirring every 30 minutes for the first 2-3 hours to break up ice crystals.
-
Freeze to Firm Up: Once churned, transfer the ice cream to a lidded container and freeze for at least 4 hours, or until firm. If you like a softer ice cream, feel free to eat it right away after churning—it will have a lovely, soft, scoopable texture!
-
Serve and Enjoy: Scoop into bowls, add your favorite toppings, and dig in! I love adding a sprinkle of zest or a slice of fresh orange for that extra pop of color!
Serving Suggestions
For the perfect serving experience, scoop your Orange Ice Cream into chilled bowls for that ultra-refreshing feel. A few sprigs of fresh mint or a thin slice of orange on the edge can elevate the look of your dish while adding a pop of color. Feeling extra fancy? A drizzle of honey or a sprinkle of crushed pistachios on top adds a delightful crunch that perfectly complements the creamy texture.
Recipe Variations
- Citrus Blast: Mix in zest from lemons or limes for a tangy twist.
- Creamy Dreamsicle: Add a swirl of vanilla ice cream to create a dreamy creamsicle effect.
- Orange Chocolate Delight: Fold in some dark chocolate chips or orange-infused chocolate shavings for an indulgent treat.
- Tropical Vibes: Combine orange juice with pineapple juice for a fruity tropical ice cream!
- Dairy-Free Option: Swap out the cream and milk for coconut cream and almond milk for a delicious dairy-free treat.
Chef’s Notes
Having fun in the kitchen can come with its fair share of mishaps! One time, I thought I’d be clever and try adding a batch of frozen berries to my orange ice cream. Let’s just say, “swampy orange” wasn’t quite the look I was going for. That’s the beauty of experimenting, though; if you try something new, you can learn what works and what doesn’t! My Orange Ice Cream recipe has evolved over the years, and I find new ways to put a twist on it with every batch. It’s all about making it your own!
FAQs and Troubleshooting
-
Why is my ice cream icy?
If your ice cream has ice crystals, it’s likely due to not enough fat in your base or not mixing it often enough while it freezes. Make sure to use full-fat cream and stir if you’re not using an ice cream maker! -
My mixture isn’t sweet enough. What can I do?
Taste your mixture before churning! If it’s lacking sweetness, feel free to add a little more sugar or honey until it hits just right. -
Can I make this without an ice cream maker?
Yes! If you don’t have an ice cream maker, simply blend your mixture until smooth, pour it into a freezer-safe container, and freeze, stirring every 30 minutes for the first few hours to break up ice crystals. -
How long does homemade ice cream last?
If properly stored in an airtight container, this Orange Ice Cream will last about 2-3 weeks in the freezer. However, I doubt it’ll last that long—it’s too delicious not to devour!
Nutritional Info
While homemade ice cream can be a tasty indulgence, moderation is key. This Orange Ice Cream will typically have around 240 calories per ½ cup serving, with about 14 grams of fat, 21 grams of carbohydrates, and 3 grams of protein. Nutritional values can vary based on substitutions and portion sizes, so always feel free to adjust according to your dietary needs!
There you have it – a delectable, refreshing Orange Ice Cream recipe that’s perfect for summer. I can’t wait for you to try this and create your own memories in the kitchen. Whether you’re enjoying it on your porch or serving it at a family gathering, I hope it brings as much joy to you as it has to me. So grab your ingredients, tie on that apron, and let’s make some kitchen magic happen together!
PrintHomemade Orange Ice Cream
A vibrant and refreshing Orange Ice Cream recipe, perfect for warm summer days.
- Prep Time: 15 minutes
- Cook Time: 0 minutes
- Total Time: 5 hours 15 minutes
- Yield: 8 servings 1x
- Category: Dessert
- Method: Churning
- Cuisine: American
- Diet: Vegetarian
Ingredients
- 2 cups heavy whipping cream
- 1 1/2 cups whole milk
- 1 cup orange juice (fresh squeezed, about 3 oranges)
- 1 cup sugar
- 1 tablespoon orange extract
- 2 teaspoons vanilla extract
- Pinch of salt
Instructions
- Mix the Base: In a large mixing bowl, whisk together the heavy whipping cream, whole milk, and granulated sugar until the sugar fully dissolves.
- Add the Citrus: Pour in the fresh orange juice, orange extract, vanilla extract, and a pinch of salt. Mix gently.
- Chill the Mixture: Cover your bowl and place it in the fridge for at least one hour.
- Churn the Ice Cream: Pour the mixture into your ice cream maker and churn according to the manufacturer’s instructions.
- Freeze to Firm Up: Transfer the ice cream to a lidded container and freeze for at least 4 hours.
- Serve and Enjoy: Scoop into bowls, add your favorite toppings, and dig in!
Notes
Serve with fresh mint or a slice of orange for added freshness. For a touch of elegance, drizzle with honey or sprinkle with crushed pistachios.
Nutrition
- Serving Size: 1/2 cup
- Calories: 240
- Sugar: 21g
- Sodium: 50mg
- Fat: 14g
- Saturated Fat: 8g
- Unsaturated Fat: 3g
- Trans Fat: 0g
- Carbohydrates: 21g
- Fiber: 0g
- Protein: 3g
- Cholesterol: 50mg
Keywords: orange ice cream, homemade ice cream, summer dessert, creamy dessert

Seasonal Blackberry Ice Cream Beginner-Friendly Summer Treat
Homemade Fresh Blackberry Ice Cream: A Summer Treat to Savor
Ah, summer! The season of sun-kissed skin, backyard barbecues, and, of course, delightful homemade ice cream. There’s nothing quite like the feeling of digging into a cold, creamy scoop of ice cream on a hot day. Today, I’m thrilled to share one of my favorite summer recipes: Homemade Fresh Blackberry Ice Cream. It’s a colorful and delicious treat that encapsulates the essence of summer in every spoonful.
What I adore about this blackberry ice cream recipe is that it’s not just about the satisfying creaminess; it’s also an ode to nature’s candy—those juicy, ripe blackberries. When you make this ice cream, you’re embracing the sweet, tart flavors of summer while creating a dessert that impresses without overwhelming. Let’s dive into this recipe, where I’ll guide you step-by-step to ensure your homemade ice cream turns out beautifully. Ready? Let’s make some magic in the kitchen!
A Sweet Memory
Growing up in a small town, summer meant my grandma’s house was the hub for family gatherings. On lazy Sunday afternoons, our backyard turned into a vibrant carnival with laughter, games, and, of course, food. One of the staples was my grandma’s berry ice cream. She’d gather blackberries from her garden, and with a few simple ingredients, would whip up the creamiest ice cream I’d ever tasted. I still remember the thrill of picking berries with my cousins and then the family’s collective excitement as we waited for the ice cream to churn. The moment those generous scoops were dished out, it was pure bliss. Each bite brought back the sunny memories of our summer gatherings. Fast forward to today, and I still crave that icy delight whenever blackberries are in season.
Ingredients
Here’s everything you’ll need to create this sensational blackberry ice cream:
-
2 cups fresh blackberries
These juicy gems are the star of the show! If blackberries are not available, you can easily swap them for raspberries or blueberries for a similar flavor profile. -
3/4 cup granulated sugar
Sweetness is key! This amount offers a perfect balance, but feel free to adjust to your taste. You could even experiment with honey or agave for a different sweetness. -
2 cups heavy cream
For that luxuriously creamy texture. If you’re looking for a lighter version, half and half works well, but expect a slightly different texture. -
1 cup whole milk
Adds creaminess but also some volume. You can substitute skim milk, but keep in mind that the final texture will be less rich. -
2 teaspoons pure vanilla extract
Using pure vanilla extract brightens the flavor. I always recommend avoiding imitation vanilla; a little goes a long way! -
1/4 teaspoon salt
Just a pinch! This enhances the overall flavor and balances the sweetness beautifully. -
1 tablespoon lemon juice
Fresh lemon juice brightens up the whole mixture and enhances the blackberry flavor. Trust me on this one—it’s a game changer!
Step-by-Step Instructions
Let’s get churning! Here’s how you can make your fabulous blackberry ice cream.
-
Prepare the Blackberries
Start by rinsing your blackberries under cold water. Make sure to gently pat them dry. In a medium bowl, sprinkle about 2 tablespoons of the granulated sugar over the blackberries. Allow them to sit for about 10-15 minutes so the sugar can draw out their delicious juices, giving you a natural blackberry syrup. -
Mash and Strain
After the blackberries have marinated in sugar, take a fork and lightly mash them. You’re not looking for a puree—just enough to break some of them open and release their juice. Once mashed, pour the mixture through a fine-mesh sieve into another bowl. Press down on the solids to extract as much juice as possible, then set that bowl aside. -
Mix the Cream Base
In a large mixing bowl, whisk together the heavy cream, whole milk, remaining sugar (adjust to your taste), vanilla extract, salt, and lemon juice. The mixture should feel rich and silky. If you have an electric mixer, you can use it on low speed to blend everything seamlessly. -
Combine Blackberry Mixture
Add the blackberry juice to the cream mixture and stir gently to combine. If you prefer a few chunks of blackberries in your ice cream, you can fold them in at this point—adding texture that’s simply divine. -
Chill the Mixture
Cover the bowl with plastic wrap and refrigerate the mixture for at least 2 hours (or overnight if you’re a planner!). Chilling the mixture ensures a smoother texture once it’s churned. -
Churn the Ice Cream
Pour the chilled berry-cream mixture into your ice cream maker following the manufacturer’s instructions. If you don’t have an ice cream maker, you can still make this work! Pour the mixture into a large bowl and place it in the freezer. Every 30 minutes, take it out and use a fork to scrape and stir it, breaking up any ice crystals. Repeat this process until the ice cream is thickened and creamy, usually about 3-4 hours. -
Freeze to Firm Up
Once the ice cream reaches your desired consistency, transfer it to an airtight container and place it in the freezer for at least 4 hours to firm up fully.
Serving Suggestions
When it’s finally time to serve your homemade blackberry ice cream, consider a few easy ideas to elevate your dish! Serve it in beautiful bowls and consider adding a sprig of fresh mint on top for a pop of color and freshness. You can also drizzle some raspberry sauce or a balsamic reduction for a gourmet touch. And if you really want to impress, sandwich it between two soft cookies for a delightful ice cream sandwich!
Recipe Variations
-
Berry Medley: Try using a mix of blackberries, raspberries, and blueberries for a colorful twist on this classic recipe.
-
Coconut Blackberry Ice Cream: Swap half of the heavy cream for coconut cream for a tropical flavor.
-
Vegan Option: Use coconut milk or an almond milk base with agave syrup instead of sugar for a delicious vegan-friendly treat.
-
Chocolate Swirl: Stir in some melted dark chocolate for a decadent fudgy experience!
-
Spiced Blackberry: Add a dash of cinnamon or cardamom to the cream mixture for a unique warm flavor that complements the berries.
Chef’s Notes
Every summer, this blackberry ice cream recipe takes me back to those wonderful afternoons spent with my grandma. It’s funny how a simple treat can evoke so many feelings of nostalgia and joy. Over the years, I’ve tweaked this recipe to match my taste and lifestyle, experimenting with different fruits and flavor combinations. Each iteration has taught me something new about balancing flavors and textures. The beauty of homemade ice cream is that it evolves with you—allowing space for creativity without fear! Just remember, the key is always to have fun in the kitchen.
FAQs and Troubleshooting
Q: Can I use frozen blackberries instead of fresh?
A: Absolutely! Just make sure to thaw them completely and drain off excess liquid before proceeding with the recipe. Frozen berries may slightly alter the texture but still yield delicious results.
Q: My ice cream turned out icy. What went wrong?
A: This could happen if the mixture wasn’t chilled sufficiently before churning. Additionally, incorporating too much air during churning can create ice crystals. A few more folds in the mixture as it freezes can help.
Q: How long can I store the ice cream?
A: Homemade ice cream can last about 2-3 weeks in the freezer, though it may need some time to soften when you take it out before scooping!
Q: How can I prevent ice crystals from forming?
A: Make sure to blend your mixture thoroughly and store the ice cream in an airtight container. If you’re freezing it without an ice cream maker, frequent stirring every 30 minutes will help create a creamy texture by breaking up ice crystals.
Nutritional Info (optional)
While I believe in enjoying dessert, it’s also great to be mindful of what you’re consuming. Here’s a general overview (per serving of 1/2 cup):
- Calories: Approx. 250
- Fat: 17g
- Carbohydrates: 24g
- Sugar: 20g
- Protein: 3g
Indulging in homemade blackberry ice cream isn’t just food; it’s a celebration of summer’s sweetest moments. I hope this recipe finds a warm spot in your heart and kitchen. So, tie on your apron, gather your ingredients, and let’s create something delicious together! Cheers to summer and all its tasty treats!
PrintHomemade Fresh Blackberry Ice Cream

A delightful homemade blackberry ice cream that captures the essence of summer with every creamy scoop.
- Prep Time: 15 minutes
- Cook Time: 10 minutes
- Total Time: 385 minutes
- Yield: 4 servings 1x
- Category: Dessert
- Method: Churning
- Cuisine: American
- Diet: Vegetarian
Ingredients
- 2 cups fresh blackberries
- 3/4 cup granulated sugar
- 2 cups heavy cream
- 1 cup whole milk
- 2 teaspoons pure vanilla extract
- 1/4 teaspoon salt
- 1 tablespoon lemon juice
Instructions
- Prepare the blackberries by rinsing them under cold water and patting them dry. Sprinkle 2 tablespoons of sugar over them and let sit for 10-15 minutes.
- Mash the blackberries lightly with a fork to release juices, then strain through a fine-mesh sieve into another bowl.
- Mix the heavy cream, whole milk, remaining sugar, vanilla extract, salt, and lemon juice in a mixing bowl until rich and silky.
- Combine the blackberry juice with the cream mixture and stir gently. Optionally, fold in some blackberry chunks.
- Chill the mixture in the refrigerator for at least 120 minutes.
- Churn the chilled mixture in an ice cream maker according to the manufacturer’s instructions or freeze while stirring every 30 minutes for 3-4 hours.
- Freeze in an airtight container for at least 240 minutes before serving.
Notes
Consider serving with fresh mint, raspberry sauce, or as an ice cream sandwich between cookies.
Nutrition
- Serving Size: 1/2 cup
- Calories: 250
- Sugar: 20g
- Sodium: 50mg
- Fat: 17g
- Saturated Fat: 10g
- Unsaturated Fat: 7g
- Trans Fat: 0g
- Carbohydrates: 24g
- Fiber: 2g
- Protein: 3g
- Cholesterol: 70mg
Keywords: blackberry ice cream, summer dessert, homemade ice cream, berry dessert