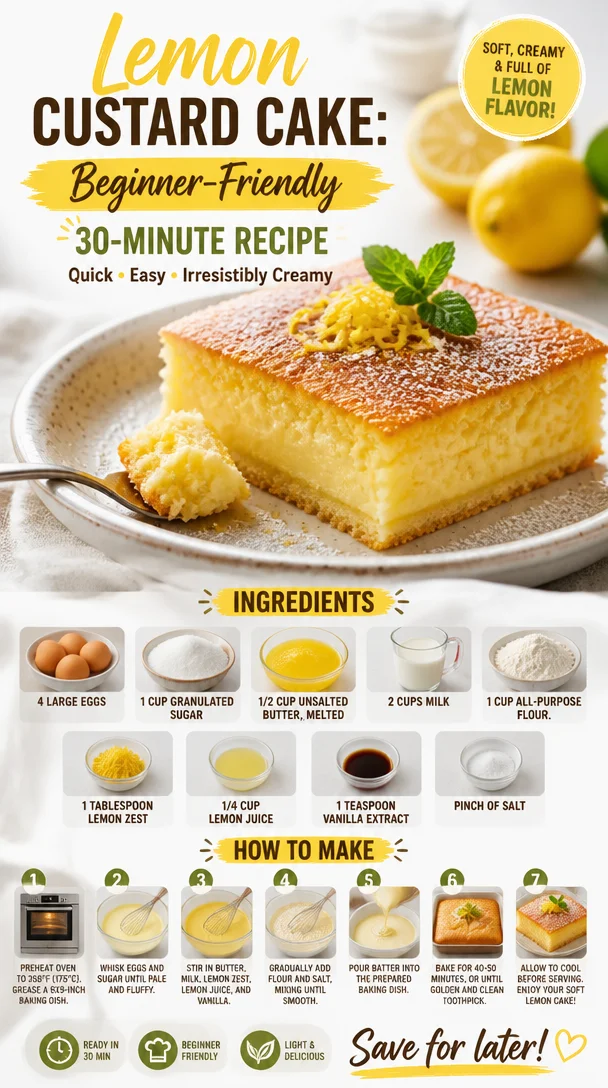
Lemon Custard Cake: Beginner-Friendly 30-Minute Recipe
The Magic Lemon Custard Cake: A Sweet Slice of Happiness
Hello, lovely foodies! I’m thrilled to have you here, ready to embark on a culinary adventure that will tantalize your taste buds and brighten your day. Today, we’re diving into the sunshine-filled world of my Magic Lemon Custard Cake. This delightful treat harmoniously blends the zesty brightness of lemons with the comforting textures of creamy custard and airy cake, making it a showstopper for any occasion.
Now, you might wonder, what’s so magical about this cake? Well, let me tell you—a whimsical phenomenon occurs as this dessert bakes. All it takes is a few simple ingredients that come together to create a cake on top with a luscious custard layer beneath. Sounds dreamy? It is! Plus, it’s easy enough for weeknight baking and elegant enough to wow your dinner guests. So, let’s get started on this delightful journey together!
A Nostalgic Slice of My Childhood
This recipe has a special place in my heart, reminiscent of warm summer afternoons spent in my grandmother’s kitchen. Every year, as lemons ripened on the tree in her backyard, she would whip up her special lemon custard dessert that filled the house with a fragrant, zesty aroma. I can still picture her, apron tied, grating fresh lemon zest and squeezing juice, while I anxiously perched on a stool, eager to help.
"Cooking is love made visible," she would say with a twinkle in her eye. That sentiment has stuck with me over the years and inspired my journey into the kitchen. The love, laughter, and deliciousness shared around her kitchen table became my foundation for hosting and creating memorable meals. Whenever I make this Magic Lemon Custard Cake, I feel like I’m channeling my grandma’s spirit, filling my own home with warmth and sweetness.
Ingredients
To whip up this delightful cake, you’ll need the following ingredients:
-
4 large eggs
Eggs provide structure and richness. If you’re looking to make a vegan version, aquafaba (the liquid from canned chickpeas) can work wonders! -
1 cup granulated sugar
Sweetness is key! You can substitute with coconut sugar or a sugar alternative like erythritol for a lower-calorie option. -
1/2 cup unsalted butter, melted
Unsalted butter lends a rich flavor. If you prefer a dairy-free version, coconut oil or vegan butter would do the trick. -
2 cups milk
Regular dairy milk is my go-to, but almond or oat milk are excellent dairy-free alternatives. Just ensure they’re unsweetened! -
1 cup all-purpose flour
This forms the base of the cake. For a gluten-free version, you can swap it out for a 1:1 gluten-free flour blend. -
1 tablespoon lemon zest
Zesty and fragrant, lemon zest brightens the flavor. Always use organic lemons to avoid pesticides. -
1/4 cup lemon juice
Fresh lemon juice is a must for that signature citrus kick. Bottled lemon juice lacks the bright freshness! -
1 teaspoon vanilla extract
Adds depth and a warm flavor. Always opt for pure vanilla extract over artificial for the best results. -
Pinch of salt
Just a little salt balances the sweetness and enhances overall flavor. Don’t skip it!
With these ingredients, you’re on your way to creating something magical!
Step-by-Step Instructions
Now, let’s get into the nitty-gritty of baking this beautiful cake. Follow these simple steps for a dessert that will impress!
-
Preheat Your Oven:
Start by preheating your oven to 350°F (175°C). This ensures that your cake will bake evenly and rise beautifully. -
Prepare the Baking Dish:
Grease an 8×8-inch baking dish with butter or non-stick spray. For an extra touch, consider lining the bottom with parchment paper for easy removal later. -
Whisk the Eggs and Sugar:
In a large mixing bowl, combine the eggs and granulated sugar. Use a whisk to mix them until you see a pale and frothy mixture. This step is crucial for creating a light texture! -
Add Melted Butter:
Slowly drizzle the melted butter into your egg-sugar mixture while whisking. This combines the rich flavors without cooking the eggs. Make sure the butter is not too hot; otherwise, it’ll scramble your eggs! -
Incorporate Milk:
Pour in the milk, followed by the lemon juice and zest, and vanilla extract. Stir gently until combined. The mixture should smell incredible at this point—tangy and sweet! -
Sift in the Flour and Salt:
Gradually sift in the flour and the pinch of salt. Use a spatula to fold everything together gently. Don’t overmix; a few flour streaks are okay. -
Pour the Batter into Your Dish:
Gently pour the batter into your prepared baking dish. The batter might look thin, but don’t worry; it will bake into the magical layers we’re aiming for! -
Bake Your Cake:
Place your dish in the center of the preheated oven and bake for about 45–50 minutes. The top should be a lovely golden brown, while the center is set but still a bit wobbly. The magic happens as it cools! -
Cool and Chill:
Once baked, allow your cake to cool at room temperature for around 15 minutes. Then, refrigerate for at least 2 hours (or overnight) to let it set. Patience is key here, trust me! -
Serve with Flair:
Once chilled, cut into squares and serve! You can dust powdered sugar on top or add some whipped cream for an extra touch of indulgence.
Serving Suggestions
When it comes to serving your Magic Lemon Custard Cake, presentation is key. Place a square on a pretty dessert plate and dust it with powdered sugar for a classic look. Add a dollop of freshly whipped cream or a scoop of vanilla ice cream alongside it.
For a sprinkle of color and freshness, garnish with a few fresh berries or mint leaves. Not only does this elevate the look, but the acidity of the berries complements the cake beautifully. Trust me; your guests will rave about this delightful treat!
Recipe Variations
To add a twist to the traditional Magic Lemon Custard Cake, here are some fun variations to consider:
- Lime Custard Cake: Swap lemons for limes for a zesty twist that’s equally delicious.
- Berry Swirl: Fold in a handful of fresh berries (like blueberries or raspberries) into the batter before baking for added sweetness and flavor.
- Coconut Custard Cake: Add shredded coconut to the batter for a tropical flair!
- Herbal Infusion: Infuse the milk with fresh thyme or rosemary for an unexpected herbal note that elevates the citrus flavor.
- Chocolate Drizzle: For chocolate lovers, a drizzle of melted dark chocolate on top is heavenly.
Each variation brings its special touch to this beloved cake—feel free to get creative and make it your own!
Chef’s Notes
I have to tell you, this Magic Lemon Custard Cake has evolved quite delightfully over the years. Initially, my grandma made it with just a few ingredients and without much fuss, but I’ve had a blast experimenting with it! The first time I tried to add lavender, I ended up overdoing it and the cake smelled more like soap than dessert—what a learning experience that was!
Over time, I’ve embraced its simplicity while finding ways to layer in flavors and textures. It’s an incredibly forgiving recipe, which is what I love about it. Even when I have kitchen mishaps (and I definitely do!), this cake always manages to turn out beautifully—proving that magic happens in the kitchen!
FAQs and Troubleshooting
1. Why did my cake not set properly?
If your cake is still too wobbly after baking, it might need more time in the oven. Every oven is different, so keep an eye on it toward the end of the baking time.
2. Can I make this cake ahead of time?
Absolutely! This cake actually gets better as it sits. I recommend making it a day in advance and letting it chill in the refrigerator overnight.
3. How do I know when the cake is done?
Your cake is ready when the edges are set, and the center has a bit of a jiggle. A toothpick inserted into the center should have moist crumbs, not raw batter.
4. What if I don’t have enough lemons?
No worries! If you’re short on lemons, consider using a mix of lemon and lime juice or even adding a splash of orange juice for a unique twist.
Nutritional Info
If you’re keeping an eye on nutrition, keep in mind that each slice of this Magic Lemon Custard Cake contains approximately:
- Calories: 250
- Fat: 12g
- Carbohydrates: 35g
- Protein: 5g
These values may vary depending on your substitutions and serving sizes, but it’s still a delightful treat worth indulging in!
And there you have it! A delightful journey into the world of Magic Lemon Custard Cake. It’s a recipe that embodies my philosophy of cooking—beautiful, approachable, and full of love. So go ahead, tie on that apron, and let’s create delicious memories together! Happy baking!
PrintMagic Lemon Custard Cake
A delightful cake that combines a zesty lemon flavor with the comforting textures of custard and cake, perfect for any occasion.
- Prep Time: 15 minutes
- Cook Time: 50 minutes
- Total Time: 65 minutes
- Yield: 8 servings 1x
- Category: Dessert
- Method: Baking
- Cuisine: American
- Diet: Vegetarian
Ingredients
- 4 large eggs
- 1 cup granulated sugar
- 1/2 cup unsalted butter, melted
- 2 cups milk
- 1 cup all-purpose flour
- 1 tablespoon lemon zest
- 1/4 cup lemon juice
- 1 teaspoon vanilla extract
- Pinch of salt
Instructions
- Preheat your oven to 350°F (175°C).
- Prepare an 8×8-inch baking dish with butter or non-stick spray.
- Whisk the eggs and sugar until pale and frothy.
- Add the melted butter slowly while whisking.
- Incorporate the milk, lemon juice, zest, and vanilla extract.
- Sift in the flour and salt, folding gently.
- Pour the batter into the prepared baking dish.
- Bake for about 45–50 minutes until golden brown.
- Cool at room temperature for 15 minutes, then refrigerate for at least 2 hours.
- Serve chilled, dusting with powdered sugar if desired.
Notes
Better when made a day in advance. This cake improves as it sits.
Nutrition
- Serving Size: 1 serving
- Calories: 250
- Sugar: 18g
- Sodium: 150mg
- Fat: 12g
- Saturated Fat: 7g
- Unsaturated Fat: 3g
- Trans Fat: 0g
- Carbohydrates: 35g
- Fiber: 1g
- Protein: 5g
- Cholesterol: 150mg
Keywords: lemon cake, dessert, custard, baking, summer dessert, sweet treats

Beginner-Friendly Homemade Fruit Tart: 6-Ingredient Recipe
Delight in Every Slice: Homemade Fruit Tart Recipe
Hello, fellow food lovers! It’s Savannah Pierce here from Ivory Apron, and today we’re diving into the wonderful world of homemade fruit tarts. There’s something simply magical about the vibrant colors and refreshing flavors of a fruit tart, wouldn’t you agree? Not only do they look stunning on any table, but they also taste like a slice of summer, no matter what the season!
Imagine this: a buttery, flaky crust cradling a creamy, dreamy filling, all topped with an array of freshly sliced fruits glistening like jewels. It’s the perfect dessert for any occasion, from casual family dinners to elegant gatherings. And the best part? You don’t need to be a pastry chef to impress your guests with this beauty. All it takes is a little guidance and a sprinkle of love!
In this blog post, I’ll take you through my cherished fruit tart recipe step by step. You’ll hear some of my kitchen stories, get a taste of the techniques that make this dessert shine, and discover ways to customize it to suit your taste. So, tie on that apron, grab your whisk, and let’s create a dessert that’ll bring smiles all around the table!
A Slice of Nostalgia
Let me take you back to my childhood for a moment. I can still picture the scene—my grandmother’s kitchen was always buzzing with activity, the air fragrant with the delicious aromas of baked goods and fresh fruits. Every summer, when the fruits were at their peak, she’d gather us around the table to make her famous fruit tart.
The process was a family affair. My siblings and I would help wash the strawberries, peel the kiwi, and hunt for the ripest blueberries in her garden. Laughter filled the kitchen as we fought over who got to pour the creamy custard into the crust. But the best part? Watching my grandmother carefully arrange the fruits into an elaborate design, as if she was painting a masterpiece.
Those moments taught me that cooking is about more than just food; it’s about love and togetherness. Today, as I share this homemade fruit tart recipe with you, I hope you’ll create your own memories in the kitchen—just like my family did!
Ingredients
Let’s get to the fun part! Here’s what you’ll need to create this gorgeous fruit tart:
-
1 1/2 cups all-purpose flour
The foundation of our tart crust. For a gluten-free option, you can use a 1:1 gluten-free flour blend. -
1/2 cup powdered sugar
This adds just the right amount of sweetness to our crust while keeping it light and tender. If you’re in a pinch, you can blend regular granulated sugar in a blender for a quick substitute. -
1/2 cup unsalted butter, softened
The buttery goodness is what gives our tart its rich flavor and flaky texture. If you’re watching your dairy intake, coconut oil can be a good alternative, though it may alter the flavor slightly. -
1 large egg yolk
This adds richness and helps bind our crust together. Use a flaxseed meal mixed with water for a vegan substitute if needed. -
1 teaspoon vanilla extract
Adds a lovely hint of sweetness and depth to the crust. Feel free to use almond extract for an exciting twist! -
2 cups milk
The base for our creamy custard filling. You can substitute almond milk, coconut milk, or any other milk alternative for a dairy-free version. -
1/4 cup granulated sugar
Balances the flavors in our custard. You can reduce the amount for a less sweet filling, or use honey or maple syrup for a natural touch. -
3 tablespoons cornstarch
Acts as a thickener for our custard. If you don’t have cornstarch, you can use the same amount of all-purpose flour, though the texture might be slightly different. -
1/4 teaspoon salt
A pinch of salt enhances all the flavors and balances the sweetness in our filling. -
1 teaspoon vanilla extract
A repeat here because it just adds that extra zest to our custard. -
Assorted fresh fruits (strawberries, kiwi, blueberries, etc.)
The star of our tart! Feel free to use any fresh fruits you love—mango, peaches, and raspberries make fabulous choices too!
Step-by-Step Instructions
Now that we’ve gathered all our ingredients, let’s get cooking! Here’s how to whip up this delightful fruit tart:
1. Preheat the Oven
Preheat your oven to 350°F (175°C). This will ensure that your crust bakes evenly and turns golden brown. While the oven is heating up, let’s get started on the crust!
2. Make the Tart Crust
In a mixing bowl, combine the all-purpose flour and powdered sugar. Use a whisk to blend them together nicely. Next, add the softened butter and egg yolk. Using a fork or your fingers, mix until the mixture resembles coarse crumbs.
Chef Tip: If your butter is too cold, it’ll be hard to incorporate. Make sure it’s at room temperature and soft to achieve that perfect buttery texture.
3. Form the Dough
Now, add the vanilla extract and mix until the dough begins to come together. If it feels too crumbly, try adding a teaspoon of ice-cold water at a time until it holds together.
4. Chill the Dough
Shape the dough into a disc, wrap it in plastic wrap, and place it in the fridge for about 30 minutes. Chilling helps the butter solidify, which will yield a flakier crust.
5. Roll Out the Dough
Once chilled, sprinkle a little flour on your countertop and roll out the dough to about 1/4-inch thickness. Carefully transfer the dough to a 9-inch tart pan, pressing it into the corners and trimming any excess dough hanging over the edges.
Chef Hack: Use a fork to poke a few holes in the bottom of the crust to allow steam to escape, preventing it from puffing up while baking.
6. Bake the Crust
Line the crust with parchment paper and fill it with pie weights or dried beans to weigh it down. Bake for 15-20 minutes or until the edges are lightly golden. Allow it to cool completely before adding the filling.
7. Create the Custard Filling
In a medium saucepan, combine milk, granulated sugar, cornstarch, salt, and vanilla extract. Whisk this mixture over medium heat until it thickens—this usually takes about 5-7 minutes. Keep stirring constantly to prevent any lumps from forming.
8. Cool the Custard
Remove the custard from heat and let it cool for a few minutes. Pour it into the cooled tart shell and spread it out evenly with a spatula.
Chef Tip: You can place plastic wrap directly on the surface of the custard to prevent a skin from forming as it cools!
9. Arrange the Fresh Fruits
Once the custard has cooled completely, it’s time to decorate! Slice your fresh fruits and artistically arrange them on top of the custard. Have fun with the colors and shapes—this is your chance to get creative!
Serving Suggestions
For serving, consider keeping it simple yet elegant! Slice the tart into wedges and place each piece on a beautiful plate. A sprinkle of powdered sugar on top adds an enchanting touch, while a dollop of whipped cream or a scoop of vanilla ice cream elevates the experience even more.
Recipe Variations
Want to mix things up? Here are some fun variations to consider:
-
Chocolate Custard: Add unsweetened cocoa powder to the custard for a rich chocolate twist.
-
Lemon Zest: Enhance the custard with lemon zest for a refreshing citrus flavor.
-
Nut Crust: Swap half the flour with ground almonds to create a nutty and crunchy crust.
-
Savory Tart: Replace the fruits with roasted vegetables and add goat cheese for a delicious savory option.
Chef’s Notes
This fruit tart recipe has been a staple in my family for years. It’s one of those lovely desserts that you can whip up for any occasion, and it always brings a smile to people’s faces. Over the years, I’ve experimented endlessly with different fruits and flavors, but the classic version still steals my heart.
One of my favorite kitchen anecdotes involves a particularly messy attempt to slice strawberries. I ended up with juice all over my shirt and kitchen counter, but I couldn’t stop laughing at myself. It’s moments like these that remind me that cooking doesn’t have to be perfect—it just has to be enjoyed!
FAQs and Troubleshooting
1. Why is my tart crust soggy?
Make sure to pre-bake the crust fully and allow it to cool before adding the custard. The pie weights are crucial to prevent bubbling.
2. How do I store leftover tart?
Store it in the refrigerator, tightly wrapped in plastic wrap for up to 2-3 days. Note that the fruits may lose some freshness over time.
3. Can I use frozen fruits?
While fresh fruits are ideal for presentation, you can use frozen fruits if they are thawed and properly drained to avoid excess moisture on top of the custard.
4. How do I stop my custard from curdling?
Constant stirring is key! Keep the heat medium—not too high. If you notice it thickening too quickly, remove it from the heat momentarily while you stir.
Nutritional Info (Optional)
While I encourage enjoying desserts like this in moderation, I understand that nutritional details can be helpful! This tart is rich in vitamins from the fresh fruits and provides a delightful balance of carbohydrates and fats from the crust and filling.
And there you have it—a homemade fruit tart that’s as delightful to make as it is to eat! So gather your loved ones, indulge in some kitchen fun, and create a beautiful dessert that will not only satisfy your sweet tooth but also whisk you down memory lane, just like my grandmother did for me. Happy baking, friends!
PrintHomemade Fruit Tart

A delightful homemade fruit tart featuring a buttery crust, creamy custard, and an assortment of fresh fruits.
- Prep Time: 30 minutes
- Cook Time: 20 minutes
- Total Time: 50 minutes
- Yield: 8 servings 1x
- Category: Dessert
- Method: Baking
- Cuisine: American
- Diet: Vegetarian
Ingredients
- 1 1/2 cups all-purpose flour
- 1/2 cup powdered sugar
- 1/2 cup unsalted butter, softened
- 1 large egg yolk
- 1 teaspoon vanilla extract
- 2 cups milk
- 1/4 cup granulated sugar
- 3 tablespoons cornstarch
- 1/4 teaspoon salt
- 1 teaspoon vanilla extract
- Assorted fresh fruits (strawberries, kiwi, blueberries, etc.)
Instructions
- Preheat your oven to 350°F (175°C).
- Combine the flour and powdered sugar in a mixing bowl.
- Add the softened butter and egg yolk, mixing until it resembles coarse crumbs.
- Mix in the vanilla extract until the dough starts to come together.
- Shape the dough into a disc, wrap it in plastic wrap, and chill for 30 minutes.
- Roll out the dough to about 1/4-inch thickness and transfer to a tart pan.
- Line the crust with parchment paper, fill with pie weights, and bake for 15-20 minutes.
- Combine milk, granulated sugar, cornstarch, salt, and vanilla in a saucepan and whisk over medium heat until thickened.
- Remove from heat and let cool, then pour into the tart shell.
- Arrange the fresh fruits on top of the cooled custard.
Notes
For variations, consider chocolate custard, lemon zest, a nut crust, or replacing fruits with roasted vegetables.
Nutrition
- Serving Size: 1 slice
- Calories: 250
- Sugar: 10g
- Sodium: 180mg
- Fat: 14g
- Saturated Fat: 8g
- Unsaturated Fat: 4g
- Trans Fat: 0g
- Carbohydrates: 32g
- Fiber: 2g
- Protein: 4g
- Cholesterol: 40mg
Keywords: fruit tart, dessert, baking, fresh fruits, custard tart