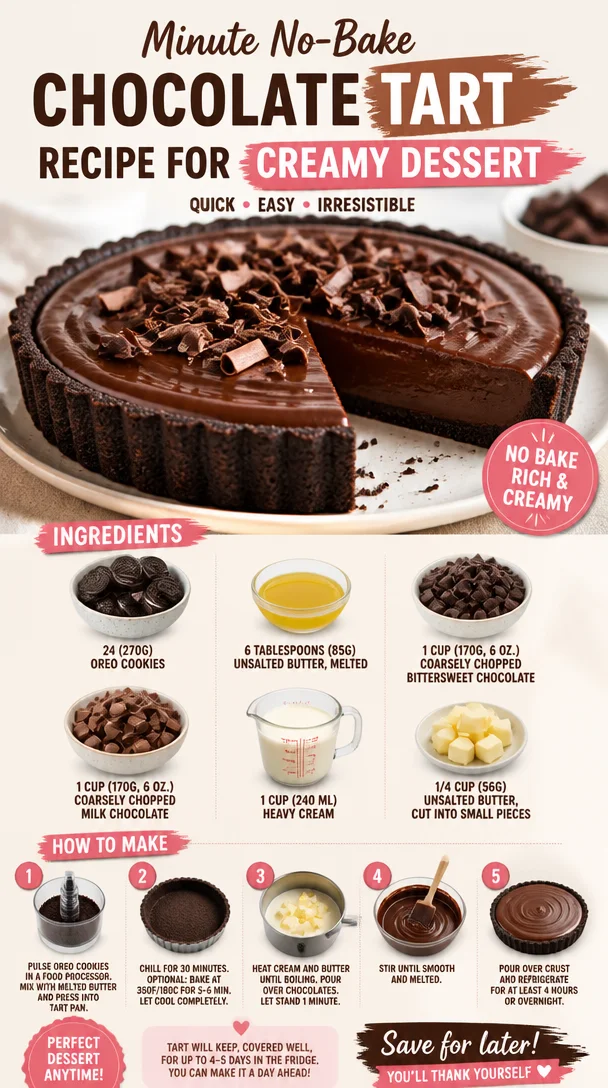
Minute No-Bake Chocolate Tart Recipe for Creamy Dessert
Indulge in Elegance: No-Bake Chocolate Tart
Hello, fellow foodies! Today, I’m thrilled to share a recipe that’s a surefire way to impress your guests without spending hours in the kitchen. I’m talking about the silky-smooth, decadently rich No-Bake Chocolate Tart. If you’ve ever thought that creating a dessert that looks elegant means dealing with complicated techniques, think again! This tart is not only distressingly easy to make, but it also tastes like it belongs in a fancy patisserie.
Picture this: a buttery, cookie crust cradling a luscious filling of bittersweet and milk chocolate, all topped off with lightly whipped cream. And the best part? You don’t have to turn on your oven! Whether it’s a dinner party, a special celebration, or just a cozy night at home, this tart fits beautifully into any occasion. So let’s dive in and create something delicious together!
A Sweet Memory
Before I get into the nitty-gritty of making this tart, let me share a little story that always brings a smile to my face. It was one hot summer evening, and I was tasked with preparing dessert for a family gathering. My grandma, a brilliant baker herself, had shown me the importance of balancing flavors and textures. I can still hear her soft voice guiding me.
I wanted to impress everyone and decided to whip up a no-bake chocolate tart! So there I was, smirking with confidence, when I discovered I’d accidentally used salted butter instead of unsalted in my crust. Instead of panicking, I laughed it off and thought, "Why not embrace the unexpected?" The result? An intriguing sweet-savory contrast that everyone adored. From then on, my family started asking for that "salted version" of the tart. That little mishap became a beautiful culinary story and a signature dish in our home. Let’s preserve that spirit of adventure as we make this tart today!
Ingredients
Before we begin rolling up our sleeves, let’s gather the stars of our show:
-
24 (270g) Oreo cookies: The base of our tart! These provide a perfect chocolatey flavor. Feel free to substitute with any chocolate cookie or even graham crackers if you’re feeling adventurous.
-
6 tablespoons (85g) unsalted butter, melted: This helps bind the crust together and gives it a rich flavor. If you want a dairy-free option, use coconut oil instead!
-
1 cup (170g, 6 oz.) coarsely chopped bittersweet chocolate: This chocolate adds that deep, intense chocolate flavor we all adore. You can swap it with dark chocolate if you prefer something even richer.
-
1 cup (170g, 6 oz.) coarsely chopped milk chocolate: For a sweeter note to balance the bittersweet chocolate. If you like it more intense, you can fully substitute it with dark chocolate.
-
1 cup (240 ml) heavy cream: The creaminess of the filling comes from this ingredient. If you need a lighter version, you can use half-and-half, but the texture will be less creamy.
-
1/4 cup (56g) unsalted butter, cut into small pieces: This adds a luscious finish to our chocolate filling and helps it set beautifully. Substitute with vegan butter for a dairy-free option.
Step-by-Step Instructions
Ready to get your hands chocolatey? Let’s get started on this delightful No-Bake Chocolate Tart!
Step 1: Prepare the Crust
-
Crush the Cookies: Place the Oreo cookies into a food processor and pulse them into fine crumbs. You can also seal them in a zip-top bag and crush them with a rolling pin if you don’t have a food processor—great way to let off some steam!
- Chef Tip: For a crunchy texture, leave a few larger pieces in the mix.
-
Mix with Melted Butter: In a mixing bowl, combine the cookie crumbs with the melted unsalted butter. Stir until the mixture resembles wet sand.
- Commentary: This step is super crucial as it binds the crust together.
-
Form the Crust: Press the mixture evenly into the bottom and up the sides of a tart pan. Make sure it’s compact so it holds together when we slice into it later.
- Little Hack: If you don’t have a tart pan, you can use a pie dish!
-
Chill: Pop the crust into the fridge for about 30 minutes to firm up. Trust me; this little patience pays off.
Step 2: Make the Filling
-
Prepare the Chocolate: In a medium bowl, combine the chopped bittersweet and milk chocolates. If you have a double boiler, that’s fabulous! If not, a heat-safe bowl over a pot of simmering water works well too—just ensure the bowl isn’t touching the water.
-
Heat the Cream: In a saucepan, gently heat the heavy cream over medium heat until it begins to simmer. Watch closely; you don’t want it to boil.
- Tip: Swirl the pan occasionally for even heating.
-
Combine: Pour the hot cream over the chopped chocolate. Let it sit for a minute or two, which allows the chocolate to melt.
- Chef Insight: This step is crucial for getting that silky texture!
-
Stir: Gently stir until the mixture is smooth and glossy. If using, add in the small pieces of butter and stir until fully melted in.
- Commentary: Look at that shine! If it’s not melting completely, you can return it to the heat for a few seconds.
Step 3: Assemble the Tart
-
Pour Filling into the Crust: Carefully pour the luscious chocolate mixture into the prepared crust.
- Tip: Use a spatula to spread it evenly for a smooth finish.
-
Chill Again: Return the tart to the fridge and allow it to set for at least two hours, or overnight if you can resist.
- Secret: The longer it sets, the better it tastes!
Step 4: Serve and Enjoy!
- Slice and Serve: When you’re ready to indulge, take the tart out of the fridge. Slice into generous wedges and serve as is, or add a dollop of whipped cream on top for that extra flair. Garnish with chocolate shavings or fresh berries to elevate your presentation.
- Plating Tip: Serve on a beautiful cake stand for a touch of elegance!
Recipe Variations
Feeling creative? Here are a few delicious variations you might enjoy:
- Mint Chocolate Tart: Add a few drops of peppermint extract to the chocolate filling for a refreshing twist.
- Nutty Delight: Incorporate crushed nuts like almonds or hazelnuts into the crust for added flavor and crunch.
- Fruit Infusion: Top with fresh raspberries or strawberries, or swirl in a raspberry puree before setting.
- Spiced Chocolate: Add a pinch of sea salt or a sprinkle of cayenne pepper to the filling for a subtle kick!
Chef’s Notes
This No-Bake Chocolate Tart has been a staple in my repertoire for years. Over time, I have experimented with various flavors and toppings, and each time it astonishes me how something so simple can impress on so many levels. I’ve had friends who were convinced they couldn’t cook make this tart with success! It’s become a culinary bridge for many, introducing them to the joys of dessert-making without the fuss.
There’s also something magical about watching the filling set—believe me when I say the wait is worth it! Everyone deserves a slice of indulgence, and this tart is just the ticket to create those joyful moments around the table.
FAQs and Troubleshooting
-
Why is my chocolate filling not smooth?
- If your filling has lumps, it may be that the chocolate didn’t melt completely. Be sure to stir thoroughly and return it to gentle heat to salvage the texture.
-
Can I freeze the tart?
- Yes! You can freeze the tart. Just wrap it well in plastic wrap. To serve, let it defrost in the fridge for several hours.
-
How do I store leftovers?
- Store any leftover tart in an airtight container in the fridge for up to 4-5 days. If you don’t lose your willpower, that is!
-
My crust is falling apart when I slice it!
- Ensure that you pressed the crust firmly into the pan. If it still crumbles, consider adding a little more melted butter next time to help bind it better.
Nutritional Info
Per slice (based on 12 servings): Approximately 320 calories, 22g fat, 34g carbs, 4g protein (note: values will vary depending on specific ingredients used).
Now that you have the recipe, I hope you feel inspired to make this No-Bake Chocolate Tart! Remember, good cooking is not just about the end result; it’s about the stories and experiences we create along the way. So tie on your apron, gather those ingredients, and let’s make something delectable together. Cheers to wonderful moments around your table!
PrintNo-Bake Chocolate Tart
Impress your guests with this easy and elegant No-Bake Chocolate Tart, featuring a cookie crust and a luscious chocolate filling.
- Prep Time: 15 minutes
- Cook Time: 0 minutes
- Total Time: 135 minutes
- Yield: 12 servings 1x
- Category: Dessert
- Method: No-Bake
- Cuisine: French
- Diet: Vegetarian
Ingredients
- 24 Oreo cookies (270g), crushed
- 6 tablespoons (85g) unsalted butter, melted
- 1 cup (170g) coarsely chopped bittersweet chocolate
- 1 cup (170g) coarsely chopped milk chocolate
- 1 cup (240ml) heavy cream
- 1/4 cup (56g) unsalted butter, cut into small pieces
Instructions
- Prepare the Crust
- Crush the cookies in a food processor or zip-top bag.
- Mix the cookie crumbs with melted butter until it resembles wet sand.
- Form the crust in a tart pan, pressing it evenly.
- Chill for about 30 minutes.
- Make the Filling
- Prepare the chocolate in a bowl over simmering water.
- Heat the cream in a saucepan until it simmers.
- Combine the hot cream with chocolate and let it sit.
- Stir until smooth and glossy, then add the butter.
- Assemble the Tart
- Pour the filling into the cooled crust.
- Chill for at least 2 hours.
- Serve by slicing and adding whipped cream on top if desired.
Notes
For a crunchy texture, leave some larger cookie pieces in the crust. Add variations like mint extract or fresh fruit toppings for extra flair.
Nutrition
- Serving Size: 1 slice
- Calories: 320
- Sugar: 20g
- Sodium: 130mg
- Fat: 22g
- Saturated Fat: 12g
- Unsaturated Fat: 8g
- Trans Fat: 0g
- Carbohydrates: 34g
- Fiber: 2g
- Protein: 4g
- Cholesterol: 30mg
Keywords: chocolate tart, no-bake dessert, easy dessert, elegant dessert