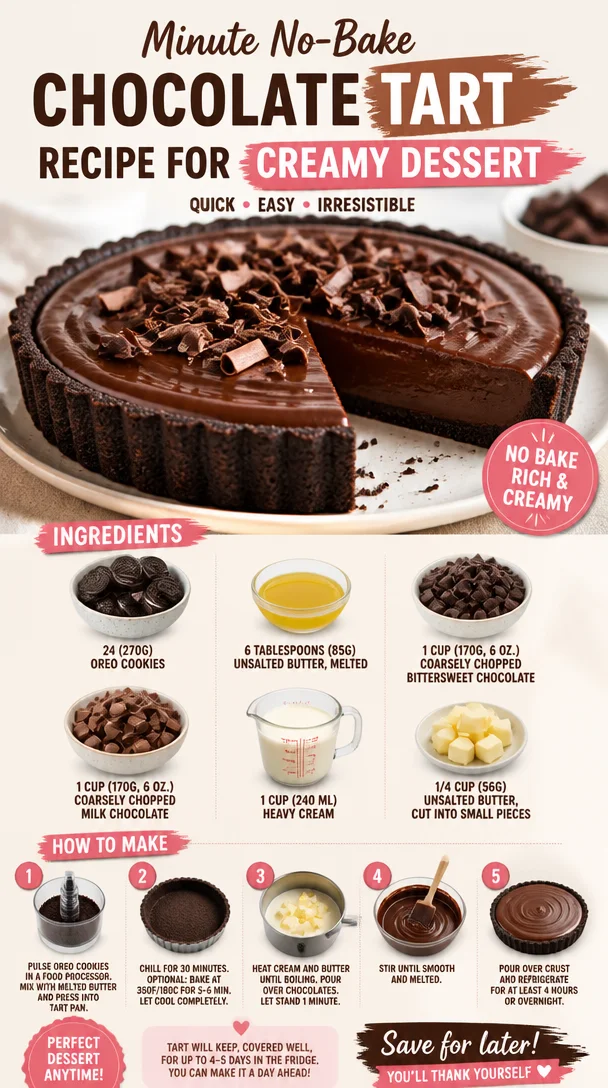
Minute No-Bake Chocolate Tart Recipe for Creamy Dessert
Indulge in Elegance: No-Bake Chocolate Tart
Hello, fellow foodies! Today, I’m thrilled to share a recipe that’s a surefire way to impress your guests without spending hours in the kitchen. I’m talking about the silky-smooth, decadently rich No-Bake Chocolate Tart. If you’ve ever thought that creating a dessert that looks elegant means dealing with complicated techniques, think again! This tart is not only distressingly easy to make, but it also tastes like it belongs in a fancy patisserie.
Picture this: a buttery, cookie crust cradling a luscious filling of bittersweet and milk chocolate, all topped off with lightly whipped cream. And the best part? You don’t have to turn on your oven! Whether it’s a dinner party, a special celebration, or just a cozy night at home, this tart fits beautifully into any occasion. So let’s dive in and create something delicious together!
A Sweet Memory
Before I get into the nitty-gritty of making this tart, let me share a little story that always brings a smile to my face. It was one hot summer evening, and I was tasked with preparing dessert for a family gathering. My grandma, a brilliant baker herself, had shown me the importance of balancing flavors and textures. I can still hear her soft voice guiding me.
I wanted to impress everyone and decided to whip up a no-bake chocolate tart! So there I was, smirking with confidence, when I discovered I’d accidentally used salted butter instead of unsalted in my crust. Instead of panicking, I laughed it off and thought, "Why not embrace the unexpected?" The result? An intriguing sweet-savory contrast that everyone adored. From then on, my family started asking for that "salted version" of the tart. That little mishap became a beautiful culinary story and a signature dish in our home. Let’s preserve that spirit of adventure as we make this tart today!
Ingredients
Before we begin rolling up our sleeves, let’s gather the stars of our show:
-
24 (270g) Oreo cookies: The base of our tart! These provide a perfect chocolatey flavor. Feel free to substitute with any chocolate cookie or even graham crackers if you’re feeling adventurous.
-
6 tablespoons (85g) unsalted butter, melted: This helps bind the crust together and gives it a rich flavor. If you want a dairy-free option, use coconut oil instead!
-
1 cup (170g, 6 oz.) coarsely chopped bittersweet chocolate: This chocolate adds that deep, intense chocolate flavor we all adore. You can swap it with dark chocolate if you prefer something even richer.
-
1 cup (170g, 6 oz.) coarsely chopped milk chocolate: For a sweeter note to balance the bittersweet chocolate. If you like it more intense, you can fully substitute it with dark chocolate.
-
1 cup (240 ml) heavy cream: The creaminess of the filling comes from this ingredient. If you need a lighter version, you can use half-and-half, but the texture will be less creamy.
-
1/4 cup (56g) unsalted butter, cut into small pieces: This adds a luscious finish to our chocolate filling and helps it set beautifully. Substitute with vegan butter for a dairy-free option.
Step-by-Step Instructions
Ready to get your hands chocolatey? Let’s get started on this delightful No-Bake Chocolate Tart!
Step 1: Prepare the Crust
-
Crush the Cookies: Place the Oreo cookies into a food processor and pulse them into fine crumbs. You can also seal them in a zip-top bag and crush them with a rolling pin if you don’t have a food processor—great way to let off some steam!
- Chef Tip: For a crunchy texture, leave a few larger pieces in the mix.
-
Mix with Melted Butter: In a mixing bowl, combine the cookie crumbs with the melted unsalted butter. Stir until the mixture resembles wet sand.
- Commentary: This step is super crucial as it binds the crust together.
-
Form the Crust: Press the mixture evenly into the bottom and up the sides of a tart pan. Make sure it’s compact so it holds together when we slice into it later.
- Little Hack: If you don’t have a tart pan, you can use a pie dish!
-
Chill: Pop the crust into the fridge for about 30 minutes to firm up. Trust me; this little patience pays off.
Step 2: Make the Filling
-
Prepare the Chocolate: In a medium bowl, combine the chopped bittersweet and milk chocolates. If you have a double boiler, that’s fabulous! If not, a heat-safe bowl over a pot of simmering water works well too—just ensure the bowl isn’t touching the water.
-
Heat the Cream: In a saucepan, gently heat the heavy cream over medium heat until it begins to simmer. Watch closely; you don’t want it to boil.
- Tip: Swirl the pan occasionally for even heating.
-
Combine: Pour the hot cream over the chopped chocolate. Let it sit for a minute or two, which allows the chocolate to melt.
- Chef Insight: This step is crucial for getting that silky texture!
-
Stir: Gently stir until the mixture is smooth and glossy. If using, add in the small pieces of butter and stir until fully melted in.
- Commentary: Look at that shine! If it’s not melting completely, you can return it to the heat for a few seconds.
Step 3: Assemble the Tart
-
Pour Filling into the Crust: Carefully pour the luscious chocolate mixture into the prepared crust.
- Tip: Use a spatula to spread it evenly for a smooth finish.
-
Chill Again: Return the tart to the fridge and allow it to set for at least two hours, or overnight if you can resist.
- Secret: The longer it sets, the better it tastes!
Step 4: Serve and Enjoy!
- Slice and Serve: When you’re ready to indulge, take the tart out of the fridge. Slice into generous wedges and serve as is, or add a dollop of whipped cream on top for that extra flair. Garnish with chocolate shavings or fresh berries to elevate your presentation.
- Plating Tip: Serve on a beautiful cake stand for a touch of elegance!
Recipe Variations
Feeling creative? Here are a few delicious variations you might enjoy:
- Mint Chocolate Tart: Add a few drops of peppermint extract to the chocolate filling for a refreshing twist.
- Nutty Delight: Incorporate crushed nuts like almonds or hazelnuts into the crust for added flavor and crunch.
- Fruit Infusion: Top with fresh raspberries or strawberries, or swirl in a raspberry puree before setting.
- Spiced Chocolate: Add a pinch of sea salt or a sprinkle of cayenne pepper to the filling for a subtle kick!
Chef’s Notes
This No-Bake Chocolate Tart has been a staple in my repertoire for years. Over time, I have experimented with various flavors and toppings, and each time it astonishes me how something so simple can impress on so many levels. I’ve had friends who were convinced they couldn’t cook make this tart with success! It’s become a culinary bridge for many, introducing them to the joys of dessert-making without the fuss.
There’s also something magical about watching the filling set—believe me when I say the wait is worth it! Everyone deserves a slice of indulgence, and this tart is just the ticket to create those joyful moments around the table.
FAQs and Troubleshooting
-
Why is my chocolate filling not smooth?
- If your filling has lumps, it may be that the chocolate didn’t melt completely. Be sure to stir thoroughly and return it to gentle heat to salvage the texture.
-
Can I freeze the tart?
- Yes! You can freeze the tart. Just wrap it well in plastic wrap. To serve, let it defrost in the fridge for several hours.
-
How do I store leftovers?
- Store any leftover tart in an airtight container in the fridge for up to 4-5 days. If you don’t lose your willpower, that is!
-
My crust is falling apart when I slice it!
- Ensure that you pressed the crust firmly into the pan. If it still crumbles, consider adding a little more melted butter next time to help bind it better.
Nutritional Info
Per slice (based on 12 servings): Approximately 320 calories, 22g fat, 34g carbs, 4g protein (note: values will vary depending on specific ingredients used).
Now that you have the recipe, I hope you feel inspired to make this No-Bake Chocolate Tart! Remember, good cooking is not just about the end result; it’s about the stories and experiences we create along the way. So tie on your apron, gather those ingredients, and let’s make something delectable together. Cheers to wonderful moments around your table!
PrintNo-Bake Chocolate Tart
Impress your guests with this easy and elegant No-Bake Chocolate Tart, featuring a cookie crust and a luscious chocolate filling.
- Prep Time: 15 minutes
- Cook Time: 0 minutes
- Total Time: 135 minutes
- Yield: 12 servings 1x
- Category: Dessert
- Method: No-Bake
- Cuisine: French
- Diet: Vegetarian
Ingredients
- 24 Oreo cookies (270g), crushed
- 6 tablespoons (85g) unsalted butter, melted
- 1 cup (170g) coarsely chopped bittersweet chocolate
- 1 cup (170g) coarsely chopped milk chocolate
- 1 cup (240ml) heavy cream
- 1/4 cup (56g) unsalted butter, cut into small pieces
Instructions
- Prepare the Crust
- Crush the cookies in a food processor or zip-top bag.
- Mix the cookie crumbs with melted butter until it resembles wet sand.
- Form the crust in a tart pan, pressing it evenly.
- Chill for about 30 minutes.
- Make the Filling
- Prepare the chocolate in a bowl over simmering water.
- Heat the cream in a saucepan until it simmers.
- Combine the hot cream with chocolate and let it sit.
- Stir until smooth and glossy, then add the butter.
- Assemble the Tart
- Pour the filling into the cooled crust.
- Chill for at least 2 hours.
- Serve by slicing and adding whipped cream on top if desired.
Notes
For a crunchy texture, leave some larger cookie pieces in the crust. Add variations like mint extract or fresh fruit toppings for extra flair.
Nutrition
- Serving Size: 1 slice
- Calories: 320
- Sugar: 20g
- Sodium: 130mg
- Fat: 22g
- Saturated Fat: 12g
- Unsaturated Fat: 8g
- Trans Fat: 0g
- Carbohydrates: 34g
- Fiber: 2g
- Protein: 4g
- Cholesterol: 30mg
Keywords: chocolate tart, no-bake dessert, easy dessert, elegant dessert

No-Bake Coconut Orange Glow Dessert: Creamy Citrus Delight
Creamy Citrus Delight: Coconut Orange Glow Dessert Recipe
Hello there, wonderful food lovers! Today, we’re diving deep into a tropical escapade with a dessert that’s not just a treat for the taste buds but also a feast for the senses. Let me introduce you to the Coconut Orange Glow Dessert – a creamy citrus delight that will have you dreaming of sun-soaked beaches and balmy evenings.
Introduction
You know, sometimes life feels overwhelmingly busy, and what’s missing is that little bit of sweetness that brings joy back. This Coconut Orange Glow Dessert is just the thing to elevate your day, whether you’re celebrating a special moment or simply treating yourself after a long week. It’s creamy, light, and bursting with that vibrant citrus flavor that screams refreshment.
Imagine sitting outside on a warm day, the sun catching the bright orange hue of this dessert, while a gentle breeze dances with the sweet scent of coconut. Not to mention, it’s incredibly easy to whip up, making it a go-to recipe for both seasoned chefs and enthusiastic home cooks. Trust me, once you make it, you’ll be asked to share the recipe (and possibly to make it again and again). A sprinkle of toasted coconut on top adds a satisfying crunch, making it not only a delight for your palate but also a visual treat. Let’s dive in and uncover the magic of this little bowl of sunshine!
Personal Story
I still remember the first time I tasted a dessert like this one. It was at my dear friend Lily’s beach bonfire party. The sun was just setting, casting a golden glow over everything, and the sweet scent of tropical fruit filled the air. She served this velvety dessert, and I was transported straight to paradise with each spoonful. The combination of coconut and orange was so unexpected yet perfectly harmonious.
That night, I spent more time plotting how I would recreate that dessert in my kitchen than I did enjoying the bonfire! It wasn’t just about the taste but also about the memories and laughter that followed. This dessert became a symbol of good times, fresh starts, and the beauty found in simple pleasures. Now, I’m excited to bring a piece of that beachy memory into your home with this Coconut Orange Glow Dessert!
Ingredients
To create this tropical masterpiece, here’s what you’ll need:
-
2 cups full-fat coconut milk: The star of the show! Creamy and luscious, it gives the dessert a silky texture. If you’re looking for a lighter option, consider using light coconut milk, but be aware it might alter the creaminess.
-
1/3 cup granulated sugar: This sweetens things up beautifully. If you’re after a healthier alternative, feel free to swap in honey or maple syrup—just adjust for sweetness to your taste!
-
1/2 cup freshly squeezed orange juice: Fresh is key here! This will brighten the dish and enhance that tropical vibe. Bottled juice is okay in a pinch, but nothing beats the flavor of fresh oranges.
-
1 tsp vanilla extract: This adds a warm, aromatic twist. I always opt for pure vanilla extract; it gives a richer flavor than the imitation versions.
-
1 tsp lime zest: A touch of lime brings a sharpness that complements the sweetness perfectly. No lime? No problem! Lemon zest will add a delightful zing too.
-
1/2 cup whipped cream: For an airy finish. You can use store-bought whipped cream or whip your own. And if you prefer a dairy-free version, coconut whipped cream works wonderfully!
-
A pinch of toasted coconut flakes: For that lovely crunch and an extra hit of flavor. Toasting coconut ensures it brings out the nuttiness, elevating the entire dessert.
Step-by-Step Instructions
Now, let’s get cooking! Here’s how to create your Coconut Orange Glow Dessert step by step:
-
Gather Your Ingredients: Make sure you have everything ready to go. This makes the process smoother and ensures you don’t forget anything mid-recipe.
-
Combine the Coconut Milk and Sugar: In a saucepan over medium heat, whisk together the coconut milk and granulated sugar. Heat until warm (but not boiling), stirring occasionally. You want the sugar to dissolve completely, creating a sweet coconut syrup. This will take about 3-5 minutes.
Tip: If you’re feeling adventurous, try adding a pinch of salt— it really helps to balance out the sweetness!
-
Add Orange Juice and Zest: Remove the saucepan from heat and stir in the freshly squeezed orange juice, lime zest, and vanilla extract. This combination brings a bright, citrusy flavor and will make your kitchen smell like a tropical paradise.
Chef Hack: Taste and adjust! If you want more sweetness, now’s your chance to add a bit more sugar or honey—just dissolve it well before proceeding.
-
Cool and Thicken: Allow the mixture to cool for about 10-15 minutes. This will thicken slightly as it cools. If you’d like a creamier texture, you can also blend the mixture briefly with a hand blender to fluff it up a bit.
-
Fold in the Whipped Cream: Gently fold in the whipped cream until combined. This step gives the dessert that cloud-like texture, making it light and airy.
Tip: Be gentle and don’t over-mix— you want to retain all that lovely airiness!
-
Chill: Pour the mixture into serving dishes or glasses, and refrigerate for at least two hours. This chilling time allows the flavors to develop and solidifies the dessert.
Chef’s Insight: If you’re short on time, popping them in the freezer for 30 minutes can work too, but let them sit out for a few minutes before serving to soften.
-
Serve and Garnish: Before serving, sprinkle a pinch of toasted coconut flakes on top for that satisfying crunch and a pop of extra flavor.
Presentation Tip: Layered desserts in clear glasses look stunning, but don’t stress! Any cute bowl or ramekin works great too!
Serving Suggestions
When it’s time to serve your Coconut Orange Glow Dessert, consider pairing it with some fresh tropical fruit—like mango slices or berries—for an added pop of color and flavor. This makes for a beautiful presentation that your guests will swoon over. Grab a few mint leaves for garnish if you have them on hand; they’ll add a refreshing touch that complements the citrus beautifully.
Recipe Variations
Feel free to get creative with this dessert! Here are a few variations you might enjoy:
-
Mango Coconut Glow: Substitute half of the orange juice with fresh mango puree for a delightful twist.
-
Tropical Combo: Add a splash of pineapple juice or some crushed pineapple for an even more tropical vibe.
-
Chocolate Drizzle: For a decadent touch, drizzle some melted dark chocolate over the top right before serving. The flavor of chocolate paired with citrus is to die for!
-
Coconut Lime Delight: Increase the lime zest and juice for a sharper, more tangy taste—perfect for lime lovers!
-
Nutty Flavors: Consider adding a hint of almond extract or some finely chopped pistachios for a unique flavor profile.
Chef’s Notes
This recipe has evolved into the beautiful creation it is today through a bit of trial and error. I originally played around with variations that missed the mark—too sweet, too heavy, or too bland. The balance of flavors is crucial, and I’ve learned that taking the time to adjust is what makes a recipe truly shine.
I once experimented by adding too much lime juice, turning it into an unintentional lime sherbet! But, hey, kitchen mishaps often lead to delightful surprises. Through that, I embraced the concept of ‘happy accidents,’ learning to adapt and turn them into something delicious. So, next time you’re in the kitchen, don’t fear the mistakes—embrace them instead!
FAQs and Troubleshooting
Q: My mixture is too runny; what did I do wrong?
A: If you find your mixture is too runny after chilling, it might be because the coconut milk wasn’t thick enough or the whip cream wasn’t fully incorporated. Next time, consider adding a bit more cornstarch to thicken it up or leaving it in the fridge longer to firm up.
Q: How long does this dessert last?
A: Your Coconut Orange Glow Dessert can last in the refrigerator for up to 3 days. Just make sure to cover it with plastic wrap to prevent it from absorbing any odors!
Q: Can I make this vegan?
A: Absolutely! The recipe is already vegan if you stick with coconut cream and plant-based whipped cream. Just ensure the sugar is vegan, as some sugars are processed using bone char.
Q: How can I store leftovers?
A: Store any leftovers in an airtight container in the fridge. I recommend finishing it within three days for the best taste and texture!
Nutritional Info
This dessert is a great option if you’re looking for something refreshing that isn’t overly sugary. Here’s a rough nutritional breakdown (per serving):
- Calories: 200
- Total Fat: 15g
- Saturated Fat: 10g
- Carbohydrates: 16g
- Sugars: 13g
- Protein: 2g
Ultimately, numbers are just numbers—what matters most is the joy these flavors bring you and your loved ones!
So there you have it! The Coconut Orange Glow Dessert is not just a recipe; it’s a little piece of sunshine to brighten your days. I can’t wait for you to try this and to hear your kitchen tales. Happy cooking!
PrintCoconut Orange Glow Dessert

A creamy citrus delight that combines the refreshing flavors of coconut and orange, perfect for warm days and special occasions.
- Prep Time: 15 minutes
- Cook Time: 5 minutes
- Total Time: 120 minutes
- Yield: 4 servings 1x
- Category: Dessert
- Method: Refrigerating
- Cuisine: Tropical
- Diet: Vegan
Ingredients
- 2 cups full-fat coconut milk
- 1/3 cup granulated sugar
- 1/2 cup freshly squeezed orange juice
- 1 tsp vanilla extract
- 1 tsp lime zest
- 1/2 cup whipped cream
- A pinch of toasted coconut flakes
Instructions
- Gather your ingredients.
- Combine the coconut milk and sugar in a saucepan over medium heat; whisk until warm.
- Add the orange juice, lime zest, and vanilla extract; mix well.
- Cool for about 10-15 minutes to thicken.
- Fold in the whipped cream gently until combined.
- Chill in serving dishes for at least two hours.
- Serve and garnish with toasted coconut flakes.
Notes
For added flavor, consider pairing with fresh tropical fruits or a drizzle of chocolate.
Nutrition
- Serving Size: 1 serving
- Calories: 200
- Sugar: 13g
- Sodium: 50mg
- Fat: 15g
- Saturated Fat: 10g
- Unsaturated Fat: 3g
- Trans Fat: 0g
- Carbohydrates: 16g
- Fiber: 1g
- Protein: 2g
- Cholesterol: 0mg
Keywords: coconut dessert, orange dessert, vegan dessert, tropical dessert, creamy dessert
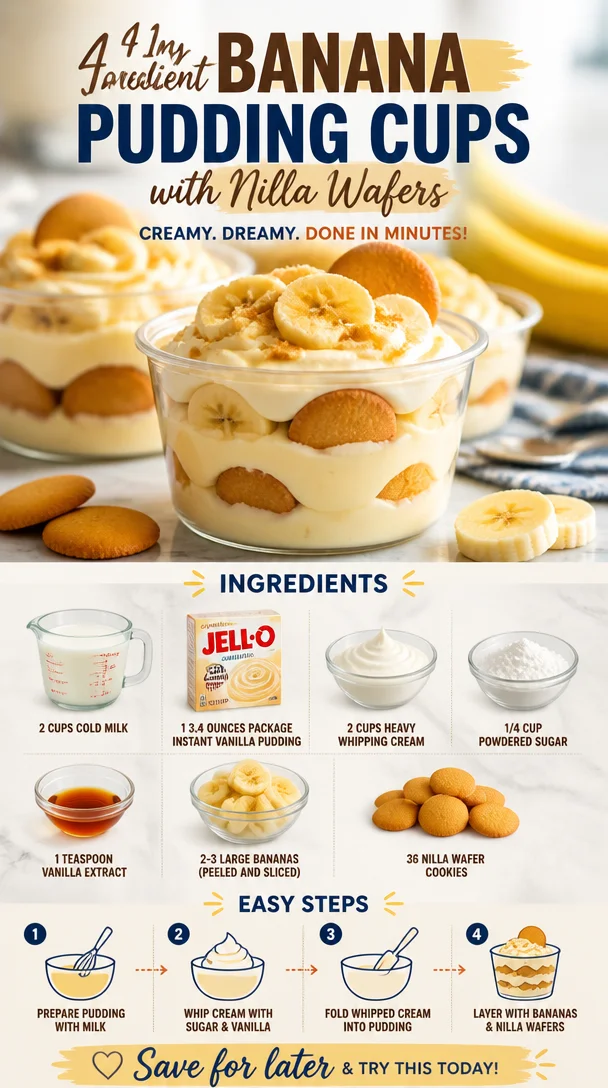
Ingredient Banana Pudding Cups with Nilla Wafers
Nilla Wafer Banana Pudding Cups: A Sweet Nostalgic Delight
Hello, fellow food lovers! Today, we’re diving into a dessert that feels like a warm hug after a long day—Nilla Wafer Banana Pudding Cups. This delightful treat is perfect for any occasion, whether you’re hosting a cozy dinner party or simply craving a sweet bite on a Tuesday night. The balance of creamy vanilla pudding, fresh bananas, and the crunch of Nilla Wafers makes this dessert not just delicious but also a brilliant trip down memory lane.
A Personal Story: A Dessert That Brings Back Memories
I can still picture the summer afternoons of my childhood, sun filtering through the kitchen window, and the enticing aroma of freshly baked treats wafting through the air. My grandma, the ultimate hostess, was a magician in the kitchen, always whipping up something delightful just for us. One of my favorite memories centers around her legendary banana pudding. In her version, layers of ripe bananas, homemade vanilla custard, and crisp Nilla Wafers came together to create a sensational treat that was the highlight of any family gathering.
The best part? She often let me help! I was in charge of layering the bananas and wafers, which was a messy but fun job that always ended with a little pudding on my nose. As we spooned the pudding into cups, we would sneak bites when no one was looking (because who could resist?).
Years later, I still cherish that dish, and now, I’m bringing my own twist to the table with these Nilla Wafer Banana Pudding Cups. They’re a gorgeous tribute to my grandma’s recipe, with a simple yet elegant presentation that feels just right for today’s gatherings.
Ingredients
To whip up these delightful Nilla Wafer Banana Pudding Cups, you’ll need the following ingredients:
-
2 cups cold milk
The base for our pudding. Whole milk works best for a creamy texture, but you can substitute with almond milk or any other milk alternative if you want to lighten things up! -
1 (3.4 ounces) package instant vanilla pudding
This is your shortcut to creamy deliciousness. If you’re feeling adventurous, a homemade vanilla pudding can be a beautiful alternative, although it requires more time and attention. -
2 cups heavy whipping cream
Whipping cream gives a rich, luxurious feel to the pudding. If you’re looking for a lighter option, you can use half-and-half, but be cautious as it won’t whip as beautifully. -
1/4 cup powdered sugar
Sweetens up the whipped cream and pudding without grittiness. Feel free to adjust the amount based on your sweetness preference; you can even use coconut sugar for a less refined choice. -
1 teaspoon vanilla extract
A splash of pure vanilla extract takes the flavor up a notch. I always recommend sticking to pure extract rather than imitation for the best flavor. -
2-3 large bananas (peeled and sliced)
Ripe bananas are key; the sweeter and softer, the better. If you’re worried about browning, toss them in a little lemon juice after slicing! -
36 Nilla Wafer cookies
These little gems add the crunch and classic taste everyone loves. If you’re feeling adventurous, feel free to swap for a chocolate wafer or even almond cookies for a fun twist!
Step-by-Step Instructions
-
Prep the Pudding
In a large mixing bowl, pour in the cold milk. Gradually whisk in the instant vanilla pudding until smooth. Together, they’ll be the creamy base for your delicious cups. -
Whip the Cream
In another bowl, pour in the heavy whipping cream. Add in the powdered sugar and vanilla extract. Using an electric mixer, beat on medium-high speed until soft peaks form. This should take about 3-5 minutes. Make sure not to overbeat; you want it fluffy, but not too stiff! -
Combine
Gently fold the whipped cream into the pudding mixture using a spatula. Be careful not to deflate the whipped cream; we want all that airy goodness to stay intact! -
Prepare Your Cups
Now for the fun part! Grab your dessert cups or any small glasses you want to use. Start with a layer of Nilla Wafers on the bottom of each cup. Feel free to break some of them if they don’t fit! -
Layer the Pudding
Add a generous spoonful of the pudding mixture over the wafers, followed by a layer of banana slices. Repeat the layers—Nilla Wafers, pudding, bananas—until you reach the top, finishing with a dollop of pudding. -
Chill
Cover the cups with plastic wrap and refrigerate for at least 2 hours. If you can let them sit overnight, even better! This is when the flavors meld, and the cookies soften, creating a luscious treat. -
Top & Serve
Before serving, crush a few Nilla Wafers and sprinkle them on top. Feel free to add a small dollop of whipped cream if desired. You’ll end up with a gorgeous presentation that’s sure to impress guests!
Serving Suggestions
For plating, I love serving these Nilla Wafer Banana Pudding Cups on a rustic wooden platter, lined with fresh mint leaves for a pop of color. You could also sprinkle some crushed nuts or chocolate shavings on top for added flair. Either way, these cups will steal the show!
Recipe Variations
Here are a few fun twists to this classic recipe:
- Chocolate Lovers: Swap half of the vanilla pudding for chocolate pudding for a delightful chocolate-banana combo.
- Nutty Banana Bliss: Incorporate chopped walnuts or pecans in between the layers for a crunch!
- Coconut Cream Twist: Use coconut milk instead of regular milk and add shredded coconut into the pudding mixture.
- Add Some Spice: A pinch of cinnamon or nutmeg can add a warm tone to the pudding—perfect for autumn!
Chef’s Notes
This recipe is one that has evolved over time for me. I can’t tell you how many attempts I made trying to get the texture just right! I initially tried using regular whipped cream instead of heavy whipping cream, but the result was never as satisfying. You live and learn! And while my grandma’s version will always hold a special place in my heart, I love how these cups feel modern yet nostalgic. They’re a blend of everything I adore about cooking—comfort, family, and a touch of creativity!
FAQs and Troubleshooting
1. My pudding didn’t set properly! What went wrong?
This often happens if the milk wasn’t cold enough or if it wasn’t whisked enough with the pudding mix. Make sure both are really cold for the right consistency.
2. Are there alternatives to Nilla Wafers?
Absolutely! Try using oreo cookies for a cookies-and-cream twist, or even graham crackers for a classic flavor.
3. Can I make this ahead of time?
Yes! These pudding cups hold up well in the fridge. They’re actually better after a night in the fridge, so feel free to prep them the day before your event.
4. How do I keep my bananas from browning?
Tossing them in a splash of lemon juice is the easiest way to keep them looking fresh and vibrant!
Nutritional Info
While I’m not a nutritionist, it’s worth noting that this dessert does contain rich ingredients like heavy cream and sugar. For those tracking calories, an approximation per cup would be about 320-350 calories, depending on portion sizes and any variations you make. Enjoy in moderation, or make them specially for those “just because” moments!
So there you have it! Nilla Wafer Banana Pudding Cups that bring joy, nostalgia, and deliciousness to your table. Remember, cooking is all about sharing love and creating memories—so gather your people, tie on that apron, and let’s get to work. Happy cooking!
PrintNilla Wafer Banana Pudding Cups
A delightful dessert that combines creamy vanilla pudding, fresh bananas, and the crunch of Nilla Wafers, perfect for any occasion.
- Prep Time: 15 minutes
- Cook Time: 0 minutes
- Total Time: 135 minutes
- Yield: 6 servings 1x
- Category: Dessert
- Method: Chilling
- Cuisine: American
- Diet: Vegetarian
Ingredients
- 2 cups cold milk
- 1 (3.4 ounces) package instant vanilla pudding
- 2 cups heavy whipping cream
- 1/4 cup powdered sugar
- 1 teaspoon vanilla extract
- 2–3 large bananas (peeled and sliced)
- 36 Nilla Wafer cookies
Instructions
- Pour the cold milk into a large mixing bowl. Gradually whisk in the instant vanilla pudding until smooth.
- Add the heavy whipping cream to another bowl. Incorporate the powdered sugar and vanilla extract. Beat on medium-high speed until soft peaks form (about 3-5 minutes).
- Gently fold the whipped cream into the pudding mixture using a spatula.
- Grab your dessert cups and start layering Nilla Wafers on the bottom of each cup.
- Add a spoonful of pudding mixture over the wafers, followed by a layer of banana slices. Repeat layers until reaching the top.
- Cover the cups with plastic wrap and refrigerate for at least 2 hours, or overnight for best results.
- Before serving, crush a few Nilla Wafers and sprinkle them on top, optionally adding a dollop of whipped cream.
Notes
For plating, serve on a rustic wooden platter with mint leaves for color. Experiment with toppings like crushed nuts or chocolate shavings.
Nutrition
- Serving Size: 1 cup
- Calories: 350
- Sugar: 24g
- Sodium: 85mg
- Fat: 25g
- Saturated Fat: 15g
- Unsaturated Fat: 7g
- Trans Fat: 0g
- Carbohydrates: 35g
- Fiber: 1g
- Protein: 4g
- Cholesterol: 80mg
Keywords: banana pudding, dessert, Nilla Wafers, pudding cups, nostalgic dessert