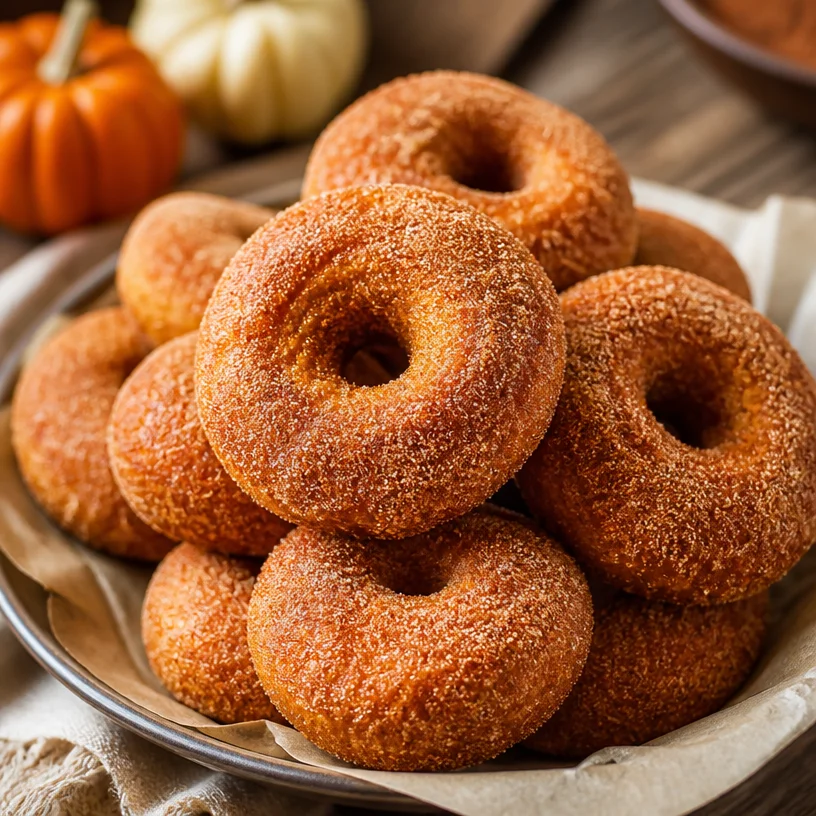
Min Gluten-Free Baked Pumpkin Donuts for Fall Harvest
Baked Pumpkin Donuts: A Slice of Autumn Happiness
Hello, fellow food lovers! I’m so thrilled to share this delightful autumn recipe that’s sure to warm your heart and home—Baked Pumpkin Donuts! There’s something truly special about the aroma of spices wafting through your kitchen, especially as the leaves turn and the air gets crisp. Whether it’s a chilly morning, a festive gathering, or just a cozy afternoon, these gluten-free donuts will be the perfect sweet treat to make you smile.
Now, you might be wondering why I chose to whip up donuts instead of something traditional like cookies or cake. Well, donuts hold a special place in my heart, transporting me back to my childhood when my family would take Sunday morning trips to the local bakery. The sights, sounds, and smells were always so magical. Everyone would be buzzing with excitement, eagerly waiting to pick out their favorite flavors, and I could never resist the spiced pumpkin options!
Fast forward to today, and I’ve developed my own spin on those nostalgic treats. My Baked Pumpkin Donuts are an elevated yet approachable version that’s incredibly straightforward to make. With just the right amount of sweetness, a hint of spice, and that lovely pumpkin flavor, these donuts are soft, moist, and downright delightful—perfect for sharing!
Personal Story
One of my fondest memories involving donuts is pulling them out of the oven on a crisp fall morning, the whole house filling with that cozy scent of pumpkin and warm spices. I remember the first time I made these baked wonders. It was a rainy Saturday, and I was craving something special but didn’t want to brave the storm to hit up the bakery. I gathered the ingredients and set to work, and as I poured the batter into the donut pan, I remembered those Sunday mornings from my childhood—something about that batter reminded me of the unpredictable joy of still-warm donuts with a hot cup of cider.
When those donuts emerged from the oven, golden and fluffy, I knew I had captured that magical moment once again—one bite was all it took to rekindle all those warm feelings. Whether dressed in a simple sprinkle of cinnamon sugar or a drizzle of glaze, these donuts are perfect for enjoying with friends or savoring in solitude with your favorite book. Now, let’s get to creating this delightful treat together!
Ingredients
Here’s what you’ll need to whip up a batch of these scrumptious Baked Pumpkin Donuts:
- 1.5 cups canned pumpkin puree: Make sure you choose pure pumpkin puree, not the sweetened pie filling. This will give you that rich, authentic pumpkin flavor without the extra sugar.
- 4 large eggs (at room temperature): Ensure your eggs are at room temperature for easy mixing and better incorporation into the batter.
- 1/4 cup melted coconut oil: This adds richness and moistness! If you prefer, you can substitute with melted butter or even your favorite neutral oil.
- 1.5 cups granulated sugar: Perfectly sweetens the donuts. You can try coconut sugar for a healthier twist, but it may alter the overall color.
- 1.5 teaspoons baking powder: This helps your donuts rise beautifully. Make sure it’s fresh for the best results!
- 1.5 teaspoons pumpkin pie spice: A vital player in the flavor department! You can make your own blend or sub in cinnamon if needed.
- 1/2 teaspoon ground cinnamon: Because who doesn’t love a little extra warmth?
- 1/4 teaspoon ground nutmeg: This spice adds depth and a comforting warmth that’s quintessentially fall!
- 1/4 teaspoon salt: A little salt enhances all those sweet flavors perfectly.
- 1 + 3/4 cup gluten-free all-purpose flour: Ensures that everyone can enjoy these donuts! Opt for a blend with xanthan gum for the best texture.
- 1/2 teaspoon cornstarch: This helps to create a lighter crumb. You can swap it for arrowroot powder if needed.
- 1 cup granulated sugar (for coating): To roll the donuts in after baking for that extra sweetness.
- 1/4 cup ground cinnamon (for coating): Mix this with the sugar for a classic touch! You’ll feel like a kid again with each bite.
- Melted butter (optional): For brushing the donuts before rolling in the sugar-cinnamon mixture, this adds extra indulgence and helps the coating stick.
Let’s dive into the cooking process, shall we?
Step-by-Step Instructions
1. Preheat and Prepare
Start by preheating your oven to 350°F (175°C). Grease your donut pan with a little coconut oil or non-stick cooking spray. This is key to ensuring your donuts come out perfectly without sticking—nobody likes a donut that won’t release!
2. Mix the Wet Ingredients
In a large mixing bowl, combine the canned pumpkin puree, eggs, and melted coconut oil. Whisk them together until smooth, creating a lovely, creamy base. Tip: I love using a handheld whisk here—it’s quick and gets the job done!
3. Add the Sugars
Next, add in the granulated sugar and mix until combined. The mixture should start to feel slightly thick and luscious. That’s what we want—this is going to lead to moist donuts!
4. Combine the Dry Ingredients
In a separate bowl, whisk together the gluten-free all-purpose flour, baking powder, pumpkin pie spice, ground cinnamon, ground nutmeg, cornstarch, and salt. Mixing these dry ingredients first helps to evenly distribute the baking powder and spices, ensuring uniform flavor throughout.
5. Bring It All Together
Now, gradually add the dry mixture to the wet ingredients, stirring just until combined. Be careful not to overmix here! A few lumps are perfectly fine. You want a soft, thick batter that holds its shape.
6. Fill the Donut Pan
Using a piping bag or a spoon, fill each cavity in the donut pan about 3/4 of the way full. This is where the magic happens, so don’t skimp on the batter!
7. Bake Away!
Place the pan in your preheated oven and bake for 15-18 minutes, or until a toothpick inserted into the center comes out clean. The sweet aroma will start to fill your kitchen, luring everyone in!
8. Cool and Coat
Once they’re out of the oven, let the donuts cool in the pan for about 5 minutes before transferring them to a wire rack. This is important to avoid soggy bottoms! While they’re still warm, brush them lightly with melted butter (if using) and roll them in the sugar-cinnamon mixture.
Serving Suggestions
These gorgeous donuts are best enjoyed fresh! Serve them warm, dusted with cinnamon sugar, along with a hot cup of coffee or a cozy mug of apple cider. Feel free to arrange them on a beautiful cake stand for a lovely presentation at your next brunch, or simply enjoy them as a sweet little pick-me-up during the day!
Recipe Variations
Looking to shake things up? Here are a few creative twists you might enjoy:
- Maple Glaze: Instead of cinnamon sugar, drizzle with a warm maple glaze made from powdered sugar and maple syrup for an extra touch of sweetness.
- Chocolate Drizzle: Top with melted dark chocolate for a decadent twist on your pumpkin delights.
- Nutty Crunch: Add chopped pecans or walnuts to the batter for a lovely crunch and nutty flavor.
- Fillings: Pipe in some cream cheese frosting or a spiced apple filling for a delightful surprise in each donut.
- Dairy-Free: Keep it dairy-free by substituting the butter and eggs for vegan alternatives like aquafaba and plant-based butter.
Chef’s Notes
Pumpkin donuts have come a long way for me! I experimented with various recipes, swapping this and that, before landing on this delightfully gluten-free version. The first time I baked these, I thought I’d lost them to the dark abyss of the oven—half of them stuck to the pan! A quick fix with a little more greasing and the right flour made a world of difference. Now, they pop right out, and every bite takes me back to those cherished bakery memories.
FAQs and Troubleshooting
1. Can I use fresh pumpkin instead of canned?
Absolutely! Just make sure to puree it until smooth and slightly reduce the liquid to avoid a watery batter.
2. Why are my donuts dense?
Overmixing or not using fresh baking powder can lead to dense donuts. Be gentle when combining the wet and dry ingredients.
3. Do I have to use a donut pan?
If you don’t have one, you can use a muffin tin! Just adjust the baking time a bit—muffins may take a few more minutes.
4. Can I freeze these donuts?
Yes! After they’ve cooled, wrap them tightly and store them in the freezer. Thaw at room temperature when you’re ready to enjoy again!
Nutritional Info
While I typically focus on flavorful recipes, I know nutritional value is important too! These baked pumpkin donuts are:
- Gluten-Free: Perfect for those with gluten sensitivities.
- Rich in Fiber: Thanks to the pumpkin, they offer a healthy dose of fiber.
- Low in Fat: With our baked method versus frying, you’re treating yourself to a lighter donut.
So, there you have it! My beloved Baked Pumpkin Donuts are not just a recipe but a heartfelt way to connect with joyful memories and those you love. I hope you enjoy making them as much as I do—so tie on that apron and let the baking begin!
PrintBaked Pumpkin Donuts
Delightful gluten-free baked pumpkin donuts that capture the essence of autumn with spices and pumpkin flavor.
- Prep Time: 15 minutes
- Cook Time: 18 minutes
- Total Time: 33 minutes
- Yield: 12 servings 1x
- Category: Dessert
- Method: Baking
- Cuisine: American
- Diet: Gluten-Free
Ingredients
- 1.5 cups canned pumpkin puree
- 4 large eggs (at room temperature)
- 1/4 cup melted coconut oil
- 1.5 cups granulated sugar
- 1.5 teaspoons baking powder
- 1.5 teaspoons pumpkin pie spice
- 1/2 teaspoon ground cinnamon
- 1/4 teaspoon ground nutmeg
- 1/4 teaspoon salt
- 1 + 3/4 cup gluten-free all-purpose flour
- 1/2 teaspoon cornstarch
- 1 cup granulated sugar (for coating)
- 1/4 cup ground cinnamon (for coating)
- Melted butter (optional)
Instructions
- Preheat your oven to 350°F (175°C) and grease your donut pan.
- Combine the pumpkin puree, eggs, and melted coconut oil in a large mixing bowl and whisk until smooth.
- Add in the granulated sugar and mix until combined.
- Whisk together the gluten-free flour, baking powder, pumpkin pie spice, ground cinnamon, ground nutmeg, cornstarch, and salt in a separate bowl.
- Gradually add the dry mixture to the wet ingredients, stirring just until combined.
- Fill each cavity of the donut pan about 3/4 of the way full with batter.
- Bake for 15-18 minutes or until a toothpick comes out clean.
- Cool in the pan for 5 minutes before transferring to a wire rack and roll in the sugar-cinnamon mixture while warm.
Notes
These donuts are best enjoyed fresh, served warm with a sprinkle of cinnamon sugar.
Nutrition
- Serving Size: 1 donut
- Calories: 180
- Sugar: 20g
- Sodium: 200mg
- Fat: 7g
- Saturated Fat: 4g
- Unsaturated Fat: 3g
- Trans Fat: 0g
- Carbohydrates: 26g
- Fiber: 2g
- Protein: 3g
- Cholesterol: 50mg
Keywords: pumpkin donuts, gluten-free donuts, autumn recipes, baked donuts, fall desserts
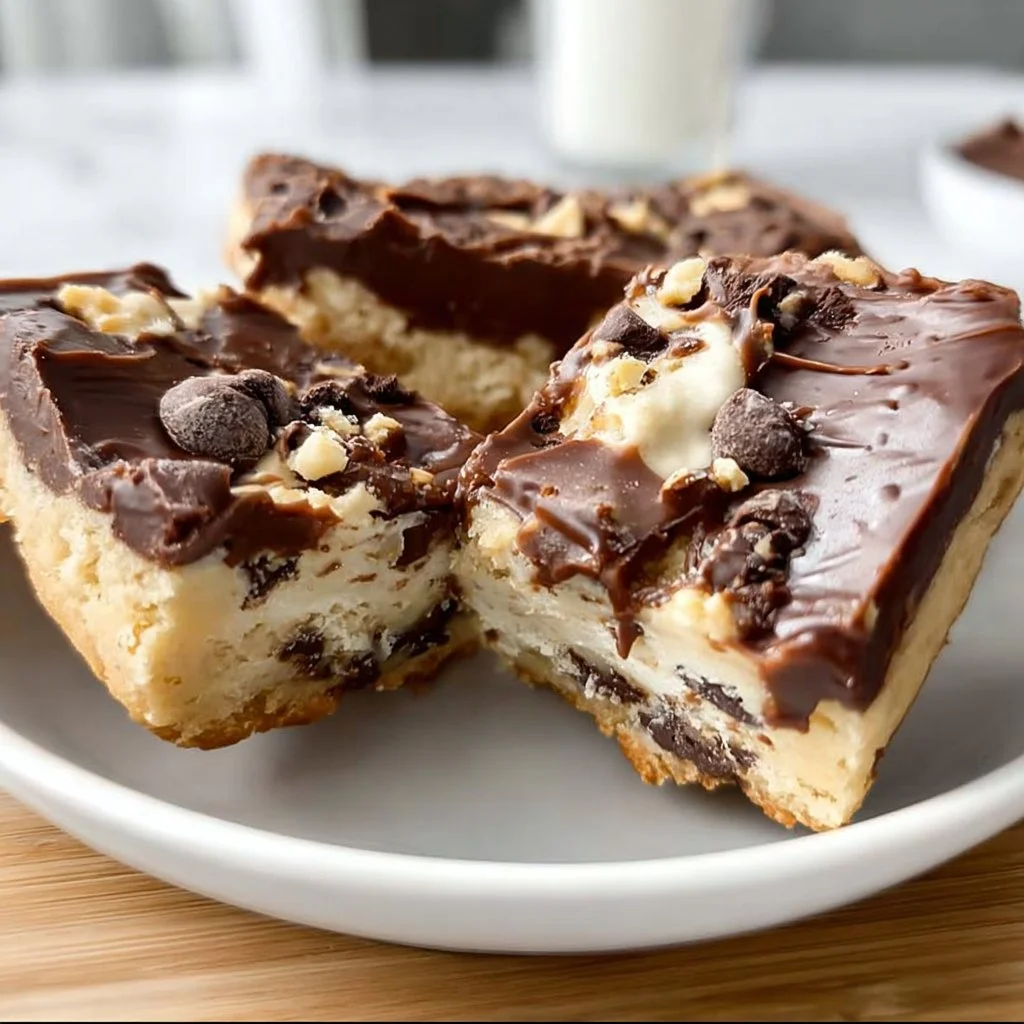
Sugar Free Low Carb Cookie Bars
# Delightful Sugar-Free Low Carb Cookie Bars

## Introduction

Hey, friend! Have you ever experienced that moment when you’re just craving something deliciously sweet, but you want it to be a little kinder to your waistline? Today, I’m thrilled to share my go-to recipe for Sugar-Free Low Carb Cookie Bars that will satisfy those sweet cravings without the guilt.

These little gems are not only simple to make but also pack all the flavor you would expect from a traditional cookie. As a recipe creator, I firmly believe that you shouldn’t have to sacrifice taste for health—or vice versa! With just a few quality ingredients, you’ll whip up a batch of these bars that may very well become your new favorite treat.

And trust me, whether you’re watching your sugar intake or simply looking for a deliciously healthy snack option, these cookie bars are bound to impress—even your non-dieting friends will be clamoring for a second bite!

So, tie on your apron, grab your mixing bowl, and let’s dive into this delightful, low-carb adventure together!

## Personal Story

I have to take you back to my college days—a time filled with late-night study sessions, laughter, and of course, super questionable snack choices. As finals rolled around, my best friends and I would gather in the kitchen, trying to fuel our brains with whatever we could find. It was during those frantic nights of studying that I first started to experiment with healthier desserts.

One evening, with a few ingredients left in the pantry, I decided to whip up a batch of cookie bars using almond flour and peanut butter. It was an instant hit among my friends! The energy boost from these cookie bars kept us fueled through the most stressful study sessions. Every bite reminded us that healthy doesn’t have to mean boring, and these bars became our go-to snack during finals week.

Fast forward to today, and I’ve refined that original recipe into these Sugar-Free Low Carb Cookie Bars. They’re just as delicious as those late-night creations but packed with all the good stuff. Now, whenever I make these bars, I’m taken back to those cherished memories of friendship and study sessions that went into the wee hours of the night.

## Ingredients

Let’s break down the ingredients you’ll need to make these delectable cookie bars. Each ingredient plays an important role in flavor and texture:

- **1 cup almond flour**
  Perfect for those low-carb diets, almond flour adds a subtly sweet flavor along with fiber and healthy fats. Looking for a substitute? You might try sunflower seed flour for a nut-free option, though it may alter the flavor slightly.

- **1/2 cup peanut butter or almond butter**
  This ingredient is your creamy base. Peanut butter lends a rich flavor; however, almond butter is a great alternative for those watching their cholesterol or who prefer a gentler taste.

- **1/4 cup sugar-free sweetener**
  Whether you use erythritol, monk fruit, or stevia, this sweetener will give your bars that delightful sweetness without the sugar crash! If you prefer natural sweeteners, consider using mashed ripe banana, but keep in mind that it will increase the carb count.

- **1/4 cup coconut oil, melted**
  Coconut oil not only helps bind the ingredients but also adds a subtle flavor and healthy fats. Unsalted butter or any mild-flavored oil can serve as a substitute.

- **1 tsp vanilla extract**
  This brings depth and warmth to your bars. Always use pure vanilla extract if you can for the best taste. In a pinch, vanilla essence will do, but the flavor might be less robust.

- **1/4 tsp salt**
  A touch of salt heightens flavors and balances the sweetness. You can use sea salt or Himalayan salt, both work well.

- **1/2 cup dark chocolate chips (sugar-free, optional)**
  For those who love a chocolaty kick, sugar-free dark chocolate chips can add that indulgent feeling without the sugar. If you’d rather skip the chocolate, feel free to leave it out for classic cookie bars.

## Step-by-Step Instructions

Now, let’s get into the fun part: making these cookie bars! Just follow these simple steps, and you’ll be on your way to cookie heaven.

1. **Preheat Your Oven**
   Preheat your oven to 350°F (175°C). This ensures your bars cook evenly and gives you that warm, inviting aroma wafting through the kitchen.

2. **Prepare Your Baking Dish**
   Line an 8x8 inch baking dish with parchment paper, leaving some overhang on the sides. This will make it super easy to lift the bars out later and slice them into pretty squares. No one wants sticky bars stuck to the pan!

3. **Mix the Wet Ingredients**
   In a mixing bowl, combine your peanut butter (or almond butter) and melted coconut oil. Use a rubber spatula or spoon to blend until smooth. Then, stir in the sweetener and vanilla extract until thoroughly mixed. It should look creamy and inviting—just like a good hug!

4. **Into the Dry Ingredients**
   Next, add your almond flour and salt to the wet mixture. Stir until just combined. You don’t want to overmix; a few lumps are perfectly fine! If you're incorporating dark chocolate chips, fold them in now to distribute the chocolate goodness throughout the dough.

5. **Spread Into the Dish**
   Transfer the dough into your prepared baking dish. Use the back of a spatula or your fingers to gently press the mixture into an even layer. Remember, it doesn’t have to look perfect; we're going for rustic charm here!

6. **Bake**
   Place your dish in the oven and let those cookie bars bake for about 15-20 minutes, or until they're golden brown around the edges. Keep an eye on them, though—we want them chewy in the middle, not crunchy!

7. **Cool**
   Once baked, remove the dish from the oven and let it cool in the pan for about 10 minutes. Then, lift the bars out using the parchment paper and allow them to cool completely on a wire rack. This step is crucial because it helps the bars set properly.

8. **Slice and Serve**
   Once they’re cool, slice them into squares or bars—and finally, dig in! The moment you taste that first bite, you’ll appreciate the harmonious blend of flavors and textures.

## Serving Suggestions

What’s the perfect way to serve these delightful cookie bars? Simple! Arrange them on a beautiful platter, maybe dust them with a sprinkle of powdered erythritol for that café-style finish. Pairing them with a hot cup of coffee or a glass of almond milk makes for a fabulous afternoon treat. Feeling fancy? Add a dollop of whipped coconut cream on top for an extra touch of sweetness!

## Recipe Variations

There’s so much versatility in this recipe! Here are a few delicious variations to try:

1. **Nutty Bliss**: Swap half the almond flour for chopped nuts like walnuts or pecans for added crunch.

2. **Fruity Twist**: Mix in 1/4 cup of unsweetened coconut flakes or dried unsweetened cranberries for a chewy texture and natural sweetness.

3. **Spiced Up**: Add a teaspoon of cinnamon or pumpkin spice to give these bars a delightful warmth—perfect for cozy evenings!

4. **Cocoa Delight**: Replace 1/4 cup of almond flour with unsweetened cocoa powder for a chocolatey version that will satisfy any chocolate lover.

5. **Protein Boost**: Stir in a scoop of low-carb protein powder for a nutritional punch.

## Chef’s Notes

These Sugar-Free Low Carb Cookie Bars started as an experimental late-night snack, and it warms my heart to see them evolve into a beloved recipe. I can’t tell you how many times I’ve come back to this treat when craving something sweet without the sugar.

One time while prepping for a dinner party, I let my best friend take the lead on the baking while I prepped other dishes. Let’s just say we forgot the salt—oops! But you know what? They still turned out amazing. It just shows that when using quality ingredients, even little mistakes can lead to delightful surprises in the kitchen!

## FAQs and Troubleshooting

**Q: My cookie bars turned out too crumbly. What happened?**
A: This can happen if there’s too much dry ingredient or if they didn’t bake long enough. Make sure to measure accurately and give them enough time to set.

**Q: Can I make these bars vegan?**
A: Absolutely! Substitute the egg with a chia egg (1 tablespoon chia seeds + 2.5 tablespoons water, let sit for 5 mins), and try using a plant-based butter instead of coconut oil.

**Q: How long do these cookie bars last?**
A: In an airtight container at room temperature, they should last about a week. If you want to keep them longer, pop them in the fridge, where they can last about 2 weeks.

**Q: Can I freeze these cookie bars?**
A: Yes! Slice and wrap them individually in plastic wrap, then place them in a freezer-safe bag. They can last up to 3 months in the freezer. Just thaw a slice when those sweet cravings hit!

## Nutritional Info

While I can't provide exact nutritional values, each serving (based on a total of 16 bars) is packed with protein and healthy fats while remaining low in carbs. This makes them a delightful option in your snacking rotation.

---

There you have it—delicious and simple Sugar-Free Low Carb Cookie Bars that anyone can whip up! I hope you enjoyed this little kitchen adventure with me and found inspiration to create your own magical memories, just like I did. Let’s keep the conversation going—let me know how your cookie bars turn out!
Sugar-Free Low Carb Cookie Bars
Delicious and guilt-free cookie bars that satisfy sweet cravings without the carbs.
- Prep Time: 10 minutes
- Cook Time: 20 minutes
- Total Time: 30 minutes
- Yield: 16 bars 1x
- Category: Dessert
- Method: Baking
- Cuisine: American
- Diet: Gluten-Free, Low Carb
Ingredients
- 1 cup almond flour
- 1/2 cup peanut butter or almond butter
- 1/4 cup sugar-free sweetener
- 1/4 cup coconut oil, melted
- 1 tsp vanilla extract
- 1/4 tsp salt
- 1/2 cup dark chocolate chips (sugar-free, optional)
Instructions
- Preheat your oven to 350°F (175°C).
- Prepare an 8×8 inch baking dish by lining it with parchment paper.
- Mix the peanut butter (or almond butter) and melted coconut oil until smooth; stir in the sweetener and vanilla extract.
- Add almond flour and salt to the wet mixture and stir until just combined; fold in chocolate chips if using.
- Transfer the dough into the prepared baking dish, pressing it into an even layer.
- Bake for 15-20 minutes, or until golden brown around the edges.
- Cool for about 10 minutes in the pan, then lift out using parchment and cool completely on a wire rack.
- Slice into squares and enjoy!
Notes
These cookie bars can be customized with various mix-ins and are great paired with coffee or almond milk.
Nutrition
- Serving Size: 1 bar
- Calories: 180
- Sugar: 1g
- Sodium: 200mg
- Fat: 14g
- Saturated Fat: 5g
- Unsaturated Fat: 7g
- Trans Fat: 0g
- Carbohydrates: 6g
- Fiber: 2g
- Protein: 6g
- Cholesterol: 0mg
Keywords: sugar-free, low carb, cookies, dessert, healthy snacks