Spooky Eyeball Caprese Bites for Halloween Parties
Eyeball Caprese Bites: A Spook-tacular Twist on an Italian Classic
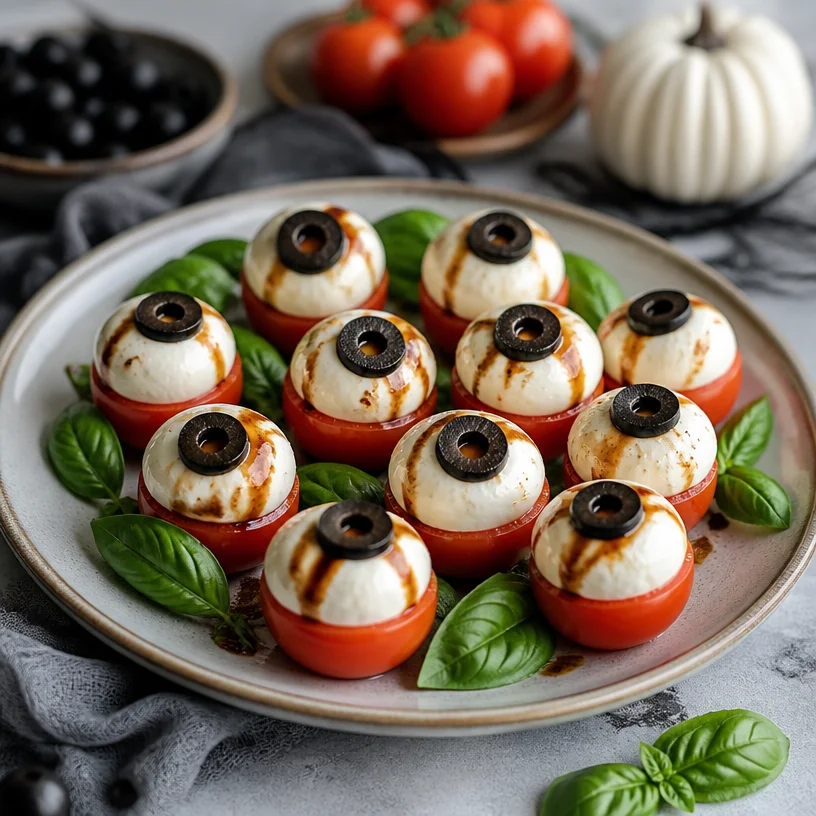
Hello, lovely friends! As the days shorten and the air grows crisp, the excitement of autumn begins to take hold. One thing I adore about this season is the playful spirit it brings, especially with gatherings—whether spooky Halloween parties or cozy fall dinners. Today, I’m thrilled to share a fun and spooky twist on a classic appetizer that will not only impress your guests but also spark a conversation or two. Are you ready for Eyeball Caprese Bites? These delightful little morsels combine the elegance of traditional Caprese salad with a fun, eerie aesthetic that’s perfect for your next gathering!
A Bite of Nostalgia
Let me take you back to my childhood for a moment. I remember the excitement that swirled around our kitchen every Halloween. My mother was a magician in her own right, transforming ordinary dishes into whimsical delights. I can still see her rolling up her sleeves, her apron dusted with flour, and turning basic ingredients into creepy creations. One year, she made “witches’ fingers” with green bell peppers and almond slices, and I was utterly captivated.
But it was her play with flavors—like the fresh mozzarella, juicy tomatoes, and vibrant basil of Caprese salad—that truly inspired me. I’ve always loved how food can evoke memories and bring people together. So, when I was contemplating a festive dish that encapsulated those heartfelt moments, Eyeball Caprese Bites leaped to mind. This fun take not only looks captivating but also packs a punch of deliciousness. So let’s dive in, shall we?
Ingredients
Here’s what you’ll need to bring these delightful eyeball bites to life:
-
Cherry Tomatoes
Beautifully juicy, cherry tomatoes are perfect for this recipe. Choose a mix of red, yellow, or even heirloom varieties for added color! If you can’t find cherry tomatoes, grape tomatoes can be a fine substitute. Just make sure they’re firm and ripe. -
Fresh Mozzarella Balls (Bocconcini or Ciliegine)
These little gems are creamy and rich, making them the star of the show. They come in various sizes, but for this recipe, go for the smaller ones, about the size of the cherry tomatoes. If you’re looking for a dairy-free option, try marinated tofu or cashew cheese for a similar texture. -
Black Olives
They add the perfect touch of a "pupil" to our eyeballs! You can use kalamata olives or any black olives you prefer. For a twist, consider using green olives for a different flavor profile. Just ensure they’re pitted before use—no one wants an unwelcome surprise when biting into these. -
Fresh Basil Leaves
Basil adds that quintessential Italian flavor we love in Caprese. Look for vibrant green leaves, and if you want to add a little fun, consider using basil-flavored vegan cream cheese for a unique spin.
Step-by-Step Instructions
Now, let’s get cooking! Follow these simple steps to assemble your Eyeball Caprese Bites.
-
Prepare the Tomatoes
Start by carefully slicing the tops off each cherry tomato, just enough to create a little cap. Use a paring knife to scoop out the insides lightly. Don’t worry if you lose a tomato or two—that’s what taste testing is for! -
Stuff with Mozzarella
Take your fresh mozzarella balls and gently press them into the hollowed tomatoes. You want them to sit snugly, resembling a little eyeball peeking out. If you’re feeling extra creative, try stuffing some of the mozzarella with a hint of pesto or roasted garlic for a flavor kick. -
Create the Olives’ Pupils
Next, slice your black olives in half. Using one olive half, place it right in the center of each stuffed mozzarella ball to create the “pupil.” This is my favorite part because it’s where the dish comes to life! -
Add the Basil
Finish your eyeballs off by placing a small basil leaf on top of each tomato. It’s an easy way to introduce that classic Caprese flavor and adds a pop of green to contrast with the red and white! -
Drizzle and Serve
For an added touch, drizzle balsamic reduction over your assembled Eyeball Caprese Bites right before serving. This not only enhances the flavor but also adds a beautiful presentation element.
Serving Suggestions
When it comes to serving, remember that presentation is everything! Arrange your Eyeball Caprese Bites on a beautiful platter, perhaps with some spooky decorations like mini pumpkins or black lace for a Halloween touch. If you want to keep it simple, a wooden cutting board can add a rustic charm. Trust me, your guests won’t be able to resist diving in!
Recipe Variations
Want to shake things up a bit? Here are a few fun twists to consider:
- Caprese Skewers: Thread your eyeball ingredients onto skewers for a fun, handheld appetizer that’s perfect for mingling.
- Spicy Eyeballs: Add a slice of jalapeño or a sprinkle of chili flakes on top for a spicy kick.
- Herbed Ricotta Swap: Instead of mozzarella, use herbed ricotta or goat cheese for a creamier texture and a burst of flavor.
- Vegan Option: Swap the mozzarella for marinated tofu balls and use olives for the pupils for a delightful vegan treat.
Chef’s Notes
As I reflect on how Eyeball Caprese Bites have evolved over the years, I can’t help but laugh at some of the mishaps that happened along the way! I once tried using grape tomatoes instead of cherry tomatoes, thinking they’d be cuter—what a mess that was! The cheese didn’t fit quite right, and let’s just say they didn’t have the same visual impact. Now I always stick with cherry tomatoes for that perfectly playful look!
These bites have become a staple at my gatherings, not just for Halloween. They are so versatile and loved by all, young and old! I love how they blend elegance and whimsy and how they offer a delightful surprise on the table.
FAQs and Troubleshooting
1. Can I prepare these ahead of time?
Absolutely! You can prep the components a few hours in advance. Just assemble them right before serving to keep the ingredients fresh.
2. What if I don’t have fresh mozzarella?
You can substitute with string cheese, paneer, or even tofu for a dairy-free version.
3. My tomatoes are too big; what do I do?
If your tomatoes are oversized, you can always cut them in half for a more manageable bite—and they look slightly more spooky that way!
4. How long will these last?
These are best enjoyed fresh, but if you have leftovers, store them in an airtight container for up to 2 days in the refrigerator. The texture may slightly change, but the flavors will still be fun!
Nutritional Info
While I didn’t calculate the exact nutritional information here, these bites are generally low in calories, particularly if you’re mindful of portions. Cherry tomatoes and basil are nutrient-dense, providing vitamins and antioxidants, while mozzarella offers protein and calcium. Just keep an eye on the balsamic drizzle if you’re counting calories!
Thank you for joining me on this delightful culinary adventure! I hope you’re inspired to create your own Eyeball Caprese Bites this season, bringing together family and friends around your table. Remember, it’s all about the joy of cooking and sharing. Tie on that apron, gather your ingredients, and let’s make something memorable! Happy cooking!
PrintEyeball Caprese Bites

A fun and spooky twist on traditional Caprese salad, perfect for Halloween parties and fall gatherings.
- Prep Time: 15 minutes
- Cook Time: 0 minutes
- Total Time: 15 minutes
- Yield: 4 servings
- Category: Appetizer
- Method: No-Cook
- Cuisine: Italian
- Diet: Vegetarian
Ingredients
- Cherry Tomatoes
- Fresh Mozzarella Balls (Bocconcini or Ciliegine)
- Black Olives
- Fresh Basil Leaves
Instructions
- Prepare the Tomatoes by slicing the tops off each cherry tomato and scooping out the insides.
- Stuff with Mozzarella by pressing the fresh mozzarella balls into the hollowed tomatoes.
- Create the Olives’ Pupils by slicing black olives in half and placing one half in the center of each mozzarella ball.
- Add the Basil by placing a small basil leaf on top of each tomato.
- Drizzle and Serve by adding balsamic reduction over the assembled bites just before serving.
Notes
For a spicy kick, add jalapeño slices or chili flakes on top. These can be prepared a few hours in advance and assembled right before serving.
Nutrition
- Serving Size: 1 serving
- Calories: 150
- Sugar: 2g
- Sodium: 300mg
- Fat: 10g
- Saturated Fat: 4g
- Unsaturated Fat: 6g
- Trans Fat: 0g
- Carbohydrates: 10g
- Fiber: 2g
- Protein: 6g
- Cholesterol: 15mg
Keywords: Eyeball Caprese Bites, Halloween appetizers, spooky food ideas, Caprese salad, easy party snacks
Minute Graveyard Taco Dip for Halloween Parties
Dive into Deliciousness with Graveyard Taco Dip!
Hello, my fabulous friends! Are you ready to turn an ordinary gathering into a spook-tacular feast? Today, we’re bringing the world of entertaining to your table with a dish that’s sure to impress—Graveyard Taco Dip! This delightful creation isn’t just a fantastic appetizer; it’s a crowd-pleaser that’s perfect for parties, game days, or a cozy movie night in. Let’s embrace the warmth of sharing delicious flavors while adding a bit of whimsy to our presentation.
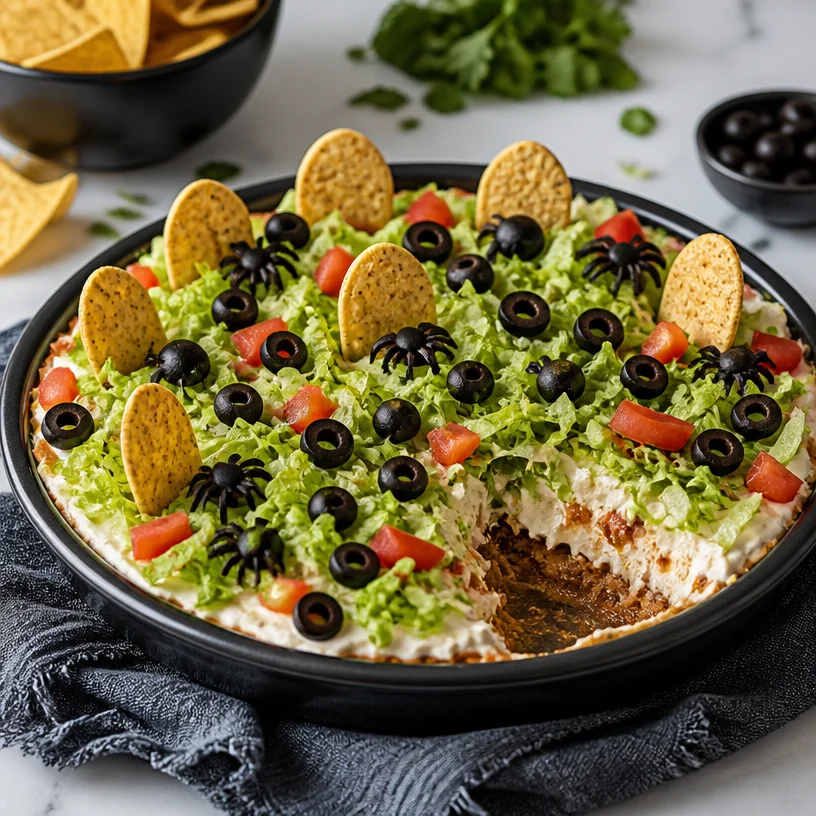
Now, you might be thinking, “Graveyard Taco Dip? What’s that all about?” Well, fear not! This dip blends all the tasty elements of a classic taco while looking like a festively eerie graveyard scene. Picture layers of creamy goodness topped with fresh lettuce, zesty taco meat, and topped with some eerie decor. Plus, this dish is as fun to make as it is to eat! Let’s dive right in!
A Memory That Takes Me Back
Before we get into the deliciousness of Graveyard Taco Dip, I want to share a fond memory that’s close to my heart. It was a cool October evening, and I was hosting my very first Halloween party. I was buzzing with excitement and a hint of nerves as I set the stage with spooky decorations and flickering candles.
My best friend, Jess, waltzed in with a grin, carrying a bubbling cauldron of taco dip—though I should mention the “graveyard” aesthetic came from us being a bit overly creative with some olives and breadsticks!
Not only did Jess’s creation steal the show, but it also became the hit of the evening. Everyone was gathering around, excited to dig into the layers of cheesy goodness while giggling over the creative grave markers. That night ignited my passion for hosting and the thrill of creating amazing memories over food. Now, years later, I still make my own version of that Graveyard Taco Dip, infusing it with my own flair while evoking those delightful nostalgia vibes.
Ingredients You’ll Need
Here’s what you’ll need to whip up this fantastic Graveyard Taco Dip:
-
Cream Cheese: This is the velvety base for our dip! If you want to cut back on calories, you can use low-fat cream cheese or even Greek yogurt for a tangy twist.
-
Taco Meat: Seasoned ground beef or turkey is traditional, but feel free to swap in shredded chicken, lentils, or a plant-based meat for a delightful vegetarian option.
-
Lettuce: Crisp and fresh! Iceberg is great for crunch, but romaine or even baby spinach works. It’s all about adding that refreshing layer.
-
Olives: The spooky touch! Black olives add a savory bite. If you’re not a fan, consider using diced jalapeños for a spicy kick or cherry tomatoes for a pop of color.
-
Tortilla Chips: The perfect scoopers for our taco dip! You can use regular, lime-flavored, or even make your own baked tortilla chips at home for a healthier option.
-
Additional Taco Toppings (optional): Think cheese, jalapeños, salsa, or avocado! Get creative here.
Fun Chef Insight:
When assembling your dip, ensure your cream cheese is softened to room temperature for easy mixing. Leaving it out for about 30 minutes before you begin helps create that luscious, creamy texture we all love without the arm workout!
Step-by-Step Instructions: Let’s Get Cooking!
-
Preheat and Prepare: Start by preheating your oven to 350°F (175°C) if you’ll be baking your taco meat. In a skillet over medium heat, brown your meat until it’s fully cooked. Drain any excess fat to keep things light and tasty!
-
Season the Meat: While the meat is cooking, add in your favorite taco seasoning—store-bought or homemade! My personal go-to mix includes chili powder, cumin, garlic powder, and a sprinkle of paprika for a smoky kick. Feel free to adjust based on your heat preference. Cook everything together for another 2-3 minutes until fragrant.
-
Cream Cheese Layer: In a large mixing bowl, take that softened cream cheese and whip it until smooth. You can use a handheld mixer or just a whisk—whatever floats your culinary boat! Spread the cream cheese mixture evenly in the bottom of a baking dish (a pretty 9×9 works great!).
-
Build Up Layers: Pour your taco meat evenly over the cream cheese layer. Take your time here and spread it out nicely, ensuring everyone gets a bite of that seasoned goodness.
-
Lettuce Add-On: Next, sprinkle a generous layer of shredded lettuce over the meat. This adds freshness and a great crunch alongside those cozy textures.
-
Olives as Headstones: Now comes the fun part! Slice black olives into rounds and place them sporadically on top of your dip to resemble gravestones. You can even get creative and cut them into spooky shapes for extra flair!
-
Bake It (Optional): If you want to warm everything together to enhance those flavors, pop the dip into the oven for about 10-15 minutes until it’s all bubbly and perfect. If you prefer it cold, feel free to skip this step!
-
Final Touches: Remove your dip from the oven, and let it sit for a minute to cool slightly before serving. That’s when you can add any additional toppings like shredded cheese or salsa, depending on your taste.
Serving Suggestions
To serve, scoop generous portions onto a plate or serve straight from the baking dish. Add a few tortilla chips alongside, and don’t forget to encourage your guests to add any desired toppings directly onto their dips. You could even lay out a colorful array of toppings so everyone can customize their own spooky graveyard scene!
Recipe Variations to Get Creative
-
Spicy Graveyard: Add diced jalapeños to your taco meat for a fiery kick, or sprinkle some crushed red pepper flakes into the cream cheese layer for extra heat!
-
Veggie Delight: Swap the taco meat for sautéed mushrooms or roasted vegetables, mixing in some black beans or chickpeas for heartiness.
-
Cheesy Explosion: Layer in freshly shredded cheese between the cream cheese and taco meat for a cheesy surprise every time you dig in.
-
Guacamole Bliss: Top with a layer of homemade guacamole instead of or in addition to the olives for a creamy, earthy taste.
-
Seasonal Twist: For a festive touch around Halloween or fall, sprinkle the top with crushed tortilla chips to resemble dirt!
Chef’s Notes: A Recipe That Keeps Evolving
This recipe has become a staple at all of my gatherings over the years! What’s great about it is how it evolves with every party. One year, I added in shredded barbecue chicken instead of traditional taco meat, and it was a hit. The next, I swirled in some spicy salsa just to kick things up! The best part? This dip never runs out of possibilities and always holds a special place in my heart.
And let me tell you, let your creativity run wild! You can even use leftover dip ingredients to create a taco platter or loaded nachos for another meal. Waste not, want not, right?
FAQs and Troubleshooting Your Taco Dip
1. Why is my dip too runny?
If you find that your dip is watery, it’s usually due to the meat or other ingredients releasing juices. Try draining the excess liquid before assembling your dip. Also, ensure your cream cheese is well blended and firm to help maintain that luscious texture.
2. Can I make this ahead of time?
Absolutely! This Taco Dip is perfect for meal prep. Just prepare it a day in advance, cover it tightly with plastic wrap, and keep it in the fridge. If you want it warm, just pop it in the oven for a few minutes before serving.
3. How can I make this a healthier option?
Try substituting lean ground turkey for the beef or using fat-free cream cheese! Adding more veggies like diced bell peppers or corn can also enhance the nutrition without compromising taste.
4. What’s the best way to store leftovers?
If you have any dip leftover (which is rare, but it happens!), transfer it to an airtight container. It stays fresh in the fridge for a few days. Just give it a good mix before serving again.
Nutritional Info (Optional)
While I love to emphasize enjoying good food, it’s also great to be conscious of nutrition. This dip, made with lean meat and fresh ingredients, can fit into your meal plan nicely. It’s packed with protein due to the meat and provides vitamins from the fresh lettuce and any additional toppings you choose.
Final Thoughts
There you have it, my wonderful foodies! Graveyard Taco Dip is not just a recipe; it’s a delightful experience waiting to happen. Whether you’re serving it at a spooky gathering or a casual hangout, it’s sure to bring smiles and tasty memories to the table. So, tie on that apron, gather your friends, and let’s celebrate the joy of cooking together!
Thank you for stopping by Ivory Apron today! Happy cooking, and may your gatherings be filled with warmth, laughter, and heaps of delicious food!
PrintGraveyard Taco Dip

A spooky and delicious taco dip perfect for gatherings, combining layers of cream cheese, seasoned meat, and festive garnishes to create a fun graveyard scene.
- Prep Time: 15 minutes
- Cook Time: 15 minutes
- Total Time: 30 minutes
- Yield: 6 servings
- Category: Appetizer
- Method: Baking
- Cuisine: Mexican
- Diet: Vegetarian option available
Ingredients
- Cream Cheese
- Taco Meat (ground beef, turkey, or vegetarian alternative)
- Lettuce (iceberg, romaine, or spinach)
- Olives (black or alternatives like jalapeños or tomatoes)
- Tortilla Chips
- Additional Taco Toppings (cheese, jalapeños, salsa, avocado)
Instructions
- Preheat the oven to 350°F (175°C) if you’re baking the taco meat.
- Brown the meat in a skillet over medium heat, then drain excess fat.
- Add taco seasoning to the meat and cook for another 2-3 minutes.
- Whip the softened cream cheese until smooth and spread it in a baking dish.
- Pour the cooked taco meat over the cream cheese layer.
- Sprinkle shredded lettuce on top of the meat.
- Slice black olives and arrange them on the dip to resemble gravestones.
- Bake for 10-15 minutes if desired, or serve cold.
- Remove from the oven, let cool slightly, and add additional toppings if desired.
Notes
This dip is versatile and can be customized with various toppings. Perfect for make-ahead preparation and can be served warm or cold.
Nutrition
- Serving Size: 1 serving
- Calories: 300
- Sugar: 2g
- Sodium: 480mg
- Fat: 20g
- Saturated Fat: 8g
- Unsaturated Fat: 10g
- Trans Fat: 0g
- Carbohydrates: 24g
- Fiber: 4g
- Protein: 10g
- Cholesterol: 30mg
Keywords: taco dip, appetizer, Halloween recipe, party food, festive dip