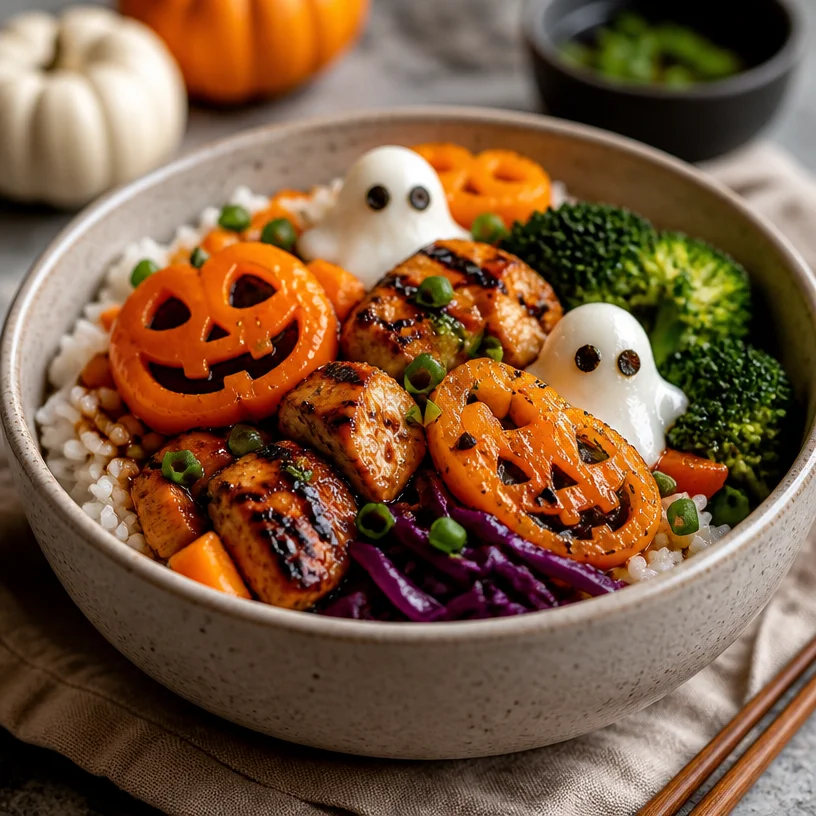
Spooky Halloween Rice Bowls: 3 Quick Weeknight Ideas
Spooktacular Halloween Rice Bowls: A Festive Treat for All!
Hello, fabulous food lovers! As the leaves turn crisp and pumpkin spice takes over, it’s time to add a little magic to your kitchen with a dish that’s not only delicious but also delightfully festive. Today, we’re diving into the world of Halloween Rice Bowls! 🎃✨
There’s something so fun about Halloween — the costumes, the decorations, and, of course, the food! I believe cooking should feel elegant but never intimidating; that’s why I’m here to show you how to create a delightful dish to celebrate this spooky season. These rice bowls are colorful, filled with flavors, and perfect for gatherings — whether you’re hosting a Halloween party or simply enjoying a cozy night in.
Imagine gathering around the table with friends, clinking glasses of apple cider, and diving into these magical bowls, brimming with vibrant rice, tender chicken, and seasonal vegetables. Not only do they look impressive, but they also come together in a pinch! Let’s get cooking because your Halloween feast awaits!
A Whimsical Memory: The Pumpkin Patch Incident
Growing up, Halloween was my absolute favorite holiday. I remember one year, when I was around eight, my family decided to take a trip to the local pumpkin patch. The smell of hay, the sight of plump pumpkins, and the excitement of picking out the perfect one filled the air with pure joy.
After a day of searching for the biggest pumpkin, we returned home only to discover that our mischievous cat, Oliver, had taken a liking to our Halloween prize. While my parents were busy in the kitchen whipping up a feast, Oliver decided to perform his best stunt, which involved launching himself onto the kitchen counter and knocking over all the carefully arranged Halloween treats. The sight of him, with pumpkin guts on his paws and a guilty look on his face, still makes me chuckle.
That evening, we made a big pot of chicken and rice—a dish we often enjoyed together. I remember how my mom would ask us to choose our favorite vegetables to toss in, and that’s where this idea for Halloween Rice Bowls was born. It’s all about creating joyful memories around food, don’t you think?
Ingredients
Here’s what you’ll need to whip up your Halloween Rice Bowls:
-
Cooked Rice (1 cup per bowl)
- Chef Insight: White, brown, or even cauliflower rice — you have options! Brown rice adds extra fiber, while cauliflower rice is a lower-carb alternative.
-
Chicken Breast (1 pound, diced)
- Substitution Tip: Feel free to swap for turkey or a plant-based protein like tofu for a delicious vegetarian option!
-
Bell Peppers (1 red, 1 yellow)
- Quick Insight: Their vibrant colors add an autumnal touch! You can also use green or orange for variety.
-
Broccoli (1 cup, chopped)
- Chef Hack: Broccoli is a nutrient powerhouse; you can easily substitute with zucchini or asparagus if desired.
-
Carrots (1 cup, sliced)
- Substitution Tip: If you want an extra crunch, swap out for snap peas or even shredded cabbage.
-
Olive Oil (2 tablespoons)
- Quick Insight: A drizzle of olive oil does wonders for flavor. Substitute with avocado oil for a similar effect!
-
Garlic (2 cloves, minced)
- Chef Insight: You can never go wrong with garlic. If fresh cloves aren’t available, garlic powder will also work!
-
Soy Sauce (1/4 cup)
- Substitution Tip: Use tamari for a gluten-free version or coconut aminos for a lighter flavor.
-
Seasonings (salt, pepper, Halloween spices like paprika or chili powder)
- Chef Hack: Play around with seasonal spices; a little cinnamon can give a warm feel to the dish!
These simple ingredients come together to create a colorful, tasty canvas for your Halloween magic, but don’t forget — it’s all about your personal touch!
Step-by-Step Instructions
Ready to transform these ingredients into a festive masterpiece? Let’s rock and roll! Follow these steps for a spooky delight:
-
Prepare Your Rice:
- Start by cooking your rice according to package instructions. Once done, fluff it with a fork and set it aside. Tip: For an added twist, try cooking it in vegetable broth for extra flavor!
-
Sauté the Chicken:
- In a large skillet, heat 1 tablespoon of olive oil over medium heat. Add the diced chicken and season with salt, pepper, and a pinch of paprika. Sauté until it’s golden and cooked through, about 5–7 minutes. Chef Hack: Don’t overcrowd the chicken to ensure it browns nicely!
-
Add the Vegetables:
- Toss in the minced garlic, bell peppers, broccoli, and carrots. Stir-fry for an additional 5–6 minutes until they’re vibrant and tender but still have a little crunch. Quick Tip: Keep the heat high and stirring to avoid burning!
-
Flavor it Up:
- Drizzle in your soy sauce and give everything a good stir to coat the chicken and veggies in deliciousness. Let it cook for another couple of minutes so the flavors meld together. Chef Insight: If you want an extra kick, add a splash of hot sauce or crushed red pepper flakes!
-
Assemble Your Bowls:
- Begin with a good scoop of rice on the bottom. Add a generous helping of the chicken and vegetable mixture on top. Make it as colorful and festive as possible! Tip: Use a small cup to neatly layer your ingredients if you want a more polished look.
-
Garnish:
- Finish off with a drizzle of sesame oil, sesame seeds, or fresh herbs like cilantro or green onions. Feel free to get creative with garnishing — the spookier, the better!
And voilà! Your Halloween Rice Bowls are all dressed up and ready for their big debut.
Serving Suggestions
To serve up your Halloween Rice Bowls, consider using black or orange bowls to amp up the spooky aesthetic. A sprinkle of edible confetti (think black and orange sprinkles) can add a fun touch, too!
Arrange them on a big, warm platter, and encourage everyone to dig in! Pair with fun cocktails or mocktails that have a hint of spice, and enjoy the festive atmosphere with friends and family.
Recipe Variations
Feeling adventurous? Here are a few creative twists to take your Halloween Rice Bowls to the next level:
- Pumpkin Spice Twist: Add 1/2 cup of pureed pumpkin to your rice while cooking — it gives a beautiful color and a hint of sweetness!
- Southwestern Style: Swap out the soy sauce for taco seasoning and top your bowls with avocado and fresh salsa.
- Creepy Crawlers: Add some edamame or black beans for a protein boost and extra texture.
- Vegan Delight: Replace the chicken with marinated roasted chickpeas for a plant-based version that doesn’t skimp on flavor.
- Harvest Flavor: Incorporate roasted butternut squash or sweet potatoes for a touch of sweetness and a seasonal feel.
Chef’s Notes
This recipe has traveled with me through many Halloween seasons! Initially, I simply made my classic chicken and rice for a cozy dinner. However, as my entertaining style evolved, I began sprucing it up for gatherings, adding vibrant veggies and playful garnishes to transform a simple dish into a visually striking centerpiece.
One of my favorite kitchen tales is how I once attempted to carve pumpkins for dinner guests while multitasking in the kitchen. Let’s just say that I ended up with more pumpkin seeds on the floor than in my dish! Lesson learned: sometimes it’s better to keep the festive activities separate to ensure your dishes shine!
FAQs and Troubleshooting
Here are some common questions and issues readers may encounter while preparing their Halloween Rice Bowls:
-
What if my rice turns out mushy?
- This can happen if too much water is added during cooking. Always measure carefully! If it does happen, try draining the rice and spreading it out on a baking sheet to air-dry a bit.
-
Can I make this dish in advance?
- Absolutely! Just keep the chicken and veggies separate from the rice until you’re ready to serve to keep everything fresh. You can reheat everything in the microwave or skillet on low heat.
-
How can I add more spice?
- If you love heat, adding a pinch of chili powder or a few slices of jalapeño can do wonders! A drizzle of sriracha right before serving also amps up the flavor.
-
What if I have leftover ingredients?
- Consider mixing leftover chicken and veggies into a salad, or add them to scrambled eggs for a breakfast twist!
Nutritional Info
If you’re curious, here’s a rough idea of what a serving might contain:
- Calories: ~550
- Protein: ~35g
- Carbs: ~65g
- Fat: ~15g
(Note: Nutritional values may vary based on specific ingredients and portion sizes.)
As we close the book on this festive recipe, remember that a great dish is about more than flavor; it’s about the joy and memories created around it. I hope these Halloween Rice Bowls fill your kitchen with warmth and laughter, just as they do mine. Happy cooking, and may your Halloween be filled with delightful treats and spooky fun! 🕷️🍂
PrintSpooktacular Halloween Rice Bowls
Colorful and flavorful Halloween Rice Bowls perfect for gatherings, filled with rice, chicken, and seasonal veggies.
- Prep Time: 15 minutes
- Cook Time: 15 minutes
- Total Time: 30 minutes
- Yield: 4 servings
- Category: Main Course
- Method: Stir-frying
- Cuisine: American
- Diet: Gluten-Free
Ingredients
- Cooked Rice (1 cup per bowl)
- Chicken Breast (1 pound, diced)
- Bell Peppers (1 red, 1 yellow)
- Broccoli (1 cup, chopped)
- Carrots (1 cup, sliced)
- Olive Oil (2 tablespoons)
- Garlic (2 cloves, minced)
- Soy Sauce (1/4 cup)
- Seasonings (salt, pepper, Halloween spices like paprika or chili powder)
Instructions
- Prepare your rice: Cook rice according to package instructions and set aside.
- Sauté the chicken: Heat olive oil in a skillet, add chicken, season, and cook until golden.
- Add the vegetables: Stir in garlic, bell peppers, broccoli, and carrots; cook until tender.
- Flavor it up: Add soy sauce and stir to combine.
- Assemble your bowls: Start with a scoop of rice, add chicken and veggies on top.
- Garnish: Drizzle with sesame oil and add herbs or sesame seeds.
Notes
Feel free to customize with your favorite vegetables or proteins. Serve in festive bowls for added fun!
Nutrition
- Serving Size: 1 bowl
- Calories: 550
- Sugar: 5g
- Sodium: 600mg
- Fat: 15g
- Saturated Fat: 2g
- Unsaturated Fat: 10g
- Trans Fat: 0g
- Carbohydrates: 65g
- Fiber: 5g
- Protein: 35g
- Cholesterol: 80mg
Keywords: Halloween, rice bowls, festive food, easy recipes, quick meals
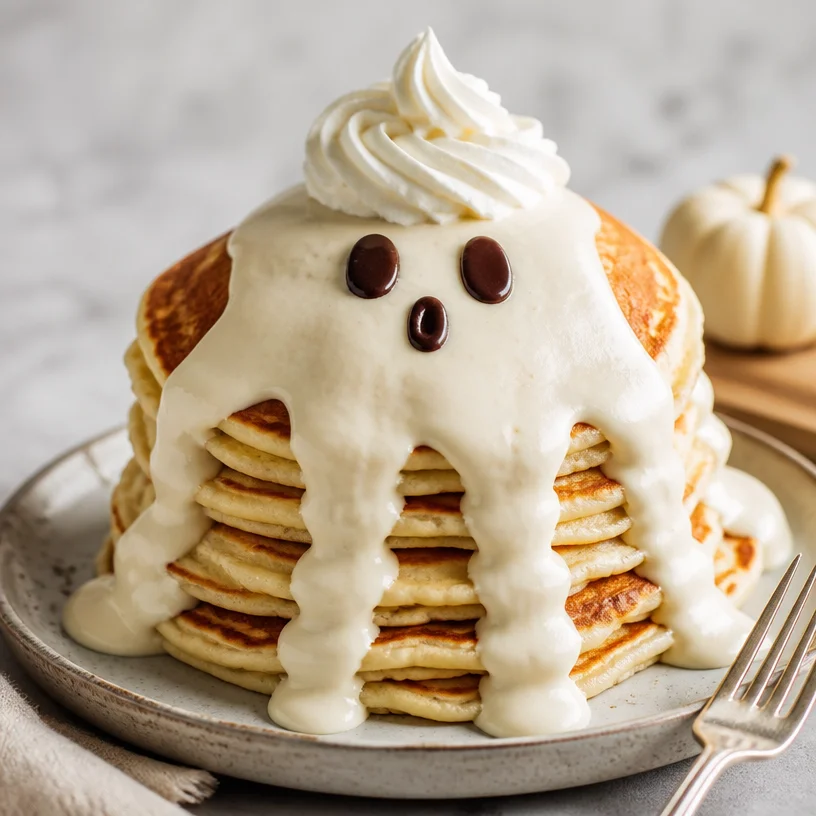
Ghost Pancakes
Ghost Pancakes: A Spooktacular Breakfast Treat
Hello, lovely foodies! Today, I have something utterly delightful and a bit whimsical to share with you—Ghost Pancakes! These spooky little creatures are perfect for adding some festive flair to your breakfast table, especially around Halloween, but honestly, they can brighten up any day of the year. I can hardly contain my excitement as I picture family and friends gathered ‘round the table, giggling over these ghostly delights.
Pancakes are not just a morning meal—they’re a canvas for creativity! So grab your apron and let’s dive into the creation of these charming breakfast ghosts that are equal parts fun and delicious!
A Personal Ghost Story
Ah, pancakes—the comfort food of my childhood! I remember one Halloween morning when I decided to surprise my younger siblings with a special breakfast. I had just learned to flip pancakes, and my confidence was through the roof! As the aroma filled the kitchen, I couldn’t have been more excited.
With a little creativity, I began to craft pancakes that looked like ghosts. Using a squeeze bottle (which I later learned is an essential chef tool), I shaped the batter into ghostly figures on the skillet. That morning blurred into a symphony of laughter as my siblings squealed in delight at the sight of their “hauntingly” delicious breakfast.
As we enjoyed our whimsical creations, I couldn’t help but feel warm inside. Food had that magic pull—it brought us together. This tradition of creating fun, themed meals stuck with me, and now I’m thrilled to share these ghost pancakes with you so you can create similar moments with your loved ones!
Ingredients
To whip up your very own ghost pancakes, you’ll need the following ingredients:
-
Pancake Batter:
- This is your pancake base! You can use a homemade or store-bought mix. If you’re feeling adventurous, I’ll share a simple recipe below! Substitute with a gluten-free blend if you’re catering to dietary needs.
-
Whipped Cream:
- This forms the ghostly “faces” and adds a touch of sweetness. You can either use store-bought whipped cream or whip your own (just beat heavy cream with a bit of sugar until peaks form). For a dairy-free option, coconut cream is a great swap!
-
Chocolate Chips or Raisins (for the eyes):
- These little guys are perfect for adding personality to your ghost pancakes! Dark chocolate chips provide a rich flavor, while raisins are a healthier alternative.
-
Syrup (optional):
- For drizzling! Maple syrup adds a classic touch, but a fruit compote can also be fabulous if you’re feeling fruity.
Step-by-Step Instructions
1. Whip Up the Pancake Batter
Start by preparing your pancake batter. If you’re using a mix, follow the instructions on the package. If you’re keen to make it from scratch, here’s a quick recipe:
- Ingredients for Homemade Pancake Batter:
- 1 cup all-purpose flour
- 2 tablespoons sugar
- 1 tablespoon baking powder
- 1/2 teaspoon salt
- 1 cup milk (or non-dairy milk)
- 1 large egg
- 2 tablespoons melted butter or vegetable oil
In a bowl, whisk together the dry ingredients: flour, sugar, baking powder, and salt. In another bowl, combine the milk, egg, and melted butter. Pour the wet ingredients into the dry, stirring until just combined. Don’t worry if it’s a little lumpy; that means fluffy pancakes!
2. Preheat the Griddle
Heat your griddle or skillet over medium heat and lightly grease it with a bit of oil or butter. This step is essential to ensure your pancakes don’t stick; plus, that buttery flavor adds magic!
3. Shape the Ghosts
Using a squeeze bottle or a measuring cup, pour the pancake batter onto the griddle in ghostly shapes—think rounded bodies with a slightly pointed top for the "head."
- Chef Hack: If you don’t have a squeeze bottle, you can also use a zip-top plastic bag. Just fill it with batter, snip a tiny corner off, and squeeze it out gently!
4. Cook Until Bubbly
Let the pancakes cook until bubbles form on the surface (about 2–3 minutes). You’ll get that satisfying anticipation as they develop a golden crust. Once bubbly, flip them to cook the other side until golden.
- Tip: Gently press down on the pancake after flipping for even cooking!
5. Add the Whipped Cream
Once your ghost pancakes are cooked, stack them on a plate. Grab your whipped cream and pipe little ghostly swirls on top. This is where they truly come to life!
6. Finish with Eyes
For eyes, drop two chocolate chips or raisins onto each whipped cream ghost. Watch as they transform into adorable little characters!
Serving Suggestions
To serve your ghost pancakes, stack them high and drizzle with maple syrup or fruit compote if desired. You can also arrange freshly sliced strawberries or bananas on the side for an extra pop of color. And don’t forget the sprinkling of extra chocolate chips or a sprinkle of powdered sugar to create a little ‘ghostly’ powder!
Recipe Variations
Here are a few fun twists on the original ghost pancake recipe:
- Pumpkin Spice Ghosts: Add a dash of pumpkin puree and pumpkin spice to your batter for an autumn twist.
- Cocoa Ghosts: Mix in cocoa powder for a chocolatey pancake experience that’s simply out of this world!
- Savory Version: Swap the sweet elements for some cheese and herbs for cheesy ghost pancakes that can be enjoyed on any brunch table!
Chef’s Notes
This recipe has evolved over the years from simple round pancakes to creative shapes and themes! I still let my creativity shine in the kitchen, and this playful dish is a perfect illustration.
One time, I tried to create a “pumpkin” version for the fall. Let’s just say they ended up looking more like lumpy squashes than cute pumpkins! But the laughter from that cooking mishap only made the experience sweeter. The lesson? Cooking is as much about the journey as it is about the final dish.
FAQs and Troubleshooting
1. My pancakes are burnt on the outside but raw in the middle. What did I do wrong?
This usually happens because the heat is too high. Be sure to keep your griddle at a medium heat and give each pancake enough time to cook through.
2. Can I make the batter ahead of time?
Absolutely! You can make the batter the night before and store it in the fridge. Just give it a gentle stir before using, as it might thicken.
3. Why are my pancakes too flat?
Make sure your baking powder is fresh, as expired leavening agents can lead to dense pancakes. Also, avoid overmixing; a few lumps in the batter are perfectly okay!
4. How can I store leftovers?
If you have any ghost pancakes left over (which is rare but possible), store them in an airtight container in the fridge for up to 2 days. You can quickly reheat them in the toaster or microwave!
Nutritional Info
(Feel free to adjust according to your recipe’s ingredients!)
- Serving Size: 2 pancakes
- Calories: Approx. 240
- Protein: 4g
- Carbohydrates: 35g
- Fat: 8g
- Sugars: 6g
Whether you’re decorating for a Halloween breakfast or just wanting to add a little whimsy to your brunch, these ghost pancakes are sure to be a hit!
Remember, cooking is about joy, connection, and a sprinkle of creativity. So don your apron, gather your loved ones, and let’s make some magical moments in the kitchen!
Happy cooking, my friends! 🥞👻
PrintGhost Pancakes
Spooktacular pancakes that bring festive flair to your breakfast table, perfect for Halloween or any day of the year!
- Prep Time: 15 minutes
- Cook Time: 15 minutes
- Total Time: 30 minutes
- Yield: 4 servings 1x
- Category: Breakfast
- Method: Griddling
- Cuisine: American
- Diet: Vegetarian
Ingredients
- Pancake Batter: Use a homemade or store-bought mix.
- Whipped Cream: For the ghostly faces, use store-bought or homemade.
- Chocolate Chips or Raisins: For the eyes.
- Syrup: Optional, for drizzling.
- 1 cup all-purpose flour
- 2 tablespoons sugar
- 1 tablespoon baking powder
- 1/2 teaspoon salt
- 1 cup milk (or non-dairy milk)
- 1 large egg
- 2 tablespoons melted butter or vegetable oil
Instructions
- Whip the pancake batter by whisking together the flour, sugar, baking powder, and salt in one bowl, then mixing the milk, egg, and melted butter in another.
- Preheat your griddle or skillet over medium heat and lightly grease it.
- Shape the ghostly figures with the pancake batter on the griddle.
- Cook until bubbles form on the surface, about 2–3 minutes, then flip to cook the other side until golden.
- Add whipped cream on top of the pancakes.
- Finish by placing chocolate chips or raisins for the eyes.
Notes
Serve with maple syrup or fruit compote and fresh fruit on the side.
Nutrition
- Serving Size: 2 pancakes
- Calories: 240
- Sugar: 6g
- Sodium: 250mg
- Fat: 8g
- Saturated Fat: 3g
- Unsaturated Fat: 4g
- Trans Fat: 0g
- Carbohydrates: 35g
- Fiber: 1g
- Protein: 4g
- Cholesterol: 10mg
Keywords: pancakes, Halloween, breakfast, fun food, family meal
Mummy Meatloaf
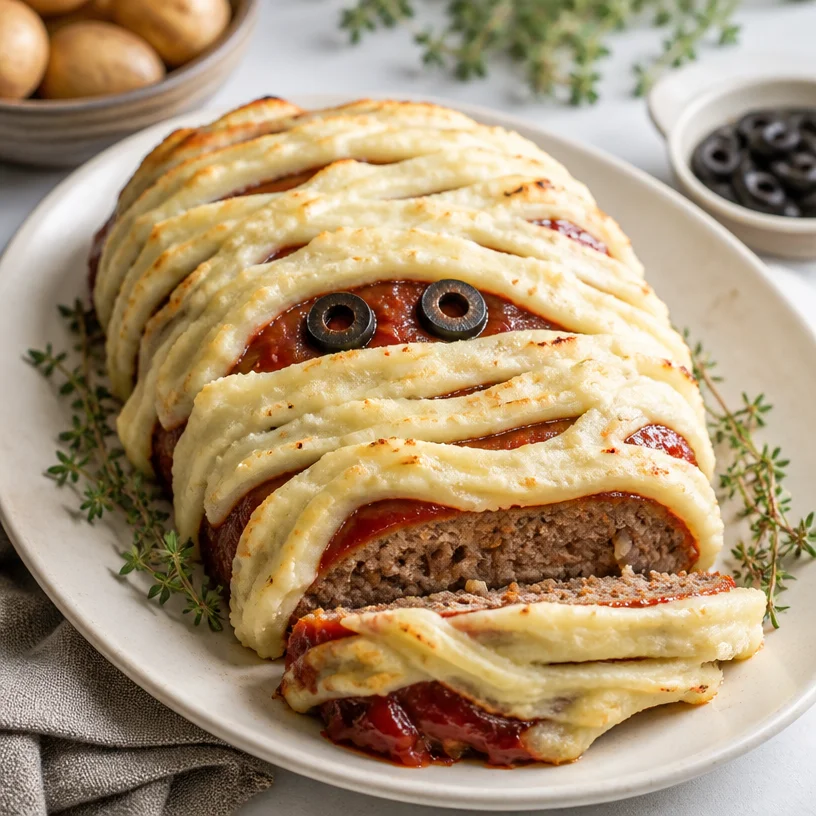
Mummy Meatloaf: A Spooktacular Family Favorite
Hello, fellow foodies! 🌟 Today, I’m thrilled to share a fun and delightful dish that’s perfect for those cozy fall evenings or Halloween celebrations: Mummy Meatloaf! This recipe is not only a hit with kids and adults alike, but it also brings back wonderful memories of creativity and laughter in the kitchen. So, tie on your apron, and let’s embark on this culinary journey!
Personal Story: A Whimsical Kitchen Adventure
I still remember the first time I made Mummy Meatloaf with my siblings. It was one of those chilly October afternoons—just the right setting for a little kitchen mischief. We carved pumpkins that morning, giggling as we created silly faces. When it came to dinner, we decided to combine our love for all things spooky with our favorite comfort food.
Armed with some ground beef, we transformed our humble meatloaf into a cutesy “mummy” by wrapping it in strips of dough and adding olives for eyes. We might have snuck in a few mini marshmallows on one of the mummies—why? Because why not add a little sweetness? The kitchen was filled with laughter, a sprinkle of flour on the floor, and an unmistakable scent of savory goodness wafting through the air. That night wasn’t just about food; it was about making memories. And that’s the magic I want to recreate with you today!
Ingredients
Here’s what you’ll need for our Mummy Meatloaf:
-
Ground Beef: The star of our meatloaf! Look for an 85/15 blend for a nice balance of flavor and moisture.
-
Mashed Potatoes: These will be our “bandages.” They add creaminess while also keeping things snug. You can use instant potatoes in a pinch if you’re short on time.
-
Onion: Chopped finely for flavor. If you’re not a fan or don’t have any, shallots or leeks can work too!
-
Breadcrumbs: They help bind the meatloaf together. Use dried breadcrumbs, or for a gluten-free option, consider ground oats.
-
Egg: This is our binding agent. If you’re looking for an alternative, flaxseed meal mixed with water can work wonders.
-
Ketchup: A classic ingredient! It’s perfect for glazing the meatloaf before it hits the oven. Try barbecue sauce for a smoky twist!
-
Mustard: Adds a zingy flavor! Any mustard should do; I prefer Dijon for its depth.
-
Black Olives: These will become our mummy’s eyes. If you’re not a fan, feel free to use capers or even slices of pickles for a fun twist!
Step-by-Step Instructions
Step 1: Preheat and Prepare
Preheat your oven to 350°F (175°C). While that’s heating up, grab a large bowl. It’s time to mix things up!
Step 2: Mix the Meaty Ingredients
In your large bowl, combine 1 pound of ground beef, 1 cup of finely chopped onion, 1/2 cup of breadcrumbs, and 1 beaten egg. Season with salt and pepper to your liking. Here’s a chef hack: mix it with your hands until just combined. Overmixing can lead to tough meatloaf!
Step 3: Add Flavor
Next, stir in 1/4 cup of ketchup and 1 tablespoon of mustard. These will not only flavor your meatloaf but also help keep it moist. Make sure to give it a good mix, but remember: no overmixing!
Step 4: Shape the Mummy
On a baking sheet lined with parchment paper, shape your mixture into a loaf. This is your chance to get creative! Carefully use your hands to form it into a “mummy” shape, perhaps making it a little longer and flatter.
Step 5: The "Bandages"
Here’s where the fun really starts. You’ll want to prepare the mashed potatoes if you haven’t already (you can even use leftover mashed potatoes if you’ve got some!). Once they’re nice and fluffy, grab a piping bag or a zip-top bag with the corner snipped off and pipe the potatoes around the meatloaf to create your bandages. Don’t worry about perfection—rustic is the name of the game!
Step 6: Add the Eyes
Pop two black olives in place for the eyes. If you’re feeling creative, you can slice them in half for a more pronounced look!
Step 7: Glaze and Bake
Drizzle a bit more ketchup on top for an extra glaze (this makes it look even more appealing!) and pop it into the preheated oven. Bake for 45-50 minutes, or until the internal temperature reaches 160°F (70°C). When it’s almost done, your kitchen will smell heavenly!
Step 8: Serve with a Smile
Once you pull it out of the oven, let it rest for about 10 minutes. This helps keep the juices in! Finally, slice and serve your delightful Mummy Meatloaf with a side of your favorite veggies or a fresh salad.
Serving Suggestions
When plating up, consider a fun Halloween-themed presentation! Arrange some roasted veggies around your Mummy Meatloaf, and perhaps sprinkle some fresh herbs for color. Or, do a mini buffet-style serving with tiny pumpkin decorations for added spookiness—your guests will love it!
Recipe Variations
Feeling adventurous? Here are some twists you can consider:
-
Turkey Mummy: Swap out ground beef for ground turkey or chicken for a lighter version.
-
Cheesy Surprise: Add shredded cheese into the meat mixture for a gooey center!
-
Spicy Kick: Stir in some diced jalapeños or hot sauce into the meat for a flavorful punch.
-
Veggie Mummy: Go meatless by using lentils or black beans mixed with breadcrumbs for a vegetarian approach.
-
Herbed Delight: Experiment with different herbs, like thyme or Italian seasoning, to elevate the flavors.
Chef’s Notes
I’ve made this recipe countless times, and it’s always a crowd-pleaser! One time, I even tried to build a “frankenstein” meatloaf tower, layering different flavors. While it was fun, the classic mummy still wins in terms of ease and likeability. Kitchen experiments often turn into giggles and laughter—I hope you embrace that spirit as you create this dish!
FAQs and Troubleshooting
-
Why is my meatloaf dry?
- If your meatloaf turns out dry, it’s often because it was overcooked or didn’t have enough binding ingredients. Make sure to monitor the cooking time closely and add enough wet ingredients like ketchup or Dijon mustard.
-
Can I make this ahead of time?
- Absolutely! You can prepare your mummy meatloaf a day ahead and store it in the refrigerator until you’re ready to bake. Just add a bit of time to your bake if it’s been chilled.
-
What if my mashed potatoes don’t hold their shape?
- If your mashed potatoes are too runny, try adding a little more butter or cream cheese to thicken them up.
-
How do I know when the meatloaf is cooked through?
- The best way is to use a meat thermometer! Aim for an internal temperature of 160°F (70°C). If you don’t have one, you can cut into the center; the juices should run clear.
Nutritional Info
While this Mummy Meatloaf is indulgent, it’s also packed with protein and can be made healthier with leaner meats or veggie options. Pairing it with a side of steamed veggies or salad makes for a balanced meal.
Alright, my culinary comrades, I hope you enjoyed this journey into Mummy Meatloaf magic! Remember, cooking is all about having fun and making memories. So gather your loved ones, create some spooky dishes, and most importantly—enjoy those moments around the table. Happy cooking! 🎉🍽️
PrintMummy Meatloaf
A fun and delightful meatloaf recipe that’s perfect for Halloween celebrations, shaped like a mummy and served with creamy mashed potatoes.
- Prep Time: 15 minutes
- Cook Time: 50 minutes
- Total Time: 65 minutes
- Yield: 4 servings 1x
- Category: Main Course
- Method: Baking
- Cuisine: American
- Diet: Omnivore
Ingredients
- 1 pound ground beef (85/15 blend)
- 1 cup finely chopped onion
- 1/2 cup dried breadcrumbs
- 1 beaten egg
- 1/4 cup ketchup
- 1 tablespoon mustard (preferably Dijon)
- Black olives (for eyes)
- Mashed potatoes (for ‘bandages’)
Instructions
- Preheat your oven to 350°F (175°C).
- Combine 1 pound of ground beef, 1 cup of finely chopped onion, 1/2 cup of breadcrumbs, and 1 beaten egg in a bowl. Season with salt and pepper.
- Stir in 1/4 cup of ketchup and 1 tablespoon of mustard.
- Shape the mixture into a loaf on a baking sheet lined with parchment paper.
- Prepare the mashed potatoes and pipe them around the meatloaf to create ‘bandages.’
- Place two black olives for eyes.
- Drizzle more ketchup on top and bake for 45-50 minutes.
- Let it rest for about 10 minutes before serving.
Notes
You can prepare the meatloaf a day in advance and store it in the refrigerator until you’re ready to bake.
Nutrition
- Serving Size: 1 serving
- Calories: 400
- Sugar: 6g
- Sodium: 600mg
- Fat: 20g
- Saturated Fat: 7g
- Unsaturated Fat: 10g
- Trans Fat: 0g
- Carbohydrates: 30g
- Fiber: 3g
- Protein: 25g
- Cholesterol: 70mg
Keywords: meatloaf, Halloween recipe, family favorite, comfort food
Spooky Halloween Mac and Cheese: Creamy One-Pan Dinner
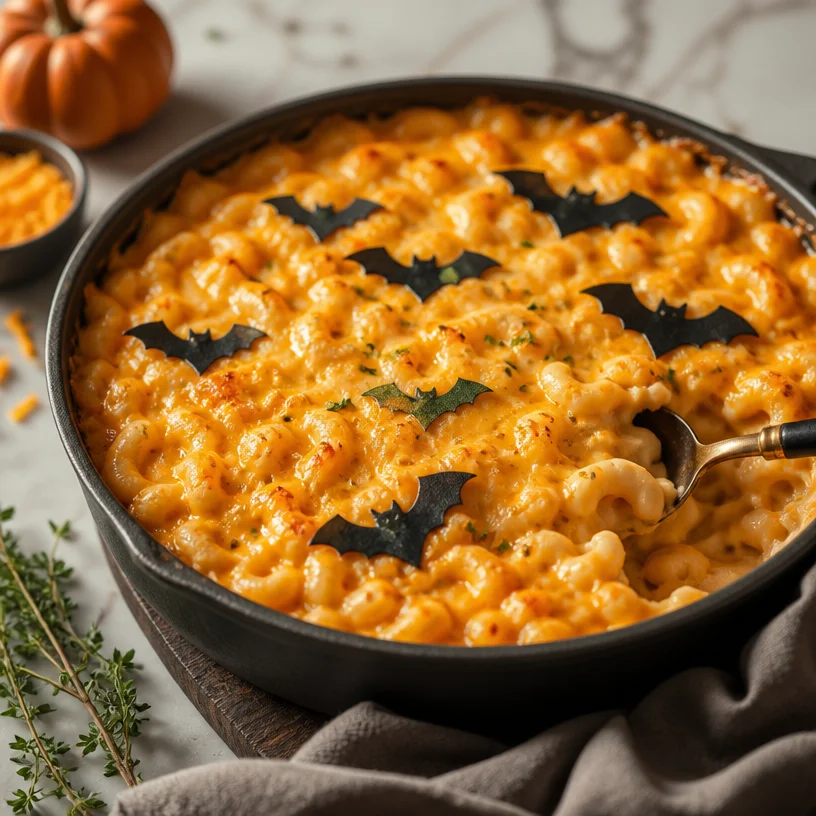
Spooktacular Halloween Mac and Cheese: A Ghoulishly Good Treat!
Hello, my delightful kitchen adventurers! As the leaves turn to vibrant shades of orange and red, and pumpkins begin to pop up on every doorstep, I can’t help but feel the cozy, festive vibes of fall. And with Halloween creeping around the corner, it’s time to embrace all things spooky and fun in the kitchen. Today, I’m thrilled to share with you a dish that’s not only a crowd-pleaser but also a fantastic addition to any Halloween gathering: Spooktacular Halloween Mac and Cheese!
When I think about Halloween, I’m immediately transported back to my childhood. I can almost taste the excitement of dressing up in silly costumes, the thrill of trick-or-treating with friends, and of course, the delicious, gooey comfort of mac and cheese! It was always my go-to meal after a night of collecting candy—nothing beats coming home and digging into a warm bowl of cheesy goodness.
But this isn’t just any mac and cheese; this version brings an element of fun and surprise to the table. We’re adding in some whimsical twists to make things Halloween-approved, with a hint of creativity that’s sure to delight friends and family of all ages. So grab your aprons, and let’s dive into this delicious adventure!
A Fond Halloween Memory
Every year, my neighborhood would host a Halloween block party that felt like the highlight of the season. Families would deck their houses with cobwebs, ghosts, and all sorts of spooky décor. It was only a matter of time before the smell of something delicious would waft through the air, pulling us kids toward the gathering spot. That aroma? You guessed it—mac and cheese!
One year, my mom decided to elevate our traditional recipe with some Halloween flair. She dyed the cheese a bright orange, shaped the pasta into little bones, and added crispy breadcrumbs on top to make it look like it was "haunted." I remember devouring that bowl, giggling with friends, and planning the next series of costumes we’d wear. To this day, that memory of mac and cheese, laughter, and the spirit of Halloween serves as my culinary inspiration. That’s the magic I want to recreate in your kitchen today!
Ingredients
Let’s gather our ingredients for this delightful Halloween Mac and Cheese! Here’s what you’ll need:
-
Macaroni: The classic. You can use elbow macaroni or any fun pasta shape you prefer. Just be ready to dive into its cheesy goodness!
-
Cheddar Cheese: A must for that rich, creamy flavor. I recommend sharp cheddar for a more intense flavor, but feel free to mix it up with mild varieties or even smoked cheddar for added depth.
-
Milk: Whole milk will give you a creamier texture, but skim or plant-based milk can work if you’re looking for alternatives.
-
Butter: A little bit of butter goes a long way in adding richness. If you’re vegan or dairy-free, opt for a plant-based butter.
-
Flour: We use this for making a roux, which is essential for that cheesy sauce. Gluten-free flour can be substituted if needed.
-
Breadcrumbs: Use panko for extra crunch! You can make your own from stale bread or purchase flavored options for a little kick.
-
Food Coloring (optional): For that ghoulishly vibrant hue! Orange is a natural choice, or you can experiment with yellow or even purple for a unique twist.
-
Spices (optional): A dash of garlic powder, onion powder, and black pepper will enhance the flavor. You might even add a pinch of paprika for a hint of smokiness.
Step-by-Step Instructions
Are you ready to bring this Halloween Mac and Cheese to life? Let’s get cooking!
1. Cook the Pasta
Bring a large pot of salted water to a rolling boil. Add your macaroni and cook until al dente, following package instructions (about 7-8 minutes). Remember, you want it firm because it will continue to cook in the oven. Drain and set aside!
Chef’s Tip: Remember to reserve a cup of pasta water—this starchy water can help loosen up your cheese sauce if it’s too thick later on!
2. Prepare the Roux
In the same pot, melt 4 tablespoons of butter over medium heat. Once melted, add 4 tablespoons of flour. Stir continuously for about 2 minutes until you form a thick paste—this is called a roux. It’s the secret to a silky cheese sauce!
Little Chef Hack: Don’t rush this step! Cooking the flour helps eliminate that raw taste—timing is everything here!
3. Add Milk
Gradually whisk in 3 cups of milk, ensuring there are no lumps. Keep whisking until the mixture thickens and starts to bubble—about 5-7 minutes.
Pro Tip: If you want a super creamy sauce, you can use half-and-half instead of milk. You deserve this decadent treat!
4. Cheese Time!
Reduce the heat to low, and it’s time to add the star of the show: cheese! Stir in about 3 cups of shredded cheddar cheese gradually. As it melts, you’ll notice your sauce transforming into a dreamy, cheesy delight. If you’re feeling adventurous, add a couple of drops of food coloring to give it that festive Halloween flair!
Fun Chef Insight: Mixing different types of cheese—like gouda or mozzarella—can add layers of flavor and texture. Don’t be shy to experiment!
5. Combine Pasta and Sauce
Once your cheese has melted and everything is beautifully combined, add the cooked macaroni to the pot. Stir until the pasta is completely coated in cheese sauce. If your sauce seems too thick, add a little reserved pasta water to adjust the consistency!
Chef’s Note: This step is where your patience pays off—the texture should be creamy, and the pasta should gleam with cheesy goodness!
6. Prepare for the Oven
Preheat your oven to 350°F (175°C). Once preheated, transfer your mac and cheese to a greased baking dish. This is when we elevate it a notch!
Tip: For added creativity, use a fun-shaped baking dish! If you’ve got a spooky skull-shaped dish, why not?
7. Add Crunchy Topping
In a small bowl, melt another 2 tablespoons of butter and mix it with about 1 cup of breadcrumbs. Sprinkle the buttery breadcrumb mixture over the top of the mac and cheese. For an extra kick and color, you can also add about half a teaspoon of paprika.
Secret Tip: Mixing in a touch of parmesan cheese with your breadcrumbs can give it that extra cheesy crunch!
8. Bake to Perfection
Bake your mac and cheese for about 20-25 minutes, until the top is golden brown and crispy. The aroma will fill your kitchen and have everyone buzzing with excitement!
Chef’s Hack: If you’re feeling fancy, broil the mac and cheese for the last 2-3 minutes to get that golden brown crust—just keep an eye on it; things can go from perfect to burnt quickly!
Serving Suggestions
Once baked to perfection and that golden crust is tantalizing, it’s time to plate! Serve the mac and cheese hot, garnished with freshly chopped herbs (like parsley or chives) for a pop of color. Consider adding some fun Halloween-themed decorations: mini pumpkin bowls or ghost-shaped napkins to enhance that spooky ambiance.
If you really want to wow your guests, pair it with a light salad or roasted veggies to balance out the richness of the dish! Place some additional hot sauce on the table for those who dare to turn up the heat!
Recipe Variations
Get creative with your Halloween Mac and Cheese! Here are some fun variations:
-
Pumpkin Spice Mac and Cheese: Add some pureed pumpkin to the cheese sauce for a seasonal twist, along with some nutmeg or cinnamon for warmth.
-
Buffalo Chicken Mac: Mix in some shredded cooked chicken and buffalo sauce for a spicy kick—perfect for gathering your friends on Halloween night!
-
Vegan Delight: Swap the cheese for a nut-based cheese or nutritional yeast, and use a plant-based milk and butter for a creamy, vegan-friendly option.
-
Ghostly Green Mac: Blend in some cooked spinach or kale to create a bright green base that’s spooky and nutritious!
-
S’mores Mac: Believe it or not, you can make dessert mac and cheese by mixing in chocolate, graham cracker crumbs, and marshmallows to create a sweet twist!
Chef’s Notes
This Halloween Mac and Cheese has become a staple in my cooking repertoire over the years, and it always brings a giggle or two when guests see the fun twists. Once, a friend brought his little girl to one of our Halloween gatherings, and she immediately dubbed it “Witch’s Brew”. From that moment on, our Halloween tradition was born—every year, we’d gather, enjoy ghoulish dishes, and create new memories around the table.
Cooking is more than just following a recipe; it’s about creating stories, laughter, and warmth around your table. I hope this dish becomes a beloved part of your own Halloween traditions, too!
FAQs and Troubleshooting
Q: My cheese sauce turned gritty. What did I do wrong?
A: It’s crucial to slowly add your cheese to the roux while keeping the heat low. Adding cheese too quickly or at high heat can cause it to seize up rather than melt smoothly.
Q: Can I make this ahead of time?
A: Yes! You can prepare the mac and cheese up to the baking step, cover it with plastic wrap, and store it in the fridge for up to 24 hours. Just add a few extra minutes to the baking time if you’re starting with it cold.
Q: What if I don’t have breadcrumbs?
A: No problem! You can use crushed crackers, potato chips, or even skip the topping altogether if you prefer a saucier dish.
Q: How can I make this dish spicier?
A: Toss in some diced jalapeños, hot sauce, or even a sprinkle of cayenne pepper to the cheese mix for those who like it hot!
Nutritional Info
While I recommend enjoying this Halloween Mac and Cheese in moderation due to its richness, here are some basic nutritional facts per serving based on traditional ingredients (be sure to adjust for variations):
- Calories: Approximately 400-450 per serving
- Protein: 15g
- Carbohydrates: 45g
- Fat: 20g
Remember, cooking is about balance—enjoy every delicious bite, knowing that every gathering brings joy and new memories!
And there you have it—your spooktacular Halloween Mac and Cheese! I hope this recipe lights up your Halloween gatherings with joy, laughter, and, of course, cheesy comfort food! Let’s keep those culinary adventures rolling and celebrate the magic of cooking together. Happy Halloween and bon appétit!
PrintSpooktacular Halloween Mac and Cheese

A fun and festive take on classic mac and cheese, perfect for Halloween gatherings!
- Prep Time: 15 minutes
- Cook Time: 30 minutes
- Total Time: 45 minutes
- Yield: 4 servings 1x
- Category: Main Course
- Method: Baking
- Cuisine: American
- Diet: Vegetarian
Ingredients
- 8 oz elbow macaroni
- 3 cups sharp cheddar cheese, shredded
- 3 cups whole milk
- 6 tablespoons butter
- 4 tablespoons all-purpose flour
- 1 cup panko breadcrumbs
- Food coloring (optional)
- Spices (garlic powder, onion powder, black pepper, paprika – to taste)
Instructions
- Cook the Pasta: Bring a large pot of salted water to a rolling boil. Add macaroni and cook until al dente, about 7-8 minutes. Drain and set aside!
- Prepare the Roux: In the same pot, melt 4 tablespoons of butter over medium heat. Add flour, stirring continuously for about 2 minutes.
- Add Milk: Gradually whisk in milk until thickened and bubbling, about 5-7 minutes.
- Add Cheese: Reduce heat and stir in cheddar cheese until melted and creamy. Add food coloring if desired.
- Combine Pasta and Sauce: Add macaroni to the pot, stirring until coated. If sauce is too thick, adjust with reserved pasta water.
- Prepare for the Oven: Preheat oven to 350°F (175°C) and transfer mac and cheese to a greased baking dish.
- Add Crunchy Topping: Mix melted butter with breadcrumbs and sprinkle over the top.
- Bake to Perfection: Bake for 20-25 minutes until golden brown and crispy.
Notes
Garnish with freshly chopped herbs and consider fun Halloween-themed decorations for serving.
Nutrition
- Serving Size: 1 serving
- Calories: 400
- Sugar: 5g
- Sodium: 600mg
- Fat: 20g
- Saturated Fat: 12g
- Unsaturated Fat: 8g
- Trans Fat: 0g
- Carbohydrates: 45g
- Fiber: 2g
- Protein: 15g
- Cholesterol: 60mg
Keywords: Halloween, Mac and Cheese, Comfort Food, Vegetarian
Jack-o’-Lantern Quesadillas
Jack-o’-Lantern Quesadillas: A Spooktacular Treat for Halloween!
Hello, fellow foodies! As October rolls in and the air becomes crisp, my kitchen transforms into a festive hub of creativity and culinary delight. When Halloween approaches, I find that food isn’t just about flavor; it’s an opportunity to have some fun and inject a little whimsy into our meals. Today, I’m excited to share a delightful recipe that’s not only easy to whip up but also brings a smile to everyone’s face – Jack-o’-Lantern Quesadillas!
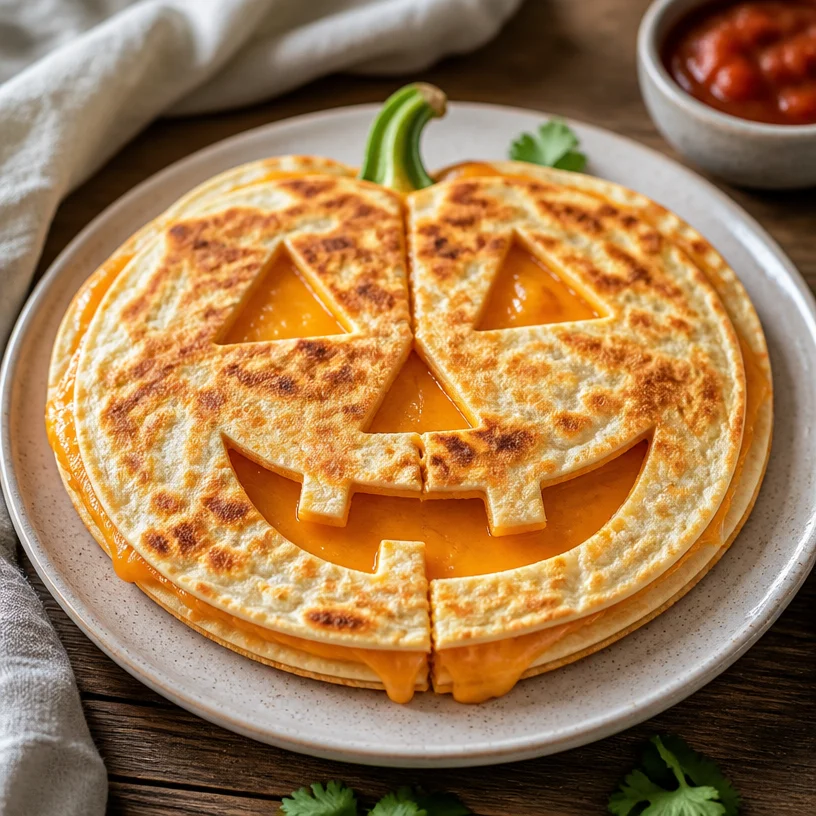
These playful quesadillas are shaped like Jack-o’-lanterns and filled with gooey cheese, making them a perfect snack for kids and adults alike. Whether you’re hosting a spooky gathering, celebrating Halloween, or just looking to add some fun to dinner, these quesadillas are sure to be a hit. They are quick to make and can even be a crafty kitchen project to involve the little ones!
So, grab your favorite apron, and let’s dive into this culinary adventure that’s as fun to make as it is to eat!
My Personal Story: Halloween Memories in the Kitchen
Growing up, Halloween was always one of my favorite holidays. The excitement of choosing costumes, decorating the house with cobwebs and pumpkins, and, of course, the Halloween treats! I fondly recall my mom and I spending the days leading up to the 31st crafting spooky snacks. One year, we decided to have a Halloween-themed dinner party for our family, and that’s when the idea of festive food struck us.
We created all kinds of delightful dishes, but the star of the show was our pumpkin-shaped quesadillas. We used cookie cutters to give them that authentic Jack-o’-lantern look, and the cheese melted to perfection inside. It wasn’t just about the food; it was about creating lasting memories and giggles in the kitchen. As we all sat together, munching on our ghoulish goodies, I realized that Halloween wasn’t just about the spooky vibes; it was about gathering people around the table for fun, laughter, and, of course, fantastic food! These Jack-o’-Lantern Quesadillas bring back those cherished memories, and I can’t wait for you to create your own stories with them.
Ingredients
Let’s talk about the ingredients you’ll need to create these festive Jack-o’-Lantern Quesadillas. Simple, wholesome, and straightforward! Here’s what you need:
-
Tortillas:
- Use any type you prefer, such as flour or corn. Flour tortillas are generally more flexible and easier to work with, especially for shaping. You can even find whole grain or gluten-free options if you have dietary needs.
-
Cheddar Cheese:
- A classic choice, cheddar melts beautifully and provides a nice sharp flavor that pairs well with the tortilla. You can substitute with Monterey Jack for a mild taste or pepper jack for a spicy kick. If you’re looking for a dairy-free or vegan alternative, shredded vegan cheese works remarkably well too!
-
Optional Add-Ins:
- Feel free to layer in extras like beans, pre-cooked chicken, or veggies for added flavor and nutrition. Just remember to keep the filling relatively thin so the quesadillas stay crispy!
Step-by-Step Instructions
Okay, time to roll up those sleeves and get cooking! Here’s a detailed guide to creating your Jack-o’-Lantern Quesadillas:
Step 1: Prep Your Space
Set up your cooking area: grab a frying pan, spatula, a cutting board, and a sharp knife. It’s always a good idea to have everything organized before you start – saves time and avoids the last-minute scramble.
Step 2: Make the “Face”
Using a small pumpkin-shaped cookie cutter or a knife, cut out fun Jack-o’-lantern faces from one side of the tortilla. You can give them silly smiles or spooky grins – the choice is yours! Lay the tortilla flat on your cutting board and gently press down the cookie cutter. If you’re using a knife, be careful and go slowly to ensure you don’t accidentally cut all the way through.
Step 3: Heat the Pan
Heat your non-stick frying pan over medium heat. You want it hot but not too hot to scorch your quesadillas. A well-heated pan ensures that the cheese will melt perfectly while keeping the outside delightfully crispy.
Step 4: Assemble the Quesadilla
Now, it’s time to fill those tortillas! Place one uncut tortilla in the pan. Sprinkle a generous layer of shredded cheddar cheese on one half, leaving room for the other half to fold over. If you’re adding extra fillings (like cooked chicken or beans), layer them on top of the cheese evenly.
Step 5: Fold and Cook
Fold the quesadilla in half. Press it down gently with your spatula to encourage even cooking. Cook for about 2-3 minutes on one side until the cheese begins to melt and the tortilla turns golden brown. Keep an eye on it, as cooking times can vary based on your stovetop.
Step 6: Flip and Finish
Gently flip the quesadilla using your spatula and cook on the other side for another 2-3 minutes. Once it’s perfectly crispy and golden on both sides, remove it from the pan and let it sit for a minute. This resting period allows the cheese to settle a bit, making it easier to slice and serve.
Step 7: Cut and Serve
Using a sharp knife or pizza cutter, slice the quesadilla into wedges. You can also use a bit of kitchen shears to do this, which may be easier, especially for those fun shapes! Serve them warm with salsa, sour cream, or guacamole for dipping.
Quick Chef Hacks:
- To prevent your tortillas from getting soggy, avoid adding too many extra fillings.
- You can keep the finished quesadillas warm in a low oven while you cook the rest.
- For extra flavor, consider sprinkling some chili powder or taco seasoning into the cheese blend.
Serving Suggestions
Presentation is key! Arrange your Jack-o’-Lantern Quesadillas on a festive Halloween-themed platter. You can garnish with sprigs of fresh cilantro or parsley for a bright pop of color. Pair them with a bowl of salsa, guacamole, or sour cream for dipping – it adds both flavor and a fun touch. You might even consider serving them alongside a Halloween-inspired salad, maybe one with black olives and shredded carrots for a spooky effect!
Recipe Variations
Now that you’ve mastered the classic Jack-o’-Lantern version, here are some tasty variations to keep the fun going:
- Cheesy Veggie Quesadillas: Add in finely chopped peppers, spinach, or zucchini for a healthy twist.
- Spicy Chicken Quesadillas: Layer in shredded rotisserie chicken with a sprinkle of taco seasoning for added protein.
- Sweet Treat Quesadillas: For dessert, try adding cream cheese and a sprinkle of cinnamon with thinly sliced apples between two tortillas. Cook until golden and serve with caramel sauce!
- Black Bean & Cheese: Combine black beans with the cheese for a protein-rich option that’s satisfying and flavorful.
Chef’s Notes
Let me share a little kitchen quirk: one year, in my excitement to serve these Jack-o’-Lantern Quesadillas at a Halloween party, I accidentally mistook the cumin for cinnamon! The result? Well, it was an interesting flavor profile, to say the least. Everyone had a good laugh, and I think I found a new recipe in the process! Cooking is about experimenting and enjoying the ride, and this recipe is no different. I encourage you to play around with flavors and have fun in the kitchen!
FAQs and Troubleshooting
1. Can I make these quesadillas in advance?
Absolutely! You can assemble the quesadillas ahead of time and store them in the refrigerator. When you’re ready to serve, just heat them in a pan or bake them in the oven until warm and crispy.
2. My quesadillas are falling apart. What did I do wrong?
If your quesadillas are falling apart, it often means they were overstuffed. Stick to a moderate amount of filling, and ensure you have the tortilla sealed well before flipping.
3. How can I make them healthier?
You can use whole grain tortillas, reduce the amount of cheese, and pack them with more veggies, like spinach, mushrooms, or roasted peppers.
4. What if I don’t have cookie cutters?
No problem! You can use a sharp knife to carve out the pumpkin shapes. It takes a little more effort but can be a fun activity on its own, especially for kids.
Nutritional Info
While I don’t have precise nutritional info for this recipe, you can estimate it based on the tortillas and cheese you use. Generally, a single quesadilla (about 2 servings) can range from 300-500 calories depending on the ingredients.
Happy cooking, everyone! I hope these Jack-o’-Lantern Quesadillas bring joy, laughter, and deliciousness to your Halloween festivities. Remember, cooking should always be fun! So tie on that apron and let your creativity shine. Let’s gather around the table and enjoy some spooky good eats!
PrintJack-o’-Lantern Quesadillas

These playful quesadillas are shaped like Jack-o’-lanterns and filled with gooey cheese, making them a perfect snack for Halloween festivities.
- Prep Time: 15 minutes
- Cook Time: 6 minutes
- Total Time: 21 minutes
- Yield: 2 servings
- Category: Appetizer
- Method: Pan-frying
- Cuisine: Mexican
- Diet: Vegetarian
Ingredients
- Tortillas (flour or corn)
- Cheddar Cheese (or Monterey Jack, pepper jack, or vegan cheese)
- Optional Add-Ins: beans, pre-cooked chicken, or veggies
Instructions
- Prep Your Space: Set up your cooking area with all necessary tools.
- Make the “Face”: Cut out fun Jack-o’-lantern faces from the tortillas.
- Heat the Pan: Warm a non-stick frying pan over medium heat.
- Assemble the Quesadilla: Fill one tortilla with cheese and optional add-ins.
- Fold and Cook: Fold the quesadilla in half and cook until golden brown.
- Flip and Finish: Cook the other side until crispy and golden.
- Cut and Serve: Slice into wedges and serve with dipping options.
Notes
Avoid overstuffing to prevent soggy tortillas. Keep finished quesadillas warm in a low oven if needed.
Nutrition
- Serving Size: 1 quesadilla
- Calories: 400
- Sugar: 2g
- Sodium: 350mg
- Fat: 15g
- Saturated Fat: 7g
- Unsaturated Fat: 5g
- Trans Fat: 0g
- Carbohydrates: 45g
- Fiber: 3g
- Protein: 12g
- Cholesterol: 35mg
Keywords: Halloween, Quesadillas, Jack-o'-Lantern, Fun Food, Kid-Friendly
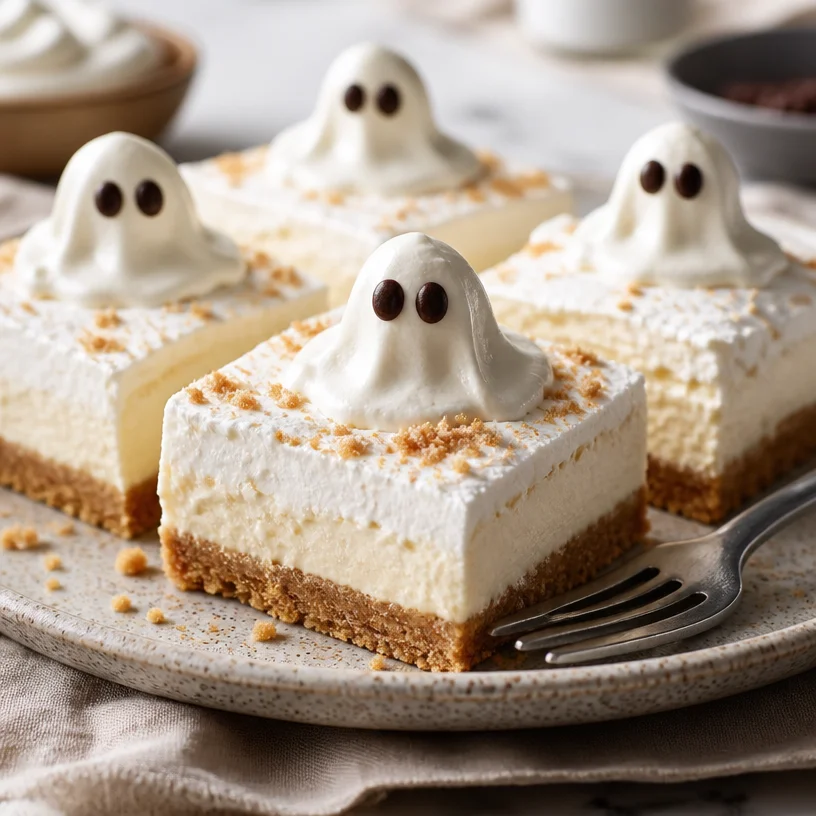
Halloween Ghost Cheesecake Bars: No-Bake Creamy Treat
Ghost Cheesecake Bars: A Spooktacular Treat for Your Halloween Gatherings
Hello, fellow food lovers! It’s Savannah here from Ivory Apron, and I’m beyond excited to share one of my absolute favorite treats that’s perfect for the spooky season: Ghost Cheesecake Bars. You might be asking yourself, “How can something that looks this cute also taste so good?” Well, my dear friend, I assure you that these bars are both a feast for the eyes and a dream for the palate. Grab your apron, and let’s get baking!
As we dive into this whimsical dessert, think about the joy of gathering with loved ones during Halloween. There’s something magical about turning the kitchen into a haunted haven, with flickering candlelight and the sweet aroma of baked goodies wafting through the air. The Ghost Cheesecake Bars are not just a delicious dessert; they are also an opportunity to create memories.
A Fun, Nostalgic Memory
I remember the first Halloween party I hosted in college—oh, what a night! I decided to get crafty and whipped up a batch of spooky treats for my friends. With a bit of imagination, I transformed simple cheesecake into what I called “Ghost Cheesecake Bites.” Picture this: soft, creamy cheesecake, adorned with little chocolate eyes on top like joyous little spirits floating on a cloud. Everyone had a blast, and we spent the night sharing ghost stories while sinking our teeth into those delightful bites. That night I learned that food has an amazing power to bring together friends and create those cherished moments we hold dear.
Fast forward to today, and I’ve refined that college creation into these delightful bars, which are perfect for serving a crowd! So, let’s get to it!
Ingredients
Gather these simple ingredients to get started on your Ghost Cheesecake Bars:
-
Cream Cheese: The star of the show! Cream cheese makes the filling rich and creamy. For a lighter version, you can substitute with a lower-fat cream cheese.
-
Graham Crackers: These little crunchy delights form the base of our bars. If you want a gluten-free option, crushed almonds or gluten-free cookies work beautifully!
-
Sugar: Adds the perfect amount of sweetness to balance the tanginess of the cream cheese. You can use coconut sugar or agave for a healthier alternative.
-
Vanilla Extract: A splash of this luscious extract enhances the flavor of the cheesecake. Use pure vanilla extract for the best taste, but imitation vanilla will work in a pinch.
-
Whipped Cream: Light and airy, whipped cream adds a dreamy texture to the filling. You can opt for store-bought or make your own for a fresher taste.
-
Chocolate or Edible Decorations: This is where the fun begins! Use melted chocolate or edible decorations to create ghostly figures on top of the bars. How about melting white chocolate and piping it out for a ghostly appearance?
Step-by-Step Instructions
Now let’s walk through the steps of making these enchanting cheesecake bars together:
-
Preheat Your Oven: Set your oven to 325°F (160°C). Pre-heating is crucial for even baking. Give your oven a moment to reach the right temperature—it’ll help ensure that your cheesecake bars turn out perfectly.
-
Prepare an 8×8 Baking Pan: Line your pan with parchment paper, allowing some overhang for easy removal later. This is a trick I swear by! It saves you from the heartbreak of broken bars.
-
Make the Graham Cracker Crust: In a mixing bowl, crush the graham crackers into fine crumbs. You could use a food processor for this, or just place them in a resealable bag and pound them with a rolling pin—it’s therapeutic! Combine the crumbs with melted butter and sugar, then mix until the mixture resembles wet sand. Press this mixture tightly into the bottom of the prepared pan. This is your sturdy foundation!
-
Bake the Crust: Pop the crust into the preheated oven and bake for about 8–10 minutes or until golden brown. The smell will be heavenly, and your kitchen will start to feel like a bakery!
-
Prepare the Cheesecake Filling: In a mixing bowl, add the softened cream cheese and sugar. Beat with an electric mixer on medium speed until smooth and creamy, about 2 minutes. Scrape down the sides of the bowl to ensure everything is mixed well.
-
Add Vanilla and Whipped Cream: Pour in the vanilla extract and fold in the whipped cream gently to keep it airy. Remember, we want lightness here! This is also the moment to taste—adjust sweetness if needed.
-
Combine and Pour: Once the mixture is fluffy, pour it over your baked crust, smoothing it out with a spatula. Don’t be shy—put your heart into it!
-
Bake the Cheesecake: Return the pan to the oven and bake for about 25–30 minutes. It’s done when the edges are set, but there’s still a slight jiggle in the middle. This will firm up as it cools.
-
Chill the Cheesecake: After baking, let it cool at room temperature for about an hour. Then, transfer it to the refrigerator and chill for at least 3 hours or overnight if time allows. Patience is key!
-
Decorate Your Ghosts: Once chilled, lift the cheesecake from the pan using the parchment overhang. Cut into bars, and now it’s time to bring those ghostly characters to life! Use melted white chocolate to create ghost shapes, or use edible decorations to make them come alive with personality. The more quirky, the better!
Serving Suggestions
When it comes to plating these delightful bars, simplicity is key! I suggest placing these on a beautiful serving platter, perhaps garnished with fresh berries or sprigs of mint for a pop of color. You can also add a drizzle of chocolate sauce around the bars for a fun effect. Don’t forget to sprinkle some edible glitter for that extra festive touch—it’s Halloween magic!
Recipe Variations
Let’s mix things up a bit! Here are some fun twists you can try:
-
Pumpkin Spice Ghost Cheesecake: Add pumpkin puree and pumpkin spice to your filling for a fall twist!
-
Chocolate Ghost Bars: Fold in melted chocolate chips or a swirl of Nutella for an indulgent chocolate version.
-
Berry Berry Ghosts: Top with fresh berry compote to add a tart freshness that complements the richness of the cheesecake.
-
Vegan Variation: Swap out traditional cream cheese for a vegan alternative and use coconut whipped cream!
-
Gluten-Free Adaptation: Use gluten-free graham crackers or an almond flour crust for gluten-free guests.
Chef’s Notes
Over the years, these Ghost Cheesecake Bars have become a staple for my Halloween gatherings. I remember one year when I dressed them up with little almond slivers to make them look extra spooky! It became a year-on-year tradition to battle for the spookiest presentation with my friends—it’s always a blast!
This recipe has blossomed over time, with little adjustments that’ve made it even better. I love experimenting with colors and flavors, connecting with the heart of the season, and creating fun memories packed in each bite.
FAQs and Troubleshooting
1. Why did my cheesecake crack?
Cracks can happen if the filling is overmixed or the cheesecake is baked at too high a temperature. Make sure to mix just until smooth and check the oven temperature with a thermometer!
2. Can I leave out the whipped cream?
You can, but it brings a lovely lightness to the filling. If you skip it, consider adding a bit of sour cream or Greek yogurt for a creamy texture.
3. How do I store leftovers?
Store any leftovers in an airtight container in the refrigerator for up to a week. They can also be frozen; just wrap them tightly for up to 3 months!
4. How can I make sure they are set properly?
The jiggle is normal, but if it looks overly wet or loose, it needs more time. You can always put it back into the oven for a few more minutes (watch it closely!).
Nutritional Info
While I recommend indulging in these bars occasionally, here’s a rough estimation per bar (yielding about 12 bars if cut evenly):
- Calories: 230
- Total Fat: 15g
- Saturated Fat: 9g
- Carbohydrates: 20g
- Sugars: 10g
- Protein: 3g
Enjoying these deliciously spooktacular Ghost Cheesecake Bars will surely draw smiles from your guests and create lasting memories around your table. So tie on that apron, gather your loved ones, and let’s cherish the moments we create together—all while indulging in the delightful flavors of Halloween. Happy cooking!
PrintGhost Cheesecake Bars
Delightful Ghost Cheesecake Bars perfect for Halloween gatherings, featuring a rich cream cheese filling and a crunchy graham cracker crust.
- Prep Time: 20 minutes
- Cook Time: 40 minutes
- Total Time: 180 minutes
- Yield: 12 servings 1x
- Category: Dessert
- Method: Baking
- Cuisine: American
- Diet: Vegetarian
Ingredients
- 8 oz Cream Cheese
- 1 cup Graham Crackers, crushed
- 1/3 cup Sugar
- 1 tsp Vanilla Extract
- 1 cup Whipped Cream
- Chocolate or Edible Decorations
Instructions
- Preheat your oven to 325°F (160°C).
- Prepare an 8×8 baking pan lined with parchment paper.
- Make the graham cracker crust by mixing crumbs with melted butter and sugar.
- Bake the crust for about 8–10 minutes until golden brown.
- Prepare the cheesecake filling by beating cream cheese and sugar until smooth.
- Add vanilla extract and fold in whipped cream gently.
- Combine the mixture and pour it over the baked crust.
- Bake the cheesecake for about 25–30 minutes until the edges are set.
- Chill the cheesecake for at least 3 hours.
- Decorate with melted white chocolate or edible decorations.
Notes
Store leftovers in an airtight container in the refrigerator for up to a week, or freeze for up to 3 months.
Nutrition
- Serving Size: 1 bar
- Calories: 230
- Sugar: 10g
- Sodium: 200mg
- Fat: 15g
- Saturated Fat: 9g
- Unsaturated Fat: 4g
- Trans Fat: 0g
- Carbohydrates: 20g
- Fiber: 1g
- Protein: 3g
- Cholesterol: 30mg
Keywords: Halloween, cheesecake, dessert, ghost, spooky treats
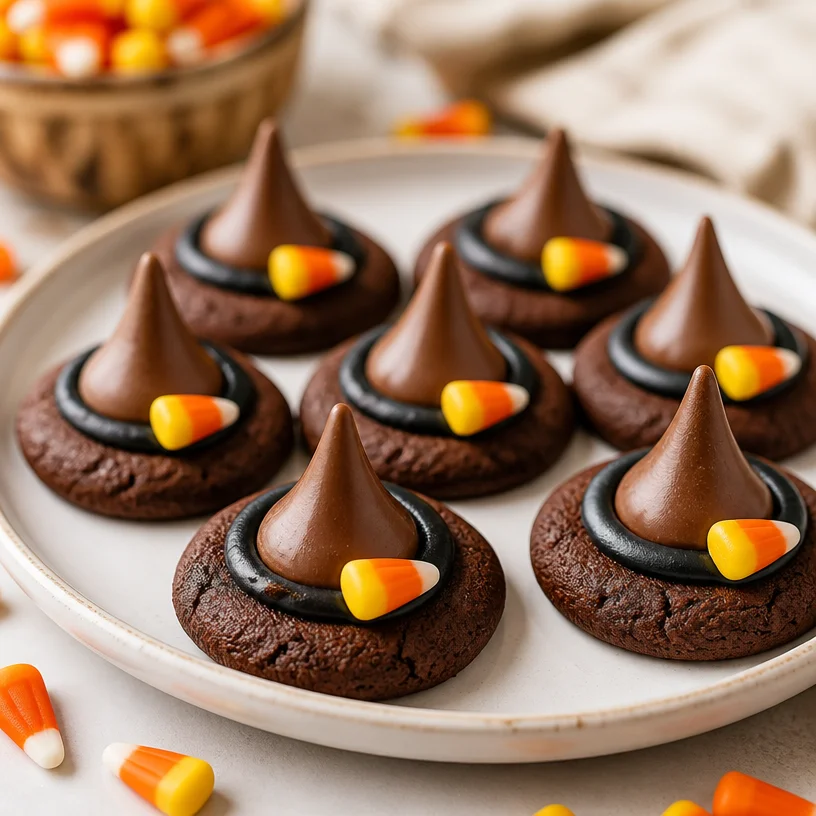
Witch Hat Cookies: 15-Minute Halloween Treats for Busy Moms
Spook-tacular Witch Hat Cookies: A Halloween Treat to Make Magic Happen!
Hello, my fellow food lovers! As Halloween creeps upon us, it’s time to conjure up some deliciously spooky treats. Today, I’m thrilled to share a delightful recipe for Witch Hat Cookies that’s not only fun to make but also a charming addition to any Halloween gathering. Whether you’re hosting a spooky soirée, bringing treats to a classroom party, or simply getting into the spirit of the season, these cookies will put a spell on you and your guests!
As we dive into this recipe, just imagine: crunchy cookies adorned with luscious chocolate kisses and candy corn, creating the perfect witch hat silhouette. It’s like a Halloween costume for your taste buds! Throughout the post, I’ll sprinkle in my personal anecdotes and tips to help you cook like a pro, even if you’re just starting out in the kitchen. So, grab your apron, and let’s brew some magic together!
A Whimsical Memory: The First Batch of Witch Hat Cookies
I still remember the first time I made Witch Hat Cookies with my little niece, Ava. She was just five years old, filled with that irresistible child-like wonder that every Halloween seems to ignite. We spent the afternoon in my cozy kitchen, splattered with flour and sugar, crafting these adorable hats. Her giggles echoed around like a sweet melody as we tried to stack the kisses on top of the cookies without them toppling over!
As we put the finishing touches on our creations, she proudly declared they were "the best witches ever!" The fearless confidence and enthusiasm in her eyes reminded me that the kitchen should always be a place of joy and exploration. Even though they may have been a little wonky—one hat even sported a candy corn that was a bit crooked—we couldn’t stop snacking on our charming little witch hats. Every bite was a reminder that cooking is about more than the food; it’s about the memories we create and the laughter we share.
Ingredients
Here’s what you’ll need to whip up your own batch of Witch Hat Cookies:
-
1 batch of chocolate chip cookie dough (store-bought or homemade)
Using chocolate chip dough gives these cookies a classic flavor. If you prefer, you can use sugar cookie dough for a sweeter base. Just watch the baking time! -
Chocolate kisses (approximately 24)
These will be the tops of our hats. You can substitute with any chocolate candies that are slightly pointed on top—like Rolos or Tootsie Rolls. Just note that you may need to adjust the baking time! -
Black icing (store-bought or homemade)
This icing will add a touch of elegance and detail. If black isn’t your preference, feel free to use purple or orange for a more colorful approach! -
Candy corn (for decoration)
Candy corn adds a fun pop of color, but if you’re not keen on it, consider using mini chocolate chips or even sprinkles as a cute alternative.
Step-by-Step Instructions
Now that we’ve gathered our magical ingredients, let’s get cooking! Follow these steps to create your very own Witch Hat Cookies:
-
Preheat the oven to 350°F (175°C). This is crucial, as starting with a preheated oven helps the cookies bake evenly.
-
Scoop the dough: Using a cookie scoop or a tablespoon, portion out the cookie dough onto ungreased baking sheets, spacing them about two inches apart. This allows room for spreading.
-
Shape the cookies: Lightly flatten each cookie dough ball with your fingers to create a more uniform shape. This step is crucial because the cookies will look more like hats if they’re firmer and thinner.
-
Bake the cookies: Pop those trays into the oven and let them bake for about 10–12 minutes until they’re just golden around the edges. Don’t worry if they seem a little soft; they’ll firm up as they cool!
-
Add the chocolate kisses: Once you take the cookies out, press a chocolate kiss gently into the center of each cookie while they’re still warm. This step allows the chocolates to meld with the cookie, almost gluing them together. Let them cool for about 5–10 minutes on the tray—it’s a crucial resting period to ensure you don’t burn yourself!
-
Decorate with icing: When the cookies have cooled and the chocolate is set, use your black icing to create a little swirl around the base of the chocolate kiss. This mimics the appearance of a witch hat and adds a delightful pop of color!
-
Crown with candy corn: Finally, place a piece of candy corn on top of the chocolate kiss—point downwards—to complete the whimsical witch hat look!
Serving Suggestions
These Witch Hat Cookies can be served on a festive platter, perhaps alongside other Halloween treats like ghost cupcakes or pumpkin-shaped brownies. For an added touch, consider arranging them on a slate board with faux spider webs or little plastic spiders. Just be sure to keep the spooky theme a fun and lighthearted one!
Recipe Variations
Let’s get creative! Here are a few fun variations to consider:
-
Flavor twist: Swap the chocolate chip cookie base for oatmeal cookie dough to ramp up the texture.
-
Nutty cookies: Add chopped nuts or crushed pretzels into the cookie dough for crunch and a deeper flavor.
-
Frosting swap: Use orange frosting instead of black for a seasonal touch that matches the candy corn.
-
Gluten-free option: Substitute regular flour with a gluten-free flour blend to accommodate gluten-sensitive guests.
-
Chocolate overload: Drizzle some melted dark chocolate over the finished cookies for an extra layer of decadence.
Chef’s Notes
Whenever I make these cookies, I can’t help but chuckle over my many attempts to create the perfect witch hat shape. I once accidentally melted the kisses too long, resulting in hats that were pancake flat! Those “pancake witches” didn’t last long. The kids loved them anyway, saying they were “wobble hats” — and that’s the magic of cooking! Remember, it doesn’t have to be perfect; the fun is in the process, and people love treats made with heart.
FAQs and Troubleshooting
What can I do if my cookies spread too much?
If your cookies flatten out too much, it’s usually because the dough is too warm. Make sure to chill the dough for at least 30 minutes before baking, especially on a warm day.
How can I make the icing thicker?
If your black icing is too runny, try adding a little powdered sugar to thicken it. If using store-bought icing, give it a good stir to mix it well before using.
Can I use other candies besides candy corn?
Absolutely! Mini chocolate chips, gummy candies, or other seasonal candies can add creative flair to your witch hats. Let your imagination fly!
How long do these cookies stay fresh?
Stored in an airtight container, these cookies will last about 5 days. You can even freeze the unbaked dough for up to 3 months and bake them fresh whenever you need a spooktacular treat!
Nutritional Info
This part is optional, but if you’d like to know, one cookie is approximately 130 calories. (Note: This may slightly vary depending on your specific ingredients.)
There you have it, folks! An enchanting recipe for Witch Hat Cookies that’s sure to delight. Cooking, much like magic, is all about the journey as much as the destination. So tie on your apron, invite over some friends or family, and celebrate the spirit of Halloween with these whimsical treats. After all, the best memories are made around the table—especially when those tables are filled with delicious, creative food. Happy baking, everyone!
PrintWitch Hat Cookies
Delicious and fun Witch Hat Cookies, perfect for Halloween gatherings.
- Prep Time: 15 minutes
- Cook Time: 12 minutes
- Total Time: 27 minutes
- Yield: 24 cookies 1x
- Category: Dessert
- Method: Baking
- Cuisine: American
- Diet: Vegetarian
Ingredients
- 1 batch of chocolate chip cookie dough (store-bought or homemade)
- Chocolate kisses (approximately 24)
- Black icing (store-bought or homemade)
- Candy corn (for decoration)
Instructions
- Preheat the oven to 350°F (175°C).
- Scoop the dough onto ungreased baking sheets, spacing them about two inches apart.
- Shape the cookies by lightly flattening each dough ball.
- Bake the cookies for about 10–12 minutes until golden around the edges.
- Add a chocolate kiss into the center of each cookie while they’re still warm.
- Decorate the cooled cookies with black icing around the base of the chocolate kiss.
- Crown with candy corn on top of the chocolate kiss, point downwards.
Notes
Chill the dough for at least 30 minutes before baking if it is warm. Decorate creatively with different candies.
Nutrition
- Serving Size: 1 cookie
- Calories: 130
- Sugar: 8g
- Sodium: 100mg
- Fat: 5g
- Saturated Fat: 2g
- Unsaturated Fat: 3g
- Trans Fat: 0g
- Carbohydrates: 18g
- Fiber: 1g
- Protein: 1g
- Cholesterol: 10mg
Keywords: Halloween cookies, Witch Hat Cookies, festive treats
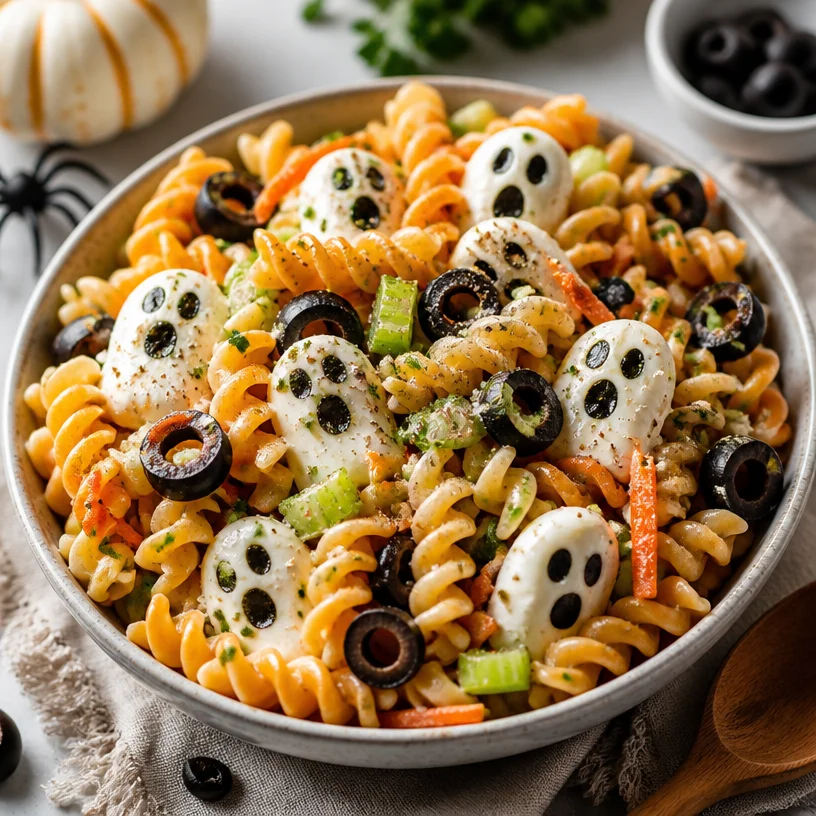
Halloween Pasta Salad: 15-Min Spooky, Crispy Bowls
Spooktacular Halloween Pasta Salad: An Elegant Treat for All Ages
Hello, fellow food lovers! As October rolls in and the leaves begin to crunch under our feet, thoughts of Halloween start swirling around in our minds. Whether you’re organizing a fun gathering for friends, a family get-together, or simply looking to add a festive flair to your dinner table, I have the perfect recipe for you: a Halloween Pasta Salad! This vibrant, whimsical dish is not only a feast for the eyes but also a celebration of flavors that will keep your guests delighted and coming back for more.
As we all know, Halloween is about more than just scares and sweets. It’s a time for gathering around tables decked out in clever decorations and mouthwatering treats. My Halloween Pasta Salad is versatile and easy to whip up, and it brings a dash of elegance while remaining totally approachable. Believe me; you don’t need to have the skills of a Michelin-star chef to impress with this pasta salad!
What makes this dish especially special to me is how it encapsulates the very essence of entertaining—bringing people together over delectable food. There’s something about the colors of Halloween—vibrant oranges, deep greens, and a pop of white—that sparks creativity in the kitchen. And when food looks playful, it creates an atmosphere where everyone can relax and have fun, easing the chatter and laughs into the evening.
So, let’s roll up our sleeves, tie on our aprons, and conjure up some deliciousness in the kitchen together!
My Love for Pasta Salad
One vivid memory that always brings a smile to my face happens in my childhood kitchen. Picture this: I was around ten years old, standing on my tiptoes to reach the counter, armed with a wooden spoon and a sense of adventure. My mom decided we would make a special dish, a vibrant pasta salad, to celebrate the changing season.
With colorful ingredients spread out before us—bright red cherry tomatoes, crisp greens, and morsels of mozzarella—the kitchen blossomed into a canvas of color. As we added olives and a drizzle of olive oil, I felt the excitement of creativity flowing through me. The beauty of this recipe was that it didn’t just taste good; it felt like an experience!
Now, as an adult and a lover of hosting, I treasure that kitchen memory. It taught me that cooking is all about connection—the joy of creating something lovely to share with others. With this Halloween Pasta Salad, I aim to replicate the fun of my childhood while giving it a festive twist that’s sure to please both kids and adults alike.
Ingredients
Let’s gather our witch’s brew of ingredients and get ready to create some magic! Here’s what you’ll need:
-
Pasta: Choose your favorite type—penne, rotini, or even spooky-shaped Halloween pasta if you can find it! Whole grain or gluten-free options work wonderfully too.
-
Olives: Black olives add that delicious briny flavor. If you’re not a fan, green olives or even capers bring a unique twist!
-
Mozzarella: Fresh mozzarella balls (bocconcini) are fantastic here. They’re both tender and creamy. For a vegan option, try marinated tofu or vegan cheese.
-
Cherry Tomatoes: Their sweet burst of flavor is essential! Any color works—red, orange, or even yellow add a fun pop.
-
Bell Peppers: Choose orange or yellow for that festive autumn hue. If you want a little heat, red peppers can bring a nice kick!
-
Basil and Parsley: Fresh herbs elevate any dish! If you have dried herbs, use them sparingly. Dried basil can work in a pinch.
-
Olive Oil: A good-quality extra virgin olive oil is a must for drizzling and adding depth.
-
Balsamic Vinegar: Adds a tangy sweetness. You can substitute red wine vinegar if that’s what you have!
-
Salt and Pepper: Essential to bring all the flavors together. Freshly cracked black pepper adds a nice touch!
Step-by-Step Instructions
Now that we have our ingredients, it’s time to get cooking! Let’s dive into the delightful process of crafting this Halloween Pasta Salad.
-
Cook the Pasta: Begin by bringing a large pot of salted water to a rolling boil; this is where the magic will begin! Add your pasta of choice and cook according to package instructions until al dente (usually about 8-10 minutes). Remember to stir occasionally to prevent sticking. Chef Tip: Always taste your pasta a minute or two before the suggested cooking time to catch that perfect doneness!
-
Prep the Olives: While the pasta is cooking, take your olives and slice them in half. This not only makes them more visually interesting but also ensures their briny goodness coats the pasta beautifully. If you’re using olives from a jar, remember to rinse them under cold water to remove excess brine. Chef Insight: If you want a fancier presentation, consider pitting and slicing black olives into fun shapes or eyes!
-
Dice the Cherry Tomatoes and Bell Peppers: Chop your cherry tomatoes into halves (or quarters for larger ones) and dice the bell peppers into bite-sized pieces. The colors of orange, yellow, and red should shine through, creating a beautiful autumn palette! Presentation Hack: For an extra pop of seasoning, sprinkle a tiny pinch of salt on the tomatoes to enhance their sweetness.
-
Prepare the Herbs: Finely chop your fresh basil and parsley. This step brings a fresh element to the pasta salad and contributes a lovely aroma that sets the mood. Chef Hint: If you want to save time, chiffonade (stack, roll and slice) the basil. This gives an elegant look!
-
Combine Ingredients: Once your pasta is cooked, don’t forget to reserve about a half cup of pasta water before draining! Drain and rinse the pasta under cold water to stop the cooking process. In a large mixing bowl, combine the pasta with olives, cherry tomatoes, diced bell peppers, mozzarella, and herbs.
-
Dress It Up: Add a generous drizzle of olive oil, a splash of balsamic vinegar, and season with salt and pepper. Mix gently, letting all those flavors mingle together. If it feels a bit dry, add a bit of the reserved pasta water to loosen it up.
-
Chill and Serve: It’s best to let the salad chill in the refrigerator for at least 30 minutes. This allows the flavors to meld beautifully. But if you’re eager, dig in right away!
-
Garnish for Spookiness: For that Halloween touch, consider garnishing with additional herbs, a few extra olives, and maybe even some pumpkin seeds for crunch!
Serving Suggestions
When it’s time to serve your Halloween Pasta Salad, I recommend presenting it in a large, deep serving bowl. This not only makes for a beautiful centerpiece but also gives everyone easy access. For an added festive flair, you can decorate the table with mini pumpkins or fun Halloween-themed napkins. This salad is also lovely served on fun Halloween plates, or even better—a cauldron-shaped dish for that extra whimsy!
Recipe Variations
-
Ghostly Pesto Pasta Salad: Swap out the oil and vinegar for store-bought or homemade pesto to give the salad a deliciously vibrant flavor and bright green hue!
-
Pumpkin Spice Surprise: Add a touch of pumpkin puree to your dressing for a festive spin, bringing autumn flavor and color to the mix.
-
Zesty Lemon Twist: Replace balsamic vinegar with fresh lemon juice and zest to give your pasta salad a refreshing twist!
-
Cheesy Boost: Mix in some crumbled feta or goat cheese for an extra creamy dimension.
-
Protein-Packed Option: Incorporate some grilled chicken or chickpeas for a heartier meal.
Chef’s Notes
One of my favorite things about this recipe is its adaptability. Over the years, I’ve played around with various add-ins depending on what’s in season or in my fridge. You can easily make this recipe your own! I remember one Halloween, we had a last-minute guest, and I had some roasted pumpkins sitting around. I cubed them up and tossed them in! The sweetness added a delightful contrast and an unexpected element to the dish. Food is always evolving, just like our tastes.
FAQs and Troubleshooting
1. What type of pasta should I use?
Any pasta shape works! Penne, rotini, or even Halloween-themed shapes if you can find them add a fun twist. Just be sure to cook it al dente.
2. Can I assemble this salad ahead of time?
Absolutely! You can make this pasta salad a day in advance. Just store it in the refrigerator in an airtight container and give it a good stir before serving.
3. It’s too dry! What can I do?
Don’t panic! Simply add a splash of reserved pasta water or extra olive oil as needed. Give it a toss to bring everything back together.
4. Can I customize this with different veggies?
You bet! Feel free to use whatever veggies you enjoy or have on hand—zucchini, broccoli, or even roasted carrots can be great additions.
As you can see, this Halloween Pasta Salad is so much more than just a side dish. It’s an invitation to gather, create, and enjoy. I hope it brightens your table and fills your hearts with joy. So, stretch your apron strings, grab a glass of something bubbly, and let’s celebrate the beauty of cooking and gathering around our tables!
Happy Halloween cooking! 🎃👻✨
PrintSpooktacular Halloween Pasta Salad
A vibrant and whimsical pasta salad perfect for Halloween gatherings, bringing together delightful flavors and colors.
- Prep Time: 15 minutes
- Cook Time: 10 minutes
- Total Time: 45 minutes
- Yield: 4 servings
- Category: Salad
- Method: Mixing
- Cuisine: Italian
- Diet: Vegetarian
Ingredients
- Pasta: penne, rotini, or spooky-shaped
- Olives: black or green
- Mozzarella: fresh mozzarella balls or vegan alternatives
- Cherry Tomatoes: red, orange, or yellow
- Bell Peppers: orange, yellow, or red
- Basil: fresh or dried
- Parsley: fresh or dried
- Olive Oil: extra virgin
- Balsamic Vinegar: or red wine vinegar
- Salt and Pepper: to taste
Instructions
- Cook the pasta in a boiling pot of salted water until al dente, about 8-10 minutes.
- Prep the olives by slicing them in half.
- Dice the cherry tomatoes and bell peppers into bite-sized pieces.
- Prepare the fresh basil and parsley by finely chopping them.
- Combine the cooked pasta, olives, tomatoes, bell peppers, mozzarella, and herbs in a large bowl.
- Dress the salad with olive oil, balsamic vinegar, salt, and pepper, mixing gently.
- Chill the salad in the refrigerator for at least 30 minutes before serving.
- Garnish with additional herbs, olives, or pumpkin seeds for a spooky touch.
Notes
This salad is adaptable; feel free to include seasonal add-ins like roasted pumpkins for extra sweetness.
Nutrition
- Serving Size: 1 serving
- Calories: 350
- Sugar: 5g
- Sodium: 400mg
- Fat: 12g
- Saturated Fat: 4g
- Unsaturated Fat: 6g
- Trans Fat: 0g
- Carbohydrates: 45g
- Fiber: 3g
- Protein: 15g
- Cholesterol: 30mg
Keywords: Halloween, pasta salad, festive dish, party food, vegetarian dish
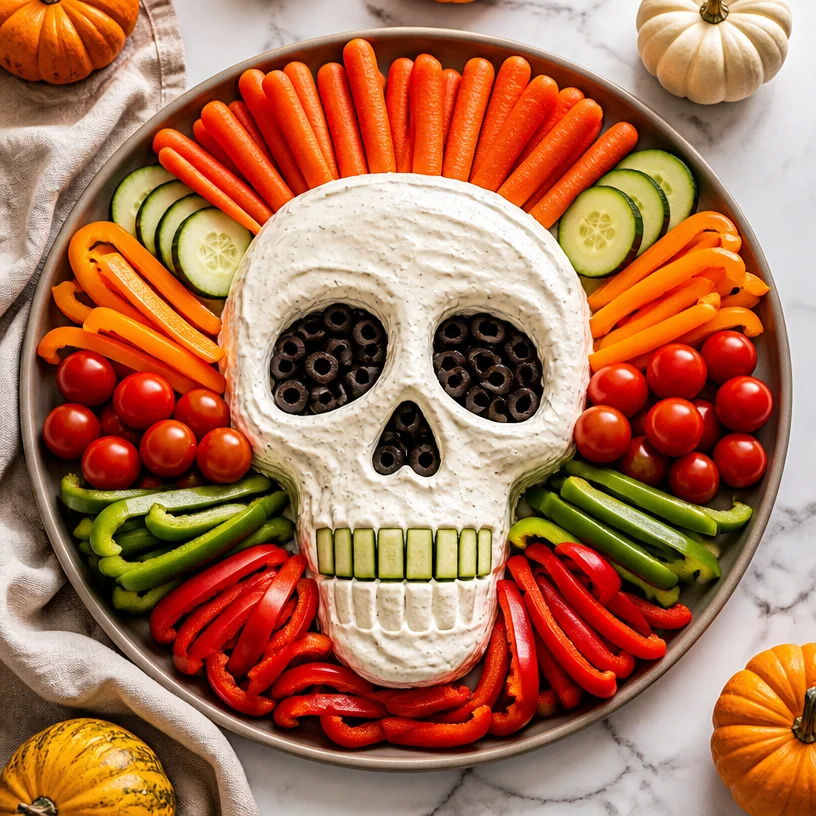
Halloween Skull Veggie Tray: Quick Spooky Party Platter
The Spook-tacular Skull Veggie Tray: Elevate Your Halloween Party with Style!
Ah, Halloween! A time for ghouls and goblins, but also an opportunity to make a bang in the kitchen! Whether you’re hosting a spooky gathering for friends or just looking to spice up a family dinner, crafting a Skull Veggie Tray is a clever way to impress your guests while sticking to healthy snacks. Who would have thought that a simple plate of vegetables could transform into a festive centerpiece?
Picture this: flickering candles, a playlist of spine-tingling tunes, and a table adorned with cobwebs. The final piece of the puzzle? A beautifully arranged Skull Veggie Tray that’s both eye-catching and delicious! This isn’t just any veggie platter; it’s a playful nod to the season that brings smiles along with a dash of horror—perfect for those Instagram moments!
In today’s blog post, I’ll walk you through creating this delightful and spooky dish. From personal memories and clever tips to its presentation, I’ll ensure that you not only nail this recipe but also have fun in the process. So grab your apron, and let’s dive into the wonderful world of veggie creativity!
A Memory From My Childhood
As a child, Halloween was filled with magic for me. I remember the vibrant orange and black decorations, the anticipation of trick-or-treating, and, oddly enough, my family’s legendary Halloween parties. My mom always took the time to create something special in the kitchen, and one year, she decided to craft a whimsical veggie tray.
With her hostess hat on, she artfully arranged carrots, cucumbers, and other colorful veggies into a fun, spooky design. I can still see the pride on her face as she served it to the guests, proudly declaring it the "Healthier Choice." People loved it—and so did I! Watching adults revel in healthy snacks inspired me to bring that same joy into my own hosting ventures. Now, it’s my turn to carry the torch with the Skull Veggie Tray, keeping tradition alive while adding my modern twist.
Ingredients
Gather ‘round, fellow foodies! Let’s look at the ingredients you’ll need to bring this Skull Veggie Tray to life. Each component plays a role in sculpting this festive masterpiece.
-
Carrots: Sweet and crunchy! Choose baby carrots for an easy option, or slice large carrots into sticks for that perfect skull shape. If you’re not a fan of carrots, parsnips offer a similar texture with a slight sweetness.
-
Cucumber: A refreshing touch! Opt for English cucumbers, which are less bitter and have fewer seeds. Want something different? Zucchini can also be a fun substitute.
-
Bell Peppers: These colorful beauties add a burst of sweetness and texture. Go for a mix of colors (red, yellow, green) for visual appeal. If you want to spice it up, use jalapeños or even roasted red peppers for added flavor.
-
Cherry Tomatoes: Their juicy pop adds a fantastic contrast to the crunch of other veggies. If tomatoes aren’t your thing, consider using radishes for a spicy flair.
-
Ranch Dip: The perfect creamy accompaniment! You can use store-bought ranch dressing or whip up a homemade version with sour cream, a dash of garlic powder, and fresh herbs. For a healthier twist, try Greek yogurt instead of sour cream!
These ingredients combine to create a lively, vibrant display perfect for Halloween or any occasion that calls for festive snacking. Plus, they’re all packed with vitamins—truly a win-win!
Step-by-Step Instructions
Ready to create the ultimate Skull Veggie Tray? Follow these simple steps and feel free to put your personal stamp on it along the way!
-
Prepare Your Veggies: Start by washing all your vegetables thoroughly. Give them a little scrub under water—this will help remove any lingering dirt or pesticides. For extra crunch, you can soak the carrots in ice water for 30 minutes to get that refreshing crispness.
-
Create Your Skull Outline: Find a large platter or board. You can even use parchment paper to map out your skull outline! Use a pencil to draw a simple skull shape if you’re feeling artsy. If you prefer to eyeball it, go for a rounded skull shape at the top with a wide jaw.
-
Arranging Your Carrots: Using baby carrots or sliced carrots, place them in the shape of the skull. Start at the forehead and work your way down to the jaw. Use larger carrot sticks for the jawline to create definition.
-
Adding the Cucumber: Slice cucumber into rounds and gradually position them to form the eye sockets for a haunting effect. You can also cut them into half moons for added variety. If you’re artistic, consider creating a cheekbone effect for an extra spooky vibe!
-
Bell Peppers for Detail: Now, let’s make it pop! Slice bell peppers into strips or triangles. Use red or yellow bell pepper pieces to create a nose and wide teeth along the jawline. Assemble them carefully to achieve that distinctive skull expression—feel free to channel your inner artist!
-
Cherry Tomatoes & Final Touches: Scatter cherry tomatoes around the platter, filling any gaps and adding color. They can double as bloodshot eyes if you place them within the eye sockets—creepy and delightful!
-
Prepare Your Ranch Dip: Pour your ranch dressing into a small bowl and place it in the center of the veggie tray or off to one side. It serves as the perfect accompaniment for dipping into those scrumptious veggies.
-
Secure and Serve: If you’re transporting your tray, consider using toothpicks and a little bit of plastic wrap to secure some of the veggies lightly. It’ll keep everything in place while ensuring that your Skull Veggie Tray reaches its destination intact.
And voila! You now have a spooky yet fun Skull Veggie Tray ready to dazzle your guests.
Serving Suggestions
When it’s time to serve, gather everyone around and draw them into the delight of your Skull Veggie Tray. It can be the conversational piece at your Halloween party. Encourage guests to dive in, offering them small plates or bowls for their veggie haul. You might even want to provide some fun napkins or Halloween-themed plates for a cohesive look!
Remember, there’s no wrong way to enjoy this tray! Whether they’re dipping or grazing straight from the platter, everyone will love this creative take on a healthy snack.
Recipe Variations
Looking to shake things up a bit? Here are a few variations for your Skull Veggie Tray that you might find inspiring:
-
Spooky Spreads: Instead of ranch, try a hummus dip mixed with roasted garlic or a spicy guacamole for that extra kick.
-
Add Some Protein: Include bite-sized pieces of cheese, like cubes of cheddar or mozzarella, to complement your veggies and add a hearty touch.
-
Herbaceous Twist: Add herbs like parsley or dill sprigs for freshness. They can also double as a garnish to enhance the overall presentation.
-
Creative Shapes: Use a cookie cutter to create spooky veggie shapes (like bats and ghosts) for a child-friendly option.
-
Flavor Boost: Spice up your ranch by incorporating hot sauce or different seasoning blends. Try ranch packets from your pantry for some quick flavor variations!
Chef’s Notes
I adore how a simple veggie tray can bring people together! It’s funny how, with a bit of creativity, an ordinary platter can steal the show. Over the years, I’ve made more veggie trays than I can count, and while they started as a simple way to present healthy options, they’ve turned into a canvas for my culinary imagination.
Once, at a Halloween bash, I accidentally knocked over the tray, sending veggies flying everywhere. Instead of panicking, I spun it as a fun “veggie explosion” moment, and everyone laughed—sometimes, you just have to embrace the chaos!
Crafting this Skull Veggie Tray has become a cherished Halloween tradition that adds a touch of whimsy to our gatherings. Here’s to continuing that legacy with each new creation while keeping it relaxed, casual, and full of joy!
FAQs and Troubleshooting
Q: How long can I prepare the veggie tray in advance?
A: You can prep the veggies a few hours ahead of time. Just be sure to keep everything covered and chilled to maintain freshness!
Q: Can I make this vegan-friendly?
A: Absolutely! The veggie tray is naturally vegan. Just choose a vegan ranch dressing or make your own using tahini or avocado for a creamy dip.
Q: What do I do if my veggies start to wilt?
A: Be sure to keep your veggies submerged in ice water and refrigerate until just before serving. This will help them stay crisp!
Q: Can I mix other vegetables into the tray?
A: Yes! Feel free to include snap peas, celery sticks, or even broccoli florets for variety. Just be mindful of how they fit into your skull design!
Nutritional Info
While I generally focus more on flavor than numbers, it is worthwhile to note that this Skull Veggie Tray is low in calories and high in vitamins A and C, fiber, and antioxidants. Perfect for guilt-free snacking!
So, there you have it—your guide to crafting a show-stopping Skull Veggie Tray that will charm all your guests while nourishing them. Cooking is truly about sharing and connecting. Enjoy the festivities, and happy Halloween! Your ghostly kitchen awaits! 🍁👻✨
PrintSkull Veggie Tray

A spooky and creative veggie tray perfect for Halloween parties, featuring a playful skull design made with fresh vegetables.
- Prep Time: 15 minutes
- Cook Time: 0 minutes
- Total Time: 15 minutes
- Yield: 8 servings
- Category: Appetizer
- Method: Assembly
- Cuisine: American
- Diet: Vegan
Ingredients
- Carrots (baby or sliced)
- Cucumber (English or zucchini)
- Bell Peppers (mix of red, yellow, green)
- Cherry Tomatoes
- Ranch Dip (store-bought or homemade)
Instructions
- Prepare your veggies by washing them thoroughly.
- Create your skull outline on a platter or board.
- Arranging your carrots in the shape of the skull starting from the forehead.
- Adding sliced cucumber for eye sockets.
- Bell peppers to create nose and teeth details.
- Scatter cherry tomatoes around the tray for color.
- Prepare your ranch dip in a small bowl in the center.
- Secure and serve your veggie tray for guests to enjoy.
Notes
Consider adding other veggies such as snap peas or celery sticks for variety.
Nutrition
- Serving Size: 1 serving
- Calories: 100
- Sugar: 6g
- Sodium: 200mg
- Fat: 7g
- Saturated Fat: 1g
- Unsaturated Fat: 6g
- Trans Fat: 0g
- Carbohydrates: 10g
- Fiber: 3g
- Protein: 2g
- Cholesterol: 0mg
Keywords: Halloween, veggie tray, healthy snacks, party food
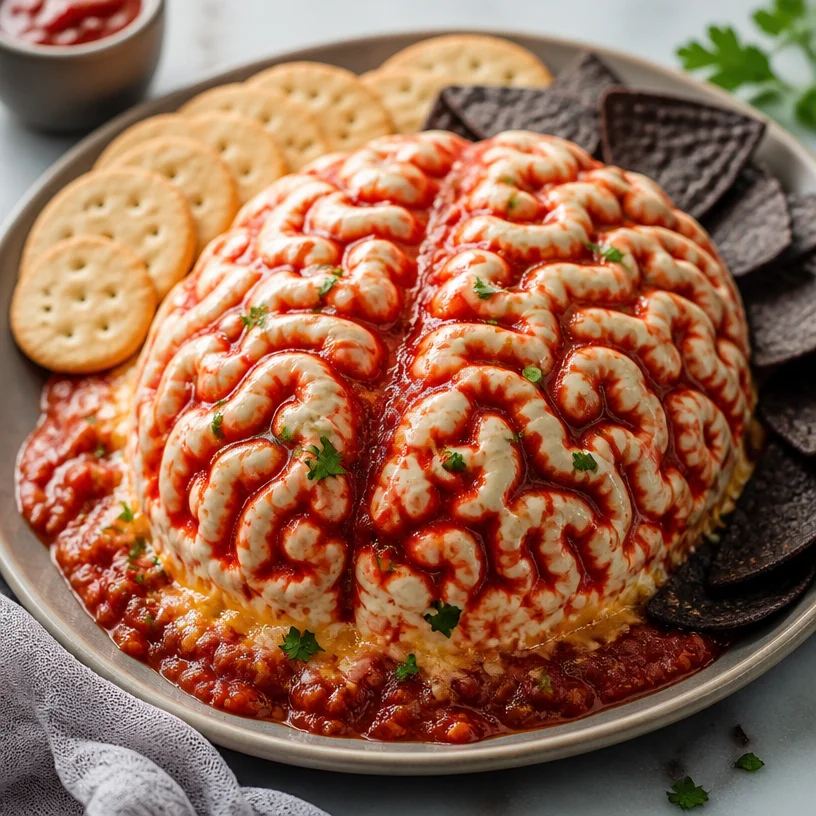
Spooky 15-Minute Halloween Zombie Brain Dip for Party Guests
Zombie Brain Dip: A Spooktacular Treat for Foodies
Hello, fellow food lovers! Today, we’re diving into a delightfully eerie dish: Zombie Brain Dip! Perfect for Halloween parties, themed gatherings, or just a fun night in with friends, this dip is both visually striking and utterly delicious. Who knew that a dish named “Zombie Brain” could become the star of your next get-together?
Picture this: a creamy, vibrant dip that looks like it came straight out of a cult classic horror film. But don’t worry; it’s not just a pretty face—it’s packed with flavor and just a little bit of whimsy. Let’s stir the pot and whip this up to impress your guests while also giving them something to talk about!
My Personal Story: A Haunted Kitchen Memory
Let me take you back to my first Halloween bash as an adult. There I was, an aspiring hostess with a flair for the dramatic, eager to impress my friends. I decided to make an entire spread of creepy Halloween-themed dishes, including my now-famous Zombie Brain Dip.
The day of the party, I cooked and danced around my kitchen, channeling my inner Julia Child while dressed in my finest witch costume, complete with a pointy hat. When I brought the dip to the table, everyone was captivated by its ghastly appearance. The ooohs and aaahs were priceless! As my friends dug in, their initial horror transformed into delight, bites of the creamy, tangy dip disappearing in no time. That moment sparked my love not just for cooking, but for creating experiences through food—bonding over laughter and tasty bites.
Ingredients
To recreate this spooky delight, let’s gather the following ingredients. Each one plays a vital role in building the flavor and texture of our Zombie Brain Dip.
-
Cream Cheese: The base of our dip, giving it that luscious texture. You can substitute with Greek yogurt for a lighter version, just know it’ll alter the flavor somewhat.
-
Salsa: Choose your favorite jarred salsa or make your own for a fresher taste. Salsa provides flavor and color but can be swapped with diced tomatoes or even a spicy pico de gallo if you want to rev up that heat.
-
Green Food Coloring (optional): For that ghoulish aesthetic! You can skip it if you prefer a more natural look or want to save time.
-
Tortilla Chips or Veggies: Ideal for serving! Use your favorite chip brand, or go for sliced cucumbers and bell peppers for a healthier option.
Step-by-Step Instructions
Ready to get cooking? Let’s get right to it! Follow these steps to create your jaw-dropping Zombie Brain Dip:
-
Prepare Your Ingredients: First things first, make sure your cream cheese is softened to room temperature. It’ll blend easier and result in a creamier dip. If you forget to leave it out, you can microwave it on low for about 15 seconds—just don’t let it melt.
-
Mix the Base: In a mixing bowl, combine 8 ounces of softened cream cheese with 1 cup of salsa. Using an electric mixer on medium speed, blend them together until smoothly integrated. This is the moment to channel your inner rock star—sing while mixing!
-
Add Color: Here comes the fun part! If you’re adding food coloring for that brainy look, now’s the time. Just a drop or two of green food coloring will do. Mix it in, and keep adding until you reach your desired shade—think slimy and spooky, but not too unappetizing!
-
Taste for Seasoning: Give your dip a taste. Want to make it hotter? Stir in a pinch of cayenne pepper or some chopped jalapeños. Feel free to add salt or pepper for extra seasoning, but remember, the salsa will have flavor as well!
-
Chilling Time: Once you’re satisfied with the taste, transfer the dip to a serving bowl. Cover it with plastic wrap and refrigerate for at least 30 minutes. This helps the flavors meld together and makes it easier to serve with a firm consistency.
-
Serve and Dazzle: Finally, when everyone’s arrived and the time is right, pull your dip from the fridge, and it’s showtime! Serve it alongside tortilla chips or sliced veggies for a color contrast that will wow your guests.
Serving Suggestions
Presentation is key! To make your Zombie Brain Dip really pop, consider shaping it into an actual brain. Use a rubber spatula to mold the dip, creating grooves on the surface to mimic brain folds. Serve it in a shallow dish. Surround it with chips and fresh veggie sticks. A sprinkle of fresh herbs or a drizzle of olive oil on top can add some visual appeal!
Recipe Variations
Want to mix things up a bit? Here are some fun twists you can try with this recipe:
-
Spicy Brain: Add some diced jalapeños or a few dashes of your favorite hot sauce to the cream cheese mixture for a fiery kick.
-
Tex-Mex Twist: Incorporate some black beans, corn, or diced avocado to the dip for a heartier option, and a hint of fresh lime juice for brightness.
-
Veggie-Loaded Dip: Sneak in some finely chopped bell peppers or scallions for a crunchy surprise while also enhancing the flavor profile.
-
Dairy-Free Option: Swap cream cheese with a dairy-free alternative like cashew cream or a nut-based cheese spread for your vegan friends.
Chef’s Notes
As I mentioned, this dip has become a staple in my entertaining arsenal. I remember one Halloween when I served this alongside a “witch’s brew” punch. The combination brought life to the party, and everyone had a blast. Over the years, I’ve simplified the recipe and found new ways to add seasonal elements, like stirring in roasted pumpkin for an autumnal feel. It evolves with me, just as every great recipe should!
FAQs and Troubleshooting
1. My dip is too runny! What can I do?
If your dip ended up too thin, try chilling it longer to allow it to firm up. Alternatively, mix in a few tablespoons of sour cream or Greek yogurt to thicken it up.
2. Can I make this dip ahead of time?
Absolutely! Prepare your Zombie Brain Dip a day in advance and store it in the refrigerator. Just be sure to add the food coloring before serving for maximum effect.
3. What if I can’t find cream cheese?
A solid alternative is to use ricotta cheese or herbed cheese spreads, which both bring a different flavor and texture but still yield delicious results.
4. How do I prevent the dip from turning brown?
Once made, cover the dip tightly with plastic wrap before refrigerating. You can also add a few drops of lemon juice to keep the freshness intact.
Nutritional Info
(Optional section for readers interested in nutritional details, particularly if you have a family or a special dietary focus.)
This Zombie Brain Dip is a fun dish, but like all creamy dips, it’s best enjoyed in moderation. A standard serving (1/4 cup) contains approximately 150 calories, with about 12g of fat and 5g of carbohydrates. Using lighter ingredients can help lower those numbers while still delivering that luscious, creamy feel!
Now that you’re ready to conjure up this spooky delight, let’s get cooking! Tie on your apron, gather your friends, and prepare for an unforgettable culinary adventure. Happy cooking, and may your Halloween be filled with laughter and delicious bites! 🍽️👻
PrintZombie Brain Dip
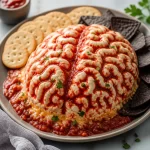
A creamy and vibrant dip that looks like a spooktacular brain, perfect for Halloween parties.
- Prep Time: 15 minutes
- Cook Time: 30 minutes
- Total Time: 45 minutes
- Yield: 4 servings 1x
- Category: Appetizer
- Method: Mixing and Chilling
- Cuisine: American
- Diet: Vegetarian
Ingredients
- 8 oz Cream Cheese
- 1 cup Salsa
- Green Food Coloring (optional)
- Tortilla Chips or Veggies (for serving)
Instructions
- Prepare your ingredients: Soften cream cheese to room temperature.
- Mix the base: Combine cream cheese and salsa in a mixing bowl and blend until smooth.
- Add color: Stir in green food coloring until you reach the desired shade.
- Taste for seasoning: Adjust with cayenne, jalapeños, salt, or pepper as desired.
- Chill the dip: Transfer to a bowl, cover, and refrigerate for at least 30 minutes.
- Serve and dazzle: Serve with tortilla chips or sliced veggies for a fun presentation.
Notes
For best presentation, shape the dip into a brain and mold grooves to mimic brain folds. Add herbs or olive oil for appeal.
Nutrition
- Serving Size: 1/4 cup
- Calories: 150
- Sugar: 2g
- Sodium: 250mg
- Fat: 12g
- Saturated Fat: 6g
- Unsaturated Fat: 4g
- Trans Fat: 0g
- Carbohydrates: 5g
- Fiber: 1g
- Protein: 2g
- Cholesterol: 30mg
Keywords: Halloween, dip, spooky, appetizer, party food