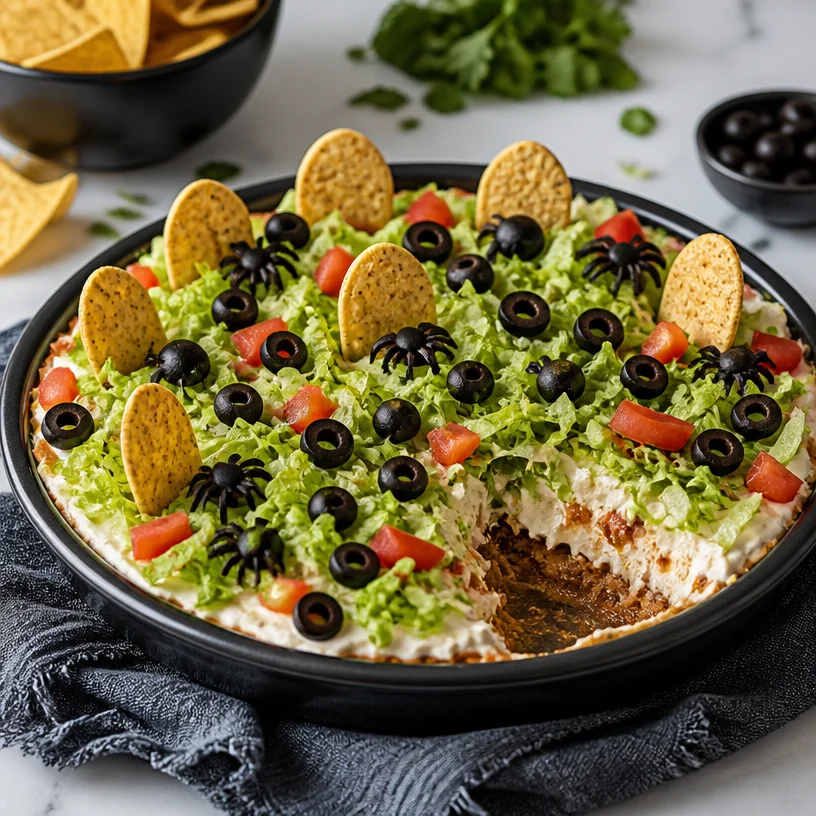
Minute Graveyard Taco Dip for Halloween Parties
Dive into Deliciousness with Graveyard Taco Dip!
Hello, my fabulous friends! Are you ready to turn an ordinary gathering into a spook-tacular feast? Today, we’re bringing the world of entertaining to your table with a dish that’s sure to impress—Graveyard Taco Dip! This delightful creation isn’t just a fantastic appetizer; it’s a crowd-pleaser that’s perfect for parties, game days, or a cozy movie night in. Let’s embrace the warmth of sharing delicious flavors while adding a bit of whimsy to our presentation.
Now, you might be thinking, “Graveyard Taco Dip? What’s that all about?” Well, fear not! This dip blends all the tasty elements of a classic taco while looking like a festively eerie graveyard scene. Picture layers of creamy goodness topped with fresh lettuce, zesty taco meat, and topped with some eerie decor. Plus, this dish is as fun to make as it is to eat! Let’s dive right in!
A Memory That Takes Me Back
Before we get into the deliciousness of Graveyard Taco Dip, I want to share a fond memory that’s close to my heart. It was a cool October evening, and I was hosting my very first Halloween party. I was buzzing with excitement and a hint of nerves as I set the stage with spooky decorations and flickering candles.
My best friend, Jess, waltzed in with a grin, carrying a bubbling cauldron of taco dip—though I should mention the “graveyard” aesthetic came from us being a bit overly creative with some olives and breadsticks!
Not only did Jess’s creation steal the show, but it also became the hit of the evening. Everyone was gathering around, excited to dig into the layers of cheesy goodness while giggling over the creative grave markers. That night ignited my passion for hosting and the thrill of creating amazing memories over food. Now, years later, I still make my own version of that Graveyard Taco Dip, infusing it with my own flair while evoking those delightful nostalgia vibes.
Ingredients You’ll Need
Here’s what you’ll need to whip up this fantastic Graveyard Taco Dip:
-
Cream Cheese: This is the velvety base for our dip! If you want to cut back on calories, you can use low-fat cream cheese or even Greek yogurt for a tangy twist.
-
Taco Meat: Seasoned ground beef or turkey is traditional, but feel free to swap in shredded chicken, lentils, or a plant-based meat for a delightful vegetarian option.
-
Lettuce: Crisp and fresh! Iceberg is great for crunch, but romaine or even baby spinach works. It’s all about adding that refreshing layer.
-
Olives: The spooky touch! Black olives add a savory bite. If you’re not a fan, consider using diced jalapeños for a spicy kick or cherry tomatoes for a pop of color.
-
Tortilla Chips: The perfect scoopers for our taco dip! You can use regular, lime-flavored, or even make your own baked tortilla chips at home for a healthier option.
-
Additional Taco Toppings (optional): Think cheese, jalapeños, salsa, or avocado! Get creative here.
Fun Chef Insight:
When assembling your dip, ensure your cream cheese is softened to room temperature for easy mixing. Leaving it out for about 30 minutes before you begin helps create that luscious, creamy texture we all love without the arm workout!
Step-by-Step Instructions: Let’s Get Cooking!
-
Preheat and Prepare: Start by preheating your oven to 350°F (175°C) if you’ll be baking your taco meat. In a skillet over medium heat, brown your meat until it’s fully cooked. Drain any excess fat to keep things light and tasty!
-
Season the Meat: While the meat is cooking, add in your favorite taco seasoning—store-bought or homemade! My personal go-to mix includes chili powder, cumin, garlic powder, and a sprinkle of paprika for a smoky kick. Feel free to adjust based on your heat preference. Cook everything together for another 2-3 minutes until fragrant.
-
Cream Cheese Layer: In a large mixing bowl, take that softened cream cheese and whip it until smooth. You can use a handheld mixer or just a whisk—whatever floats your culinary boat! Spread the cream cheese mixture evenly in the bottom of a baking dish (a pretty 9×9 works great!).
-
Build Up Layers: Pour your taco meat evenly over the cream cheese layer. Take your time here and spread it out nicely, ensuring everyone gets a bite of that seasoned goodness.
-
Lettuce Add-On: Next, sprinkle a generous layer of shredded lettuce over the meat. This adds freshness and a great crunch alongside those cozy textures.
-
Olives as Headstones: Now comes the fun part! Slice black olives into rounds and place them sporadically on top of your dip to resemble gravestones. You can even get creative and cut them into spooky shapes for extra flair!
-
Bake It (Optional): If you want to warm everything together to enhance those flavors, pop the dip into the oven for about 10-15 minutes until it’s all bubbly and perfect. If you prefer it cold, feel free to skip this step!
-
Final Touches: Remove your dip from the oven, and let it sit for a minute to cool slightly before serving. That’s when you can add any additional toppings like shredded cheese or salsa, depending on your taste.
Serving Suggestions
To serve, scoop generous portions onto a plate or serve straight from the baking dish. Add a few tortilla chips alongside, and don’t forget to encourage your guests to add any desired toppings directly onto their dips. You could even lay out a colorful array of toppings so everyone can customize their own spooky graveyard scene!
Recipe Variations to Get Creative
-
Spicy Graveyard: Add diced jalapeños to your taco meat for a fiery kick, or sprinkle some crushed red pepper flakes into the cream cheese layer for extra heat!
-
Veggie Delight: Swap the taco meat for sautéed mushrooms or roasted vegetables, mixing in some black beans or chickpeas for heartiness.
-
Cheesy Explosion: Layer in freshly shredded cheese between the cream cheese and taco meat for a cheesy surprise every time you dig in.
-
Guacamole Bliss: Top with a layer of homemade guacamole instead of or in addition to the olives for a creamy, earthy taste.
-
Seasonal Twist: For a festive touch around Halloween or fall, sprinkle the top with crushed tortilla chips to resemble dirt!
Chef’s Notes: A Recipe That Keeps Evolving
This recipe has become a staple at all of my gatherings over the years! What’s great about it is how it evolves with every party. One year, I added in shredded barbecue chicken instead of traditional taco meat, and it was a hit. The next, I swirled in some spicy salsa just to kick things up! The best part? This dip never runs out of possibilities and always holds a special place in my heart.
And let me tell you, let your creativity run wild! You can even use leftover dip ingredients to create a taco platter or loaded nachos for another meal. Waste not, want not, right?
FAQs and Troubleshooting Your Taco Dip
1. Why is my dip too runny?
If you find that your dip is watery, it’s usually due to the meat or other ingredients releasing juices. Try draining the excess liquid before assembling your dip. Also, ensure your cream cheese is well blended and firm to help maintain that luscious texture.
2. Can I make this ahead of time?
Absolutely! This Taco Dip is perfect for meal prep. Just prepare it a day in advance, cover it tightly with plastic wrap, and keep it in the fridge. If you want it warm, just pop it in the oven for a few minutes before serving.
3. How can I make this a healthier option?
Try substituting lean ground turkey for the beef or using fat-free cream cheese! Adding more veggies like diced bell peppers or corn can also enhance the nutrition without compromising taste.
4. What’s the best way to store leftovers?
If you have any dip leftover (which is rare, but it happens!), transfer it to an airtight container. It stays fresh in the fridge for a few days. Just give it a good mix before serving again.
Nutritional Info (Optional)
While I love to emphasize enjoying good food, it’s also great to be conscious of nutrition. This dip, made with lean meat and fresh ingredients, can fit into your meal plan nicely. It’s packed with protein due to the meat and provides vitamins from the fresh lettuce and any additional toppings you choose.
Final Thoughts
There you have it, my wonderful foodies! Graveyard Taco Dip is not just a recipe; it’s a delightful experience waiting to happen. Whether you’re serving it at a spooky gathering or a casual hangout, it’s sure to bring smiles and tasty memories to the table. So, tie on that apron, gather your friends, and let’s celebrate the joy of cooking together!
Thank you for stopping by Ivory Apron today! Happy cooking, and may your gatherings be filled with warmth, laughter, and heaps of delicious food!
PrintGraveyard Taco Dip
A spooky and delicious taco dip perfect for gatherings, combining layers of cream cheese, seasoned meat, and festive garnishes to create a fun graveyard scene.
- Prep Time: 15 minutes
- Cook Time: 15 minutes
- Total Time: 30 minutes
- Yield: 6 servings
- Category: Appetizer
- Method: Baking
- Cuisine: Mexican
- Diet: Vegetarian option available
Ingredients
- Cream Cheese
- Taco Meat (ground beef, turkey, or vegetarian alternative)
- Lettuce (iceberg, romaine, or spinach)
- Olives (black or alternatives like jalapeños or tomatoes)
- Tortilla Chips
- Additional Taco Toppings (cheese, jalapeños, salsa, avocado)
Instructions
- Preheat the oven to 350°F (175°C) if you’re baking the taco meat.
- Brown the meat in a skillet over medium heat, then drain excess fat.
- Add taco seasoning to the meat and cook for another 2-3 minutes.
- Whip the softened cream cheese until smooth and spread it in a baking dish.
- Pour the cooked taco meat over the cream cheese layer.
- Sprinkle shredded lettuce on top of the meat.
- Slice black olives and arrange them on the dip to resemble gravestones.
- Bake for 10-15 minutes if desired, or serve cold.
- Remove from the oven, let cool slightly, and add additional toppings if desired.
Notes
This dip is versatile and can be customized with various toppings. Perfect for make-ahead preparation and can be served warm or cold.
Nutrition
- Serving Size: 1 serving
- Calories: 300
- Sugar: 2g
- Sodium: 480mg
- Fat: 20g
- Saturated Fat: 8g
- Unsaturated Fat: 10g
- Trans Fat: 0g
- Carbohydrates: 24g
- Fiber: 4g
- Protein: 10g
- Cholesterol: 30mg
Keywords: taco dip, appetizer, Halloween recipe, party food, festive dip
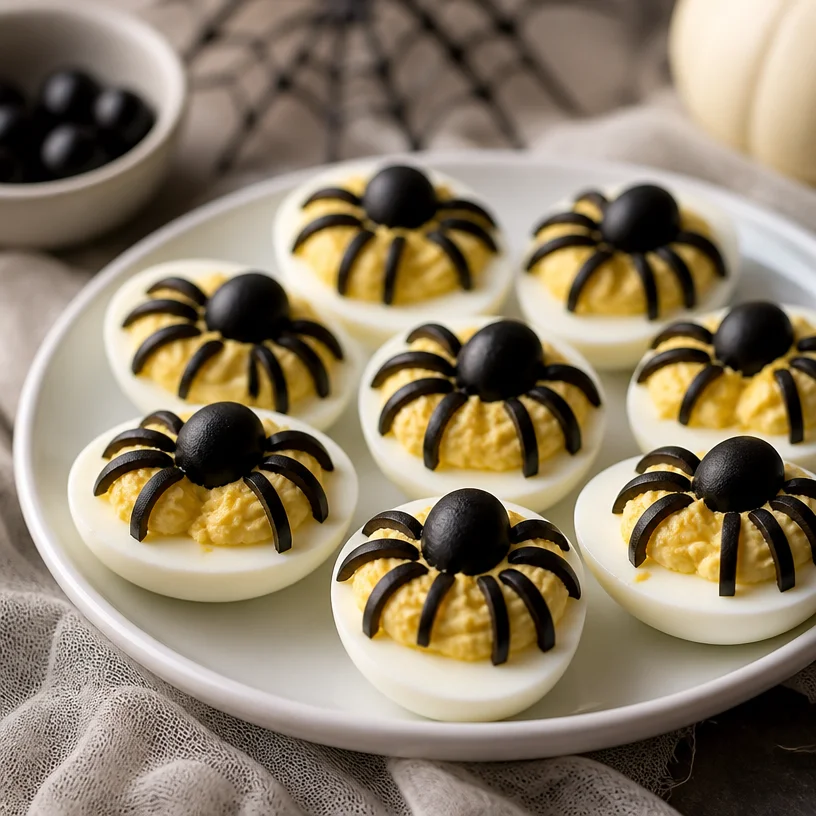
Spooky Spider Deviled Eggs for Halloween Party Appetizers
Spider Deviled Eggs: A Delightful Twist on a Classic Fave
Hello foodies! Today, we’re diving deep into a dish that’s a staple at any gathering—Deviled Eggs. But wait, we’re adding a cool twist for Halloween or any fun occasion: these are Spider Deviled Eggs! They’re just as creamy and delicious as the classic version, but with a playful presentation that’ll make your guests smile. Let’s get into it! 🕷️
Introduction
We all have that one dish that brings back cherished memories, don’t we? For me, it’s deviled eggs. I remember my grandmother whipping them up for every family gathering, her laughter filling the kitchen as she’d joke about how "a little bit of devil can bring out the angel in all of us!" I have to agree—there’s something magical about gathering around a table full of delicious food, sharing stories and laughter.
Traditionally, deviled eggs are simple: hard-boiled eggs transformed into creamy, flavorful bites. But why not add a little flair? This playful take is perfect for Halloween parties, family BBQs, or even just a fun dinner with friends. The best part? They’re still super easy to make, while creating a delightful centerpiece that’s sure to impress!
Imagine a platter of deviled eggs, each one topped with a black olive spider perched, making them not only delicious but also the talk of the evening. Grab your apron, and let’s get started on these whimsical Spider Deviled Eggs that will surely add a sense of fun and elegance to your gatherings!
Personal Story
It was one Halloween, and I decided to host a little get-together for my closest friends. I wanted to create a menu that was festive but approachable—something that captured the playful spirit of the night without scaring anyone away from the kitchen. As I brainstormed, the image of deviled eggs popped into my mind, but of course, I couldn’t just serve plain ones!
So, I turned to my trusty black olives and came up with this spooky little twist! I carefully crafted a few veggies and olives into little spider shapes atop the eggs, and as I laid them out on the table, the smiles on my friends’ faces were priceless. It turned out to be a hit, with everyone snapping photos before they even took a bite! That night wasn’t just about the food—it was a reminder that when we get a little creative in the kitchen, we can transform simple memories into lasting traditions.
Ingredients
Here’s what you’ll need to whip up these delightful Spider Deviled Eggs:
-
Eggs: The cornerstone of this dish! Use large eggs, as they yield the perfect creamy filling. Tip: For easier peeling, use eggs that are at least a week old.
-
Mayonnaise: Adds creaminess and richness. If you’re looking for a lighter option, swap half of the mayonnaise with Greek yogurt for a tangy twist.
-
Dijon Mustard: This brings a lovely depth of flavor. If you want a little heat, a spicy mustard could elevate the dish!
-
Black Olives: These are your spider legs! Slice them in half for the body and cut the remaining pieces into leg shapes. If black olives aren’t your thing, any dark olive works just as well.
-
Salt and Pepper: Essential for seasoning, don’t skip this step! Taste as you mix to ensure your filling hits the right flavor notes.
A friendly tip: You can add a pinch of smoked paprika for a subtle smokiness or some chopped fresh herbs like chives for a fresher flavor!
Step-by-Step Instructions
-
Hard Boil the Eggs: Start by placing your eggs in a pot and covering them with cold water, about an inch or two above the eggs. Bring that to a rolling boil over medium-high heat. Once boiling, turn off the heat, cover the pot, and let them sit for about 12 minutes. What’s great? This method reduces the chances of that greenish ring around the yolks!
-
Cool and Peel: Once the time is up, transfer your eggs to an ice bath (a bowl filled with ice water) for about 5-10 minutes. This will stop the cooking and make peeling easier. Crack the shells gently and peel under running water if you need. Embrace the kitchen mantra: a little patience goes a long way!
-
Prepare the Filling: Slice the cooled eggs in half lengthwise and gently remove the yolks into a mixing bowl. Use a fork to smash them until they’re crumbly. Add in the mayonnaise, Dijon mustard, salt, and pepper. Mix until smooth and creamy. Here’s a pro tip: Don’t overmix— a little texture adds personality to your filling!
-
Fill the Egg Halves: Grab a piping bag or a ziplock bag (with the corner snipped off) and fill the egg whites with that luscious yolk mixture. Neater filling means prettier eggs, so take your time!
-
Add the Spooky Spiders: Time to make these eggs fun! Take your black olives—cut half of each olive for the body and slice the other halves into legs. Arrange them on top of the filled egg whites to create your little spiders!
-
Chill and Serve: Place your Spider Deviled Eggs in the fridge for about 30 minutes to firm up a bit. Serving chilled eggs ensures a refreshing bite!
Serving Suggestions
For presentation, lay the eggs on a rustic platter with a sprinkle of fresh herbs or a drizzle of olive oil. You could even throw in some around cut veggies to create a Halloween scene—think mini pumpkins or a little cobweb effect with some shredded cheese. Your guests will appreciate the aesthetic just as much as they will the taste!
Recipe Variations
Feeling adventurous? Here are a few fun ways to shake things up with your Spider Deviled Eggs:
-
Spicy Kick: Add a few dashes of hot sauce or some chopped jalapeños into the yolk mixture for a delightful heat that wakes up the taste buds.
-
Bacon Bits: Who doesn’t love bacon? Fold in some crumbled cooked bacon into your yolk filling for a smoky, savory twist.
-
Herb Love: Mix in finely chopped fresh herbs like cilantro or dill for a fresh taste that pops.
-
Cheesy Delight: Stir in some shredded cheese, like sharp cheddar or crumbled feta, for extra flavor layers.
-
Vegan Option: Swap the eggs for avocado halves and fill them with a mixture of mashed avocado, vegan mayonnaise, and mustard for a creamy, egg-free alternative.
Chef’s Notes
Creating these Spider Deviled Eggs has become a cherished tradition in my home. Over the years, I’ve played with flavors and presentations—sometimes swapping out olives for cherry tomatoes for a more colorful take! I recall one Halloween where I turned these into scary mummy eggs by wrapping them in strips of crescent dough and baking them. The kitchen filled with laughter as everyone debated if they looked more spooky or silly!
In cooking, it’s often about experimenting and having fun—so don’t worry about being perfect. Let your creativity shine!
FAQs and Troubleshooting
Q: My yolks crumbled too much, how can I fix that?
A: If your yolks are crumbling and not blending smoothly, make sure to use fresh eggs that are easier to peel. Additionally, take your time mashing; a slight twist of a fork can help create a creamier texture.
Q: Can I make these ahead of time?
A: Absolutely! Make them a day in advance and keep them covered in the fridge. Just add the olive spiders right before serving to keep them fresh!
Q: How do I know when my eggs are perfectly hard-boiled?
A: The cooking method I mentioned should give you excellent results. If you’re concerned about overcooking, set a timer for 10 minutes, then cool immediately to stop the cooking process.
Q: What if I don’t have an ice bath?
A: Not to worry! Just run the eggs under cold water once they’re done boiling. While it doesn’t cool them as quickly, it still helps with the peeling.
And there you have it! Your guide to creating Spider Deviled Eggs that are sure to unite people around your table, full of joy, laughter, and deliciousness. Remember, good food is about connection, intention, and of course—having a little fun along the way! So tie on that apron, whip up a batch, and let the gathering begin. Happy cooking!
Nutritional Info (Per Egg Half):
- Calories: 70
- Protein: 3.6g
- Fat: 6g
- Carbohydrates: 1g
- Fiber: <1g
Enjoy your culinary adventures, and remember: every great dish starts with loving the process! 👩🍳✨
PrintSpider Deviled Eggs

A playful twist on classic deviled eggs, perfect for Halloween gatherings or creative appetizers.
- Prep Time: 15 minutes
- Cook Time: 12 minutes
- Total Time: 27 minutes
- Yield: 12 servings 1x
- Category: Appetizer
- Method: Boiling
- Cuisine: American
- Diet: Vegetarian
Ingredients
- 6 large eggs
- 1/4 cup mayonnaise
- 1 tsp Dijon mustard
- Black olives
- Salt and pepper to taste
- Optional: smoked paprika, fresh chives
Instructions
- Hard boil the eggs by placing them in a pot and covering with water. Bring to a boil, then cover and let sit for 12 minutes.
- Cool the eggs in an ice bath for 5-10 minutes.
- Prepare the filling by removing yolks and mixing with mayonnaise, mustard, salt, and pepper until smooth.
- Fill egg whites with the mixture using a piping bag or ziplock bag.
- Add sliced black olives on top to create spider shapes.
- Chill the eggs in the fridge for about 30 minutes before serving.
Notes
Enhance flavor with herbs or spices; excellent for parties and gatherings.
Nutrition
- Serving Size: 1 egg half
- Calories: 70
- Sugar: 0g
- Sodium: 60mg
- Fat: 6g
- Saturated Fat: 1g
- Unsaturated Fat: 5g
- Trans Fat: 0g
- Carbohydrates: 1g
- Fiber: <1g
- Protein: 3.6g
- Cholesterol: 186mg
Keywords: deviled eggs, Halloween, appetizers, party food, spider deviled eggs
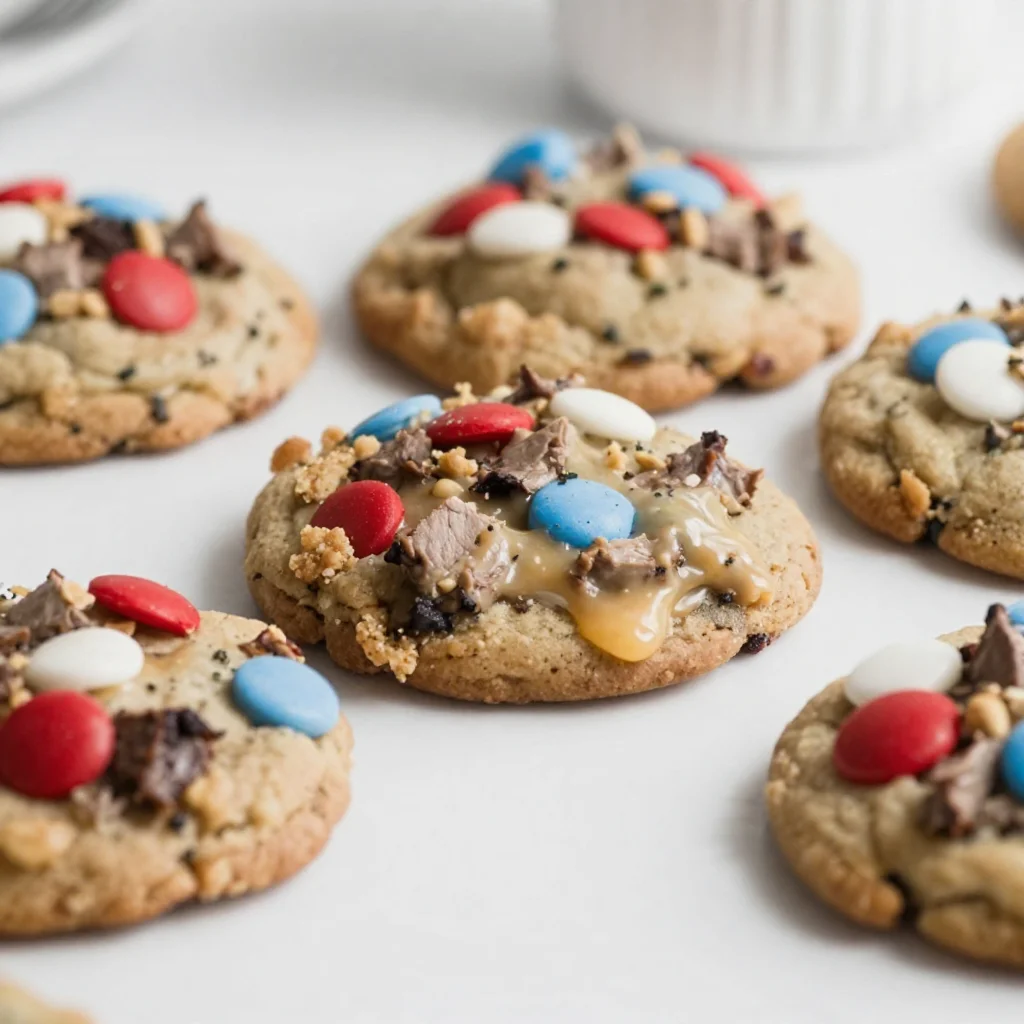
Patriotic 4th of July Monster Cookies: Quick Party Treat
Celebrate with 4th of July Monster Cookies: A Sweet, Festive Treat!
As the summer sun shines bright and the scent of barbecue fills the air, there’s one thing that truly captures the spirit of the 4th of July for me: baking up a storm in my kitchen! And what better way to celebrate America’s birthday than with a batch of vibrant, indulgent Monster Cookies? These spirited confections are the epitome of a festive treat—they’re chewy, chunky, and bursting with flavors that make your taste buds dance!
Picture this: friends and family gathered around, laughter echoing in the warm summer air, as you present a platter of these delightful cookies, each one a masterpiece of flavors and colors. What’s more? Monster Cookies are wonderfully forgiving, allowing even novice bakers to create a stunning dessert that impresses without the fuss. I’m excited to guide you through this family-friendly cookie adventure, so grab your apron, and let’s get baking!
A Cookie That Holds Memories
Let me take you on a little trip down memory lane. I remember the first time I ever made cookies for a party—ironically, it was another 4th of July gathering. Armed with just a worn-out cookbook and my mom’s old mixer, I whipped up a batch of chocolate chip cookies, thinking I could impress a few friends.
What I didn’t anticipate was how they would turn out! The cookies were a complete disaster; they spread too thin and ended up like puddles of goo on the baking sheet! But amidst the culinary chaos, I learned something invaluable: it’s not just about the cookies, but the joy of sharing, creating, and laughing together in the kitchen.
Fast forward a few years, and I’ve perfected my cookie game, adding colorful M&M’s to my classic recipe to create the ultimate Monster Cookies. Now, these festive favorites not only remind me of my early baking days but are also my go-to treat for any celebration—especially the 4th of July!
Ingredients
Here’s what you’ll need to make these festive 4th of July Monster Cookies:
-
1 cup browned butter
Browned butter adds a rich, nutty flavor that transforms basic cookies into something truly special. If you’re short on time, melted regular butter can work as a substitute, although you won’t get that toasty depth of flavor. -
1 cup brown sugar
This adds moisture and a hint of caramel sweetness. If you need a lighter option, you can use coconut sugar, though it may alter the taste slightly. -
1/2 cup granulated sugar
The granulated sugar balances the richness of the brown sugar and helps achieve the perfect chewy texture. You could substitute with a sugar alternative like agave syrup, but the amount will vary. -
2 large eggs
Eggs not only bind the ingredients together but also contribute to the cookies’ rise. For a vegan option, you can use flaxseed meal mixed with water as a substitute. -
1 teaspoon vanilla extract
Pure vanilla extract elevates the cookie’s flavor with a sweet aromatic essence. Try to use pure vanilla rather than imitation for best results. -
2 cups all-purpose flour
This creates the base of the cookie. You can use a gluten-free all-purpose flour blend if you’re looking for a gluten-free option. -
1 teaspoon baking soda
This is essential for leavening, giving your cookies that perfect soft-chewy texture. Don’t confuse it with baking powder; they are NOT interchangeable. -
1/2 teaspoon salt
A pinch of salt enhances the sweetness of your cookies and balances flavors. If you’re watching your sodium intake, feel free to reduce the amount, but don’t omit it altogether. -
1 cup chocolate chips
Semi-sweet chocolate chips are a classic choice, but feel free to mix things up with milk chocolate or dark chocolate, depending on your preference. -
1/2 cup M&M’s
These colorful candies are not only delicious, they also add a pop of fun and color, perfect for the 4th of July festivities! -
1/2 cup oats
Oats add chewiness to each cookie and a bit of heartiness. You can use quick-cooking oats in a pinch, but the texture will be slightly different.
Step-by-Step Instructions
Now that we have our ingredients gathered, let’s dive into the fun part—the baking!
-
Brown the Butter
Start by adding the butter to a saucepan over medium heat. Let it melt and continue cooking until it turns a lovely golden brown, with a nutty aroma wafting through your kitchen. Make sure to stir it occasionally to prevent burning. Once browned, remove from heat and let it cool for a few minutes. -
Combine Sugars
In a large mixing bowl, combine the cooled browned butter with brown sugar and granulated sugar. Using a hand mixer or a whisk, beat until the mixture is smooth and creamy—about 2-3 minutes. This fluffy mixture means we’re on the right track! -
Add Eggs and Vanilla
Next up, add in the eggs one at a time, mixing well after each addition. Then, pour in the vanilla extract, mixing until it’s well incorporated. This step will make your kitchen smell heavenly! -
Mix Dry Ingredients
In a separate bowl, whisk together the all-purpose flour, baking soda, and salt. Gradually add the dry mixture to the wet ingredients, mixing until just combined—overmixing can lead to tough cookies, and we don’t want that! -
Fold in Chocolate and M&M’s
Using a spatula, gently fold in the chocolate chips, M&M’s, and oats. The batter should look thick and luscious—just how cookie dough should be! -
Chill the Dough (Optional)
If you have time, it’s advantageous to chill the dough for at least 30 minutes. This helps to solidify the fats in the dough, leading to thicker cookies. It’s a small step that makes a big difference! -
Preheat the Oven
While the dough chills, preheat your oven to 350°F (175°C). Don’t skip this step; a well-preheated oven is key to even-baked cookies. -
Scoop and Bake
Line baking sheets with parchment paper. Use a cookie scoop (or two spoons) to drop generous mounds of dough onto the baking sheet, spacing them about 2 inches apart. Bake for 10-12 minutes or until the edges are lightly golden but the centers are still soft. Remember, they will continue to cook as they cool! -
Cool and Enjoy
Once baked, let the cookies cool on the baking sheet for a few minutes before transferring them to a wire rack. Warm cookies are the best, especially with a glass of milk!
Serving Suggestions
These beautiful Monster Cookies are perfect for sharing! You can plate them on a festive 4th of July-themed platter or create individual servings in colorful paper bags tied with ribbon for picnics and gatherings. A scoop of vanilla ice cream on the side wouldn’t hurt either—think cookie ice cream sandwiches or simply a delicious accompaniment.
Recipe Variations
Want to customize your Monster Cookies? Here are a few fun variations:
-
Add Nuts: Throw in chopped pecans or walnuts for an extra crunch.
-
Nut Butter Swirl: Mix in a spoonful of peanut butter or almond butter for a nutty twist.
-
Fruit Frenzy: Swap the M&M’s for dried fruits like cranberries or cherries for a chewy, fruity flavor.
-
Spice It Up: Add a dash of cinnamon or nutmeg for a warm, comforting undertone.
Chef’s Notes
I’d be remiss if I didn’t mention that these Monster Cookies have a little history of their own in my kitchen! The recipe has evolved over time based on what’s in the pantry or what I’m craving. Sometimes I experiment with different types of chocolate or even add a sprinkle of sea salt on top right before baking. Do you get the urge to take a bite of your freshly baked cookies while standing over the cooling rack? Guilty as charged! It’s all about the joy of indulging in the fruits of your labor.
FAQs and Troubleshooting
-
Why did my cookies spread too much?
This can happen if the butter is too warm or if you didn’t chill the dough. Make sure to let your cookies rest before baking! -
How do I know when my cookies are done?
Look for edges that are set and a slightly soft center. They’ll continue to firm up while cooling on the baking sheet. -
Can I freeze the cookie dough?
Absolutely! You can scoop the dough into balls and freeze them on a baking sheet. Once frozen, transfer them to a ziplock bag for later baking—great for last-minute cravings! -
What should I do if my cookies turn out too dry?
Overmixing can lead to dry cookies. Make sure to mix until just combined and not too much after adding the flour.
Nutritional Info
While I love indulging during festivities, moderation is key! Here’s a rough outline for one cookie (based on 24 servings):
- Calories: 180
- Total Fat: 9g
- Carbohydrates: 24g
- Protein: 2g
- Fiber: 1g
And there you have it! Your ultimate guide to creating delicious 4th of July Monster Cookies—made with love, laughter, and a pinch of nostalgia. So this holiday season, gather your loved ones, tie on an apron, and whip up a batch of these delightful cookies. Remember, it’s all about creating memories around your table while enjoying the sweet rewards of baking together. Happy 4th of July!
Print4th of July Monster Cookies

Celebrate America’s birthday with these vibrant, chewy Monster Cookies bursting with flavors and colors. Perfect for sharing at summer gatherings!
- Prep Time: 15 minutes
- Cook Time: 12 minutes
- Total Time: 45 minutes
- Yield: 24 servings 1x
- Category: Dessert
- Method: Baking
- Cuisine: American
- Diet: Vegetarian
Ingredients
- 1 cup browned butter
- 1 cup brown sugar
- 1/2 cup granulated sugar
- 2 large eggs
- 1 teaspoon vanilla extract
- 2 cups all-purpose flour
- 1 teaspoon baking soda
- 1/2 teaspoon salt
- 1 cup chocolate chips
- 1/2 cup M&M’s
- 1/2 cup oats
Instructions
- Brown the Butter: Add the butter to a saucepan over medium heat. Let it melt and continue cooking until it turns golden brown, stirring occasionally to prevent burning. Remove from heat and let it cool.
- Combine Sugars: In a large mixing bowl, combine the cooled browned butter with brown sugar and granulated sugar. Beat until smooth and creamy, about 2-3 minutes.
- Add Eggs and Vanilla: Add in the eggs one at a time, mixing well after each addition. Pour in the vanilla extract and mix until incorporated.
- Mix Dry Ingredients: In a separate bowl, whisk together flour, baking soda, and salt. Gradually add to the wet ingredients, mixing until just combined.
- Fold in Chocolate and M&M’s: Gently fold in the chocolate chips, M&M’s, and oats until the batter is thick.
- Chill the Dough (Optional): Chill the dough for at least 30 minutes for thicker cookies.
- Preheat the Oven: While the dough chills, preheat your oven to 350°F (175°C).
- Scoop and Bake: Line baking sheets with parchment paper. Scoop mounds of dough onto the sheets, spaced about 2 inches apart. Bake for 10-12 minutes or until edges are lightly golden.
- Cool and Enjoy: Let the cookies cool on the baking sheet for a few minutes before transferring them to a wire rack.
Notes
For a fun twist, consider adding nuts or a swirl of nut butter. These cookies can also be frozen for later enjoyment.
Nutrition
- Serving Size: 1 cookie
- Calories: 180
- Sugar: 10g
- Sodium: 150mg
- Fat: 9g
- Saturated Fat: 5g
- Unsaturated Fat: 3g
- Trans Fat: 0g
- Carbohydrates: 24g
- Fiber: 1g
- Protein: 2g
- Cholesterol: 30mg
Keywords: Monster Cookies, 4th of July, festive cookies, baking, summer desserts

Crab Rangoon Bombs
Crab Rangoon Bombs: A Delicious Twist on a Classic
Hello there, food lovers! Today, I’m shaking things up in the kitchen with a scrumptious recipe that you’re going to adore: Crab Rangoon Bombs. Imagine the delightful taste of traditional crab rangoon, but with a fun twist that makes them perfect for anything from lazy weeknight dinners to fabulous gatherings. These crispy little bombs are filled with a creamy crab filling and pack a punch of flavor, making them an instant hit at any table.
As you know, I believe cooking should be both elegant and approachable. So, whether you’re a seasoned chef or just starting your culinary journey, I hope this recipe inspires you to bring a little more joy into your kitchen. Let’s dive in and get those taste buds tingling!
A Taste of Nostalgia
Growing up, I was always fascinated by the magic of food. My family would gather around the table for special occasions, sharing stories over plates filled with our favorites. One dish that frequently made its appearance at parties was crab rangoon. I can still remember the tempting aroma of those golden-brown, crispy pockets filled with creamy goodness.
I often found myself lingering in the kitchen, watching my mom transform simple ingredients into mouthwatering bites. I loved how vibrant colors and enticing flavors came together, creating a dish that stirred up excitement before it even hit the table.
Fast forward to my adult life, and I wanted to pay homage to that beloved recipe with a twist! These Crab Rangoon Bombs embody the essence of the original but are ridiculously easy to whip up, making them the perfect choice for both formal gatherings and relaxed evenings spent at home. Let’s make some kitchen magic!
Ingredients
Here’s what you’ll need to create these delightful bombs:
-
12 wonton wrappers
These crispy little squares are the perfect vessel for your crab filling. You can usually find them in the refrigerated section of your grocery store. Can’t find wonton wrappers? Try egg roll wrappers cut into quarters for a similar effect! -
1 cup lump crab meat (fresh or canned)
The star of this dish! Fresh lump crab meat will give you the best flavor and texture, but canned crab meat will work in a pinch. Just be sure to check for shells! -
4 oz cream cheese (softened)
This adds a luscious creaminess that balances the sweet and briny flavor of the crab. For a lighter version, consider using Neufchâtel cheese. -
2 green onions (finely chopped)
These add a pop of freshness and flavor! If green onions aren’t available, finely chopped chives or shallots work well too. -
1 tsp garlic powder
A little bit of garlic powder enhances the flavor profile without overpowering the crab. If you’re a garlic lover, feel free to add a little crushed garlic! -
1 tsp soy sauce
This adds a savory umami note that ties everything together. Tamari works for a gluten-free option, or coconut aminos for a soy-free choice. -
Vegetable oil (for frying)
You’ll need this to achieve that perfect, crispy exterior. If you’re looking for alternatives, sunflower or canola oil are also great options!
Step-by-Step Instructions
Now that you’ve gathered all your ingredients, let’s get cooking! Follow these steps closely for perfectly crispy Crab Rangoon Bombs.
-
Prep the Filling
In a medium bowl, combine the softened cream cheese, lump crab meat, finely chopped green onions, garlic powder, and soy sauce. Mix gently until all ingredients are well incorporated. You want to maintain some chunkiness from the crab for that delightful texture, so don’t overmix! This is the moment to taste; feel free to adjust the seasoning to your preference. -
Assemble the Bombs
Take a wonton wrapper and place about a tablespoon of the crab filling in the center. Using your finger, wet the edges of the wonton wrapper with a little water to help it seal. Fold the wrapper over the filling to create a triangle or fold it into a pocket shape, pressing the edges firmly to seal. You can also twist the top for a fun bomb shape! Repeat this step until all the filling is used up. Lay them on a parchment-lined tray to keep them organized. -
Heat the Oil
Pour about 2 inches of vegetable oil into a large pot or deep skillet. Heat over medium heat until shimmering. To check if the oil is ready, drop a small piece of wonton wrapper into the oil; if it sizzles immediately, you’re good to go! -
Fry the Bombs
Carefully add a few of the assembled Crab Rangoon Bombs to the hot oil, ensuring not to overcrowd the pan. Fry them for about 2-3 minutes, or until they’re golden brown and crispy on all sides. Use a slotted spoon to remove them from the oil and transfer them to a paper towel-lined plate to drain excess oil. Repeat with the remaining bombs. -
Serve and Enjoy
These little beauties are best served immediately while they’re still warm and crispy. Gather your favorite dipping sauce, perhaps sweet chili sauce or soy sauce, and dig in!
Serving Suggestions
When it comes to presentation, a little thought goes a long way! Serve your Crab Rangoon Bombs on a beautiful platter garnished with sliced green onions or fresh herbs for a pop of color. Pair them with a simple dipping sauce for an extra kick and let everyone reach for their serving. It’s all about creating an inviting atmosphere—after all, food is best enjoyed shared!
Recipe Variations
Feeling adventurous? Here are some fun twists on the classic Crab Rangoon Bombs you can try:
-
Cheesy Spin: Add a handful of shredded cheese, like mozzarella or cheddar, to the crab filling for an ooey-gooey experience!
-
Spicy Kick: Mix in some sriracha or diced jalapeños for a spicy version that will wake up your taste buds.
-
Vegetarian Delight: Swap the crab with sautéed mushrooms or a mixture of chopped vegetables for a delicious vegetarian option.
-
Herb Infusion: Incorporate fresh herbs like cilantro or dill into your filling for an extra layer of flavor.
-
Baked Alternative: If you prefer a healthier option, brush the bombs with oil and bake them at 375°F (190°C) until crisp and golden.
Chef’s Notes
These Crab Rangoon Bombs have a special place in my heart. They remind me of cozy gatherings with friends where laughter and great food filled the air. Over the years, I’ve played around with the recipe, adding different flavors and fillings, but the base remains as delicious as ever. Trust me, you’ll get rave reviews whenever you serve these!
A funny little kitchen story: once, I created a batch while hosting a dinner party, and midway through frying, I got super distracted chatting with my guests. You can guess what happened next—I ended up overcooking a few, turning them into a crispy disaster! But hey, even kitchen mishaps can lead to laughs and great memories.
FAQs and Troubleshooting
-
Why are my Crab Rangoon Bombs breaking open when frying?
Ensure your wrappers are sealed tightly. If they’re not sealed, the filling can escape during frying. A dab of water goes a long way in sealing those edges! -
Can I make these ahead of time?
Absolutely! You can assemble the bombs and refrigerate them for up to 24 hours before frying. Just be sure to bring them to room temperature before frying for even cooking. -
How do I prevent the oil from splattering?
Be cautious when adding the bombs to the oil, and avoid overcrowding the pan to maintain a consistent temperature, which will help reduce splattering. -
What should I do if I have leftover filling?
Use any leftover filling as a creamy pasta sauce! Just toss it with some noodles and maybe a splash of cream. You’ll have a quick and delicious meal.
Nutritional Info
While I don’t typically provide nutritional breakdowns, I encourage you to consider the ingredients used and portion sizes. An indulgent treat, these Crab Rangoon Bombs can be made lighter by modifying the oil and introducing more veggies!
And there you have it, my darlings! An elegant, approachable recipe for Crab Rangoon Bombs that will surely impress at your next gathering. My hope is that you feel inspired to tie on your apron and get cooking. Remember, it’s all about enjoying the process and creating beautiful memories around your table. Happy cooking!
PrintCrab Rangoon Bombs

Crispy Crab Rangoon Bombs with a creamy crab filling, perfect for gatherings and weeknight dinners.
- Prep Time: 20 minutes
- Cook Time: 10 minutes
- Total Time: 30 minutes
- Yield: 4 servings 1x
- Category: Appetizer
- Method: Frying
- Cuisine: Asian
- Diet: Gluten-Free (if using gluten-free wrappers)
Ingredients
- 12 wonton wrappers
- 1 cup lump crab meat (fresh or canned)
- 4 oz cream cheese (softened)
- 2 green onions (finely chopped)
- 1 tsp garlic powder
- 1 tsp soy sauce
- Vegetable oil (for frying)
Instructions
- Prep the filling by mixing softened cream cheese, lump crab meat, green onions, garlic powder, and soy sauce in a medium bowl.
- Assemble the bombs by placing a tablespoon of crab filling in the center of each wonton wrapper, wetting edges to seal.
- Heat vegetable oil in a large pot over medium heat until shimmering.
- Fry the assembled Crab Rangoon Bombs for 2-3 minutes until golden brown, then transfer to a paper towel-lined plate.
- Serve immediately with your favorite dipping sauce.
Notes
Feel free to customize with different fillings or serve baked for a healthier option.
Nutrition
- Serving Size: 3 Bombs
- Calories: 300
- Sugar: 1g
- Sodium: 350mg
- Fat: 20g
- Saturated Fat: 6g
- Unsaturated Fat: 10g
- Trans Fat: 0g
- Carbohydrates: 30g
- Fiber: 1g
- Protein: 10g
- Cholesterol: 40mg
Keywords: Crab Rangoon, appetizer, Asian cuisine, fried snacks, party food