
Cheesy Zucchini Breadsticks
From Garden to Table: Cheesy Zucchini Breadsticks
Welcome to my kitchen! Today, I’m excited to share a delightful recipe that perfectly combines comfort and creativity: Cheesy Zucchini Breadsticks. If you’re like me and love to sneak a little veggie goodness into your meals, these cheesy delights are just the ticket. They’re a fantastic appetizer, an irresistible snack, or even a fun addition to your weeknight dinner.
Zucchini is one of those underappreciated heroes of the vegetable kingdom. Not only does it provide moisture and subtle sweetness, but it also soaks up flavors beautifully, making it a versatile ingredient in so many dishes. And combined with gooey, melty cheese? Well, let’s just say it’s a match made in culinary heaven!
These Cheesy Zucchini Breadsticks are packed with flavor and texture, perfect for impressing your guests or simply indulging yourself. They’re crispy on the outside, cheesy on the inside, and bursting with flavor. Plus, they’re gluten-free, making them a great option for everyone around your table!
So grab your apron, and let’s get started. I’m ready to cook alongside you!
A Slice of Nostalgia
Growing up, my family had a beautiful garden bursting with vegetables. I can still remember those sun-drenched summer days spent picking zucchini, my hands tinged with dirt and the smell of fresh herbs wafting through the air. My mom would whip up all sorts of dishes, but her cheesy zucchini fritters were always a family favorite. As kids, we’d devour them straight from the skillet, refusing to let them cool down!
Fast forward to today, and my love for zucchini hasn’t waned; it’s just evolved. These breadsticks are my homage to those cherished moments in the kitchen—messy, joyful, and so full of flavor. I invite you to share in this delightful memory and to create new ones around your own table.
Ingredients
Here’s what you’ll need for these delectable Cheesy Zucchini Breadsticks:
-
2 medium zucchinis (about 2 cups shredded)
Fresh zucchini adds moisture and a subtle sweetness. If you can’t find zucchini, yellow squash works nicely too! -
2 large eggs
Eggs act as a binder, helping everything stick together. If you need a vegan alternative, you can use flax eggs (1 tablespoon of ground flaxseed mixed with 2.5 tablespoons of water, let it sit for 5 minutes). -
½ cup shredded mozzarella cheese
Mozzarella brings that melt-in-your-mouth texture. Feel free to substitute with any cheese that melts well, like provolone or gouda. -
¼ cup grated Parmesan cheese
Parmesan adds a wonderful depth and nuttiness. Nutritional yeast can serve as a great dairy-free substitute if you want a cheesy taste without the cheese. -
1 teaspoon garlic powder
This enhances the overall flavor. Fresh minced garlic can be used too—just go for 2-3 cloves. -
1 teaspoon Italian seasoning
A blend of dried herbs that pairs beautifully with the zucchini. You can create your own mix with basil, oregano, and thyme if you prefer. -
½ teaspoon salt
Salt enhances all the flavors but adjust to your taste, especially if you’re using salted cheese. -
¼ teaspoon black pepper
For a little kick. Feel free to add more if you enjoy a peppery punch! -
1 cup shredded mozzarella cheese (for topping)
Because who doesn’t love extra cheese on top? -
Optional: fresh parsley or basil for garnish
Fresh herbs add a lovely pop of color and freshness to your dish.
Step-by-Step Instructions
Let’s dive into the heart of cooking these Cheesy Zucchini Breadsticks! Here’s how to make them step-by-step:
-
Preheat Your Oven
Preheat your oven to 425°F (220°C). This high temperature will help create that perfect crispy texture on the outside of your breadsticks. -
Prep the Zucchini
Using a box grater or food processor, shred the zucchini. I love the rustic feel of hand-grating, but do what makes you happy! Once shredded, place the zucchini in a clean kitchen towel or cheesecloth. Squeeze out as much moisture as you can. This step is crucial as excess water can make your breadsticks soggy. -
Mix Ingredients
In a large mixing bowl, combine the squeezed zucchini, eggs, mozzarella cheese, Parmesan cheese, garlic powder, Italian seasoning, salt, and black pepper. Mix until everything is well incorporated. You want a uniform mixture that holds together. Pro tip: don’t be afraid to get your hands in there! -
Line the Baking Sheet
Line a baking sheet with parchment paper for easy cleanup and to prevent sticking. Trust me, parchment paper is a chef’s best friend! -
Shape the Breadsticks
With your mixture ready, scoop out portions and shape them into small rectangles or “sticks” on the baking sheet. Each should be about ½ inch thick. Try to keep them uniform so they cook evenly. Feel free to use a spatula to smooth the tops out and create neat edges! -
Bake First Time
Pop the baking sheet in the oven and bake for about 15-20 minutes until the breadsticks are golden and firm to the touch. This initial bake is crucial for texture! -
Add Toppings
Remove the breadsticks from the oven and sprinkle the remaining shredded mozzarella cheese evenly over the top. Don’t be shy—this is your chance for a cheesy crown! -
Final Bake
Return the cheesy zucchini breadsticks to the oven and bake for an additional 5-10 minutes until the cheese is melted and bubbly. The aroma will be divine—get ready for it! -
Cool and Serve
Once done, let them cool on the baking sheet for about 5 minutes. This helps them firm up a little more, making them easier to cut and serve.
Serving Suggestions
Serving these Cheesy Zucchini Breadsticks can be as simple or as elegant as you like! I love to cut them into strips and serve them alongside a bowl of marinara for dipping—classic! You can also sprinkle some fresh chopped parsley or basil on top for a stunning presentation. Pair these with a crisp salad or a cozy bowl of soup, and you have a well-rounded meal that’s both fun and satisfying.
Recipe Variations
Want to mix things up? Here are some fun variations you can experiment with:
-
Spicy Twist: Add red pepper flakes to the mixture for a little heat.
-
Herbed Delight: Incorporate fresh chopped herbs like thyme or dill for a fresh flavor boost.
-
Cheeseboard Style: Swap out the mozzarella for a mix of feta and goat cheese for a tangy twist.
-
Vegetable Medley: Add in some finely chopped spinach or bell peppers for extra nutrition and flavor.
-
The Sweet Tooth: Mix in some grated parmesan and a sprinkle of cinnamon for an unexpected sweet twist.
Chef’s Notes
These Cheesy Zucchini Breadsticks have come a long way from my childhood memories. They started as a grab-and-go snack but have now evolved into a beloved appetizer that finds its way into many of my gatherings. During one particularly memorable potluck, I forgot to squeeze out the excess moisture from the zucchini, and the result was hilariously disastrous! But the guests loved them so much, they didn’t care. It’s those little imperfections that make cooking so relatable and enjoyable. And the best part? You can always learn from your kitchen conquests!
FAQs and Troubleshooting
1. My breadsticks turned out soggy. What went wrong?
This is often due to excess moisture in the zucchini! Make sure you squeeze out as much liquid as possible before mixing.
2. Can I freeze these Cheesy Zucchini Breadsticks?
Absolutely! Just bake them, let them cool completely, and then freeze in an airtight container. When you’re ready to enjoy, bake straight from the freezer—just add a few extra minutes to the cooking time.
3. What if I don’t have zucchini?
No worries! You can substitute with other vegetables such as yellow squash, or even finely shredded carrots for a different texture and flavor.
4. How can I tell when they’re done?
Look for a golden brown exterior and ensure the cheese is melted and bubbly. They should feel firm to the touch when you lightly press down on them.
Nutritional Info
While I love making delicious food, I also want to ensure we’re conscious about nutrition! These Cheesy Zucchini Breadsticks are a great source of vitamins and protein, making them an excellent choice for both snacks and appetizers. They’re low-carb, gluten-free, and high in veggies, making them guilt-free indulgences!
There you have it—Cheesy Zucchini Breadsticks that you can easily whip up for any occasion! I hope this recipe inspires you to gather people around your table and create lasting memories. Don’t forget to share your cooking adventures with me—I love seeing your takes on my recipes! Happy cooking, and remember, good food isn’t just about showing off. It’s all about showing up for the people you love. Cheers!
PrintCheesy Zucchini Breadsticks

Delicious cheesy zucchini breadsticks that are crispy on the outside and gooey on the inside, perfect as an appetizer or snack.
- Prep Time: 15 minutes
- Cook Time: 30 minutes
- Total Time: 45 minutes
- Yield: 4 servings 1x
- Category: Appetizer
- Method: Baking
- Cuisine: American
- Diet: Gluten-Free
Ingredients
- 2 medium zucchinis (about 2 cups shredded)
- 2 large eggs
- ½ cup shredded mozzarella cheese
- ¼ cup grated Parmesan cheese
- 1 teaspoon garlic powder
- 1 teaspoon Italian seasoning
- ½ teaspoon salt
- ¼ teaspoon black pepper
- 1 cup shredded mozzarella cheese (for topping)
- Optional: fresh parsley or basil for garnish
Instructions
- Preheat your oven to 425°F (220°C).
- Prep the zucchini by shredding and squeezing out excess moisture.
- Mix all ingredients in a large mixing bowl until well combined.
- Line a baking sheet with parchment paper.
- Shape the mixture into small rectangles on the baking sheet.
- Bake for about 15-20 minutes until golden and firm.
- Add the topping mozzarella cheese and bake for an additional 5-10 minutes.
- Cool on the baking sheet for 5 minutes before serving.
Notes
Serve with marinara sauce for dipping. Can be frozen and baked straight from the freezer.
Nutrition
- Serving Size: 1 serving
- Calories: 250
- Sugar: 3g
- Sodium: 320mg
- Fat: 10g
- Saturated Fat: 4g
- Unsaturated Fat: 6g
- Trans Fat: 0g
- Carbohydrates: 30g
- Fiber: 2g
- Protein: 12g
- Cholesterol: 70mg
Keywords: zucchini breadsticks, cheesy appetizer, gluten-free snacks, vegetable recipes
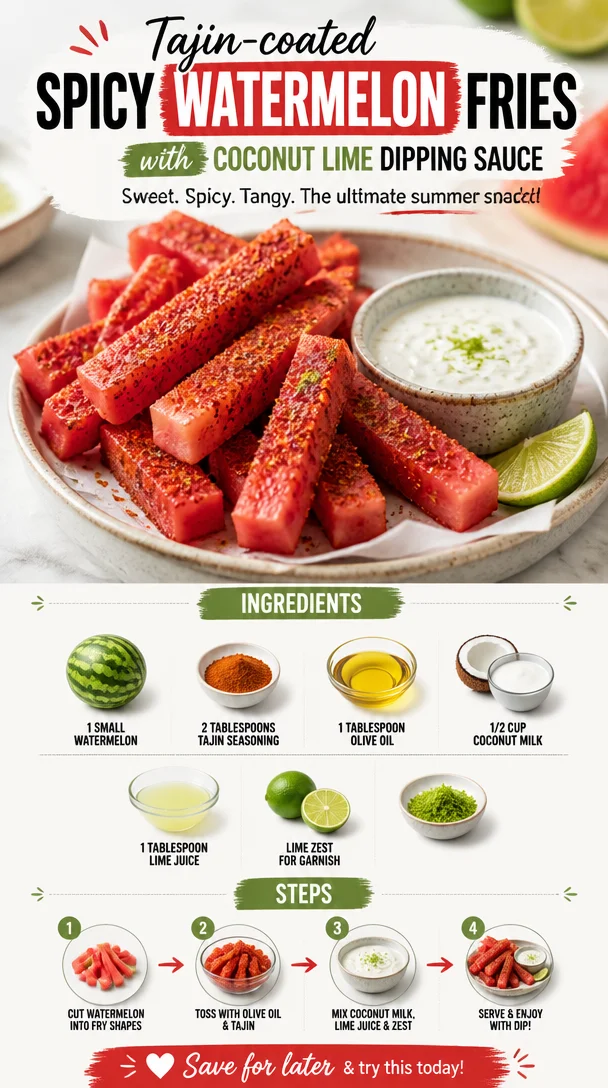
Tajin-coated Spicy Watermelon Fries with Coconut Lime Dipping Sauce
Tajin-Coated Spicy Watermelon Fries with Coconut Lime Dipping Sauce
Hello, my fabulous food lovers! I’m so excited to share a refreshing recipe that brings a burst of flavors to your table: Tajin-coated Spicy Watermelon Fries with Coconut Lime Dipping Sauce! This dish is the perfect companion for those summer nights, picnics in the park, or whenever you’re in need of a fun, easy, and slightly spicy snack. Trust me, this combination is going to make your taste buds sing!
Watermelon fries? Yes, you read that right! We’re taking the juicy goodness of watermelon and transforming it into crispy, flavorful fries that are both sweet and spicy. When you coat them in Tajin seasoning—made from chili, lime, and salt—you’ll find a tangy kick that dances on your palate like a fiesta! And to top it all off, we’re drenching these delightful bites in a creamy, coconut lime sauce that’s simply irresistible.
A Personal Story
Growing up, my family had a tradition of grilling on warm summer evenings. After a day of playing outside, we would gather around the patio table, enjoying the food and each other’s company as the sun dipped below the horizon. One year, my aunt introduced us to the idea of spicing up our favorite seasonal fruits. She created a version of spicy watermelon slices that melted in your mouth and sparked a competition to see who could create the most delicious twist. It was during one of those evenings that I realized how layering spices can elevate something as simple as a fresh fruit.
Fast forward to this day, and I’m channeling that nostalgia into these Tajin-coated Watermelon Fries. Every bite transports me back to those joyful summer nights with laughter and love swirling around the table. Now, I can’t wait for you to experience it too!
Ingredients
For this vibrant and delicious dish, here’s what you’ll need:
-
1 small watermelon
Select a firm, ripe watermelon for the best flavor. If you can, choose one that feels heavy for its size—this usually means it’s packed with juicy goodness! -
2 tablespoons Tajin seasoning
This is the star of the show! Tajin is a Mexican spice blend of dried chilies, lime, and salt, and it adds a zesty kick to any fruit. If you can’t find Tajin, a pinch of chili powder, lime zest, and a little salt works as a decent substitute. -
1 tablespoon olive oil
Olive oil helps the Tajin adhere to the watermelon instead of falling off. If you prefer a different flavor profile, avocado oil or coconut oil can also work splendidly here. -
1/2 cup coconut milk
Rich and creamy, coconut milk creates a luscious dip. Opt for full-fat coconut milk for a richer flavor, but light coconut milk can work in a pinch. -
1 tablespoon lime juice
Freshly squeezed lime juice brightens up the dip and balances the sweetness of the watermelon. Bottled lime juice is fine, but fresh is always best! -
Lime zest for garnish
This adds a pop of color and additional citrusy aroma. Be sure to zest from an unwaxed lime for the best flavor!
Step-by-Step Instructions
-
Prep the Watermelon
Begin by slicing your watermelon into fries. Cut the watermelon into thick slices, then cut those slices into wedges resembling fries. Aim for uniform sizes to help them cook evenly! Don’t worry about being too precise—this is a fun dish! -
Season the Watermelon
In a mixing bowl, gently toss the watermelon fries with the olive oil until they’re lightly coated. This step is crucial, as it helps the Tajin seasoning stick. Once coated, sprinkle the Tajin seasoning over the fries. Start with 2 tablespoons, but feel free to adjust based on your spice preference! -
Preheat Your Grill or Oven
If you’re heading to the grill, fire it up on medium heat. If you’re opting for the oven, preheat it to 400°F (200°C). If you have a grill pan, that’s a fantastic option too! -
Grill or Bake the Watermelon Fries
Place the seasoned watermelon fries directly on the grill or a baking sheet lined with parchment paper. Grill them for about 2-3 minutes per side or bake for 10-12 minutes. You want them to get a touch of caramelization on the outside while staying juicy inside. Just keep a watchful eye—overcooked watermelon can become mushy! -
Make the Coconut Lime Dipping Sauce
While your fries are cooking, it’s time for the star sauce! Combine the coconut milk, lime juice, and a pinch of salt in a small bowl. Whisk until it’s all smooth and creamy. For added flair, you can mix in a touch of lime zest to enhance the flavor. -
Plate the Dish
Once the watermelon fries are beautifully grilled and slightly charred, remove them from the heat and let them cool for a minute. Then, plate them up like a masterpiece, drizzling some of that luscious coconut lime sauce over the fries. Finish with a sprinkle of fresh lime zest for that extra zing!
Serving Suggestions
I love serving these Tajin-coated Spicy Watermelon Fries with a side of that creamy Coconut Lime Dipping Sauce—it’s a match made in culinary heaven! You can present them in a rustic bowl, garnished with fresh herbs like mint or cilantro for a pop of color and freshness. Pair this dish with a refreshing cocktail or a sparkling water garnish with a wedge of lime for a vibrant summer experience!
Recipe Variations
-
Grilled Pineapple Fries: Swap the watermelon for fresh pineapple and coat it with Tajin instead for a tropical twist!
-
Honey Drizzle: For an extra layer of sweetness, drizzle some honey over the fries before serving.
-
Herb-Infused Dipping Sauce: Add a handful of chopped fresh mint or cilantro into the coconut lime sauce for a fresh herbal note.
-
Cucumber Fries: Try this with cucumber sticks for a refreshing crunch and a different flavor profile.
-
Balsamic Glaze: Instead of coconut sauce, drizzle a traditional balsamic glaze over the grilled watermelon for a savory take.
Chef’s Notes
This recipe has evolved over time, and I love how versatile it is! I originally started playing with just straight watermelon and salt, but then came the discovery of Tajin. Once that happened, my cooking life changed forever; I found myself adding it to everything from corn to fruits! It’s become a staple in my kitchen.
One funny kitchen memory I have related to this dish is when I invited friends over for a casual summer BBQ and forgot that watermelon slices can be slippery. As I was tossing them on the grill, my neighbor heard a loud “splat” and found me on my knees scooping up the mess. The best part? My friends laughed and said that even the disaster watermelon still tasted great thanks to the spices!
FAQs and Troubleshooting
-
What if my watermelon fries fall apart?
If your fries are too thin, they might lose their shape. Aim for thicker fries to ensure they hold together during cooking. -
Can I prepare the sauce in advance?
Absolutely! You can make the coconut lime sauce a few hours ahead. Just store it in an airtight container in the fridge, and give it a good stir before serving! -
How do I know when the watermelon fries are done?
Look for light grill marks and a slight caramelization around the edges. They should still feel firm when you pick them up. -
What if I don’t have a grill?
No worries! You can also bake these in the oven or use a grill pan on the stovetop to achieve a similar effect without any hassle.
Nutritional Info
Please note that nutritional values may vary based on specific ingredients used and portion sizes. Typically, this recipe is low in calories and saturated fats, making it a healthy choice for a snack or appetizer!
With this recipe in your culinary repertoire, you’re sure to bring smiles to the faces of everyone around your table. Don’t forget to share your creations with me on social media—tag @IvoryApron, and let’s gather over good food, beautiful moments, and great company! Happy cooking, friends! 🍉✨
PrintTajin-Coated Spicy Watermelon Fries with Coconut Lime Dipping Sauce

A refreshing twist on summer snacks, these Tajin-coated watermelon fries are spicy, sweet, and paired with a creamy coconut lime dipping sauce.
- Prep Time: 10 minutes
- Cook Time: 10 minutes
- Total Time: 20 minutes
- Yield: 4 servings 1x
- Category: Snack
- Method: Grilling
- Cuisine: Mexican
- Diet: Vegan
Ingredients
- 1 small watermelon
- 2 tablespoons Tajin seasoning
- 1 tablespoon olive oil
- 1/2 cup coconut milk
- 1 tablespoon lime juice
- Lime zest for garnish
Instructions
- Begin by slicing your watermelon into fries.
- In a mixing bowl, gently toss the watermelon fries with the olive oil.
- Once coated, sprinkle the Tajin seasoning over the fries.
- If you’re heading to the grill, fire it up on medium heat.
- Place the seasoned watermelon fries directly on the grill or a baking sheet lined with parchment paper.
- Grill them for about 2-3 minutes per side or bake for 10-12 minutes.
- Combine the coconut milk, lime juice, and a pinch of salt in a small bowl.
- Whisk until it’s all smooth and creamy.
- Once the watermelon fries are beautifully grilled, remove them from the heat.
- Plate them up, drizzling some coconut lime sauce over the fries.
Notes
Make sure to choose a firm, ripe watermelon for the best flavor. The coconut lime sauce can be prepared in advance.
Nutrition
- Serving Size: 1 serving
- Calories: 120
- Sugar: 8g
- Sodium: 250mg
- Fat: 9g
- Saturated Fat: 7g
- Unsaturated Fat: 2g
- Trans Fat: 0g
- Carbohydrates: 14g
- Fiber: 1g
- Protein: 1g
- Cholesterol: 0mg
Keywords: watermelon fries, spicy snack, summer recipe, tacos, vegan snack