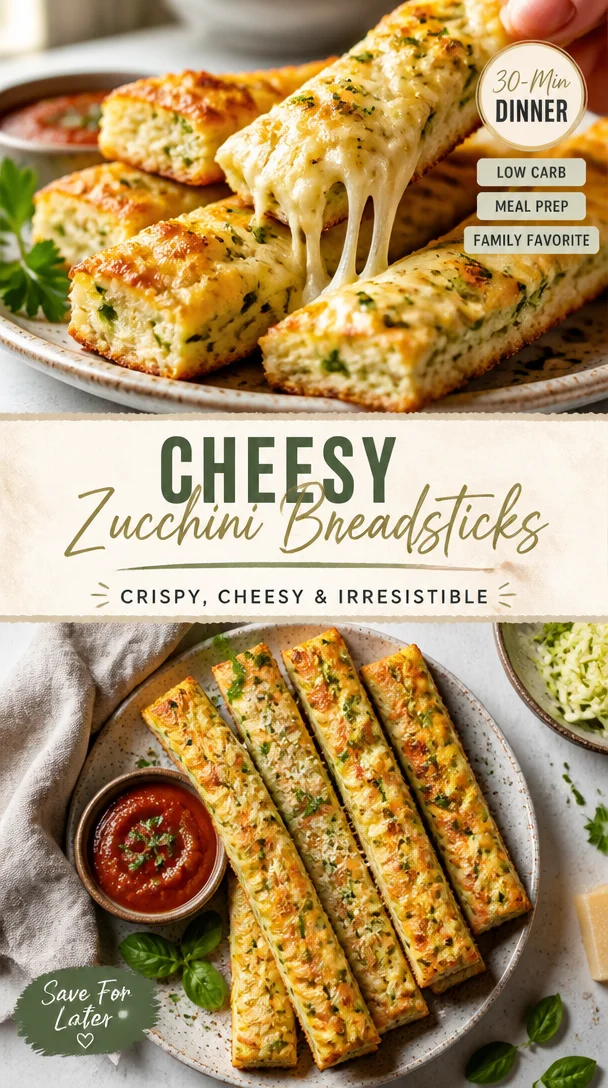
Cheesy Zucchini Breadsticks
From Garden to Table: Cheesy Zucchini Breadsticks
Welcome to my kitchen! Today, I’m excited to share a delightful recipe that perfectly combines comfort and creativity: Cheesy Zucchini Breadsticks. If you’re like me and love to sneak a little veggie goodness into your meals, these cheesy delights are just the ticket. They’re a fantastic appetizer, an irresistible snack, or even a fun addition to your weeknight dinner.
Zucchini is one of those underappreciated heroes of the vegetable kingdom. Not only does it provide moisture and subtle sweetness, but it also soaks up flavors beautifully, making it a versatile ingredient in so many dishes. And combined with gooey, melty cheese? Well, let’s just say it’s a match made in culinary heaven!
These Cheesy Zucchini Breadsticks are packed with flavor and texture, perfect for impressing your guests or simply indulging yourself. They’re crispy on the outside, cheesy on the inside, and bursting with flavor. Plus, they’re gluten-free, making them a great option for everyone around your table!
So grab your apron, and let’s get started. I’m ready to cook alongside you!
A Slice of Nostalgia
Growing up, my family had a beautiful garden bursting with vegetables. I can still remember those sun-drenched summer days spent picking zucchini, my hands tinged with dirt and the smell of fresh herbs wafting through the air. My mom would whip up all sorts of dishes, but her cheesy zucchini fritters were always a family favorite. As kids, we’d devour them straight from the skillet, refusing to let them cool down!
Fast forward to today, and my love for zucchini hasn’t waned; it’s just evolved. These breadsticks are my homage to those cherished moments in the kitchen—messy, joyful, and so full of flavor. I invite you to share in this delightful memory and to create new ones around your own table.
Ingredients
Here’s what you’ll need for these delectable Cheesy Zucchini Breadsticks:
-
2 medium zucchinis (about 2 cups shredded)
Fresh zucchini adds moisture and a subtle sweetness. If you can’t find zucchini, yellow squash works nicely too! -
2 large eggs
Eggs act as a binder, helping everything stick together. If you need a vegan alternative, you can use flax eggs (1 tablespoon of ground flaxseed mixed with 2.5 tablespoons of water, let it sit for 5 minutes). -
½ cup shredded mozzarella cheese
Mozzarella brings that melt-in-your-mouth texture. Feel free to substitute with any cheese that melts well, like provolone or gouda. -
¼ cup grated Parmesan cheese
Parmesan adds a wonderful depth and nuttiness. Nutritional yeast can serve as a great dairy-free substitute if you want a cheesy taste without the cheese. -
1 teaspoon garlic powder
This enhances the overall flavor. Fresh minced garlic can be used too—just go for 2-3 cloves. -
1 teaspoon Italian seasoning
A blend of dried herbs that pairs beautifully with the zucchini. You can create your own mix with basil, oregano, and thyme if you prefer. -
½ teaspoon salt
Salt enhances all the flavors but adjust to your taste, especially if you’re using salted cheese. -
¼ teaspoon black pepper
For a little kick. Feel free to add more if you enjoy a peppery punch! -
1 cup shredded mozzarella cheese (for topping)
Because who doesn’t love extra cheese on top? -
Optional: fresh parsley or basil for garnish
Fresh herbs add a lovely pop of color and freshness to your dish.
Step-by-Step Instructions
Let’s dive into the heart of cooking these Cheesy Zucchini Breadsticks! Here’s how to make them step-by-step:
-
Preheat Your Oven
Preheat your oven to 425°F (220°C). This high temperature will help create that perfect crispy texture on the outside of your breadsticks. -
Prep the Zucchini
Using a box grater or food processor, shred the zucchini. I love the rustic feel of hand-grating, but do what makes you happy! Once shredded, place the zucchini in a clean kitchen towel or cheesecloth. Squeeze out as much moisture as you can. This step is crucial as excess water can make your breadsticks soggy. -
Mix Ingredients
In a large mixing bowl, combine the squeezed zucchini, eggs, mozzarella cheese, Parmesan cheese, garlic powder, Italian seasoning, salt, and black pepper. Mix until everything is well incorporated. You want a uniform mixture that holds together. Pro tip: don’t be afraid to get your hands in there! -
Line the Baking Sheet
Line a baking sheet with parchment paper for easy cleanup and to prevent sticking. Trust me, parchment paper is a chef’s best friend! -
Shape the Breadsticks
With your mixture ready, scoop out portions and shape them into small rectangles or “sticks” on the baking sheet. Each should be about ½ inch thick. Try to keep them uniform so they cook evenly. Feel free to use a spatula to smooth the tops out and create neat edges! -
Bake First Time
Pop the baking sheet in the oven and bake for about 15-20 minutes until the breadsticks are golden and firm to the touch. This initial bake is crucial for texture! -
Add Toppings
Remove the breadsticks from the oven and sprinkle the remaining shredded mozzarella cheese evenly over the top. Don’t be shy—this is your chance for a cheesy crown! -
Final Bake
Return the cheesy zucchini breadsticks to the oven and bake for an additional 5-10 minutes until the cheese is melted and bubbly. The aroma will be divine—get ready for it! -
Cool and Serve
Once done, let them cool on the baking sheet for about 5 minutes. This helps them firm up a little more, making them easier to cut and serve.
Serving Suggestions
Serving these Cheesy Zucchini Breadsticks can be as simple or as elegant as you like! I love to cut them into strips and serve them alongside a bowl of marinara for dipping—classic! You can also sprinkle some fresh chopped parsley or basil on top for a stunning presentation. Pair these with a crisp salad or a cozy bowl of soup, and you have a well-rounded meal that’s both fun and satisfying.
Recipe Variations
Want to mix things up? Here are some fun variations you can experiment with:
-
Spicy Twist: Add red pepper flakes to the mixture for a little heat.
-
Herbed Delight: Incorporate fresh chopped herbs like thyme or dill for a fresh flavor boost.
-
Cheeseboard Style: Swap out the mozzarella for a mix of feta and goat cheese for a tangy twist.
-
Vegetable Medley: Add in some finely chopped spinach or bell peppers for extra nutrition and flavor.
-
The Sweet Tooth: Mix in some grated parmesan and a sprinkle of cinnamon for an unexpected sweet twist.
Chef’s Notes
These Cheesy Zucchini Breadsticks have come a long way from my childhood memories. They started as a grab-and-go snack but have now evolved into a beloved appetizer that finds its way into many of my gatherings. During one particularly memorable potluck, I forgot to squeeze out the excess moisture from the zucchini, and the result was hilariously disastrous! But the guests loved them so much, they didn’t care. It’s those little imperfections that make cooking so relatable and enjoyable. And the best part? You can always learn from your kitchen conquests!
FAQs and Troubleshooting
1. My breadsticks turned out soggy. What went wrong?
This is often due to excess moisture in the zucchini! Make sure you squeeze out as much liquid as possible before mixing.
2. Can I freeze these Cheesy Zucchini Breadsticks?
Absolutely! Just bake them, let them cool completely, and then freeze in an airtight container. When you’re ready to enjoy, bake straight from the freezer—just add a few extra minutes to the cooking time.
3. What if I don’t have zucchini?
No worries! You can substitute with other vegetables such as yellow squash, or even finely shredded carrots for a different texture and flavor.
4. How can I tell when they’re done?
Look for a golden brown exterior and ensure the cheese is melted and bubbly. They should feel firm to the touch when you lightly press down on them.
Nutritional Info
While I love making delicious food, I also want to ensure we’re conscious about nutrition! These Cheesy Zucchini Breadsticks are a great source of vitamins and protein, making them an excellent choice for both snacks and appetizers. They’re low-carb, gluten-free, and high in veggies, making them guilt-free indulgences!
There you have it—Cheesy Zucchini Breadsticks that you can easily whip up for any occasion! I hope this recipe inspires you to gather people around your table and create lasting memories. Don’t forget to share your cooking adventures with me—I love seeing your takes on my recipes! Happy cooking, and remember, good food isn’t just about showing off. It’s all about showing up for the people you love. Cheers!
PrintCheesy Zucchini Breadsticks
Delicious cheesy zucchini breadsticks that are crispy on the outside and gooey on the inside, perfect as an appetizer or snack.
- Prep Time: 15 minutes
- Cook Time: 30 minutes
- Total Time: 45 minutes
- Yield: 4 servings 1x
- Category: Appetizer
- Method: Baking
- Cuisine: American
- Diet: Gluten-Free
Ingredients
- 2 medium zucchinis (about 2 cups shredded)
- 2 large eggs
- ½ cup shredded mozzarella cheese
- ¼ cup grated Parmesan cheese
- 1 teaspoon garlic powder
- 1 teaspoon Italian seasoning
- ½ teaspoon salt
- ¼ teaspoon black pepper
- 1 cup shredded mozzarella cheese (for topping)
- Optional: fresh parsley or basil for garnish
Instructions
- Preheat your oven to 425°F (220°C).
- Prep the zucchini by shredding and squeezing out excess moisture.
- Mix all ingredients in a large mixing bowl until well combined.
- Line a baking sheet with parchment paper.
- Shape the mixture into small rectangles on the baking sheet.
- Bake for about 15-20 minutes until golden and firm.
- Add the topping mozzarella cheese and bake for an additional 5-10 minutes.
- Cool on the baking sheet for 5 minutes before serving.
Notes
Serve with marinara sauce for dipping. Can be frozen and baked straight from the freezer.
Nutrition
- Serving Size: 1 serving
- Calories: 250
- Sugar: 3g
- Sodium: 320mg
- Fat: 10g
- Saturated Fat: 4g
- Unsaturated Fat: 6g
- Trans Fat: 0g
- Carbohydrates: 30g
- Fiber: 2g
- Protein: 12g
- Cholesterol: 70mg
Keywords: zucchini breadsticks, cheesy appetizer, gluten-free snacks, vegetable recipes
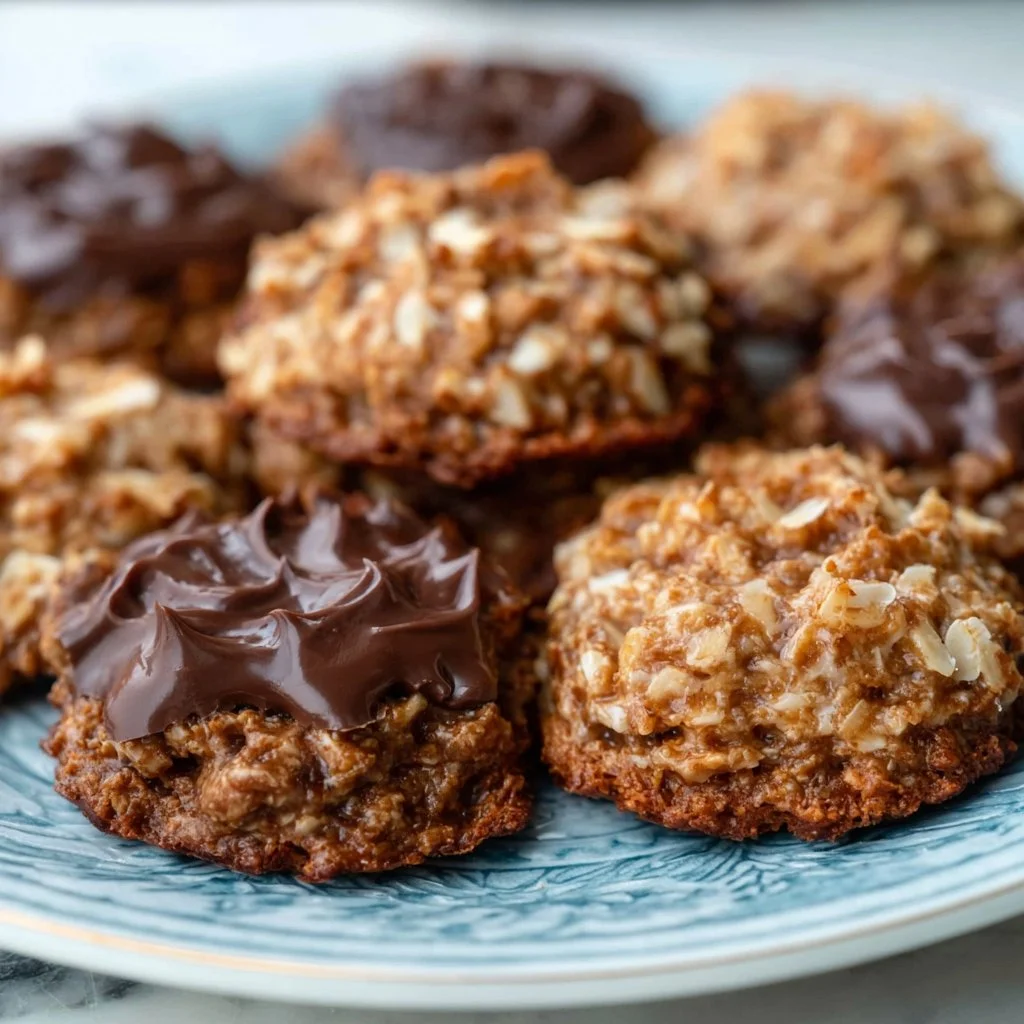
Easy No-Bake Keto Cookies (Low Carb & Delicious!)
Easy No-Bake Keto Cookies (Low Carb & Delicious!)
Hello, fellow foodies! Welcome back to my little corner of the culinary world, Ivory Apron. Today, we’re diving into a deliciously simple treat that’s all about flavor without the fuss—No-Bake Keto Cookies! If you’re following a low-carb lifestyle or just want a sweet pick-me-up without all the guilt, these cookies are both a game changer and a lifesaver.
Picture this: It’s a cozy afternoon, you’ve got your favorite playlist humming in the background, and you suddenly crave something sweet. But here’s the kicker—you don’t want to spend hours slaving away in the kitchen, and you certainly don’t want to turn on the oven in the heat of summer! That’s where these no-bake wonders come in. They’re super easy to whip up and boast ingredients that keep you on track while satisfying that sweet tooth.
These delightful cookies combine rich flavors and healthy fats, making them the perfect snack or dessert option. Plus, you can customize them to suit your taste buds, and they are totally kid-approved! So grab your apron (or just a mixing bowl if you prefer), and let’s create something scrumptious together!
Personal Story
You know, my love for no-bake desserts goes way back to my childhood. I vividly remember those long summer days spent in my grandmother’s kitchen. She had a knack for showing me just how enjoyable cooking can be, and one of her favorite treats was her famous no-bake chocolate oat cookies. The chocolate would melt in your mouth, sweetened just right with a hint of peanut butter.
We would often make a batch to share with family and friends, and honestly, it seemed like they were gone in an instant. It became our little summer tradition; the laughter, the mess, and the sweet smell of chocolate were all part of the experience. Fast forward to today, and while I’ve certainly refined the recipe a bit to fit my keto lifestyle, those warm, nostalgic feelings of joy and togetherness still inspire me to share these delightful No-Bake Keto Cookies with you.
Ingredients
Here’s what you’ll need to make these easy-peasy No-Bake Keto Cookies:
-
1 cup unsweetened almond butter
A creamy, rich base that complements our flavors. If you’re allergic to nuts, you can substitute it with sunflower seed butter or even tahini for a different twist! -
1/3 cup unsweetened cocoa powder
This adds that deep chocolate flavor we all love. Look for a good quality cocoa powder to really elevate your cookies. If you want a hint of sweetness, you can use carob powder instead! -
1/4 cup keto-friendly sweetener (like erythritol or stevia)
This will sweeten your cookies without the carbs! Experiment with different blends to find your perfect level of sweetness. You can use monk fruit sweetener here too! -
1/4 cup coconut oil, melted
Melted coconut oil helps bind everything together while adding a subtle flavor. You can easily replace this with unsalted butter if that’s more your style! -
1/2 teaspoon vanilla extract
A classic addition that brings warmth and depth. Don’t skip it—it makes all the difference! You can experiment with almond extract for a fun variation too. -
1/4 cup unsweetened shredded coconut
This adds a lovely texture and flavor! If you’re not a fan, you can leave this out or substitute it with chopped nuts for an extra crunch. -
1/4 cup sugar-free dark chocolate chips
Totally optional but recommended if you’re a chocolate lover! You could swap these for dried fruit like cranberries or chopped dates—just keep an eye on the carbs!
Step-by-Step Instructions
Ready to get started? Here’s how to whip up your No-Bake Keto Cookies in no time!
-
Gather Your Ingredients
Take a moment to measure out all your ingredients. This not only speeds up the process, but it also ensures you don’t forget anything. You’ll need a medium mixing bowl and a rubber spatula for folding everything together. -
Mix Wet Ingredients First
In your medium bowl, combine the almond butter, melted coconut oil, and vanilla extract. Stir them together until well incorporated. The almond butter should be creamy and smooth. This is where the magic starts! -
Add Dry Ingredients
Now, sprinkle in the unsweetened cocoa powder, keto-friendly sweetener, and shredded coconut. Use your spatula to fold the dry ingredients into the wet mixture gently. You should see a rich, chocolate-y batter starting to form.Chef Tip: If you’re finding the mixture too thick, feel free to add a splash of coconut milk to loosen it up.
-
Incorporate Chocolate Chips
Finally, fold in your sugar-free dark chocolate chips (if using). Make sure they are evenly distributed across your cookie mixture. You want that delicious burst of chocolate in every bite! -
Form the Cookies
Using a tablespoon, scoop out portions of the batter and place them onto a parchment-lined baking sheet. Flatten them slightly with the back of the spoon or your fingers to create a cookie shape.Chef Hack: Wet your hands with a little coconut oil for easier handling!
-
Chill in the Fridge
Pop your baking sheet in the fridge for at least 30 minutes to allow the cookies to set. This is the hardest part! Try not to eat all the batter (although I won’t tell if you sneak a bite!). -
Enjoy!
Once they’re firm, take them out and enjoy these delightful no-bake treats! Store any leftovers in an airtight container in the fridge for a quick go-to snack.
Serving Suggestions
To plate these cookies perfectly, simply arrange them on a rustic wooden board or a pretty plate. You can garnish with a sprinkle of shredded coconut or a drizzle of melted dark chocolate if you’re feeling fancy. They also pair wonderfully with a tall glass of almond milk or your favorite herbal tea—perfect for an afternoon treat.
Recipe Variations
-
Nut-Free Version: Substitute almond butter with sunflower seed butter for a nut-free alternative. This adds a new flavor profile while keeping it low-carb!
-
Chewy Texture: Add 1/4 cup of ground flaxseed or chia seeds for extra fiber and a bit of chewiness.
-
Spicy Twist: A pinch of cinnamon or cayenne pepper can make the flavor profile pop! This is a fun way to give them a bit of a kick.
-
Caramel Lovers: Drizzle in some sugar-free caramel sauce before chilling for that silky sweetness.
-
Nutty Crunch: Fold in some chopped pecans or walnuts for added crunch and healthy fats!
Chef’s Notes
Creating no-bake desserts became a sort of personal mission for me—not only do they save time, but they evoke a sense of nostalgia. Each time I whip up these cookies, I think back to those sweltering summer afternoons spent with my grandmother. It’s incredible how something so simple can carry such vibrant memories.
Over the years, I’ve played with the recipe to make it more versatile and appealing to a wider range of dietary preferences. It keeps evolving, just like my cooking journey, and every batch comes out a little different depending on what I’m feeling that day.
FAQs and Troubleshooting
1. Can I use a different nut butter?
Absolutely! Any nut butter will work, but make sure it’s creamy rather than chunky for the right texture.
2. What if my cookies are too crumbly?
If your cookies are crumbling apart, try adding a bit more melted coconut oil or almond butter. This will help them bind better.
3. How can I store these cookies?
Keep these cookies in an airtight container in the fridge for up to a week. They also freeze well if you want to keep a stash for later!
4. Can I omit the cocoa powder?
Yes, if you prefer a more classic cookie flavor, you can leave out the cocoa powder entirely and maybe add a bit more vaniller or coconut for flavor!
Nutritional Info (Optional)
Each No-Bake Keto Cookie contains approximately:
- Calories: 120
- Total Fat: 10g
- Net Carbs: 2g
- Protein: 4g
So there you have it! These easy No-Bake Keto Cookies are not just a delightful treat but a chance to create memories in the kitchen. Whether you’re indulging solo or sharing with friends, they’re bound to shine. Now, put on your apron, gather your ingredients, and let’s make something delicious together. Happy baking (or no-baking!), everyone!
PrintEasy No-Bake Keto Cookies
Deliciously simple no-bake cookies that are low-carb and perfect for satisfying your sweet tooth without guilt.
- Prep Time: 10 minutes
- Cook Time: 30 minutes
- Total Time: 40 minutes
- Yield: 12 cookies 1x
- Category: Dessert
- Method: No-Bake
- Cuisine: Keto
- Diet: Low Carb
Ingredients
- 1 cup unsweetened almond butter
- 1/3 cup unsweetened cocoa powder
- 1/4 cup keto-friendly sweetener (like erythritol or stevia)
- 1/4 cup coconut oil, melted
- 1/2 teaspoon vanilla extract
- 1/4 cup unsweetened shredded coconut
- 1/4 cup sugar-free dark chocolate chips (optional)
Instructions
- Gather your ingredients.
- Mix wet ingredients first: combine almond butter, melted coconut oil, and vanilla extract.
- Add dry ingredients: sprinkle in cocoa powder, keto sweetener, and shredded coconut.
- Incorporate chocolate chips (if using).
- Form the cookies: scoop portions onto a parchment-lined baking sheet.
- Chill in the fridge for at least 30 minutes to set.
- Enjoy! Store leftovers in an airtight container.
Notes
Feel free to customize with nut substitutes or additional flavors like cinnamon or chopped nuts.
Nutrition
- Serving Size: 1 cookie
- Calories: 120
- Sugar: 1g
- Sodium: 50mg
- Fat: 10g
- Saturated Fat: 8g
- Unsaturated Fat: 2g
- Trans Fat: 0g
- Carbohydrates: 2g
- Fiber: 1g
- Protein: 4g
- Cholesterol: 0mg
Keywords: no-bake, keto, cookies, low carb, dessert