
Greek Chicken Tenders
Flavorful Greek Chicken Tenders: Your New Go-To Recipe
Welcome back to Ivory Apron! Today, we’re diving into a dish that has quickly become a favorite in my home: Greek Chicken Tenders. Simple yet bursting with flavor, these tender bites of chicken marinated in a tangy, herby blend are perfect for weeknight dinners, casual get-togethers, or even upscale entertaining. The best part? You can whip them up in no time, making them a delicious choice when you want something special without the stress.
Think of this dish as a passport to the Mediterranean — each bite is like taking a sun-kissed trip to the Greek islands. I’m talking about juicy chicken morsels infused with the zest of lemon, aromatic garlic, and fresh herbs, all perfectly paired with a creamy Greek yogurt sauce that will make your taste buds dance. Plus, the vibrant colors and appealing presentation make for a meal that looks elegant, yet feels comfortably homemade.
In my years of cooking and hosting, I’ve learned that food has a magical way of bringing people together. These Greek Chicken Tenders are no exception; whether you’re serving them as an appetizer, tossing them into a salad, or enjoying them with a side of roasted veggies, they create a delicious moment that you and your guests will savor. So, tie on your apron, gather your ingredients, and let’s get cooking!
Personal Story
I’ll never forget the first time I truly embraced the flavors of Greece. It was a bright summer evening; my husband and I had just returned from a little trip to Santorini. We were enchanted by the sunlit streets, the vibrant blue waters, and of course, the delicious food we wouldn’t stop raving about. One night, we stumbled upon a quaint little taverna by the water, where the scent of grilled chicken and herbs wafted through the air as the sun dipped below the horizon.
We ordered a plate of grilled chicken skewers served alongside a homemade tzatziki, and each bite was a memory in the making. Trying to recreate that experience at home became my culinary quest! Fast forward to now, and these Greek Chicken Tenders have been inspired by that very moment. With fresh ingredients and a little love, I’ve brought those holiday flavors to my dining table, where they quickly became a family favorite — and I’m excited to share it with you!
Ingredients
Let’s get a closer look at what you’ll need to create these delectable Greek Chicken Tenders:
-
1.5 lbs chicken tenders (or sliced chicken breast): These chicken tenders are juicy and tender, perfect for absorbing the marinade. If you prefer, boneless, skinless chicken breasts work beautifully as well — just make sure to slice them into strips for quick cooking.
-
1/2 cup plain Greek yogurt: This ingredient adds creaminess and tang, making our marinate both rich and zesty. If you’re looking for dairy-free options, try a coconut yogurt or any plant-based yogurt that suits your taste!
-
3 tablespoons olive oil: A staple in Mediterranean cooking, olive oil not only enhances flavors but also aids in marinating and cooking. Feel free to use avocado oil for a different flavor profile.
-
2 tablespoons fresh lemon juice: Freshly squeezed lemon juice provides brightness and acidity – a crucial balance for the dish. If you’re in a pinch, bottled lemon juice can work, but nothing replaces the freshness of the real deal!
-
2 teaspoons lemon zest: This boosts the lemon flavor without adding extra liquid. Zest before juicing your lemons for ease. You can swap in lime zest for a fun twist!
-
3 garlic cloves, minced: Garlic adds an aromatic base that’s essential for depth of flavor. If you’re not a fan of raw garlic, roasted garlic offers a milder, sweeter profile.
-
1 tablespoon dried oregano: Oregano is a beloved herb in Greek cuisine. If you have fresh oregano, it’s even better – use about three times the amount as it loses potency when dried.
-
1 teaspoon salt: Essential for flavor enhancement. Remember, you can always add more, but it’s hard to remove it, so start small!
-
1/2 teaspoon black pepper: Freshly cracked black pepper elevates the overall flavor. If you want some heat, consider adding a pinch of cayenne or red pepper flakes.
-
Optional: 1/2 teaspoon ground cumin: Cumin adds a warm, earthy note that takes the flavors to another level. It can be skipped if you prefer a more traditional Greek flavor.
Let’s move on to the fun part: cooking these tasty tenders!
Step-by-Step Instructions
-
Prepare the Marinade: In a medium mixing bowl, combine the Greek yogurt, olive oil, lemon juice, lemon zest, minced garlic, dried oregano, salt, black pepper, and optional cumin. Give it a good whisk until all the ingredients are well incorporated. This is where the magic happens; the yogurt is going to tenderize the chicken and infuse it with flavor. It’s best to let the mixture sit for about 5-10 minutes to allow the flavors to meld.
-
Marinate the Chicken: In the same bowl or a large Ziploc bag, add your chicken tenders. Make sure they’re well-coated in that luscious marinade. If you have some time, let them marinate in the fridge for at least 30 minutes, or even overnight if you can plan ahead. The longer they sit, the more flavorful they’ll become.
-
Preheat Your Grill or Oven: If you’re using a grill, preheat it to medium-high heat. For oven cooking, preheat your oven to 400°F (200°C). The choice is yours, but grilling adds that fantastic smoky flavor!
-
Cook the Chicken: If you’re grilling, place the chicken tenders directly on the grill. Cook for about 5-7 minutes on each side until they are cooked through and have nice grill marks. If you’re using the oven, arrange the chicken on a baking sheet lined with parchment paper. Bake for 20-25 minutes or until they reach an internal temperature of 165°F (75°C).
-
Rest Before Serving: Once cooked, let the chicken tenders rest for 5 minutes. This step is crucial for juicy chicken as it allows the juices to redistribute throughout the meat. Trust me, it’s worth the wait!
-
Make Your Sauce: While the chicken is resting, you can whip up a quick dipping sauce or dressing. Simply mix some more Greek yogurt with a dash of lemon and a sprinkle of fresh herbs like dill or parsley. This light sauce is a perfect complement to the flavors of the chicken.
And voila! You’ve mastered the Greek Chicken Tenders.
Serving Suggestions
For a gorgeous presentation, serve the chicken tenders on a rustic wooden board or a white platter. Drizzle with your yogurt sauce and sprinkle with fresh herbs for a pop of color. Pair them with a light Greek salad with cucumbers, tomatoes, and feta, and you have a meal that looks as good as it tastes. For a heartier meal, serve over a bed of couscous or alongside roasted potatoes.
Recipe Variations
These Greek Chicken Tenders can easily be tweaked to suit your palate or dietary needs:
-
Herb-Infused: Swap in fresh herbs like thyme or rosemary for a different aromatic experience.
-
Spicy Kick: Add chopped jalapeños or crushed red pepper to the marinade if you enjoy a bit of heat.
-
Citrus Blend: Experiment with lime or orange zest and juice for a brighter flavor profile.
-
Vegan Option: Substitute chicken for tofu or tempeh, and use a dairy-free yogurt to make a plant-based version.
-
Skewered Delight: Thread the marinated chicken onto skewers with peppers and onions for a fun, grilled platter.
Chef’s Notes
As I mentioned earlier, cooking is all about love and sharing – and these Greek Chicken Tenders embody that. Over the years, I’ve experimented with this recipe flight of flavors, initially sticking to the classics and then growing bolder with additional spices and ingredients. I once hosted a friend’s birthday, and let’s just say we had a little too much “help” from a bottle of wine while preparing the marinade. It resulted in the most delicious “oops” moment when I accidentally added too much lemon juice! Despite that, the guests raved about a ‘new twist’ on my recipe. Lesson learned: embrace the accidents; they may lead to delicious discoveries!
FAQs and Troubleshooting
Q1: My chicken is dry; what did I do wrong?
A: One common mistake is overcooking the chicken. Always check the internal temperature with a meat thermometer. Remove it from heat as soon as it reaches 165°F (75°C).
Q2: Can I marinate the chicken longer than overnight?
A: You can, but be cautious! Recipes with acidic marinades can break down the chicken’s texture if left too long. Stick to 12-24 hours for the best results.
Q3: Can I use chicken thighs instead of tenders?
A: Absolutely! Chicken thighs will offer a richer flavor. Just keep in mind they may take a little longer to cook through.
Q4: How can I store leftovers?
A: Store any leftovers in an airtight container in the fridge for up to 3 days. You can enjoy them cold on a salad or reheated gently for another delicious meal!
Nutritional Info (if applicable)
While I won’t delve into exhaustive nutritional details here, it’s important to know that these Greek Chicken Tenders are a healthy, protein-packed option, thanks to the chicken and Greek yogurt. You can easily customize the recipe based on your dietary needs and make it your own!
There you have it! Your guide to creating unforgettable Greek Chicken Tenders that will surely impress. Thank you for joining me today, and happy cooking! I can’t wait to hear how your culinary adventures unfold. Don’t forget to share your creations and any adaptations you make; I love connecting with fellow foodies!
PrintFlavorful Greek Chicken Tenders

Juicy chicken tenders marinated in a tangy, herby blend, paired with a creamy Greek yogurt sauce for a delicious Mediterranean meal.
- Prep Time: 10 minutes
- Cook Time: 30 minutes
- Total Time: 40 minutes
- Yield: 4 servings 1x
- Category: Main Course
- Method: Grilling or Baking
- Cuisine: Greek
- Diet: Gluten-Free
Ingredients
- 1.5 lbs chicken tenders
- 1/2 cup plain Greek yogurt
- 3 tablespoons olive oil
- 2 tablespoons fresh lemon juice
- 2 teaspoons lemon zest
- 3 garlic cloves, minced
- 1 tablespoon dried oregano
- 1 teaspoon salt
- 1/2 teaspoon black pepper
- Optional: 1/2 teaspoon ground cumin
Instructions
- Prepare the Marinade: In a medium mixing bowl, combine the Greek yogurt, olive oil, lemon juice, lemon zest, minced garlic, dried oregano, salt, black pepper, and optional cumin. Whisk until well incorporated.
- Marinate the Chicken: Add your chicken tenders to the marinade and ensure they are well-coated. Marinate in the fridge for at least 30 minutes or overnight.
- Preheat Your Grill or Oven: Preheat the grill to medium-high heat or the oven to 400°F (200°C).
- Cook the Chicken: Grill for 5-7 minutes on each side or bake for 20-25 minutes until cooked through at an internal temperature of 165°F (75°C).
- Rest Before Serving: Let the chicken rest for 5 minutes before serving.
- Make Your Sauce: Mix Greek yogurt with a dash of lemon and fresh herbs for dipping.
Notes
For a lovely presentation, serve on a wooden board or white platter. Pair with a Greek salad or roasted potatoes for a complete meal.
Nutrition
- Serving Size: 1 serving
- Calories: 350
- Sugar: 5g
- Sodium: 400mg
- Fat: 12g
- Saturated Fat: 4g
- Unsaturated Fat: 6g
- Trans Fat: 0g
- Carbohydrates: 45g
- Fiber: 3g
- Protein: 15g
- Cholesterol: 30mg
Keywords: Greek chicken tenders, Mediterranean chicken recipe, healthy chicken tenders

Sausage Egg Breakfast Roll-Ups – Quick & Easy Morning Treat! – mommyplates
# Sausage Egg Breakfast Roll-Ups: Quick & Easy Morning Treat!

## Introduction

Good morning, breakfast lovers! 🌞 If you're like me, you know that breakfast is the most important meal of the day—it's your opportunity to kickstart your energy and fuel your body for whatever adventures await. But let’s face it: some mornings can be hectic. That’s where my **Sausage Egg Breakfast Roll-Ups** swoop in like a delicious superhero to save the day!

These delightful roll-ups are a breakfast game-changer. Not only are they incredibly easy to whip up, but they also bring that warm, comforting feeling without demanding hours of your time. Picture this: flaky crescent dough wrapped around fluffy scrambled eggs and savory sausage, all topped off with a sprinkle of cheese. What's not to love? It's like a cozy hug on a plate!

Whenever I make these roll-ups, I’m transported back to lazy Sundays spent with family, everyone gathered around the table, laughing and enjoying the day ahead. It’s a memory that's etched in my heart, where food brought us all together. And the best part? You can customize these delicious bites to fit your family’s tastes and dietary needs.

Whether you’re a busy parent, a college student looking for a quick breakfast, or simply someone who loves food that feels as good as it tastes, these roll-ups are for you! So, grab your apron and let’s get rolling with this easy, fun breakfast treat that promises to add a sprinkle of joy to your morning routine.

## Personal Story

As a child, the smell of breakfast wafting through the house was a sure sign that the day was about to get a whole lot better. I can still picture my dad in the kitchen, flipping pancakes like a pro while simultaneously tending to the sizzling sausage links on the stovetop. Those aromas combined created an early-morning symphony that not only delicately teased my stomach but also tugged at my heartstrings.

One morning, he decided to take breakfast up a notch by introducing us to sausage and eggs rolled up in warm, flaky crescent rolls. We all gathered around the table, each taking a turn to fill and roll our own breakfast bundles. The laughter, creativity, and delightful mess we made that day feels like yesterday. It ignited my passion for making meals a joyful experience, not just a way to fuel our bodies.

Now, whenever I make these roll-ups, it’s a little flashback to those carefree mornings spent sharing food and stories. I hope this recipe brings the same warmth and nostalgia to your kitchen as it does to mine.

## Ingredients

To make your own **Sausage Egg Breakfast Roll-Ups**, gather the following ingredients:

- **1 package of crescent roll dough**
  *This is the base of our roll-ups and gives them that flaky texture we all adore. You can easily substitute with puff pastry if that's what you have on hand.*

- **2 cooked sausage links, crumbled**
  *I recommend using your favorite type—whether that’s pork, turkey, or a plant-based alternative. Always check your local butcher for fresh options!*

- **2 large eggs, scrambled**
  *Fresh eggs are best for fluffiness, but you can use egg whites or a flaxseed mix (2.5 tablespoons of water mixed with 1 tablespoon of ground flaxseed) for a vegan option.*

- **Shredded cheese (optional)**
  *Cheddar, mozzarella, or pepper jack add a lovely richness. Feel free to skip the cheese for a lighter option or swap it for a dairy-free cheese alternative.*

## Step-by-Step Instructions

1. **Preheat Your Oven**
   Preheat your oven to 375°F (190°C) to ensure your roll-ups bake evenly and come out golden brown.

2. **Prepare Your Crescent Roll Dough**
   Open the package of crescent roll dough. Carefully unroll the dough, keeping it intact as much as possible. You’ll notice perforated triangles; that’s perfect for your individual servings!

3. **Scramble the Eggs**
   In a bowl, crack the eggs and whisk until fully blended. Heat a non-stick skillet over medium heat, add a splash of oil or a pat of butter, and scramble those eggs. Aim for soft, fluffy results—remember, they’ll continue to cook in the oven.

4. **Crumble the Sausage**
   If not using pre-crumbled sausage, take your cooked sausage links and chop or crumble them into bite-sized pieces. You want each roll-up to have a good amount of sausage without overpowering the eggs.

5. **Assemble the Roll-Ups**
   On each triangle of crescent dough, place a tablespoon or so of scrambled eggs, a generous sprinkle of crumbled sausage, and a dash of cheese if using. Roll the dough from the wide end to the pointy end and pinch the edges to seal.

6. **Bake Until Golden**
   Place your assembled roll-ups on a baking sheet lined with parchment paper. Bake for 10-12 minutes or until they’re wonderfully golden and flaky. The kitchen will smell divine!

7. **Cool & Serve**
   Allow them to cool for a few minutes—trust me, they’ll be super hot coming out of the oven! Then serve them as-is, or garnish with chopped fresh herbs like chives or parsley for an elevated touch.

## Serving Suggestions

I love to serve these roll-ups with a side of fresh fruit or a light salad for a balanced meal. For a special touch, you can drizzle a little sriracha or your favorite hot sauce on top! Arrange the roll-ups on a beautiful platter with a few sprigs of fresh herbs to elevate your presentation further. Not only will your guests feel pampered, but you’ll also impress them with your culinary flair!

## Recipe Variations

1. **Veggie Twist**: Add in sautéed bell peppers, onions, or spinach to the egg mixture to sneak in some extra veggies.
2. **Spicy Kick**: Incorporate diced jalapeños or hot sausage for those who love a bit of heat.
3. **Herby Delight**: Infuse your scrambled eggs with fresh herbs like dill or basil for an aromatic twist.
4. **Savory Sweet**: Swap the sausage for crumbled bacon and drizzle a little maple syrup over the top before serving.
5. **Cheesy Goodness**: Experiment with different cheese blends, or mix a little cream cheese into your scrambled eggs for ultra creaminess.

## Chef’s Notes

I often find that the best recipes evolve through trial and error, and these Sausage Egg Breakfast Roll-Ups are no exception! I first started making them with whatever leftover ingredients I had, and over time, they became a staple in my breakfast rotation. Some days, I’ll swap the eggs for a delightful tofu scramble for a heart-healthy option. The beauty of this recipe is in its versatility—don’t hesitate to play around and make it yours!

Oh, and a little kitchen tip: always keep an eye on the roll-ups while they bake. They can transition from perfectly golden to golden-brown in the blink of an eye! Nothing ruins a lovely breakfast like burnt edges!

## FAQs and Troubleshooting

**1. What if my crescent dough tears?**
Don't worry! Simply pinch the ends together gently to seal it up. The dough is forgiving!

**2. Can I make these ahead of time?**
Absolutely! Prepare the roll-ups, then refrigerate them for up to 24 hours before baking. Just add a couple of extra minutes to the baking time.

**3. My eggs turned out rubbery. What happened?**
Overcooking the eggs can lead to a rubbery texture. Opt for medium-low heat and cook them just until set. They'll finish cooking in the oven.

**4. Help! My roll-ups are leaking!**
Make sure to pinched the dough seams tight! If the filling is too generous, reduce the amount slightly. A little filling is delicious but too much can cause leaks.

## Nutritional Info (Optional)

While I always encourage enjoying these roll-ups without guilt, here's a rough nutritional estimate per roll-up (considering 8 servings):

- **Calories**: 160
- **Protein**: 7g
- **Carbs**: 12g
- **Fat**: 10g

Feel free to adapt ingredients based on your health goals or dietary needs!

---

Cooking should always be an experience filled with joy and flavor, and I hope you enjoy making these **Sausage Egg Breakfast Roll-Ups** as much as I do! Whether whipping them up for a busy school morning or a relaxed weekend brunch, rest assured they are sure to impress and satisfy. So tie on your apron, let your creativity flow, and get ready to savor every delightful bite. Happy cooking, friends!
Sausage Egg Breakfast Roll-Ups

Quick and easy breakfast roll-ups featuring flaky crescent dough, scrambled eggs, and crumbled sausage.
- Prep Time: 15 minutes
- Cook Time: 12 minutes
- Total Time: 27 minutes
- Yield: 8 servings 1x
- Category: Breakfast
- Method: Baking
- Cuisine: American
- Diet: Omnivore
Ingredients
- 1 package of crescent roll dough
- 2 cooked sausage links, crumbled
- 2 large eggs, scrambled
- Shredded cheese (optional)
Instructions
- Preheat your oven to 375°F (190°C).
- Prepare your crescent roll dough by unrolling it carefully.
- Scramble the eggs in a skillet until soft and fluffy.
- Crumble the sausage into bite-sized pieces.
- Assemble the roll-ups with eggs, sausage, and cheese on the crescent dough.
- Bake for 10-12 minutes until golden brown.
- Cool for a few minutes before serving.
Notes
Feel free to customize with veggies, different cheeses, or other ingredients according to your taste.
Nutrition
- Serving Size: 1 roll-up
- Calories: 160
- Sugar: 1g
- Sodium: 500mg
- Fat: 10g
- Saturated Fat: 4g
- Unsaturated Fat: 4g
- Trans Fat: 0g
- Carbohydrates: 12g
- Fiber: 0g
- Protein: 7g
- Cholesterol: 100mg
Keywords: breakfast, roll-ups, sausage, eggs, quick recipes, easy breakfast

Chicken Bacon Wraps
# Irresistible Chicken Bacon Wraps: Your New Go-To Recipe

## Introduction

Hello, culinary adventurers! Today, I’m thrilled to share a recipe that’s not only delicious but also brings an element of comfort to the table: **Chicken Bacon Wraps**. Imagine tender chicken enveloped in savory bacon, a creamy layer of cheese, and a burst of freshness from veggies. It’s a dish that brings smiles, sparks conversation, and—dare I say—it might just become a staple in your recipe repertoire!

I remember the first time I whipped up these wraps for a cozy gathering with friends. The kitchen was filled with delightful aromas, and the laughter that flowed was as plentiful as the food on the table. I had decided to make them on a whim, using whatever ingredients I had on hand. They turned out so scrumptious that I knew I was onto something special. The beauty of Chicken Bacon Wraps is they strike the perfect balance between indulgent and approachable; they're a celebration of flavors and textures that will leave your guests wanting more.

Whether you’re hosting a casual dinner or simply want to elevate your weeknight meal, this recipe is here for you. So, tie on that apron, pour yourself a lovely glass of something refreshing, and let’s get cooking!

---

## Personal Story

One of my fondest kitchen memories revolves around these Chicken Bacon Wraps. It was a crisp autumn evening, and I had invited my closest friends over for a cozy dinner party. The mood was electrified by fragrant candles and a hint of pumpkin spice in the air, setting the perfect backdrop for connection.

I rummaged through my fridge and, realizing I had chicken, bacon, and all the good stuff, I decided to create something delightful. As I crafted these wraps, my friends mingled in the living room, laughter underscoring the clinking of glasses. When it came time to serve the Chicken Bacon Wraps, you could see the intrigue on their faces; they practically devoured them! Seeing the joy on their faces as they took their first bites made every minute spent in the kitchen worthwhile. Those wraps became a staple at our gatherings, a symbol of friendship and fond memories—all created around a table filled with delicious food.

---

## Ingredients

Let’s gather all the good stuff! Here are the ingredients you’ll need to create these mouthwatering Chicken Bacon Wraps, including some tips and tricks along the way:

- **Chicken Breasts (2-3, boneless and skinless)**
  The star of the show! Aim for organic or free-range chicken for the best flavor. If you’re short on chicken breasts, feel free to use thighs for a juicier bite.

- **Bacon (6-8 strips)**
  Ah, bacon! It adds a delicious crunch and savory smokiness. For a healthier twist, turkey bacon is a great substitute, though it may not crisp up as much.

- **Cream Cheese (4 oz, softened)**
  This creamy goodness adds a rich texture and flavor. You can use herbed cream cheese for an extra flavor punch or even Greek yogurt if you're looking for a lighter option.

- **Cheddar Cheese (1 cup, shredded)**
  A classic pairing that melts beautifully. If you prefer a sharper taste, use aged cheddar, or mix it up with pepper jack for a spicy kick!

- **Spinach or Lettuce (1 cup, chopped)**
  Adding greens brings some freshness and color! Swap spinach for arugula for peppery notes, or go with romaine for a nice crunch.

- **Salt and Pepper (to taste)**
  Always season to your preference! Feel free to explore spicier seasonings like paprika or garlic powder for an added depth of flavor.

---

## Step-by-Step Instructions

Let’s get down to it! Follow these steps to make your Chicken Bacon Wraps:

1. **Preparation Time**
   Begin by preheating your oven to 400°F (200°C). This ensures that the bacon crisps up perfectly while the chicken cooks through nicely—my golden rule of oven culinary magic!

2. **Pound the Chicken**
   Place your chicken breasts between two sheets of plastic wrap or parchment paper. Using a meat mallet or rolling pin, gently pound them to an even thickness of about 1 inch. This ensures even cooking, and it’s a wonderful stress reliever—give it a little extra “love” if you need to!

3. **Season the Chicken**
   Season both sides of the chicken breasts with salt and pepper. Don’t be shy—this chicken will be the canvas for all that yummy flavor. If you like, sprinkle on any spices that you fancy!

4. **Spread the Cream Cheese**
   In a small bowl, soften the cream cheese in the microwave for about 15 seconds until spreadable. Add in some herbs or spices if you’re feeling creative! Now, spread a generous layer on one side of each chicken breast, followed by a sprinkle of shredded cheddar cheese.

5. **Add Spinach and Bacon**
   Top the cheese with a layer of chopped spinach or lettuce. Now, here comes the smoky goodness! Lay 2-3 strips of bacon over the greens. The bacon adds flavor and essential moisture to your wraps. It’s a game changer—trust me!

6. **Roll It Up**
   Carefully roll the chicken tightly, starting from the edge with the cream cheese. Tuck in the sides as you go to keep the filling in. Secure them with toothpicks or wrap them tightly in kitchen twine for that fancy flair!

7. **Wrap with Bacon**
   Here’s where it gets savory! Wrap additional bacon strips around each chicken roll, ensuring they’re well covered. Secure with toothpicks if necessary, so they maintain their shape while baking.

8. **Bake to Perfection**
   Place the wrapped chicken in a greased baking dish. Bake in your preheated oven for about 25-30 minutes or until the chicken reaches an internal temperature of 165°F (74°C). The bacon should be perfectly crispy. Check halfway through: if bacon is getting too crispy, shield it with aluminum foil!

9. **Rest and Slice**
   Once baked, let the chicken rest for about 5 minutes before slicing. This helps retain those juicy flavors. Serve whole or slice to showcase all that deliciousness inside.

---

## Serving Suggestions

To plate your Chicken Bacon Wraps, arrange them artfully on a rustic wooden board or a lovely white platter for that elegant contrast. Drizzle a tangy dipping sauce like ranch or honey mustard for an added punch! You can garnish with freshly chopped herbs or a sprinkle of cracked pepper. Serve these wraps alongside a simple salad or roasted veggies for a complete meal that looks as stunning as it tastes.

---

## Recipe Variations

Feeling adventurous? Here are some tasty twists to personalize your Chicken Bacon Wraps:

- **Spicy Kick**: Add jalapeños or Sriracha to the cream cheese for an extra spicy layer.
- **Mediterranean Delight**: Include feta cheese and sun-dried tomatoes instead of cheddar for a Mediterranean flair.
- **BBQ Bliss**: Brush BBQ sauce over the chicken before rolling for a smoky, tangy finish!
- **Vegetarian Version**: Swap chicken for thick slices of eggplant or tofu that have been marinated and grilled.
- **Sweet & Savory**: Add a layer of apricot or peach preserves beneath the cream cheese for a sweet contrast!

---

## Chef’s Notes

As I reminisce about the evolution of these Chicken Bacon Wraps, I can’t help but smile. There have been countless iterations, ranging from spicy to sweet. Each time I make them, I tweak ingredients and experiment with different flavors. Food is all about creativity, and I encourage you to embrace the process! The best recipes come from a space of joy and discovery. And remember, if you have leftovers (which is rare!), they make for a killer lunch the next day!

---

## FAQs and Troubleshooting

### Q: Why is my bacon not crispy?
A: If your bacon isn’t crisping up, it could be because the chicken was rolled too tightly. Allow some space for the bacon to cook. You can always broil the wraps for a minute or two at the end for extra crispiness.

### Q: Can I make these wraps ahead of time?
A: Absolutely! You can prepare and assemble the wraps, refrigerate them, and bake when ready. Just increase the cooking time slightly if they’re cold from the fridge.

### Q: What’s the best way to store leftovers?
A: Store any leftovers in an airtight container in the refrigerator for up to 3 days. Reheat in the oven at 350°F until warmed through for the best results!

### Q: Can I freeze these wraps?
A: Yes! Assemble, wrap tightly in foil and plastic wrap, and freeze. When ready to enjoy, bake from frozen, adding extra time until fully cooked.

---

## Nutritional Info

While I’m not a nutritionist, a single serving of these Chicken Bacon Wraps generally contains a hearty dose of protein, healthy fats, and essential vitamins from the greens. Enjoy in moderation as a part of a balanced diet.

---

There you have it! Delicious, crowd-pleasing Chicken Bacon Wraps that will undoubtedly become a cherished recipe in your kitchen. I can’t wait for you all to try these, make them your own, and create memories just like I did. Happy cooking, friends!
Irresistible Chicken Bacon Wraps

Delicious Chicken Bacon Wraps featuring tender chicken, crispy bacon, creamy cheese, and fresh veggies.
- Prep Time: 15 minutes
- Cook Time: 30 minutes
- Total Time: 45 minutes
- Yield: 4 servings 1x
- Category: Main Course
- Method: Baking
- Cuisine: American
- Diet: Paleo
Ingredients
- 2–3 boneless, skinless Chicken Breasts
- 6–8 strips of Bacon
- 4 oz Cream Cheese, softened
- 1 cup Cheddar Cheese, shredded
- 1 cup Spinach or Lettuce, chopped
- Salt and Pepper, to taste
Instructions
- Preheat your oven to 400°F (200°C).
- Place your chicken breasts between two sheets of plastic wrap or parchment paper and pound to an even thickness.
- Season both sides of the chicken breasts with salt and pepper.
- In a small bowl, soften the cream cheese in the microwave and spread it on one side of each chicken breast.
- Add a layer of chopped spinach or lettuce over the cheese, then 2-3 strips of bacon.
- Roll the chicken tightly starting from the edge with the cream cheese, tucking in the sides.
- Wrap each roll with additional bacon strips and secure with toothpicks.
- Place in a greased baking dish and bake for 25-30 minutes or until the chicken is cooked through.
- Let rest for 5 minutes before slicing.
Notes
Try adding jalapeños for a spicy kick or feta cheese for a Mediterranean twist!
Nutrition
- Serving Size: 1 wrap
- Calories: 400
- Sugar: 2g
- Sodium: 600mg
- Fat: 28g
- Saturated Fat: 10g
- Unsaturated Fat: 13g
- Trans Fat: 0g
- Carbohydrates: 3g
- Fiber: 1g
- Protein: 30g
- Cholesterol: 90mg
Keywords: chicken, bacon, wraps, easy dinner, comfort food
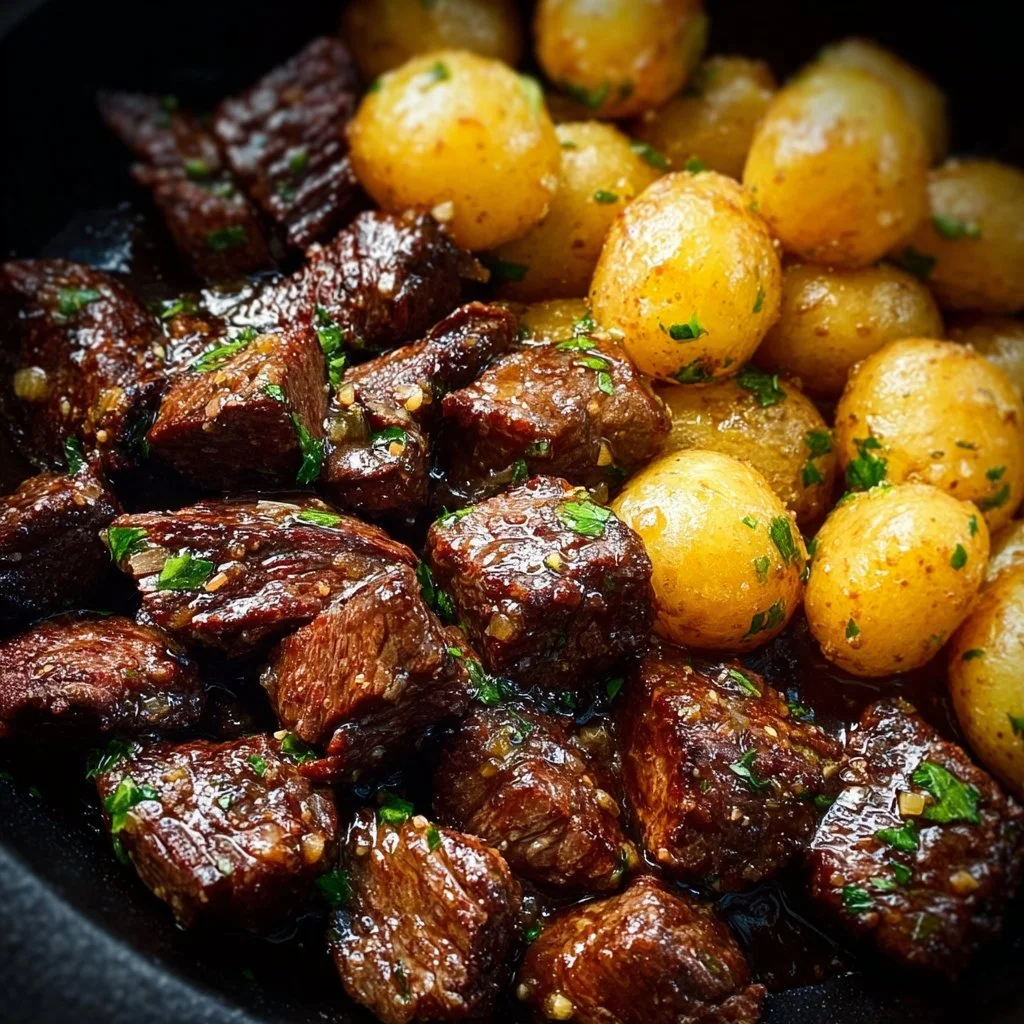
Garlic Butter Beef Bites with Potatoes
# Garlic Butter Beef Bites with Potatoes: An Irresistible Comfort Dish

## Introduction

Hello, fellow foodies! Today, we're whipping up something that’s sure to warm your heart and satisfy your taste buds: **Garlic Butter Beef Bites with Potatoes**. This dish combines tender beef, golden baby potatoes, and a heavenly garlic butter sauce that will have everyone coming back for seconds. Trust me, it’s the kind of dish you’ll want to make on a cozy night in or when friends are gathered around your table.

Let’s face it—who doesn’t love a plate filled with flavorful bite-sized beef, buttery potatoes, and the aroma of garlic wafting through the kitchen? This recipe is the epitome of comfort food and easy elegance, perfect for any occasion. Whether you’re hosting a casual dinner or enjoying a cozy night at home, these beef bites are the perfect companion.

In my kitchen, they hold a special place because of their simplicity and the absolute joy they bring. Picture yourself plating these irresistible pieces of beef alongside those little potatoes and drenching them in that glorious garlic butter sauce—it's a feast for the eyes and the palate. Ready? Grab your apron, and let's dive into this flavorful adventure!

## Personal Story

I have so many fond cooking memories that revolve around family gatherings, but one stands out vividly. Growing up, my family had a tradition of Sunday dinners where everyone would pitch in to help prepare the meal. One evening, my father decided to make a beef stew, but little did we know that he had something special up his sleeve. With a hefty dose of garlic butter and some fresh herbs, he transformed a simple stew into a dish that still makes my mouth water to this day!

Those Sunday dinners became a joyful cacophony of laughter and chatter, with us all battling for a taste of Dad's delicious creation. Now, years later, I remember those moments when I prepare my garlic butter beef bites and Baby potatoes. I can still hear the clinking of plates, the chatter around the table, and my father’s proud smile as we devoured his handiwork. It’s these love-filled memories that inspire me to create recipes you can share with your loved ones.

## Ingredients

Let’s chat about the ingredients you’ll need for these heavenly Garlic Butter Beef Bites with Potatoes:

- **2 pounds beef stew meat**
  Tender and flavorful, this cut of meat is perfect for searing and soaking up that garlic butter. If you’re looking for a substitution, you can use sirloin or chuck roast cut into bite-sized pieces.

- **1 pound baby potatoes, halved**
  These little gems are not only cute but cook quickly and are fantastic for soaking up the garlic butter sauce. If you can't find baby potatoes, feel free to use diced regular potatoes; just adjust the cooking time.

- **1/2 cup unsalted butter**
  The star of our dish! Unsalted allows you to control the seasoning. Don’t worry; you can use salted butter as well, just reduce the added salt in the recipe.

- **4 cloves garlic, minced**
  Fresh garlic adds a punch of flavor. If you’re in a pinch, you can use pre-minced garlic, but fresh is always best!

- **1 teaspoon salt**
  Seasoning is key! Adjust according to your taste preference, particularly if you're using salted butter.

- **1/2 teaspoon black pepper**
  A little background heat perfectly complements the richness of the butter.

- **1 teaspoon dried thyme**
  Earthy thyme pairs beautifully with beef. You can also use fresh thyme if you have it on hand—just double the amount!

- **1 teaspoon dried rosemary**
  Another herb that boosts this dish’s flavor. Substitute with fresh if you prefer!

- **1/4 cup fresh parsley, chopped (for garnish)**
  Fresh parsley adds a beautiful pop of color and brightness to our dish. Feel free to swap it out for other herbs like chives or cilantro if you’re feeling adventurous!

---

With these ingredients in hand, you’re just a few steps away from a delicious home-cooked meal that will impress everyone at your table!

## Step-by-Step Instructions

Cooking these delightful Garlic Butter Beef Bites is as easy as 1-2-3! Follow along for the detailed steps:

1. **Prep the Beef**:
   Begin by cutting your beef stew meat into 1-inch cubes (if not already pre-cut). This will allow for even cooking and easy serving. Season generously with salt and black pepper. Don’t skip this step—seasoning the meat before it hits the heat can significantly enhance the flavor!

2. **Sear the Beef**:
   In a large skillet or pot, melt 1/4 cup of your unsalted butter over medium-high heat. Once the butter is melted and slightly foamy, add the beef in batches. Sear each side until nicely browned, about 3-4 minutes. Avoid overcrowding the pan, as this can prevent the beef from browning properly. If you have to work in batches, just keep the seared beef warm on a plate while you cook the rest.

3. **Cook the Potatoes**:
   Once all your beef is browned, add the halved baby potatoes to the same skillet. They will soak up all those delicious meat drippings! Stir them around for a couple of minutes until they get a nice glisten from the butter. This step is crucial for flavor development!

4. **Garlic Time**:
   Time for the star of the show—add the minced garlic, dried thyme, and dried rosemary to the skillet. Stir everything together and let the garlic cook for about 30 seconds until fragrant. Be careful not to burn the garlic, as this can lead to a bitter taste.

5. **Simmer & Soften**:
   Pour in a cup of water (or beef broth for extra flavor) and cover the skillet. Lower the heat to medium-low and let everything simmer for about 15-20 minutes until the potatoes are fork-tender. This step allows the flavors to meld beautifully.

6. **Finishing Touches**:
   Once the potatoes are soft, taste for seasoning. Feel free to add more salt and pepper if necessary. Toss the whole mixture around, so everything is well incorporated. If you want an extra hit of richness, add the remaining 1/4 cup of butter. Trust me; you’ll thank me later!

7. **Garnish & Serve**:
   Lastly, sprinkle your fresh parsley on top and give a gentle toss to incorporate it. Your dish is now ready to be served—look at that glorious sheen, inviting aromas and vibrant colors!

## Serving Suggestions

Now that your Garlic Butter Beef Bites with Potatoes is ready, let’s talk about how to plate it up! I recommend serving this dish family-style, straight from the skillet. This not only promotes a warm and inviting atmosphere but also encourages everyone to dig in and help themselves. For an elevated touch, use a beautiful wooden serving platter with a sprinkle of parsley for a pop of color. Pair it with a crisp green salad or some crusty bread to soak up the extra garlic butter sauce—heavenly!

## Recipe Variations

Get creative! Here are some fun twists on this classic recipe:

- **Spicy Garlic Butter**: Add some red pepper flakes to the garlic butter for a spicy kick.

- **Herb-Infused**: Use fresh herbs—such as thyme, rosemary, and oregano—instead of dried for a more vibrant flavor.

- **Savory Add-Ins**: Toss in some diced bell peppers or mushrooms along with the potatoes for added texture and flavor.

- **Creamy Version**: Drizzle some heavy cream into the sauce at the end for a creamy garlic butter sauce that’s irresistible.

- **Gluten-Free Option**: Simply ensure your broth is gluten-free, and you're good to go!

## Chef’s Notes

This recipe has come a long way for me and has evolved over the years. I remember the first time I made it—I used a pre-packaged sauce that made things a whole lot easier but lacked that homemade touch. With each attempt, I began to play around with flavors and techniques, leading to the delicious garlic butter sauce we have today.

Funny story: One time, I was so excited to cook this for friends that I didn’t notice I had added three tablespoons of garlic instead of just four cloves! We had a good laugh, and surprisingly, they loved it! So remember, cooking is an adventure. Trust your instincts, and don’t be afraid to make a few mistakes along the way!

## FAQs and Troubleshooting

1. **What if my beef is tough?**
   If your beef doesn’t seem tender, it may need more time to simmer. Just cover it and let it cook longer on low heat!

2. **Can I use frozen beef?**
   Yes! Just thaw it properly and ensure to sear it well when cooking.

3. **How do I know when the potatoes are done?**
   Simply puncture a potato with a fork. If it goes in easily, they’re done!

4. **Can I prep this ahead of time?**
   While I recommend enjoying this dish fresh, you can certainly chop your ingredients earlier in the day or the night before for less stress when dinner rolls around.

## Nutritional Info

(If applicable) Each serving of Garlic Butter Beef Bites with Potatoes contains approximately:

- Calories: 450
- Protein: 35g
- Carbohydrates: 30g
- Fat: 25g

Remember, these numbers may vary depending on the specific brands and quantities you use!

---

Cooking should be joyful and filled with love! I hope you enjoy making— and most importantly, sharing— these Garlic Butter Beef Bites with Potatoes. Tie on that apron, gather your loved ones, and let’s create something timeless together. Happy cooking!
Garlic Butter Beef Bites with Potatoes

Tender beef bites and golden baby potatoes bathed in a rich garlic butter sauce, perfect for a cozy dinner.
- Prep Time: 15 minutes
- Cook Time: 30 minutes
- Total Time: 45 minutes
- Yield: 4 servings 1x
- Category: Main Course
- Method: Searing
- Cuisine: American
- Diet: None
Ingredients
- 2 pounds beef stew meat
- 1 pound baby potatoes, halved
- 1/2 cup unsalted butter
- 4 cloves garlic, minced
- 1 teaspoon salt
- 1/2 teaspoon black pepper
- 1 teaspoon dried thyme
- 1 teaspoon dried rosemary
- 1/4 cup fresh parsley, chopped (for garnish)
Instructions
- Prep the beef: Begin by cutting your beef stew meat into 1-inch cubes (if not already pre-cut). Season generously with salt and black pepper.
- Sear the beef: In a large skillet, melt 1/4 cup of unsalted butter over medium-high heat. Add the beef in batches and sear each side until nicely browned, about 3-4 minutes.
- Cook the potatoes: Once all your beef is browned, add the halved baby potatoes to the same skillet and stir for a couple of minutes until they glisten.
- Add garlic: Add the minced garlic, dried thyme, and dried rosemary to the skillet. Stir and let the garlic cook for about 30 seconds.
- Simmer: Pour in a cup of water (or beef broth) and cover. Lower the heat to medium-low and let simmer for about 15-20 minutes until the potatoes are tender.
- Finish: Taste for seasoning and add more salt and pepper if necessary. If desired, add the remaining 1/4 cup of butter for extra richness.
- Garnish: Sprinkle the fresh parsley on top, toss gently, and serve.
Notes
Serve family-style directly from the skillet for an inviting experience. Pair with a crisp green salad or crusty bread.
Nutrition
- Serving Size: 1 serving
- Calories: 450
- Sugar: 2g
- Sodium: 800mg
- Fat: 25g
- Saturated Fat: 10g
- Unsaturated Fat: 10g
- Trans Fat: 0g
- Carbohydrates: 30g
- Fiber: 4g
- Protein: 35g
- Cholesterol: 100mg
Keywords: beef, garlic, potatoes, comfort food, hearty meal