
Chocolate Covered Strawberries
Chocolate Covered Strawberries: A Sweet Treat with Heart
Hello, my fellow food lovers! It’s Savannah here, and today we’re diving into a delectable treat that perfectly balances elegance and simplicity: chocolate covered strawberries. These little delights are not just a feast for the eyes but also for the palate, with their luscious chocolate coating and sweet, juicy strawberries. Whether you’re preparing for a special occasion, planning a romantic evening in, or simply looking for a fun and easy treat to whip up, chocolate covered strawberries are always a hit!
A Sweet Memory
Growing up, my summers were filled with the joy of berry picking at my family’s favorite local farm. The sun would shine down on us as we wandered through rows of vibrant strawberries, their scent filling the air. Once we had gathered a basket full of the ripest berries, we would rush home in anticipation, our hands stained red from the fruit. My mom would melt chocolate on the stove, filling the kitchen with a warm, sweet aroma that was simply irresistible.
Together, we would dip each strawberry into the silky chocolate, letting the excess drip off, and carefully place them on a baking sheet lined with parchment paper. As we waited for them to set in the fridge, we whispered about our favorite toppings— chopped nuts, sprinkles, or coconut flakes. Those moments were more than just about cooking; they were about bonding, laughter, and creating sweet memories that I cherish to this day. So let’s recreate that nostalgia together, shall we?
Ingredients
Here’s what you’ll need to make these delightful treats:
-
Fresh Strawberries: Select ripe, firm strawberries with bright green leaves. Opt for organic if possible for the best flavor. If strawberries aren’t in season, you can also experiment with other berries!
-
Chocolate: Use high-quality chocolate for melting. You can choose bittersweet, semisweet, or even white chocolate. For a healthier option, you could use dark chocolate with high cocoa content.
-
Optional Toppings: Get creative! Consider crushed nuts, sprinkles, coconut flakes, or even sea salt for a gourmet touch.
Chef Insight:
When choosing chocolate, 60-70% cocoa content is ideal for a rich flavor that isn’t overly sweet. However, make sure to avoid chocolate chips as they often contain stabilizers that make them resistant to melting.
Step-by-Step Instructions
Let’s dive into the fun part and get started with our chocolate covered strawberries!
-
Prepare Your Strawberries:
- First, rinse your strawberries under cool running water and gently pat them dry with a paper towel. Make sure they are completely dry; any moisture will prevent the chocolate from adhering properly.
- Want a pro tip? Leave the green tops on! They’re not just for decoration; they provide a convenient handle while dipping.
-
Melt the Chocolate:
- Break the chocolate into small, even pieces and place them in a microwave-safe bowl.
- Microwave your chocolate in 30-second intervals, stirring after each interval until it’s almost completely melted. Take your time here—chocolate can seize up quickly if it overheats.
-
Dip the Strawberries:
- Hold a strawberry by the green stem and dip it into the melted chocolate, swirling it around to coat it evenly. Let the excess chocolate drip off.
- For a thicker coating, dip it back into the chocolate again, then set it on the parchment paper.
-
Add Your Toppings:
- If you’re using toppings, sprinkle them over the chocolate while it’s still wet so they’ll stick nicely. You can also try rolling the dipped strawberry in the toppings for an even coat.
-
Let Them Set:
- Transfer the baking sheet to the refrigerator and let the chocolate set for at least 30 minutes. If you’re in a hurry, a 10-minute stay in the freezer can work wonders too!
-
Serve and Enjoy:
- Once the chocolate is set, transfer the strawberries to a beautiful serving platter. You can even drizzle extra melted chocolate on top for that chef’s touch.
Serving Suggestions
When plating your chocolate covered strawberries, consider creating a lovely arrangement. Use a tiered cake stand for a beautiful display or place them in small, individual cups for a fun party snack. It’s all about making those strawberries shine, so let your creativity flow! A sprinkle of edible gold dust never hurt anyone either!
Recipe Variations
Now, let’s mix things up a bit! Here are a few delicious variations to try out:
-
Spicy Chocolate: Add a pinch of cayenne or chili powder to your melted chocolate for a delightful kick!
-
Nutty Chocolate: Roll your dipped strawberries in crushed pistachios or almonds for a crunchy texture.
-
Coconut Crush: Dip your strawberries in melted white chocolate and then roll them in shredded coconut for a tropical vibe.
-
Zesty Lime: Top the chocolate with finely grated lime zest for a citrusy twist.
-
Dark Chocolate Raspberry Mix: Instead of strawberries, try raspberries dipped in dark chocolate for a rich and tangy sweet!
Chef’s Notes
Chocolate covered strawberries are a recipe that has stood the test of time. I love how they effortlessly transform any occasion into something special. Over the years, I’ve played with different chocolates and toppings, finding that the best memories are made of real, simple ingredients shared with loved ones. They’ve evolved from simple kitchen adventures to show-stoppers at dinner parties and anniversaries.
One memorable twist? I once did an “Around the World” chocolate dip experience at a gathering, featuring spices and flavors from various cultures. Wasabi chocolate dip? Yes, please!
FAQs and Troubleshooting
Q: My chocolate seizes up; what happened?
A: Seizing can happen when water gets into the chocolate. Make sure your bowl and utensils are completely dry, and try using a double boiler next time for more control over the melting process.
Q: Can I use chocolate chips?
A: Technically, yes—but note that they may have stabilizers that prevent them from melting smoothly. If you do use them, ensure to add a splash of coconut oil or shortening to help them melt.
Q: How do I store leftover chocolate covered strawberries?
A: Store them in a single layer in an airtight container in the fridge for up to 2 days. They might lose a bit of their firmness but will still be delicious!
Q: Can I freeze chocolate covered strawberries?
A: Yes, but it’s best to enjoy them fresh! If you freeze them, keep them in an airtight container, but they may become mushy once thawed.
Nutritional Info
(Example – Optional section; adjust as needed based on actual ingredients)
- Calories: Approximately 75 per strawberry (based on semisweet chocolate and medium strawberry)
- Carbohydrates: 10g
- Fat: 4g
- Protein: 1g
- Fiber: 1g
So there you have it! Chocolate covered strawberries are not just a treat; they’re a symbol of shared moments around the table. Whether it’s a quiet evening or a festive celebration, I hope this recipe brings as much joy to your table as it has to mine. Grab your apron, and let’s get dipping! Happy cooking!
PrintChocolate Covered Strawberries

Delicious chocolate covered strawberries, a perfect balance of elegance and simplicity, ideal for any occasion.
- Prep Time: 15 minutes
- Cook Time: 5 minutes
- Total Time: 20 minutes
- Yield: 12 servings 1x
- Category: Dessert
- Method: No-Cook
- Cuisine: American
- Diet: Vegetarian
Ingredients
- 1 pound fresh strawberries
- 8 ounces bittersweet or semisweet chocolate
- Optional toppings: crushed nuts, sprinkles, coconut flakes, sea salt
Instructions
- Prepare your strawberries: Rinse under cool water and pat dry; leave the green tops on for easy dipping.
- Melt the chocolate: Break into small pieces and microwave in 30-second intervals, stirring until almost melted.
- Dip the strawberries: Hold by the green stem and swirl into the chocolate to coat; let excess drip off.
- Add your toppings: Sprinkle while chocolate is still wet or roll in toppings for better adherence.
- Let them set: Place in the refrigerator for at least 30 minutes, or 10 minutes in the freezer.
- Serve and enjoy: Transfer to a platter and drizzle extra chocolate if desired.
Notes
Store leftovers in a single layer in an airtight container in the fridge for up to 2 days.
Nutrition
- Serving Size: 1 strawberry
- Calories: 75
- Sugar: 9g
- Sodium: 5mg
- Fat: 4g
- Saturated Fat: 2g
- Unsaturated Fat: 2g
- Trans Fat: 0g
- Carbohydrates: 10g
- Fiber: 1g
- Protein: 1g
- Cholesterol: 0mg
Keywords: chocolate, strawberries, dessert, sweet treat, easy recipe
Indulgent No-Bake Cookie Dough Bites Recipe: Easy Dessert Bliss
# Indulgent No-Bake Cookie Dough Bites Recipe: Easy Dessert Bliss
## Introduction
Hello, fellow food lovers! Today, we’re diving into the world of indulgence with a recipe that’s not just easy but downright blissful: No-Bake Cookie Dough Bites! If you’ve ever found yourself craving that nostalgic taste of cookie dough straight from the bowl (you know what I’m talking about!), then hold onto your aprons because this recipe is a game-changer.
Picture this: it’s a Saturday afternoon. The sun is shining through your kitchen window, and there’s nothing on your agenda except indulging in something sweet. These no-bake cookie dough bites come together in a snap! They’re uncomplicated, fun to make, and perfect for satisfying those sweet cravings without turning on the oven.
As I share my tips, tricks, and insights, I want you to feel at home in your kitchen. Let’s whisk together our love for good food and create something delightful that we can share with friends or enjoy all by ourselves (no judgment here!). Ready to roll up those sleeves and create some culinary magic? Let’s do this!
## Personal Story
Whenever I make cookie dough bites, I’m taken back to my childhood—the sweet time when cookie dough was the ultimate treat, and everyone's fingers had a little dough residue. I remember my mom whipping up batch after batch of cookies for family gatherings, and I’d inevitably sneak spoonfuls of that creamy, buttery goodness when her back was turned. We’d laugh at the absurdity of it all, pretending it was our little secret.
One rainy afternoon, with a mix of boredom and hunger, I decided to take matters into my own hands. Armed with my mom’s coveted recipe, I ventured to make cookie dough all by myself. Of course, my first attempt was met with a sprinkle of chaos—flour on the floor, sugar exploding from the bag, and a clear indication that I didn’t quite grasp the concept of “gentle mixing.” Yet, with every failed attempt, to me, the journey was sweeter than the end result. Fast forward years later, and instead of slaving away over a hot oven, I’m bringing you these revamped no-bake bites that capture that same joy and nostalgia.
## Ingredients
Gather your ingredients and let the fun begin! Here’s what you’ll need for these delightful no-bake cookie dough bites:
- **1 stick Unsalted Butter (Softened)**
This is your foundation for rich, buttery flavor. For a vegan option, simply substitute with dairy-free butter.
- **1/2 cup Light Brown Sugar**
This adds a hint of caramel flavor, creating that irresistible warmth in the cookie dough. If you're out of brown sugar, you can substitute with granulated sugar mixed with a touch of molasses.
- **2 tablespoons Milk**
Regular milk or a non-dairy option works great here. The milk helps bring the dough together nicely, so if you're dairy-free, go for almond, soy, or coconut milk; they work perfectly!
- **1 teaspoon Vanilla Extract**
A must-have for any cookie recipe, this gives depth to the flavor. You can use imitation vanilla in a pinch, but the real stuff elevates the experience.
- **1 cup All-Purpose Flour (Must be heat-treated)**
Treating your flour is essential for safety since we’re not baking it. To heat-treat, just spread it onto a baking sheet and bake at 350°F (175°C) for about 5-10 minutes, or microwave it in 30-second intervals.
- **1/4 teaspoon Salt**
This is key for balancing out the sweetness; a touch makes a world of difference!
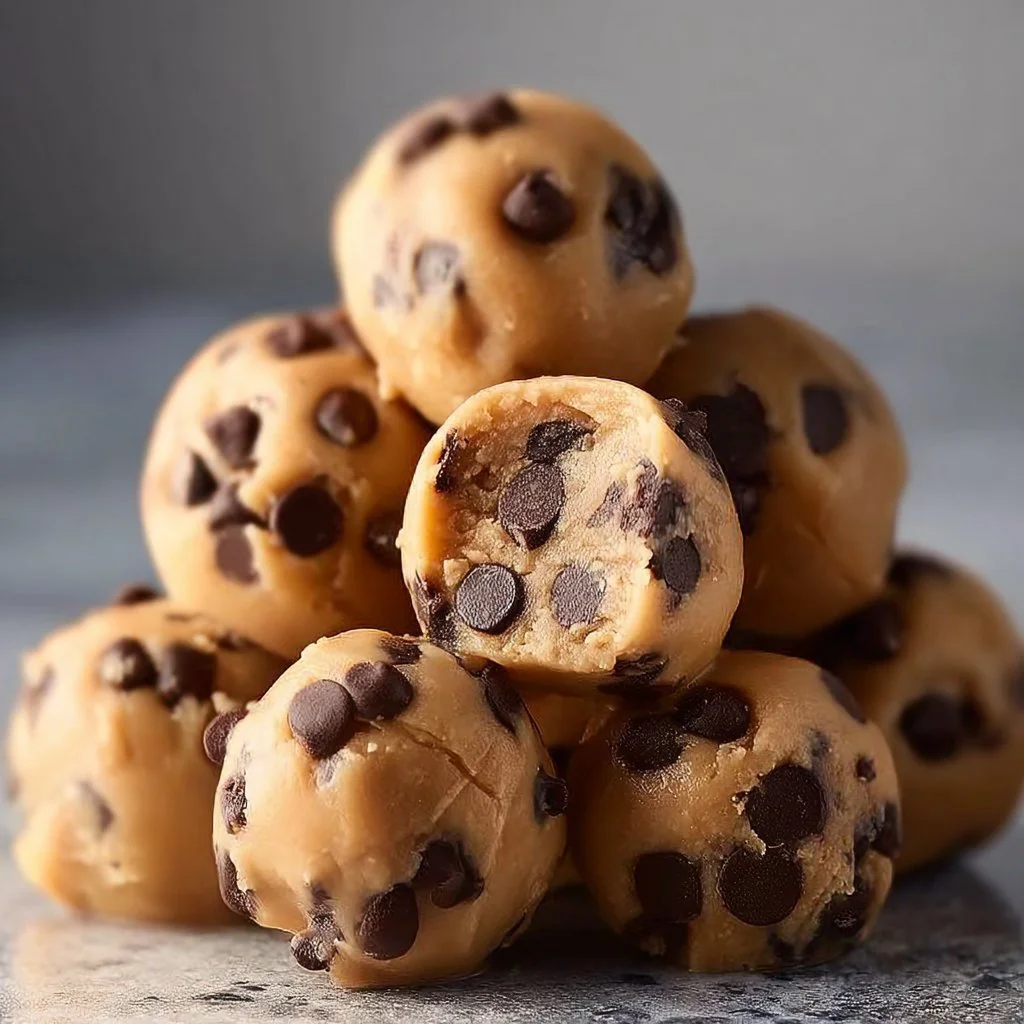
- **1/2 cup Mini Chocolate Chips**
Because who doesn’t love chocolate? Mini chips blend in beautifully, offering bites of chocolatey goodness throughout.
- **1 cup Semisweet or Milk Chocolate**
This will be the outer coating for your bites. Get your favorites here—dark, semisweet, or milk chocolate are all great choices!
- **1 tablespoon Coconut Oil or Vegetable Oil (Optional)**
Adding this to the chocolate when melting will give it a smoother texture for coating. Plus, it’s an easy way to make the chocolate a little more indulgent.
## Step-by-Step Instructions
Let’s whip up these cookie dough bites and elevate our dessert game!
1. **Prepare Your Flour**: As mentioned, we need heat-treated flour. Spread it on a baking sheet, and pop it in the oven for about 5-10 minutes. This step is crucial to eliminate any potential bacteria since we’re not baking these bites. **Chef Tip**: You can do this ahead of time and store it in an airtight container.
2. **Blend the Butter and Sugar**: In a mixing bowl, cream together your softened unsalted butter and light brown sugar. Using an electric mixer makes this easy-peasy, but don’t worry; a wooden spoon and some elbow grease will do just fine. You want it to be light and fluffy—about 2-3 minutes. **Insider Tip**: Room temperature butter blends better, so don’t forget to take it out of the fridge ahead of time.
3. **Add the Liquid Ingredients**: Mix in the milk and vanilla extract until well combined. This creates a creamy base that will take your cookie bites to the next level.
4. **Incorporate Dry Ingredients**: Once the wet ingredients are mixed together, gradually add in your heat-treated flour and salt. Mix until just combined; this will start looking like the cookie dough you’ve always loved.
5. **Chocolate Chips, Please!**: Stir in the mini chocolate chips. I always find it fun to add just a few extra for good measure—more chocolate, more happiness! **Chef Hack**: If you prefer a chunkier cookie dough, try chopping up a chocolate bar instead.
6. **Chill the Dough**: Now, grab a spatula, and scoop your cookie dough mixture onto a piece of plastic wrap. Form it into a log or a disc shape, wrap it tightly, and pop it in the fridge for 20-30 minutes. This helps the dough firm up a bit, making rolling easier.
7. **Melt the Chocolate**: In a microwave-safe bowl, combine semisweet or milk chocolate with coconut oil (if using). Microwave in 30-second intervals, stirring in between until fully melted and glossy. A double boiler works perfectly if you prefer to melt chocolate the old-school way.
8. **Shape the Bites**: Once the dough is firm, remove it from the fridge. Using a melon baller or your hands, scoop out bite-sized portions and roll them into balls.
9. **Dip Them in Chocolate**: Dip each dough ball into the melted chocolate, using a fork to gently lift it out and let the excess drip off. **Chef Tip**: If you want an even coating, you can double dip after the first coat has set slightly!
10. **Chill Again**: Place the chocolate-coated bites on a baking sheet lined with parchment paper. Refrigerate until the chocolate has set—about 20 minutes more.
11. **Enjoy**: Once set, pop those bites into a cute jar or onto a pretty plate, and watch them disappear in a flash!
## Serving Suggestions
These No-Bake Cookie Dough Bites are perfect for sharing, but they also make a glorious afternoon snack! To serve, arrange them in a stylish bowl or tiered dessert stand, sprinkle with sea salt for a gourmet touch, and garnish with fresh mint or berries for that pop of color. They’re delightful paired with coffee or a glass of milk for a classic treat!
## Recipe Variations
Get creative with these cookie dough bites! Here are some simple twists you can try:
- **Nutty Cookie Dough Bites**: Mix in crushed nuts, like pecans or walnuts, for added crunch.
- **Peanut Butter Heaven**: Swirl in some creamy peanut butter for a rich and delightful flavor.
- **Coconut Bliss**: Add shredded coconut to the dough for a tropical twist.
- **S’Mores Style**: Toss in mini marshmallows and graham cracker crumbs for a fun take on the campfire classic.
- **Gluten-Free Option**: Substitute all-purpose flour with oat flour or a gluten-free all-purpose blend.
## Chef’s Notes
Creating these bites has been such a rewarding experience, blending nostalgia with modern convenience. From my sticky childhood attempts at crafting cookie dough to these no-bake wonders, it’s all about enjoyment in the kitchen. Far too often, we build barriers around cooking, thinking it must be complicated or time-consuming. This recipe serves as a reminder that joy can come from simplicity! Plus, who wouldn't love a treat that's ready in no time?
## FAQs and Troubleshooting
1. **Can I skip the heat-treating step for the flour?**
- Technically, yes, but it's not recommended! Heating flour kills any potential bacteria, making it safe to consume raw.
2. **How long do these cookie dough bites last?**
- Store them in an airtight container in the fridge for up to a week. I doubt they’ll last that long, though!
3. **What if my chocolate is too thick for dipping?**
- If your melted chocolate is too thick, simply add a little bit more coconut oil or vegetable oil until you reach the desired consistency.
4. **Can I freeze these no-bake bites?**
- Absolutely! They freeze beautifully. Just make sure to allow them to thaw in the fridge before serving for the best texture.
## Nutritional Info
(Per Cookie Dough Bite - Approximately, varies based on size)
- Calories: 120
- Total Fat: 7g
- Saturated Fat: 4g
- Cholesterol: 15mg
- Sodium: 33mg
- Total Carbohydrates: 13g
- Dietary Fiber: 0g
- Sugars: 9g
- Protein: 1g
---
So there you have it — a delightful recipe for No-Bake Cookie Dough Bites that’s guaranteed to make your sweet tooth sing! Whether you’re sharing with friends or keeping them all to yourself (no judgment here!), I hope you find joy in every bite. Let’s make cooking fun, approachable, and absolutely delicious! Happy baking (or should we say, no baking!), and don’t forget to share your creations with me!
Indulgent No-Bake Cookie Dough Bites

Delicious and easy no-bake cookie dough bites that capture the nostalgic taste of cookie dough.
- Prep Time: 10 minutes
- Cook Time: 30 minutes
- Total Time: 40 minutes
- Yield: 12 servings 1x
- Category: Dessert
- Method: No-Bake
- Cuisine: American
- Diet: Vegetarian
Ingredients
- 1 stick Unsalted Butter (Softened)
- 1/2 cup Light Brown Sugar
- 2 tablespoons Milk
- 1 teaspoon Vanilla Extract
- 1 cup All-Purpose Flour (Must be heat-treated)
- 1/4 teaspoon Salt
- 1/2 cup Mini Chocolate Chips
- 1 cup Semisweet or Milk Chocolate
- 1 tablespoon Coconut Oil or Vegetable Oil (Optional)
Instructions
- Prepare Your Flour: Spread it on a baking sheet and pop it in the oven for about 5-10 minutes.
- Blend the Butter and Sugar: Cream together your softened unsalted butter and light brown sugar until light and fluffy.
- Add the Liquid Ingredients: Mix in the milk and vanilla extract until well combined.
- Incorporate Dry Ingredients: Gradually add in your heat-treated flour and salt, mixing until just combined.
- Chocolate Chips, Please!: Stir in the mini chocolate chips.
- Chill the Dough: Scoop your cookie dough mixture onto plastic wrap and form it into a log or disc shape. Refrigerate for 20-30 minutes.
- Melt the Chocolate: Combine semisweet or milk chocolate with coconut oil and microwave in 30-second intervals until fully melted.
- Shape the Bites: Scoop out bite-sized portions of dough and roll them into balls.
- Dip Them in Chocolate: Dip each dough ball into the melted chocolate and let the excess drip off.
- Chill Again: Place the chocolate-coated bites on a parchment-lined baking sheet and refrigerate until the chocolate has set.
- Enjoy: Serve the bites in a cute jar or on a plate and delight in their goodness!
Notes
These cookie dough bites are perfect for sharing or as an afternoon snack. For a gourmet touch, sprinkle with sea salt or garnish with fresh mint.
Nutrition
- Serving Size: 1 bite
- Calories: 120
- Sugar: 9g
- Sodium: 33mg
- Fat: 7g
- Saturated Fat: 4g
- Unsaturated Fat: 2g
- Trans Fat: 0g
- Carbohydrates: 13g
- Fiber: 0g
- Protein: 1g
- Cholesterol: 15mg
Keywords: cookie dough, no-bake dessert, easy sweets, indulgent treats