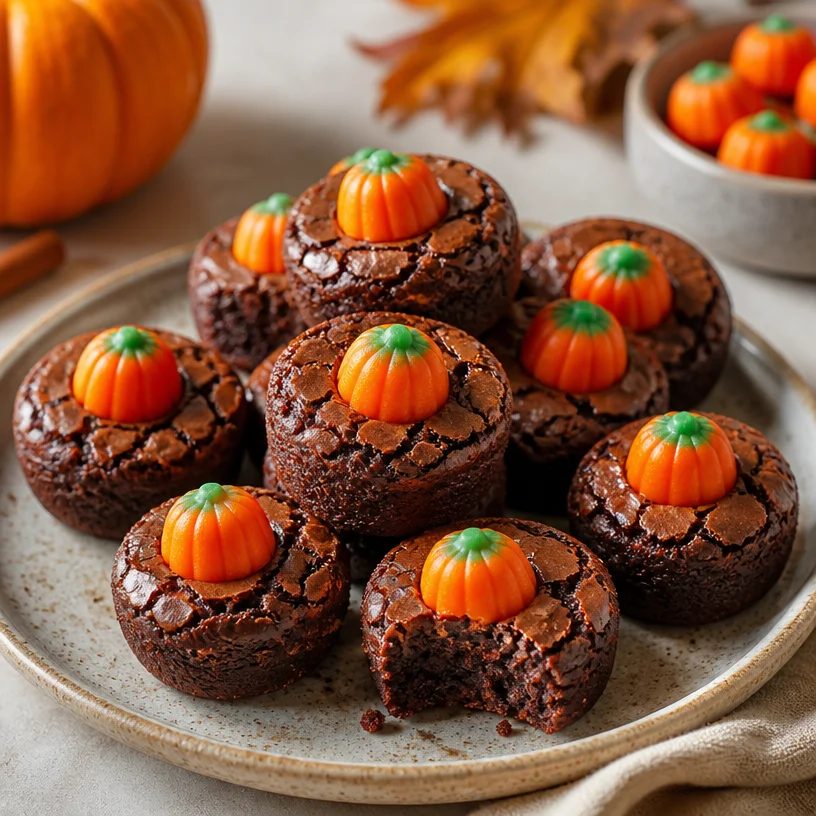
Pumpkin Brownie Bites: Quick Fall Treats for Busy Weeknights
Indulge in the Sweetness of Fall: Pumpkin Brownie Bites
Hello, fellow foodies! As the air turns crisp and the leaves begin to fall, there’s an undeniable shift that awakens my culinary curiosity. It’s the magical season of pumpkin spice, cozy sweaters, and heartwarming gatherings. Today, we’re diving into a delightful treat that brings together the rich, fudgy goodness of brownies with the festive charm of pumpkin: Pumpkin Brownie Bites.
Now, brownie lovers, get ready to elevate your dessert game! Picture this: fudgy brownie bites topped with adorable candy pumpkins, making them not just delicious but downright adorable. They’re perfect for autumn gatherings, Halloween parties, or just a cozy night in. Trust me, once you try these, you’ll want to make them a seasonal staple.
Let’s get started on this sweet adventure! Follow along as I guide you through my recipe, share some fun kitchen stories, and sprinkle in a few tips and tricks to ensure your pumpkin brownie bites come out perfectly every time.
A Slice of Nostalgia
I remember the first time I made brownies by myself. I must have been around 10 years old, pouring over my mom’s old recipe box, searching for the perfect dessert to surprise her after a long day. Little did I know I was setting the foundation for a lifelong love affair with chocolate!
As I mixed the ingredients together, there was something magical about watching that cocoa powder transform into a thick, velvety batter. The sweet aroma that filled the kitchen as they baked was pure heaven. Fast forward a few years to when the leaves turned golden and crisp—I discovered the intrigue of incorporating pumpkin into the mix. Even in the early days of my culinary journey, I understood the beauty of blending flavors and seasons.
Now, combining that childhood love of brownies with the creamy texture and warm spice of pumpkin feels like a celebration of all things cozy. With every bite, you’ll taste nostalgia, comfort, and a hint of seasonal magic. Let’s bring that feeling to life in your kitchen!
Ingredients
Here’s what you’ll need to whip up these delightful Pumpkin Brownie Bites:
-
1 cup unsweetened cocoa powder
A rich, dark cocoa powder yields the best flavor. If you’re in a pinch, you can substitute it with Dutch-process cocoa for a lighter touch. -
1 cup granulated sugar
This sweetens the brownies beautifully! For a twist, consider swapping half for brown sugar for a caramel-like complexity. -
1 cup all-purpose flour
Standard flour works best, but you can easily use a gluten-free mix if you’re accommodating those with dietary restrictions. Make sure it’s a blend specifically for baking. -
1/2 cup unsalted butter, melted
Butter adds a lovely richness to the brownies. You can substitute with coconut oil for a dairy-free option. -
3 large eggs
These give structure to your brownies. If vegan, consider using flax eggs (1 tablespoon ground flaxseed + 2.5 tablespoons water = 1 egg) instead. -
1 cup canned pumpkin puree
Look for pure pumpkin, not the spiced pie filling. This autumn staple adds moisture and flavor! -
1 teaspoon vanilla extract
Pure vanilla extract enhances all the flavors. For a fun twist, try using maple syrup instead. -
1 teaspoon baking powder
Ensures your brownies rise beautifully. If you’re out, baking soda can work as a substitute in half the amount. -
Pinch of salt
A little salt balances the sweetness. Trust me; it’s a game-changer! -
Candy pumpkins for decoration
These festive candies bring a pop of color and fun! Feel free to swap them with seasonal sprinkles or nuts for texture.
Step-by-Step Instructions
Now that we’ve gathered our ingredients, let’s bring these pumpkin brownie bites to life. Trust me, this process is just as enjoyable as the final product!
Step 1: Preheat and Prep
Preheat your oven to 350°F (175°C) and line a mini muffin tin with paper liners. If you don’t have liners, a quick spritz of non-stick spray will do the trick. This helps with easy removal later on!
Step 2: Mix Dry Ingredients
In a medium mixing bowl, whisk together the cocoa powder, granulated sugar, flour, baking powder, and salt. This step is crucial for ensuring that all the dry ingredients are well combined, promoting an even bake. Plus, it will smell heavenly!
Step 3: Blend Wet Ingredients
In another large bowl, combine your melted butter, eggs, pumpkin puree, and vanilla extract. Mix until everything is fully blended and looks smooth. This pumpkin mixture adds a warm, comforting element to your brownies.
Step 4: Combine
Pour the dry ingredients into the wet mixture and fold gently with a spatula. Be careful not to overmix; we just want everything to come together. If you see a few flour streaks—no worries! That little bit of flour will mix in when it bakes.
Step 5: Scoop and Fill
Using a small cookie scoop or spoon, fill each muffin tin cup about three-quarters of the way full. This way, they have room to rise while maintaining their bite-sized charm.
Step 6: Bake
Pop your tray into the preheated oven and bake for about 15 minutes. Keep an eye on them! You’ll know they’re ready when they puff slightly and a toothpick inserted comes out with a few moist crumbs—this will ensure that signature fudgy texture.
Step 7: Cool and Decorate
Let your brownie bites cool in the pan for 5-10 minutes before transferring them to a wire rack to cool completely. Once cooled, top each brownie with a candy pumpkin for that cute fall flair. Not only do they look great, but they add a sweet little crunch!
Serving Suggestions
To elevate your serving game, consider placing your pumpkin brownie bites on a beautiful platter adorned with autumn leaves or mini pumpkins. Drizzling a little chocolate ganache or a dusting of powdered sugar can add an extra touch of elegance. These treats can be a whimsical centerpiece at your next gathering, and trust me, they’ll disappear in a flash!
Recipe Variations
Don’t be afraid to experiment! Here are some fun twists to put your personal spin on these pumpkin brownie bites:
- Nutty Delight: Add chopped walnuts or pecans for a crunchy texture.
- Spiced Pumpkin: Mix in a teaspoon of pumpkin pie spice to intensify that fall flavor.
- Chocolate Chunk: Toss in some chocolate chips or chunks for a delightful melt-in-your-mouth experience.
- Frosted Bliss: Top them with a cream cheese frosting drizzle for a richer finish.
- Minty Fresh: Add a few drops of peppermint extract for a refreshing take when the holidays roll around.
Chef’s Notes
Every recipe tells a story, and this one is no exception! When I first combined pumpkin and brownie batter, it felt like magic in my kitchen. It’s incredible how two simple ingredients can create something so comforting and festive. Over the years, I’ve played around with spices and mix-ins, but the core joy of creating this treat has never changed. It’s like a hug in dessert form, and I can’t wait for you to experience that!
FAQs and Troubleshooting
Q1: My brownie bites are too dry. What happened?
A: This can happen if you overbake them. Be sure to check them a couple of minutes before the recommended time. The brownies will continue to set as they cool.
Q2: Can I use fresh pumpkin instead of canned?
A: Absolutely! Just make sure to cook and puree it, then drain out any excess moisture so your brownies don’t turn out soggy.
Q3: How do I ensure my brownie bites are fudgy?
A: Keep an eye on the baking time and don’t overmix the batter. Less mixing leads to a denser, fudgier texture!
Q4: Can I freeze these brownie bites?
A: Yes! They freeze wonderfully. Just ensure they’re in an airtight container, and they’ll keep for up to three months. Thaw them at room temperature before enjoying!
Nutritional Info
While I’m all about indulgence, I believe in balance too! These treats bring joy and are best enjoyed in moderation. A rough estimate is around 100 calories per brownie bite, depending on toppings and variations.
So there you have it! A fall-inspired treat that will bring warmth and joy to your gatherings and celebrations. I hope you feel inspired to tie on your apron and create these delightful Pumpkin Brownie Bites. Just remember, cooking should be fun, lighthearted, and always filled with love.
Let’s make something special together this season! Happy baking, and I can’t wait to hear how your pumpkin brownie bites turn out!
PrintPumpkin Brownie Bites
Delightfully fudgy brownie bites infused with pumpkin and topped with candy pumpkins, perfect for autumn gatherings.
- Prep Time: 15 minutes
- Cook Time: 15 minutes
- Total Time: 30 minutes
- Yield: 24 servings 1x
- Category: Dessert
- Method: Baking
- Cuisine: American
- Diet: Vegetarian
Ingredients
- 1 cup unsweetened cocoa powder
- 1 cup granulated sugar
- 1 cup all-purpose flour
- 1/2 cup unsalted butter, melted
- 3 large eggs
- 1 cup canned pumpkin puree
- 1 teaspoon vanilla extract
- 1 teaspoon baking powder
- Pinch of salt
- Candy pumpkins for decoration
Instructions
- Preheat your oven to 350°F (175°C) and line a mini muffin tin with paper liners.
- Mix together the cocoa powder, granulated sugar, flour, baking powder, and salt in a medium mixing bowl.
- Blend melted butter, eggs, pumpkin puree, and vanilla extract in another bowl until smooth.
- Combine the dry ingredients into the wet mixture and fold gently.
- Scoop and fill each muffin tin cup about three-quarters full.
- Bake in the preheated oven for about 15 minutes.
- Cool in the pan for 5-10 minutes before transferring to a wire rack and decorating with candy pumpkins.
Notes
For a vegan option, use flax eggs instead of regular eggs. You can also try using brown sugar for a caramel-like complexity.
Nutrition
- Serving Size: 1 brownie bite
- Calories: 100
- Sugar: 8g
- Sodium: 50mg
- Fat: 5g
- Saturated Fat: 2.5g
- Unsaturated Fat: 2.5g
- Trans Fat: 0g
- Carbohydrates: 13g
- Fiber: 1g
- Protein: 1g
- Cholesterol: 30mg
Keywords: pumpkin, brownies, fall dessert, Halloween treats, cozy baking
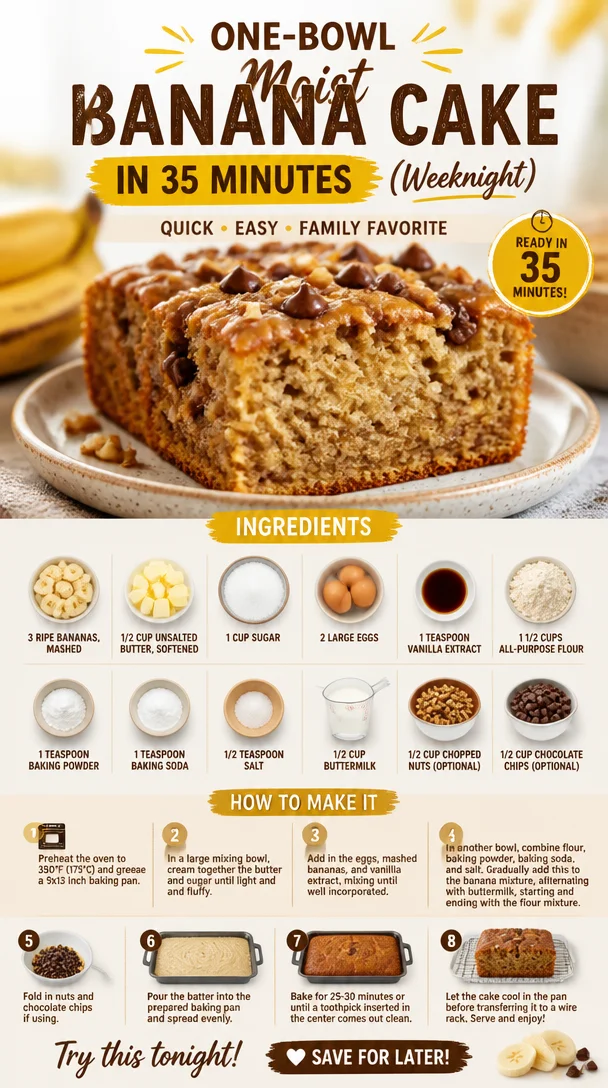
One-Bowl Moist Banana Cake in 35 Minutes (Weeknight)
The Ultimate Moist Banana Cake: A Slice of Joy
Hello, dear food lovers! Today, we’re diving into the world of moist banana cake—a delightful dessert that feels like a warm hug on a chilly day. This recipe brings together the sweetness of ripe bananas with the richness of butter, creating a cake that’s tender, flavorful, and oh-so-satisfying. If you’re looking to impress your friends or just treat yourself, you’re in for a real treat!
A Slice of My Childhood
Let me take you back to my childhood—when baking was more like an adventure than a chore. I vividly remember standing on a stool in my grandmother’s kitchen, my little hands clumsily mixing ingredients in a bowl that was almost as big as I was. The aroma of ripe bananas filling the air would lure my brothers and me in, and soon we would be fighting over the beaters and scraping the bowl clean.
My grandma had a magic touch; her banana cake was famous in our family. It was more than just cake; it was an experience, bringing us all together for celebrations, birthdays, and even the most mundane Tuesdays. As we gathered around the table, my grandma’s laughter filled the room alongside the sweet scent of warm banana cake. Each bite was moist and flavorful, the kind of cake that made you feel like everything was right in the world.
Now, I want to share that same joy with you. This moist banana cake is perfect for any occasion, or even for when you just need a moment of sweet comfort. So tie on your apron, and let’s create a cake that’s brimming with memories and deliciousness!
Ingredients
Here’s what you’ll need to bake this delectable banana cake:
-
3 ripe bananas, mashed
The riper, the better! Brown spots on the skin mean maximum sweetness and moisture. You can also use frozen bananas—just thaw them first and drain any excess liquid. -
1/2 cup unsalted butter, softened
Butter adds richness and flavor. If you’re in a pinch, feel free to swap with coconut oil or a plant-based margarine for a dairy-free option. -
1 cup sugar
Granulated sugar gives our cake the sweetness it needs. For a healthier twist, you could use coconut sugar or brown sugar; it’ll add a nice depth of flavor. -
2 large eggs
Eggs help bind everything together and contribute to the cake’s fluffiness. If you need a vegan alternative, try using flax eggs (1 tablespoon ground flaxseed + 2.5 tablespoons water = 1 egg). -
1 teaspoon vanilla extract
This enhances the sweetness and flavor profile of our cake. You can substitute with almond extract for a different taste. -
1 1/2 cups all-purpose flour
All-purpose flour is your go-to here, but if you want a gluten-free version, use a 1:1 gluten-free flour blend. -
1 teaspoon baking powder
This helps our cake rise. Ensure it’s fresh for maximum fluffiness! -
1 teaspoon baking soda
Another leavener that pairs with the acidity in the bananas for a perfect rise. -
1/2 teaspoon salt
Salt balances the sweetness and enhances all the flavors—don’t skip it! -
1/2 cup buttermilk
This adds moisture and a subtle tang. You can make your own by adding a tablespoon of vinegar or lemon juice to regular milk and letting it sit for a few minutes. -
1/2 cup chopped nuts (optional)
Walnuts or pecans add a crunchy texture and nutty flavor. Feel free to skip this if nuts aren’t your thing! -
1/2 cup chocolate chips (optional)
Who can resist chocolate? Add these in for a delightful chocolatey twist, or use dark chocolate for a gourmet feel!
Step-by-Step Instructions
Ready to get baking? Let’s walk through this recipe step-by-step!
-
Preheat Your Oven
Start by preheating your oven to 350°F (175°C). This ensures our cake bakes evenly from the get-go. -
Prepare Your Pan
Grease and flour a 9-inch round cake pan (or two for a layer cake). You can also line the bottom with parchment paper to prevent sticking—trust me; it’s the little things that make a big difference! -
Mash Those Bananas
In a bowl, mash the ripe bananas with a fork until they’re smooth but still have a few small chunks for texture. The more disheveled, the better! -
Cream the Butter and Sugar
In a separate bowl, beat the softened butter and sugar together until light and fluffy. This will take about 3-5 minutes. Creaming is crucial; it incorporates air into the batter, ensuring a light cake! -
Add Eggs and Vanilla
Next, add the eggs, one at a time, mixing well after each addition. This step helps with emulsifying the mixture. Don’t forget to add the vanilla extract – you want those flavor notes to dance in the background! -
Combine Wet Ingredients
Stir in the mashed bananas and buttermilk. This is where the magic begins. The batter will start to come together beautifully! -
Sift in Dry Ingredients
In a separate bowl, whisk together the flour, baking powder, baking soda, and salt. Gradually fold the dry ingredients into the wet mixture. Be gentle—overmixing can lead to a dense cake! -
Gently Fold in Extras
If you’re using nuts or chocolate chips, this is the time to add them in. Use a spatula or wooden spoon to fold them carefully into the batter. -
Pour and Level
Pour the batter into your prepared pan(s), smoothing the top with a spatula. Give the pan a little shake to level it all out—you want an even rise. -
Bake Away!
Place in the preheated oven and bake for 25-30 minutes (if using round pans) or 45-50 minutes for a single layer. A toothpick inserted in the center should come out clean! -
Cool it Down
Once baked, remove from the oven and let it cool in the pan for about 10 minutes. Then, transfer it to a wire rack to cool completely. Patience is key here—resist the urge to dive in too soon!
Serving Suggestions
For the best presentation, I like to serve slices of this banana cake on a beautiful plate, perhaps garnished with a sprig of mint or a dusting of powdered sugar. You can pair it with a scoop of vanilla ice cream or a dollop of whipped cream for an elevated dessert experience. Feel free to get creative with toppings—candied nuts or a drizzle of chocolate sauce could take it over the top!
Recipe Variations
Here are a few twists to make this recipe your own:
- Banana Nutella Cake: Swirl Nutella into the batter before baking for a decadent chocolate hazelnut vibe.
- Lemon Zest Banana Cake: Add a tablespoon of lemon zest for a fresh, zesty flavor contrast.
- Coconut Banana Cake: Incorporate shredded coconut into the batter for a tropical twist.
- Spiced Banana Cake: Add a pinch of cinnamon and nutmeg for extra warmth and flavor.
- Banana Oatmeal Cake: Substitute half the flour with rolled oats for a heartier, more filling texture.
Chef’s Notes
You know, every time I bake this banana cake, I can’t help but think about my grandma. She always said that the secret ingredient was love, and I truly believe that! Over the years, I’ve experimented with countless recipes, but this one remains a classic in my kitchen. It’s simple, straightforward, and never fails to bring smiles.
One little kitchen mishap I remember was the time I tried to rush the process. I grabbed a bowl straight from the sink without drying it fully, and my beautiful cake had a weird, soapy taste. Lesson learned! Always use a clean bowl—it makes all the difference.
FAQs and Troubleshooting
1. My cake turned out dry. What went wrong?
It could be a few things—overmixing the batter or baking it too long can both lead to dryness. Make sure to check the cake a few minutes before the timer goes off!
2. Can I make this recipe in advance?
Absolutely! You can bake the cake a day ahead and store it covered at room temperature. You can also freeze it for longer storage; just ensure it’s wrapped tightly!
3. My cake sank in the middle. Why did this happen?
This could be due to underbaking or a sudden change in temperature. Make sure to bake it until the toothpick test (clean or with a few moist crumbs) passes, and adjust your oven temperature accordingly.
4. Can I add more bananas?
Sure! Just be cautious not to add too much extra moisture. Substituting one ripe banana for a bit of flour can help balance it out as needed.
Nutritional Info (Optional)
While this cake is a treat, it’s always good to be aware of portions. A standard slice contains roughly 250-300 calories, depending on added ingredients. Enjoy every bite in moderation!
Now that you have all the tips, tricks, and a slice of my history, you’re ready to bake your own moist banana cake! Remember, great cooking is about the joy you share and the love you put in. So tie your apron, gather your ingredients, and let’s make some delicious memories together! Happy baking!
PrintThe Ultimate Moist Banana Cake
A delightful moist banana cake that combines the sweetness of ripe bananas with the richness of butter, perfect for any occasion.
- Prep Time: 15 minutes
- Cook Time: 30 minutes
- Total Time: 45 minutes
- Yield: 8 servings 1x
- Category: Dessert
- Method: Baking
- Cuisine: American
- Diet: Vegetarian
Ingredients
- 3 ripe bananas, mashed
- 1/2 cup unsalted butter, softened
- 1 cup sugar
- 2 large eggs
- 1 teaspoon vanilla extract
- 1 1/2 cups all-purpose flour
- 1 teaspoon baking powder
- 1 teaspoon baking soda
- 1/2 teaspoon salt
- 1/2 cup buttermilk
- 1/2 cup chopped nuts (optional)
- 1/2 cup chocolate chips (optional)
Instructions
- Preheat your oven to 350°F (175°C).
- Prepare a 9-inch round cake pan with grease and flour.
- Mash the ripe bananas in a bowl.
- Cream the butter and sugar together until light and fluffy.
- Add the eggs one at a time and mix well.
- Stir in the mashed bananas and buttermilk until combined.
- Sift the flour, baking powder, baking soda, and salt together, then gradually fold into the wet mixture.
- Gently fold in nuts and chocolate chips if using.
- Pour the batter into the prepared pan.
- Bake for 25-30 minutes or until a toothpick comes out clean.
- Cool in the pan for 10 minutes, then transfer to a wire rack to cool completely.
Notes
Serve with a garnish of mint, powdered sugar, or a scoop of vanilla ice cream for an elevated dessert experience.
Nutrition
- Serving Size: 1 slice
- Calories: 275
- Sugar: 16g
- Sodium: 300mg
- Fat: 10g
- Saturated Fat: 5g
- Unsaturated Fat: 4g
- Trans Fat: 0g
- Carbohydrates: 38g
- Fiber: 1g
- Protein: 3g
- Cholesterol: 40mg
Keywords: banana cake, moist cake, baking, dessert, sweet treats
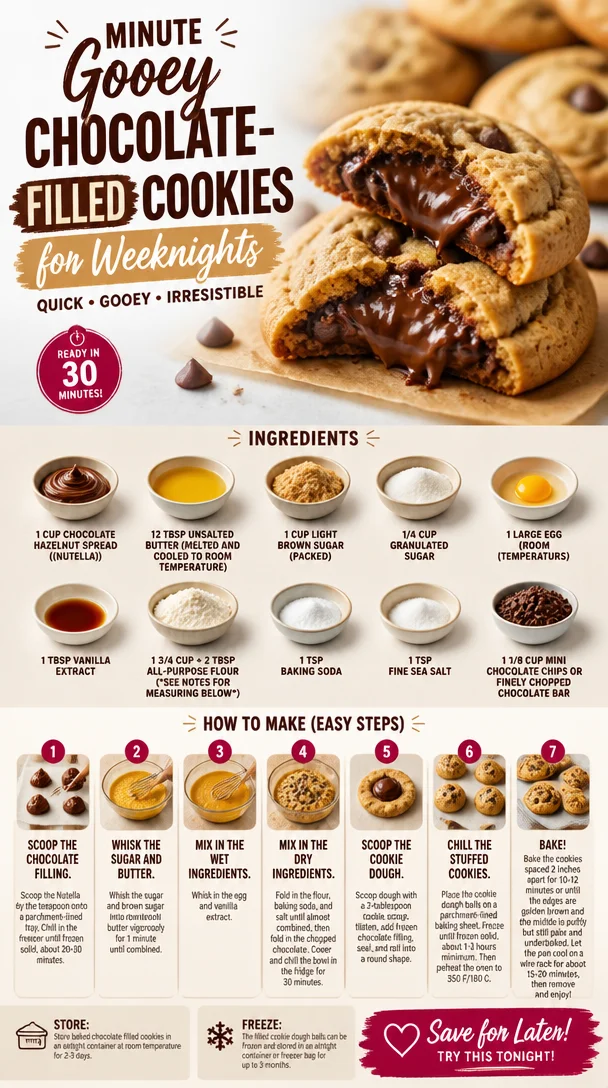
Minute Gooey Chocolate-Filled Cookies for Weeknights
Indulge in Chocolate Heaven: The Ultimate Chocolate Filled Cookies Recipe
Hello, fellow foodies! I’m so excited to have you here today at Ivory Apron, where the kitchen is buzzing with creativity and the air is filled with the sweet aroma of deliciousness. Today, we’re diving into a recipe that produces cookies so good they’ll make you weak in the knees: Chocolate Filled Cookies! These delightful treats are not only filled with smooth chocolate hazelnut goodness but also boast that perfect balance of crispy edges and a gooey center. So, tie on your apron, and let’s get baking!
A Sweet Memory
Every time I whip up a batch of Chocolate Filled Cookies, I can’t help but take a stroll down memory lane. Picture this: a rainy Saturday afternoon, the kind where you’re cozied up inside, and the world outside feels a little grey. My sister and I were tasked with preparing a treat for our family game night, and chocolate was the only requirement on our list. Enter our trusty jar of chocolate hazelnut spread. We slathered it over everything, from toast to spoonfuls straight from the jar (because who can resist, really?).
As we would bake our cookies, the kitchen would fill with laughter, playful arguments over which cookie shape was best, and the dreamy scent of melting chocolate. Those cookies became the highlight of our game nights, bringing our family together surrounded by laughter and love. Now, every time I make these cookies, I’m reminded of how food can create bonds and weave little moments of joy.
Ingredients
Let’s gather our ingredients! Each one plays a crucial role in achieving cookie perfection.
-
1 cup chocolate hazelnut spread (Nutella)
This golden ingredient adds a rich, creamy chocolate flavor. If you’re on the hunt for substitutions, try almond butter or any nutty spread. Just ensure it’s smooth for that dreamy filling! -
12 tbsp unsalted butter (melted and cooled to room temperature)
Butter gives our cookies richness and a tender crumb. If you want to make it dairy-free, coconut oil works like a charm (just solidify it before mixing). -
1 cup light brown sugar (packed)
This sweetener adds depth and moisture to our cookies. If you prefer a less sugary bite, swap with coconut sugar for a healthier sweet fix. -
1/4 cup granulated sugar
For added sweetness and a slight crunch! You can use coconut sugar here as well; it’ll offer a lovely caramel flavor. -
1 large egg (room temperature)
The egg binds everything together. If you’re looking for an eggless version, try replacing it with 1/4 cup unsweetened applesauce. -
1 tbsp vanilla extract
A must-have ingredient that enriches flavors and amplifies the chocolate notes. Homemade vanilla extract? Even better! -
1 3/4 cup + 2 tbsp all-purpose flour
This is the backbone of our cookies. Make sure to spoon and level the flour for accuracy, as too much can lead to dry cookies. For a gluten-free option, oat flour works great! -
1 tsp baking soda
This helps our cookies rise and become light. If you’re out, cream of tartar or baking powder can serve as substitutes, just in different amounts. -
1 tsp fine sea salt
Salt elevates flavors, making the sweetness pop. If you prefer a finer taste, use kosher salt. -
1 1/8 cup mini chocolate chips or finely chopped chocolate bar
These little gems will add delightful pockets of melty chocolate throughout your cookies. You can replace them with white chocolate chips for a fun flavor twist!
Step-by-Step Instructions
Ready to bake? Let’s jump into the nitty-gritty. These steps are designed to make your baking adventure smooth and, dare I say, enjoyable!
-
Preheat the Oven
Preheat your oven to 350°F (175°C). This is the secret to getting those cookies nice and golden. Make sure to preheat for at least 10 minutes for an even bake! -
Prep Your Baking Sheet
Line a baking sheet with parchment paper. This helps prevent sticking and makes cleanup a breeze. If you run out of parchment, you can lightly grease the pan with some butter or cooking spray. -
Mix the Wet Ingredients
In a large bowl, mix the melted butter with chocolate hazelnut spread using a whisk. We’re looking for a homogenized mixture that’s silky smooth. If you find the spread is stubborn, warm it slightly in the microwave to make it easier to combine. Then, add in the brown sugar and granulated sugar. Whisk until well combined. Blend in the egg and vanilla extract until the mixture is glossy and lovely. -
Combine the Dry Ingredients
In another bowl, whisk together the flour, baking soda, and salt. This step is crucial for even distribution of the leavening agents and ensures our cookies bake evenly. Little chef hack: sift the flour directly into the dry mix to eliminate any lumps. -
Merge Wet and Dry
Gradually add the dry mixture into the wet one, stirring gently until just combined. Be careful not to overmix; we want tender cookies, not chewy ones! Fold in the mini chocolate chips or chopped chocolate for those delicious melty pockets. -
Scoop and Chill
Here’s where the magic happens! Using a cookie scoop or two spoons, drop generous tablespoons of dough onto the prepared baking sheet, leaving enough space in between for spreading (about 2 inches apart). Pro tip: For extra flavor, chill the dough in the fridge for 30 minutes—this enhances the cookies’ flavors and helps them hold shape! -
Bake
Bake these beauties in your preheated oven for 10–12 minutes or until the edges are set, and the centers look slightly underbaked (they’ll firm up as they cool). It’s a true test of patience (but you can always sneak a taste while they’re baking!). -
Cool
Allow the cookies to cool on the baking sheet for about 5–10 minutes before transferring them to a wire rack. This helps them retain their chewy center while still crisping up on the outside.
Serving Suggestions
These Chocolate Filled Cookies are best served warm, straight from the oven! Consider stacking them on a beautiful plate, adorned with a dusting of powdered sugar. For an extra touch, drizzle them with melted chocolate or serve them alongside a scoop of vanilla ice cream for a delightful dessert experience. Trust me; your friends will be raving!
Recipe Variations
Why not get a little adventurous with your cookies? Here are some fun variations to try:
-
Nutty Twist: Add chopped nuts like hazelnuts or walnuts for a satisfying crunch.
-
Spicy Kick: Mix in a pinch of cayenne or ground cinnamon for unexpected warmth.
-
Stuffed Surprises: Try filling the cookies with caramel or a tangy fruit jam instead of chocolate hazelnut spread.
-
Dairy-Free Delight: Substitute the butter with vegan butter and use dairy-free chocolate chips for a vegan version.
-
Double Chocolate: Replace a portion of the flour with unsweetened cocoa powder for a more intense chocolate experience.
Chef’s Notes
This recipe has evolved over the years in my kitchen. I remember my early attempts were always a bit too flat (I might have been a little heavy-handed with the flour!). But with practice, these cookies became my go-to treat for any occasion. Whenever I feel the need for a little comfort or just want to impress some guests, I reach for this recipe. Plus, no matter how many times I share it, the joy of seeing friends and family bite into a warm, gooey cookie never gets old!
FAQs and Troubleshooting
Q: Why did my cookies spread too much?
A: Overmixing or not chilling the dough can cause excess spreading. Ensure you mix just until combined and allow the dough to chill for at least 30 minutes.
Q: Can I freeze the cookie dough?
A: Absolutely! Just scoop the dough onto a baking sheet, freeze until solid, then transfer them to a zip-top bag. Frozen dough can be baked directly from the freezer, just add a couple of additional minutes to the baking time.
Q: My cookies came out too dry. What happened?
A: This could be due to the flour measurement. Make sure to spoon and level your flour instead of packing it in! Also, be careful not to overbake; those cookies should have a soft center.
Q: How can I tell when the cookies are done?
A: The edges should be set and slightly golden, while the centers may look a tad underbaked—that’s okay! They’ll continue cooking on the baking sheet after you take them out.
Nutritional Info (Optional)
While I always encourage savoring every bite, here’s a general idea per cookie (this can vary based on ingredient brands):
- Calories: 200
- Total Fat: 10g
- Saturated Fat: 4g
- Carbohydrates: 25g
- Sugars: 14g
- Protein: 2g
Final Thoughts
Making these Chocolate Filled Cookies is more than just baking; it’s about creating moments that matter and sharing joy with those you love. I hope you bring your own memories into the kitchen as you bake these sweet delights. Remember, there’s no perfect cookie—just delicious ones made with intention and love!
Thanks for joining me today at Ivory Apron! May your kitchen be filled with warmth, laughter, and, of course, the aroma of freshly baked cookies. Happy baking, my friends!
PrintChocolate Filled Cookies
Indulge in these delightful Chocolate Filled Cookies, featuring a rich chocolate hazelnut filling surrounded by crispy edges and a gooey center.
- Prep Time: 15 minutes
- Cook Time: 12 minutes
- Total Time: 27 minutes
- Yield: 24 cookies 1x
- Category: Dessert
- Method: Baking
- Cuisine: American
- Diet: Vegetarian
Ingredients
- 1 cup chocolate hazelnut spread (Nutella)
- 12 tbsp unsalted butter (melted and cooled to room temperature)
- 1 cup light brown sugar (packed)
- 1/4 cup granulated sugar
- 1 large egg (room temperature)
- 1 tbsp vanilla extract
- 1 3/4 cup + 2 tbsp all-purpose flour
- 1 tsp baking soda
- 1 tsp fine sea salt
- 1 1/8 cup mini chocolate chips or finely chopped chocolate bar
Instructions
- Preheat your oven to 350°F (175°C) for at least 10 minutes.
- Line a baking sheet with parchment paper.
- Mix the melted butter with chocolate hazelnut spread using a whisk until smooth. Add the brown sugar and granulated sugar; whisk until well combined. Blend in the egg and vanilla extract.
- Whisk together the flour, baking soda, and salt in another bowl.
- Gradually add the dry mixture to the wet mixture, stirring gently until just combined. Fold in the mini chocolate chips.
- Scoop generous tablespoons of dough onto the prepared baking sheet, spacing them about 2 inches apart. Chill in the fridge for 30 minutes.
- Bake for 10–12 minutes until edges are set and centers are slightly underbaked.
- Cool on the baking sheet for 5–10 minutes before transferring to a wire rack.
Notes
For extra flavor, chill the dough before baking. These cookies can be served warm with a dusting of powdered sugar or alongside vanilla ice cream.
Nutrition
- Serving Size: 1 cookie
- Calories: 200
- Sugar: 14g
- Sodium: 200mg
- Fat: 10g
- Saturated Fat: 4g
- Unsaturated Fat: 6g
- Trans Fat: 0g
- Carbohydrates: 25g
- Fiber: 1g
- Protein: 2g
- Cholesterol: 30mg
Keywords: chocolate cookies, dessert, baking, chocolate hazelnut, cookies recipe
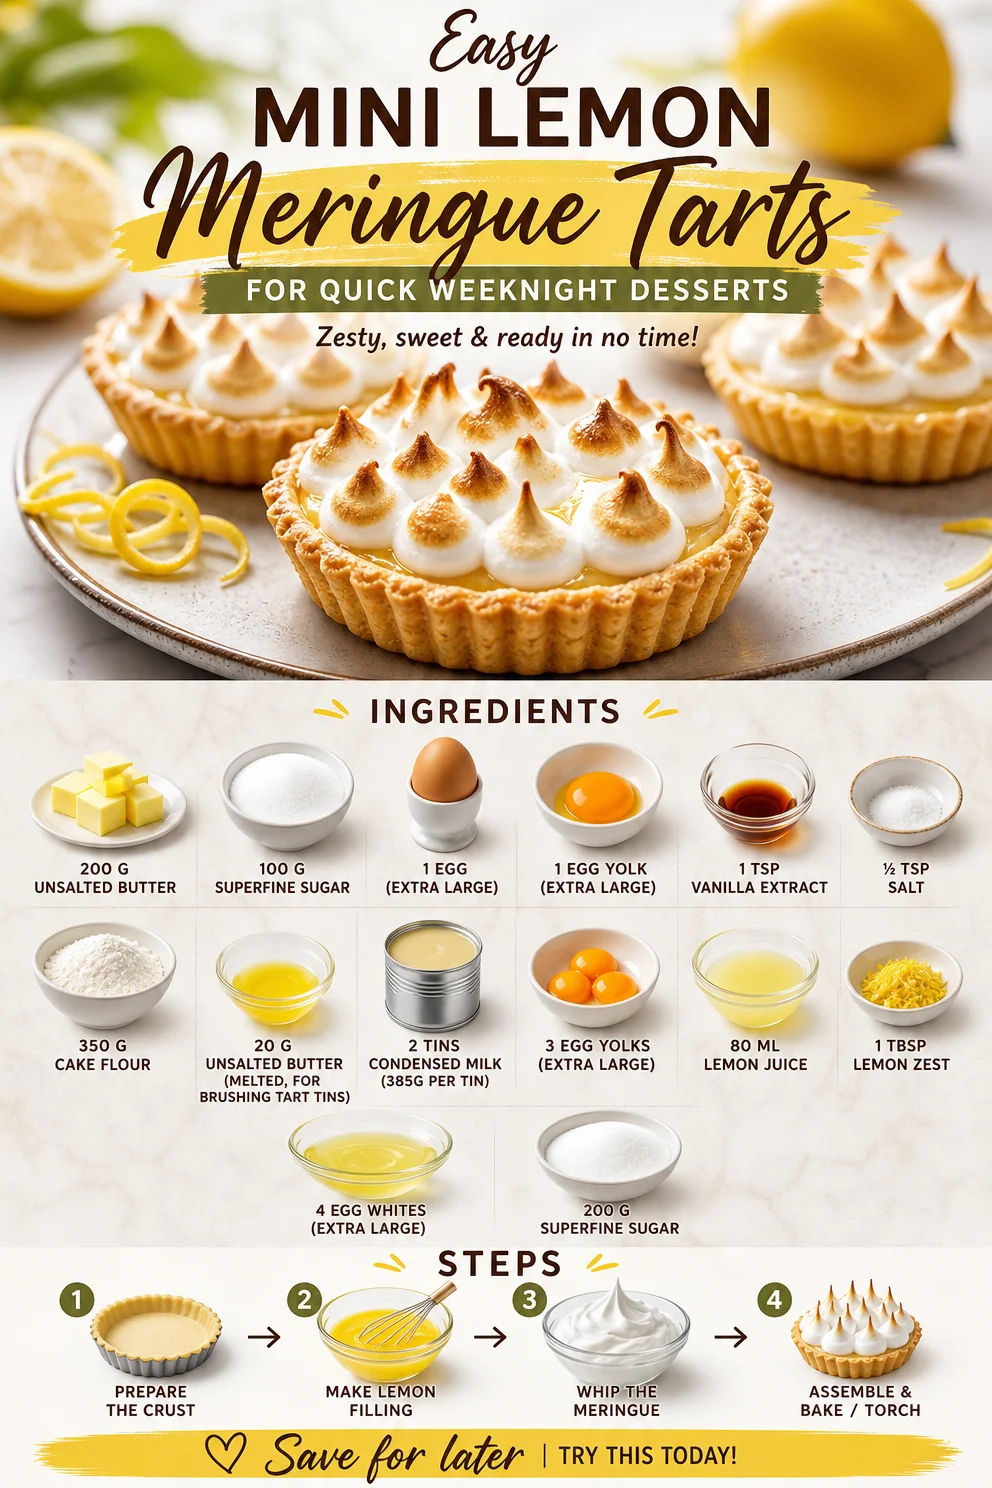
Easy Mini Lemon Meringue Tarts for Quick Weeknight Desserts
Mini Lemon Meringue Tarts: A Sweet Bite of Sunshine
Hello, fellow food lovers! If you’re anything like me, you believe that cooking should be an exciting adventure, blending artistry with flavors that dance on your palate. Today, I’m thrilled to share a recipe that captures the essence of summer in every bite—Mini Lemon Meringue Tarts. These little beauties are perfect for any occasion, whether you’re throwing a dinner party or just indulging in a sweet treat after a long day. Let’s dive into the sunny world of tangy lemon curd and fluffy meringue topped tarts!
A Family Tradition
Growing up in my family, lemon meringue pie was almost a rite of passage. My grandma had a rhythm to her baking—the crackle of her mixing bowl, the sweet and sour aroma wafting through the air, and of course, her infamous meringue that always had to reach that perfect glossy peak. One summer afternoon, I decided to step into the kitchen, determined to replicate her masterpiece. Armed with her handwritten recipe and a heap of enthusiasm, I soon discovered the wonder of whipping egg whites and the magic of balancing sweet and tart flavors.
Though my first attempt ended in a bit of a mess—let’s just say there was more meringue on my face than on the pie—I still remember the joy of creating something special. After a few tries and many giggles later, I finally nailed the recipe. This experience sparked my love for baking and laid the foundation for many delightful kitchen adventures. Fast forward to today, and I’m excited to share a mini version of that classic dessert. Trust me, these Mini Lemon Meringue Tarts will win hearts just like my grandma’s pie!
Ingredients
Here’s what you’ll need to create your own mini lemon meringue tarts:
For the Tart Shells:
- 200 g unsalted butter: Adds a rich flavor and tender texture. If you prefer, you can use a plant-based butter for a dairy-free option.
- 100 g superfine sugar: This helps create a light and tender crust. You can also use powdered sugar if that’s what you have on hand.
- 1 extra-large egg: Acts as a binder in the crust. A flax egg (1 tablespoon flaxseed meal + 2.5 tablespoons water) can be a good substitute for a vegan version.
- 1 extra-large egg yolk: Contributes to the richness. No substitute for this—just embrace the decadence!
- 1 tsp vanilla extract: Enhances the flavor of the crust. Feel free to use almond extract for a twist!
- ½ tsp salt: Just a pinch to balance the sweetness.
- 350 g cake flour: A lighter flour for tender tarts. All-purpose flour will work too, just expect a slightly denser crust.
- 20 g unsalted butter (melted, for brushing tart tins): This is for greasing the tins easily.
For the Lemon Curd Filling:
- 2 tins condensed milk (385g per tin): Provides sweetness and thickness. You can opt for sweetened coconut milk if you’d like to go dairy-free.
- 3 extra-large egg yolks: These will thicken your curd beautifully.
- 80 ml lemon juice: Freshly squeezed is best for a vibrant flavor. Bottle juice works in a pinch, but freshness makes a difference!
- 1 tbsp lemon zest: Always zest before juicing! It adds a lovely aromatic element to your curd.
For the Meringue Topping:
- 4 extra-large egg whites: They’re the star of this meringue—so fluffy and perfect!
- 200 g superfine sugar: Helps stabilize the egg whites to create that dreamy meringue.
Step-by-Step Instructions
Let’s get cooking! Here’s how to create these delightful Mini Lemon Meringue Tarts.
-
Prepare the Tart Shells:
Preheat your oven to 180 °C (350 °F). In a large mixing bowl, cream together the 200 g unsalted butter and 100 g superfine sugar until it’s light and fluffy—this usually takes about 3 minutes at medium speed. Pro tip: A stand mixer can make this process easier, but a handheld mixer works just fine! -
Add the Wet Ingredients:
Mix in the 1 whole egg, 1 egg yolk, and 1 tsp vanilla extract, ensuring everything is well-combined. You want a lovely light yellow mixture that smells divine! -
Incorporate Dry Ingredients:
Gradually sift in the 350 g cake flour and ½ tsp salt. Use a spatula to fold in the flour until just combined. Be careful not to overmix! You want a soft dough that holds together when pressed. If it feels too crumbly, add a teaspoon of cold water. -
Shape and Chill:
Lightly flour your work surface, roll out the dough to about ½ cm thick, and cut out circles that will fit into your tart tins. Press the dough gently into the tins and poke a few holes in the bottom to prevent puffing. Pop these into the fridge for 20-30 minutes to chill—this will help keep them from shrinking during baking. -
Bake the Shells:
Brush the tart shells with melted butter and bake them in the preheated oven for about 15-18 minutes, or until they are golden brown. Keep an eye on them to avoid burning! -
Prepare the Lemon Curd:
While your shells are baking, let’s whip up that luscious lemon curd! In a medium saucepan over low heat, combine the two tins of condensed milk, 3 egg yolks, 80 ml lemon juice, and 1 tbsp lemon zest. Stir constantly until the mixture thickens, about 5-7 minutes. You’ll know it’s ready when it coats the back of a spoon.Tip: Don’t rush this step; patience is key!
-
Fill the Tarts:
Once your shells are cooled and the lemon curd thickened, pour the curd into each tart shell, filling them up to the brim. Set them aside to cool completely while you prepare the meringue. -
Make the Meringue:
In a clean mixing bowl, whip the 4 egg whites on medium speed until soft peaks form. Gradually add in the 200 g superfine sugar, a tablespoon at a time, until the meringue becomes glossy and holds stiff peaks. You want to be able to turn that bowl upside down without losing a drop of meringue! -
Top Your Tarts:
Pipe or spoon the meringue high onto each filled tart. Get creative with the design! A fun swirl or little peaks always looks wonderful. -
Toast the Meringue:
Using a kitchen torch, toast the meringues until they reach a lovely golden hue. If you don’t have a torch, simply pop them under the broiler for 2-3 minutes, keeping a close eye on them to avoid burning. -
Serve and Enjoy:
Let the tarts cool for a few minutes, then serve them chilled or at room temperature. Your guests will be singing your praises!
Serving Suggestions
For an elegant presentation, serve your Mini Lemon Meringue Tarts on a beautiful cake stand, garnished with fresh berries or mint leaves. Consider pairing them with a refreshing drink like iced tea with lemon or a sweet cocktail.
Recipe Variations
Here are a few fun twists you can try:
- Berry Bliss: Add a layer of fresh blueberries or raspberries underneath the lemon curd for a burst of vibrant flavor.
- Coconut Meringue: Incorporate toasted coconut into the meringue for a tropical twist.
- Savory Lemon Tarts: Replace lemon curd with a mixture of savory ingredients like goat cheese and thyme for a unique appetizer.
- Mini Cheesecakes: Swap out lemon curd with cheesecake filling for a delicious twist on classic tarts.
- Vegan Variation: Use aquafaba (chickpea water) in place of egg whites for a delightful vegan meringue.
Chef’s Notes
I can’t help but chuckle when reminiscing about the first time I tried to toast meringue under the broiler. I was so excited to impress my guests that I didn’t pay attention, and voilà! A charred, sad little mound of meringue was all that was left. Lesson learned: sometimes, less is more—especially when it comes to toasting. These tarts are all about bringing joy to the table without stress, so don’t worry about perfection; just enjoy the process!
FAQs and Troubleshooting
1. My meringue didn’t whip up nicely; what went wrong?
Make sure your mixing bowl and beaters are squeaky clean! Any fat or residue can inhibit the egg whites from whipping up properly.
2. How do I prevent my tart shells from getting soggy?
Chill your crusts before baking and make sure to bake until they are golden brown. Pre-baking helps develop a sturdy shell that can handle fillings without getting soggy.
3. Can I make these tarts in advance?
Absolutely! You can prepare the tart shells and lemon curd a day ahead and assemble them right before serving for a fresh meringue.
4. What’s the best way to store leftovers?
Store any leftover tarts in the refrigerator for up to 2 days. They taste amazing cold, but the meringue is best enjoyed fresh!
Nutritional Info
Each mini tart is a delightful treat, bursting with fresh lemon flavor, but be mindful of the sugar content! Indulging in these is best enjoyed in moderation as part of a balanced diet.
I hope you feel inspired to create these Mini Lemon Meringue Tarts in your own kitchen! Remember, it’s not just about the food; it’s the joy, laughter, and memories that gather around the table that makes cooking worthwhile. So grab your apron, and let’s make something delicious together! Happy cooking! 🍋✨
PrintMini Lemon Meringue Tarts
Delightful mini tarts with tangy lemon curd and fluffy meringue, perfect for any occasion.
- Prep Time: 30 minutes
- Cook Time: 30 minutes
- Total Time: 60 minutes
- Yield: 12 servings 1x
- Category: Dessert
- Method: Baking
- Cuisine: American
- Diet: Vegetarian
Ingredients
- 200 g unsalted butter
- 100 g superfine sugar
- 1 extra-large egg
- 1 extra-large egg yolk
- 1 tsp vanilla extract
- ½ tsp salt
- 350 g cake flour
- 20 g unsalted butter (melted, for brushing tart tins)
- 2 tins condensed milk (385 g per tin)
- 3 extra-large egg yolks
- 80 ml lemon juice
- 1 tbsp lemon zest
- 4 extra-large egg whites
- 200 g superfine sugar (for meringue)
Instructions
- Preheat your oven to 180 °C (350 °F). In a large mixing bowl, cream together the butter and sugar until light and fluffy.
- Mix in the egg, egg yolk, and vanilla extract until well-combined.
- Gradually sift in the cake flour and salt, folding until just combined.
- Roll out the dough, cut into circles, and press into tart tins. Chill for 20-30 minutes.
- Brush the tart shells with melted butter and bake for 15-18 minutes until golden brown.
- In a medium saucepan, combine the condensed milk, egg yolks, lemon juice, and zest over low heat. Stir until thickened.
- Pour the lemon curd into each tart shell once cooled.
- Whip the egg whites until soft peaks form, gradually adding sugar until glossy and stiff peaks form.
- Pipe the meringue onto the tarts and toast using a kitchen torch.
- Serve the tarts chilled or at room temperature.
Notes
For a creative twist, try adding fresh berries under the lemon curd or making a vegan version with aquafaba.
Nutrition
- Serving Size: 1 tart
- Calories: 250
- Sugar: 15g
- Sodium: 100mg
- Fat: 10g
- Saturated Fat: 5g
- Unsaturated Fat: 5g
- Trans Fat: 0g
- Carbohydrates: 30g
- Fiber: 1g
- Protein: 4g
- Cholesterol: 70mg
Keywords: lemon tarts, dessert, meringue, baking, summer treats