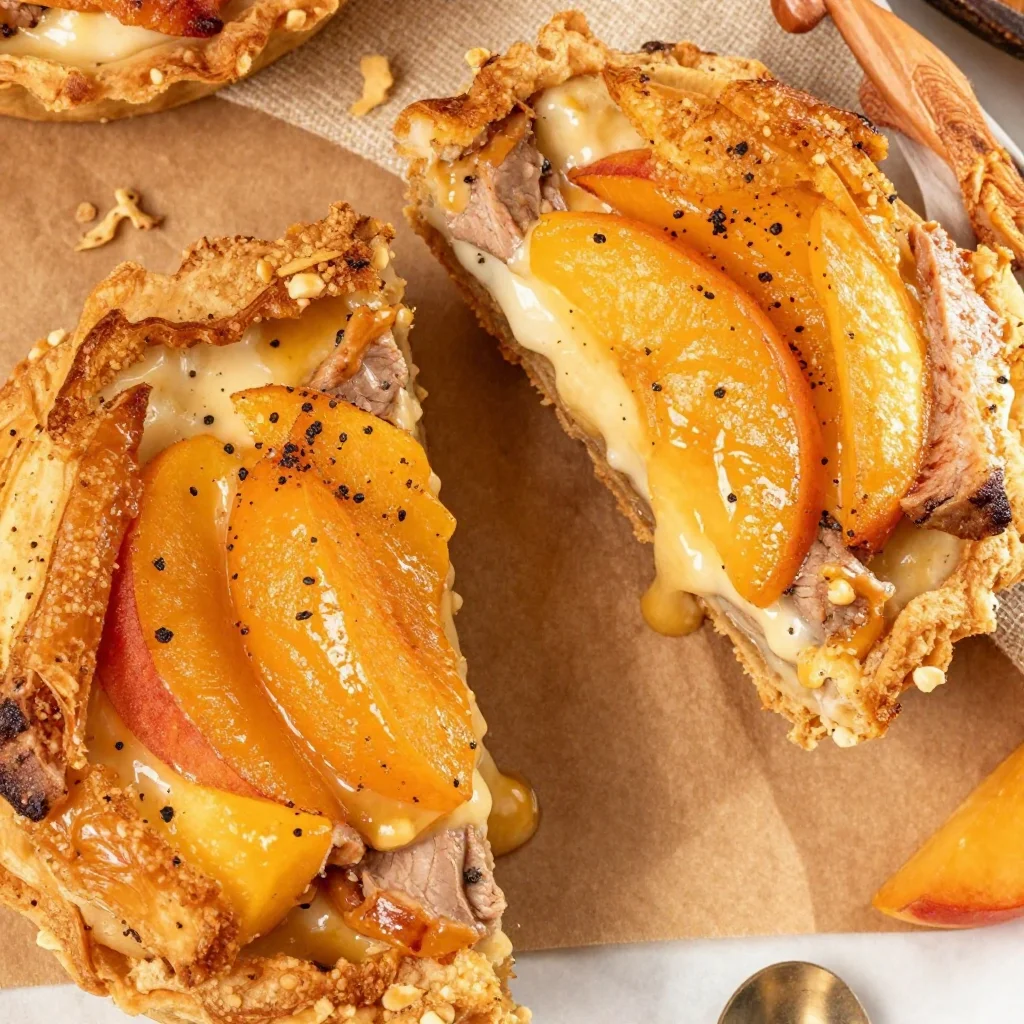
Ingredient Mini Peach Cream Cheese Tarts in 20 Minutes
Mini Peach and Cream Cheese Tarts: A Slice of Summer Bliss
Hello, my dear friends! Today, I’m thrilled to share a delightful treat that embodies summer sweetness and a touch of elegance: Mini Peach and Cream Cheese Tarts. These tarts are the perfect marriage of rich cream cheese and juicy, ripe peaches, all wrapped up in flaky puff pastry. Imagine your kitchen filled with the aroma of baked pastry and cinnamon while you indulge in these bite-sized delights.
Cooking is all about creating memories, and I’m excited to take you on this journey. So, tie on your apron, grab your favorite drink, and let’s dive into this scrumptious recipe that’ll have your taste buds singing!
A Slice of My Childhood
Growing up, summer meant peach season. Our local farm would host a peach-picking day, and I can still recall the thrill of plucking those fuzzy gems right from the tree. As we loaded up our baskets, my mother would talk about her favorite peach desserts, each story woven with laughter and love. One afternoon, after a long day of picking, she surprised us all with a batch of mini tarts, topped with fresh fruit and a creamy filling.
Those tarts were little miracles! Each bite was a memory, a warm hug on a sunny afternoon. As I watched my family gather around the table, enjoying those tarts, I realized that food has an incredible power to connect us. That’s why I wanted to recreate something similar here—an easy yet impressive treat that encourages you to gather your loved ones and share stories over something delicious.
Ingredients
For these Mini Peach and Cream Cheese Tarts, you’ll need the following ingredients:
-
Puff Pastry: This flaky pastry is the perfect base for our tarts. If you don’t have puff pastry on hand, you can use pie crust or even phyllo dough for a different texture. Just remember to pre-bake it according to the package instructions.
-
Fresh Peaches, Sliced: The star of the show! Ripe, juicy peaches bring sweetness and color. If peaches are out of season, feel free to use nectarines or even canned peaches (drained) in a pinch.
-
Cream Cheese Slices: Cream cheese adds that luscious, creamy texture we all crave. For a lighter option, consider using Neufchâtel cheese or a vegan cream cheese alternative.
-
Cinnamon: This spice not only warms the flavor but also enhances the natural sweetness of peaches. For a twist, you could try nutmeg or allspice instead.
-
Lemon Juice: A splash of lemon juice brightens up the flavors and keeps the peaches from browning. If you don’t have lemon, lime juice works nicely too.
-
Honey: This natural sweetener adds a touch of sweetness without overwhelming the dish. Maple syrup or agave nectar can be good substitutes if you prefer.
Each ingredient works together harmoniously, creating a balance of flavors that’s absolutely irresistible.
Step-by-Step Instructions
Now, let’s get down to business! Follow these steps for crafting your Mini Peach and Cream Cheese Tarts:
-
Preheat Your Oven: Start by preheating your oven to 400°F (200°C). The warm air will help your tarts puff up beautifully, creating that flaky texture we love.
-
Prepare the Puff Pastry: Roll out your puff pastry on a lightly floured surface. It should be about ¼ inch thick. Using a round cutter (or a glass), cut out circles—about 3 to 4 inches in diameter. You should have enough for a dozen mini tarts. Place the pastry circles on a parchment-lined baking sheet.
Chef’s Tip: If you want an extra golden finish, brush the edges of the pastry with an egg wash (1 beaten egg mixed with a splash of water).
-
Pre-bake the Pastry: Prick the centers of each pastry circle with a fork to prevent it from puffing up too much. Bake in the preheated oven for 8-10 minutes, or until they are lightly golden.
-
Craft the Filling: While the pastry is baking, it’s time to prep the filling. In a small bowl, combine your cream cheese, honey, and a splash of lemon juice. Beat everything together until smooth. You want it to be creamy and spreadable.
Little Hack: If your cream cheese is too firm, pop it in the microwave for a few seconds to soften it up!
-
Slice the Peaches: Take your fresh peaches and slice them into thin wedges. If peaches are really ripe, you might want to chill them slightly to make slicing easier.
-
Assemble the Tarts: Once the pastry is done and has cooled for a few moments, spread a generous layer of cream cheese mixture in the center of each tart. Then, carefully arrange the peach slices on top in a circular pattern. Sprinkle a light dusting of cinnamon over the peaches for that warm spice flavor.
-
Final Bake: Return the tarts to the oven and bake for an additional 5-7 minutes, until everything is warmed through and your kitchen is filled with an intoxicating aroma. The peaches should be tender but not mushy.
-
Cool and Serve: Let the tarts cool on the baking sheet before transferring them to a serving platter. Drizzle a little extra honey on top for that added touch of sweetness.
Serving Suggestions
To make your presentation shine, serve these Mini Peach and Cream Cheese Tarts on a beautiful platter, garnished with fresh mint leaves or edible flowers for that touch of whimsy. Pair them with a scoop of vanilla ice cream or a dollop of whipped cream for an extra indulgent experience. Perfect for a summer gathering or a cozy family dessert night!
Recipe Variations
Feel free to get creative with this recipe! Here are a few variations you might enjoy:
-
Berry Medley: Swap out the peaches for mixed berries like strawberries, blueberries, and raspberries for a delightful twist.
-
Spiced Up: Add a pinch of cardamom to the cream cheese filling for an exotic flavor profile.
-
Nutty Delight: Top the tarts with crushed almonds or pecans before baking for added crunch.
-
Chocolate Drizzle: Finish with a drizzle of melted chocolate for something truly decadent.
-
Gluten-Free Option: Use gluten-free puff pastry to make this treat accessible for everyone.
Chef’s Notes
As always, each time I whip up these tarts, I remember that sunny day in the orchard with my family. Cooking isn’t just about food; it’s about those feelings of nostalgia and connection. These Mini Peach and Cream Cheese Tarts have become a summer staple in my kitchen, and I hope they will become a cherished recipe in yours too!
FAQs and Troubleshooting
-
What if my puff pastry gets soggy?
- Make sure to prick the pastry before baking and avoid overloading with the cream cheese filling.
-
Can I make the filling ahead of time?
- Absolutely! Prepare the cream cheese mixture a day in advance, but keep it stored in the fridge, covered. Assemble the tarts just before baking.
-
How do I store leftover tarts?
- Store any leftover tarts in an airtight container in the fridge for up to 2 days. They taste best fresh, so enjoy them ASAP!
-
How do I know when the peaches are ripe?
- Look for peaches that are slightly soft to the touch but not mushy. They should have a fragrant aroma, signaling sweetness!
Nutritional Info
While I won’t bore you with all the numbers, these Mini Peach and Cream Cheese Tarts are a lovely balance of indulgence and fresh ingredients. Each tart is a delightful treat and can definitely be enjoyed in moderation as part of a balanced diet!
I hope you enjoyed this culinary journey into my kitchen! These Mini Peach and Cream Cheese Tarts are not just about satisfying your sweet tooth; they’re about making memories, sharing love, and connecting with the people around you. So gather your ingredients, bring your friends together, and let’s create something beautiful. Happy baking, friends! 🍑✨
PrintMini Peach and Cream Cheese Tarts

A delightful treat that combines rich cream cheese with juicy peaches wrapped in flaky puff pastry.
- Prep Time: 15 minutes
- Cook Time: 20 minutes
- Total Time: 35 minutes
- Yield: 12 servings 1x
- Category: Dessert
- Method: Baking
- Cuisine: American
- Diet: Vegetarian
Ingredients
- 1 sheet Puff Pastry
- 2 Fresh Peaches, sliced
- 4 oz Cream Cheese, sliced
- 1 tsp Cinnamon
- 1 tbsp Lemon Juice
- 2 tbsp Honey
Instructions
- Preheat your oven to 400°F (200°C).
- Prepare the puff pastry by rolling it out to ¼ inch thickness and cutting circles of 3 to 4 inches.
- Pre-bake the pastry circles for 8-10 minutes until lightly golden.
- Craft the filling by combining the cream cheese, honey, and lemon juice until smooth.
- Slice your peaches into thin wedges.
- Assemble the tarts by spreading the cream cheese mixture on each pastry and topping with peach slices.
- Return the tarts to the oven and bake for an additional 5-7 minutes.
- Cool the tarts on a baking sheet before serving.
Notes
Serve with mint leaves or edible flowers and pair with ice cream or whipped cream for a perfect treat.
Nutrition
- Serving Size: 1 tart
- Calories: 200
- Sugar: 10g
- Sodium: 150mg
- Fat: 10g
- Saturated Fat: 5g
- Unsaturated Fat: 4g
- Trans Fat: 0g
- Carbohydrates: 22g
- Fiber: 1g
- Protein: 3g
- Cholesterol: 15mg
Keywords: peach tarts, cream cheese, dessert, summer, baking
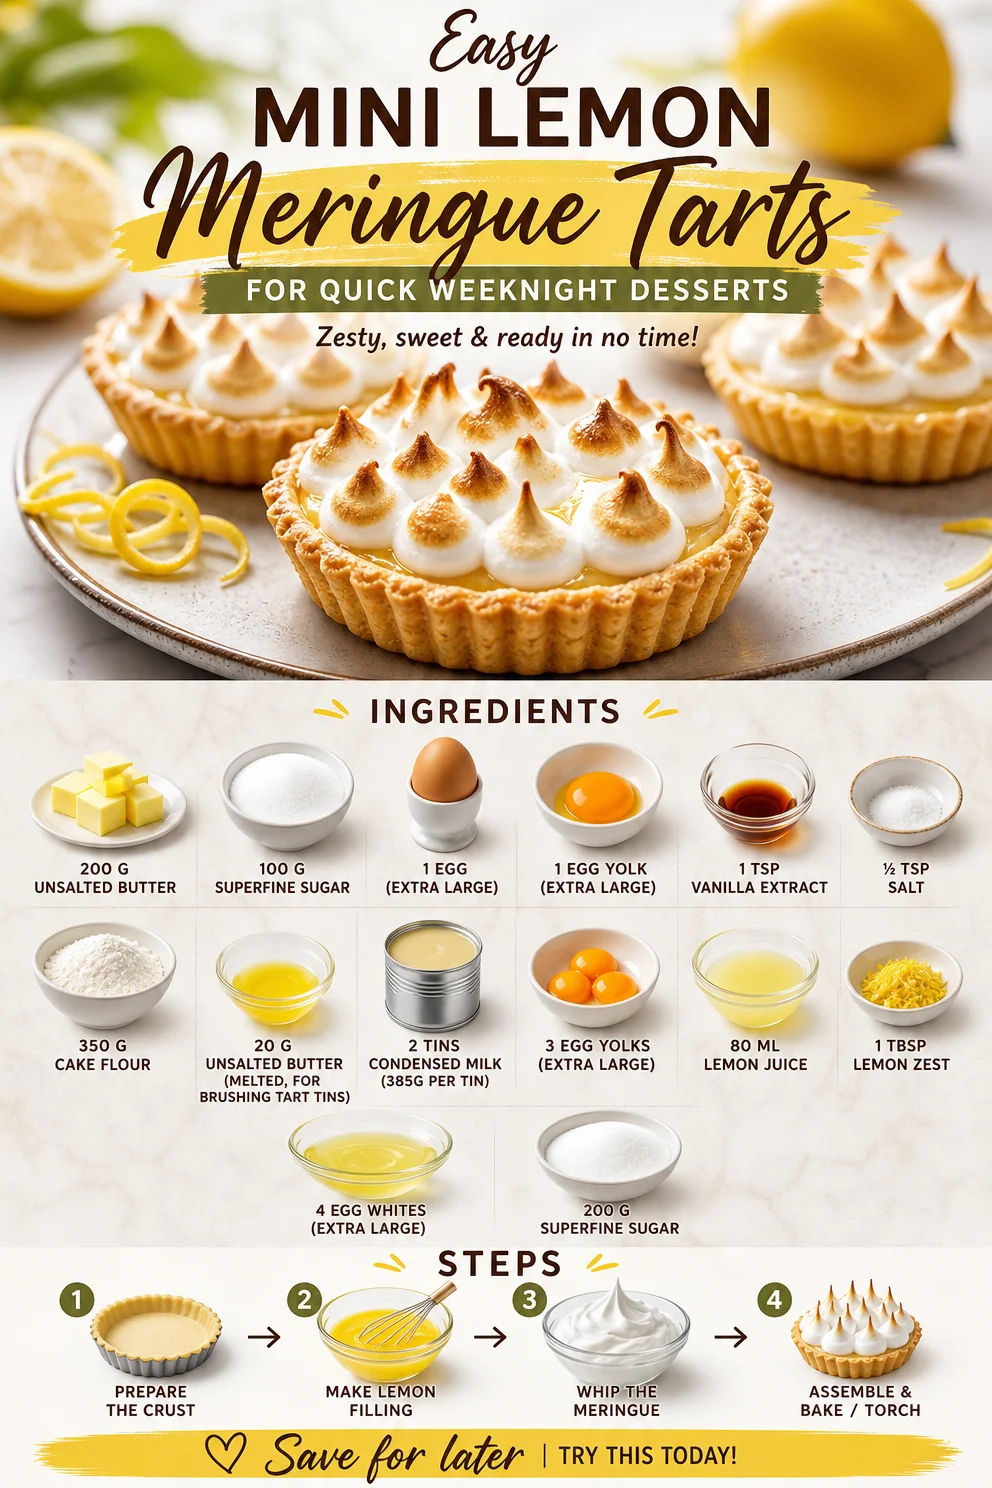
Easy Mini Lemon Meringue Tarts for Quick Weeknight Desserts
Mini Lemon Meringue Tarts: A Sweet Bite of Sunshine
Hello, fellow food lovers! If you’re anything like me, you believe that cooking should be an exciting adventure, blending artistry with flavors that dance on your palate. Today, I’m thrilled to share a recipe that captures the essence of summer in every bite—Mini Lemon Meringue Tarts. These little beauties are perfect for any occasion, whether you’re throwing a dinner party or just indulging in a sweet treat after a long day. Let’s dive into the sunny world of tangy lemon curd and fluffy meringue topped tarts!
A Family Tradition
Growing up in my family, lemon meringue pie was almost a rite of passage. My grandma had a rhythm to her baking—the crackle of her mixing bowl, the sweet and sour aroma wafting through the air, and of course, her infamous meringue that always had to reach that perfect glossy peak. One summer afternoon, I decided to step into the kitchen, determined to replicate her masterpiece. Armed with her handwritten recipe and a heap of enthusiasm, I soon discovered the wonder of whipping egg whites and the magic of balancing sweet and tart flavors.
Though my first attempt ended in a bit of a mess—let’s just say there was more meringue on my face than on the pie—I still remember the joy of creating something special. After a few tries and many giggles later, I finally nailed the recipe. This experience sparked my love for baking and laid the foundation for many delightful kitchen adventures. Fast forward to today, and I’m excited to share a mini version of that classic dessert. Trust me, these Mini Lemon Meringue Tarts will win hearts just like my grandma’s pie!
Ingredients
Here’s what you’ll need to create your own mini lemon meringue tarts:
For the Tart Shells:
- 200 g unsalted butter: Adds a rich flavor and tender texture. If you prefer, you can use a plant-based butter for a dairy-free option.
- 100 g superfine sugar: This helps create a light and tender crust. You can also use powdered sugar if that’s what you have on hand.
- 1 extra-large egg: Acts as a binder in the crust. A flax egg (1 tablespoon flaxseed meal + 2.5 tablespoons water) can be a good substitute for a vegan version.
- 1 extra-large egg yolk: Contributes to the richness. No substitute for this—just embrace the decadence!
- 1 tsp vanilla extract: Enhances the flavor of the crust. Feel free to use almond extract for a twist!
- ½ tsp salt: Just a pinch to balance the sweetness.
- 350 g cake flour: A lighter flour for tender tarts. All-purpose flour will work too, just expect a slightly denser crust.
- 20 g unsalted butter (melted, for brushing tart tins): This is for greasing the tins easily.
For the Lemon Curd Filling:
- 2 tins condensed milk (385g per tin): Provides sweetness and thickness. You can opt for sweetened coconut milk if you’d like to go dairy-free.
- 3 extra-large egg yolks: These will thicken your curd beautifully.
- 80 ml lemon juice: Freshly squeezed is best for a vibrant flavor. Bottle juice works in a pinch, but freshness makes a difference!
- 1 tbsp lemon zest: Always zest before juicing! It adds a lovely aromatic element to your curd.
For the Meringue Topping:
- 4 extra-large egg whites: They’re the star of this meringue—so fluffy and perfect!
- 200 g superfine sugar: Helps stabilize the egg whites to create that dreamy meringue.
Step-by-Step Instructions
Let’s get cooking! Here’s how to create these delightful Mini Lemon Meringue Tarts.
-
Prepare the Tart Shells:
Preheat your oven to 180 °C (350 °F). In a large mixing bowl, cream together the 200 g unsalted butter and 100 g superfine sugar until it’s light and fluffy—this usually takes about 3 minutes at medium speed. Pro tip: A stand mixer can make this process easier, but a handheld mixer works just fine! -
Add the Wet Ingredients:
Mix in the 1 whole egg, 1 egg yolk, and 1 tsp vanilla extract, ensuring everything is well-combined. You want a lovely light yellow mixture that smells divine! -
Incorporate Dry Ingredients:
Gradually sift in the 350 g cake flour and ½ tsp salt. Use a spatula to fold in the flour until just combined. Be careful not to overmix! You want a soft dough that holds together when pressed. If it feels too crumbly, add a teaspoon of cold water. -
Shape and Chill:
Lightly flour your work surface, roll out the dough to about ½ cm thick, and cut out circles that will fit into your tart tins. Press the dough gently into the tins and poke a few holes in the bottom to prevent puffing. Pop these into the fridge for 20-30 minutes to chill—this will help keep them from shrinking during baking. -
Bake the Shells:
Brush the tart shells with melted butter and bake them in the preheated oven for about 15-18 minutes, or until they are golden brown. Keep an eye on them to avoid burning! -
Prepare the Lemon Curd:
While your shells are baking, let’s whip up that luscious lemon curd! In a medium saucepan over low heat, combine the two tins of condensed milk, 3 egg yolks, 80 ml lemon juice, and 1 tbsp lemon zest. Stir constantly until the mixture thickens, about 5-7 minutes. You’ll know it’s ready when it coats the back of a spoon.Tip: Don’t rush this step; patience is key!
-
Fill the Tarts:
Once your shells are cooled and the lemon curd thickened, pour the curd into each tart shell, filling them up to the brim. Set them aside to cool completely while you prepare the meringue. -
Make the Meringue:
In a clean mixing bowl, whip the 4 egg whites on medium speed until soft peaks form. Gradually add in the 200 g superfine sugar, a tablespoon at a time, until the meringue becomes glossy and holds stiff peaks. You want to be able to turn that bowl upside down without losing a drop of meringue! -
Top Your Tarts:
Pipe or spoon the meringue high onto each filled tart. Get creative with the design! A fun swirl or little peaks always looks wonderful. -
Toast the Meringue:
Using a kitchen torch, toast the meringues until they reach a lovely golden hue. If you don’t have a torch, simply pop them under the broiler for 2-3 minutes, keeping a close eye on them to avoid burning. -
Serve and Enjoy:
Let the tarts cool for a few minutes, then serve them chilled or at room temperature. Your guests will be singing your praises!
Serving Suggestions
For an elegant presentation, serve your Mini Lemon Meringue Tarts on a beautiful cake stand, garnished with fresh berries or mint leaves. Consider pairing them with a refreshing drink like iced tea with lemon or a sweet cocktail.
Recipe Variations
Here are a few fun twists you can try:
- Berry Bliss: Add a layer of fresh blueberries or raspberries underneath the lemon curd for a burst of vibrant flavor.
- Coconut Meringue: Incorporate toasted coconut into the meringue for a tropical twist.
- Savory Lemon Tarts: Replace lemon curd with a mixture of savory ingredients like goat cheese and thyme for a unique appetizer.
- Mini Cheesecakes: Swap out lemon curd with cheesecake filling for a delicious twist on classic tarts.
- Vegan Variation: Use aquafaba (chickpea water) in place of egg whites for a delightful vegan meringue.
Chef’s Notes
I can’t help but chuckle when reminiscing about the first time I tried to toast meringue under the broiler. I was so excited to impress my guests that I didn’t pay attention, and voilà! A charred, sad little mound of meringue was all that was left. Lesson learned: sometimes, less is more—especially when it comes to toasting. These tarts are all about bringing joy to the table without stress, so don’t worry about perfection; just enjoy the process!
FAQs and Troubleshooting
1. My meringue didn’t whip up nicely; what went wrong?
Make sure your mixing bowl and beaters are squeaky clean! Any fat or residue can inhibit the egg whites from whipping up properly.
2. How do I prevent my tart shells from getting soggy?
Chill your crusts before baking and make sure to bake until they are golden brown. Pre-baking helps develop a sturdy shell that can handle fillings without getting soggy.
3. Can I make these tarts in advance?
Absolutely! You can prepare the tart shells and lemon curd a day ahead and assemble them right before serving for a fresh meringue.
4. What’s the best way to store leftovers?
Store any leftover tarts in the refrigerator for up to 2 days. They taste amazing cold, but the meringue is best enjoyed fresh!
Nutritional Info
Each mini tart is a delightful treat, bursting with fresh lemon flavor, but be mindful of the sugar content! Indulging in these is best enjoyed in moderation as part of a balanced diet.
I hope you feel inspired to create these Mini Lemon Meringue Tarts in your own kitchen! Remember, it’s not just about the food; it’s the joy, laughter, and memories that gather around the table that makes cooking worthwhile. So grab your apron, and let’s make something delicious together! Happy cooking! 🍋✨
PrintMini Lemon Meringue Tarts

Delightful mini tarts with tangy lemon curd and fluffy meringue, perfect for any occasion.
- Prep Time: 30 minutes
- Cook Time: 30 minutes
- Total Time: 60 minutes
- Yield: 12 servings 1x
- Category: Dessert
- Method: Baking
- Cuisine: American
- Diet: Vegetarian
Ingredients
- 200 g unsalted butter
- 100 g superfine sugar
- 1 extra-large egg
- 1 extra-large egg yolk
- 1 tsp vanilla extract
- ½ tsp salt
- 350 g cake flour
- 20 g unsalted butter (melted, for brushing tart tins)
- 2 tins condensed milk (385 g per tin)
- 3 extra-large egg yolks
- 80 ml lemon juice
- 1 tbsp lemon zest
- 4 extra-large egg whites
- 200 g superfine sugar (for meringue)
Instructions
- Preheat your oven to 180 °C (350 °F). In a large mixing bowl, cream together the butter and sugar until light and fluffy.
- Mix in the egg, egg yolk, and vanilla extract until well-combined.
- Gradually sift in the cake flour and salt, folding until just combined.
- Roll out the dough, cut into circles, and press into tart tins. Chill for 20-30 minutes.
- Brush the tart shells with melted butter and bake for 15-18 minutes until golden brown.
- In a medium saucepan, combine the condensed milk, egg yolks, lemon juice, and zest over low heat. Stir until thickened.
- Pour the lemon curd into each tart shell once cooled.
- Whip the egg whites until soft peaks form, gradually adding sugar until glossy and stiff peaks form.
- Pipe the meringue onto the tarts and toast using a kitchen torch.
- Serve the tarts chilled or at room temperature.
Notes
For a creative twist, try adding fresh berries under the lemon curd or making a vegan version with aquafaba.
Nutrition
- Serving Size: 1 tart
- Calories: 250
- Sugar: 15g
- Sodium: 100mg
- Fat: 10g
- Saturated Fat: 5g
- Unsaturated Fat: 5g
- Trans Fat: 0g
- Carbohydrates: 30g
- Fiber: 1g
- Protein: 4g
- Cholesterol: 70mg
Keywords: lemon tarts, dessert, meringue, baking, summer treats
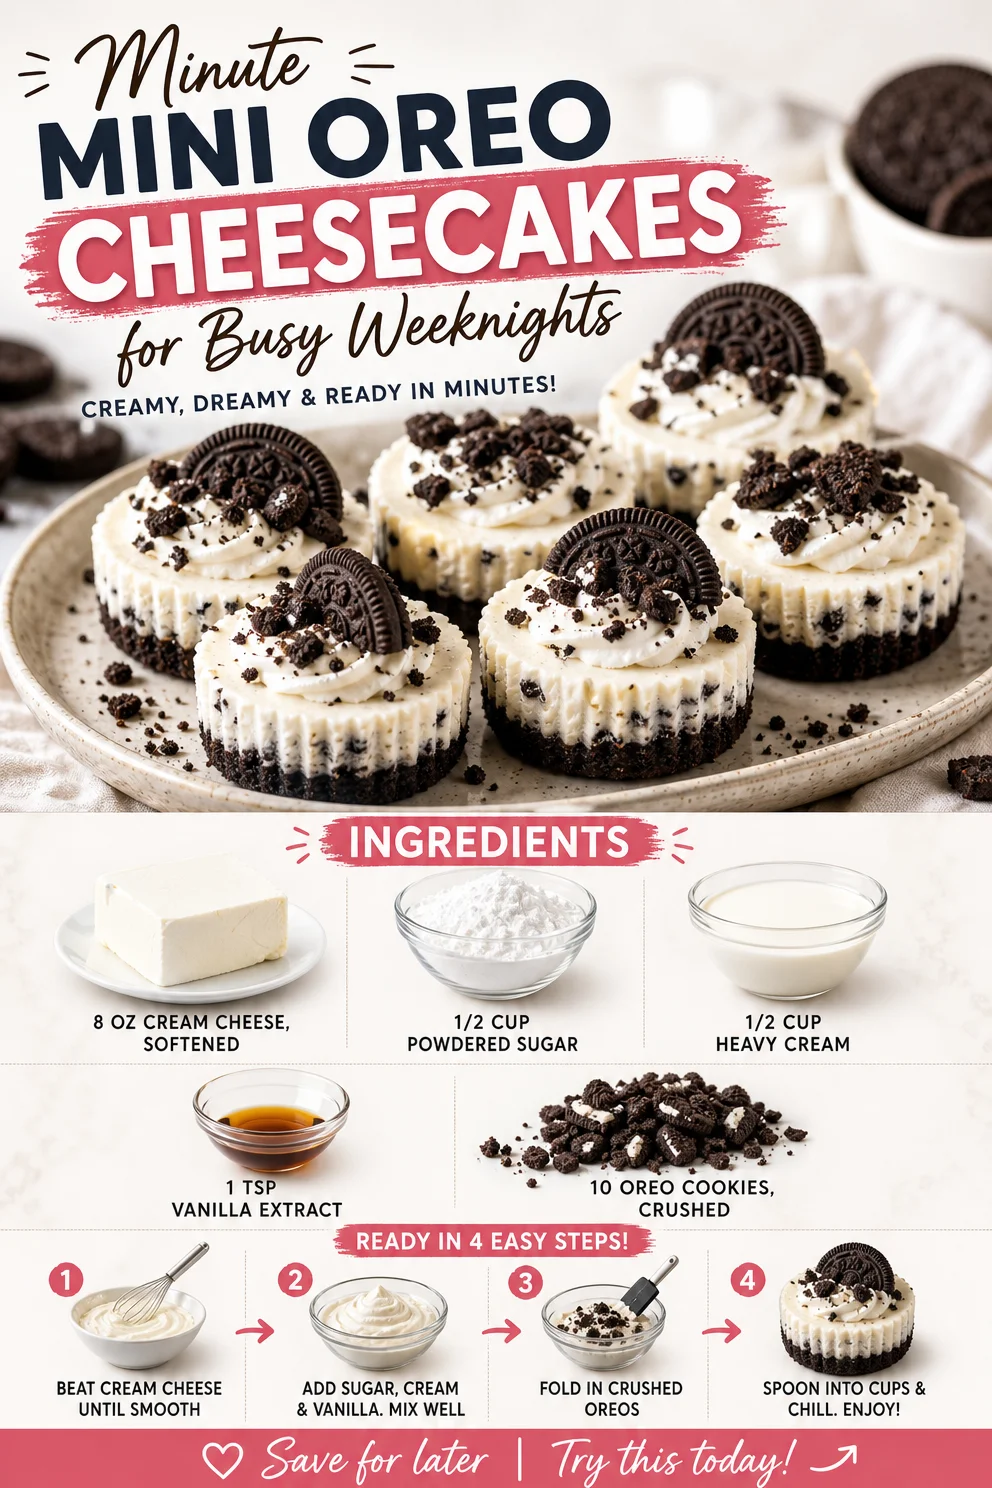
Minute Mini Oreo Cheesecakes for Busy Weeknights
Mini Oreo Cheesecakes: A Sweet Indulgence for Every Occasion
Hello, fellow food lovers! Savannah here, and today I’ve got something truly delightful to share: Mini Oreo Cheesecakes. These bite-sized treasures are the perfect blend of creamy, dreamy cheesecake and that irresistible chocolatey crunch we all love from Oreos. Whether it’s a dinner party, a casual get-together, or simply a sweet treat after a long day, these mini cheesecakes will steal the show and keep your guests coming back for seconds—and maybe even thirds!
You might be wondering, “Savannah, what makes these mini cheesecakes so special?” Well, let me tell you, it’s all about the balance of flavors and textures. They are rich but not overwhelming, sweet but not cloyingly so. Plus, they are so easy to whip up! No need for any baking skills or fancy kitchen gadgets—just your trusty mixing bowl and a little bit of love. So, let’s dive into this scrumptious recipe that’s sure to bring joy to any table.
My Mini Oreo Cheesecake Story
I remember the first time I made mini cheesecakes. It was for a friend’s birthday celebration. I wanted to create something special that would stand out among the usual cake options. While browsing through my pantry for inspiration, the sight of those familiar black-and-white cookies caught my eye. “What if I could incorporate Oreos?” I thought. The idea of a mini cheesecake infused with that classic Oreo flavor sparked my creativity, and before I knew it, I was mixing and tasting, feeling like a true kitchen alchemist.
The party was a hit! Guests raved about these little morsels, and their faces lit up with joy after each bite. It was that night I discovered the magic of individual desserts. There’s something so personal about having a treat made just for you, and I knew I had to share this recipe with all my culinary companions. Fast forward to today, and I’m thrilled to guide you through making your very own Mini Oreo Cheesecakes!
Ingredients
Here’s what you’ll need to create these luscious little cheesecakes:
-
8 oz cream cheese, softened
This is the star of the show! Softening the cream cheese is essential for a smooth and creamy texture. If you’re in a pinch, you can use Neufchâtel for a lighter option. -
1/2 cup powdered sugar
This sweetener dissolves beautifully into the cream cheese, giving the filling that silky-smooth finish. Need a swap? Coconut sugar will work, but it’s dark and may affect the final color slightly. -
1/2 cup heavy cream
Whipping cream adds lightness and richness. If you prefer a lower-fat version, you can use half-and-half, but it won’t whip up quite as fluffy. -
1 tsp vanilla extract
A splash of vanilla enhances the flavors and adds a lovely aroma. Always opt for pure vanilla extract when you can—it’s worth it! -
10 Oreo cookies, crushed
These delicious cookies will give our cheesecakes that classic flavor and a nice crunch. If you’re feeling adventurous, try different flavored Oreos for a unique twist!
Step-by-Step Instructions
Now, let’s make these adorable cheesecakes! Follow these steps closely, and I promise they will be a breeze to whip up:
-
Prepare the Cupcake Liners
Start by placing cupcake liners in a muffin tin. This will help with the removal later and ensure a beautiful presentation. Pro tip: choose festive liners if you’re feeling celebratory! -
Crush the Oreos
Place your 10 Oreo cookies in a zip-top bag and crush them using a rolling pin or your hands until they resemble fine crumbs. Alternatively, you can pulse them in a food processor for finer crumbs. This will be your crust! Leave a handful of crumbs to sprinkle on top later — it’s all about that final touch! -
Make the Cheesecake Filling
In a mixing bowl, combine the 8 oz of softened cream cheese and 1/2 cup of powdered sugar. Using an electric mixer, beat until smooth and creamy. This step is crucial—you want to make sure there are no lumps! Keep scraping down the sides of your bowl to ensure an even consistency. -
Add the Heavy Cream and Vanilla
Pour in the 1/2 cup heavy cream and 1 tsp of vanilla extract into your cream cheese mixture. Beat again until the mixture is thick and fluffy. This step usually takes about 2-3 minutes. If you’re feeling fancy, whip the cream separately until it forms stiff peaks before folding it in—this adds extra lightness! -
Fold in the Oreo Crumbs
Gently fold in the crushed Oreos, ensuring they’re evenly distributed. This gives you that lovely contrast between the creamy cheesecake and the crunchy bits of cookie. -
Fill the Cups
Spoon the cheesecake filling into your prepared cupcake liners, filling them about three-quarters of the way full. Smooth the tops with a spatula for a neat finish. Don’t worry about being too precise—that little rustic charm adds to the inviting nature of the dessert! -
Chill and Set
Place the muffin tin in the fridge for at least 4 hours, or ideally overnight. This chilling time is essential to help your cheesecakes set properly. While you’re waiting, treat yourself to a cup of tea or coffee; you’ve earned it! -
Serve and Enjoy
Once the cheesecakes are set, remove them from the muffin tin and remove the cupcake liners carefully. Top with the reserved Oreo crumbs and a dollop of whipped cream for that extra touch of decadence!
Serving Suggestions
To serve your Mini Oreo Cheesecakes, you can plate them on a beautiful dessert stand or arrange them on a rustic wooden board for that charming, homey vibe. Consider adding fresh mint leaves or a drizzle of chocolate sauce for a pop of color and contrast. And remember—presentation matters, but it’s the taste that truly counts, so don’t stress too much about it!
Recipe Variations
Here are a few fun variations to spice up your Mini Oreo Cheesecakes:
-
Peanut Butter Twist
Add 1/4 cup of creamy peanut butter to your cheesecake mixture for a rich, nutty flavor. -
Minty Fresh
Substitute mint Oreos for a refreshing spin and add a drop or two of mint extract. -
Fruit-Filled Delight
Top your cheesecakes with fresh berries or a quick berry compote for a fruity contrast. -
Chocolate Drizzle
Melt some chocolate and drizzle it over the cheesecakes just before serving for a luxurious touch. -
Gluten-Free Version
Use gluten-free Oreos and ensure your powdered sugar is gluten-free for a luscious treat everyone can enjoy!
Chef’s Notes
I can’t help but laugh when I think back to the first time I made these cheesecakes. I was so eager to whip them up that I accidentally confusingly added double the amount of powdered sugar! What resulted was an unbelievably sweet filling—almost too much for my taste! But instead of a disaster, it turned into a fun learning experience. I learned to take my time and follow my intuition in the kitchen. Remember, every mishap is a chance to learn!
FAQs and Troubleshooting
-
Q: My cheesecakes are too liquidy. What went wrong?
A: Make sure the cream cheese is fully softened before mixing. Also, ensure you whip the heavy cream until it reaches stiff peaks before folding it into the mixture for perfect texture. -
Q: Can I freeze these cheesecakes?
Absolutely! Just wrap them tightly in plastic wrap and foil, then store them in an airtight container. They can be frozen for up to 2 months. Thaw them in the fridge before serving. -
Q: How long do these last in the fridge?
They should be good for about 5 days in the refrigerator. Just keep them covered to maintain freshness! -
Q: Are these kid-friendly?
Definitely! Little ones love the mini size. Just keep an eye on portion sizes if they’re in a sugar rush!
Nutritional Info (Optional)
While indulging in delicious desserts can mean giving up a bit on the nutritional side, here’s a rough estimate for each mini cheesecake:
- Calories: 150
- Fat: 10g
- Carbohydrates: 15g
- Protein: 2g
Ultimately, indulging in sweets occasionally is all about balance, so enjoy these cheesecakes guilt-free!
Mini Oreo Cheesecakes are a delightful way to spread joy and sweeten any occasion. With easy preparation, customizable flavors, and irresistible taste, they’ll become a favorite no matter where you serve them. So, roll up those sleeves, gather your ingredients, and let’s create something timeless at your table! Tie on your apron, and let the fun begin!
PrintMini Oreo Cheesecakes
Bite-sized mini cheesecakes that combine creamy cheesecake and crunchy Oreos for a delightful treat.
- Prep Time: 15 minutes
- Cook Time: 240 minutes
- Total Time: 255 minutes
- Yield: 12 servings 1x
- Category: Dessert
- Method: No-Bake
- Cuisine: American
- Diet: Vegetarian
Ingredients
- 8 oz cream cheese, softened
- 1/2 cup powdered sugar
- 1/2 cup heavy cream
- 1 tsp vanilla extract
- 10 Oreo cookies, crushed
Instructions
- Prepare the cupcake liners by placing them in a muffin tin.
- Crush the Oreo cookies in a zip-top bag until they resemble fine crumbs.
- Make the cheesecake filling by beating the cream cheese and powdered sugar until smooth.
- Add the heavy cream and vanilla extract to the mixture and beat until thick and fluffy.
- Fold in the crushed Oreos carefully.
- Fill the cupcake liners with the cheesecake mixture.
- Chill in the fridge for at least 4 hours, or overnight.
- Serve with reserved Oreo crumbs and whipped cream on top.
Notes
Can be customized with various Oreo flavors or toppings. Best served chilled for a delightful experience.
Nutrition
- Serving Size: 1 serving
- Calories: 150
- Sugar: 10g
- Sodium: 200mg
- Fat: 10g
- Saturated Fat: 6g
- Unsaturated Fat: 4g
- Trans Fat: 0g
- Carbohydrates: 15g
- Fiber: 1g
- Protein: 2g
- Cholesterol: 30mg
Keywords: cheesecake, mini desserts, Oreo, no-bake, easy recipes
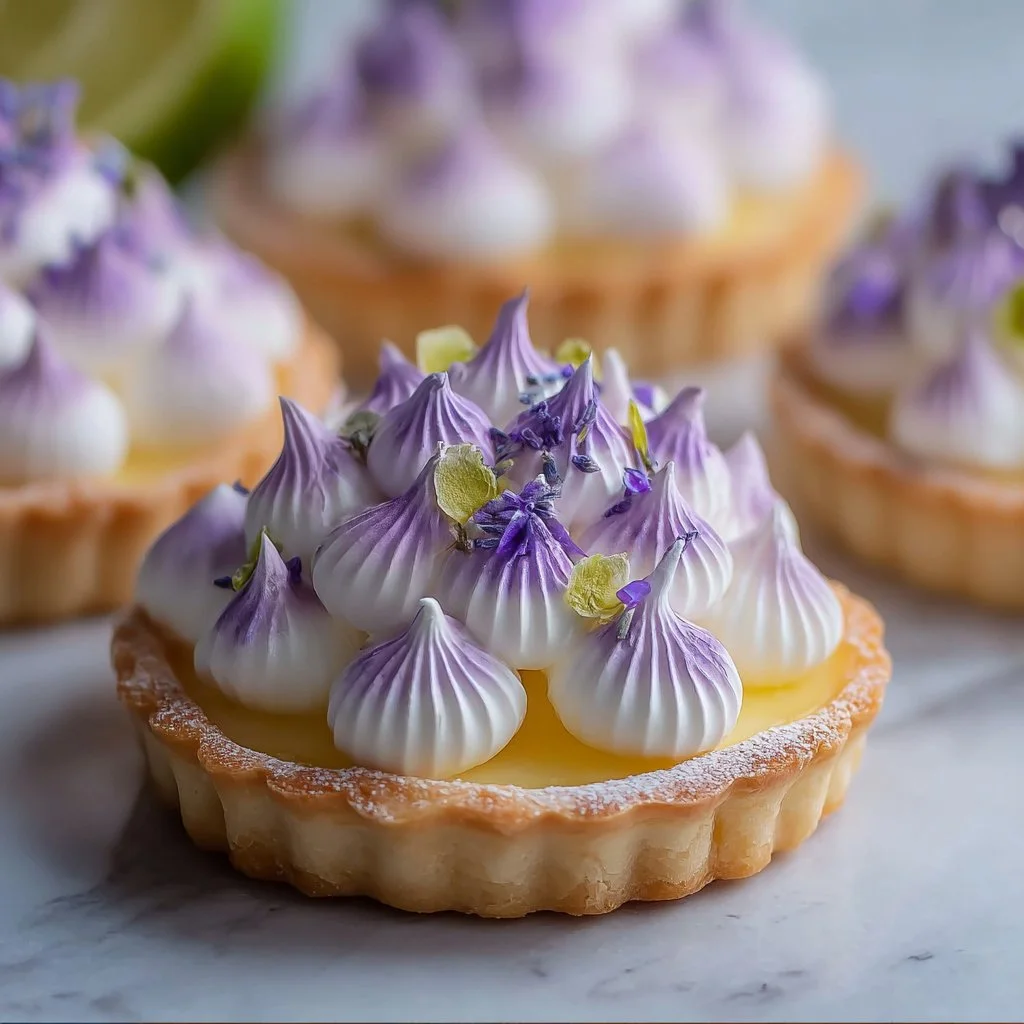
Mini Lemon Tart with Lilac Meringue: Spring Dessert
Mini Lemon Tart with Lilac Meringue: A Spring Dessert to Brighten Your Day
Hello there, fellow food lovers! As the days grow longer and the blossoms begin to dance in the gentle spring breeze, there’s nothing quite like the fresh, zesty goodness of lemon to awaken our taste buds. I can still remember the first time I tasted a bright, tangy lemon tart at a quaint little café. It was like sunshine on my plate—crisp, vibrant, and utterly delightful. And now, I want to share that same joy with you through my Mini Lemon Tart with Lilac Meringue!
This dessert is more than just a feast for the senses; it’s a celebration of the season. The buttery crumb crust is perfectly balanced by the creamy lemon filling, while the ethereal lilac meringue adds a whimsical pop of color and flavor. Trust me, friends, this recipe will have you dreaming of picnics in the park, backyard gatherings, and all the sweet moments spring brings.
Gather your favorite apron and let’s whip up this delightful treat together! This isn’t just about following a recipe; it’s about infusing a little love and sunshine into your kitchen. Whether you’re preparing a delightful dessert for a family gathering or simply treating yourself, these mini lemon tarts will surely impress!
Personal Story
Ah, springtime! A season that evokes nostalgia for me, especially when it comes to my love for baking and hosting. I vividly recall the first time I made lemon tarts. It was during an Easter brunch, the sun streaming through my kitchen window, casting a warm glow over everything. My family had gathered, laughter echoing as we set the table. I wanted to serve something special to celebrate the moment—a dish that encapsulated the essence of spring.
After hours of experimenting (and maybe a few kitchen mishaps), I finally settled on a fresh lemon tart with a delicate meringue. It was the first dessert that made my family swoon. They still talk about that very first taste of citrus bliss, and the vignettes of lilac meringue stealing the show! Now, I adore bringing this memory to life every spring, creating little bites of sunshine that capture the warmth of those cherished times.
So, whether this tart becomes a new family favorite or simply a sweet note of spring, I can’t wait for you to create your own delicious memories!
Ingredients
To create your Mini Lemon Tarts with Lilac Meringue, you’ll need the following ingredients:
For the Crust:
- 1 1/4 cups all-purpose flour: This forms the base of your delightful tart crust. If you’re feeling adventurous, substitute with whole wheat flour for a nuttier flavor or almond flour for a gluten-free option.
- 1/4 cup powdered sugar: This sweetens the dough without making it grainy. If you don’t have powdered sugar, you can blend granulated sugar in a spice grinder until fine.
- 1/2 cup unsalted butter, cold and cubed: Butter adds richness and flakiness. Remember, cold butter is key for that melt-in-your-mouth texture! You can replace it with coconut oil for a dairy-free version.
- 1 large egg yolk: This helps bind the dough together. If you’re vegan, consider a flax egg (1 tablespoon ground flaxseed mixed with 2.5 tablespoons water).
- 1–2 tbsp cold water: Just enough to bring the dough together. Use ice water to keep it cold!
For the Filling:
- 1/2 cup fresh lemon juice (about 2 lemons): Fresh is best here—nothing beats that zingy flavor! Bottled lemon juice can be used but may have a more subdued flavor.
- 1 tbsp lemon zest: Adds an extra punch of citrusy aroma. Feel free to use lime zest for a change of pace!
- 3/4 cup granulated sugar: Sweetness to balance out the tartness of the lemon. For a lower sugar option, feel free to use a sugar substitute like coconut sugar.
- 3 large eggs: These create the structure. You could experiment with aquafaba for a plant-based approach.
- 6 tbsp unsalted butter, cubed: Again, for richness and that creamy texture.
For the Lilac Meringue:
- 3 large egg whites: Make sure they’re at room temperature for the best volume! Egg white powder can be a great alternative if you’re avoiding eggs.
- 3/4 cup granulated sugar: This sugar will hold the meringue’s structure. Organic cane sugar can work if you’re looking for a cleaner alternative.
- 1/4 tsp cream of tartar: Helps stabilize the egg whites. If you don’t have it, you can use lemon juice as a substitute.
- 1/2 tsp vanilla extract: For flavor depth. Try almond extract for a unique twist!
- A few drops of violet food coloring or a mix of red and blue: This is purely optional, but who can resist beautiful color? Natural coloring from beet juice or blueberries can be an alternative.
- Optional: edible lilac flowers for garnish: Because we eat with our eyes first!
Step-by-Step Instructions
Let’s jump into the kitchen and get this delightful dish made step by step!
1. Prepare the Tart Crust
-
Mix Dry Ingredients: In a mixing bowl, whisk together the all-purpose flour and powdered sugar until well combined. This ensures an even sweetness throughout the crust.
-
Add Cold Butter: Using a pastry cutter or forks, cut in the cold, cubed butter until the mixture resembles coarse crumbs. If you don’t have a pastry cutter, your hands work well too—just be quick to avoid heating the butter.
-
Add Egg Yolk: Make a well in the center and add the egg yolk. Use a fork to blend it in lightly.
-
Bring Dough Together: Gradually add cold water, one tablespoon at a time, until the dough holds together but isn’t sticky. If it’s too crumbly, add a touch more water.
-
Chill the Dough: Shape the dough into a disc, wrap it in plastic wrap, and refrigerate for at least 30 minutes. Chilling helps prevent the crust from shrinking when we bake it.
2. Blind Bake the Crust
-
Preheat Oven: Set your oven to 350°F (175°C).
-
Roll Out the Dough: On a lightly floured surface, roll out the chilled dough to about 1/4 inch thick. It should feel supple but firm.
-
Cut and Fill: Cut the dough into circles to fit your mini tart pans. Press the dough into the pans gently, ensuring it’s even on the bottom and along the sides.
-
Prick and Chill: Using a fork, prick the bottom of each crust to prevent bubbling, then pop them back into the fridge for another 10 minutes.
-
Blind Bake: Place parchment paper over the crust and fill with pie weights (or dry beans) to keep it from puffing. Bake for 15 minutes, then remove the weights and parchment, and bake for another 10 minutes or until lightly golden. Allow to cool completely.
3. Prepare the Lemon Filling
-
Mix Lemon Ingredients: In a medium bowl, combine fresh lemon juice, lemon zest, granulated sugar, and eggs. Whisk until fully incorporated. The lemon zest adds a fragrant aroma that brings your filling to life!
-
Melt the Butter: In a saucepan, melt the cubed butter over low heat. Once melted, remove from heat, and slowly whisk in the lemon mixture until combined.
-
Cook until Thickened: Return the mixture to the saucepan over medium-low heat. Stir constantly for about 5-7 minutes until it thickens enough to coat the back of a spoon. Be patient; no one likes scrambled eggs in their lemon tart, so keep stirring gently!
-
Fill the Tart Shells: Pour the warm lemon filling evenly into your cooled tart shells. Leave a little room on top as it may puff during baking.
-
Bake Again: Bake at 350°F (175°C) for an additional 10-12 minutes until the filling is set but still slightly jiggly in the center. Let them cool completely on a wire rack.
4. Make the Lilac Meringue
-
Whip Egg Whites: In a clean mixing bowl, add the egg whites and cream of tartar. Using an electric mixer, beat on medium speed until soft peaks form.
-
Add Sugar Gradually: Gradually add the granulated sugar, continuing to beat on high speed until stiff, glossy peaks form. Test it by rubbing a little between your fingers—if it feels smooth without sugar granules, you’re good to go!
-
Flavor and Color: Beat in the vanilla extract and a few drops of violet food coloring. Remember, a little goes a long way! Feel free to play with the color until it’s just right.
-
Top Tarts: Spoon or pipe the meringue over the cooled lemon filling, creating swirls and peaks. This is your chance to get creative!
-
Toast the Meringue: Using a kitchen torch or the broiler, toast the meringue until golden brown. Keep an eye on it—I can’t tell you how many times I’ve gotten distracted and ended up with a blackened meringue!
Serving Suggestions
When it comes to serving your Mini Lemon Tarts with Lilac Meringue, presentation is key! Place each tart on a dessert plate, and consider garnishing them with a fresh lilac flower for that extra touch of elegance. Add a sprig of mint or some edible flowers around the plate for a vibrant and colorful display. A dusting of powdered sugar over the top adds an airy, whimsical finish!
Recipe Variations
- Berry Blast: Add a layer of fresh berries, like raspberries or blueberries, before topping with meringue for a fruity twist.
- Coconut Cream: Mix in some shredded coconut into the lemon filling for a tropical flair.
- Ginger Zest: Incorporate some finely grated fresh ginger into the lemon mixture for a spicy zing.
- Herb Infusion: Add two sprigs of fresh rosemary or thyme to the filling while it cooks for an herbal note—just remember to remove before filling the tarts!
- Chocolate Surprise: Drizzle melted chocolate over the meringue for a decadent chocolate contrast.
Chef’s Notes
As a cook who loves to experiment, this recipe has changed over the years, much like my own culinary journey! I once hosted a spring dinner party where my little cousin declared that nothing could beat the taste of a "rainbow of flavors." That inspired me to play with colors through meringue. I love how a tiny drop of color can transform a dish, just as seasons change how we feel about food.
Also, if you find yourself with leftover meringue, pipe little kisses onto a lined baking tray and bake at 200°F (90°C) until dry for delicious meringue cookies—no waste here!
FAQs and Troubleshooting
Q: My meringue collapsed! What happened?
A: Collapsing meringue can happen if the egg whites weren’t whipped long enough, or if they’ve been over-beaten. Make sure to whip until you have stiff peaks without drying out the meringue.
Q: How can I keep the tart crust from getting soggy?
A: A few tips! Always ensure the crust is cooked until golden before adding the lemon filling. Blind baking is crucial here, as is allowing the tart to cool completely once baked.
Q: Can I make the tarts ahead of time?
A: Absolutely! You can prepare the crust a day in advance and store it in the refrigerator. Fill it with lemon curd and meringue just before serving to keep everything fresh and vibrant.
Q: Is it normal for the filling to be a little jiggly after baking?
A: Yes! The filling will continue to set as it cools. Just make sure it’s not liquid in the center before you remove it from the oven.
Nutritional Info (Approx. per mini tart)
- Calories: 250
- Protein: 4g
- Carbohydrates: 30g
- Total Fat: 12g
- Saturated Fat: 7g
- Fiber: 1g
- Sugar: 18g
Now that we’ve created this beautiful mini lemon tart with lilac meringue, I can’t wait for you to experience that burst of flavor and joy. So, tie on your apron, gather your loved ones, and create your own food memories. Each slice is a little piece of spring, and I promise, they’re meant to be shared. Happy baking, friends! 🍋💜
PrintMini Lemon Tart with Lilac Meringue
A delightful spring dessert featuring a buttery crust, zesty lemon filling, and ethereal lilac meringue.
- Prep Time: 20 minutes
- Cook Time: 40 minutes
- Total Time: 1 hour
- Yield: 12 mini tarts 1x
- Category: Dessert
- Method: Baking
- Cuisine: American
- Diet: Vegetarian
Ingredients
- 1 1/4 cups all-purpose flour
- 1/4 cup powdered sugar
- 1/2 cup unsalted butter, cold and cubed
- 1 large egg yolk
- 1–2 tbsp cold water
- 1/2 cup fresh lemon juice (about 2 lemons)
- 1 tbsp lemon zest
- 3/4 cup granulated sugar
- 3 large eggs
- 6 tbsp unsalted butter, cubed
- 3 large egg whites
- 3/4 cup granulated sugar
- 1/4 tsp cream of tartar
- 1/2 tsp vanilla extract
- A few drops of violet food coloring
- Edible lilac flowers for garnish (optional)
Instructions
- Prepare the Tart Crust:
- Mix dry ingredients: In a mixing bowl, whisk together the all-purpose flour and powdered sugar until well combined.
- Add cold butter: Cut in the cold, cubed butter until the mixture resembles coarse crumbs.
- Add egg yolk: Make a well in the center and add the egg yolk, blending it in lightly.
- Bring dough together: Gradually add cold water until the dough holds together.
- Chill the dough: Shape into a disc, wrap in plastic, and refrigerate for at least 30 minutes.
- Blind Bake the Crust:
- Preheat oven to 350°F (175°C).
- Roll out the dough to about 1/4 inch thick.
- Cut into circles to fit mini tart pans, pressing gently.
- Prick the bottoms of each crust to prevent bubbling, then chill for 10 minutes.
- Blind bake with parchment and pie weights for 15 minutes, then remove weights and bake for another 10 minutes.
- Prepare the Lemon Filling:
- Mix lemon ingredients in a medium bowl until whisked.
- Melt the butter in a saucepan over low heat, remove from heat, and whisk into the lemon mixture.
- Cook until thickened over medium-low heat for about 5-7 minutes.
- Fill the tart shells with the warm lemon filling.
- Bake again at 350°F for 10-12 minutes until set.
- Make the Lilac Meringue:
- Whip the egg whites and cream of tartar until soft peaks form.
- Add sugar gradually, beating until stiff peaks form.
- Flavor with vanilla and color with food coloring.
- Top tarts with meringue and toast until golden brown.
Notes
Garnish with edible flowers for an elegant presentation. You can also experiment by adding fresh berries or coconut to the filling.
Nutrition
- Serving Size: 1 tart
- Calories: 250
- Sugar: 18g
- Sodium: 75mg
- Fat: 12g
- Saturated Fat: 7g
- Unsaturated Fat: 3g
- Trans Fat: 0g
- Carbohydrates: 30g
- Fiber: 1g
- Protein: 4g
- Cholesterol: 55mg
Keywords: lemon tart, spring dessert, mini tart, meringue, baking