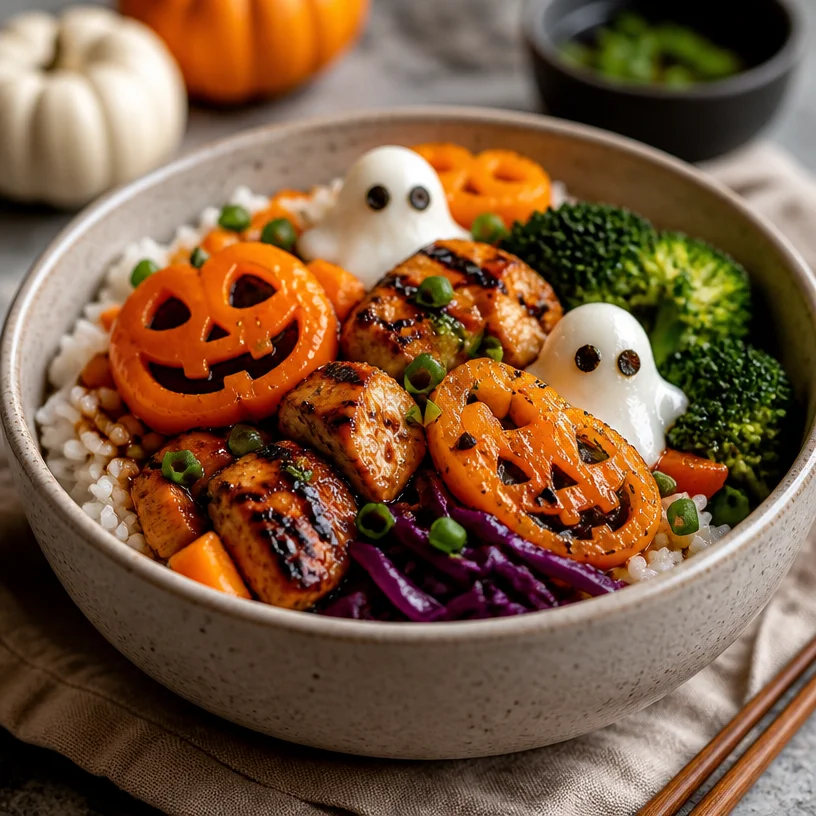
Spooky Halloween Rice Bowls: 3 Quick Weeknight Ideas
Spooktacular Halloween Rice Bowls: A Festive Treat for All!
Hello, fabulous food lovers! As the leaves turn crisp and pumpkin spice takes over, it’s time to add a little magic to your kitchen with a dish that’s not only delicious but also delightfully festive. Today, we’re diving into the world of Halloween Rice Bowls! 🎃✨
There’s something so fun about Halloween — the costumes, the decorations, and, of course, the food! I believe cooking should feel elegant but never intimidating; that’s why I’m here to show you how to create a delightful dish to celebrate this spooky season. These rice bowls are colorful, filled with flavors, and perfect for gatherings — whether you’re hosting a Halloween party or simply enjoying a cozy night in.
Imagine gathering around the table with friends, clinking glasses of apple cider, and diving into these magical bowls, brimming with vibrant rice, tender chicken, and seasonal vegetables. Not only do they look impressive, but they also come together in a pinch! Let’s get cooking because your Halloween feast awaits!
A Whimsical Memory: The Pumpkin Patch Incident
Growing up, Halloween was my absolute favorite holiday. I remember one year, when I was around eight, my family decided to take a trip to the local pumpkin patch. The smell of hay, the sight of plump pumpkins, and the excitement of picking out the perfect one filled the air with pure joy.
After a day of searching for the biggest pumpkin, we returned home only to discover that our mischievous cat, Oliver, had taken a liking to our Halloween prize. While my parents were busy in the kitchen whipping up a feast, Oliver decided to perform his best stunt, which involved launching himself onto the kitchen counter and knocking over all the carefully arranged Halloween treats. The sight of him, with pumpkin guts on his paws and a guilty look on his face, still makes me chuckle.
That evening, we made a big pot of chicken and rice—a dish we often enjoyed together. I remember how my mom would ask us to choose our favorite vegetables to toss in, and that’s where this idea for Halloween Rice Bowls was born. It’s all about creating joyful memories around food, don’t you think?
Ingredients
Here’s what you’ll need to whip up your Halloween Rice Bowls:
-
Cooked Rice (1 cup per bowl)
- Chef Insight: White, brown, or even cauliflower rice — you have options! Brown rice adds extra fiber, while cauliflower rice is a lower-carb alternative.
-
Chicken Breast (1 pound, diced)
- Substitution Tip: Feel free to swap for turkey or a plant-based protein like tofu for a delicious vegetarian option!
-
Bell Peppers (1 red, 1 yellow)
- Quick Insight: Their vibrant colors add an autumnal touch! You can also use green or orange for variety.
-
Broccoli (1 cup, chopped)
- Chef Hack: Broccoli is a nutrient powerhouse; you can easily substitute with zucchini or asparagus if desired.
-
Carrots (1 cup, sliced)
- Substitution Tip: If you want an extra crunch, swap out for snap peas or even shredded cabbage.
-
Olive Oil (2 tablespoons)
- Quick Insight: A drizzle of olive oil does wonders for flavor. Substitute with avocado oil for a similar effect!
-
Garlic (2 cloves, minced)
- Chef Insight: You can never go wrong with garlic. If fresh cloves aren’t available, garlic powder will also work!
-
Soy Sauce (1/4 cup)
- Substitution Tip: Use tamari for a gluten-free version or coconut aminos for a lighter flavor.
-
Seasonings (salt, pepper, Halloween spices like paprika or chili powder)
- Chef Hack: Play around with seasonal spices; a little cinnamon can give a warm feel to the dish!
These simple ingredients come together to create a colorful, tasty canvas for your Halloween magic, but don’t forget — it’s all about your personal touch!
Step-by-Step Instructions
Ready to transform these ingredients into a festive masterpiece? Let’s rock and roll! Follow these steps for a spooky delight:
-
Prepare Your Rice:
- Start by cooking your rice according to package instructions. Once done, fluff it with a fork and set it aside. Tip: For an added twist, try cooking it in vegetable broth for extra flavor!
-
Sauté the Chicken:
- In a large skillet, heat 1 tablespoon of olive oil over medium heat. Add the diced chicken and season with salt, pepper, and a pinch of paprika. Sauté until it’s golden and cooked through, about 5–7 minutes. Chef Hack: Don’t overcrowd the chicken to ensure it browns nicely!
-
Add the Vegetables:
- Toss in the minced garlic, bell peppers, broccoli, and carrots. Stir-fry for an additional 5–6 minutes until they’re vibrant and tender but still have a little crunch. Quick Tip: Keep the heat high and stirring to avoid burning!
-
Flavor it Up:
- Drizzle in your soy sauce and give everything a good stir to coat the chicken and veggies in deliciousness. Let it cook for another couple of minutes so the flavors meld together. Chef Insight: If you want an extra kick, add a splash of hot sauce or crushed red pepper flakes!
-
Assemble Your Bowls:
- Begin with a good scoop of rice on the bottom. Add a generous helping of the chicken and vegetable mixture on top. Make it as colorful and festive as possible! Tip: Use a small cup to neatly layer your ingredients if you want a more polished look.
-
Garnish:
- Finish off with a drizzle of sesame oil, sesame seeds, or fresh herbs like cilantro or green onions. Feel free to get creative with garnishing — the spookier, the better!
And voilà! Your Halloween Rice Bowls are all dressed up and ready for their big debut.
Serving Suggestions
To serve up your Halloween Rice Bowls, consider using black or orange bowls to amp up the spooky aesthetic. A sprinkle of edible confetti (think black and orange sprinkles) can add a fun touch, too!
Arrange them on a big, warm platter, and encourage everyone to dig in! Pair with fun cocktails or mocktails that have a hint of spice, and enjoy the festive atmosphere with friends and family.
Recipe Variations
Feeling adventurous? Here are a few creative twists to take your Halloween Rice Bowls to the next level:
- Pumpkin Spice Twist: Add 1/2 cup of pureed pumpkin to your rice while cooking — it gives a beautiful color and a hint of sweetness!
- Southwestern Style: Swap out the soy sauce for taco seasoning and top your bowls with avocado and fresh salsa.
- Creepy Crawlers: Add some edamame or black beans for a protein boost and extra texture.
- Vegan Delight: Replace the chicken with marinated roasted chickpeas for a plant-based version that doesn’t skimp on flavor.
- Harvest Flavor: Incorporate roasted butternut squash or sweet potatoes for a touch of sweetness and a seasonal feel.
Chef’s Notes
This recipe has traveled with me through many Halloween seasons! Initially, I simply made my classic chicken and rice for a cozy dinner. However, as my entertaining style evolved, I began sprucing it up for gatherings, adding vibrant veggies and playful garnishes to transform a simple dish into a visually striking centerpiece.
One of my favorite kitchen tales is how I once attempted to carve pumpkins for dinner guests while multitasking in the kitchen. Let’s just say that I ended up with more pumpkin seeds on the floor than in my dish! Lesson learned: sometimes it’s better to keep the festive activities separate to ensure your dishes shine!
FAQs and Troubleshooting
Here are some common questions and issues readers may encounter while preparing their Halloween Rice Bowls:
-
What if my rice turns out mushy?
- This can happen if too much water is added during cooking. Always measure carefully! If it does happen, try draining the rice and spreading it out on a baking sheet to air-dry a bit.
-
Can I make this dish in advance?
- Absolutely! Just keep the chicken and veggies separate from the rice until you’re ready to serve to keep everything fresh. You can reheat everything in the microwave or skillet on low heat.
-
How can I add more spice?
- If you love heat, adding a pinch of chili powder or a few slices of jalapeño can do wonders! A drizzle of sriracha right before serving also amps up the flavor.
-
What if I have leftover ingredients?
- Consider mixing leftover chicken and veggies into a salad, or add them to scrambled eggs for a breakfast twist!
Nutritional Info
If you’re curious, here’s a rough idea of what a serving might contain:
- Calories: ~550
- Protein: ~35g
- Carbs: ~65g
- Fat: ~15g
(Note: Nutritional values may vary based on specific ingredients and portion sizes.)
As we close the book on this festive recipe, remember that a great dish is about more than flavor; it’s about the joy and memories created around it. I hope these Halloween Rice Bowls fill your kitchen with warmth and laughter, just as they do mine. Happy cooking, and may your Halloween be filled with delightful treats and spooky fun! 🕷️🍂
PrintSpooktacular Halloween Rice Bowls

Colorful and flavorful Halloween Rice Bowls perfect for gatherings, filled with rice, chicken, and seasonal veggies.
- Prep Time: 15 minutes
- Cook Time: 15 minutes
- Total Time: 30 minutes
- Yield: 4 servings
- Category: Main Course
- Method: Stir-frying
- Cuisine: American
- Diet: Gluten-Free
Ingredients
- Cooked Rice (1 cup per bowl)
- Chicken Breast (1 pound, diced)
- Bell Peppers (1 red, 1 yellow)
- Broccoli (1 cup, chopped)
- Carrots (1 cup, sliced)
- Olive Oil (2 tablespoons)
- Garlic (2 cloves, minced)
- Soy Sauce (1/4 cup)
- Seasonings (salt, pepper, Halloween spices like paprika or chili powder)
Instructions
- Prepare your rice: Cook rice according to package instructions and set aside.
- Sauté the chicken: Heat olive oil in a skillet, add chicken, season, and cook until golden.
- Add the vegetables: Stir in garlic, bell peppers, broccoli, and carrots; cook until tender.
- Flavor it up: Add soy sauce and stir to combine.
- Assemble your bowls: Start with a scoop of rice, add chicken and veggies on top.
- Garnish: Drizzle with sesame oil and add herbs or sesame seeds.
Notes
Feel free to customize with your favorite vegetables or proteins. Serve in festive bowls for added fun!
Nutrition
- Serving Size: 1 bowl
- Calories: 550
- Sugar: 5g
- Sodium: 600mg
- Fat: 15g
- Saturated Fat: 2g
- Unsaturated Fat: 10g
- Trans Fat: 0g
- Carbohydrates: 65g
- Fiber: 5g
- Protein: 35g
- Cholesterol: 80mg
Keywords: Halloween, rice bowls, festive food, easy recipes, quick meals
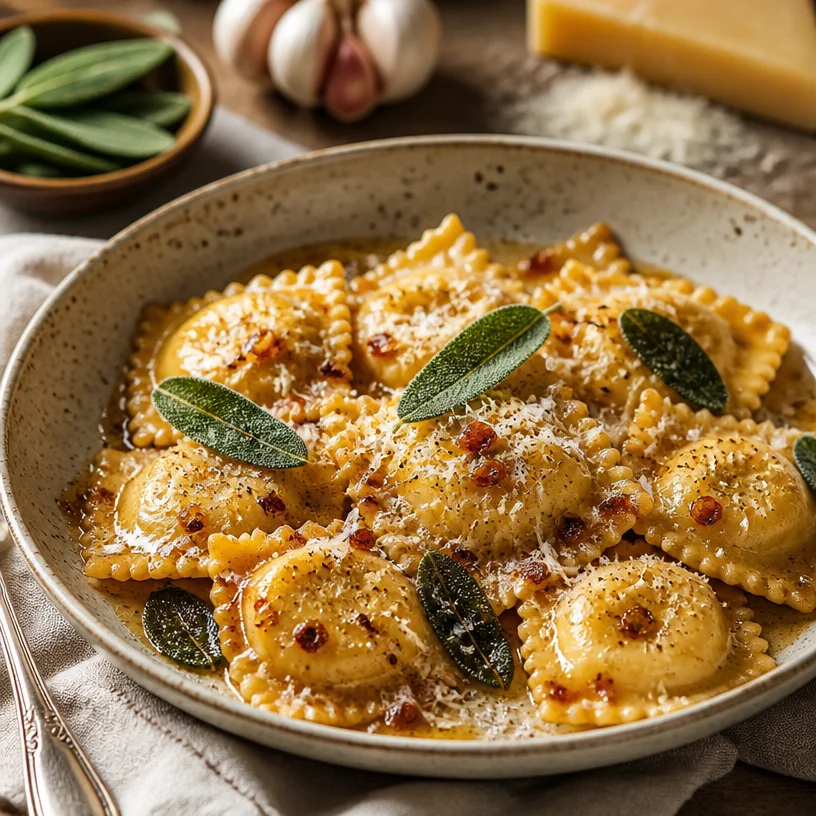
Weeknight Pumpkin Ravioli with Garlic Brown Butter Sauce
Homemade Pumpkin Ravioli with Garlic Brown Butter
Introduction
Hello, fellow food lovers! Today, I’m thrilled to take you on a delightful culinary journey as we whip up a dish that’s perfect for those cozy fall evenings — Homemade Pumpkin Ravioli with Garlic Brown Butter. Imagine the aroma of nutmeg and garlic wafting through your kitchen, the golden filling of pumpkin mingling with creamy ricotta, all lovingly enveloped in tender pasta. This dish is not just a meal; it’s a celebration of warmth, togetherness, and the simple pleasure of creating something special from scratch.
In my kitchen at Ivory Apron, I’ve come to love experimenting with seasonal ingredients, and pumpkin is a true star of the fall harvest. Its creamy texture and naturally sweet flavor make it the perfect filling for ravioli. Not to mention, pairing it with a luscious garlic brown butter sauce elevates the dish to new heights! Trust me, this recipe is as much about the joy of cooking as it is about the end result.
Whether you’re looking to impress at your next dinner party or just delighting in a quiet evening at home, making your own ravioli can feel elegant and satisfying. Don’t worry if you’ve never made pasta before — I’m here to guide you every step of the way. So, roll up your sleeves, tie on that ivory apron, and let’s dive into this delightful dish together!
Personal Story
Ah, the nostalgia of homemade ravioli! I still remember the first time I tried my hand at making pasta. I was a young chef-in-training, deeply inspired by my grandmother’s kitchen. One autumn afternoon, she invited me to join her in crafting ravioli filled with her famous ricotta and spinach. Watching her hands deftly work the dough was mesmerizing — it was like she was dancing with the pasta.
We filled those little pillows of joy with love and laughter, and when they hit the boiling water, I was mesmerized watching them float to the surface! The meal that followed was filled with delightful stories and cozy warmth. As I took my first bite of that homemade ravioli, I knew in that moment that the kitchen would always be my happy place.
Years later, I’ve taken that memory, along with my love for pumpkin, to create this uniquely seasonal twist. This pumpkin ravioli pays homage to those cherished moments while introducing the delightful flavors of fall. Ready to make your own memories? Let’s begin!
Ingredients
Here’s what you’ll need to make your homemade pumpkin ravioli:
-
2 cups all-purpose flour: This serves as your pasta base. Use “00” flour for an even silkier texture if you have it but good old all-purpose works just as well.
-
3 large eggs: These are essential for creating a rich and elastic pasta dough. If you’re short on eggs, you can substitute one egg with two egg yolks for a more indulgent dough.
-
1 cup pumpkin puree: Make sure to use pure pumpkin puree, not the sweetened pie filling. You can roast your own pumpkin or use store-bought — either works beautifully.
-
1/2 cup ricotta cheese: This adds creaminess and balances the pumpkin’s sweetness. If you want a lighter option, try using cottage cheese, blended until smooth.
-
1/4 cup grated Parmesan cheese: A sprinkle of nutty, salty Parmesan elevates the filling. For a dairy-free version, try nutritional yeast for a cheesy flavor.
-
1/2 teaspoon salt: A good pinch of salt enhances all the flavors. Adjustable to your preference, of course!
-
1/2 teaspoon nutmeg: This spice adds warmth and depth to the filling; fresh grated nutmeg can really take it to another level.
-
1/4 teaspoon black pepper: A touch of heat that complements the pumpkin perfectly.
-
1/2 cup unsalted butter: Essential for the brown butter sauce which brings everything together. If you need a substitute, olive oil can work, but you’ll lose that distinct nutty flavor.
-
3 cloves garlic, minced: Garlic adds a fragrant kick to the sauce. Feel free to add more if you’re a garlic lover like me!
-
Fresh sage leaves (for garnish): The earthy flavor of sage pairs beautifully with the pumpkin. You can also use other herbs like thyme or rosemary if you prefer.
Step-by-Step Instructions
Step 1: Make the Pasta Dough
-
Flour Mountain:
Create a mound with the flour on a clean surface or in a bowl, forming a well in the center. This is where your eggs will go! -
Add Eggs:
Crack the eggs into the well and sprinkle in that half teaspoon of salt. Using a fork, gently beat the eggs, gradually incorporating the flour from the edges of the well. -
Knead it Good:
Once the mixture is too stiff to mix with a fork, use your hands! Knead the dough for about 8-10 minutes until it’s smooth and elastic. Don’t hesitate to sprinkle a bit of flour if it gets too sticky. -
Rest Time:
Wrap your dough in plastic wrap and let it rest for at least 30 minutes at room temperature. Trust me, this step helps to relax the gluten and makes rolling out the dough a breeze!
Step 2: Prepare the Filling
-
Combine Ingredients:
In a mixing bowl, combine the pumpkin puree, ricotta cheese, Parmesan cheese, nutmeg, and black pepper. Adjust seasoning to your taste and make sure it’s well mixed. -
Taste Test:
This is the fun part! Sneak a spoonful to ensure the flavors are just right — and make sure to save some for your ravioli!
Step 3: Roll Out the Pasta
-
Divide and Conquer:
Cut the rested dough into four pieces. Work with one piece at a time while keeping the others covered to prevent them from drying out. -
Flatten and Roll:
Lightly flour your surface and use a rolling pin or pasta machine to roll your dough to about 1/16-inch thickness. Aim for transparency but take your time — it’s okay if it’s a touch thicker! -
Trim and Cut:
Cut the pasta into long strips, about 3 inches wide. (If you’re feeling lazy, you can also use store-bought pasta sheets for an even quicker dish!)
Step 4: Fill and Shape the Ravioli
-
Egg Wash:
Beat one egg and brush a thin layer around the edges of the pasta strips. This will help seal the ravioli closed. -
Fill ‘Em Up:
Place about a tablespoon of filling spaced about 2 inches apart on one of the pasta strips. Feel free to use a piping bag for easier filling! -
Seal the Deal:
Fold the pasta over the filling to create a pocket, gently pressing to eliminate air bubbles. Press around the edges to seal and use a fork to crimp the edges for a pretty design. -
Repeat:
Continue with the rest of the dough and filling until all are made. Flour them lightly to prevent sticking!
Step 5: Cook the Ravioli
-
Boil, Baby, Boil:
Bring a large pot of salted water to a boil. Once boiling, add the ravioli gently and cook for about 4-5 minutes or until they float to the surface. -
Drain Carefully:
Use a slotted spoon to carefully remove the ravioli, and let them rest on a kitchen towel while you make the sauce.
Step 6: Make the Garlic Brown Butter Sauce
-
Brown the Butter:
In a skillet, melt the unsalted butter over medium heat. Add the minced garlic as the butter begins to foam. -
Watch it Carefully:
Stir frequently to ensure the butter doesn’t burn. Keep cooking until it turns a lovely golden brown and has a nutty aroma — about 4-5 minutes. -
Add Some Sage:
Toss in fresh sage leaves and let them fry briefly in the browned butter for flavor. Your kitchen will smell divine!
Step 7: Combine and Serve
-
Toss the Ravioli:
Gently add the cooked ravioli to the skillet with the garlic brown butter sauce. Toss carefully to coat them without breaking them. -
Plating Perfection:
Serve in a warm bowl, drizzling extra brown butter over the top. Garnish with crispy sage leaves and a sprinkle of Parmesan for an elegant finish.
Serving Suggestions
To serve, place your pumpkin ravioli in shallow bowls, ensuring they have a good layer of the garlic brown butter sauce. Add a sprinkle of fresh Parmesan, and if you’re feeling fancy, try a touch of freshly cracked black pepper or a drizzle of balsamic glaze for added flair. This dish is visually stunning and will have your guests raving before they even take a bite!
Recipe Variations
-
Add Protein: Mix in some cooked pancetta or browned sausage with the filling for a hearty option.
-
Go Vegan: Swap the egg in the pasta for aquafaba (chickpea water) and use a dairy-free ricotta paired with nutritional yeast.
-
Herb-Infused: Try adding chopped spinach or fresh herbs like basil or thyme to the filling for extra flavor and nutrition.
-
Cheesy Twist: Add a bit of goat cheese or feta for an added tangy element to the filling.
-
Sauce Variations: Experiment with other sauces like a sage cream sauce or a light marinara for a different flavor profile.
Chef’s Notes
As I’ve developed this recipe over the years, I’ve found joy in experimenting with flavors and techniques. One funny story? The first time I made these wasn’t as pretty as I envisioned — my ravioli burst open in the pot, filling the water with pumpkin goodness! But even during those moments, laughter ensued, and I learned that cooking is all about the process, not just the perfect end result.
This recipe has evolved from traditional family favorites to something uniquely my own. I love sharing it with friends, and I hope it inspires you to create your own kitchen memories!
FAQs and Troubleshooting
1. My pasta dough is too sticky. What should I do?
If your dough is sticky, sprinkle in a bit more flour as you knead until it reaches a soft, manageable consistency. But remember, don’t overdo it — you want that nice elasticity!
2. How can I ensure my ravioli don’t burst while cooking?
Make sure to press out all the air when sealing the ravioli. A good egg wash around the edges will also create a stronger seal.
3. Can I freeze the ravioli?
Absolutely! Place them in a single layer on a baking sheet until frozen, then transfer to a freezer bag. Cook them straight from frozen for about 6-8 minutes.
4. What’s the best way to reheat leftover ravioli?
Gently reheat in a skillet with a splash of water or some melted butter over low heat to retain the texture without overcooking.
Nutritional Info
While I won’t focus too much on the numbers because cooking should be about enjoyment, it’s good to know that an average serving of these delightful pumpkin raviolis (without excessive butter) can offer a decent balance of protein, healthy fats, and carbs, packed with vitamins and minerals from the pumpkin.
Now that you have your recipe, gathering your loved ones around the table to enjoy the fruits of your labor will make all that effort worthwhile. I can’t wait to hear how it goes! Enjoy this process—it’s all about creating beautiful meals and memories. Happy cooking!
PrintHomemade Pumpkin Ravioli with Garlic Brown Butter

Delight in the warmth of homemade pumpkin ravioli enveloped in a creamy ricotta filling and topped with a luscious garlic brown butter sauce.
- Prep Time: 15 minutes
- Cook Time: 30 minutes
- Total Time: 45 minutes
- Yield: 4 servings 1x
- Category: Main Course
- Method: Baking
- Cuisine: Italian
- Diet: Vegetarian
Ingredients
- 2 cups all-purpose flour
- 3 large eggs
- 1 cup pumpkin puree
- 1/2 cup ricotta cheese
- 1/4 cup grated Parmesan cheese
- 1/2 teaspoon salt
- 1/2 teaspoon nutmeg
- 1/4 teaspoon black pepper
- 1/2 cup unsalted butter
- 3 cloves garlic, minced
- Fresh sage leaves (for garnish)
Instructions
- Create a mound with the flour on a clean surface and form a well in the center for the eggs.
- Crack the eggs into the well and sprinkle in salt. Beat the eggs, gradually incorporating the flour.
- Knead the dough for about 8-10 minutes until it’s smooth and elastic.
- Wrap the dough in plastic wrap and let it rest for at least 30 minutes.
- In a mixing bowl, combine the pumpkin puree, ricotta cheese, Parmesan cheese, nutmeg, and black pepper for the filling.
- Cut the rested dough into four pieces, working with one piece at a time while keeping the others covered.
- Roll the dough to about 1/16-inch thickness, and cut into strips about 3 inches wide.
- Beat one egg and brush a thin layer around the edges of the pasta strips.
- Place about a tablespoon of filling spaced about 2 inches apart on one of the pasta strips.
- Fold the pasta over the filling, gently pressing to eliminate air bubbles. Seal and crimp the edges with a fork.
- Bring a large pot of salted water to a boil and cook the ravioli for about 4-5 minutes or until they float.
- Melt the unsalted butter in a skillet over medium heat and add the minced garlic.
- Stir frequently until the butter turns golden brown, about 4-5 minutes, then add sage leaves.
- Add the cooked ravioli to the skillet and gently toss to coat.
- Serve in warm bowls, drizzling extra brown butter and garnishing with sage and Parmesan.
Notes
For vegan options, substitute egg in the pasta with aquafaba and use dairy-free cheese. Freezing ravioli is possible; just ensure they are well sealed before cooking.
Nutrition
- Serving Size: 1 serving
- Calories: 350
- Sugar: 5g
- Sodium: 400mg
- Fat: 12g
- Saturated Fat: 4g
- Unsaturated Fat: 6g
- Trans Fat: 0g
- Carbohydrates: 45g
- Fiber: 3g
- Protein: 15g
- Cholesterol: 30mg
Keywords: pumpkin ravioli, homemade pasta, fall recipe, garlic brown butter
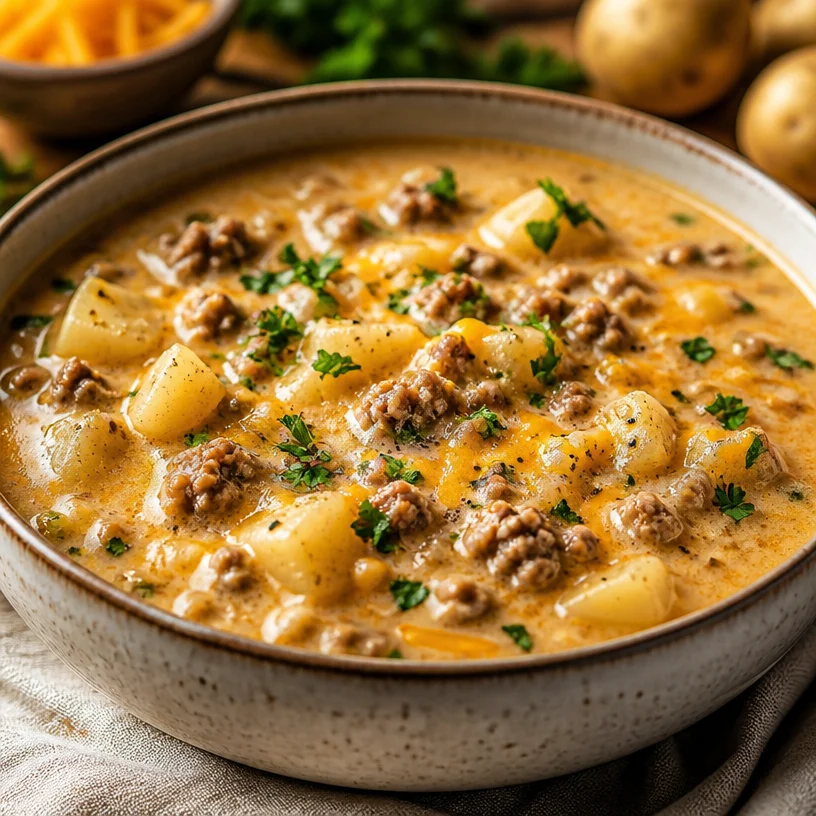
One-Pot Creamy Cheesy Beef and Potato Soup for Weeknights
Comfort in a Bowl: Cheesy Beef and Potato Soup
Introduction
Hey there, fellow foodies! I’m so excited to take you on this flavorful journey today as we whip up a warm and hearty Cheesy Beef and Potato Soup. Picture this: a chilly evening where the air is crisp, and all you want to do is curl up with a comforting bowl of something delicious. This soup is exactly that—a cozy, creamy masterpiece layered with savory beef, tender potatoes, and, of course, a velvety cheddar cheese finish. It’s perfect for those weeknights when you need a little extra warmth or a casual get-together with friends and family.
There’s something inherently soothing about a steaming bowl of soup, right? It’s like a big hug in a bowl. This particular recipe has roots that run deep in my cooking journey; it embodies warmth, nostalgia, and a sprinkle of home-cooked happiness. The best part? It’s not only easy to make but also delightful to share. Whether you’re sitting around the dinner table or catching up with friends over bowls of soup, this dish encourages gathering, sharing, and making memories—the true essence of home cooking.
So, grab your apron, and let’s dive into creating this creamy, cheesy delight that will become a staple in your kitchen!
Personal Story
Let me take you back to a winter’s evening when I first mastered this Cheesy Beef and Potato Soup. I was curled up at home, glancing outside at the snow that blanketed the ground. My friends were planning a movie night, but honestly, I wasn’t feeling like heading out into the cold. I wanted something cozy but also tasty to impress my friends. That’s when I recalled a comforting recipe my grandmother used to make—though her version involved a significant amount of trial and error!
I grabbed some ground beef from my fridge and a few potatoes that were longing to be used, and I let my culinary instincts take over. As I sautéed the beef and onions, the aroma wafted through my home, transforming it into a comforting haven. By the time I folded in the cheese and cream, I was filled with an overwhelming sense of satisfaction. When my friends arrived and tasted the soup, there were smiles all around and compliments galore—proof that food truly does bring us together. That brisk night led to a cherished recipe that warmed bellies and hearts alike.
Ingredients
Let’s gather everything we need to create this delicious soup! Here’s what you’ll need:
-
1 lb ground beef: This is the hearty backbone of our soup. Feel free to use lean ground beef if you prefer. Ground turkey or chicken can also be swapped for a lighter option!
-
4 medium potatoes, diced: I love using Yukon Gold for their buttery flavor, but Russets or red potatoes work just as well! Make sure to dice them evenly for consistent cooking.
-
1 onion, chopped: The more aromatic, the better! You can substitute with shallots for a slightly sweeter taste.
-
3 cups beef broth: Store-bought works fine, but homemade broth elevates the flavor! You can use vegetable broth for a lighter version or even chicken broth for a different twist.
-
2 cups shredded cheddar cheese: You can’t go wrong with sharp cheddar, but feel free to experiment with smoked gouda or pepper jack for a unique flavor!
-
1 cup heavy cream: This adds richness, but half-and-half or whole milk can be used if you want a lighter option. Just keep in mind that the creaminess will lessen.
-
Salt and pepper to taste: Essential for enhancing flavors—don’t be shy with your seasonings!
-
Fresh parsley for garnish: Adds a pop of color and freshness to the rich soup. Basil or chives work beautifully as well!
Step-by-Step Instructions
Now that we have our ingredients ready, it’s time to roll up our sleeves and get cooking! Follow these steps for a bubbling pot of goodness:
-
Brown the Beef: In a large pot over medium heat, add the ground beef, breaking it apart with a wooden spoon. Cook for about 5-7 minutes until it’s browned and all the pink is gone. Don’t forget to season it with salt and pepper as it cooks! Tip: If there’s excess grease, feel free to drain it—no one wants a greasy soup!
-
Sauté the Aromatics: Add your chopped onion to the pot and sauté together with the beef for about 3-4 minutes. You want the onion to become translucent and fragrant. This step is crucial for building layers of flavor in your soup.
-
Incorporate the Potatoes: Stir in the diced potatoes, allowing them to soak up all those delicious flavors. Mix well and let them cook with the beef and onion for a couple of minutes before moving on.
-
Add the Broth: Pour in the beef broth and bring the mixture to a gentle simmer. Don’t forget to scrape the bottom of the pot to release any flavorful browned bits! This step adds a depth of flavor that truly makes your soup shine.
-
Simmer Away: Cover the pot and allow the soup to simmer for about 15-20 minutes, until the potatoes are tender. You can check them by piercing with a fork—if they slide off easily, they’re ready!
-
Creamy Goodness: Once the potatoes are tender, stir in the heavy cream and shredded cheddar cheese. Allow the cheese to melt completely into the soup, creating a luscious, creamy texture. Don’t rush this step; let the flavors meld together beautifully.
-
Final Seasoning: Taste and adjust the seasoning as necessary. A little extra salt or pepper can elevate your soup even further! If you like a little bit of heat, a dash of cayenne pepper goes a long way.
-
Garnish and Serve: Ladle the soup into bowls and garnish with freshly chopped parsley. This little touch goes a long way in creating a beautiful presentation.
Serving Suggestions
When it comes to plating this Cheesy Beef and Potato Soup, the simpler, the better! Use rustic bowls to serve and don’t skimp on the cheese—people love a cheesy topping. Pair it with a crusty loaf of bread or some crunchy crackers. Trust me, your guests (and you!) will be diving in with big smiles and happy hearts.
Recipe Variations
Feel free to get creative with your Cheesy Beef and Potato Soup. Here are some fun variations:
-
Spicy Kick: Add diced jalapeños or a splash of hot sauce for a spicy twist—perfect for heat lovers!
-
Vegetarian Delight: Swap the ground beef with chopped mushrooms or lentils for a hearty vegetarian version.
-
Add Greens: Toss in some hearty greens like spinach or kale during the last few minutes of cooking for added nutrition and color.
-
Bacon Infusion: Sauté some bacon before the ground beef for an added smoky flavor that will elevate your soup experience!
-
Herbaceous Flavor: Add a sprig of thyme or rosemary while the soup simmers for a refreshing layer of herbaceous goodness.
Chef’s Notes
If you’re anything like me, the kitchen is a place where magical things happen! The beauty of this recipe is that it evolves with you. I’ve experimented with different cheeses and broths over time, and I can tell you that it’s brilliant no matter how you adapt it. One funny moment I remember was a time I mistook powdered sugar for flour while preparing this dish! Let’s just say we enjoyed a very sweet dinner that evening—but it taught me to always check the pantry labels!
So take this recipe and make it your own; every little change adds a story to the dish. Each bowl of soup won’t just be a meal but a memory filled with joy and laughter.
FAQs and Troubleshooting
1. Why is my soup too thick?
If you find that your soup has thickened too much, simply add a bit more beef broth or water until it reaches your desired consistency.
2. Can I use frozen potatoes?
While fresh is best, you can use frozen diced potatoes. Just remember they may add extra water to your soup, so adjust your broth accordingly.
3. My cheese clumped up! What went wrong?
This usually happens if the cheese is added too quickly or at too high of a temperature. To avoid this, ensure the soup is at a lower simmer when you stir in the cheese gradually.
4. Can I make this ahead of time?
Absolutely! Like most soups, the flavors deepen over time. Just be sure to store it in an airtight container. You can reheat on the stove with a splash of water or broth to revive the creamy texture.
Nutritional Info
(Nutrition info is optional; here’s a quick guide to average stats for this recipe)
- Calories: Approximately 400-450 per serving (based on 6 servings).
- Protein: 24g
- Carbs: 30g
- Fat: 25g
Let’s wrap this up, shall we? This Cheesy Beef and Potato Soup is not just a meal; it’s an experience—one that brings warmth, comfort, and delicious flavors into your home. So let’s head to the kitchen, create some culinary magic, and enjoy every cozy bite together. Cheers to delightful cooking!
PrintCheesy Beef and Potato Soup

A warm, hearty soup made with ground beef, tender potatoes, and creamy cheddar cheese, perfect for chilly evenings.
- Prep Time: 15 minutes
- Cook Time: 30 minutes
- Total Time: 45 minutes
- Yield: 6 servings 1x
- Category: Soup
- Method: Stovetop
- Cuisine: American
- Diet: Carnivore
Ingredients
- 1 lb ground beef
- 4 medium potatoes, diced
- 1 onion, chopped
- 3 cups beef broth
- 2 cups shredded cheddar cheese
- 1 cup heavy cream
- Salt and pepper to taste
- Fresh parsley for garnish
Instructions
- Brown the beef in a large pot over medium heat, breaking it apart with a wooden spoon for about 5-7 minutes until browned.
- Sauté the onion with the beef for 3-4 minutes until translucent.
- Incorporate the diced potatoes, mixing well.
- Add the beef broth and bring to a gentle simmer, scraping the bottom of the pot.
- Simmer for 15-20 minutes until potatoes are tender.
- Stir in the heavy cream and cheddar cheese until melted.
- Adjust seasoning as necessary.
- Garnish with parsley and serve.
Notes
Feel free to experiment with different cheeses and add-ins like greens or spices for a unique twist.
Nutrition
- Serving Size: 1 bowl
- Calories: 400
- Sugar: 3g
- Sodium: 800mg
- Fat: 25g
- Saturated Fat: 12g
- Unsaturated Fat: 10g
- Trans Fat: 1g
- Carbohydrates: 30g
- Fiber: 3g
- Protein: 24g
- Cholesterol: 80mg
Keywords: soup, beef, potatoes, cheesy soup, comfort food
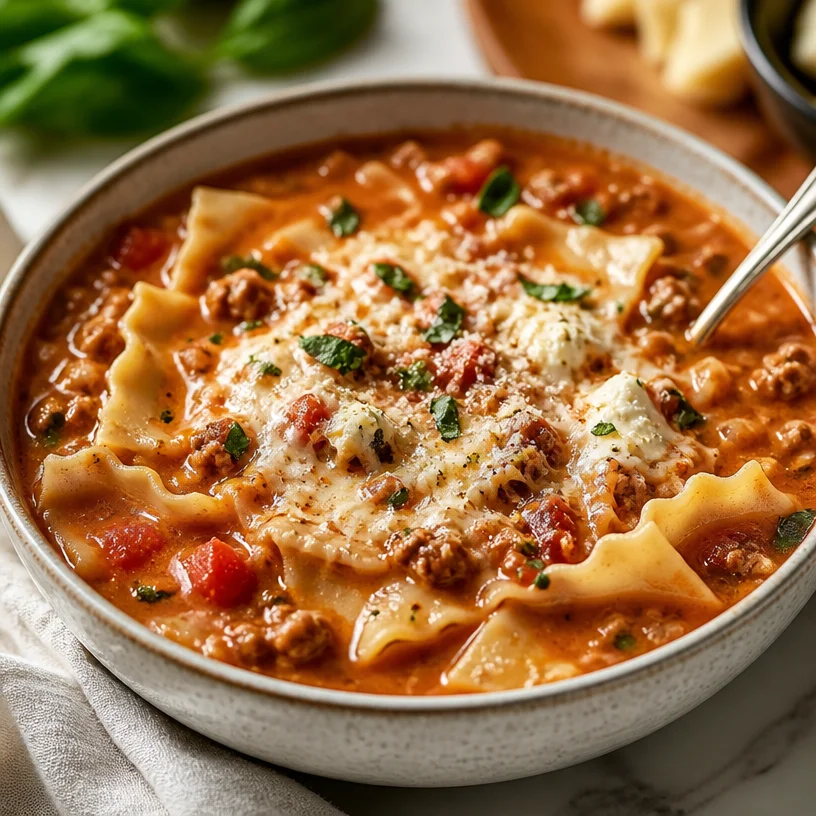
One-Pot Creamy Lasagna Soup in 30 Minutes (Weeknight Meal)
Easy Creamy Lasagna Soup
Introduction
Hey there, my fellow kitchen adventurers! If you’re anything like me, there are days when you just want to dive into a cozy, comforting bowl of soup that warms your soul. Well, I’ve got just the recipe for you: Easy Creamy Lasagna Soup! Imagine the rich flavors of traditional lasagna, but in a delightful, slurp-worthy soup form. It’s the best of both worlds—combining hearty lasagna with the ease of a soup that’s perfect for any day of the week.
This creamy indulgence is a dish that’s as easy to make as it is to enjoy. With a delightfully smooth texture and tantalizing flavors that will make your taste buds sing, this soup has become a staple in my kitchen. Plus, it’s a fantastic way to use up pantry staples and create an impressive dish for family and friends.
In this post, I’ll walk you through my journey into the delicious world of lasagna soup, share some cooking tips and tricks, and offer up a few variations to get those creative juices flowing. Grab your apron, and let’s get cooking!
Personal Story
I still remember the first time I excitedly made this lasagna soup for my friends. It was a chilly autumn evening, and I wanted to create something that not only tasted delicious but also brought everyone together in my cozy little kitchen. I recall throwing open the windows to let in the brisk air while lighting a few candles to set the mood.
As the delicious aroma of garlic and ground beef filled the room, my pals began to wander in, drawn by the lovely scents wafting through the air. We had a wonderful time mixing laughter with cooking, and soon enough, we were gathered around the table, bowls of this creamy goodness in hand.
Everyone dug into the soup, and I watched their expressions shift from curiosity to pure delight. The delightful combination of flavors and textures made this soup a hit. In that moment, I realized that cooking is more than just about the food; it’s about connecting with others. This Easy Creamy Lasagna Soup has since earned its place as a cherished recipe in my kitchen, a dish that brings friends closer while warming our hearts!
Ingredients
Let’s get into this creamy goodness! Here are all the ingredients you’ll need:
-
1 tablespoon olive oil
A staple in any kitchen, olive oil adds richness to your soup. For a different flavor, try avocado oil or even a butter blend. -
1 medium onion (finely diced)
Onions provide the aromatic base for your soup. If you’re not a fan of onion, feel free to substitute with shallots or leeks for a milder flavor. -
1 pound ground beef (80/20)
This blend ensures juicy flavor! If you’re looking for a lighter option, ground turkey or chicken can work wonders too; just keep an eye on the cooking time. -
5 cloves garlic (minced)
Garlic makes everything better! If you love garlic, toss in an extra clove or two—just be ready for strong flavors! -
½ teaspoon red pepper flakes
Spice it up! This adds a bit of heat; adjust based on your personal palate (or omit if you’re keeping it mild). -
1 teaspoon dried oregano
A classic herb that gives your soup depth. Thyme or Italian seasoning are great substitutes if you want to mix things up. -
2 tablespoons tomato paste
Intensifies the tomato flavor and adds a touch of sweetness. No tomato paste? Use ketchup in a pinch—just reduce the amount for balance. -
25 ounces tomato basil pasta sauce
The star of this soup! If you’re feeling ambitious, homemade sauce can elevate this dish even more! -
28 ounces diced canned tomatoes
Adds texture and brightness. If you’re using fresh tomatoes, aim for about 4 cups diced. -
4 cups chicken broth
The base of your soup! Feel free to use vegetable broth for a vegetarian option. -
2 teaspoons kosher salt (divided or more to taste)
Always season to your liking! If you’re watching your sodium, use low-sodium broth or omit some salt. -
12 lasagna noodles (uncooked and broken into 2” pieces)
This adds that signature lasagna flair. Use gluten-free pasta if necessary, or even break up spaghetti if you’re in a bind! -
½ cup heavy cream (optional)
For that luxurious creaminess. Replace it with half-and-half for a lighter touch, or use coconut cream if you’re dairy-free. -
1 cup shredded mozzarella cheese
The melty goodness that ties it all together! Use any cheese that melts well; provolone or fontina are fantastic alternatives! -
½ cup parmesan cheese (freshly grated)
Adds a nutty, savory flavor. Avoid pre-grated for the freshest taste – but if that’s all you have, it’ll still work. -
½ cup ricotta cheese
A staple in lasagna that adds creaminess. You could substitute with cottage cheese or skip it entirely for a lighter soup. -
6 tablespoons fresh basil (finely chopped)
A splash of freshness! Use parsley or spinach if basil isn’t accessible.
Step-by-Step Instructions
Now, let’s bring this delicious soup to life! Follow these steps for a creamy lasagna experience:
-
Sauté the Aromatics:
In a large pot, heat the olive oil over medium heat. Once warm, toss in the finely diced onion and sauté until translucent, about 4-5 minutes. This is where the magic begins! The aroma of onions sizzling will start to fill your kitchen. -
Add the Garlic and Ground Beef:
Next up, stir in the minced garlic and ground beef. Break the beef apart with a spatula, cooking until it’s browned all the way through (about 7-8 minutes). The smell of garlic and beef is simply irresistible—don’t forget to taste-test a tiny piece (you know, for quality control!) -
Spice it Up:
Sprinkle in the red pepper flakes and dried oregano. Stir everything around for a minute to let the spices bloom; this boosts the flavor exponentially. I promise, you’ll love this step! -
Incorporate Tomato:
Add in the tomato paste, mixing well to incorporate it with the beef mixture. This step intensifies the flavor even more. Now, pour in the tomato basil pasta sauce and canned diced tomatoes. Stir to combine and let those flavors mingle for a couple of minutes. -
Add Broth and Seasoning:
Gradually pour in the chicken broth, scraping the bottom of the pot to lift any flavorful bits. Season with 1 teaspoon of kosher salt (you can always add more later based on your taste) and bring it to a simmer. While it simmers, give it a taste! This is your base, so play with the seasoning here. -
Toss in the Noodles:
Once it’s bubbling, toss in the broken lasagna noodles. Stir occasionally and let it simmer for about 10 minutes until the noodles are al dente. If you prefer a thicker soup, cook just a bit longer; remember, the noodles will continue to absorb liquid! -
Cream it Up:
In the final minutes of cooking, drizzle in the heavy cream and stir well. This step is crucial for that creamy lasagna feel we’re aiming for. Now, add in half of your shredded mozzarella and the parmesan cheese. Stir until melted and beautifully combined. Enjoy the delicious aroma wafting through your kitchen! -
Finish it Off:
Remove from heat and fold in the ricotta cheese and fresh basil. This last moment of mixing will add that lovely creaminess and brightness to your soup. Trust me, it makes a world of difference!
Serving Suggestions
Now that your Easy Creamy Lasagna Soup is ready and begging to be served, let’s make it look oh-so-inviting! Grab your favorite soup bowls and ladle in a generous portion. Top each bowl with a sprinkle of remaining shredded mozzarella, a few dollops of ricotta, and extra fresh basil. Not only does this look stunning, but it also adds layers of flavor. Serve with a slice of crusty artisan bread or a fresh garden salad for a complete meal.
Recipe Variations
Looking to switch things up? Here are a few creative twists for your Easy Creamy Lasagna Soup:
- Vegetarian Twist: Swap out the ground beef for mushrooms or a mix of your favorite vegetables like zucchini and bell peppers.
- Spicy Italian Sausage: For a kick, use spicy Italian sausage instead of ground beef, and adjust your red pepper flakes accordingly.
- Creamy Spinach Lasagna Soup: Stir in fresh spinach leaves just before serving for added nutrients and an extra pop of color.
- Cheesy Overload: Go wild with different types of cheeses, like fontina, gouda, or adding cheese into the mix while cooking and on top before serving.
Chef’s Notes
As I reflect on my journey with this recipe, I realize how adaptable it is! The base is incredibly forgiving. If I’ve learned anything from my years in the kitchen, it’s that cooking is about experimenting and having fun. Initially, I was intimidated by the thought of making lasagna—so many layers, so many steps! This soup made it simple and absolutely divine.
I also have to chuckle when I remember a particular lasagna soup ‘fail’ when I accidentally added too much garlic. Let’s just say there was enough garlic in that batch to keep a pack of vampires at bay! Laughter echoed through my kitchen that night, and it turned into an impromptu garlic bread feast as a result.
FAQs and Troubleshooting
Here are some frequently asked questions to help you along the way:
1. Can I make this soup ahead of time?
Absolutely! This soup can be made a day in advance and stored in the fridge. Just reheat gently when you’re ready to serve. However, I recommend storing the noodles separately if you don’t want them to absorb too much liquid.
2. My soup is too thick; what do I do?
Don’t panic! Add additional chicken broth or water until it reaches your desired consistency.
3. How can I make it gluten-free?
Simply use gluten-free pasta, and you’re good to go! Just keep an eye on the cooking time since gluten-free noodles often have different cooking requirements.
4. What other toppings can I use?
Feel free to experiment! Crushed red pepper for heat, Italian herbs for freshness, or even a drizzle of balsamic reduction can really elevate the dish.
Nutritional Info
While I typically leave the nutrition specifics to your own research, keep in mind that this lasagna soup is packed with protein from the beef and cheeses, along with a good dose of vitamins from the tomatoes and basil. It’s a comforting dish that can be enjoyed in moderation as part of a balanced diet.
So there you have it! This Easy Creamy Lasagna Soup is ready to make its way into your home and heart. I hope you enjoy it as much as I do! Happy cooking, and may your kitchen always be filled with laughter and love.
PrintEasy Creamy Lasagna Soup

A cozy and comforting lasagna soup that combines the rich flavors of traditional lasagna in a creamy, slurp-worthy bowl.
- Prep Time: 15 minutes
- Cook Time: 30 minutes
- Total Time: 45 minutes
- Yield: 4 servings 1x
- Category: Main Course
- Method: Stovetop
- Cuisine: Italian
- Diet: Beef
Ingredients
- 1 tablespoon olive oil
- 1 medium onion (finely diced)
- 1 pound ground beef (80/20)
- 5 cloves garlic (minced)
- ½ teaspoon red pepper flakes
- 1 teaspoon dried oregano
- 2 tablespoons tomato paste
- 25 ounces tomato basil pasta sauce
- 28 ounces diced canned tomatoes
- 4 cups chicken broth
- 2 teaspoons kosher salt (divided or more to taste)
- 12 lasagna noodles (uncooked and broken into 2” pieces)
- ½ cup heavy cream (optional)
- 1 cup shredded mozzarella cheese
- ½ cup parmesan cheese (freshly grated)
- ½ cup ricotta cheese
- 6 tablespoons fresh basil (finely chopped)
Instructions
- Sauté the aromatics: In a large pot, heat the olive oil over medium heat. Toss in the finely diced onion and sauté until translucent, about 4-5 minutes.
- Add the garlic and ground beef: Stir in the minced garlic and ground beef, cooking until browned (about 7-8 minutes).
- Spice it up: Sprinkle in the red pepper flakes and dried oregano. Stir for a minute.
- Incorporate tomato: Add the tomato paste and mix well, then pour in the tomato basil pasta sauce and canned diced tomatoes. Stir and let flavors mingle.
- Add broth and seasoning: Gradually pour in the chicken broth, scraping the bottom of the pot and seasoning with kosher salt. Bring to a simmer.
- Toss in the noodles: Once bubbling, add the broken lasagna noodles and simmer for about 10 minutes until al dente.
- Cream it up: Drizzle in the heavy cream, add half the shredded mozzarella and parmesan. Stir until melted.
- Finish it off: Remove from heat and fold in the ricotta cheese and fresh basil.
Notes
For added flavor, serve with extra mozzarella and fresh basil on top. This soup can be made ahead of time and stored in the fridge.
Nutrition
- Serving Size: 1 serving
- Calories: 400
- Sugar: 6g
- Sodium: 500mg
- Fat: 20g
- Saturated Fat: 10g
- Unsaturated Fat: 8g
- Trans Fat: 0g
- Carbohydrates: 30g
- Fiber: 4g
- Protein: 25g
- Cholesterol: 70mg
Keywords: lasagna, soup, creamy soup, Italian recipe, comfort food
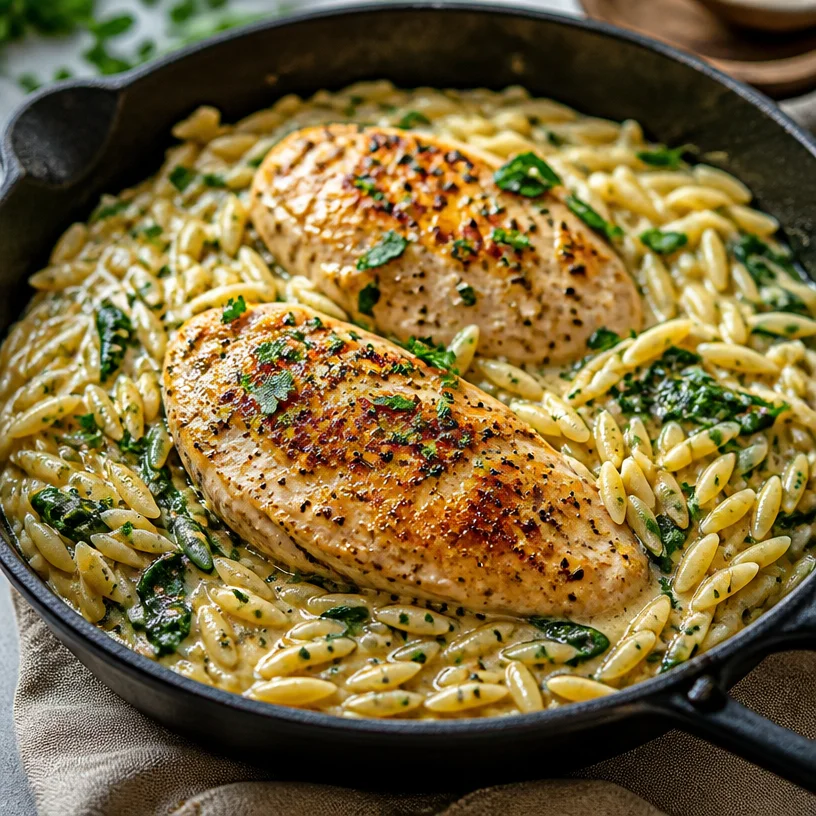
Weeknight One-Pot Creamy Boursin Chicken Orzo Skillet
Creamy Boursin Chicken Orzo: A Dish to Delight
Welcome to my kitchen! Today, I’m excited to share a recipe that’s not just a crowd-pleaser, but a personal favorite: Creamy Boursin Chicken Orzo. This dish perfectly balances comfort and elegance, making it ideal for weeknight dinners or those impromptu dinner parties when you want to impress without the stress. Grab your apron, and let’s dive into the magic of this irresistible dish!
A Culinary Memory
Ah, the warm embrace of creamy comfort food! I remember the first time I made a creamy dish with Boursin cheese. It was a chilly fall evening, and my friends and I were gathered at my place. The air was filled with laughter and the enticing aroma of garlic and herbs. I decided to whip up something special and vibrant — a creamy pasta dish that would embody the warmth of our togetherness. The moment I added the Boursin cheese to the bubbling orzo and watched it transform into a luscious sauce, I knew I’d stumbled onto something extraordinary.
Not only did we enjoy a meal that night, but we also created unforgettable memories. I can still hear the squeals of delight when my friends took that first bite, their eyes lighting up as if they’d just found the missing piece of their culinary puzzle. This recipe isn’t just a meal; it’s a way to foster connection, love, and laughter around the table.
Ingredients
Here’s what you’ll need to create this creamy, dreamy dish:
-
2 chicken breasts
- Use boneless, skinless chicken breasts for easy cooking. If you don’t have chicken, feel free to substitute with diced turkey or even go meatless with sautéed mushrooms!
-
1 cup orzo pasta
- A delightful pasta choice that cooks quickly and absorbs flavors beautifully. If you’re looking for a gluten-free option, quinoa or brown rice can work wonders here!
-
1 cup fresh spinach
- Fresh spinach adds a pop of color and nutrients. You could swap this out for kale or arugula if you prefer a different leafy green, but don’t skip the greens altogether!
-
8 oz Boursin cheese
- This creamy, herbed cheese is the star of the show! If you don’t have Boursin on hand, try a garlic and herb cream cheese as a delicious alternative.
-
2 cups chicken broth
- Use low-sodium chicken broth for a balanced flavor. You can also replace this with vegetable broth if you want to keep things plant-based!
-
Olive oil
- A drizzle is all you need for sautéing the chicken! Feel free to use avocado oil or melted butter if you prefer. Don’t skip this, as it adds essential flavor!
-
Salt and Pepper
- Essential for seasoning. Always taste as you go, and don’t be shy about adjusting based on your personal preference!
Step-by-Step Instructions
Ready to create some magic? Let’s get cooking!
-
Cook the Orzo:
- Bring a pot of salted water to a boil. Add your orzo and cook according to package instructions until al dente, usually about 8–10 minutes. Tip: Stir occasionally to prevent sticking!
-
Prepare the Chicken:
- While your orzo is cooking, heat a tablespoon of olive oil in a large skillet over medium-high heat. Season the chicken breasts with salt and pepper. Once the skillet is hot, carefully add the chicken and sear for about 5-7 minutes on each side until golden brown and cooked through. Chef Hack: For extra flavor, add a pinch of garlic powder or smoked paprika to the seasoning!
-
Sauté the Spinach:
- Once the chicken is cooked, remove it from the skillet and let it rest on a plate. In the same skillet, add another splash of olive oil if needed, then toss in the fresh spinach. Sauté for 2-3 minutes until it wilts down. Pro Tip: This step helps deglaze the pan, picking up all those flavor bits left behind by the chicken!
-
Create the Creamy Sauce:
- Lower the heat and pour in the chicken broth, scraping the skillet to mix in all that flavorful goodness. Stir in the Boursin cheese until it melts into a creamy sauce. This should take about 2-3 minutes. Just wait for it—magic awaits!
-
Combine Everything:
- Add your cooked orzo to the skillet with the creamy sauce, tossing everything together. Slice the chicken and lay it on top. If you want, sprinkle a little extra cheese or fresh herbs as a garnish. Remember, presentation matters!
-
Final Touches:
- Give everything a taste and adjust the seasoning with salt and pepper as needed. Voila! Your Creamy Boursin Chicken Orzo is ready to serve!
Serving Suggestions
Now that your dish is prepped and plated, get ready to wow your guests! Serve the orzo heaped in a beautiful bowl with the sliced chicken placed strategically atop it. A sprinkle of cracked black pepper and maybe a few extra herbs can elevate presentation. Want an extra touch? Drizzle a bit of olive oil over it just before serving for that lovely sheen!
Recipe Variations
Feel free to make this dish your own! Here are a few creative twists to try:
- Add Veggies: Toss in cherry tomatoes or asparagus for added color and nutrition.
- Pesto Perfection: Incorporate a spoonful of pesto with the Boursin cheese for an herbaceous upgrade.
- Nutty Crunch: Top it with toasted pine nuts or slivered almonds for a delightful crunch.
- Spicy Kick: Add a pinch of red pepper flakes when sautéing for a little heat.
- Creamy Mushroom Orzo: Swap out the chicken for mushrooms for a satisfying vegetarian option.
Chef’s Notes
As I continue to experiment in the kitchen, I find that this recipe evolves with every season! In the summer, I love adding fresh garden tomatoes, while in the winter, a handful of roasted butternut squash makes it feel even cozier. This recipe is all about simplicity and adaptability—so don’t hesitate to play around with flavors!
And of course, there’s always that one time I accidentally added way too much Boursin cheese. It turned into a creamy masterpiece, but I had to remind my friends that less is more… sometimes!
FAQs and Troubleshooting
1. My orzo turned out mushy. What happened?
- The most common culprit is overcooking. Next time, check the package for timing and always taste a minute or two before the recommended time.
2. Can I make this dish in advance?
- Absolutely! You can prep the chicken and sauce ahead of time. Just reheat gently on the stove, adding a splash of broth if needed to loosen up the sauce.
3. What if I don’t have chicken broth?
- No worries! You can replace it with water or vegetable broth for a lighter flavor, but consider boosting it with a bit of seasoning to maintain richness.
4. Can I freeze leftovers?
- Yes, but remember that the texture of orzo may change when frozen and reheated. Consume within a month for the best flavor!
Nutritional Info
While specific nutritional information can vary based on portion sizes and exact ingredients, on average, this Creamy Boursin Chicken Orzo contains approximately:
- Calories: 550 per serving
- Protein: 30g
- Carbohydrates: 60g
- Fat: 20g
Enjoy this indulgent yet balanced meal, and remember—cooking is all about enjoying the process. With every dish you create, you’re not just feeding your loved ones, you’re creating memories together. Happy cooking!
PrintCreamy Boursin Chicken Orzo

A creamy and elegant dish perfect for weeknight dinners or dinner parties, made with chicken, orzo, and Boursin cheese.
- Prep Time: 15 minutes
- Cook Time: 15 minutes
- Total Time: 30 minutes
- Yield: 4 servings 1x
- Category: Main Course
- Method: Sautéing and Boiling
- Cuisine: Italian
- Diet: Paleo
Ingredients
- 2 boneless, skinless chicken breasts
- 1 cup orzo pasta
- 1 cup fresh spinach
- 8 oz Boursin cheese
- 2 cups low-sodium chicken broth
- 1 tablespoon olive oil
- Salt and pepper to taste
Instructions
- Bring a pot of salted water to a boil. Add your orzo and cook according to package instructions until al dente, usually about 8–10 minutes.
- Heat a tablespoon of olive oil in a large skillet over medium-high heat. Season the chicken breasts with salt and pepper. Once the skillet is hot, carefully add the chicken and sear for about 5-7 minutes on each side until golden brown and cooked through.
- Remove the chicken from the skillet and let it rest on a plate. In the same skillet, add another splash of olive oil if needed, then toss in the fresh spinach and sauté for 2-3 minutes until it wilts down.
- Lower the heat and pour in the chicken broth, scraping the skillet to mix in all that flavorful goodness. Stir in the Boursin cheese until it melts into a creamy sauce, about 2-3 minutes.
- Add your cooked orzo to the skillet with the creamy sauce, tossing everything together. Slice the chicken and lay it on top, garnishing with extra cheese or fresh herbs if desired.
- Taste and adjust the seasoning with salt and pepper as needed. Serve and enjoy!
Notes
Feel free to add cherry tomatoes, asparagus or incorporate pesto for variations. This dish can be made ahead of time and reheated, and leftovers can be frozen (though the texture may change).
Nutrition
- Serving Size: 1 serving
- Calories: 550
- Sugar: 3g
- Sodium: 700mg
- Fat: 20g
- Saturated Fat: 10g
- Unsaturated Fat: 8g
- Trans Fat: 0g
- Carbohydrates: 60g
- Fiber: 4g
- Protein: 30g
- Cholesterol: 80mg
Keywords: chicken, orzo, creamy pasta, Boursin cheese, comfort food, weeknight dinner

One-Pan Chicken Fajita Casserole: 30-Minute Weeknight Dinner
Chicken Fajita Casserole: A Crowd-Pleasing Feast
Hello, fellow food enthusiasts! If you’re looking for a dish that combines vibrant flavors, comforting textures, and just the right amount of zing, you’ve landed in the right spot. Today, I’m thrilled to share my Chicken Fajita Casserole recipe that will have you wagging your fork in excitement and declaring it a family favorite before the first bite is out of the oven. This recipe is not just a meal; it’s a celebration of good times, laughter, and the joy of gathering around the table.
Introduction
Let’s set the stage: You’ve had a long day at work, or maybe it’s just one of those days where time feels like it’s sprinting ahead of you. The last thing you want to do is spend hours in the kitchen, but your heart tells you that a homemade dinner is the only way to go. Enter the Chicken Fajita Casserole—a delightful one-dish wonder that brings all the gourmet vibes to your dinner table without the gourmet effort.
This casserole is straightforward to put together, and it’s loaded with ingredients that deliver a flavor punch! You can customize it to suit your crew’s tastes, making it a versatile option whether you’re cooking for one, two, or a small army. Plus, who doesn’t love a dish that can be made ahead and simply popped in the oven when it’s time for dinner?
So, grab your favorite apron (how about a stylish Ivory one?) and let’s dive into a dish that marries the fabulous flavors of chicken fajitas with the ease of a casserole. By the end of this post, you’ll be ready to whip it up with flair, and maybe learn a little something along the way!
Personal Story
I can still remember the first time I tried making a casserole. It was a chilly evening in my college dorm, and I needed something warm and filling that wouldn’t require too many ingredients or much time—a typical college dilemma! I had some leftover chicken from a previous dinner, a few bell peppers from taco night, and tons of enthusiasm. As I tossed everything together in one pan, I realized the magic happening before my eyes. The flavors blended together beautifully in the oven, filling my small living space with the most incredible aroma.
That first casserole night turned into a weekly ritual. My friends began showing up on my doorstep, lured in by that heavenly scent wafting through the air. Little did I know, this simple, thrown-together meal would become a cherished tradition of laughter-filled evenings and shared stories around my tiny table. This Chicken Fajita Casserole is a tribute to those nights—great food that brings people together.
Ingredients
Here’s what you’ll need to create this delightful casserole:
-
2 cups cooked chicken, shredded
Cooked rotisserie chicken is a fantastic time-saver here! Feel free to use turkey instead, or for a vegetarian option, swap in roasted zucchini or mushrooms. -
1 cup bell peppers, sliced (red, green, yellow)
These colorful beauties not only taste amazing but also add a pop of color to your dish! If you’re short on bell peppers, any other mild peppers will work, or addition of fresh spinach can also add a great taste. -
1 cup onion, sliced
Sweet onions or yellow onions are great choices here. If you’re more into a milder flavor, consider using shallots instead! -
1 can black beans, drained and rinsed
These beans bring a hearty texture and protein boost. You could substitute with pinto beans or garbanzo beans if you prefer. -
1 cup corn kernels (fresh or frozen)
Sweet corn adds a delicious crunch! If you’re in a pinch, canned corn works too—just be sure to rinse it. -
1 cup salsa
Go for your favorite salsa, whether it’s chunky, smooth, or spicy! You can make fresh salsa at home or even use a jarred version. -
2 cups shredded cheese (cheddar or Mexican blend)
Cheese makes everything better! Experiment with pepper jack for a little heat or go for a vegan cheese option if you’re dairy-free. -
1 teaspoon chili powder
This spice adds depth and warmth. If you want to kick it up a notch, try using chipotle chili powder for a smoky flavor! -
1 teaspoon cumin
Cumin lends that authentic fajita flair. If you’re out of cumin, coriander can be a lovely alternative. -
Salt and pepper to taste
Essential for bringing all those flavors together! -
Tortilla chips (optional for topping)
Crushed tortilla chips on top add a brilliant crunch. You could also get creative with crushed cornflakes or even crunchy fried onions!
Step-by-Step Instructions
Ready to bring this delicious casserole to life? Follow these steps, and you’ll be savoring every layer of flavor in no time!
-
Preheat Your Oven
Preheat your oven to 350°F (175°C). This step is crucial to ensure your casserole bakes evenly, giving it the perfect texture. -
Prepare Your Ingredients
While your oven preheats, take a moment to shred your cooked chicken if you haven’t done so already. This can be done with two forks or in a stand mixer with a paddle attachment. Get those bell peppers and onion sliced! -
Sauté the Vegetables
In a large skillet, add a drizzle of olive oil over medium heat. Toss in the sliced onions and bell peppers. Sauté for about 5-7 minutes, or until they’re soft and fragrant. A little browning on the edges adds extra flavor! -
Combine the Casserole Ingredients
In a large mixing bowl, combine the shredded chicken, sautéed peppers and onions, black beans, corn, salsa, chili powder, cumin, salt, and pepper. Stir until everything is well mixed. You want every bite to be packed with flavor! -
Layer with Cheese
Now, it’s time to bring the cheesy goodness into play. In your casserole dish, pour half of your chicken mixture. Top it with half of the shredded cheese, and then layer the remaining chicken mixture on top. Finish off with the rest of the cheese for a deliciously gooey topping. -
Bake Away
Cover your casserole dish with aluminum foil and pop it in the oven. Bake for 25 minutes, then remove the foil and bake for an additional 10-15 minutes, or until the cheese is golden and bubbly. If you like a little extra crunch, treat yourself to a broil for a minute or two at the end—just keep a close eye on it! -
Presentation Time
Once your casserole is out of the oven and has slightly cooled, you’re ready to plate! If you’re using tortilla chips, sprinkle some on top for that delightful crunch. Fresh cilantro or a squeeze of lime can add that burst of flavor!
Serving Suggestions
This casserole is a magnificent dish on its own, but serving it with sides can elevate your dining experience. Pair it with a fresh garden salad, guacamole, or a bowl of sour cream for dipping! You could even serve it with warm tortillas on the side for a more traditional touch.
Recipe Variations
Feeling creative? Here are a few fun twists you can try:
-
Spicy Chicken Fajita Casserole: Add some diced jalapeños to the mix for an extra kick.
-
Italian-Inspired Fajita Casserole: Swap out the salsa for a jar of marinara sauce, and add Italian seasoning instead of chili powder and cumin.
-
Vegetarian Delight: Replace the chicken with a mix of roasted vegetables, such as zucchini, eggplant, and bell peppers.
-
Fiesta Casserole: Add sliced black olives and top with fresh avocado for that fiesta flair!
Chef’s Notes
I’ve made this casserole countless times with friends and family, and it never fails to impress. One of my funniest kitchen mishaps happened while I was developing this recipe—I accidentally grabbed the cayenne instead of chili powder! Let’s just say the unexpected heat had everyone reaching for drinks and laughing as they admired my “courageous” cooking decision.
Over the years, I’ve simplified the steps and made it more accessible while ensuring all the flavors shine through. This recipe has evolved with countless feedback, altering this crowd-pleaser endlessly, but one thing always remains the same: the joy it brings to my dining table.
FAQs and Troubleshooting
1. Can I prepare this casserole ahead of time?
Absolutely! You can assemble the casserole a day in advance, cover it, and keep it in the fridge. When you’re ready, just pop it in the oven—adjust baking time as it might need a bit longer if refrigerated.
2. Why is my casserole dry?
If your casserole turns out dry, it might be due to overbaking. Keep an eye on the cheese and cover it with foil if it starts to brown too soon. Adding a bit more salsa can also help keep it moist.
3. Can I freeze leftovers?
Yes, this casserole freezes beautifully! Just be sure to cool it completely before placing it in an airtight container. It should last about three months in the freezer. Reheat by thawing overnight in the fridge, then bake in the oven until warm.
4. What can I do if I don’t have certain ingredients?
No problem! As we mentioned in the ingredients section, you can swap in a variety of beans, vegetables, or spices based on what you have on hand. Fajitas are all about personalization!
Nutritional Info
One serving of this Chicken Fajita Casserole is approximately:
- Calories: 380
- Protein: 35g
- Carbs: 30g
- Fat: 18g
Tailor your sides and servings according to your dietary needs!
Now that you’ve got the scoop on this delectable Chicken Fajita Casserole, I hope your kitchen is buzzing with excitement just like mine. Your family and friends are going to love this dish as much as I do, and I can’t wait for you to experience the joy it brings! So, let’s get cooking, shall we? Happy feasting, friends!
PrintChicken Fajita Casserole

A delightful one-dish wonder that combines the fabulous flavors of chicken fajitas with the ease of a casserole.
- Prep Time: 15 minutes
- Cook Time: 40 minutes
- Total Time: 55 minutes
- Yield: 6 servings 1x
- Category: Main Course
- Method: Baking
- Cuisine: Mexican
- Diet: Paleo
Ingredients
- 2 cups cooked chicken, shredded
- 1 cup bell peppers, sliced (red, green, yellow)
- 1 cup onion, sliced
- 1 can black beans, drained and rinsed
- 1 cup corn kernels (fresh or frozen)
- 1 cup salsa
- 2 cups shredded cheese (cheddar or Mexican blend)
- 1 teaspoon chili powder
- 1 teaspoon cumin
- Salt and pepper to taste
- Tortilla chips (optional for topping)
Instructions
- Preheat your oven to 350°F (175°C).
- Prepare your ingredients by shredding the chicken and slicing the bell peppers and onion.
- Sauté the vegetables in a large skillet over medium heat with olive oil for about 5-7 minutes.
- Combine the shredded chicken, sautéed peppers and onions, black beans, corn, salsa, chili powder, cumin, salt, and pepper in a bowl.
- Layer half of the chicken mixture in a casserole dish, top with half of the cheese, then add the remaining mixture and finish with the remaining cheese.
- Bake covered with aluminum foil for 25 minutes, then uncover and bake for an additional 10-15 minutes until cheese is golden and bubbly.
- Plate and serve, topping with crushed tortilla chips if desired.
Notes
Make ahead and refrigerate; adjust baking time if cooking from cold.
Nutrition
- Serving Size: 1 serving
- Calories: 380
- Sugar: 4g
- Sodium: 600mg
- Fat: 18g
- Saturated Fat: 8g
- Unsaturated Fat: 8g
- Trans Fat: 0g
- Carbohydrates: 30g
- Fiber: 8g
- Protein: 35g
- Cholesterol: 75mg
Keywords: Chicken Fajita, Casserole, Easy Dinner, One Dish Meal, Family Recipe
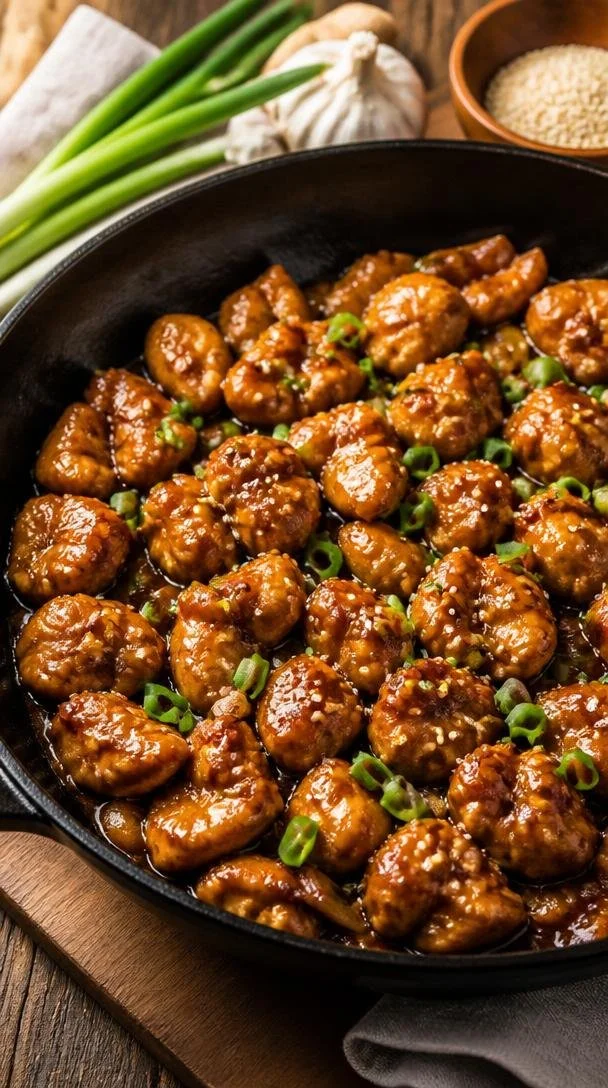
Minute Garlic Ginger Chicken Skillet (Weeknight Dinner)
The Joy of Garlic Ginger Chicken: A Flavorful Journey
Hello, fellow food lovers! Today, we’re diving deep into a dish that captures the essence of cozy home cooking—Garlic Ginger Chicken. This dish combines the intoxicating flavors of garlic and ginger with tender chicken thighs, creating a meal that’s not only delicious but also comforting. So, grab your apron, and let’s get started on a culinary adventure that’s both elegant and approachable!
Our Flavor Adventure Begins
I remember the first time I made Garlic Ginger Chicken. I was hosting a small get-together with friends after a long week of work, and I wanted to prepare something that felt special without requiring me to spend all day in the kitchen. Scrolling through my collection of favorite recipes, I stumbled upon this gem, and it felt like a warm hug on a plate.
As the aroma of ginger and garlic filled my kitchen, my friends gathered around, sipping on sparkling drinks and sharing stories. When I finally pulled the pan off the stove, we dove into the vibrant flavors of that first bite, all laughter and oohs and aahs. As we feasted, I realized that this dish wasn’t just about mixing ingredients; it was about creating memories. It’s a recipe I hold dear, like an old friend you always welcome back into your life.
That’s the magic of Garlic Ginger Chicken—it connects us through food. Now, let’s break down the fantastic ingredients that bring this dish to life!
Ingredient List
-
1 lb. Chicken Thighs (boneless, skinless – cut into small chunks)
Chicken thighs are juicy and packed with flavor. If you’re looking for a leaner option, feel free to use chicken breast; just be mindful that it cooks faster and can dry out. -
1 Egg
The egg serves as a binder in this recipe, helping the cornstarch adhere to the chicken for a lovely crunchy texture. If you’re vegan, you can substitute with a flaxseed egg (1 tablespoon ground flaxseed + 3 tablespoons water). -
3 tbsp Cornstarch
Cornstarch is your secret weapon for achieving that delightful crispy coating! You can swap this with arrowroot powder for a gluten-free alternative or even potato starch if that’s what you have on hand. -
3/4 cup Water
Water helps create the sauce’s silky consistency. You can also use chicken broth for an added flavor boost if you have it on hand. -
1 tbsp Fresh Ginger (very finely chopped)
Ginger provides that aromatic zing that brightens the dish. If you can’t find fresh ginger, ground ginger can work in a pinch—just use about 1 teaspoon. -
1 tbsp Fresh Garlic (very finely chopped)
Nothing quite beats the delicious punch of freshly chopped garlic. In case of a garlic shortage, use garlic powder (1 tsp) or garlic paste for a similar effect. -
1 tbsp Yellow/White Onion (very finely chopped)
Onion adds a subtle sweetness and depth. Shallots are a lovely alternative for a more delicate flavor. -
3 tbsp Soy Sauce
Soy sauce gives this dish its umami goodness. For a gluten-free option, choose tamari or coconut aminos. -
3 tbsp Brown Sugar
Brown sugar balances the salty notes of soy sauce beautifully. If you’re looking to cut sugar, consider using honey or a sugar alternative like maple syrup. -
1 tbsp White Wine Vinegar
This tangy addition brightens all the flavors. Apple cider vinegar would be a solid swap if you’re out of white wine vinegar. -
1 tsp Sesame Oil
Sesame oil brings a warm, nutty flavor. If you don’t have it, feel free to use another oil—just look for something that complements the dish. -
2 tbsp Avocado Oil
This oil is great for sauteing at high temperatures and adds a subtle flavor. Canola oil or light olive oil can easily replace it. -
Green Onions (for garnish)
These not only add a pop of color but also a fresh crunch. If you’re out of green onions, cilantro or parsley can bring a delightful twist. -
Sesame Seeds (for garnish)
Sprinkling sesame seeds lends a lovely crunch and an elegant finish. You can skip them if you don’t have any on hand, but they do elevate the dish!
Step-by-Step Instructions
-
Marinate the Chicken
In a medium bowl, whisk together the egg, cornstarch, and a pinch of salt. Add the chicken chunks and toss until they are coated evenly. Let them marinate for about 15-20 minutes. This step ensures a crispy exterior when cooked! -
Prepare the Sauce
While your chicken marinated, grab another bowl and whisk together the water, soy sauce, brown sugar, white wine vinegar, sesame oil, garlic, ginger, and onion. It should smell divine already! This mixture will bring a burst of flavor to your chicken while it cooks. -
Heat Your Oil
In a large skillet or wok, heat the avocado oil over medium-high heat. You want it hot enough to sizzle but not smoke! An easy tip: test the oil by dropping a small piece of chicken in; if it sizzles immediately, it’s time to cook. -
Cook the Chicken
Carefully add the marinated chicken and cook for about 5-7 minutes until the chicken is golden brown and cooked through, turning occasionally. Cooking in batches can help maintain that gorgeous crispiness! -
Add the Sauce
Once the chicken is cooked, pour in your prepared sauce. Stir gently to coat the chicken pieces evenly. Cook for an additional 3-4 minutes; this allows the sauce to reduce and thicken, coating the chicken beautifully. -
Final Touches
Remove from heat and let it rest for about a minute. This helps the sauce cling to the chicken even better. Garnish with fresh green onions and a sprinkle of sesame seeds before serving.
Serving Suggestions
Plate your Garlic Ginger Chicken over a bed of jasmine rice or crispy noodles for an inviting and hearty meal. To add a fresh touch, include a side of stir-fried vegetables or a light salad dressed in sesame vinaigrette.
Recipe Variations
-
Spicy Garlic Ginger Chicken
Add crushed red pepper flakes or some diced jalapeños to the marinade for a spicy kick! -
Coconut Curry Garlic Ginger Chicken
Mix in coconut milk with the sauce for a creamy, tropical twist. -
Lemon Garlic Ginger Chicken
Squeeze in fresh lemon juice for a zesty bright flavor. -
Honey Soy Garlic Ginger Chicken
Swap out brown sugar for honey for a richer sweetness. -
Veggie-Packed Garlic Ginger Stir-Fry
Toss in bell peppers, snap peas, or bok choy for added nutrition and texture.
Chef’s Notes
This recipe has been a staple in my kitchen for years. I started with it as a base and played around with different flavors and techniques. Over time, it has gone from a simple skillet dish to a family favorite, often requested for potlucks and casual Sunday dinners.
My favorite memory was when I introduced it to my neighbors during a summer BBQ, and they couldn’t believe how easy it was yet tasted like something straight from a restaurant menu. Little did they know the secret was just a few quality ingredients and a little love!
FAQs and Troubleshooting
-
Can I use chicken breast instead of thighs?
Yes! Just keep an eye on the cooking time; chicken breasts can cook faster and might dry out if overcooked. -
The sauce turned out too salty. What happened?
This can happen if your soy sauce is on the saltier side. Next time, try low-sodium soy sauce or adjust the amount to your taste. -
Why isn’t my chicken crispy?
Make sure your oil is hot enough before adding the chicken and avoid overcrowding the pan, which can cause the chicken to steam instead of sear. -
What sides go well with Garlic Ginger Chicken?
Steamed jasmine rice, sautéed bok choy, or a simple cucumber salad provide a refreshing counterbalance to the rich flavors of the chicken.
Nutritional Info
While I won’t go too in-depth, Garlic Ginger Chicken is a wonderful source of protein and can be a healthy addition to your meal, especially when served alongside vegetables. Enjoy it in moderation as part of a balanced diet.
Let’s Create Something Timeless
I hope you find joy in making this Garlic Ginger Chicken! It’s a celebration of flavors that will surely fill your kitchen with warmth and laughter. Remember that cooking isn’t just about the food; it’s about the experience and connections we build along the way. So, tie your apron, turn up that music, and let’s create beautiful moments around our tables together! Happy cooking!
PrintGarlic Ginger Chicken

A flavorful and comforting dish featuring tender chicken thighs marinated in a savory garlic and ginger sauce.
- Prep Time: 20 minutes
- Cook Time: 15 minutes
- Total Time: 35 minutes
- Yield: 4 servings 1x
- Category: Main Course
- Method: Stir-frying
- Cuisine: Asian
- Diet: Gluten-Free
Ingredients
- 1 lb. Chicken Thighs (boneless, skinless – cut into small chunks)
- 1 Egg
- 3 tbsp Cornstarch
- 3/4 cup Water
- 1 tbsp Fresh Ginger (very finely chopped)
- 1 tbsp Fresh Garlic (very finely chopped)
- 1 tbsp Yellow/White Onion (very finely chopped)
- 3 tbsp Soy Sauce
- 3 tbsp Brown Sugar
- 1 tbsp White Wine Vinegar
- 1 tsp Sesame Oil
- 2 tbsp Avocado Oil
- Green Onions (for garnish)
- Sesame Seeds (for garnish)
Instructions
- Marinate the Chicken: In a medium bowl, whisk together the egg, cornstarch, and a pinch of salt. Add the chicken chunks and toss until they are coated evenly. Let them marinate for about 15-20 minutes.
- Prepare the Sauce: While your chicken marinates, grab another bowl and whisk the water, soy sauce, brown sugar, white wine vinegar, sesame oil, garlic, ginger, and onion together.
- Heat Your Oil: In a large skillet or wok, heat the avocado oil over medium-high heat until hot but not smoking.
- Cook the Chicken: Carefully add the marinated chicken and cook for about 5-7 minutes until golden brown and cooked through.
- Add the Sauce: Pour in your prepared sauce and stir gently to coat the chicken evenly. Cook for an additional 3-4 minutes.
- Final Touches: Remove from heat and garnish with fresh green onions and a sprinkle of sesame seeds before serving.
Notes
Serve over jasmine rice or crispy noodles. Can be adapted with various spices or vegetables.
Nutrition
- Serving Size: 1 serving
- Calories: 350
- Sugar: 10g
- Sodium: 800mg
- Fat: 18g
- Saturated Fat: 2g
- Unsaturated Fat: 12g
- Trans Fat: 0g
- Carbohydrates: 22g
- Fiber: 1g
- Protein: 25g
- Cholesterol: 90mg
Keywords: Garlic Ginger Chicken, Chicken Recipe, Easy Chicken Dinner

Bang Bang Chicken Skewers: 15-Minute Weeknight Dinner
Bang Bang Chicken Skewers: A Flavorful Adventure
Hello, fellow foodies! Are you ready to embark on a delicious journey with me? Today, we’re making Bang Bang Chicken Skewers! Imagine succulent chicken pieces, tender and juicy, smothered in a creamy, spicy sauce that has that perfect balance of sweetness and heat. It’s a dish that’s not only bursting with flavor but is also incredibly fun to make and share. Whether you’re hosting friends, having a family dinner, or just want to enjoy a tasty treat, these skewers are sure to elevate your meal.
Cooking has always been a way for me to express love and creativity, and Bang Bang Chicken Skewers hold a special place in my heart. I remember the first time I made these for a small gathering at my home. The sun was setting, and I had set up my patio with twinkling lights, creating a perfect ambiance. As I grilled the chicken skewers, the fragrance danced in the air, drawing my friends closer, and as we savored our first bite, smiles lit up their faces. The combination of flavors was an instant hit! It was one of those moments where I truly felt the magic of cooking – it brought people together around great food.
With that in mind, let’s dive into this recipe and bring some of that magic to your table!
Ingredients
Here’s what you’ll need for your Bang Bang Chicken Skewers:
-
1 pound chicken breast, cubed
- The star of the dish! Chicken breast is lean and cooks quickly, making it perfect for skewers. If you prefer a more tender option, you can also use chicken thighs for extra juiciness.
-
1 tablespoon olive oil
- Perfect for seasoning and keeping the chicken moist while cooking. Feel free to swap it for vegetable or canola oil if that’s what you have on hand.
-
1/4 teaspoon salt
- Essential for balancing flavors; it enhances the chicken’s natural taste. You could also use garlic salt for an extra punch.
-
1/4 teaspoon black pepper
- A must-have for seasoning; it adds a nice warmth. Want a kick? Consider adding some red pepper flakes!
-
1/2 cup mayonnaise
- This creamy base brings richness to our sauce. If you’re looking for a lighter option, try Greek yogurt as a healthier substitute.
-
2 tablespoons sweet chili sauce
- The sweet-and-spicy element. It adds a lovely glaze as well! If you want it spicier, use extra sriracha in its place.
-
1 tablespoon sriracha
- This fiery ingredient gives the dish its signature zing! Adjust according to your heat preference.
-
1 tablespoon lime juice
- Fresh lime juice brightens up the flavors. In a pinch, lemon juice could work nicely.
-
Skewers
- Wooden or metal, either will do! If using wooden skewers, remember to soak them in water for about 30 minutes to prevent burning.
Step-by-Step Instructions
Step 1: Prepare the Chicken
Start by washing and patting dry your chicken breasts. Once they’re nice and dry, cube them into bite-sized pieces, about 1 to 1.5 inches. This size ensures they cook evenly. While you’re chopping, feel free to share any kitchen stories or misadventures with friends (it makes the cooking process more enjoyable)!
Step 2: Marinate
In a bowl, combine the cubed chicken with olive oil, salt, and black pepper. Mix well to ensure every piece is coated. Marinating the chicken enhances the flavor and tenderness. Let it sit for at least 15 minutes; however, if you have time, longer marination is better!
Step 3: Prepare the Sauce
In another bowl, it’s sauce time! Whisk together mayonnaise, sweet chili sauce, sriracha, and lime juice until smooth and creamy. Taste it along the way; adjust the sweet or spicy level based on your preference. This sauce is where the magic happens—creamy, spicy, and perfectly tangy!
Step 4: Skewering Time
Now that your chicken is marinated and your sauce is ready, it’s time to thread the chicken onto the skewers. Using metal skewers? Just slide the cubes on! Prefer wooden skewers? Make sure they’ve been soaked. Leave a little space between each piece for even cooking. If you want to have fun with it, add bell peppers or zucchini between the chicken pieces!
Step 5: Grill or Bake
Heat your grill to medium-high or preheat your oven to 400°F (200°C). If you’re using an outdoor grill, aim for that beautiful char; it adds incredible flavor! Place the skewers on the grill or a baking sheet if you’re oven-baking. Cook for about 10-12 minutes, turning halfway through. You’ll know they’re done when the chicken is cooked through and opaque.
Step 6: Sauce it Up!
Once the chicken skewers are done, remove them from the heat. Drizzle or brush those beautiful skewers with the remaining Bang Bang sauce. Give them a moment to soak up that flavor, and watch your friends’ eyes widen with anticipation when they see the scrumptious presentation!
Serving Suggestions
Plate your Bang Bang Chicken Skewers with a sprinkle of fresh herbs like cilantro or green onions for added freshness. These skewers pair beautifully with jasmine rice or a crunchy slaw to balance the richness of the sauce. Don’t forget a wedge of lime on the side to squeeze on top for that extra zing!
Recipe Variations
Want to mix things up? Here are some creative twists to try:
- Add Veggies: Alternate with cherry tomatoes, bell peppers, or red onions on the skewers for extra color and nutrients.
- Switch Proteins: Try shrimp or tofu for a delightfully different take!
- Change the Heat: Use a different hot sauce for variety—try chipotle or chili garlic sauce!
- Sweeten the Deal: Add a drizzle of honey to your sauce for extra sweetness.
- Make It Smooth: Blend the sauce until smooth for a luxurious feel instead of leaving it creamy.
Chef’s Notes
When I first developed this recipe, I was living in a cozy apartment with limited space. Balancing a frying pan on my tiny stovetop while dodging the cat at my feet made for quite the amusing evening! Over the years, I’ve honed this recipe, always excited to share it with friends. Every time I make it, I’m reminded of how food can transform any gathering into a memorable event. I encourage you to unleash your creativity and make this dish your own!
FAQs and Troubleshooting
1. My chicken skewers are dry. What went wrong?
Dry chicken can often be traced back to cooking too long or using overly lean cuts. Always check for doneness with a meat thermometer—165°F (75°C) is your friend here!
2. How can I prepare these skewers ahead of time?
You can marinate the chicken the night before and store it in the fridge. Assemble and cook them when you’re ready to serve!
3. What do I do if my skewers burn?
If you’re grilling over direct heat, starting too high can cause burning. Try moving them to a cooler part of the grill or turning down the heat.
4. Can I bake them instead of grilling?
Absolutely! Baking is a great alternative. Place them on a lined baking sheet and roast them in a preheated oven at 400°F (200°C) until cooked through, about 12-15 minutes.
Nutritional Info (optional)
Per serving (based on skewers made with chicken breast):
- Calories: ~275
- Protein: ~30g
- Carbohydrates: ~5g
- Fat: ~15g
Now, grab your apron, fire up that grill, and get ready for a flavor explosion! Whether it’s a casual weeknight dinner or a gathering with friends, these Bang Bang Chicken Skewers are sure to impress. Happy cooking, and let’s continue to create beautiful memories around the table!
PrintBang Bang Chicken Skewers

Succulent chicken skewers smothered in a creamy, spicy sauce that balances sweetness and heat.
- Prep Time: 15 minutes
- Cook Time: 12 minutes
- Total Time: 27 minutes
- Yield: 4 servings 1x
- Category: Main Course
- Method: Grilling
- Cuisine: Asian
- Diet: Gluten-Free
Ingredients
- 1 pound chicken breast, cubed
- 1 tablespoon olive oil
- 1/4 teaspoon salt
- 1/4 teaspoon black pepper
- 1/2 cup mayonnaise
- 2 tablespoons sweet chili sauce
- 1 tablespoon sriracha
- 1 tablespoon lime juice
- Skewers
Instructions
- Prepare the Chicken: Start by washing and patting dry your chicken breasts. Cube them into bite-sized pieces, about 1 to 1.5 inches.
- Marinate: In a bowl, combine the cubed chicken with olive oil, salt, and black pepper. Mix well and let it sit for at least 15 minutes.
- Prepare the Sauce: In another bowl, whisk together mayonnaise, sweet chili sauce, sriracha, and lime juice until smooth.
- Skewering Time: Thread the marinated chicken onto the skewers, leaving a little space between each piece.
- Grill or Bake: Heat your grill to medium-high or preheat your oven to 400°F (200°C). Cook for about 10-12 minutes, turning halfway through.
- Sauce it Up!: Once done, remove the skewers from heat and brush with the remaining sauce, allowing it to soak in.
Notes
Serve with a sprinkle of fresh herbs and a wedge of lime for an extra zing.
Nutrition
- Serving Size: 1 skewer
- Calories: 275
- Sugar: 5g
- Sodium: 400mg
- Fat: 15g
- Saturated Fat: 2g
- Unsaturated Fat: 10g
- Trans Fat: 0g
- Carbohydrates: 6g
- Fiber: 0g
- Protein: 30g
- Cholesterol: 70mg
Keywords: Bang Bang Chicken, Chicken Skewers, Grilled Chicken, Spicy Chicken Recipe, Easy Dinner

Crispy One-Pan Baked Feta Potatoes for Weeknight Dinner
Baked Feta Potatoes – A Comforting Culinary Hug
Hello, fellow food lovers! Today, we’re diving into the realm of comfort food that warms your heart and fills your belly – Baked Feta Potatoes! This dish is both simple and elegant, perfect for cozy nights in or impressing your friends at a dinner party. Who knew a potato could be so versatile and delicious?
Picture this: it’s a chilly evening, and you’re nestled in your kitchen, fragrant herbs wafting in the air, while you prepare a meal that not only nourishes your body but also your soul. Grab your apron, and let’s get started on this delightful dish that can transform ordinary ingredients into an extraordinary experience!
Personal Story
This Baked Feta Potatoes recipe holds a special place in my heart. I remember the first time I made it during a cozy get-together with friends. We had gathered for a casual dinner party, and I wanted to try something new. With the potatoes and the block of feta cheese sitting in my fridge, I decided to whip up this dish, inspired by the deliciousness I had seen scrolling through my feeds.
As the potatoes roasted in the oven, the aroma filled the room, inviting all of us to the kitchen. We laughed, told stories, and eagerly anticipated the meal. When I pulled the bubbling tray out of the oven, adorned with golden potatoes, creamy melted feta, and fragrant garlic, it felt like a warm culinary hug. From that day on, this dish became a staple for gatherings and has accompanied many joyous moments in my home. I can’t wait to share it with you!
Ingredients
Let’s get to the good stuff! Here’s what you’ll need for Baked Feta Potatoes:
- 2 large baking potatoes: The stars of the dish! Choose Russet or Idaho potatoes for their fluffy interiors. If you’re in a pinch, sweet potatoes work great too.
- 200g block of feta cheese: Creamy and tangy, feta adds a unique flavor. If you can’t find feta, goat cheese will give you a similar creamy texture and a slightly different flavor twist.
- 2 tbsp olive oil: A must-have for drizzling on potatoes. It not only adds richness but helps achieve a lovely golden crust. Avocado oil can be a great substitute if you prefer.
- 1 tsp dried thyme: This herb lends a beautiful aroma and pairs well with the other ingredients. Fresh thyme works too; just double the amount!
- 1 tsp dried oregano: A classic herb that adds depth and warmth. You can substitute with Italian seasoning if you have it.
- 1 head of garlic (top cut off): Roasting garlic brings out its sweetness and mellows its sharpness. If you’re short on garlic, you can use garlic powder, but roasted garlic really elevates this dish!
- 1 lemon (quartered): The zesty freshness of lemon brightens up the flavors. If you’re not a lemon lover, a splash of balsamic vinegar can give a different yet delightful tang.
- 1 tbsp honey: Just a touch of sweetness balances the saltiness of the feta. Maple syrup can be used for a vegan alternative.
- Fresh basil for garnish: Adds a pop of color and a fresh herbaceous note. If basil isn’t handy, feel free to use parsley or chives!
Step-by-Step Instructions
Alright! It’s time to roll up our sleeves and get cooking. Here’s how to create these mouthwatering Baked Feta Potatoes:
-
Preheat the Oven: Preheat your oven to 400°F (200°C). This ensures a nice, hot environment for roasting. While the oven is heating up, wash and scrub the potatoes thoroughly under running water to remove any dirt.
-
Prepare the Baking Dish: Drizzle a tablespoon of olive oil on a baking sheet or an oven-safe dish. This will prevent the potatoes from sticking and add a lovely flavor.
-
Prep the Potatoes: Pat the potatoes dry and poke them a few times with a fork. This helps steam escape during baking, preventing them from bursting. Rub the potatoes with the remaining olive oil, and sprinkle them with the thyme and oregano.
-
Roast: Place the potatoes on the baking sheet and add the garlic head (top cut off) and lemon wedges around them. Roast in the preheated oven for about 45-50 minutes or until the potatoes are fork-tender and the skin is crisp. This roasting process caramelizes the edges, making them super flavorful.
-
Add the Feta: After 30 minutes, add the block of feta cheese to the baking dish, tucking it right in with the potatoes. Drizzle the honey over the feta to caramelize it as it bakes.
-
The Final Bake: Return everything to the oven for an additional 15-20 minutes, until the feta is golden and soft, and the potatoes are delectably crispy.
-
Garnish and Serve: Once out of the oven, squeeze the roasted garlic cloves out of their skins, into a bowl. Mash them up with a fork, mixing it with the melted feta and the juices from the lemons for a pillowy spread. Serve the potatoes hot, garnished with fresh basil.
Chef’s Tip: Keep an eye on the feta during the last few minutes of baking, as it can go from golden to overly browned quite quickly!
Serving Suggestions
Plating is where the magic truly unfolds! Serve your Baked Feta Potatoes family-style on a large platter, drizzled with any leftover honey and olive oil from the baking dish for added richness. Don’t forget to top it off with a generous handful of fresh basil – it adds a burst of color and flavor!
These potatoes are fantastic on their own or paired with a fresh side salad or roasted vegetables for a complete meal. You can even serve them with a dollop of yogurt for added creaminess and a little zing!
Recipe Variations
While this recipe is delectable on its own, why not mix things up a bit? Here are some creative twists you can try:
- Spicy Kick: Add red pepper flakes or a sprinkle of cayenne pepper to the oil before roasting for a spicy finish.
- Mediterranean Style: Toss in chopped Kalamata olives or sundried tomatoes for a Mediterranean flair.
- Vegan Option: Swap the feta cheese with a vegan cheese alternative or a cashew cream topping.
- Herby Delight: Experiment with fresh herbs like rosemary or dill for different flavor profiles.
- Comforting Addition: Sprinkle crispy bacon bits or sautéed mushrooms on top before serving for a savory crunch!
Chef’s Notes
Baked Feta Potatoes are a wonderfully adaptable dish. In my kitchen, I often use whatever herbs or add-ins I have on hand, making them a great go-to for last-minute meals. They pair great with wine, laughter, and good conversation.
One fun memory I have is when I was recipe-testing in my tiny apartment, and the aroma brought my neighbor knocking on my door to check if I was cooking something special. We ended up sharing a plate, bonding over flavors and laughs. That’s the essence of cooking – it connects us and creates lasting memories.
FAQs and Troubleshooting
-
What if my potatoes aren’t tender after the cooking time?
No worries! Just pop them back in the oven for an extra 10-15 minutes and check them again. Oven times can vary based on size and type of potatoes. -
Can I make this dish ahead of time?
Yes! Pre-cook the potatoes and add the feta just before serving – just warm them back in the oven when you’re ready to eat. -
How do I know if my garlic is roasted perfectly?
Roasted garlic should be soft and lightly caramelized. If you see it turning too dark, it might taste bitter, so keep an eye on its color! -
What are some great side dishes to pair with Baked Feta Potatoes?
A fresh arugula salad with lemon vinaigrette or grilled veggies complement this dish beautifully. You can also serve it alongside grilled chicken or fish for a complete feast.
Nutritional Info
While I love sharing the flavor experiences, I also believe in enjoying food without obsessing over the numbers! Each serving of Baked Feta Potatoes can be balanced with wholesome side dishes – just remember to savor the moment rather than tallying up the calories.
And there you have it, my friends! Dive into this comforting, chic recipe that proves you can elevate simplicity without the stress. Tie on that apron, gather your ingredients, and let’s elevate dinner time into a beautiful experience. Happy cooking!
PrintBaked Feta Potatoes

A comforting dish featuring roasted potatoes with creamy feta cheese, garlic, and fresh herbs.
- Prep Time: 15 minutes
- Cook Time: 50 minutes
- Total Time: 65 minutes
- Yield: 4 servings 1x
- Category: Main Course
- Method: Baking
- Cuisine: Mediterranean
- Diet: Vegetarian
Ingredients
- 2 large baking potatoes (Russet or Idaho)
- 200g block of feta cheese
- 2 tbsp olive oil
- 1 tsp dried thyme
- 1 tsp dried oregano
- 1 head of garlic (top cut off)
- 1 lemon (quartered)
- 1 tbsp honey
- Fresh basil for garnish
Instructions
- Preheat the oven to 400°F (200°C).
- Drizzle a tablespoon of olive oil on a baking sheet.
- Pat the potatoes dry and poke them with a fork.
- Rub the potatoes with olive oil, thyme, and oregano.
- Place the potatoes on the baking sheet with garlic and lemon.
- Roast for 45-50 minutes or until fork-tender.
- Add feta cheese after 30 minutes and drizzle honey.
- Return to oven for an additional 15-20 minutes.
- Garnish with mashed roasted garlic, feta, and serve with fresh basil.
Notes
Keep an eye on the feta during the last few minutes to prevent over-browning.
Nutrition
- Serving Size: 1 serving
- Calories: 350
- Sugar: 5g
- Sodium: 400mg
- Fat: 12g
- Saturated Fat: 4g
- Unsaturated Fat: 6g
- Trans Fat: 0g
- Carbohydrates: 45g
- Fiber: 3g
- Protein: 15g
- Cholesterol: 30mg
Keywords: baked feta potatoes, comfort food, Mediterranean recipe, vegetarian dish, easy dinner

Minute Lemon-Dill Salmon for Busy Weeknights (Healthy)
Elevate Your Dinner with Lemon Dill Salmon
Hello, fellow food lovers! Today, I’m thrilled to share a dish that is equal parts bright, flavorful, and simple enough to make any weeknight dinner feel special. Meet Lemon Dill Salmon, a beautiful pairing of flaky salmon fillets brilliantly complemented by the zest of lemon and the aromatic freshness of dill. If you’ve ever felt the urge to whip up something impressive yet approachable, this is the recipe for you!
In my culinary journey, I have developed a soft spot for seafood, especially salmon. This rich fish is not only delicious but also incredibly versatile. It’s the star of family dinners, simple lunches, and everything in between. I remember the first time I experienced the magic of herb-infused salmon. I was only ten, and my family hosted a summer barbecue. We used a charcoal grill, and there was something mesmerizing about those smoky flavors mingling with the bright notes of lemon and fresh herbs drifting through the air. This dish has been a staple in my kitchen ever since, a timeless recipe that embodies the joy of unexpected, delightful gatherings.
So, pull out your apron, pour yourself a little something bubbly, and let’s dive into the world of Lemon Dill Salmon!
Personal Story
One of my fondest memories associated with salmon revolves around a charming little cabin we rented for a family reunion by the lake. The sun was setting, casting a golden hue over everything, and the air was filled with laughter and delicious aromas. My aunt shared her secret lemon dill marinade for salmon, and we decided to grill it outside, creating an unforgettable experience. The flares of the barbecue, the sizzle of the fish, and the sparkle of laughter made that meal magical. After a delightful evening spent feasting on lemon dill salmon and sharing stories, I realized that food is more than just sustenance; it’s an invitation to connect, to share, and to create lasting memories. Now, each time I make this dish, I’m transported back to that serene lakeside evening, surrounded by loved ones, and it fills my heart with joy.
Ingredients
Here are the ingredients you’ll need to make this delightful dish:
-
4 salmon fillets
Freshness is key! Look for fillets that are bright and moist with a clean smell. If you’re in a pinch, frozen salmon works just as well—just thaw it out overnight in the fridge. -
2 tablespoons olive oil
A staple in many kitchens, olive oil brings richness and depth to the dish. Feel free to substitute it with avocado oil for a different flavor profile or sesame oil for an Asian twist! -
2 tablespoons butter
Butter adds a luscious creaminess that perfectly balances the acidity of lemon. For a dairy-free option, you can use ghee or even coconut oil, which will give a unique flavor twist. -
1 lemon (juiced and zested)
Fresh lemon juice brightens everything up! If you’re out of fresh lemons, bottled juice will do in a pinch, but nothing beats the vibrant flavor of fresh juice and zest. -
2 tablespoons fresh dill (chopped)
Dill is the star herb for this dish, delivering that signature fresh taste. If you’re not a fan of dill, you can substitute it with fresh parsley or tarragon for a lovely touch. -
Salt and pepper to taste
Seasoning is crucial! A pinch of salt and a twist of pepper really brings the flavors together. Experiment with other spices like smoked paprika for a delicious change.
Step-by-Step Instructions
Now, let’s get cooking! Here’s how to prepare your Lemon Dill Salmon in a few easy steps. Follow along and let your kitchen come alive with delicious aromas!
-
Preheat your oven or grill.
Set your oven to 400°F (200°C) or preheat your grill to medium-high heat. Preheating ensures that the salmon cooks evenly and gets that lovely texture we’re all after! -
Prepare the marinade.
In a small bowl, whisk together the olive oil, butter (melted), lemon juice, lemon zest, and fresh dill. The fragrant combination will have you dreaming of summer days! If you like a bit of kick, add a pinch of red pepper flakes to the mix. -
Season the salmon.
Place the salmon fillets on a baking tray lined with parchment paper or directly on the grill grates. Generously salt and pepper each fillet. Remember, seasoning is key to bringing out the natural flavors! -
Pour the marinade.
Drizzle the marinade generously over the salmon fillets, making sure each piece gets some love. Use a brush if you want to spread it evenly. This step is crucial for ensuring that flavor permeates through each bite! -
Bake or grill the salmon.
If you’re baking, place the tray in the oven and cook for about 12-15 minutes, or until the salmon flakes easily with a fork. If you’re grilling, close the lid and let it cook for approximately 6-8 minutes per side, depending on the thickness of your fillets. You want that perfect balance between tender and flaky! -
Garnish and serve.
Once cooked, remove the salmon from the oven or grill and let it rest for a few minutes. This allows the juices to redistribute, ensuring every bite is just as juicy as the last! Give it a sprinkle of fresh dill and a little more lemon zest before serving. -
Enjoy!
Plate it up, gather your loved ones, and dig in. Trust me, that first bite will transport you to a sunny picnic by the lake!
Serving Suggestions
To create a beautiful presentation, serve your Lemon Dill Salmon on a colorful platter over a bed of roasted seasonal vegetables or a light, fresh salad. A side of garlic mashed potatoes or quinoa pairs beautifully with the dish, creating a harmonious balance. Add a slice of lemon and a sprinkle of fresh dill on top for that pop of color and extra zesty flavor!
Recipe Variations
Mix things up a bit with these fun variations on Lemon Dill Salmon:
- Mediterranean Twist: Add chopped olives, capers, and feta cheese to your marinade for a Mediterranean flair.
- Cajun Style: Use Cajun seasoning instead of dill for a spicy kick that will awaken your tastebuds.
- Honey Glaze: Drizzle honey over the salmon before baking for a sweet and tangy version that caramelizes beautifully!
- Herb Medley: Mix in fresh herbs like basil and thyme alongside dill for a delightful herbal bouquet.
- Grilled Veggies: Add seasonal vegetables like asparagus, zucchini, or bell peppers to the grill for a complete, colorful meal.
Chef’s Notes
Over the years, I’ve tweaked this recipe more times than I can count! What started as a simple lemon dill marinade has evolved into a family favorite with endless possibilities. There was even one memorable dinner where I accidentally used orange zest instead of lemon zest! Surprisingly, it worked beautifully—sometimes mistakes can lead to delightful discoveries in the kitchen.
Cooking should be fun and open to modification, so don’t hesitate to play around with this recipe. Let your creativity shine and make it your own!
FAQs and Troubleshooting
-
What if my salmon is overcooked?
If you find yourself with overcooked salmon, don’t despair! Adding a splash of lemon juice or a drizzle of olive oil can help reintroduce moisture. -
Can I make this dish ahead of time?
Absolutely! You can marinate the salmon fillets a few hours ahead of time or even overnight. Just store them in the fridge until you’re ready to cook. -
How do I know when the salmon is done?
The salmon is perfectly cooked when it flakes easily with a fork and is opaque throughout. You can also use a meat thermometer—145°F (63°C) is the magic number! -
What sides pair well with lemon dill salmon?
The options are endless! Consider serving it with steamed vegetables, a fresh salad, rice pilaf, or even a light pasta for a perfect complement to your flavorful salmon.
Nutritional Info
Each serving of Lemon Dill Salmon packs a delightful protein punch along with healthy fats from salmon and olive oil. It’s a great source of omega-3 fatty acids, vitamin D, and provides a host of minerals! Pair it with your favorite sides for a balanced meal.
Elevating your home cooking doesn’t have to be an overwhelming task! With Lemon Dill Salmon, you’re armed with a beautiful recipe that brings elegance and ease to your table. So grab those ingredients, invite someone you love over, and savor the creativity that fills your kitchen. Cheers to delicious moments shared over a scrumptious meal! Happy cooking!
PrintLemon Dill Salmon

A bright and flavorful dish featuring flaky salmon fillets enhanced by lemon zest and fresh dill, perfect for weeknight dinners.
- Prep Time: 10 minutes
- Cook Time: 15 minutes
- Total Time: 25 minutes
- Yield: 4 servings 1x
- Category: Main Course
- Method: Grilling/Baking
- Cuisine: Mediterranean
- Diet: Pescatarian
Ingredients
- 4 salmon fillets
- 2 tablespoons olive oil
- 2 tablespoons butter
- 1 lemon (juiced and zested)
- 2 tablespoons fresh dill (chopped)
- Salt and pepper to taste
Instructions
- Preheat your oven or grill to 400°F (200°C).
- Prepare the marinade by whisking together olive oil, melted butter, lemon juice, lemon zest, and fresh dill.
- Season the salmon by placing fillets on a baking tray or grill and adding salt and pepper.
- Pour the marinade over the salmon fillets.
- Bake or grill the salmon for 12-15 minutes (baking) or 6-8 minutes per side (grilling).
- Garnish with fresh dill and lemon zest before serving.
Notes
Serve with roasted seasonal vegetables or a fresh salad for an elegant meal. Can be made ahead of time by marinating the salmon.
Nutrition
- Serving Size: 1 serving
- Calories: 350
- Sugar: 1g
- Sodium: 300mg
- Fat: 25g
- Saturated Fat: 8g
- Unsaturated Fat: 15g
- Trans Fat: 0g
- Carbohydrates: 1g
- Fiber: 0g
- Protein: 35g
- Cholesterol: 70mg
Keywords: salmon, lemon dill, seafood, healthy dinner, easy recipe