
Grilled Salsa Verde Pepper Jack Chicken
Grilled Salsa Verde Pepper Jack Chicken: A Flavorful Delight for Your Table
Hello, fellow food enthusiasts! Today, I’m excited to share a recipe that has become a staple in my kitchen – Grilled Salsa Verde Pepper Jack Chicken. This dish beautifully marries the vibrant essence of salsa verde with the satisfying creaminess of pepper Jack cheese, all enveloping juicy chicken breasts that grill to perfection. It not only looks stunning on the plate but tastes even better, embodying that effortless elegance I adore.
Growing up, my summer evenings were often filled with the sound of the grill sizzling and the warm aroma of spices wafting through the air. My family knew it was a special occasion when the grill was lit. Those days inspired my love for outdoor cooking and delicious, flavor-packed meals. This recipe takes me back to those fond memories, where laughter mingled with the scent of charred chicken and zesty salsa.
So, whether you’re prepping for a casual weeknight dinner or hosting friends for a summer barbecue, this dish is the perfect way to impress your guests while keeping things easy and fun. Let’s dive into creating this delightful meal that’s sure to make your kitchen feel like the heart of the home!
Personal Story
As a child, summer meant family BBQs, where the grill would be fired up in our backyard on sunny afternoons. My dad was the undisputed king of the grill, flipping burgers and chicken like a pro. But my favorite part was always his secret ingredient: a vibrant green salsa he’d whip up using fresh herbs from our garden. The zing of that salsa transformed every dish into something magical.
One evening, as we sat around the table, I watched him pour the salsa over grilled chicken. The colors danced in the sunlight, and I was mesmerized by the joy it brought to everyone around. That dish became a family favorite, inspiring me to experiment with flavors and create my own grilled versions. This Grilled Salsa Verde Pepper Jack Chicken is my homage to those sun-soaked days, filled with good food and cherished memories.
Ingredients
Gather these delicious ingredients to create your own Grilled Salsa Verde Pepper Jack Chicken:
-
1 ½ pounds thin-sliced boneless skinless chicken breasts (about 4 breasts)
- Look for uniform thickness to ensure even cooking. If you can’t find thin-sliced, you can butterfly thick breasts or pound them down gently.
-
12 ounces salsa verde (Trader Joe’s recommended)
- Salsa verde offers a fresh, tangy flavor. Feel free to try making your own or use a jar from your favorite local brand.
-
3 tablespoons olive oil
- This adds richness while helping to keep the chicken moist on the grill. You could substitute with avocado oil for a similar flavor.
-
2 tablespoons lime juice
- Fresh lime juice brightens the dish! If you’re in a pinch, bottled lime juice works too, but fresh really makes a difference.
-
1 teaspoon cumin
- Cumin adds a warm, earthy spice. If you’re looking for a twist, smoked paprika could be a fun substitute.
-
1 teaspoon salt (or more, to taste)
- Always taste as you go! You might want more or less depending on your salt preference.
-
1 teaspoon freshly ground black pepper
- Freshly cracked pepper has a bold flavor that pre-ground just can’t match. Adjust to your taste.
-
4 slices pepper Jack cheese (or as desired)
- The creaminess and spice of pepper Jack cheese elevate the dish. Feel free to use Monterey Jack, cheddar, or even a vegan cheese alternative!
-
Fresh cilantro, finely minced (optional, for garnishing)
- Cilantro adds a fresh pop! If you’re not a fan, try finely chopped green onions or parsley instead.
-
Lime wedges (optional, for serving)
- A squeeze of lime just before eating brightens the flavors wonderfully.
Step-by-Step Instructions
Now that we have our ingredients ready, let’s get cooking! Follow these detailed steps to create your Grilled Salsa Verde Pepper Jack Chicken, and I promise you’ll be amazed how simple and enjoyable this process is.
Step 1: Marinate the Chicken
- In a large mixing bowl, combine your salsa verde, olive oil, lime juice, cumin, salt, and black pepper. Stir well until everything is mixed.
- Place your thin-sliced chicken breasts into the marinade, ensuring they’re coated evenly. This step infuses your chicken with incredible flavor!
- Cover the bowl with plastic wrap or transfer everything into a resealable bag. Refrigerate for at least 30 minutes – but if you can, let it marinate for a few hours or even overnight to deepen the flavor.
Step 2: Prepare the Grill
- Preheat your grill to medium-high heat, about 375°F to 450°F (190°C to 230°C). A hot grill will give you lovely grill marks while sealing in all the juices.
- Brush the grill grates with a little olive oil to help prevent sticking.
Step 3: Grill the Chicken
- Remove chicken from the marinade, shaking off any excess. Discard the leftover marinade (for safety reasons).
- Place the chicken breasts on the hot grill and close the lid. Grill for about 5-7 minutes on one side.
- After 5-7 minutes, check for grill marks and flip the chicken. Cook for another 5 minutes. You want the internal temperature to reach 165°F (75°C).
- During the last minute of grilling, place a slice of pepper Jack cheese on each breast. Close the lid and let the cheese melt – this is where the magic happens!
Step 4: Let It Rest
- Once your chicken is grilled to perfection, carefully remove it from the grill and let it rest for about 5 minutes. Resting is key; it allows the juices to redistribute, resulting in tender chicken.
Serving Suggestions
Now for the fun part: plating! To serve, lay the juicy grilled chicken on a vibrant plate. Drizzle a bit more salsa verde on top, allowing it to cascade onto the plate for that lovely, colorful presentation.
Garnish with freshly minced cilantro and serve with a wedge of lime on the side for an extra citrusy squeeze. This dish is perfect alongside a crisp green salad or grilled veggies to create a balanced and eye-catching meal!
Recipe Variations
Ready to mix things up? Here are a few delicious twists for your Grilled Salsa Verde Pepper Jack Chicken:
- Spicy Kick: Add a minced jalapeño or some hot sauce to the marinade for an extra level of heat.
- Herb Infusion: Mix in freshly chopped cilantro or basil with the marinade for an aromatic twist.
- Fruit Fusion: Top your chicken with fresh mango or peach salsa for a sweet and savory contrast.
- Cheesy Delight: Combine different cheeses for depth – try a mix of cheddar and pepper Jack for extra flavor.
- Vegan Version: Substitute chicken with thick slices of eggplant or zucchini. Marinate and grill them for a hearty vegetarian dish.
Chef’s Notes
This Grilled Salsa Verde Pepper Jack Chicken recipe started as a way to utilize leftover salsa. The first time I threw it together, I was simply attempting to clear out my fridge. To my surprise, the combination was so delectable that it quickly became a household favorite.
I’ve played around with various salsas since then, and each brought a unique twist to the dish! Salsa verde is my top choice due to its vibrant flavor, but don’t hesitate to experiment with whatever you have on hand. Who knew a pantry staple could evolve into such a memorable dish?
FAQs and Troubleshooting
Q: Can I use chicken thighs instead?
- Absolutely! Just ensure they’re boneless and skinless for even cooking. Thighs will offer a richer flavor and juiciness.
Q: My chicken came out dry; what did I do wrong?
- Overcooking can dry out chicken breasts quickly. Use a meat thermometer to accurately check for doneness.
Q: Can I make this in the oven?
- Yes, you can! Bake the marinated chicken at 375°F (190°C) for about 25-30 minutes, then add cheese in the last few minutes.
Q: What if I don’t have a grill?
- No worries! You can use a grill pan or even a skillet on the stovetop. Just make sure to preheat your pan and follow the same steps.
Nutritional Info
This Grilled Salsa Verde Pepper Jack Chicken is a delightful addition to a balanced diet, providing protein from the chicken and healthy fats from olive oil. Each serving (one 4-ounce grilled chicken breast) has approximately:
- Calories: 320
- Protein: 32g
- Fat: 18g
- Carbohydrates: 5g
- Fiber: 1g
And there you have it! A tantalizing recipe for Grilled Salsa Verde Pepper Jack Chicken that’s not only a treat for the taste buds but also embodies warmth, love, and delightful memories at the table. I hope you enjoy cooking this as much as I do! Remember, cooking is all about creating joyful experiences, so get in the kitchen, tie on your apron, and let’s make something delicious!
PrintGrilled Salsa Verde Pepper Jack Chicken

A delightful dish combining the vibrant essence of salsa verde with creamy pepper Jack cheese and juicy grilled chicken.
- Prep Time: 30 minutes
- Cook Time: 15 minutes
- Total Time: 45 minutes
- Yield: 4 servings 1x
- Category: Main Course
- Method: Grilling
- Cuisine: Mexican
- Diet: Gluten-Free
Ingredients
- 1 ½ pounds thin-sliced boneless skinless chicken breasts (about 4 breasts)
- 12 ounces salsa verde
- 3 tablespoons olive oil
- 2 tablespoons lime juice
- 1 teaspoon cumin
- 1 teaspoon salt (or more, to taste)
- 1 teaspoon freshly ground black pepper
- 4 slices pepper Jack cheese (or as desired)
- Fresh cilantro, finely minced (optional, for garnishing)
- Lime wedges (optional, for serving)
Instructions
- Marinate the chicken: In a large mixing bowl, combine salsa verde, olive oil, lime juice, cumin, salt, and black pepper. Stir well until mixed. Place chicken in marinade, ensuring it’s coated evenly. Cover and refrigerate for at least 30 minutes.
- Prepare the grill: Preheat your grill to medium-high heat (375°F to 450°F). Brush grill grates with olive oil.
- Grill the chicken: Remove chicken from marinade, discarding excess marinade. Place chicken breasts on the grill, cooking for 5-7 minutes. Flip and cook for another 5 minutes. Ensure internal temperature reaches 165°F (75°C). During the last minute, place cheese on each breast to melt.
- Let it rest: Remove chicken from the grill and let it rest for about 5 minutes.
Notes
This dish is perfect alongside a crisp green salad or grilled veggies. Options for variations include adding jalapeño for heat or using eggplant for a vegan version.
Nutrition
- Serving Size: 1 serving
- Calories: 320
- Sugar: 2g
- Sodium: 800mg
- Fat: 18g
- Saturated Fat: 6g
- Unsaturated Fat: 10g
- Trans Fat: 0g
- Carbohydrates: 5g
- Fiber: 1g
- Protein: 32g
- Cholesterol: 75mg
Keywords: grilled chicken, salsa verde, pepper jack cheese, summer BBQ, easy recipes

Bang Bang Chicken Skewers
Bang Bang Chicken Skewers Recipe: A Delightful Twist on a Classic
Hello, food lovers! Today, I’m thrilled to share with you a fantastic recipe that’s perfect for any gathering — Bang Bang Chicken Skewers. These bite-sized pieces of grilled chicken are marinated in a creamy, spicy sauce that will have everyone coming back for seconds (and maybe thirds). Whether you’re throwing a backyard barbecue, hosting a dinner party, or just looking for a delicious weeknight meal, these skewers are an absolute crowd-pleaser.
What I adore about this dish is its vibrant flavor and easy preparation. You don’t need a culinary degree to make these beauties come to life. Just gather your ingredients, tie on your apron, and let’s cook up something memorable! These skewers are not only about the taste; they also carry storytelling moments that bring friends and families closer together.
So, let’s ignite our taste buds and dive into a recipe that’s all about flavor, warmth, and a pinch of creativity. Trust me, these Bang Bang Chicken Skewers will quickly become a staple in your culinary repertoire!
Personal Story
Ah, Bang Bang Chicken Skewers! The very first time I made these was during a summer get-together at my friend’s backyard picnic. The sun was shining, friends were mingling, and the aroma of grilled food filled the air. I wanted to bring something special to the table, a dish that would wow and satisfy everyone.
As I prepared the chicken, I couldn’t help but reminisce about my childhood, and how my family would gather around the grill during the summer months. My dad would take the lead, teasing the neighbors with delicious smoky flavors, and I would be right there by his side, mixing marinades and stealing bits of seasoned meat. It was during those moments that I learned the joy of cooking and the importance of sharing meals with others.
Fast forward to that sunny afternoon when I served my Bang Bang Chicken Skewers. With our friends gathered around, laughter and good vibes filled the atmosphere. Everyone loved the flavor-packed skewers, and it felt like an ode to those cherished memories of family meals and gatherings. The dish embodies the spirit of togetherness and is the perfect way to celebrate life’s little moments.
Ingredients
Here are the ingredients you’ll need to create your Bang Bang Chicken Skewers:
-
1 lb cubed chicken breast: The star of the show! Look for fresh, high-quality chicken breast. If you prefer, you can substitute with thighs for extra juiciness.
-
1/2 cup mayonnaise: This creamy base provides richness to the sauce. If you’re looking for a lighter alternative, Greek yogurt works surprisingly well!
-
2 tablespoons sweet chili sauce: This magical ingredient brings a sweet-and-spicy kick that adds character to the marinade. Make sure it’s not too thick for even mixing!
-
1 tablespoon Sriracha sauce: Spice things up with Sriracha. If you’re sensitive to heat, you can reduce the amount or use a milder hot sauce instead.
-
1 tablespoon lime juice: Fresh lime juice adds a zesty brightness that balances the flavors beautifully. Don’t substitute with bottled; fresh is always better!
-
Salt and pepper to taste: Essential for enhancing flavors. Feel free to sprinkle in extra seasoning — a touch of smoked paprika can lend a nice depth!
-
Skewers for grilling: Don’t forget the skewers! Soak wooden skewers in water for at least 30 minutes to prevent burning on the grill. Metal skewers are a convenient alternative if you have them.
Step-by-Step Instructions
1. Prepare the Chicken
Start by cutting your chicken breast into bite-sized cubes, about 1-2 inches each. This helps them cook evenly and ensures that every skewer gets that delicious bang bang flavor. If using chicken thighs, make sure to remove any excess fat for a cleaner bite.
2. Make the Marinade
In a medium bowl, combine the mayonnaise, sweet chili sauce, Sriracha sauce, lime juice, salt, and pepper. Whisk until you achieve a smooth consistency. Taste the marinade and adjust seasoning according to your preference. Don’t be shy — this is where flavor magic happens!
Chef Tip: Make extra marinade for dipping sauce; it’s a crowd favorite!
3. Marinate the Chicken
Add the cubed chicken to the marinade, ensuring every piece is coated. Cover the bowl with plastic wrap and let it sit in the refrigerator for at least 30 minutes. If you have more time, marinating for a few hours (or even overnight) will deepen the flavors.
4. Prepare the Grill
Preheat your grill to medium-high heat. If using a charcoal grill, let those coals turn ashy gray before cooking. For a stovetop grill pan, heat it until it’s sizzling. Remember, a good sear is essential for that mouthwatering char!
5. Assemble the Skewers
Once the chicken has marinated, it’s skewering time! Thread the chicken cubes onto the soaked skewers, leaving a bit of space between each piece for even cooking. Remember not to crowd them!
6. Grill the Skewers
Place the skewers on the grill and let them cook for about 10-12 minutes, turning occasionally. You want that perfect golden-brown color. The chicken is done when the internal temperature reaches 165°F.
Chef Hack: For those beautiful grill marks, avoid flipping the skewers too soon! Give them a few minutes to sear on one side before turning.
7. Serve!
Once cooked, remove the skewers from the grill and let them rest for a couple of minutes. This step allows the juices to redistribute and keeps your chicken tender.
Serving Suggestions
To plate your Bang Bang Chicken Skewers, consider serving them on a beautiful platter with a sprinkle of fresh herbs like cilantro or parsley for a pop of color. Pair with lime wedges for an extra zesty kick. These skewers are fantastic on their own or alongside a fresh salad, rice, or grilled vegetables.
Recipe Variations
Want to get creative? Here are a few delightful twists to elevate your Bang Bang Chicken Skewers:
-
Vegetarian Option: Swap chicken with firm tofu or halloumi for a tasty veggie version.
-
Tangy Twist: Add a tablespoon of apple cider vinegar to the marinade for a tangy touch.
-
Tropical Flair: Thread pieces of pineapple or bell peppers onto the skewers for a sweet and colorful addition!
-
Herb-Infused: Incorporate fresh herbs like basil or cilantro into the marinade for added flavor.
-
Spicy Option: Increase the Sriracha for more heat, or add red pepper flakes to the marinade!
Chef’s Notes
Oh, how these Bang Bang Chicken Skewers have evolved over time! I remember when I first stumbled upon the idea of “bang bang” flavors during my travels across Southeast Asia. The refreshing combination of sweet and spicy really stuck with me, and I just had to create a home version that could be shared with friends and family.
A funny kitchen story comes to mind—one time, I was cooking up these skewers for a potluck, and in my excitement, I accidentally doubled the Sriracha. Let’s just say it was a fiery hit that had everyone laughing and reaching for the cold drinks. But hey, cooking is all about experimentation and laughter, right?
FAQs and Troubleshooting
1. What if my chicken is dry?
Ensure you marinated the chicken long enough. The acid in the marinade helps to keep the chicken juicy. If it’s still dry, consider using chicken thighs instead of breasts — they’re more forgiving!
2. Can I bake these instead of grilling?
Absolutely! Preheat your oven to 400°F, place the skewers on a baking sheet lined with parchment paper, and bake for about 20 minutes, flipping halfway through.
3. How do I store leftovers?
Leftover skewers can be refrigerated in an airtight container for up to 2 days. Reheat in the oven or a skillet to preserve their texture.
4. How do I know when the chicken is cooked?
Use a meat thermometer to check the internal temperature; it should reach 165°F. If you don’t have one, ensure the chicken is no longer pink in the center.
Nutritional Info
(Optional: Nutritional information may vary based on ingredients used and portion sizes. Always consult a professional if you require detailed nutritional information for dietary reasons.)
And there you have it — a flavorful, inviting recipe for Bang Bang Chicken Skewers that captures the essence of shared meals and sweet moments. I hope you enjoyed this journey through cooking and will feel inspired to create these dish at home. Remember: cooking is about joy, adventure, and connection. So grab your apron, gather your loved ones, and let’s create some memorable meals together! Happy cooking! 🍽️
PrintBang Bang Chicken Skewers

A delightful recipe for Bang Bang Chicken Skewers, marinated in a creamy, spicy sauce that’s perfect for gatherings.
- Prep Time: 15 minutes
- Cook Time: 12 minutes
- Total Time: 42 minutes
- Yield: 4 servings 1x
- Category: Main Course
- Method: Grilling
- Cuisine: Asian
- Diet: Paleo
Ingredients
- 1 lb cubed chicken breast
- 1/2 cup mayonnaise
- 2 tablespoons sweet chili sauce
- 1 tablespoon Sriracha sauce
- 1 tablespoon lime juice
- Salt and pepper to taste
- Skewers for grilling
Instructions
- Prepare the Chicken: Start by cutting your chicken breast into bite-sized cubes.
- Make the Marinade: In a bowl, combine mayonnaise, sweet chili sauce, Sriracha, lime juice, salt, and pepper; whisk until smooth.
- Marinate the Chicken: Add chicken to marinade, ensuring each piece is coated, and refrigerate for at least 30 minutes.
- Prepare the Grill: Preheat your grill to medium-high heat.
- Assemble the Skewers: Thread marinated chicken onto skewers, leaving space between pieces.
- Grill the Skewers: Cook skewers for 10-12 minutes, turning occasionally, until golden-brown and cooked through.
- Serve! Let the skewers rest for a few minutes before serving.
Notes
To enhance the dish, consider serving with fresh herbs and lime wedges. These skewers can also be baked at 400°F for about 20 minutes.
Nutrition
- Serving Size: 1 skewer
- Calories: 350
- Sugar: 4g
- Sodium: 420mg
- Fat: 22g
- Saturated Fat: 3g
- Unsaturated Fat: 19g
- Trans Fat: 0g
- Carbohydrates: 10g
- Fiber: 1g
- Protein: 30g
- Cholesterol: 120mg
Keywords: Bang Bang Chicken, Skewers, Grilled Chicken, Party Food, Asian Recipes

Lime Chicken Party
Lime Chicken Party: A Zesty Delight for Any Gathering!
Hello, fellow foodies! Welcome back to my cozy corner of culinary creativity here at Ivory Apron! If you’re looking to elevate your next gathering with something vibrant and delicious, then you’ve landed in the right place. Today, I’m excited to share with you a recipe that not only celebrates the zestiness of lime but also embodies all the warmth of a friendly gathering. Say hello to my Lime Chicken Party—a dish that’s as effortless as it is impressive!
Cooking is all about creating experiences, and there’s something special about gathering around the table to share a meal infused with flavors and fresh ingredients. The bright acidity of lime combined with the tender juiciness of chicken brings sunshine to any plate, and I can’t wait for you to experience it with your loved ones!
Let’s Get Personal: A Memory with Lime Chicken
This Lime Chicken recipe holds a special place in my heart because it reminds me of a long summer evening spent with family and friends in my backyard. One year, during a balmy summer evening, I decided to host a casual barbecue to celebrate my cousin’s birthday. As we set up the string lights overhead and arranged picnic blankets on the grass, I wanted a showstopper of a dish that wouldn’t keep me stuck in the kitchen.
I marinated chicken breasts in a luscious lime mixture, using fresh herbs and spices to brighten the flavor. As the chicken grilled to perfection, the sizzle mixed with our laughter and the smell of charred goodness wafted through the air. I recall the joy on everyone’s faces as they took the first bite—the zesty chicken paired deliciously with ripe avocado and colorful salads. That night was filled with great conversations, hearty laughter, and a lot of love, and I’ve been sharing this fabulous dish ever since!
Ingredients
Here’s what you’ll need to create this vibrant Lime Chicken Party dish. Each ingredient is not only essential but also brings something special to the table:
-
4 Chicken Breasts
Tender and versatile, chicken breasts serve as the perfect canvas for our zesty marinade. You can swap these for chicken thighs for a juicier bite or even use tofu for a vegetarian-friendly option. -
2 Limes (juiced)
Fresh lime juice adds a bright acidity that elevates the dish. Bottled lime juice is convenient in a pinch, but I highly recommend fresh for that vibrant flavor. -
1 Avocado (sliced)
Creamy avocados balance out the zesty lime and add richness to your plate. If you’re feeling adventurous, you can swap it for mango for a fruity twist! -
1/4 Cup Fresh Cilantro (chopped)
Fresh cilantro introduces a lovely herbaceous note. If cilantro isn’t your thing, parsley works beautifully as a substitute or skip it altogether for a milder flavor. -
1 Teaspoon Chili Powder
A hint of chili powder adds depth and a touch of warmth. You can adjust the heat level by using smoked paprika for a smoky flavor or cayenne pepper for an extra kick. -
1 Tablespoon Olive Oil
This helps to keep the chicken moist and adds a touch of richness. You can use avocado oil or grapeseed oil for a neutral flavor. -
Salt and Pepper to taste
Essential for enhancing flavors. Don’t forget to taste as you go—seasoning is key!
Step-by-Step Instructions
Alright, let’s dive into the fun part: cooking this fabulous Lime Chicken! Follow these steps and remember, cooking should feel joyful, so dance around the kitchen if inspiration strikes!
Step 1: Prepare the Marinade
- Mix it Up! In a bowl, combine the juice of two limes, olive oil, chili powder, and a pinch of salt and pepper. Whisk until well blended.
Chef Note: The acid from the lime juice helps to tenderize the chicken, making it juicy and delicious.
Step 2: Marinate the Chicken
- Let It Soak Up Flavor! Place your chicken breasts in a zip-top bag or shallow dish and pour the marinade over. Seal the bag or cover the dish, then refrigerate for at least 30 minutes. If you have more time, let it marinate for up to 2 hours for maximum flavor.
Pro Tip: Always refrigerate while marinating to keep the chicken safe!
Step 3: Preheat the Grill (or Pan)
- Let’s Get Cooking! Preheat your grill to medium-high heat, or if you prefer using a skillet, heat a drizzle of olive oil in a large pan over medium heat.
Chef Tip: A well-heated grill ensures that your chicken gets those beautiful grill marks!
Step 4: Grill the Chicken
- On the Heat! Remove the chicken from the marinade (discard the marinade), and grill each breast for about 6-7 minutes per side or until they’re cooked through (165°F internal temperature).
Commentary: For that extra charred flavor, don’t move the chicken too much! Let it sear before flipping.
Step 5: Rest and Slice
- The Waiting Game! Once cooked, transfer the chicken to a plate and let it rest for about 5 minutes. This helps the juices redistribute, ensuring your chicken remains juicy.
Chef Insight: Always rest your meat—this is where the magic happens!
Step 6: Assemble Your Dish
- Time to Plate Up! Slice the grilled chicken, serve it with sliced avocado, a sprinkle of fresh cilantro, and some lime wedges on the side for an extra burst of flavor.
Serving Suggestion: Arrange it beautifully on a platter for that wow factor!
Serving Suggestions
Presentation makes all the difference! For serving, arrange the sliced chicken on a large platter with the avocado nestled beside it. Scatter some chopped cilantro over the top and garnish with lime wedges. Not only does it look gorgeous, but it’s also a feast for the eyes, inviting everyone to dig in!
Recipe Variations
Getting creative is half the fun! Try out some of these ideas for a unique twist on this Lime Chicken:
- Tropical Twist: Add diced pineapple or mango to the marinade for a sweet tropical flavor.
- Spice It Up: Incorporate fresh jalapeños into the marinade for a fiery kick!
- Herbed Delight: Swap lime juice with lemon or orange juice for a different citrus spin, accompanied by fresh basil instead of cilantro.
- Colombian Ajiaco Style: Create a hearty bowl with potatoes and corn, served alongside the chicken for a comforting dish.
Chef’s Notes
This Lime Chicken recipe has evolved over time in my kitchen, swapping in and out of various ingredients based on what I have on hand or the season. I remember one evening when I had some leftover coconut milk— I added it to the marinade. The result? It was absolutely tropical bliss! Experimenting like this is what keeps cooking fun and exciting, so don’t be afraid to trust your instincts!
FAQs and Troubleshooting
Q1: What if my chicken is dry?
A: Dry chicken often results from overcooking. Use a meat thermometer to check doneness and aim for 165°F.
Q2: Can I make this dish ahead of time?
A: Absolutely! You can marinate the chicken a day in advance, and when ready to serve, just grill it!
Q3: How can I adjust the lime flavor?
A: If you find lime too tart, balance it by adding a teaspoon of honey or agave to the marinade for a touch of sweetness.
Q4: Is it okay to freeze the marinated chicken?
A: Yes! Just make sure to thaw in the refrigerator before cooking it to maintain its juiciness.
Nutritional Info
Optional, but helpful!
While specifics excite some, generally, a serving of this Lime Chicken (without sides) is about 200 calories, packed with protein and fresh flavors. Perfect for a healthy meal that doesn’t compromise on taste!
And there you have it! My Lime Chicken Party recipe is not just food; it’s an experience waiting to unfold in your kitchen. I hope you find joy in making this dish as much as I do. Remember, it’s all about sharing flavors, laughter, and beautiful moments around your table! So tie on your apron, gather your loved ones, and let’s create something magical together. Happy cooking! 🍗💛
PrintLime Chicken Party

A zesty Lime Chicken dish perfect for gatherings, combining fresh flavors and tender grilled chicken with vibrant lime.
- Prep Time: 15 minutes
- Cook Time: 30 minutes
- Total Time: 45 minutes
- Yield: 4 servings 1x
- Category: Main Course
- Method: Grilling
- Cuisine: Mexican
- Diet: Paleo
Ingredients
- 4 Chicken Breasts
- 2 Limes (juiced)
- 1 Avocado (sliced)
- 1/4 Cup Fresh Cilantro (chopped)
- 1 Teaspoon Chili Powder
- 1 Tablespoon Olive Oil
- Salt and Pepper to taste
Instructions
- Mix it Up! In a bowl, combine the juice of two limes, olive oil, chili powder, and a pinch of salt and pepper. Whisk until well blended.
- Let It Soak Up Flavor! Place your chicken breasts in a zip-top bag or shallow dish and pour the marinade over. Seal the bag or cover the dish, then refrigerate for at least 30 minutes. If you have more time, let it marinate for up to 2 hours for maximum flavor.
- Preheat your grill to medium-high heat, or if you prefer using a skillet, heat a drizzle of olive oil in a large pan over medium heat.
- Remove the chicken from the marinade (discard the marinade), and grill each breast for about 6-7 minutes per side or until they’re cooked through (165°F internal temperature).
- Transfer the chicken to a plate and let it rest for about 5 minutes to ensure juiciness.
- Slice the grilled chicken, serve it with sliced avocado, a sprinkle of fresh cilantro, and some lime wedges on the side for an extra burst of flavor.
Notes
For added taste, you can incorporate fresh jalapeños into the marinade or swap lime juice with lemon for a different citrus spin.
Nutrition
- Serving Size: 1 serving
- Calories: 200
- Sugar: 1g
- Sodium: 300mg
- Fat: 10g
- Saturated Fat: 1.5g
- Unsaturated Fat: 7g
- Trans Fat: 0g
- Carbohydrates: 6g
- Fiber: 3g
- Protein: 28g
- Cholesterol: 70mg
Keywords: lime chicken, grilled chicken, party recipe, summer recipe, healthy chicken

Honey Garlic Chicken Kabobs
# Sweet and Savory Honey Garlic Chicken Kabobs

## Introduction

Hey there, fellow foodies! Welcome to another delicious adventure in my kitchen. Today, we’re diving into a dish that’s equal parts comforting and exciting: **Honey Garlic Chicken Kabobs**. Perfect for grilling up in the summer or roasting during colder months, these skewers are bursting with flavor that’ll make your taste buds dance!

Now, I have to say, there’s something undeniably fun about cooking kabobs. Maybe it’s the beautiful colors of the ingredients, or perhaps it’s the memories they bring back of gathering with family and friends around a smoky grill. Whatever it is, when I think of kabobs, I’m immediately transported to sunny backyard barbecues, laughter echoing in the air, and the intoxicating aroma of grilling chicken wafting through the neighborhood.

The joy of assembling skewers can’t be understated. It’s like food art—each ingredient gets to shine, all while creating a symphony of flavors. And trust me, when you drizzle that sweet honey garlic sauce over the chicken and veggies, it’s pure magic.

So, roll up your sleeves, tie on that apron, and let’s create something unforgettable together! Whether you’re hosting a gathering or just treating yourself to a satisfying meal, this recipe is sure to impress. Plus, the best part? It’s super approachable, so you can get glorious results even if you’re just starting your cooking journey. Let's dive in!

## Personal Story

I remember the first time I made kabobs—it was a warm summer evening, and I had invited a few close friends over for a barbecue. It was one of those magical nights where everything seems effortless. I had marinated the chicken earlier in the day, prepping the honey garlic sauce and fresh veggies. The kitchen filled with sweet and savory aromas, making even my impatient friends hang around, eagerly awaiting the grilled delight.

As the sun dipped below the horizon, we gathered in the backyard, the grill crackling with heat. I handed each friend a skewered kabob, and we toasted with our glasses of lemonade, laughing as we cooked together. The moment we took that first bite was unforgettable; the combination of juicy chicken, crisp veggies, and that sticky honey glaze was nothing short of heavenly.

That night not only filled our bellies but also created cherished memories. It solidified the notion that food isn’t just about the ingredients—it's about the people and moments we share. To me, that’s what cooking is really about: bringing people together around the table (or grill, in this case) to savor beautiful moments and delicious flavors.

## Ingredients

Here’s what you’ll need to whip up these scrumptious **Honey Garlic Chicken Kabobs**:

- **2 lbs chicken breast, cubed**: Chicken breast is our star ingredient here. Use fresh, high-quality chicken for the juiciest results. If you’re looking for a leaner option, boneless, skinless thighs work beautifully too.

- **1/4 cup honey**: This is what adds that delightful sweetness and glossy finish. If you’re out of honey, maple syrup can be a fun and tasty substitute that also brings a touch of sweetness.

- **1/4 cup soy sauce**: Packed with umami, soy sauce balances the sweetness of the honey. You can opt for low-sodium soy sauce if you’re watching your sodium intake, or even coconut aminos for a gluten-free option.

- **3 cloves garlic, minced**: Garlic adds depth and flavor to our marinade. Fresh is key here, but you can use powdered garlic in a pinch. Just remember that it’s more potent, so use about 1 teaspoon.

- **1 tablespoon sesame oil**: This oil infuses a nutty flavor that enhances our dish. If you’re looking to cut calories, you can use olive oil instead, though you’ll miss that sesame allure.

- **1/2 teaspoon black pepper**: A dash of black pepper adds a subtle kick. If you want to spice things up, feel free to add red pepper flakes or even a pinch of cayenne!

- **Bell peppers, cut into pieces**: I love using colorful bell peppers for their crunch and sweetness. Throw in some red, yellow, and green for a vibrant dish! If you prefer other veggies, zucchini, mushrooms, or cherry tomatoes work excellently here.

- **Onions, cut into pieces**: Onions caramelize beautifully on the grill and add a nice flavor contrast. Red or yellow onions are perfect for this. If you want a milder taste, consider using sweet onions.

- **Skewers (wooden or metal)**: Whether you use wooden skewers or metal ones is a matter of preference. If you’re going with wooden skewers, don’t forget to soak them in water for about 30 minutes beforehand to prevent burning on the grill!

## Step-by-Step Instructions

### Step 1: Marinate the Chicken

In a mixing bowl, combine the honey, soy sauce, minced garlic, sesame oil, and black pepper. Whisk until well blended.

**Chef Tip:** If you have time, marinate the chicken for at least 30 minutes or even overnight in the refrigerator. The longer it sits, the more flavorful it becomes!

### Step 2: Cube Your Chicken

Cut the chicken breasts into 1-inch cubes, making sure they’re all around the same size for even cooking.

**Chef Hack:** If your chicken is a bit too slippery to cut, try placing it in the freezer for 15–20 minutes. This firms up the meat, making it much easier to slice.

### Step 3: Assemble the Kabobs

Thread the marinated chicken onto your skewers, alternating with pieces of bell peppers and onions.

**Chef Insight:** Don’t crowd the skewer! Leave a little space between each ingredient to allow for even cooking and that beautiful char we all crave.

### Step 4: Preheat the Grill

Get your grill sizzling hot over medium-high heat. If you're using a grill pan, heat it on the stovetop until it’s hot.

### Step 5: Grill the Kabobs

Place the skewers on the grill and cook for about 10-12 minutes, turning them occasionally. You want that char to develop on all sides and ensure the chicken is fully cooked (165°F or 75°C internal temperature).

**Chef Tip:** Avoid constantly flipping the kabobs too early! Let them get a nice sear before turning them to lock in those flavors.

### Step 6: Glaze and Serve

In the last few minutes of grilling, brush on any leftover marinade for an extra layer of flavor.

**Chef Hack:** Just be sure to reserve a small amount of marinade beforehand if you want to avoid cross-contamination!

### Step 7: Check for Doneness

Once the kabobs are beautifully charred and the chicken is no longer pink, remove them from the grill. Let them rest for a couple of minutes to allow the juices to redistribute.

## Serving Suggestions

To plate these kabobs, simply arrange them on a large platter, garnishing with fresh herbs like parsley or cilantro for a pop of color and freshness. Serve them warm alongside a refreshing side salad or fluffy rice to soak up that marvelous honey garlic sauce.

## Recipe Variations

1. **Spicy Honey Garlic Kabobs:** Add a splash of Sriracha or a pinch of red pepper flakes to the marinade for a kick!

2. **Teriyaki Twist:** Substitute the honey with a sweet teriyaki sauce for a different flavor profile that will still wow your guests.

3. **Vegetarian Delight:** Swap out the chicken for cubed firm tofu or tempeh, marinating it the same way. Toss in assorted veggies like zucchini and mushrooms for a delightful plant-based option.

4. **Herb-Infused Kabobs:** Add fresh herbs like rosemary or thyme to the marinade for an aromatic touch.

5. **Fruit & Chicken Combo:** Add chunks of pineapple to the skewers for a sweet twist that complements the savory chicken beautifully.

## Chef’s Notes

Every time I make these kabobs, I’m reminded of how versatile they are! I’ve adapted the recipe over the years, playing with different marinades and veggie combinations. Sometimes, I’ll even stuff the chicken with cheese for a gooey surprise!

A funny memory that comes to mind is the time I got a little too creative with the skewers. I decided to mix chicken, shrimp, and veggies on the same skewers. Let’s just say, I learned that some proteins cook at different rates. I ended up with perfectly cooked shrimp and slightly undercooked chicken! Lesson learned—stick with one type of protein per skewer for the best results.

## FAQs and Troubleshooting

### 1. **What if my chicken is dry?**

Overcooking is the most common culprit for dry chicken. Always use a meat thermometer—aim for 165°F (75°C) for perfectly juicy chicken. If you’re grilling on high heat, remember it cooks faster, so keep an eye on it!

### 2. **How do I prevent veggies from burning?**

To ensure your veggies cook evenly, cut them into larger pieces than the chicken. Also, give them a light coat of oil to prevent direct charring. If you’re worried about burning, consider grilling them in a grill basket.

### 3. **Could I bake these kabobs?**

Absolutely! Preheat your oven to 400°F (200°C) and place the kabobs on a foil-lined baking sheet. Bake for about 15-20 minutes, turning halfway through. I still recommend broiling the last couple of minutes for that nice char.

### 4. **Can I use frozen chicken?**

While it’s best to use fresh chicken, you can use frozen chicken as long as you thaw it fully before marinating and grilling. Just remember that thawing will take time, so plan ahead!

## Nutritional Info (Optional)

While this recipe offers a delightful serving of protein and veggies, I recommend checking nutritional values based on your specific ingredient brands and quantities!

---

So, are you ready to don that apron and get started on these delicious **Honey Garlic Chicken Kabobs**? Whether it's a casual weeknight dinner or an exciting grilling party, this flavorful dish might just become a new favorite. Happy cooking, and don’t forget to gather those you love around the table to enjoy!
Honey Garlic Chicken Kabobs
Delicious honey garlic chicken kabobs bursting with flavor, perfect for grilling or roasting.
- Prep Time: 30 minutes
- Cook Time: 12 minutes
- Total Time: 42 minutes
- Yield: 4 servings 1x
- Category: Main Course
- Method: Grilling
- Cuisine: American
- Diet: Gluten-Free
Ingredients
- 2 lbs chicken breast, cubed
- 1/4 cup honey
- 1/4 cup soy sauce
- 3 cloves garlic, minced
- 1 tablespoon sesame oil
- 1/2 teaspoon black pepper
- Bell peppers, cut into pieces
- Onions, cut into pieces
- Skewers (wooden or metal)
Instructions
- Marinate the chicken: In a mixing bowl, combine honey, soy sauce, minced garlic, sesame oil, and black pepper. Whisk until well blended.
- Cube your chicken: Cut the chicken breasts into 1-inch cubes, making sure they’re all around the same size for even cooking.
- Assemble the kabobs: Thread the marinated chicken onto your skewers, alternating with pieces of bell peppers and onions.
- Preheat the grill: Get your grill sizzling hot over medium-high heat.
- Grill the kabobs: Place the skewers on the grill and cook for about 10-12 minutes, turning them occasionally.
- Glaze and serve: In the last few minutes of grilling, brush on any leftover marinade.
- Check for doneness: Once the kabobs are beautifully charred and the chicken is no longer pink, remove them from the grill.
Notes
For added flavor, allow the chicken to marinate for a longer time. Serve with fresh herbs for garnish.
Nutrition
- Serving Size: 1 kabob
- Calories: 350
- Sugar: 14g
- Sodium: 750mg
- Fat: 10g
- Saturated Fat: 2g
- Unsaturated Fat: 8g
- Trans Fat: 0g
- Carbohydrates: 25g
- Fiber: 2g
- Protein: 30g
- Cholesterol: 70mg
Keywords: chicken kabobs, honey garlic, grilled chicken, summer recipe, easy dinner

Crockpot BBQ Chicken
Slow Cooker BBQ Chicken: A Savory Sensation for Any Gathering
Hey there, fellow food lovers! Welcome back to Ivory Apron, where the kitchen feels like home and cooking feels like an art. Today, I’m beyond excited to share one of my go-to recipes for those busy weeknights or laid-back weekends—Crockpot BBQ Chicken! This dish is perfect for cozy family dinners, entertaining guests, or even as meal prep for the week.
Picture this: It’s a warm evening; the sun is setting, casting a beautiful golden glow in your kitchen. You’ve tied on your favorite apron, and the tantalizing aroma of BBQ chicken wafts through the air, promising deliciousness. Not only does this dish deliver that mouthwatering flavor, but it’s also incredibly easy to make—just toss everything into the crockpot and let it work its magic!
I’ll take you through every step from preparation to serving, ensuring that you feel like a pro—even if it’s your first time in the kitchen. Whether you’re hosting a backyard BBQ or simply craving some comforting chicken sandwiches, this recipe is your ticket to culinary bliss. So grab your apron, and let’s get cooking!
Personal Story
Ah, BBQ chicken! It takes me back to those long summer evenings at my grandparents’ backyard; the grill was always fired up, and the laughter of family sprinkled the air. My grandmother would marinate the chicken in her secret BBQ sauce, letting it soak in that smoky-sweet flavor. I can still see my younger self stealing bites as it grilled, trying to sneak a taste of that delicious sauce.
When we moved our gatherings inside for some reason—perhaps a sudden summer storm or an unexpected drop in temperature—the crockpot came to the rescue. My mom would whip up her version of BBQ chicken, letting it simmer away while we played board games. It became a family favorite—something that was equally perfect for game night as it was for Sunday dinners. Now I get to share the joys of this dish with you, blending nostalgia with practicality in the modern kitchen.
Ingredients
Here’s what you’ll need to prepare this delectable dish:
-
4 Boneless, Skinless Chicken Breasts
These beauties are the heart of the dish! They’re tender, juicy, and soak up every ounce of flavor from the BBQ sauce. You can easily substitute with thighs if you prefer dark meat; they’re a bit richer in flavor and won’t dry out as easily. -
1 Cup BBQ Sauce
Choose your favorite brand or homemade variety! I love a classic sauce that balances sweetness and tanginess. If you’re feeling adventurous, try a spicy or smoky BBQ sauce for a flavor twist. -
1/4 Cup Chicken Broth
This adds moisture and richness without overwhelming the BBQ flavor. If you don’t have broth on hand, water or even apple cider can work—though that may change the flavor profile a bit. -
1 Tablespoon Worcestershire Sauce
This umami-packed sauce enhances the overall flavor and gives a depth that’s simply divine. If you’re avoiding it, soy sauce is an excellent substitute, though it may alter the flavor slightly. -
1 Teaspoon Garlic Powder
Garlic lovers rejoice! This ingredient adds a savory kick. If you have fresh garlic, feel free to substitute 2-3 minced cloves for an even fresher taste. -
1 Teaspoon Onion Powder
A must-have for that deep, aromatic taste. In a pinch, finely chopped onions or shallots can do the trick! -
Salt and Pepper to Taste
Essential for bringing all the flavors together. I recommend starting with a bit and adding more as needed during cooking. -
Buns for Serving (Optional)
These are a great way to turn your BBQ chicken into delicious sandwiches! Opt for soft brioche buns for a little luxury, or use whole grain for a healthier twist.
Step-by-Step Instructions
Here’s how to get your Crockpot BBQ Chicken ready for a glorious feast!
1. Prep Your Chicken
Begin by rinsing your chicken breasts under cold water, then pat them dry with paper towels. Drying them ensures better seasoning absorption and browning. Trim off any excess fat for a leaner dish.
2. Season and Layer
Sprinkle the chicken breasts with salt, pepper, garlic powder, and onion powder. Don’t be shy—seasoning is where flavor starts! Lay them in the bottom of the crockpot, making sure they’re arranged neatly in a single layer.
3. Mix Your Sauces
In a separate bowl, whisk together the BBQ sauce, Worcestershire sauce, and chicken broth until it’s well combined. This is where you can taste-test and adjust—add a pinch of chili powder or honey if you like!
4. Pour and Cover
Pour the mixture over the seasoned chicken, making sure they’re well coated. Pop the lid on your crockpot, set it to low heat, and let it do its magic for 6-8 hours. Pro tip: avoid lifting the lid during cooking! Every time you check, you lose precious heat and extend the cooking time.
5. Shred and Serve
When you’re ready to eat, carefully insert a fork or two into the chicken and shred it right in the pot! It should fall apart easily if cooked correctly. If you want a thicker sauce, keep the lid off for the last half hour and let it reduce.
6. Toast Your Buns
For that extra touch, pop some buns under the broiler for a minute or two until they’re delightfully toasted. A little butter before toasting goes a long way for flavor!
Serving Suggestions
Now that your BBQ chicken is ready, it’s time to serve! Pile the juicy, shredded chicken onto toasted buns, adding coleslaw or pickle slices for crunch if you like. Arrange them on a wooden cutting board surrounded by napkins for a rustic touch. It’s perfect for feeding a crowd.
Recipe Variations
Want to shake things up? Here are a few creative twists you can make with this recipe:
-
Spicy BBQ Chicken: Mix in some cayenne pepper or hot sauce into the BBQ sauce for a kick!
-
Honey Mustard Flavor: Swap out the BBQ sauce for honey mustard for a sweet-savory experience!
-
Greek Inspired: Add some oregano, lemon juice, and serve it in pita bread with tzatziki.
-
Veggie Lovers Delight: Toss in some halved bell peppers or onions while cooking for added veggies and flavor.
-
Low-Carb Option: Serve over lettuce instead of buns for a refreshing, low-carb alternative.
Chef’s Notes
Every time I make this recipe, I’m reminded of family gatherings and the love that food brings us together. There was one summer where I overestimated how hungry we all were—I had made way too much chicken! But instead of leftovers, my friends and family made unforgettable memories, serving the BBQ chicken in tacos, nachos, and even pizzas! Creativity flourishes in the kitchen, and that’s what makes cooking so special. Trust me; this dish will cater to any occasion!
FAQs and Troubleshooting
1. What if my chicken is dry?
If your chicken turns out dry, make sure to season it adequately and check that your crockpot temperature is set correctly. Adding more liquid during cooking can help keep it moist.
2. How can I make this recipe ahead of time?
Prep everything the night before! Season the chicken and mix your sauces, storing it in the fridge. In the morning, toss it into the crockpot for effortless evening dinner!
3. Can I use frozen chicken?
Yes, you can use frozen chicken, but increase the cooking time to 8-10 hours. Always check to ensure the chicken is thoroughly cooked before serving.
4. How can I store leftovers?
Store any leftover BBQ chicken in an airtight container in the refrigerator for up to three days. You can also freeze portions for up to three months—perfect for a quick weeknight meal!
Nutritional Info (Optional)
While specific nutritional information can vary, here’s a general overview for this BBQ chicken recipe:
- Calories: Approximately 300 per serving (including a bun)
- Protein: 30g
- Carbohydrates: 30g
- Fat: 6g
Feel free to adapt the recipe’s elements to suit any dietary requirements!
I hope you’ll give this Crockpot BBQ Chicken recipe a try—it’s simplicity and delicious flavor are sure to impress any diners at your table. Remember, the best memories are made around the table, and I can’t wait to hear about your culinary adventures! Happy cooking, and let’s keep spreading the love of good food. 🌟
PrintSlow Cooker BBQ Chicken

A savory and easy slow cooker BBQ chicken dish perfect for any gathering.
- Prep Time: 15 minutes
- Cook Time: 480 minutes
- Total Time: 495 minutes
- Yield: 4 servings 1x
- Category: Main Course
- Method: Slow Cooking
- Cuisine: American
- Diet: None
Ingredients
- 4 Boneless, Skinless Chicken Breasts
- 1 Cup BBQ Sauce
- 1/4 Cup Chicken Broth
- 1 Tablespoon Worcestershire Sauce
- 1 Teaspoon Garlic Powder
- 1 Teaspoon Onion Powder
- Salt and Pepper to Taste
- Buns for Serving (Optional)
Instructions
- Prep Your Chicken: Rinse the chicken breasts under cold water, then pat them dry with paper towels.
- Season and Layer: Sprinkle the chicken with salt, pepper, garlic powder, and onion powder, then lay them in the crockpot.
- Mix Your Sauces: Whisk together the BBQ sauce, Worcestershire sauce, and chicken broth in a separate bowl.
- Pour and Cover: Pour the sauce mixture over the seasoned chicken, cover, and set to low for 6-8 hours.
- Shred and Serve: Shred the chicken in the pot with forks when ready to eat.
- Toast Your Buns: Toast the buns under the broiler if desired.
Notes
For extra flavor, consider adding some cayenne pepper or hot sauce to the BBQ sauce.
Nutrition
- Serving Size: 1 serving
- Calories: 300
- Sugar: 8g
- Sodium: 600mg
- Fat: 6g
- Saturated Fat: 1g
- Unsaturated Fat: 5g
- Trans Fat: 0g
- Carbohydrates: 30g
- Fiber: 1g
- Protein: 30g
- Cholesterol: 80mg
Keywords: BBQ chicken, slow cooker, easy chicken recipes, family dinner

Juicy Grilled California Avocado Chicken
Juicy Grilled California Avocado Chicken: Elevate Your Meal with Style
Hello, fellow food lovers! If you’re anything like me, there’s nothing quite like cooking up a storm in the kitchen. It’s where magic happens—ingredients come together, flavors collide, and you create beautiful memories around your table. Today, I’m thrilled to share a dish that perfectly captures those special moments: Juicy Grilled California Avocado Chicken. Trust me; this dish is all about fresh flavors and simple elegance.
Introduction: Let’s Talk About Avocados and Chicken
Picture a sunny California afternoon: the sound of birds chirping, a light breeze blowing through the trees, and the tantalizing aroma of grilled chicken wafting through the air. Avocados are king here, and adding them to your chicken dish elevates it from pretty good to absolutely divine!
This recipe combines succulent grilled chicken with creamy avocado and vibrant tomatoes that will transport you straight to the golden coasts of California. Imagine juicy chicken breasts marinated in a zesty blend of lime juice, garlic, and spices, then grilled to perfection. As if that wasn’t enough, we’re adding ripe avocado slices and sweet cherry tomatoes on top—a beautiful explosion of flavors and textures in each bite.
Beyond the deliciousness, this dish is also about connection. It’s about bringing friends and family together around a beautifully set table. Whether you’re hosting a Sunday brunch, planning a casual dinner, or simply craving a fresh and delicious meal, this Juicy Grilled California Avocado Chicken has got you covered. So grab your apron, and let’s get cooking!
Personal Story: A California Summer
Growing up, I spent my summers soaking in the California sun, often at my grandmother’s house. Her garden was bursting with ripe vegetables and fragrant herbs, and the moment I stepped through her door, I could smell something scrumptious. One of my fondest memories is cooking with her in her backyard kitchen. She would pull out perfectly ripe avocados and tell me stories of how she used to make guacamole for her friends during summer picnics.
One particular day, while she grilled her famous chicken, I asked if we could try something new. That’s when we combined her grilled chicken recipe and those luscious avocados into one incredible dish. We created a summer sensation that had everyone coming back for seconds. My grandma’s eyes twinkled with delight as we prepared our meal, and the laughter shared around the table was priceless. Those moments became the bedrock of my culinary journey and inspire me every time I step into the kitchen today.
Ingredients
Here’s what you’ll need for this delightful dish:
-
2 boneless, skinless chicken breasts
Juicy and lean, chicken breasts are perfect for grilling. They soak up flavors beautifully and deliver a satisfying bite every time. -
2 ripe avocados, sliced
Ripe avocados are rich and creamy, adding a luxurious texture to the dish. Look for avocados that yield slightly to pressure. -
1 cup cherry tomatoes, halved
Sweet and bursting with flavor, cherry tomatoes balance the dish with their juicy freshness. Substitute with grape tomatoes if needed! -
1/4 cup fresh lime juice
This bright and tangy juice not only adds flavor but also helps tenderize the chicken. If fresh limes aren’t available, bottled lime juice will do just fine. -
2 tablespoons olive oil
Great for marinating and grilling, olive oil adds richness. You can substitute it with avocado oil for a more intense avocado flavor. -
1 teaspoon garlic powder
Garlic powder infuses the chicken with a subtle garlicky goodness. If you prefer fresh garlic, 1-2 cloves minced will also work. -
1 teaspoon chili powder
This spice lends warmth and depth to the chicken. Feel free to adjust according to your heat preference. -
1 teaspoon cumin
Cumin adds an earthy flavor that compliments the other spices beautifully. If you don’t have cumin, try smoked paprika as an alternative. -
Salt and pepper to taste
Essential for enhancing all the flavors—don’t skip out! Use coarse salt for better texture! -
Fresh cilantro for garnish
Cilantro adds a fresh herbaceous kick that elevates the entire dish. If you’re not a cilantro fan, fresh parsley is a great substitute!
Step-by-Step Instructions
Alright, let’s dive into the cooking process! Follow these steps to make your gorgeous Juicy Grilled California Avocado Chicken:
-
Prepare the Marinade
In a bowl, combine the lime juice, olive oil, garlic powder, chili powder, cumin, salt, and pepper. Whisk until the mixture is smooth and well combined. This marinade is essential for infusing your chicken with layers of flavor.Chef’s Tip: Marinate your chicken breasts for at least 30 minutes—if you can let them soak for 2 hours or more, even better! This will enhance the flavor and tenderness.
-
Marinate the Chicken
Place the chicken breasts in a resealable plastic bag or a shallow dish. Pour the lime marinade over the chicken, ensuring it’s evenly coated. Seal the bag or cover the dish and refrigerate. Let it work its magic!Little Hack: If you want an extra kick, consider adding a little bit of your favorite hot sauce to the marinade!
-
Preheat the Grill
While your chicken is marinating, preheat your grill over medium-high heat (about 375°F to 450°F). Make sure it’s nice and hot before placing the chicken on it—this will help create those beautiful grill marks!Commentary: You can also use a grill pan on the stove if you don’t have access to an outdoor grill. Just be sure to follow the same heat guidelines!
-
Grill the Chicken
Remove the chicken from the marinade, letting any excess drip off, and place it on the grill. Close the lid and grill for about 6-7 minutes on one side, then flip and grill for another 5-6 minutes, or until the chicken is cooked through and has nice grill marks. A meat thermometer should read 165°F when done.Tip: Avoid flipping too soon! Let it sear to get those perfect grill marks before flipping.
-
Prepare the Avocado and Tomatoes
While the chicken is grilling, slice your ripe avocados and halve your cherry tomatoes. This is your opportunity to add a sprinkle of salt and pepper on the tomatoes for added flavor! -
Rest the Chicken
Once the chicken is done grilling, remove it from the grill and let it rest for about 5 minutes. This allows the juices to redistribute, keeping your chicken moist.Chef Insight: Don’t skip this step! A rested chicken is a happy chicken.
-
Plating Perfection
Slice the grilled chicken, then layer it on a serving platter. Top it with the sliced avocados and halved cherry tomatoes, sprinkling fresh cilantro over everything for that pop of color.Presentation Matters: For an elegant touch, drizzle a little extra lime juice over the top or a dash of balsamic reduction!
Serving Suggestions
Serve this beautiful dish with a side of quinoa salad, garlic bread, or over a bed of mixed greens for a refreshing meal. Pair it with a chilled glass of white wine or lemonade for the ultimate California vibe. Don’t forget to provide extra lime wedges on the side for guests who want an extra zing!
Recipe Variations
Feel free to mix things up with these creative twists:
- Spicy Kick: Add diced jalapeños into the marinade for heat.
- Different Proteins: Swap out chicken for shrimp or firm tofu for a vegetarian version.
- Grilled Veggies: Add grilled veggies like zucchini or bell peppers as sides or toppings.
- Herbed Chicken: Incorporate fresh herbs such as thyme or rosemary into your marinade for a different flavor profile.
- Creamy Avocado Sauce: Blend avocados with Greek yogurt, lime juice, and garlic for a creamy drizzle on top.
Chef’s Notes
I’ve made this recipe countless times, and it never gets old! Every time I prepare it, I think of those summer afternoons with my grandma, creating dishes that filled our home with laughter. I’ve learned that cooking is as much about the experience as it is about the ingredients and techniques. Each bite tells a story of connection and love.
And be prepared for compliments! When you bring this dish to your table, be ready for guests to ask for the recipe—it’s that good!
FAQs and Troubleshooting
1. Can I use frozen chicken?
Absolutely! Just make sure to thaw it completely before marinating and grilling. Otherwise, you’ll end up with uneven cooking.
2. My chicken is dry after grilling. What happened?
Overcooking is usually the culprit! Always check your chicken with a meat thermometer, and remember to let it rest after grilling to retain moisture.
3. What should I do if I can’t find ripe avocados?
You can speed up the ripening process by placing them in a brown paper bag with an apple or banana. However, if you’re in a hurry, sliced cucumbers on the side provide a refreshing alternative!
4. How do I store leftovers?
Store any leftovers in an airtight container in the fridge for up to 3 days. Reheat gently to avoid drying the chicken.
Nutritional Info
While precise nutritional info can vary based on ingredient brands and portions, here’s a rough estimate per serving:
- Calories: 450
- Protein: 30g
- Carbohydrates: 22g
- Fat: 28g
So there you have it, my dear culinary friends! Now you’re ready to create your own Juicy Grilled California Avocado Chicken experience at home. It’s a dish that captures the heart of summer and the essence of gathering together. I can’t wait to hear how yours turns out! Let’s set the table and celebrate the joy of cooking together. Happy cooking! 🍽️✨
PrintJuicy Grilled California Avocado Chicken

A delicious grilled chicken dish topped with creamy avocados and cherry tomatoes, perfect for summer gatherings.
- Prep Time: 30 minutes
- Cook Time: 20 minutes
- Total Time: 50 minutes
- Yield: 4 servings 1x
- Category: Main Course
- Method: Grilling
- Cuisine: California
- Diet: Gluten-Free
Ingredients
- 2 boneless, skinless chicken breasts
- 2 ripe avocados, sliced
- 1 cup cherry tomatoes, halved
- 1/4 cup fresh lime juice
- 2 tablespoons olive oil
- 1 teaspoon garlic powder
- 1 teaspoon chili powder
- 1 teaspoon cumin
- Salt and pepper to taste
- Fresh cilantro for garnish
Instructions
- Prepare the Marinade: In a bowl, combine the lime juice, olive oil, garlic powder, chili powder, cumin, salt, and pepper. Whisk until the mixture is smooth and well combined.
- Marinate the Chicken: Place the chicken breasts in a resealable plastic bag or a shallow dish. Pour the lime marinade over the chicken, ensuring it’s evenly coated. Seal the bag or cover the dish and refrigerate.
- Preheat the Grill: Preheat your grill over medium-high heat (about 375°F to 450°F).
- Grill the Chicken: Remove the chicken from the marinade and place it on the grill. Grill for about 6-7 minutes on one side, then flip and grill for another 5-6 minutes, or until cooked through.
- Prepare the Avocado and Tomatoes: Slice the ripe avocados and halve the cherry tomatoes.
- Rest the Chicken: Remove it from the grill and let it rest for about 5 minutes.
- Plating Perfection: Slice the grilled chicken, layer on a serving platter, top it with the sliced avocados and halved cherry tomatoes, sprinkle fresh cilantro on top.
Notes
Serve with a side of quinoa salad or garlic bread. Add extra lime wedges for guests.
Nutrition
- Serving Size: 1 serving
- Calories: 450
- Sugar: 3g
- Sodium: 700mg
- Fat: 28g
- Saturated Fat: 4g
- Unsaturated Fat: 20g
- Trans Fat: 0g
- Carbohydrates: 22g
- Fiber: 8g
- Protein: 30g
- Cholesterol: 80mg
Keywords: grilled chicken, avocado, summer recipe, healthy meal, California cuisine
Easy Grilled Chicken
Easy Grilled Chicken: A Flavorful Feast for Everyone
Hello, fellow foodies! Today, we’re diving into one of my all-time favorite staples: grilled chicken! There’s something magical about transforming simple ingredients into a mouthwatering dish that everyone can enjoy. Grilled chicken is not just a summer barbeque hero; it’s a year-round delight that can take center stage on your dining table, regardless of the occasion.
Whether you’re firing up the grill for a weekend gathering, prepping for an easy weeknight dinner, or throwing a casual dinner party, this easy grilled chicken recipe is going to be your go-to. It’s juicy, flavorful, and, best of all, surprisingly simple to pull off! Trust me; your taste buds will thank you for making this dish a regular on your menu.
The magic starts with brining the chicken to lock in moisture and create a delicious base layer of flavor. We’ll add a sprinkle of seasoning for that perfect kick, and you’ll be amazed at how these simple steps elevate your cooking game. Picture this: succulent chicken breasts grilled to golden perfection, with a smoky aroma that’ll have everyone gathered around your table, eager for a taste.
So, grab your apron and let’s get cooking! I can’t wait to share this joyful culinary adventure with you, and by the end of it, you’ll be ready to impress your friends and family with your new grilling prowess.
Personal Story
Growing up, summer evenings were all about the grill at my family’s backyard gatherings. My dad would tend to the barbecue, flipping burgers and chicken while the smell wafted through the air, mingling with laughter and stories over ice-cold drinks. I can still recall my first attempt at grilling with him—how nervous I was about not burning the chicken. He calmed my fears and reminded me that the art of grilling isn’t just about the meat; it’s about the memories you create.
One memorable night, I was in charge of marinating the chicken. I mistakenly added what I thought was a tablespoon of cayenne pepper, but it turned out to be a teaspoon. The chicken was spicier than intended, leading to fits of laughter and plenty of ice cream later to cool off! Even in those fiery moments, the joy of sitting around the table, sharing a meal together, was what truly mattered.
That’s what remains in my heart every time I grill chicken—it’s not just about food; it’s about connection, laughter, and creating lasting memories. With this easy grilled chicken recipe, I hope you create beautiful experiences around your table, just as I have over the years.
Ingredients
To get started, here’s what you’ll need for this delightful grilled chicken:
-
4 boneless chicken breasts (or 8 thighs)
Boneless chicken breasts give you a lean and tender result, but thighs add unbeatable flavor. Choose what you prefer! -
4 cups warm water (for brine)
Warm water helps dissolve the salt and sugar in your brine more effectively. -
1/4 cup kosher salt (for brine)
Kosher salt is ideal due to its larger crystals, making it easy to distribute evenly across the meat. -
2 tbsp brown sugar (for brine)
The sugar not only balances out the saltiness but also helps caramelize the chicken when grilling. -
2 cloves garlic, smashed (for brine)
Garlic infuses the chicken with flavor. Smashing releases more oils and essences for a robust taste. -
2 tbsp olive oil (to coat chicken)
Olive oil keeps your chicken moist while adding a rich taste. A light brush will do wonders! -
1 tsp salt (for seasoning)
This will give your chicken that final boost of flavor. -
1/2 tsp black pepper (for seasoning)
Black pepper enhances all other flavors. A staple in any savory dish. -
1 tsp garlic powder (for seasoning)
An extra punch of garlic goodness! This seasoning makes it easy to distribute flavor evenly. -
1 tsp paprika (adds color)
Paprika not only contributes a vibrant color but also a subtle sweetness and depth. -
1/2 tsp dried oregano (herbal note)
The herbs add a fragrant element that elevates the final dish. -
1/4 tsp cayenne pepper (optional heat)
If you like a kick, throw it in! Adjust to your spice tolerance.
Step-by-Step Instructions
Now let’s get into the nitty-gritty of creating your easy grilled chicken. Follow these simple steps for an effortlessly delicious plate:
1. Make the Brine
In a large bowl or pot, combine the 4 cups of warm water, 1/4 cup of kosher salt, 2 tbsp of brown sugar, and 2 smashed garlic cloves. Stir until the salt and sugar have dissolved completely. This brine will work its magic to ensure that your chicken remains juicy and bursting with flavor.
2. Brine the Chicken
Submerge the chicken breasts or thighs in the brine, ensuring they’re fully submerged. Cover and refrigerate for at least 1 hour or up to 4 hours. This step is crucial because it helps the chicken retain moisture while cooking.
Chef Tip: If you’re short on time, even a quick 30-minute brine can add a world of difference!
3. Prepare the Grill
While the chicken is brining, preheat your grill to a medium-high heat (about 375°F to 400°F). Make sure grates are clean and lightly oiled to prevent sticking.
Chef Hack: If you don’t have a grill, a grill pan on the stovetop works wonders too. Just crank up the heat!
4. Season the Chicken
After brining, remove the chicken from the brine and pat it dry with paper towels. It’s time to add flavor! Drizzle 2 tbsp of olive oil over the chicken, then sprinkle with 1 tsp of salt, 1/2 tsp of black pepper, 1 tsp of garlic powder, 1 tsp of paprika, 1/2 tsp of dried oregano, and 1/4 tsp cayenne pepper (if you like a bit of heat). Use your hands to rub the seasonings into the chicken for an even coating.
5. Grill the Chicken
Place the chicken on the grill and cook for about 6-7 minutes on one side without moving it. This allows for stunning grill marks! Then, flip and cook for an additional 6-7 minutes on the other side until the chicken reaches an internal temperature of 165°F.
Chef Insight: If you’re using thick pieces, cover the grill during the cooking process to trap heat, ensuring thorough cooking. For more flavor, add a few sprigs of fresh herbs to the grill during cooking!
6. Rest and Enjoy
Once cooked, remove the chicken from the grill and let it rest for 5 minutes. This resting period allows the juices to redistribute, ensuring each bite is tender and juicy.
Serving Suggestions
Now for the fun part—plating! Slice the grilled chicken for visual appeal and serve it on a beautiful platter drizzled with a touch of olive oil or a squeeze of fresh lemon for brightness. Pair it with grilled vegetables, a fresh green salad, or fluffy rice seasoned with herbs.
Grill marks and fresh herbs make the dish pop, so consider garnishing with fresh parsley or basil for an elegant touch!
Recipe Variations
Get creative with your grilled chicken! Here are a few variations to keep things exciting:
-
Citrus Marinade: Swap out the brown sugar and garlic for orange or lemon juice, zest, and a splash of soy sauce for a fresh, citrus-driven flavor.
-
Herb Explosion: Instead of dried oregano, use fresh herbs like rosemary or thyme for a more aromatic profile.
-
Mediterranean Twist: Add olives, feta cheese, or a sprinkle of za’atar seasoning to the brine for a taste of the Mediterranean.
-
BBQ Flavor: Slather the grilled chicken with your favorite barbecue sauce during the last few minutes of cooking for a sweet and smoky spin.
-
Honey Mustard Glaze: Brush with honey mustard marinade before grilling for a sweet and tangy flavor.
Chef’s Notes
This recipe is such a crowd-pleaser and has evolved over the years. I often swap ingredients based on what I have in my pantry or what feels right for the season. One of my favorite recent adaptations was adding a splash of balsamic vinegar to the brine, giving the chicken a subtle tang.
I can’t count the number of times I’ve grilled chicken for friends and family, and every gathering is always filled with laughter, stories, and delicious bites. Don’t be afraid to make this recipe your own; experiment and add your flair!
FAQs and Troubleshooting
Q: Why is my grilled chicken dry?
A: Overcooking is usually the culprit. Invest in a meat thermometer (they’re super handy!) to ensure the chicken is cooked just to 165°F.
Q: Can I marinate the chicken overnight?
A: Yes! Just cut back on the salt in the brine, as the longer it sits, the saltier it can become.
Q: Can I grill frozen chicken?
A: It’s best to thaw the chicken beforehand for even cooking. If you’re in a pinch, you can grill them from frozen but cook on low heat to ensure they cook through without burning.
Q: Can I add other flavorings to the brine?
A: Absolutely! Feel free to experiment with different herbs, spices, or even beer or cider for unique flavors.
Nutritional Info (Optional)
Per serving (the following is an estimate):
- Calories: 220
- Protein: 28g
- Total Fat: 10g
- Saturated Fat: 1.5g
- Carbohydrates: 1g
- Sugar: 1g
- Sodium: 800mg
Final Thoughts
And there you have it! With this easy grilled chicken recipe, you’re not just cooking; you’re creating experiences that linger in memories long after the plates have been cleared. Enjoy the process and don’t forget to pour yourself something bubbly while you’re at it! Happy grilling, my friend—here’s to the delicious moments ahead! 🍽✨
PrintEasy Grilled Chicken
A simple and flavorful grilled chicken recipe that’s perfect for any occasion.
- Prep Time: 60 minutes
- Cook Time: 15 minutes
- Total Time: 75 minutes
- Yield: 4 servings 1x
- Category: Main Course
- Method: Grilling
- Cuisine: American
- Diet: Gluten-Free
Ingredients
- 4 boneless chicken breasts (or 8 thighs)
- 4 cups warm water (for brine)
- 1/4 cup kosher salt (for brine)
- 2 tbsp brown sugar (for brine)
- 2 cloves garlic, smashed (for brine)
- 2 tbsp olive oil (to coat chicken)
- 1 tsp salt (for seasoning)
- 1/2 tsp black pepper (for seasoning)
- 1 tsp garlic powder (for seasoning)
- 1 tsp paprika (adds color)
- 1/2 tsp dried oregano (herbal note)
- 1/4 tsp cayenne pepper (optional heat)
Instructions
- Make the brine: In a large bowl or pot, combine the warm water, kosher salt, brown sugar, and smashed garlic. Stir until dissolved.
- Brine the chicken: Submerge the chicken in the brine, cover, and refrigerate for 1 to 4 hours.
- Prepare the grill: Preheat your grill to medium-high heat (375°F to 400°F).
- Season the chicken: Remove the chicken from the brine, pat dry, drizzle with olive oil, and season with salt, pepper, garlic powder, paprika, oregano, and cayenne.
- Grill the chicken: Cook on the grill for 6-7 minutes on each side until reaching 165°F internal temperature.
- Rest and enjoy: Remove the chicken from the grill and let it rest for 5 minutes before serving.
Notes
For extra flavor, garnish with fresh herbs or a squeeze of lemon before serving.
Nutrition
- Serving Size: 1 serving
- Calories: 350
- Sugar: 5g
- Sodium: 800mg
- Fat: 10g
- Saturated Fat: 1.5g
- Unsaturated Fat: 8.5g
- Trans Fat: 0g
- Carbohydrates: 1g
- Fiber: 0g
- Protein: 28g
- Cholesterol: 75mg
Keywords: grilled chicken, easy recipe, summer grilling, healthy meal

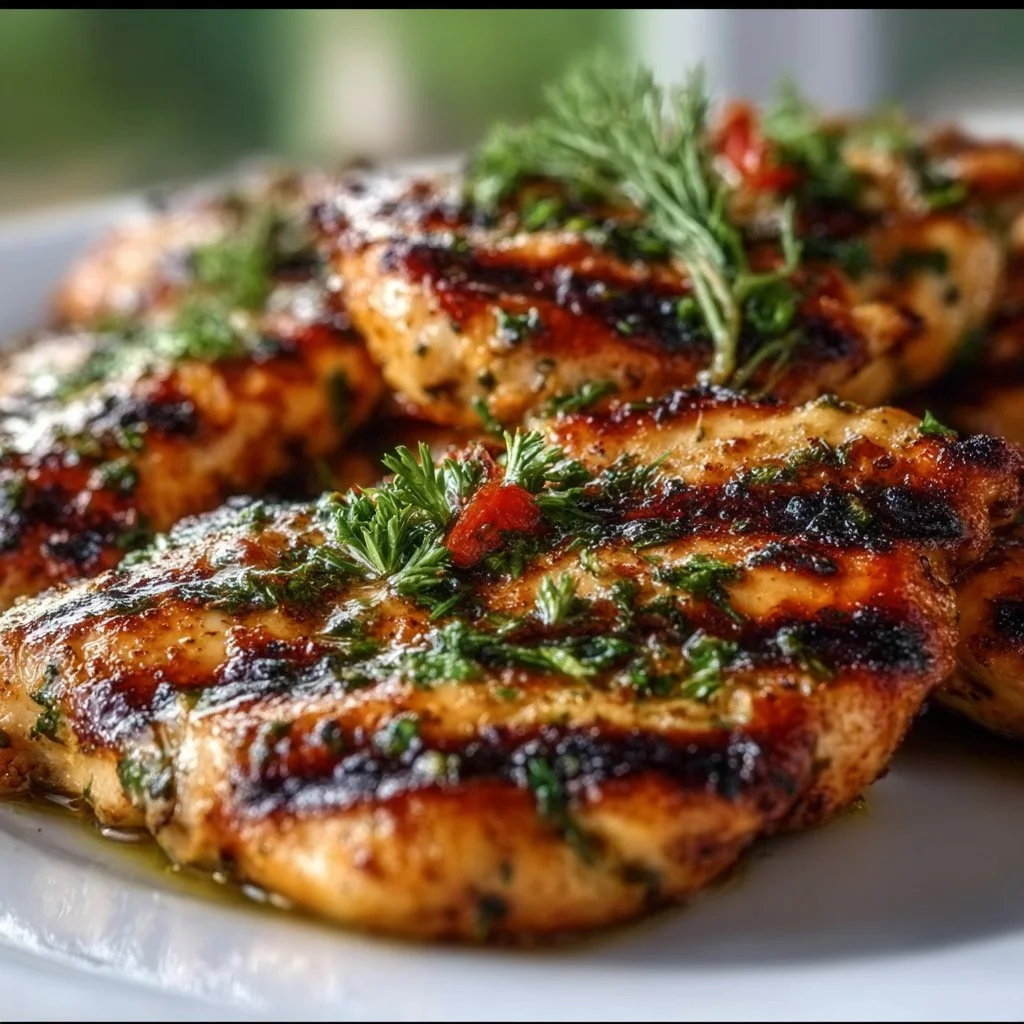
Chili Lime Chicken
# Chili Lime Chicken: A Zesty Celebration of Flavor

## Introduction

Hello, my fellow food enthusiasts! Today, I’m thrilled to share a vibrant recipe that will light up your dinner table with spectacular flavor: Chili Lime Chicken! This dish is not only a feast for the taste buds, but it’s also incredibly straightforward to whip up — perfect for both busy weeknights and leisurely weekend gatherings.

Imagine your kitchen filled with the tantalizing aroma of fresh lime zest, perfectly searing chicken, and a hint of smokiness from the chili powder. Sounds enticing, right? Let’s talk about why this dish holds a special place in my heart.

Chili lime chicken brings me back to those joyful summer nights spent grilling in my backyard with friends and family. The sizzle of the grill, laughter in the air, and the clinking of glasses as we toast to another beautiful evening — it was all about enjoying each other's company and delicious food. This simple dish quickly became a staple during our summer get-togethers, and now, every bite takes me back to those laughter-filled nights.

Rustic yet impressive, Chili Lime Chicken is marinated to perfection, allowing all the flavors to mingle and celebrate wonderfully on your palate. Toss it on the grill or bake it in the oven; either way, it’s guaranteed to become a family favorite. So, grab your apron and let’s dive into this recipe that perfectly blends zesty brightness with savory satisfaction!

## Personal Story

One of my fondest memories of cooking Chili Lime Chicken was during a warm summer evening. I had invited a handful of close friends over for an impromptu barbecue. You know the kind: laughter sprinkled with spontaneity!

As the sun began to set, I marinated the chicken while chatting and sharing stories. When it was time to grill, I could feel the excitement build as the chicken sizzled, releasing that intoxicating scent of lime and spice into the warm night air.

We paired it with a colorful corn salsa — an explosion of textures and flavors that complemented the chicken perfectly. As we gathered around the table, sharing bites and heartwarming laughter, it became clear that not only was I serving a meal; I was creating lasting memories. This dish, with its vibrant flavors, became the perennial star of our summer celebrations, uniting us over appetites and joy.

## Ingredients

Let’s get started with the ingredients — these are the essentials that will transform your dinner into a taste sensation!

- **4 boneless, skinless chicken breasts**
  Tender chicken breasts are perfect for absorbing the marinating flavors. If you prefer, you can substitute with thighs for more juiciness.

- **1/4 cup lime juice**
  Freshly squeezed lime juice is key to achieving that bright flavor. You can substitute with lemon juice in a pinch, but the taste will shift slightly.

- **2 tablespoons olive oil**
  This adds moisture and helps the spices adhere to the chicken. Feel free to swap it with avocado or canola oil, if desired.

- **2 teaspoons chili powder**
  This is where the dish gets its irresistible kick! Adjust the amount based on your desired spice level – or use smoked paprika for a smokier depth.

- **1 teaspoon garlic powder**
  Garlic powder gives a warm, savory undertone. Fresh minced garlic works too – just remember to use less since it's more potent.

- **1 teaspoon onion powder**
  Bringing in subtle sweetness, onion powder balances out the other flavors. You can skip it if you want a lighter flavor profile.

- **Salt and pepper to taste**
  These pantry staples enhance every dish. Don’t be shy with seasoning; it’s the magic that the chicken needs!

- **Chopped fresh cilantro (optional for garnish)**
  Cilantro adds a pop of color and freshness at the end. If you’re not a fan, try fresh parsley or skip it altogether.

## Step-by-Step Instructions

### 1. Marinate the Chicken

Start by gathering your chicken breasts in a large zip-top bag. Pour in the lime juice, olive oil, chili powder, garlic powder, onion powder, salt, and pepper. Seal the bag and give it a gentle shake to ensure the flavors coat every inch of the chicken.

*Chef’s Hack:* For the best flavor, allow the chicken to marinate for at least 30 minutes. If you have time, let it marinate for up to 2 hours in the fridge. Just remember to take it out and bring it to room temperature for about 15 minutes before cooking.

### 2. Prepare to Cook

Preheat your grill to medium-high. If you’re using an oven, preheat to 375°F (190°C). Grease the grill grates with a bit of olive oil or, if baking, lightly grease a baking dish.

*Chef Insight:* A hot cooking surface will give you those beautiful grill marks or a lovely, golden crust in the oven!

### 3. Cook the Chicken

For grilling, place the marinated chicken on the grill and close the lid. Cook for about 6-8 minutes on each side, or until the internal temperature reaches 165°F (75°C). If using the oven, bake for 25-30 minutes or until cooked through.

*Pro Tip:* If you’ve got a meat thermometer, use it to ensure perfect juiciness! If you find the chicken browning too quickly, lower the heat slightly.

### 4. Rest and Garnish

Once the chicken is done, remove it from the grill or oven and let it rest for 5 minutes. This step is crucial, as it allows the juices to redistribute, retaining that succulent moisture.

Before serving, sprinkle with freshly chopped cilantro for that pop of freshness!

## Serving Suggestions

For a beautiful presentation, slice the chicken against the grain and arrange it artistically on a platter. Drizzle with any leftover marinade or a squeeze of fresh lime juice. Pair it with a vibrant salad, a side of grilled veggies, or perhaps some cilantro-lime rice for a complete meal.

## Recipe Variations

The beauty of Chili Lime Chicken lies in its adaptability. Here are a few creative twists you can try out:

1. **Citrus Swap:** Experiment with different citrus fruits like orange or grapefruit for a sweet twist!

2. **Spicy Kick:** Add red pepper flakes or a dash of cayenne pepper for an extra layer of heat.

3. **Herb-Infused:** Incorporate fresh herbs like oregano or marjoram into the marinade for a fragrant twist.

4. **Tropical Vibes:** Mix in some diced pineapple to the marinade for a tropical flair — sweet and spicy!

5. **Low-Carb Option:** Serve with zucchini noodles or cauliflower rice for a keto-friendly meal.

## Chef’s Notes

Reflecting on the times I made Chili Lime Chicken, I remember one occasion when I mistook chili powder for cinnamon! Let me tell you, the surprised laughter that erupted from my guests was priceless. Luckily, I had a backup plan and whipped up a quick batch of tacos instead!

Over the years, my recipe has evolved with hints of different spices based on what I had on hand, making each chicken adventure a truly unique experience. Food is all about experimentation and sharing joyous moments, right?

## FAQs and Troubleshooting

### Q1: What do I do if my chicken is dry?
If the chicken is overcooked, it can become dry. Always use a meat thermometer to ensure you’re cooking it to the right temperature. If it’s dry, try soaking it in warm broth or a quick sauce post-cooking to add moisture.

### Q2: Can I use frozen chicken?
While fresh chicken yields the best results, you can use thawed frozen chicken. Just make sure to marinate it properly for the right absorption of flavor.

### Q3: What if I don’t have a grill?
No worries! Baking the chicken in the oven at 375°F (190°C) is a fantastic alternative. Alternatively, try a stovetop skillet — just sear it over medium heat until golden brown and cooked through.

### Q4: How can I brighten leftovers?
Refrigerate any leftovers in an airtight container. When reheating, add a splash of lime or a drizzle of olive oil to revive the flavors. Serve it in a salad or as a filling for wraps to enjoy it anew!

## Nutritional Info

While nutrition can vary based on specific ingredients, the beauty of this dish is it gives you a wholesome, satisfying meal! On average, a serving of Chili Lime Chicken (without sides) contains:
- Calories: 250
- Protein: 30g
- Fat: 12g
- Carbohydrates: 1g
- Fiber: 0g

## Conclusion

This Chili Lime Chicken recipe is more than just a meal; it’s an invitation to gather, share, and celebrate the small joys of life. So whether you are grilling this up for your closest friends or cooking a comforting dinner for yourself, remember that every dish tells a story.

Thank you for joining me on this culinary adventure! Now, it’s your turn to make a splash in your kitchen and create unforgettable memories around your table. Tie on that apron, pour yourself something delightful, and let’s keep the celebration of good food and great company alive!
Chili Lime Chicken

A vibrant and zesty Chili Lime Chicken recipe that is perfect for grilling or baking, bringing a burst of flavor to your dinner table.
- Prep Time: 15 minutes
- Cook Time: 30 minutes
- Total Time: 45 minutes
- Yield: 4 servings 1x
- Category: Main Course
- Method: Grilling or Baking
- Cuisine: Mexican
- Diet: Gluten-Free
Ingredients
- 4 boneless, skinless chicken breasts
- 1/4 cup lime juice
- 2 tablespoons olive oil
- 2 teaspoons chili powder
- 1 teaspoon garlic powder
- 1 teaspoon onion powder
- Salt and pepper to taste
- Chopped fresh cilantro (optional for garnish)
Instructions
- Marinate the chicken by gathering the chicken breasts in a large zip-top bag. Pour in the lime juice, olive oil, chili powder, garlic powder, onion powder, salt, and pepper. Seal the bag and shake to coat.
- Prepare to cook by preheating your grill to medium-high or oven to 375°F (190°C). Grease the grill grates or a baking dish.
- Cook the chicken on the grill for 6-8 minutes on each side or bake in the oven for 25-30 minutes until the internal temperature reaches 165°F (75°C).
- Rest the chicken for 5 minutes after cooking, then sprinkle with cilantro before serving.
Notes
For best flavor, marinate the chicken for at least 30 minutes. Use a meat thermometer for perfect doneness.
Nutrition
- Serving Size: 1 serving
- Calories: 250
- Sugar: 1g
- Sodium: 500mg
- Fat: 12g
- Saturated Fat: 2g
- Unsaturated Fat: 8g
- Trans Fat: 0g
- Carbohydrates: 1g
- Fiber: 0g
- Protein: 30g
- Cholesterol: 70mg
Keywords: chili lime chicken, grilled chicken, summer recipes, easy dinner

Healthy Zucchini Noodles with Grilled Chicken and Basil Pesto
Savoring Summer: Healthy Zucchini Noodles with Grilled Chicken and Basil Pesto
Hello there, fellow food lover! Today, we’re diving into one of my favorite summer dishes — Healthy Zucchini Noodles with Grilled Chicken and Basil Pesto. Picture a plate bursting with fresh flavors, vibrant colors, and wholesome goodness. It’s comfort food made light, perfect for those warm evenings when you want something delicious without feeling weighed down.
Zucchini noodles, or “zoodles” as they charmingly call them, are not just a trendy substitute for pasta; they bring a delightful crunch and subtle sweetness that pairs perfectly with well-seasoned grilled chicken and the fragrant, nutty essence of basil pesto. And here’s the best part: this dish is incredibly easy to whip up! So why not put on that apron of yours, grab your favorite kitchen tools, and join me in creating a dish that sings summer?
This dish transports me right back to my childhood summers spent in my grandmother’s garden, where the zucchini grew in abundance. She would pick them fresh, and we’d often make amazing meals together, creating memories alongside our food. Now, I share those flavors with you but with a bit of my own twist. Grab a glass of something refreshing, and let’s sauté our way into a culinary adventure that celebrates both the simplicity and elegance of home cooking.
Personal Story
I vividly remember summers on my grandmother’s farm, where the sun kissed the earth, and the air was sweet with the scent of fresh basil and ripe tomatoes. As a kid, I loved the excitement of harvesting vegetables from her garden. One summer day, she asked me to help her prepare dinner for the family. We grabbed a basket and headed out to gather a bunch of crunchy, green zucchinis and a handful of fragrant basil.
Returning to the cozy kitchen, I watched in awe as she turned our simple harvest into a beautiful meal. With just a handful of ingredients, she created magic: sautéed zucchini with grilled chicken, drizzled with a homemade pesto that made every bite irresistible. Her joy in cooking filled the kitchen, creating a warm and inviting atmosphere that made every meal special — a tradition I carry on today.
Now, as I step into my kitchen, I strive to replicate that feeling: the joy of cooking with fresh ingredients and the warmth that comes from sharing with friends and family. Every time I make zucchini noodles, it feels like I’m taking a trip back to my roots, honoring my grandmother while bringing a fresh perspective to the dish.
Ingredients
Here’s what you’ll need to create this delightful summer dish:
-
Zucchini (4 medium)
- The star of our show! Zucchini is low in calories and high in nutrients. If you want a twist, yellow squash works beautifully too.
-
Grilled Chicken (2 boneless, skinless breasts)
- Seasoned to perfection, grilled chicken adds protein and heartiness. Feel free to swap in tofu or chickpeas for a vegetarian option!
-
Basil Pesto (1 cup)
- A luscious blend of fresh basil, garlic, and pine nuts — homemade is best, but store-bought works in a pinch. For nut-free pesto, try sunflower seeds instead!
-
Olive Oil (2 tablespoons)
- Extra virgin is best for dressing and sautéing. It’s full of healthy fats! Avocado oil can be a good substitute with a milder flavor.
-
Salt (to taste)
- Enhances flavor — always start small and adjust! Sea salt or kosher salt are great choices.
-
Black Pepper (to taste)
- Freshly cracked pepper adds an aromatic touch. If you like a little heat, try a pinch of red pepper flakes.
-
Parmesan Cheese (optional, for topping)
- Adds a savory depth to the dish. You can use nutritional yeast as a dairy-free option.
-
Cherry Tomatoes (1 cup, halved)
- A pop of sweetness and color. Feel free to substitute with diced bell peppers for a different flavor profile.
Step-by-Step Instructions
Let’s get cooking! Follow these steps and allow yourself to enjoy the process:
-
Spiralize the Zucchini:
- Using a spiralizer, create long strands of zucchini. If you don’t have a spiralizer, a vegetable peeler can also produce delightful ribbons! I love how this method transforms ordinary zucchini into something visually exciting. Tip: Salt the zucchini noodles lightly and allow them to sit for about 10 minutes. This will draw out excess moisture, preventing your dish from becoming too watery.
-
Prepare the Chicken:
- Preheat your grill or a grill pan over medium-high heat. While it’s heating up, season both sides of the chicken breasts with olive oil, salt, and black pepper. This simple seasoning lets the grilled flavor shine through. When the grill is hot, add the chicken and cook for about 6-7 minutes on each side until fully cooked. You can tell it’s done when the juices run clear! Once cooked, let the chicken rest for a few minutes before slicing it into thin strips — this keeps it juicy.
-
Make the Pesto:
- If you’re preparing homemade pesto, blend the fresh basil, garlic, pine nuts, and olive oil in a food processor until smooth. Season with salt and additional olive oil as desired. Tasting along the way is key — adjust to your preference! No worries if you’re using store-bought — just give it a quick stir and set it aside.
-
Sauté the Zucchini Noodles:
- In a large skillet, heat a tablespoon of olive oil over medium heat. Add the zucchini noodles to the skillet, sautéing them for just 2-3 minutes. You want them to remain tender yet retain a little crunch; overcooking will turn them mushy. As they sauté, toss in the halved cherry tomatoes, mixing everything together until warmed through.
-
Combine and Serve:
- Now, it’s time to bring it all together! Add the sliced grilled chicken to the skillet and gently mix in the bright green basil pesto until everything is coated with that delicious, aromatic sauce. It’s visually stunning — you’ll want to dive right in!
Serving Suggestions
For plating, I suggest a simple yet elegant approach. Use a large bowl or plate to create a nest of zucchini noodles, topped with a generous portion of grilled chicken and then a drizzle of extra pesto to finish. Garnish with freshly grated Parmesan cheese, a few basil leaves, and a sprinkle of black pepper for that restaurant-worthy touch. Pair with a chilled glass of white wine or sparkling water, and you’re all set for a delightful meal!
Recipe Variations
Here are a few fun twists you can play with to keep things exciting:
-
Zoodles with Shrimp: Swap out the chicken for shrimp for a quick, seafood option. Just sauté them until they turn pink, and you’re golden!
-
Spicy Pesto: Add a few red pepper flakes to your basil pesto for a spicy kick that adds an extra layer of flavor.
-
Roasted Vegetable Medley: Toss in some roasted bell peppers, asparagus, or cherry tomatoes for added nutrition and depth.
-
Creamy Avocado Sauce: Blend ripe avocados with garlic and lime juice instead of pesto for a creamy, dairy-free sauce.
-
Savory Vegan Option: Substitute grilled chicken with chickpeas and use nutritional yeast in place of cheese for a full vegan transformation.
Chef’s Notes
As I reflect on the evolution of this recipe, I think back to the first time I glimpsed zucchini noodles on a gourmet menu. I remember being skeptical but intrigued. Once I tried them, I was hooked! This dish has evolved over time, becoming a staple in my own kitchen, and I have played around with flavors, from adding spicy elements to experimenting with different sauces. The heart of the recipe remains grounded in that simple joy of cooking with fresh ingredients and sharing it with loved ones.
Cooking is as much about creativity as it is about technique — don’t hesitate to play around with flavors! Each iteration tells a story, just like my grandmother’s zucchini-inspired meals.
FAQs and Troubleshooting
-
How do I prevent my zucchini noodles from turning mushy?
- Great question! Salt your zoodles lightly before cooking to draw out moisture and sauté them just until tender (2-3 minutes) for a nice bite!
-
Can I make the basil pesto in advance?
- Absolutely! You can prepare your pesto up to a week in advance. Store it in an airtight container and drizzle a little olive oil on top to prevent browning.
-
What if I don’t have a spiralizer?
- No problem! You can simply use a vegetable peeler to create wide ribbons of zucchini or even slice them into thin strips with a knife.
-
Is this dish suitable for meal prep?
- Yes! This dish stores well in the refrigerator for up to 3 days. Just remember to keep the sauce separate until you’re ready to eat to maintain the zoodles’ texture.
Nutritional Info
Per Serving (Based on 4 servings):
- Calories: 320
- Protein: 32g
- Carbohydrates: 12g
- Dietary Fiber: 3g
- Sugars: 4g
- Total Fat: 18g
- Saturated Fat: 3g
I hope you enjoy creating these delightful Healthy Zucchini Noodles with Grilled Chicken and Basil Pesto as much as I do! Remember, cooking is all about sharing love and joy through food, so invite a friend over, and let’s fill the table with laughter and beautiful moments. Happy cooking! 🍽️
PrintHealthy Zucchini Noodles with Grilled Chicken and Basil Pesto

A light and flavorful summer dish featuring zucchini noodles, grilled chicken, and homemade basil pesto.
- Prep Time: 15 minutes
- Cook Time: 20 minutes
- Total Time: 35 minutes
- Yield: 4 servings 1x
- Category: Main Course
- Method: Sautéing, Grilling
- Cuisine: Italian
- Diet: Gluten-Free, Low-Carb
Ingredients
- 4 medium Zucchini
- 2 boneless, skinless Grilled Chicken breasts
- 1 cup Basil Pesto
- 2 tablespoons Olive Oil
- Salt (to taste)
- Black Pepper (to taste)
- Parmesan Cheese (optional, for topping)
- 1 cup Cherry Tomatoes, halved
Instructions
- Spiralize the Zucchini: Using a spiralizer, create long strands of zucchini. Lightly salt and let sit for about 10 minutes.
- Prepare the Chicken: Preheat the grill. Season the chicken with olive oil, salt, and pepper. Grill for 6-7 minutes per side until fully cooked. Let it rest before slicing.
- Make the Pesto: Blend fresh basil, garlic, pine nuts, and olive oil in a food processor until smooth, seasoning to taste.
- Sauté the Zucchini Noodles: Heat olive oil in a skillet, sauté zucchini noodles for 2-3 minutes, then mix in the halved cherry tomatoes.
- Combine and Serve: Add sliced chicken and pesto to the skillet, mixing until well-coated. Serve garnished with Parmesan cheese and basil.
Notes
For a vegetarian option, substitute chicken with tofu or chickpeas. Experiment with different vegetables for added flavor.
Nutrition
- Serving Size: 1 serving
- Calories: 320
- Sugar: 4g
- Sodium: 300mg
- Fat: 18g
- Saturated Fat: 3g
- Unsaturated Fat: 10g
- Trans Fat: 0g
- Carbohydrates: 12g
- Fiber: 3g
- Protein: 32g
- Cholesterol: 70mg
Keywords: zucchini noodles, grilled chicken, basil pesto, healthy recipe, summer dish, low-carb
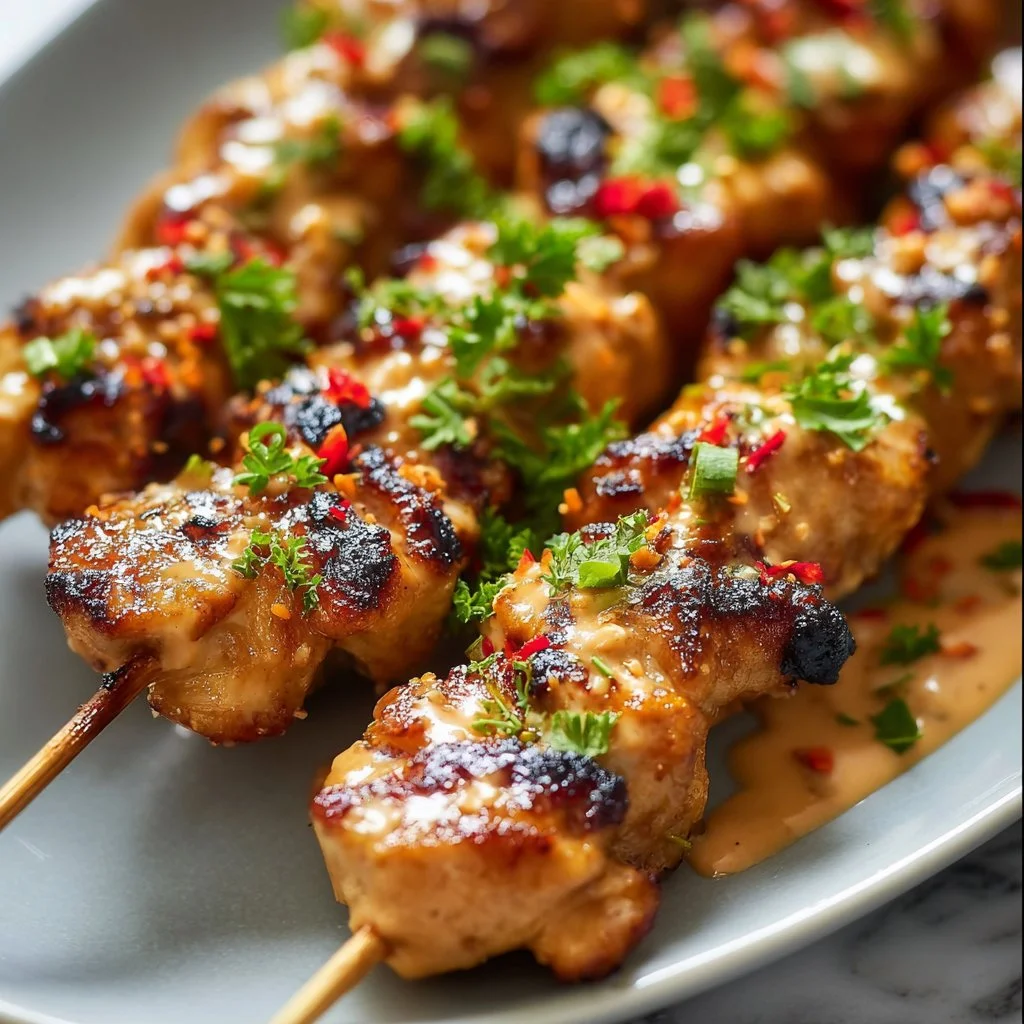
Bang Bang Chicken Skewers
Bang Bang Chicken Skewers: A Flavorful Journey to the Grill
Hello, fellow food enthusiasts! It’s Savannah here, and today I’m tickled to share one of my favorite recipes that brings the sizzle and spice right to your backyard or dining table: Bang Bang Chicken Skewers. If you’re in the mood for something that’s both elegant and easy to whip up, you’ve stumbled onto the right recipe!
Picture this: a warm summer evening, the sun dipping low, golden rays cascading onto your patio, laughter ringing in the air, and the tantalizing aroma of chicken grilling to perfection. These Bang Bang Chicken Skewers are truly the stars of the show, bringing together juicy chicken with a creamy, spicy sauce that you’ll want to drizzle (or slather) on everything! It’s all about having fun in the kitchen, and trust me, these skewers are an accessible way to bring a culinary flair without breaking a sweat.
The beauty of Bang Bang Chicken Skewers lies not just in their flavor, but also in their adaptability. They’re great for weeknight dinners, friendly gatherings, or even more formal occasions. Plus, the vibrant colors and the delightful presentation will make your plate pop! Whether you’re an experienced cook or a newbie looking to impress, I’m here to walk you through it step by step. So grab your apron, and let’s get started!
Personal Story
I first encountered Bang Bang Chicken Skewers at a friend’s birthday party a few summers ago. It was one of those magical evenings where everything just clicked: the lights were twinkling, the music was playing, and the food was simply divine. My friend’s mom had grilled these skewers to perfection, and as I took my first bite, the explosion of flavors danced merrily on my palate. The hint of sweetness from the chili sauce, the subtle heat of sriracha, and the creamy mayo brought a delightful balance that had me reaching back for seconds.
That moment sparked a mission: to recreate those skewers and bring that joyful experience to my own table. After some experimenting in the kitchen – a little trial and error here and there – I finally perfected my version. Each skewer now brings a wave of nostalgia and happiness, perfectly suited for gatherings or quiet dinners at home. So, here’s a recipe that invites you to replicate a moment of joy, flavor by flavor!
Ingredients
Here’s what you’ll need to make these crowd-pleasing Bang Bang Chicken Skewers:
-
1 lb Chicken Breast, cubed
A classic choice; chicken breast remains tender and juicy when marinated and grilled. You could substitute with chicken thighs for added flavor if you prefer a richer taste. -
1/2 cup Mayonnaise
Adds creaminess and richness to our sauce. For a lighter version, try using Greek yogurt instead, which will provide a similar tanginess with fewer calories. -
1/4 cup Sweet Chili Sauce
This is the backbone of our Bang Bang sauce, lending a perfect balance of sweetness. No sweet chili sauce? You can use hoisin sauce mixed with a bit of sugar as a substitute. -
1-2 tablespoons Sriracha (to taste)
Gives that signature kick! Feel free to adjust the amount based on your heat tolerance. For a milder flavor, switch to a less spicy hot sauce or omit it altogether. -
1 tablespoon Lime Juice
Fresh lime juice brightens the dish and enhances the flavors. In a pinch, lemon juice can be used as a zesty alternative. -
Salt and Pepper to taste
Essential for enhancing the overall flavors of the dish. Don’t skip this – it makes a huge difference! -
Skewers (wooden or metal)
Wooden skewers should be soaked in water for at least 30 minutes prior to using them to prevent burning. Metal skewers are great because they don’t require this step!
Step-by-Step Instructions
-
Prepare The Marinade:
In a medium bowl, combine the mayonnaise, sweet chili sauce, sriracha, lime juice, and a pinch of salt and pepper. Whisk until smooth and well-blended. The texture should be creamy yet pourable. This marinade is both a basting sauce for the chicken and a delicious dipping sauce for when the skewers are ready to serve. Yum! -
Marinate the Chicken:
Cube the chicken breast into bite-sized pieces (about 1-inch cubes). Add the chicken to the marinade, ensuring each piece is generously coated. Cover the bowl with plastic wrap and let it marinate in the fridge for at least 30 minutes. If you have time, marinating for a few hours will elevate the flavor even more! -
Skewer the Chicken:
Preheat your grill to medium-high heat. While it’s heating up, thread the cubed chicken onto your skewers. Leave a bit of space between each piece to ensure even cooking. If you’re using wooden skewers, remember those should be soaking in water for at least 30 minutes before threading. -
Grill The Skewers:
Place the skewers on the grill and cook for about 10-12 minutes, turning occasionally, until the chicken is golden brown and reaches an internal temperature of 165°F (75°C). If you fancy a bit of charring (who doesn’t!), feel free to cook a tad longer, but keep an eye on them to avoid burning. -
Baste and Brown:
During the last few minutes of grilling, brush a little of the remaining marinade on the skewers. This will enhance the flavor and add a beautiful glaze. You might want to reserve just a touch more marinade for an extra serving sauce — perfect for dipping! -
Serve Immediately:
Once the chicken is cooked through and beautifully charred, remove the skewers from the grill and let them rest for a minute. This step allows the juices to redistribute. Serve the skewers with any remaining sauce (it’s too good to waste!) and enjoy those satisfied smiles around the table!
Serving Suggestions
Plate these Bang Bang Chicken Skewers on a vibrant platter, perhaps over a bed of lightly dressed greens or alongside a fragrant rice dish. Drizzling the extra sauce over the skewers will not only enhance the presentation but compel your guests to reach for another! Consider garnishing with freshly chopped cilantro or green onions for an added pop of color and flavor.
Recipe Variations
-
Vegetarian Version: Swap out the chicken with cubed tofu or larger vegetable chunks (like zucchini, bell peppers, or mushrooms) for a delightful meat-free option.
-
Add a Simple Side: Serve with a refreshing cucumber salad or pickled vegetables to counterbalance the richness of the skewers.
-
Sriracha Alternative: For a smoky flavor, replace sriracha with chipotle sauce or harissa. It will add a different layer of complexity!
-
Flavor Twist: Incorporate different nut butters (think peanut or cashew) into the marinade for a nutty flavor, and up the creaminess. Just be mindful of allergens!
-
Asian Flair: If you want to go further with the Asian vibe, consider adding a splash of sesame oil for depth of flavor or some crushed peanuts for texture.
Chef’s Notes
Every recipe tells a story and, oh boy, do I have one with these Bang Bang Chicken Skewers! It’s evolved over time from that memorable birthday party into something I confidently serve at my own gatherings. I remember one summer night, I decided to attempt these skewers for a dinner with friends. To my horror, I realized I was out of sweet chili sauce—and panic set in! After a brief moment of ingenuity and a dash of this and that from my pantry, I mixed up a makeshift sauce that surprisingly was a hit. Now, I could tell you about my various mishaps in the kitchen, but I prefer to think of my kitchen as a playground; sometimes, the best flavors come from a little adventurous improvisation!
FAQs and Troubleshooting
Q: My chicken skewers are dry. What did I do wrong?
Don’t fret! Dry chicken usually means they were overcooked. Keep an eye on the grill, and use a meat thermometer to ensure that the internal temperature reaches 165°F (75°C) but no more. Marinating also helps keep the chicken juicy.
Q: My sauce is too spicy! How do I tone it down?
If you find the sauce too hot, a dash more mayonnaise can help balance out the heat. Alternatively, you can mix in a bit of honey or sugar for sweetness.
Q: Can I bake these skewers instead of grilling?
Absolutely! Preheat your oven to 400°F (200°C) and place the skewers on a baking sheet lined with parchment paper. Bake for about 20-25 minutes, turning them halfway through, until the chicken is cooked through.
Q: How do I store leftovers?
Place any leftover skewers in an airtight container and store them in the refrigerator for up to 3 days. They also make for a rewarding cold lunch the next day!
Nutritional Info (Optional)
While the specific nutritional content can vary based on brands and cooking methods, here’s a concise estimate for one serving (assuming 4 servings total) of Bang Bang Chicken Skewers:
- Calories: 320
- Protein: 30g
- Fat: 20g (mostly from the mayo)
- Carbohydrates: 10g
- Dietary Fiber: 1g
- Sugar: 4g
Bang Bang Chicken Skewers are not just a dish; they are a celebration of flavors, memories, and the joy of sharing meals with those you love. I hope you enjoy crafting these as much as I do! Let’s keep the flavors flowing, and don’t hesitate to share your own kitchen adventures with me. Happy cooking!
PrintBang Bang Chicken Skewers

Flavorful Bang Bang Chicken Skewers with a creamy, spicy sauce that’s perfect for grilling at any gathering.
- Prep Time: 10 minutes
- Cook Time: 12 minutes
- Total Time: 42 minutes
- Yield: 4 servings 1x
- Category: Appetizer
- Method: Grilling
- Cuisine: Asian
- Diet: Gluten-Free
Ingredients
- 1 lb Chicken Breast, cubed
- 1/2 cup Mayonnaise
- 1/4 cup Sweet Chili Sauce
- 1–2 tablespoons Sriracha (to taste)
- 1 tablespoon Lime Juice
- Salt and Pepper to taste
- Skewers (wooden or metal)
Instructions
- Prepare the Marinade: In a medium bowl, combine mayonnaise, sweet chili sauce, sriracha, lime juice, and a pinch of salt and pepper. Whisk until smooth and well-blended.
- Marinate the Chicken: Cube the chicken breast into bite-sized pieces. Add the chicken to the marinade, ensuring each piece is generously coated. Cover and let it marinate in the fridge for at least 30 minutes.
- Skewer the Chicken: Preheat your grill to medium-high heat. Thread the cubed chicken onto the skewers, leaving space between each piece.
- Grill The Skewers: Place the skewers on the grill and cook for about 10-12 minutes, turning occasionally until golden brown and cooked through.
- Baste and Brown: During the last few minutes of grilling, brush remaining marinade on the skewers.
- Serve Immediately: Let the skewers rest for a minute after grilling and serve them with any leftover sauce.
Notes
For a vegetarian version, substitute chicken with cubed tofu or vegetables. Enjoy with a refreshing side salad or rice.
Nutrition
- Serving Size: 1 skewer
- Calories: 320
- Sugar: 4g
- Sodium: 500mg
- Fat: 20g
- Saturated Fat: 5g
- Unsaturated Fat: 10g
- Trans Fat: 0g
- Carbohydrates: 10g
- Fiber: 1g
- Protein: 30g
- Cholesterol: 70mg
Keywords: Bang Bang Chicken, Chicken Skewers, Grill Recipes, Asian Cuisine, Appetizers, Party Food