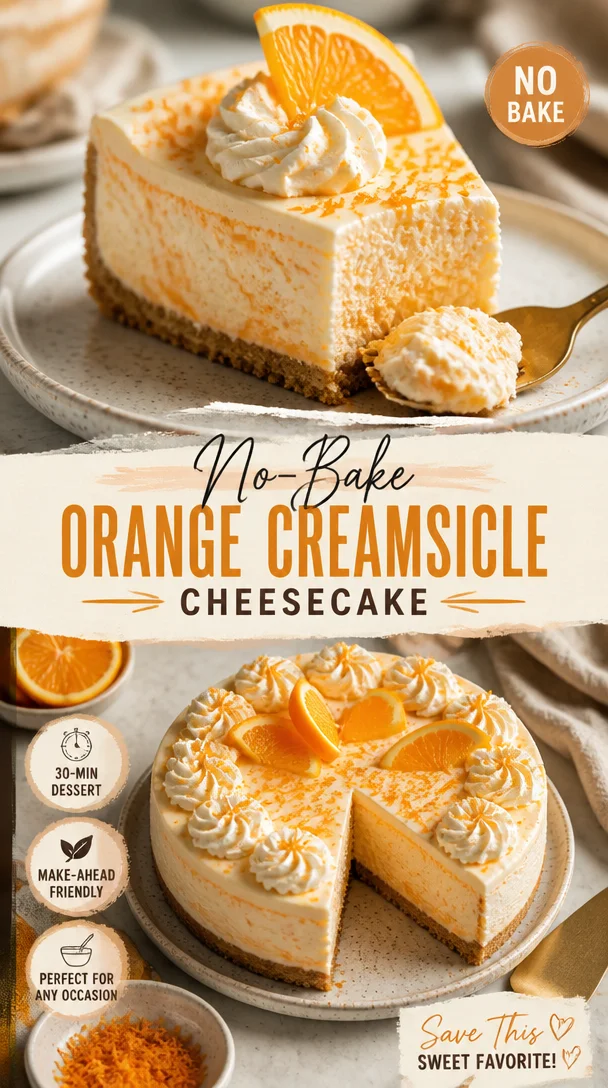
No-Bake Orange Creamsicle Cheesecake
No-Bake Orange Creamsicle Cheesecake: A Deliciously Nostalgic Treat
Hello, fellow food lovers! Today, we’re diving into the sunny world of desserts with a delightful No-Bake Orange Creamsicle Cheesecake. This sweet treat takes me back to lazy summer days filled with the joyful scents of citrus and the satisfying crunch of a graham cracker crust. If you’ve ever enjoyed the nostalgia of an ice cream truck rolling down your street on a hot summer day, this cheesecake might just be your new favorite dessert. So grab your apron, because we’re about to create something wonderfully refreshing and dreamy!
Personal Story
Growing up, my summers were always marked by the sound of the ice cream truck. Like most kids, I raced to the front yard, hoping to snag some pocket change from my parents to grab a cool treat. The creamsicle was a standout, with its bright orange exterior and creamy, dreamy center. It was a flavor that seemed to capture sunshine—totally irresistible! Fast forward to my kitchen adventures as an adult, I wanted to recreate that same joy, but with a twist. Thus, the No-Bake Orange Creamsicle Cheesecake was born! It’s an embodiment of those blissful days—the perfect refreshment for a summer gathering, or really any occasion that calls for a taste of nostalgia. Trust me, when you make this for your friends and family, you’ll not only fill their bellies, but you’ll also warm their hearts!
Ingredients
Here’s what you’ll need to whip up this beautiful cheesecake:
-
1 (3 ounce) box orange jello
The secret to that zesty orange flavor! If you don’t have jello on hand, a little orange juice concentrate can be a substitute. -
1 cup boiling water
This helps dissolve the jello easily. No boiling water? Hot tap water will work in a pinch, but it’s not quite as effective. -
2 cups Graham Cracker crumbs (about 14 sheets)
These form the crispy base of the cheesecake—a must-have! For a gluten-free option, use gluten-free graham crackers. -
6 tablespoons unsalted butter, melted
Butter brings richness and binds the crumbs together. Coconut oil can serve as a dairy-free alternative! -
Pinch of salt
A little pinch lifts the flavors and balances the sweetness. You could use a tiny bit of sea salt or even omit it if you prefer. -
2 (8 ounce) blocks cream cheese, softened
Bring this to room temperature for a creamy texture. Neufchâtel cheese can lighten up the recipe if you’d like! -
1 1/2 cups powdered sugar, divided
This sweetens the mixture—definitely a key ingredient! If you want a less sweet version, you can reduce this amount. -
2 cups heavy whipping cream
Whipping cream makes the cheesecake light and fluffy—so dreamy! If you want a non-dairy option, coconut cream works wonders. -
1/2 teaspoon vanilla extract
For that little extra depth of flavor! You can use almond extract for a unique twist. -
Zest of 1 orange (optional)
This adds an extra burst of orange flavor and color! Feel free to skip if you’re in a rush; this cheesecake is plenty delicious as is.
Step-by-Step Instructions
Let’s get into the heart of this recipe! Follow these steps for a perfectly creamy, light cheesecake that captures all that orange dreams are made of:
-
Dissolve the Jello
In a small mixing bowl, combine the orange jello powder with the boiling water. Stir until the mixture is fully dissolved. This will be your flavor powerhouse! Set it aside to cool slightly while we prepare the crust. -
Prepare the Crust
In a medium mixing bowl, combine the Graham cracker crumbs, melted butter, and a pinch of salt. Mix until the crumbs are fully coated and resemble wet sand. Transfer this mixture to a 9-inch springform pan. Press firmly into the bottom to create an even layer. Use the bottom of a measuring cup to help you get a sturdy crust! -
Beat the Cream Cheese
In a large mixing bowl, beat the softened cream cheese with an electric mixer on medium speed until smooth and creamy. This process is key—overlook it, and you might have lumps. Remember to scrape down the sides of the bowl periodically to ensure everything is evenly incorporated. -
Sweeten It Up
Gradually add in 1 cup of powdered sugar while continuing to mix. Beat until fully combined and creamy. Taste it here! You can adjust the sweetness if needed. -
Incorporate the Whipping Cream
In a separate bowl, whip the heavy cream until stiff peaks form—that’s your perfect whipped cream! Use a spatula to fold this into your cream cheese mixture gently; it will lighten up the texture beautifully. Aim for a light, airy mix, but be careful not to deflate it! -
Add the Jello Mixture
Now, gently fold in the cooled jello mixture and the vanilla extract. This step is where the magic happens! Combine thoroughly, but be gentle—this is what keeps your cheesecake fluffy. -
Zest it Up (Optional)
If you’re feeling adventurous, add the orange zest here for an extra citrusy kick. Fold it in carefully to maintain that lightness. -
Pour and Chill
Transfer the cheesecake mixture into the prepared crust, smoothing the top with a spatula. Cover it with plastic wrap and refrigerate for at least 4 hours, or ideally overnight. This will set it to perfection!
Serving Suggestions
When it’s time to unveil your masterpiece, carefully remove the springform pan. You can serve it as-is for a simple presentation, or dress it up a bit! Garnish slices with fresh orange slices, a dollop of whipped cream, or even a sprinkle of extra orange zest for a dazzling finish. You might even consider pairing this cheesecake with a refreshing herbal tea or a glass of sparkling water to balance the sweetness.
Recipe Variations
- Fruit Toppings: Top each slice with fresh berries or a citrus salad for a colorful burst of flavor.
- Chocolate Drizzle: For a fun twist, drizzle melted chocolate over the top before serving. Orange and chocolate are a match made in heaven!
- Coconut Cream: Replace half the cream cheese with coconut cream for a tropical vibe.
- Lower Sugar: Swap out the powdered sugar for a sugar substitute if you’re monitoring your sugar intake.
- Add Spice: Try adding a pinch of nutmeg or cinnamon to the cream cheese mixture for a different flavor profile that complements the orange beautifully!
Chef’s Notes
This No-Bake Orange Creamsicle Cheesecake is not only delicious but incredibly versatile! While I’ve used orange jello for that nostalgic flavor, experimenting with lemon or even cherry jello can yield fantastic results. It’s transformed at the drop of a hat, and I love introducing new flavors based on the season or my mood! One time, I used leftover summer fruit to make a layer on top, which turned out to be a delightful surprise for my dinner guests. Just remember, while this cheesecake looks elegant, the simplicity of making it is part of the charm. Enjoy the process as much as the result!
FAQs and Troubleshooting
1. Why is my cheesecake not setting?
If your cheesecake isn’t setting, it may need more time in the fridge. Make sure you let it chill for at least 4 hours, but overnight is best for ideal firmness.
2. Can I use a different type of crust?
Absolutely! You can use any cookie crust or even a nut crust. Just make sure to adjust the butter accordingly depending on your choice.
3. My cream cheese is lumpy; what did I do wrong?
To prevent lumpy cream cheese, make sure it’s at room temperature before beating. Cold cream cheese doesn’t blend well!
4. How long will this cheesecake last in the refrigerator?
The No-Bake Orange Creamsicle Cheesecake will keep well covered in the fridge for about 4-5 days—perfect for keepers of leftovers!
Nutritional Info
(Nutritional content will vary based on portion size and ingredient brands, so it’s always good to calculate it based on your specific ingredients.)
So, there you have it! A No-Bake Orange Creamsicle Cheesecake that’s as easy to make as it is joyful to eat. Invite your friends over, savor a slice, and relive the carefree delight of summer all year long. Happy baking, and remember: good food is best shared! Cheers!
PrintNo-Bake Orange Creamsicle Cheesecake
A delightful and nostalgic no-bake cheesecake that captures the refreshing flavors of orange creamsicles, perfect for summer gatherings.
- Prep Time: 20 minutes
- Cook Time: 0 minutes
- Total Time: 240 minutes
- Yield: 8 servings 1x
- Category: Dessert
- Method: No-Bake
- Cuisine: American
- Diet: Vegetarian
Ingredients
- 1 (3 ounce) box orange jello
- 1 cup boiling water
- 2 cups graham cracker crumbs (about 14 sheets)
- 6 tablespoons unsalted butter, melted
- Pinch of salt
- 2 (8 ounce) blocks cream cheese, softened
- 1 1/2 cups powdered sugar, divided
- 2 cups heavy whipping cream
- 1/2 teaspoon vanilla extract
- Zest of 1 orange (optional)
Instructions
- Dissolve the Jello: In a small mixing bowl, combine the orange jello powder with the boiling water. Stir until fully dissolved and set aside to cool.
- Prepare the Crust: In a medium mixing bowl, combine the graham cracker crumbs, melted butter, and a pinch of salt. Mix until the crumbs resemble wet sand, then press firmly into a 9-inch springform pan.
- Beat the Cream Cheese: In a large mixing bowl, beat the softened cream cheese until smooth. Scrape down the sides to ensure an even texture.
- Sweeten It Up: Gradually add 1 cup of powdered sugar and mix until fully combined and creamy. Adjust sweetness if necessary.
- Incorporate the Whipping Cream: In a separate bowl, whip the heavy cream until stiff peaks form. Gently fold into the cream cheese mixture.
- Add the Jello Mixture: Gently fold in the cooled jello mixture and vanilla extract, combining thoroughly yet gently.
- Zest it Up (Optional): Fold in orange zest for an extra burst of flavor, if using.
- Pour and Chill: Transfer the cheesecake mixture into the prepared crust, smoothing the top. Cover and refrigerate for at least 4 hours, preferably overnight.
Notes
Garnish slices with fresh orange slices or a dollop of whipped cream for extra flair. This cheesecake can also be varied with different jello flavors and toppings.
Nutrition
- Serving Size: 1 slice
- Calories: 400
- Sugar: 27g
- Sodium: 300mg
- Fat: 28g
- Saturated Fat: 16g
- Unsaturated Fat: 8g
- Trans Fat: 0g
- Carbohydrates: 38g
- Fiber: 1g
- Protein: 4g
- Cholesterol: 65mg
Keywords: cheesecake, no-bake, orange, dessert, summer, creamy, nostalgic

Oreo Cheesecake
Indulge in Decadence: The Ultimate Oreo Cheesecake Recipe
Hello, fellow food lovers! Today, I’m excited to share with you a recipe that’s near and dear to my heart—Oreo Cheesecake. If you love the rich creaminess of classic cheesecake and the delightful crunch of Oreos, then this dessert is about to sweep you off your feet. Think of it as a delicious hug in dessert form.
A Slice of Nostalgia
Let me take you back to a sunny afternoon when I was in my late teens. My best friend and I decided it was time for a baking showdown. Both of us had an affinity for sweets, especially anything chocolatey. After some epic back-and-forth banter, we both settled on the idea of making cheesecake. But not just any cheesecake—an Oreo cheesecake.
Strapped with aprons and armed with ample bags of Oreos, we turned our tiny kitchen into a bustling bakery. There was flour flying, laughter echoing, and maybe a minor meltdown when we nearly burnt the crust. But moments like these create the best memories. After hours of mixing and mastering our cheesecakes, we finally sat down to taste the fruits of our labor. The creamy, rich filling blended flawlessly with the chocolatey crunch of the Oreos. It was pure magic! Thus began my love affair with cheesecake, filled with experiments, tweaks, and, of course, a sprinkle of joyful chaos.
Ingredients
Here’s what you’ll need for this decadent Oreo Cheesecake, along with some handy tips:
-
63 Oreos: The star of the show! Use regular Oreos for the classic chocolate flavor. If you want to switch it up, try using golden Oreos or mint-flavored ones for a twist!
-
2 tablespoons unsalted butter: This adds richness to the crust. You can substitute with coconut oil for a dairy-free option.
-
16 oz cream cheese, softened: Make sure it’s at room temperature for a smooth, creamy consistency when mixing. You can use a full-fat or even a lighter cream cheese if preferred, just avoid non-fat versions, as they won’t yield the same richness.
-
1 cup granulated sugar: This balances the creaminess. If you’re cutting down on sugar, you can use a sugar substitute like stevia, but keep in mind it may alter the texture a bit.
-
1 teaspoon vanilla extract: A natural vanilla extract enhances the flavor. If you’re in a pinch, you can use imitation vanilla, but the taste will differ slightly.
-
4 large eggs: Make sure they’re at room temperature to help the cheesecake bake evenly. If you’re vegan, you can substitute this with flax eggs (1 tablespoon ground flaxseed mixed with 2.5 tablespoons water per egg, let sit for 5 minutes).
-
1 cup heavy cream: This gives the cheesecake a luscious texture. You can use whipped coconut cream for a dairy-free version.
-
1 cup chocolate chips: Semi-sweet or dark chocolate adds a wonderful richness. For an even sweeter bite, opt for milk chocolate chips.
Step-by-Step Instructions
Let’s dive into the delightful process of creating this Oreo Cheesecake!
-
Prep Your Space: Preheat your oven to 325°F (160°C). This ensures even cooking right from the get-go. Meanwhile, grab a 9-inch springform pan, grease it lightly, and set it aside.
-
Make the Crust: In a food processor, combine 36 Oreos (yes, we’re using half the package!) and pulverize them into fine crumbs. This is the moment when you can really let loose—feel free to sneak a few bites of Oreos; you deserve it! Once crushed, add the melted butter and pulse until the mixture resembles wet sand. Transfer the mixture to your prepared pan, and press it firmly into the bottom and slightly up the sides. You want a sturdy crust here! Bake for about 10 minutes, then allow to cool while you whip up the filling.
-
Cheesecake Filling: In a large mixing bowl, beat the softened cream cheese with an electric mixer until smooth and creamy. This is where patience comes in; a well-beaten cream cheese is the key to avoiding lumps in your cheesecake. Gradually add in the sugar and continue to mix. Once combined, add in the vanilla extract, and mix until combined. One by one, mix in the eggs, making sure each one is fully incorporated. Scrape down the sides of the bowl as needed.
-
Add the Heavy Cream: Pour in the heavy cream, and mix until it’s all silky and blended. For an added touch, briefly stir in half of the crushed remaining Oreos (the other half will go on top later).
-
Assemble the Cheesecake: Carefully pour the cheesecake filling over the cooled crust, smoothing out the top with a spatula. Pop it in the oven for about 60–70 minutes. You want the edges to be set, but the center should still have a slight jiggle when you gently shake it. Don’t worry; it will firm up as it cools!
-
Cool and Chill: After baking, turn the oven off and crack the oven door. Allow the cheesecake to cool in the oven for about an hour (this prevents cracking). Then transfer it to a wire rack to cool completely. Once cooled, cover it and chill in the fridge for at least 4 hours, or preferably overnight. The waiting is tough, but trust me—it’s worth it!
-
Ultimate Topping: Before serving, melt the chocolate chips in a microwave-safe bowl, heating in short bursts of 20 seconds so you don’t scorch them. Drizzle this melted goodness over the chilled cheesecake. Crumble the remaining Oreos and sprinkle them on top for that extra crunch. And voila—your cheesecake is now ready to shine!
Serving Suggestions
Slice your Oreo cheesecake with a sharp knife and serve it on beautiful plates. I love dolloping some whipped cream on each slice and a sprinkle of crushed Oreos for that extra touch. You might also lay down a bed of fresh raspberries or strawberries alongside each slice for a delightful contrast in flavor and presentation. If you’re feeling extra fancy, serve with a side of chocolate sauce for drizzling!
Recipe Variations
Feel free to get creative with this Oreo cheesecake. Here are a few variations to inspire you:
-
Mint Oreo Cheesecake: Use mint-flavored Oreos and add a splash of peppermint extract to the filling for a refreshing twist.
-
Peanut Butter Lovers: Swirl in some creamy peanut butter into the filling before baking for a delightful peanut butter Oreo cheesecake.
-
Pumpkin Spice: Mix in half a cup of pumpkin puree and a teaspoon of pumpkin spice for a festive flavor in the fall.
-
Nutty Delight: Incorporate crushed nuts like pecans or walnuts in the crust for a delightful crunch.
-
Low-Sugar Option: Replace sugar with a sugar substitute and follow the previous substitution tips to create a healthier version.
Chef’s Notes
This recipe has followed me through countless family dinners, birthdays, and celebrations. I remember once forgetting to take my cheesecake out of the oven in time and being left with an extremely jiggly center. So, I wrapped it in chocolate ganache and called it a “molten cheesecake.” It was a hit! While baking can come with some surprises, learning to pivot and adapt can lead to delightful kitchen adventures.
Over the years, I’ve perfected this Oreo cheesecake, slowly tweaking the ratios and playing with flavors. It’s funny how a recipe can evolve, much like our culinary skills!
FAQs and Troubleshooting
-
Why did my cheesecake crack? Cracks can happen when the cheesecake is baked at too high a temperature or if it cools too quickly. To prevent this, make sure to bake it low and slow, and let it cool gradually in the oven.
-
Can I make this cheesecake in advance? Absolutely! In fact, it’s best to make this cheesecake a day ahead. The flavors meld beautifully after chilling overnight.
-
How do I know when the cheesecake is done? The edges should be set with a slight jiggle in the middle. It will continue to firm up as it cools.
-
What’s the best way to cut a cheesecake? For clean slices, use a sharp knife and dip it in hot water, then wipe it dry before cutting each piece. This helps achieve that perfect, clean edge!
Nutritional Info (optional)
Serves: 12
Calories per slice: Approximately 440 calories
Total Fat: 30g
Saturated Fat: 18g
Carbohydrates: 36g
Sugar: 26g
Protein: 6g
Thank you for stopping by today, fellow foodies! I can’t wait to see your take on this Oreo Cheesecake. Remember, the kitchen is the heart of the home, so embrace the joy of cooking, and always keep experimenting. Until next time, happy baking, and don’t forget to gather your loved ones around the table—after all, that’s what great food is all about!
PrintOreo Cheesecake

Indulge in the rich creaminess of this classic Oreo Cheesecake, combining the delightful crunch of Oreos with a smooth filling.
- Prep Time: 30 minutes
- Cook Time: 70 minutes
- Total Time: 4 hours 30 minutes
- Yield: 12 servings 1x
- Category: Dessert
- Method: Baking
- Cuisine: American
- Diet: Vegetarian
Ingredients
- 63 Oreos
- 2 tablespoons unsalted butter
- 16 oz cream cheese, softened
- 1 cup granulated sugar
- 1 teaspoon vanilla extract
- 4 large eggs
- 1 cup heavy cream
- 1 cup chocolate chips
Instructions
- Preheat your oven to 325°F (160°C).
- Combine 36 Oreos in a food processor and pulverize into fine crumbs.
- Add the melted butter and pulse until resembling wet sand.
- Transfer the mixture to the prepared pan, pressing it firmly into the bottom.
- Bake for about 10 minutes, then allow to cool.
- Beat the softened cream cheese with an electric mixer until smooth.
- Add in the sugar and vanilla extract, mixing until combined.
- Incorporate the eggs one by one, mixing fully.
- Pour in the heavy cream and mix until silky.
- Pour the cheesecake filling over the cooled crust.
- Bake for about 60–70 minutes.
- Cool the cheesecake in the oven for about an hour.
- Chill in the fridge for at least 4 hours.
- Melt the chocolate chips and drizzle over the cheesecake before serving.
- Crumble the remaining Oreos and sprinkle on top.
Notes
Serve with whipped cream and fresh berries for an extra touch.
Nutrition
- Serving Size: 1 slice
- Calories: 440
- Sugar: 26g
- Sodium: 400mg
- Fat: 30g
- Saturated Fat: 18g
- Unsaturated Fat: 8g
- Trans Fat: 0g
- Carbohydrates: 36g
- Fiber: 1g
- Protein: 6g
- Cholesterol: 90mg
Keywords: Oreo, Cheesecake, Dessert, Chocolate, Baking

Ingredient Peach Cobbler Cheesecake
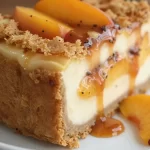
Sweet Harmony: Peach Cobbler Cheesecake Recipe
Hello, dear friends! Today, I’m excited to bring you a delightful fusion of two classic desserts: Peach Cobbler and Cheesecake. Yes, you heard that right! This Peach Cobbler Cheesecake combines the creamy decadence of cheesecake with the warm, comforting essence of summer peaches and that buttery, crumbly topping we all love. It’s like a dreamy hug on a plate, and let me tell you, it’s a showstopper that’ll impress your guests or make a quiet evening at home feel extra special.
A Slice of Nostalgia
Before we jump into this enticing recipe, I want to share a little story with you. Growing up, my family would gather every summer for a big peach-picking weekend. The smell of ripe peaches filled the air, and the sun-kissed fruits glistened like jewels on the trees. We would spend the day plucking peaches and brainstorming all the delicious things we could make with them.
One summer, my grandmother introduced me to her famous peach cobbler. I can still picture her in the kitchen, humming to her favorite tunes as she mixed and poured. She taught me that cooking is about love, creativity, and, most importantly, sharing. Her cobbler was always a hit, and the leftovers (if there were any!) would mysteriously vanish by morning. This recipe is a tribute to those cherished memories and the joy of sharing good food with loved ones.
Ingredients
Here’s what you’ll need to create this Peach Cobbler Cheesecake masterpiece:
-
1 ½ cups graham cracker crumbs
These provide the perfect buttery base and a subtle crunch. If you’re feeling adventurous, try using crushed vanilla wafers for a twist! -
½ cup unsalted butter, melted
This binds the crumbs together and gives the crust its delicious richness. Make sure it’s unsalted to control the overall saltiness of the dessert. -
2 cups cream cheese, softened
The star of our cheesecake! It creates that rich, creamy texture. If you’re looking for a lighter option, you can use Neufchâtel cheese (it’s lower in fat!). -
1 cup granulated sugar
This sweetens our cheesecake filling. If you’re trying to cut back on sugar, consider using a sweetener like monk fruit or a reduced-sugar alternative. -
1 teaspoon vanilla extract
For that warm, aromatic flavor that makes everything better! A splash of almond extract can also elevate the taste. -
3 large eggs
They add structure and help set the cheesecake. Want an egg-free version? You can substitute each egg with ¼ cup unsweetened applesauce. -
2 cups fresh peaches, sliced
Use ripe, juicy peaches for the best flavor. If peaches are out of season, frozen peaches work too—just make sure to thaw and drain them well first! -
½ cup brown sugar
This gives an extra caramel-like flavor to the peaches and enhances their sweetness. Don’t have brown sugar? A mix of white sugar and a bit of molasses can do the trick! -
1 teaspoon cinnamon
A warm spice that complements the peaches perfectly. Feel free to experiment with nutmeg or even pumpkin pie spice! -
1 tablespoon cornstarch
This helps thicken the peach mixture and gives it that delectable saucy quality. Arrowroot powder can be substituted if preferred. -
1 tablespoon lemon juice
A splash of acidity to balance the sweetness. Lime juice can be a nice alternative and adds a fun twist!
Step-by-Step Instructions
Alright, let’s get cooking! Follow these steps to create your Peach Cobbler Cheesecake.
-
Preheat Your Oven:
Begin by preheating your oven to 325°F (163°C). This allows the cheesecake to bake evenly, creating that perfectly creamy texture we all love. -
Prepare the Crust:
In a mixing bowl, combine the graham cracker crumbs and melted butter until the mixture resembles wet sand. Press this mixture firmly into the bottom of a 9-inch springform pan. Make sure it’s compact, as this will hold everything together. Plus, a little tip: you can use the bottom of a measuring cup to smooth it out perfectly! -
Bake the Crust:
Pop the crust into your preheated oven for about 8-10 minutes or until it’s lightly golden. This helps set the crust, ensuring it holds up against the creamy cheesecake filling. Let it cool while we work on the filling. -
Make the Filling:
In a mixing bowl, beat the softened cream cheese until smooth (about 2 minutes). Gradually add the granulated sugar and beat until combined. We want that mixture creamy and dreamy! Scrape down the sides of the bowl to catch any lumps—no one likes unexpected lumps in their cheesecake! -
Add Vanilla and Eggs:
Stir in the vanilla extract. Then, add the eggs, one at a time, beating on low speed after each addition until just combined. Be careful not to over-mix here; we want a light and fluffy texture, not an airy one. -
Prepare the Peach Layer:
In a small bowl, toss the sliced peaches with brown sugar, cinnamon, cornstarch, and lemon juice. Let them sit for about 10 minutes until they’re nice and juicy. The natural flavors will meld beautifully, creating an incredible topping for our cheesecake. -
Layer It Up:
Pour half of the cheesecake mixture over the cooled crust, then carefully layer half of the peach mixture on top. Follow with the remaining cheesecake filling and sprinkle the rest of the peaches on top. Don’t worry about perfection; this is all part of the charm! -
Bake the Cheesecake:
Bake in the oven for about 60-70 minutes until the edges are set, but the center still slightly jiggles (it will set more as it cools). Here’s a little chef hack: to prevent cracking, you can place a shallow pan of water in the oven alongside the cheesecake. It creates steam and keeps your cheesecake from drying out. -
Cool and Chill:
Once it’s done, turn off the oven and leave the cheesecake inside for an additional hour, cracking the door slightly. This allows it to cool gradually, reducing the chances of cracks. After an hour, let it cool fully before transferring it to the refrigerator to chill for at least 4 hours (or overnight if you can handle the wait!).
Serving Suggestions
When it’s finally time to serve your Peach Cobbler Cheesecake, carefully run a knife around the edge of the springform pan before releasing the sides. You can serve it plain, or dress it up with a dollop of whipped cream or a scoop of vanilla ice cream on the side—you can never go wrong with that classic combination!
Recipe Variations
- Add Crunch: Mix in some chopped pecans or walnuts to the peach layer for added texture.
- Flavor Substitutions: Try using blueberries or raspberries instead of peaches for a berry cobbler cheesecake surprise.
- Healthy Twist: Swap out the graham crackers for almond flour or oat flour to make a gluten-free crust without sacrificing flavor.
- Celebrate Fall: Feel free to mix in some pumpkin puree into the cheesecake batter for a seasonal variation!
- Dairy-Free Delight: Use cashew cream and a dairy-free butter substitute to make a vegan version without sacrificing creaminess.
Chef’s Notes
This recipe has evolved from my traditional peach cobbler. Initially, I had a simple, straightforward way of making it, but over the years it morphed into a creamy cheesecake that carries that nostalgic flavor of my grandma’s cobbler. I’m constantly amazed at how the simplest of ingredients can turn into something so exquisite. I still remember one time making it for a picnic—by the time we reached our destination, the cheesecake was gone! Everyone raved about it, wanting the recipe immediately. I couldn’t help but smile, knowing it brought a little joy to their day!
FAQs and Troubleshooting
Q: Why does my cheesecake have cracks on the surface?
A: Cracking can happen due to overmixing the batter or baking it at too high of a temperature. Always mix on low speed and try to bake it in a water bath for extra moisture.
Q: How do I know my cheesecake is done?
A: The edges should be set, but the center will still have a slight jiggle when you gently shake the pan. It will firm up more as it cools.
Q: Can I freeze my Peach Cobbler Cheesecake?
A: Absolutely! To freeze, cover the cooled cheesecake tightly with plastic wrap and then again with aluminum foil. It can be frozen for up to 2 months. Just thaw in the fridge overnight before serving.
Q: What if I don’t have fresh peaches?
A: No worries! Frozen peaches work perfectly. Just be sure to thaw and drain any excess liquid to avoid a soggy cheesecake.
Conclusion
And there you have it, my dear friends! A beautiful Peach Cobbler Cheesecake that’s sure to become a treasured recipe in your collection. Not only does it blend two beloved desserts into one, but it also carries with it a personal story—a reminder of the joy that comes from gathering around the table and sharing moments with those we love.
So, gather your favorite people, tie on your apron, and get ready to create something incredible. And remember, as you whip up this delightful dessert, it’s not just about the ingredients; it’s about the love and intention you put into it. Enjoy every bite, and happy cooking!
PrintPeach Cobbler Cheesecake
A delightful fusion of creamy cheesecake and warm, comforting peach cobbler, perfect for impressing guests or enjoying at home.
- Prep Time: 20 minutes
- Cook Time: 70 minutes
- Total Time: 90 minutes
- Yield: 8 servings 1x
- Category: Dessert
- Method: Baking
- Cuisine: American
- Diet: Vegetarian
Ingredients
- 1 ½ cups graham cracker crumbs
- ½ cup unsalted butter, melted
- 2 cups cream cheese, softened
- 1 cup granulated sugar
- 1 teaspoon vanilla extract
- 3 large eggs
- 2 cups fresh peaches, sliced
- ½ cup brown sugar
- 1 teaspoon cinnamon
- 1 tablespoon cornstarch
- 1 tablespoon lemon juice
Instructions
- Preheat your oven to 325°F (163°C).
- Combine the graham cracker crumbs and melted butter until the mixture resembles wet sand. Press into the bottom of a 9-inch springform pan.
- Bake the crust for about 8-10 minutes until lightly golden. Let it cool.
- Beat the softened cream cheese until smooth, then gradually add the granulated sugar and mix.
- Stir in the vanilla extract and add the eggs one at a time, mixing on low speed until just combined.
- Toss the sliced peaches with brown sugar, cinnamon, cornstarch, and lemon juice, then let sit for about 10 minutes.
- Pour half of the cheesecake mixture over the cooled crust, layer half of the peach mixture on top, then add the remaining cheesecake filling and the rest of the peaches.
- Bake in the oven for about 60-70 minutes until the edges are set but the center still jiggles.
- Cool the cheesecake inside the oven for an hour with the door slightly cracked, then refrigerate for at least 4 hours.
Notes
Serve plain or with whipped cream or vanilla ice cream. You can also mix in nuts for added texture or swap fruits for variations.
Nutrition
- Serving Size: 1 slice
- Calories: 400
- Sugar: 25g
- Sodium: 300mg
- Fat: 25g
- Saturated Fat: 15g
- Unsaturated Fat: 5g
- Trans Fat: 0g
- Carbohydrates: 45g
- Fiber: 2g
- Protein: 6g
- Cholesterol: 90mg
Keywords: peach cobbler, cheesecake, dessert, summer dessert, fruity cheesecake

Honey Lavender Cheesecake Recipe
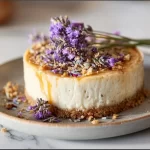
Indulge in Elegance: Honey Lavender Cheesecake Recipe
Hello, fellow food lovers! Today, we’re diving into a sweet and dreamy world of flavors with my Honey Lavender Cheesecake. This delightful dessert perfectly combines the floral essence of lavender with the luscious sweetness of honey, creating a cheesecake that’s not just a feast for the palate, but also a visual delight. I can’t wait to share this recipe with you, so grab your apron and let’s get started!
A Sweet Memory
Before we jump into the recipe, I have to share a charming little story that inspired this dish. One sunny afternoon, I found myself wandering through a local farmer’s market—one of my favorite weekend rituals. As I strolled past colorful stalls, a delicate aroma caught my attention. It was a vendor selling lavender-infused honey, and the moment I tasted it, I was transported to a blissful moment in my childhood.
My grandmother—a culinary wizard in her own right—had a habit of incorporating unique flavors into her desserts. One summer, she decided to experiment with lavender in her cooking. We spent evenings in her cozy kitchen, blending ingredients and laughing, as the aroma of her sweet concoctions wafted through the air. That lavender honey sparked a memory, and I promised myself that one day, I would create a dessert that brought that feeling of warmth and nostalgia back. Today, we’ll bring that dream to life with this luscious Honey Lavender Cheesecake.
Ingredients
To make this exquisite cheesecake, we’ll need the following ingredients:
For the Crust:
-
1 ½ cups graham cracker crumbs
This forms the base of your cheesecake, providing a sweet, crunchy texture. If you’re looking for alternatives, digestive biscuits or crushed Oreos work beautifully, too. -
¼ cup granulated sugar
This adds sweetness to the crust. You can replace it with coconut sugar for a hint of caramel flavor or omit it entirely if you prefer a less sweet crust. -
6 tbsp unsalted butter (melted)
The butter binds the crumbs together. You can substitute it with coconut oil for a dairy-free option.
For the Filling:
-
3 (8 oz) packages cream cheese, softened
Cream cheese brings that rich, creamy texture we all love in cheesecake. Neufchâtel cheese can be used for a lighter version. -
¾ cup honey
This is the star of our recipe, adding sweetness and flavor. If you’re looking for a vegan option, you can use maple syrup or agave nectar. -
1 cup heavy cream
Heavy cream helps achieve that velvety texture. For a lighter alternative, you can use Greek yogurt, but be aware it may change the tanginess. -
3 large eggs
Eggs provide structure and stability. For a vegan alternative, use a flaxseed meal or a commercial egg replacer. -
1 tsp vanilla extract
This adds depth to the flavor. If you have the opportunity, vanilla beans would be a fantastic upgrade! -
1 tbsp dried culinary lavender
Dried lavender gives our cheesecake its unique flavor. If you can’t find it, feel free to use lavender extract instead. -
2 tbsp cornstarch
This helps to set the cheesecake. If you’re looking for a gluten-free option, you can use arrowroot powder.
For the Honey Lavender Syrup (Optional Topping):
-
½ cup honey
A sweet drizzle to enhance your cheesecake. -
1 tbsp dried culinary lavender
Keep that floral note alive! -
¼ cup water
This helps to create the syrup base.
Step-by-Step Instructions
Step 1: Prepare the Crust
-
Preheat your oven to 350°F (175°C). Let’s get that warm haven ready for our cheesecake!
-
In a large bowl, combine the graham cracker crumbs, sugar, and melted butter. Mix until everything is well combined; it should resemble damp sand.
-
Press the mixture into the bottom of a 9-inch springform pan. You want to create an even layer that’s firmly packed, so don’t be shy about applying a bit of elbow grease. A flat-bottomed glass works wonderfully for this!
-
Bake the crust for about 10 minutes, or until it’s lightly golden. This helps to caramelize the sugars and gives it a delicious crunch. Once it’s done, remove it from the oven and allow it to cool while you whip up the filling.
Step 2: Make the Filling
-
In a large mixing bowl, beat the softened cream cheese using a hand mixer or a stand mixer. You want it to be smooth and creamy—no lumps allowed! This should take about 2-3 minutes.
-
Add in the honey, and mix until it’s fully incorporated. Feel free to taste along the way. We want that perfect balance of sweetness!
-
Next, add the heavy cream and continue mixing until silky smooth. The heavy cream adds richness, so ensure it’s blended well!
-
Incorporate the eggs one at a time. Mix on low speed after each addition until just combined. You want to avoid incorporating too much air, which can lead to cracks.
-
Add the vanilla extract, dried lavender, and cornstarch. Again, mix until just combined. The lavender will give a subtle flavor that is sophisticated yet comforting.
Step 3: Bake the Cheesecake
-
Pour the filling over the cooled crust in the springform pan. Gently tap the pan on the counter to release any air bubbles—this will ensure a dense and creamy texture.
-
Bake the cheesecake for about 50-60 minutes, or until the edges are set but the center still jiggles slightly. Remember, it’s going to set more as it cools!
-
Turn off the oven and crack the door open; let the cheesecake cool in the oven for about an hour. This helps to prevent sudden temperature changes, which can cause cracking.
-
Once cooled, transfer it to the fridge and chill for at least 4 hours, ideally overnight. Trust me; the flavors will develop beautifully during that time!
Step 4: Make the Honey Lavender Syrup (Optional)
-
In a small saucepan, combine honey, dried lavender, and water. Bring it to a gentle boil over medium heat.
-
Reduce the heat and let it simmer for about 5 minutes, stirring occasionally, until thickened slightly. Strain the syrup through a fine-mesh sieve to remove the lavender buds, and allow it to cool.
Serving Suggestions
When it’s time to serve, remove the cheesecake from the springform pan and transfer it to a beautiful serving platter. Drizzle the honey lavender syrup over the top and garnish with a few sprigs of fresh lavender or some small edible flowers for that elegant touch! Slice into pieces and watch as everyone’s eyes light up.
Recipe Variations
-
Lemon Zest Twist: Add the zest of one lemon to the filling for a bright, citrusy contrast to the floral notes.
-
Chocolate Drizzle: For a richer dessert, drizzle melted dark chocolate over the cheesecake before serving.
-
Nutty Crust: Mix in some finely chopped almonds or pecans with your graham cracker crumbs for additional flavor and texture.
-
Spiced Notes: Incorporate a pinch of cardamom or cinnamon into the filling for a warm spice that complements the lavender beautifully.
-
Fruit Toppings: Fresh berries or candied citrus slices can provide a pop of flavor and color on top!
Chef’s Notes
This recipe has evolved beautifully over time! I’ve played around with different flavors, textures, and components. One of my personal favorites is swapping honey for a tart fruit puree as a topping—it brings a whole new level of freshness to the cheesecake. Also, don’t be surprised if you start serving this at every gathering; trust me, friends and family will come knocking just to get a slice!
FAQs and Troubleshooting
1. Why did my cheesecake crack?
Cracking often occurs due to rapid changes in temperature. Make sure to cool it gradually in the oven and avoid over-mixing your batter.
2. Can I make this in advance?
Absolutely! In fact, making it the day before allows the flavors to meld beautifully, so it’s perfect for planning ahead.
3. How do I store leftovers?
Store any uneaten cheesecake in an airtight container in the refrigerator for up to 5 days. It can also be frozen for longer storage—just be sure to wrap it well!
4. What can I use instead of cream cheese?
You can try a dairy-free cream cheese for a vegan option, though the texture may vary slightly. Silken tofu blended until creamy is another alternative, though it will change the flavor a bit.
Nutritional Info
While I won’t include exact nutritional information here, I encourage you to enjoy this cheesecake in moderation and savor each delightful bite. Indulgence is part of the joy of cooking!
That’s it for today, my culinary friends! Thank you so much for joining me on this journey of flavors and memories. I hope my Honey Lavender Cheesecake brings joy to your kitchen and becomes a staple in your dessert rotation. Remember, cooking is all about love and sharing. So, gather your friends and family around the table, slice up that cheesecake, and create some sweet memories! Happy baking!
PrintHoney Lavender Cheesecake
A delightful cheesecake combining the floral essence of lavender with the sweetness of honey for a dreamy dessert experience.
- Prep Time: 20 minutes
- Cook Time: 60 minutes
- Total Time: 80 minutes
- Yield: 8 servings 1x
- Category: Dessert
- Method: Baking
- Cuisine: American
- Diet: Vegetarian
Ingredients
- 1 ½ cups graham cracker crumbs
- ¼ cup granulated sugar
- 6 tbsp unsalted butter (melted)
- 3 (8 oz) packages cream cheese, softened
- ¾ cup honey
- 1 cup heavy cream
- 3 large eggs
- 1 tsp vanilla extract
- 1 tbsp dried culinary lavender
- 2 tbsp cornstarch
- ½ cup honey (for syrup)
- 1 tbsp dried culinary lavender (for syrup)
- ¼ cup water (for syrup)
Instructions
- Preheat your oven to 350°F (175°C).
- Combine the graham cracker crumbs, sugar, and melted butter in a large bowl.
- Press the mixture into the bottom of a 9-inch springform pan.
- Bake the crust for about 10 minutes until lightly golden.
- Beat the softened cream cheese until smooth and creamy.
- Add honey and mix until fully incorporated.
- Incorporate the heavy cream and mix until silky smooth.
- Add the eggs one at a time, mixing on low speed after each addition.
- Mix in vanilla extract, dried lavender, and cornstarch until just combined.
- Pour the filling over the cooled crust.
- Bake for 50-60 minutes, or until the edges are set but the center jiggles slightly.
- Turn off the oven and crack the door open, letting the cheesecake cool for about an hour.
- Chill in the fridge for at least 4 hours, ideally overnight.
- Combine honey, dried lavender, and water in a saucepan for the syrup; bring to a gentle boil.
- Simmer for about 5 minutes until thickened slightly, then strain and cool.
Notes
For a richer flavor, try adding lemon zest, chocolate drizzle, or a nutty crust variation. Store leftovers in an airtight container in the refrigerator.
Nutrition
- Serving Size: 1 slice
- Calories: 350
- Sugar: 25g
- Sodium: 300mg
- Fat: 20g
- Saturated Fat: 10g
- Unsaturated Fat: 8g
- Trans Fat: 0g
- Carbohydrates: 35g
- Fiber: 1g
- Protein: 5g
- Cholesterol: 100mg
Keywords: cheesecake, dessert, lavender, honey, baking

Mango Cheesecake
Mango Cheesecake: A Slice of Bright Paradise
Hello, fellow foodies! Grab your apron and get ready for a culinary adventure that will transport your taste buds straight to a tropical paradise. Today, we’re whipping up a delightful Mango Cheesecake that’s as luscious as a sun-drenched beach and as refreshing as a gentle ocean breeze.
This cheesecake combines the creamy richness of classic cheesecake with the vibrant sweetness of ripe mangoes, creating a dessert that feels elegant yet is surprisingly easy to make. Whether you’re planning a gathering, celebrating a special occasion, or simply in need of a little indulgence after a long week, this mango cheesecake is the perfect answer. It’s a show-stopper that impresses, yet it holds a special place in anyone’s heart who loves the simple joys of cooking and sharing delicious food.
What I adore about this dessert is its versatility; it can be a comforting after-dinner delight or a dazzling centerpiece for your dessert table. Plus, the process of making it— from crushing those graham crackers for the crust to swirling in that glorious mango purée— feels rewarding in every sense. Best of all, whether you’re an experienced home cook or just starting, I promise you’ll feel like a kitchen rockstar!
So, lean in, and let’s dive into the world of flavors, memories, and of course, a delicious mango cheesecake that will have your friends asking for seconds!
Personal Story
Growing up, one of my fondest memories revolves around family gatherings at my grandmother’s house. Every summer, my cousins and I would gather around her kitchen while she whipped up her splendid cheesecakes—each one more decadent than the last. Among them, her mango cheesecake became a family favorite.
I vividly remember the bright yellow color of the mango swirl as it danced atop the creamy filling, so inviting that a slice seemed impossible to decline. As the sunlight poured through the kitchen window, we waited impatiently for it to chill in the fridge, giggling and sharing stories while our impatient stomachs grumbled.
One detail that always stood out was Grandma’s joyful spirit, which filled the air as she shared tips and secrets about the cheesecake. “It’s all about using fresh fruit, sweethearts!” she’d say with a wink. Inspired by those cherished moments, I’ve added my little spin, making this mango cheesecake a personal tribute to her love for cooking, family, and the power of coming together over good food.
Ingredients
To embark on our mango cheesecake journey, here’s what you’ll need:
-
2 cups graham cracker crumbs
A classic base for cheesecakes, they provide that delightful crunch! If you’re feeling adventurous, try using crushed vanilla wafers or gingersnaps for a unique twist. -
1/2 cup unsalted butter, melted
This is the glue that holds your crust together. Prefer a dairy-free option? Try coconut oil—it adds a subtle tropical flavor! -
1 cup sugar, divided
Sweetness is essential! Use granulated sugar for the filling, and consider using brown sugar for an earthier flavor in the crust. -
4 (8-ounce) packages cream cheese, softened
The star of the show! Ensure it’s softened to room temperature; this makes mixing smoother. If you want a lighter version, opt for Neufchâtel cheese. -
1 teaspoon vanilla extract
This enhances flavor while bringing warmth to the cheesecake. Pure vanilla extract delivers the best flavor, but imitation works too in a pinch. -
4 large eggs
Eggs create the rich, custardy texture. If you need an egg-free option, consider using flax eggs (1 tablespoon flaxseed meal mixed with 3 tablespoons of water per egg). -
1 cup pureed mango
The key ingredient! Aim for ripe, fresh mangoes for optimum flavor. In a hurry? Use store-bought mango purée! -
1/4 cup sour cream
Adds tanginess and richness. Greek yogurt is a great substitute if you’re looking for a healthier option.
Step-by-Step Instructions
Let’s dive right into creating this delightful mango cheesecake! Gather your ingredients and let’s get cooking.
-
Preheat Your Oven: Begin by preheating your oven to 325°F (160°C). Preheating is an essential step to ensure your cheesecake sets beautifully.
-
Make the Crust: In a medium bowl, combine the graham cracker crumbs with melted butter and 1/4 cup of sugar. Mix until the crumbs are well-coated and the mixture resembles wet sand. Here’s a little tip: pressing the mixture firmly into the bottom of your springform pan creates a deliciously crunchy base. Use a measuring cup to press the crust down evenly!
-
Bake the Crust: Once your mixture is well-formed, pop it into the oven and bake for about 8-10 minutes, until it’s lightly browned. The aroma filling your kitchen will have your mouth watering—trust me! Allow it to cool as you prepare the filling.
-
Prepare the Cream Cheese Mixture: In a large mixing bowl, use a hand mixer or stand mixer to beat the softened cream cheese until it’s creamy and smooth. Dump in the remaining 3/4 cup of sugar and vanilla, mixing until fully combined. This is where the magic begins!
-
Add the Eggs: One at a time, add in the eggs, mixing well after each addition. Take care not to overmix; we want to keep the batter light and airy. An over-mixed batter can lead to a cheesecake that cracks when it bakes—nobody wants that!
-
Incorporate Mango: Gently fold in the mango puree and sour cream into the cream cheese mixture. Make sure it’s all well combined but be careful not to deflate the batter! The vibrant color of the mango is just stunning, isn’t it?
-
Pour and Smooth: Pour the cheesecake filling over the cooled crust, spreading it evenly. Now, here’s a pro tip: tap the pan gently on the countertop before baking to release any air bubbles that might be lurking in there.
-
Bake It: Bake your cheesecake in the preheated oven for about 60-70 minutes. The edges should be set, while the center has a slight jiggle—don’t worry, it will firm up as it cools! Place a shallow pan with water on the lower rack of the oven to create steam, helping to prevent cracks.
-
Cool Down: Once baked, turn off the oven and crack the door open—let the cheesecake cool gently for about an hour. This gradual cooling helps prevent cracks, so patience is key!
-
Chill: After it’s cooled, cover the cheesecake and pop it in the fridge for at least 4 hours or overnight for the best flavor. Trust me; good things come to those who wait!
Serving Suggestions
When you’re ready to serve your glorious mango cheesecake, take a moment to appreciate its beauty. I like to garnish mine with a sprinkle of crushed graham crackers on top and a few slices of fresh mango. For an extra pop of flavor, drizzle a little honey or a sprinkle of fresh mint leaves around the edges.
Slice it up, and serve each piece on a chilled plate. Your guests will be in for a treat, and if you’re hosting a gathering, just watch their smiles light up the room!
Recipe Variations
Want to get creative with your mango cheesecake? Here are some delicious twists and substitutions to consider:
-
Passion Fruit Mango Delight: Swirl in some passion fruit purée alongside the mango for an exotic flavor boost!
-
Chocolate Graham Crust: Mix cocoa powder into your graham cracker crust for a delightful chocolatey base, pairing well with the mango.
-
Coconut Cream Cheesecake: Fold in coconut cream into the batter and top with toasted coconut flakes for a tropical vibe—paradise on a plate!
-
Vegan Version: Substitute cream cheese with your favorite vegan cream cheese product, eggs with aquafaba (the water from chickpeas), and use coconut yogurt instead of sour cream for a plant-based delight.
-
Spiced Mango Cheesecake: Add a dash of cinnamon or nutmeg to the filling for a warm spice that complements the natural sweetness of the mango.
Chef’s Notes
This mango cheesecake holds a special place in my heart—like a canvas for creativity. Over the years, I’ve tinkered with spices, trying out fresh fruit variations, and even taming the sweetness to cater to different preferences. Each iteration taught me something new about balancing flavors and textures.
One time, in a rush to make this for a family gathering, I accidentally grabbed salt instead of sugar! Let’s just say, desserts and salty surprises don’t mix well… But every mistake turned out to be a lesson, reminding me that mistakes can lead to moments of joy and creativity in the kitchen.
Today, the mango cheesecake stands as a testament to loving not just the outcome, but the process! So, feel free to let your imagination run wild on this one.
FAQs and Troubleshooting
-
Why did my cheesecake crack?
Cracks often occur when the batter is overmixed or due to rapid temperature changes. To prevent this, always mix just until incorporated, and allow gradual cooling in the oven when done baking. -
Can I use frozen mango?
Absolutely! Just be sure to thaw and drain any excess liquid before puréeing. Fresh mango yields a brighter flavor, but frozen works well in a pinch. -
How do I know when my cheesecake is done?
The edges should be set, and the center should have a slight jiggle. It will firm up nicely during cooling, so trust your instincts! -
How do I store leftovers?
Cover any uneaten cheesecake and store it in the refrigerator for up to 5 days. If you’re feeling inventive, try using leftovers in a smoothie or parfait the next day!
Nutritional Info
(Insert optional nutritional info if desired. For example: A slice contains approximately 350 calories, 22g fat, 30g carbs, and 5g protein.)
Well, there you have it! A scrumptious and inviting mango cheesecake that’s sure to bring a smile to your face and those you love. It’s all about enjoying the little moments—from mixing, baking, and sharing this delightful dessert. So, tie on that apron, get to the kitchen, and create some beautiful memories with this incredible recipe. Happy baking, friends! 🍰🌞
PrintMango Cheesecake

A delightful mango cheesecake that combines creamy richness with vibrant mango sweetness, perfect for gatherings or as a comforting dessert.
- Prep Time: 30 minutes
- Cook Time: 70 minutes
- Total Time: 100 minutes
- Yield: 12 servings 1x
- Category: Dessert
- Method: Baking
- Cuisine: American
- Diet: Vegetarian
Ingredients
- 2 cups graham cracker crumbs
- 1/2 cup unsalted butter, melted
- 1 cup sugar, divided
- 4 (8-ounce) packages cream cheese, softened
- 1 teaspoon vanilla extract
- 4 large eggs
- 1 cup pureed mango
- 1/4 cup sour cream
Instructions
- Preheat your oven to 325°F (160°C).
- Make the crust by combining graham cracker crumbs, melted butter, and 1/4 cup of sugar.
- Bake the crust for about 8-10 minutes until lightly browned. Allow it to cool.
- Prepare the cream cheese mixture by beating cream cheese until creamy, then mixing in 3/4 cup of sugar and vanilla extract.
- Add in the eggs one at a time, mixing well after each addition.
- Incorporate the mango puree and sour cream into the mixture gently.
- Pour the filling over the cooled crust, smoothing it out.
- Bake for 60-70 minutes until the edges are set and the center has a slight jiggle.
- Cool the cheesecake in the oven with the door cracked for about an hour.
- Chill in the refrigerator for at least 4 hours or overnight.
Notes
For best results, let the cheesecake cool gradually and chill overnight for optimal flavor.
Nutrition
- Serving Size: 1 slice
- Calories: 350
- Sugar: 22g
- Sodium: 300mg
- Fat: 22g
- Saturated Fat: 12g
- Unsaturated Fat: 8g
- Trans Fat: 0g
- Carbohydrates: 30g
- Fiber: 1g
- Protein: 5g
- Cholesterol: 100mg
Keywords: cheesecake, mango dessert, tropical cheesecake, summer dessert, easy cheesecake

Peach Cobbler Cheesecake Fruit Salad Recipe
# Peach Cobbler Cheesecake Fruit Salad Recipe: A Sweet Summer Delight

Welcome, fellow culinary enthusiasts! If you’ve ever found yourself in the kitchen, pondering how to celebrate summer’s bounty, you’re in for a treat today. It’s time to steal a moment, tie on that trusty apron, and whip up a Peach Cobbler Cheesecake Fruit Salad that will have your taste buds dancing with delight. This dessert is everything you love about summer—fresh peaches, creamy cheesecake goodness, and just a hint of nostalgia, all nestled together for an unparalleled flavor experience.

## A Sweet Memory of Summer Picnics

Like many of you, my journey into the world of food began with cherished moments around the table. I fondly remember summer picnics at my grandmother’s house, where a spread of vibrant dishes and desserts filled the backyard table. One particular memory stands out—Grandma’s peach cobbler. The aroma of sweet peaches mingled with cinnamon wafting through the air was pure magic. It was always the highlight of our gatherings, drawing everyone in for a slice.

Those sunny days made me realize that food isn’t just about taste—it’s about connection. Inspired by Grandma's cobbler, I thought, why not reinvent it in a way that accommodates busy lives while preserving that warm nostalgia? Enter the Peach Cobbler Cheesecake Fruit Salad, a delightful twist that merges creamy cheesecake with the freshness of juicy peaches. So, gather your loved ones and let’s create something beautiful together!

## Ingredients

Here's what you'll need to make this delightful dish:

- **4 fresh peaches, chopped**
  Fresh peaches are the star of the show! Use ripe, juicy peaches for the best flavor. If peaches aren’t in season, feel free to swap in nectarines or canned peaches (just make sure to drain them well).

- **8 oz cream cheese, softened**
  Cream cheese adds that rich, velvety texture reminiscent of cheesecake. Soften it for at least 30 minutes at room temperature for easy mixing. You can substitute with mascarpone cheese for a creamier finish.

- **1 cup sour cream**
  This ingredient helps lighten up the cream cheese and adds a lovely tang. Greek yogurt is a fantastic substitute if you’re looking for a lighter option.

- **1/2 cup granulated sugar**
  Just the right amount of sweetness to balance the flavors. If you prefer a healthier alternative, try using honey or maple syrup, keeping in mind to adjust the quantities since they are sweeter!

- **1 tsp vanilla extract**
  Vanilla adds depth to your cheesecake flavor. Always opt for pure vanilla extract; the difference in flavor is worth it!

- **1/2 tsp cinnamon**
  Cinnamon enhances that peach cobbler essence. Feel free to add a pinch more if you love that warm spice!

- **1 cup mini marshmallows**
  These fluffy bites add a playful texture and hint of sweetness. You can swap regular marshmallows if that’s what you have on hand, or even omit them if you’re looking to keep it simpler.

- **1/2 cup chopped nuts (optional)**
  A crunch factor! These add a wonderful contrast to the creamy salad. Pecans or walnuts work beautifully, but skip them if you have nut allergies.


## Step-by-Step Instructions

Time to roll up those sleeves and get cooking! Here’s how to bring this delightful dish to life:

1. **Prep Your Ingredients**
   Start by washing and chopping your peaches into bite-sized pieces. You can peel them if desired, but I love leaving the skin on for added color and nutrition! Set them aside while you prepare the creamy base.

2. **Mix the Creamy Mixture**
   In a large mixing bowl, combine the softened cream cheese and sour cream. Use an electric mixer or a good old whisk (if you’re feeling adventurous!) and beat them together until smooth and lump-free. The goal here is to achieve an airy, creamy texture that will encapsulate the flavors of summer.

3. **Add the Sweetness**
   Gradually mix in the granulated sugar, vanilla extract, and cinnamon. Keep mixing until everything is evenly blended and the sugar dissolves into the creamy mixture. Taste it (You can’t resist, right?) and adjust sweetness as you prefer!

4. **Fold in the Peach Magic**
   Gently fold in the chopped peaches, making sure they’re evenly coated in that dreamy cream. Be gentle here—nobody wants mushy peaches! This is where you can also fold in the mini marshmallows for an added sweet surprise.

5. **Add Nuts for Crunch (Optional)**
   If you're choosing to include nuts for that extra crunch, now's the time to fold them into the mixture. Take care to combine just enough to distribute them without breaking them apart.

6. **Chill it Out**
   Once everything is mixed, cover the bowl with plastic wrap or transfer it to an airtight container. Pop it in the fridge for at least an hour—this chilling time allows the flavors to mingle and lets the marshmallows soften ever so slightly.

7. **Serve with Flair**
   When you’re ready to serve, give it a gentle stir and transfer the salad into a beautiful serving bowl. Consider garnishing with extra peach slices, a sprinkle of cinnamon, or even a dollop of whipped cream for that wow factor!


## Serving Suggestions

Presentation is key, my friends! When serving the Peach Cobbler Cheesecake Fruit Salad, consider using a clear glass bowl to showcase its vibrant colors. You might even want to layer it in individual dessert cups for an elegant touch at your next gathering. A mint leaf or two makes for an inviting garnish, hinting at the freshness of the dish. This dessert is perfect for summer BBQs, potlucks, or simply as a refreshing treat on a warm afternoon.


## Recipe Variations

While this recipe is a classic, feel free to get creative! Here are some fun twists:

- **Berry Bliss**: Substitute half of the peaches with fresh strawberries or blueberries for a mixed berry fruit salad.
- **Coconut Cream**: Add 1/2 cup of toasted coconut flakes to bring in a tropical vibe.
- **Spiced Up**: Add more spices like nutmeg or allspice for a deeper, warm flavor profile.
- **Dairy-Free Delight**: Use cashew cream and coconut yogurt to make it dairy-free and just as creamy!
- **Chocolate Lovers**: Sprinkle some chocolate chips or shavings on top for extra indulgence!


## Chef’s Notes

This recipe has evolved over the years—it started as an attempt to recreate Grandma’s peach cobbler but soon morphed into something even more versatile. One particularly memorable summer, I was short on time before hosting a picnic and needed a cooler dessert. With just a few simple ingredients and a touch of creativity, this peach cobbler cheesecake salad came to fruition! Now, I can't host a gathering without it. Plus, it’s a total crowd-pleaser!

And let me tell you, watching everyone's faces light up as they take their first bite makes my job oh-so-rewarding. It's these small, flavorful moments that make cooking so special.


## FAQs and Troubleshooting

**Q: My peaches are too hard. What should I do?**
A: If your peaches are still a bit firm, try letting them sit at room temperature for a day or two. Alternatively, you can slice them thinly and let them marinate in a bit of sugar and lemon juice for about 30 minutes to help soften them up!

**Q: Can I use frozen peaches?**
A: Absolutely! Frozen peaches work well; just thaw them and drain excess liquid before mixing into the salad.

**Q: Can this be made ahead of time?**
A: Yes, indeed! This salad is perfect for make-ahead meals. Just be sure to cover it tightly as it will help maintain its freshness.

**Q: How long will leftovers last?**
A: Your Peach Cobbler Cheesecake Fruit Salad will last for about 3–4 days in the refrigerator in an airtight container.

## Nutritional Info (Optional)

If you’re keeping track of your nutrition, here’s a quick breakdown per serving (estimate based on 8 servings):

- Calories: Approximately 210
- Protein: 4g
- Carbohydrates: 32g
- Fat: 9g
- Fiber: 1g

---

And there you have it, my friends! A refreshing, creamy, wallop of flavor that encapsulates summer in a single bite. So, are you ready to bring this Peach Cobbler Cheesecake Fruit Salad to your table? Let me know how it turns out! Tie on your apron, pour a glass of something bubbly, and enjoy every moment spent creating beautiful memories around the table. Happy cooking!
Peach Cobbler Cheesecake Fruit Salad

A delightful twist on a summer classic, merging creamy cheesecake with fresh peaches for an unforgettable fruit salad.
- Prep Time: 15 minutes
- Cook Time: 0 minutes
- Total Time: 60 minutes
- Yield: 8 servings 1x
- Category: Dessert
- Method: No-Cook
- Cuisine: American
- Diet: Vegetarian
Ingredients
- 4 fresh peaches, chopped
- 8 oz cream cheese, softened
- 1 cup sour cream
- 1/2 cup granulated sugar
- 1 tsp vanilla extract
- 1/2 tsp cinnamon
- 1 cup mini marshmallows
- 1/2 cup chopped nuts (optional)
Instructions
- Prep your ingredients by washing and chopping peaches into bite-sized pieces.
- Mix the softened cream cheese and sour cream in a large mixing bowl until smooth.
- Add the sugar, vanilla extract, and cinnamon; mix until well blended.
- Fold in the chopped peaches and mini marshmallows gently.
- Add nuts if desired, folding them into the mixture.
- Chill in the fridge for at least an hour to let the flavors meld.
- Serve in a beautiful bowl and garnish if desired.
Notes
Best served chilled; great for summer gatherings and potlucks.
Nutrition
- Serving Size: 1 serving
- Calories: 210
- Sugar: 18g
- Sodium: 150mg
- Fat: 9g
- Saturated Fat: 5g
- Unsaturated Fat: 3g
- Trans Fat: 0g
- Carbohydrates: 32g
- Fiber: 1g
- Protein: 4g
- Cholesterol: 30mg
Keywords: summer salad, peach salad, dessert, fruit salad, cheesecake