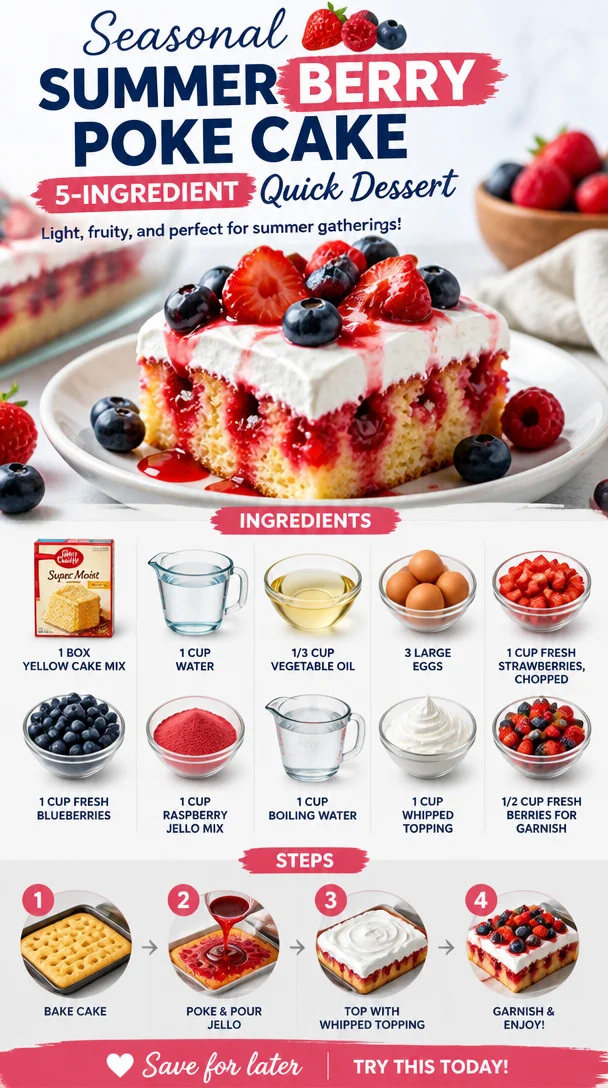
Seasonal Summer Berry Poke Cake: 5-Ingredient Quick Dessert
The Ultimate Summer Berry Poke Cake: A Burst of Flavor and Nostalgia
Hello, fellow food lovers! I can’t tell you how excited I am to share one of my all-time favorite summer desserts with you — the delightful Summer Berry Poke Cake. Think of sunshine, fresh-picked berries, and the joy of gatherings with loved ones. This lovely dessert doesn’t just taste amazing; it also has a special place in my heart, and I can’t wait to dive into the details of how it all came together.
The Memory That Inspired It All
Growing up, my grandmother was the queen of summer desserts. There was always something sweet and fruity wafting through her kitchen — from cobblers to pies, but her poke cake was the one that stole my heart. I vividly remember the sweet aroma of yellow cake baking, mingling with that fresh berry scent wafting through the air. Every summer, we would gather for family picnics, and she would proudly unveil her signature poke cake drenched in red raspberry Jell-O, topped with whipped cream and the freshest berries.
Eating that cake was always a delight, but the best memories revolved around us sitting around the picnic table, laughing and sharing stories while enjoying the splendid flavors that only summer can bring. When I created my version of her poke cake, it brought back all those warm and fuzzy feelings. I made it a little more vibrant with an extra punch of colorful berries. So, roll up your sleeves and let’s channel that summer nostalgia into the kitchen!
Ingredients
Here’s what you’ll need to create this mouthwatering cake:
-
1 box yellow cake mix
This is your base! You could switch it up with a gluten-free cake mix or even a lemon cake mix if you want to add a citrusy twist. -
1 cup water
Perfect for mixing the cake. Use cold or room temperature water; both work well, though cold water keeps the batter smooth. -
1/3 cup vegetable oil
This adds moisture and richness. If you’re looking to be a bit healthier, you could substitute with unsweetened applesauce! -
3 large eggs
Eggs provide structure. If you have egg allergies, you can use flax eggs as a binder (1 tablespoon ground flaxseed mixed with 2.5 tablespoons water equals 1 egg). -
1 cup fresh strawberries, chopped
These sweet gems are essential for that summery flavor. If strawberries are out of season, feel free to swap them for blackberries or your berry of choice! -
1 cup fresh blueberries
Antioxidant-rich and bursting with flavor, they add a delightful joy to the cake! They can also be substituted with diced peaches for a tropical flair. -
1 cup raspberry Jell-O mix
Essential for infusing flavor and color, this is what makes the cake “poke”! You could also use another flavor, like strawberry or cherry. -
1 cup boiling water
This is what dissolves the Jell-O mix, allowing it to soak beautifully into the cake. -
1 cup whipped topping
For that luscious frosting! You can use homemade whipped cream if you prefer, which will elevate the texture. -
1/2 cup fresh berries for garnish
Choose whatever berries you love — a rainbow of colors makes for an Instagram-worthy dessert!
Step-by-Step Instructions
Now that we’ve rounded up our ingredients, let’s embark on our sweet journey:
-
Preheat your Oven:
Start by preheating your oven to 350°F (175°C). This will ensure your cake bakes evenly and comes out perfectly golden. -
Mix Your Batter:
In a large mixing bowl, combine the yellow cake mix, water, vegetable oil, and eggs. Whisk until smooth. This is the fun part — get your family involved and let everyone take turns mixing. It’s a great way to create lasting memories (and get everyone a bit messy!). -
Pour and Bake:
Grease a 9×13-inch baking pan and pour in the cake batter. Bake it in the preheated oven for 25-30 minutes or until a toothpick inserted into the center comes out clean. While it’s baking, you’ll have the perfect opportunity to let the delicious aroma fill your home. -
Cool the Cake:
Once baked, allow the cake to cool in the pan for about 10-15 minutes. You want it to be warm, but not hot, before you start poking holes in it. -
Poke the Holes:
Using the handle of a wooden spoon or a straw, gently poke holes all over the top of the cake, about 1 inch apart. This is what allows that delicious Jell-O mixture to seep into the cake — trust me, it’s worth it. -
Prepare the Jell-O Mixture:
In a separate bowl, dissolve the raspberry Jell-O in 1 cup of boiling water, stirring until fully dissolved. This is where the magic begins! -
Pour the Jell-O Over the Cake:
Carefully pour the Jell-O mixture over the cake evenly, ensuring it fills in all the holes. You’ll see it start to seep into the cake, creating irresistible pockets of fruity goodness. -
Let It Chill:
Next, let the cake cool in the refrigerator for at least 2-3 hours (or overnight if you can wait that long!). This helps the flavors mingle and makes it easier to cut clean slices. -
Top It Off:
Once chilled, remove the cake from the fridge and spread the whipped topping over the top. Decorate with the fresh berries for a stunning finish. -
Slice and Serve:
You’re ready to slice into this summer delight. Serve it in generous squares and watch as your guests smile with delight!
Serving Suggestions
To elevate your serving experience, plate the slices on colorful dessert plates, and add a sprig of mint on top for a lovely pop of color. Pair slices with a scoop of vanilla ice cream or a dollop of extra whipped cream — because who can ever say no to ice cream, right?
Recipe Variations
The beauty of the Summer Berry Poke Cake is its versatility. Consider these fun variations:
- Tropical Twist: Replace berries with diced pineapple and mango for a tropical version.
- Lemon Burst: Swap out the yellow cake for lemon cake and use lemon Jell-O for a zesty kick.
- Chocolate Lover’s Dream: Use chocolate cake mix and raspberry Jell-O for a delicious chocolate-berry fusion.
- Vegan Version: Replace eggs with flax eggs, and use plant-based whipped cream.
Chef’s Notes
You know what’s great about this recipe? It’s not just a cake; it’s an experience! Each summer’s gathering and celebration becomes intertwined with this beloved poke cake. I’ll never forget the year I accidentally forgot to poke holes in the cake. My friends loved it anyway, but I resolved never to make that mistake again!
Over time, I’ve played around with flavors — from peach to lemon — but I always circle back to my original love for a strawberry-blueberry-raspberry combination. Each version reminds me of those warm summer afternoons spent with family.
FAQs and Troubleshooting
Q1: What if my cake comes out too dense?
Sometimes, if you overmix your batter, it can result in a dense cake. Just mix until the ingredients are incorporated!
Q2: Can I use frozen berries?
Absolutely! Fresh berries are great, but frozen will work too. Just ensure they’re thawed and drained before you use them to avoid excess moisture.
Q3: How do I store leftover cake?
Cover any leftover cake with plastic wrap or aluminum foil and keep it in the refrigerator for up to 3 days. Although, let’s be honest — it rarely lasts that long!
Q4: How can I tell when the cake is fully baked?
A toothpick inserted into the center of the cake should come out clean or with just a few moist crumbs. If there’s wet batter clinging to it, bake for a few more minutes and check again.
Nutritional Info
(Disclaimer: Nutritional information will vary depending on brands and ingredients used, but here’s a general ballpark per slice):
- Calories: approx. 260
- Fat: 10g
- Carbohydrates: 40g
- Protein: 2g
- Sugars: 15g
There you have it, my lovely friends! A cheerful Summer Berry Poke Cake that brings back memories of warm afternoons and joyful gatherings. So, tie on your apron and get baking! Let’s make some sweet memories this summer — one poke cake at a time!
PrintUltimate Summer Berry Poke Cake
A delightful summer dessert bursting with fresh berries and nostalgic flavors, perfect for gatherings.
- Prep Time: 15 minutes
- Cook Time: 30 minutes
- Total Time: 180 minutes
- Yield: 12 servings 1x
- Category: Dessert
- Method: Baking
- Cuisine: American
- Diet: Vegetarian
Ingredients
- 1 box yellow cake mix
- 1 cup water
- 1/3 cup vegetable oil
- 3 large eggs
- 1 cup fresh strawberries, chopped
- 1 cup fresh blueberries
- 1 cup raspberry Jell-O mix
- 1 cup boiling water
- 1 cup whipped topping
- 1/2 cup fresh berries for garnish
Instructions
- Preheat your oven to 350°F (175°C).
- Mix the yellow cake mix, water, vegetable oil, and eggs in a large mixing bowl until smooth.
- Pour the cake batter into a greased 9×13-inch baking pan and bake for 25-30 minutes.
- Cool the cake in the pan for about 10-15 minutes.
- Poke holes in the cake using a wooden spoon handle.
- Prepare the Jell-O mixture by dissolving it in 1 cup of boiling water.
- Pour the Jell-O mixture over the cake, ensuring it seeps into the holes.
- Let the cake cool in the refrigerator for at least 2-3 hours.
- Top the chilled cake with whipped topping and decorate with fresh berries.
- Slice and serve!
Notes
For additional variations, consider using diced pineapple and mango for a tropical twist, or lemon cake with lemon Jell-O for a zesty kick.
Nutrition
- Serving Size: 1 slice
- Calories: 260
- Sugar: 15g
- Sodium: 200mg
- Fat: 10g
- Saturated Fat: 1.5g
- Unsaturated Fat: 8g
- Trans Fat: 0g
- Carbohydrates: 40g
- Fiber: 1g
- Protein: 3g
- Cholesterol: 50mg
Keywords: Summer, Berry, Poke Cake, Dessert, Refreshing, Nostalgic
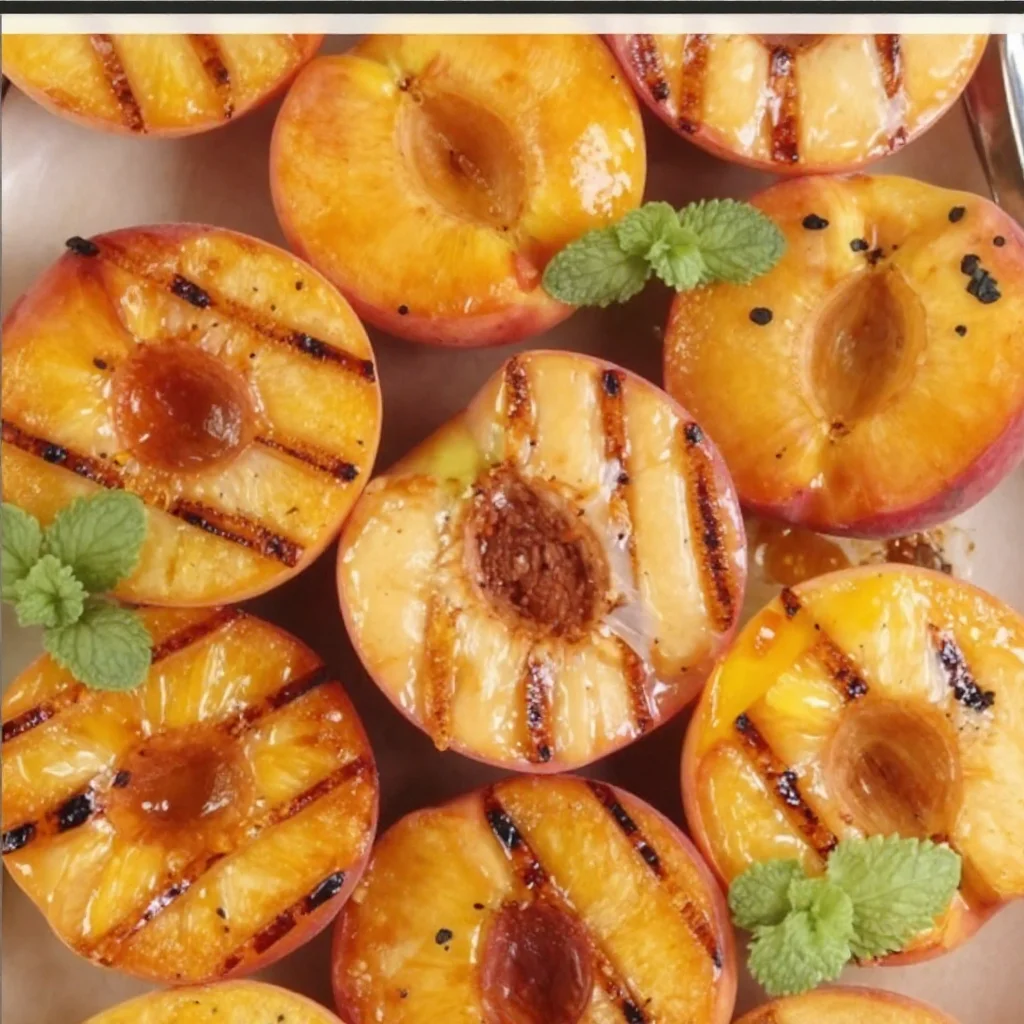
Minute Grilled Cinnamon Peaches: Quick Summer Treat
Grilled Peaches with Cinnamon: A Sweet Summer Delight
Hello and welcome back, foodie friends! Today, we’re stepping into a world of sweet indulgence with a delightful recipe that embodies the essence of summer: Grilled Peaches with Cinnamon. If you’re a fan of simple, delicious desserts that look like you’ve embraced your inner gourmet chef, you’re in for a treat!
Imagine this: the sun is shining, you’re outside enjoying a leisurely afternoon, and the smell of peaches caramelizing on the grill fills the air. This isn’t just a recipe; it’s a celebration of summer flavors that will transform how you enjoy one of nature’s sweetest offerings. Grilling brings out the natural sugars in the fruit, creating little bites of heaven that are juicy and tender, with a touch of warmth and spice from the cinnamon. A scoop of vanilla ice cream on top, or a drizzle of caramel sauce, takes this dish over the top!
Not only is this recipe incredibly easy to whip up, but it also allows you to share a beautiful dish that looks like you put in hours of effort — and trust me, nobody needs to know just how simple it really is! So grab your apron, and let’s get cooking!
A Memory of Peaches
Let me take you back to a summer evening spent at my grandparents’ house in the countryside. The air was fragrant with blooming jasmine, and the sun was dipping below the horizon, painting the sky in shades of pink and orange. My grandmother would gather all of us kids around her little charcoal grill in the backyard, and we’d line up as she skewered fresh fruits. That’s when I first tasted grilled peaches.
She would coat them lightly with olive oil and sprinkle on cinnamon, placing them directly on the hot grill. As the peaches cooked, we could hardly contain our anticipation, the sweet aroma wafting through the air, mingling with the sounds of laughter and summer insects. When those peaches came off the grill, they were soft and slightly charred, and we’d scoop them up with vanilla ice cream. Every bite was pure bliss, a moment of pure summer joy.
That memory has always stayed with me, a reminder that the simplest ingredients can create the most meaningful experiences. So, let’s recreate that magic and make our own grilled peach memories!
Ingredients
Here’s what you’ll need to bring this sweet summer creation to life:
-
4 ripe peaches
Choose peaches that give slightly when pressed; they should be ripe but not overly soft. If you can’t find peaches, nectarines make a great substitute too! -
2 tablespoons olive oil
A high-quality extra virgin olive oil adds richness and enhances the fruit’s natural sweetness. You can also use melted coconut oil for a unique flavor twist. -
1 teaspoon ground cinnamon
This spice adds warmth and a cozy aroma to your peaches. If you want to get adventurous, consider trying cardamom or nutmeg for a different flavor profile. -
2 tablespoons brown sugar
The brown sugar caramelizes beautifully on the grill, enhancing the sweetness of the peaches. If you’re looking for a lighter option, you can replace it with honey or maple syrup. -
Optional: ice cream or caramel sauce for serving
A scoop of creamy vanilla ice cream or a drizzle of rich caramel sauce elevates this dish to pure indulgence. Go for dairy-free ice cream if you want to keep it vegan!
Step-by-Step Instructions
Now, let’s dive into the cooking! Follow these steps for perfectly grilled peaches:
-
Prepare the Peaches
Start by washing the peaches under cold water. Dry them gently, then cut each peach in half, removing the pit. If you’re using particularly ripe peaches, be careful with your knife; they should yield easily but still hold their shape. -
Preheat the Grill
Heat your grill to medium-high heat. If you’re using a charcoal grill, let the coals settle until they’re glowing red-hot. A well-prepped grill is crucial for achieving those perfect grill marks and caramelized flavors. -
Create the Mixture
In a small bowl, whisk together the olive oil, cinnamon, and brown sugar. This mixture should form a paste that lightly coats the peach halves. It’s a flavor bomb and will enhance the caramelization process. -
Brush the Peaches
Take a pastry brush and generously brush the olive oil mixture onto the cut sides of each peach half. Make sure to coat them well, as this step is key to flavor and caramelization. -
Grill Time
Place the peaches cut side down on the grill. Grill for about 3-4 minutes until you see those lovely grill marks start to form. Keep an eye on them; you want them to soften without falling apart! -
Flip and Grill Again
Carefully flip the peaches over using tongs or a spatula. Grill for another 2-3 minutes. This allows the olive oil and sugar mixture to caramelize beautifully. You’ll know they’re ready when they’re fragrant and slightly soft to the touch. -
Remove and Let Cool
Once done, remove the peaches from the grill and place them on a plate. Give them a few moments to cool slightly; they’ll be steaming hot! -
Serve
If you’ve chosen to use ice cream or caramel sauce, go ahead and serve the grilled peaches warm alongside a scoop of ice cream or drizzle caramel over the top. You can also sprinkle some extra cinnamon if you feel like it.
Tip: Make sure to gather your friends or family around. This dish is all about sharing joy and creating memories!
Serving Suggestions
When it comes to plating, simplicity is key. You want to showcase the gorgeous golden-brown grill marks and the lusciousness of the peaches. Place the warm grilled halves on a vibrant plate, allowing the juices to pool slightly. Add a generous scoop of ice cream right in the center, and a drizzle of caramel sauce over it all. A sprig of mint or a dusting of additional cinnamon elevates the presentation, making it feel extra special — all without too much fuss.
Recipe Variations
Want to mix things up a bit? Here are some fun variations to try:
-
Balsamic Grilled Peaches: Drizzle some balsamic glaze over the peaches before grilling for a tangy contrast.
-
Spiced Pecans or Walnuts: Add chopped and toasted nuts on top for a delicious crunch. It adds texture and complements the sweetness beautifully.
-
Honey Drizzle: Replace sugar with a drizzle of honey if you want a more natural sweetener.
-
Minty Twist: Add finely chopped mint leaves as a topping for a refreshing flavor boost that brightens the dish.
-
Flavored Ice Cream: Experiment with different ice cream flavors like cinnamon, caramel, or coconut for a unique taste experience!
Chef’s Notes
This recipe is truly a reflection of the beauty of seasonal cooking. My own grilling adventure with peaches has evolved over the years, from just dessert to becoming a centerpiece at summer cookouts. I often find myself experimenting with spices and toppings, and it never ceases to amaze me how versatile grilled peaches can be.
I once made this dish for a backyard barbecue, and unexpectedly, a close friend ended up at the hospital that day! It was a wild adventure, and I ended up serving grilled peaches as a dessert to all our other friends while regularly checking my phone for updates about our friend. It brought laughter and lightness to the situation, reminding me that good food can create joy even in challenging moments.
FAQs and Troubleshooting
1. What’s the best way to tell if peaches are ripe?
Look for peaches that give slightly to pressure. They should be fragrant and have a nice golden hue. If they’re hard, let them sit at room temperature until they soften.
2. My peaches fell apart while grilling! Tips?
Overripe peaches can be tricky! Next time, choose slightly firmer peaches, and handle them gently when flipping to keep the halves intact.
3. Can I make this recipe ahead of time?
While grilled peaches are best served fresh, you can prep them ahead of time by cutting and coating them, then grilling just before serving.
4. How do I store leftovers?
If you have leftovers, store them in the refrigerator in an airtight container for up to 2 days. Gently reheat them in a microwave or on the grill to enjoy again!
Nutritional Info
While I don’t usually add nutritional info, here’s a little insight: Peaches are rich in vitamins A and C, and fiber, making them a healthy dessert option. Paired with ice cream, you get an indulgent treat, so enjoy every bite mindfully!
With every grilled peach you make, you’re not just serving dessert — you’re sharing a piece of summer and creating warm memories. Let’s gather around the table and make moments that matter, one delicious bite at a time. Happy grilling, friends! 🍑✨
PrintGrilled Peaches with Cinnamon

A simple and delicious dessert featuring grilled peaches caramelized with cinnamon and served warm, perfect for summer indulgence.
- Prep Time: 10 minutes
- Cook Time: 10 minutes
- Total Time: 20 minutes
- Yield: 4 servings 1x
- Category: Dessert
- Method: Grilling
- Cuisine: American
- Diet: Vegetarian
Ingredients
- 4 ripe peaches
- 2 tablespoons olive oil
- 1 teaspoon ground cinnamon
- 2 tablespoons brown sugar
- Optional: ice cream or caramel sauce for serving
Instructions
- Prepare the peaches by washing them and cutting in half, removing the pit.
- Preheat the grill to medium-high heat, ensuring coals are glowing if using charcoal.
- Create the mixture by whisking together olive oil, cinnamon, and brown sugar in a small bowl.
- Brush the mixture onto the cut sides of the peach halves with a pastry brush.
- Grill the peaches cut side down for about 3-4 minutes until grill marks form.
- Flip the peaches and grill for another 2-3 minutes until fragrant and soft.
- Remove the peaches from the grill and let cool slightly on a plate.
- Serve warm with ice cream or caramel sauce and enjoy!
Notes
Make sure to gather friends and family around to share this delightful dessert!
Nutrition
- Serving Size: 1 peach half
- Calories: 180
- Sugar: 15g
- Sodium: 0mg
- Fat: 8g
- Saturated Fat: 1g
- Unsaturated Fat: 7g
- Trans Fat: 0g
- Carbohydrates: 24g
- Fiber: 2g
- Protein: 2g
- Cholesterol: 0mg
Keywords: grilled peaches, summer dessert, cinnamon peaches, easy dessert
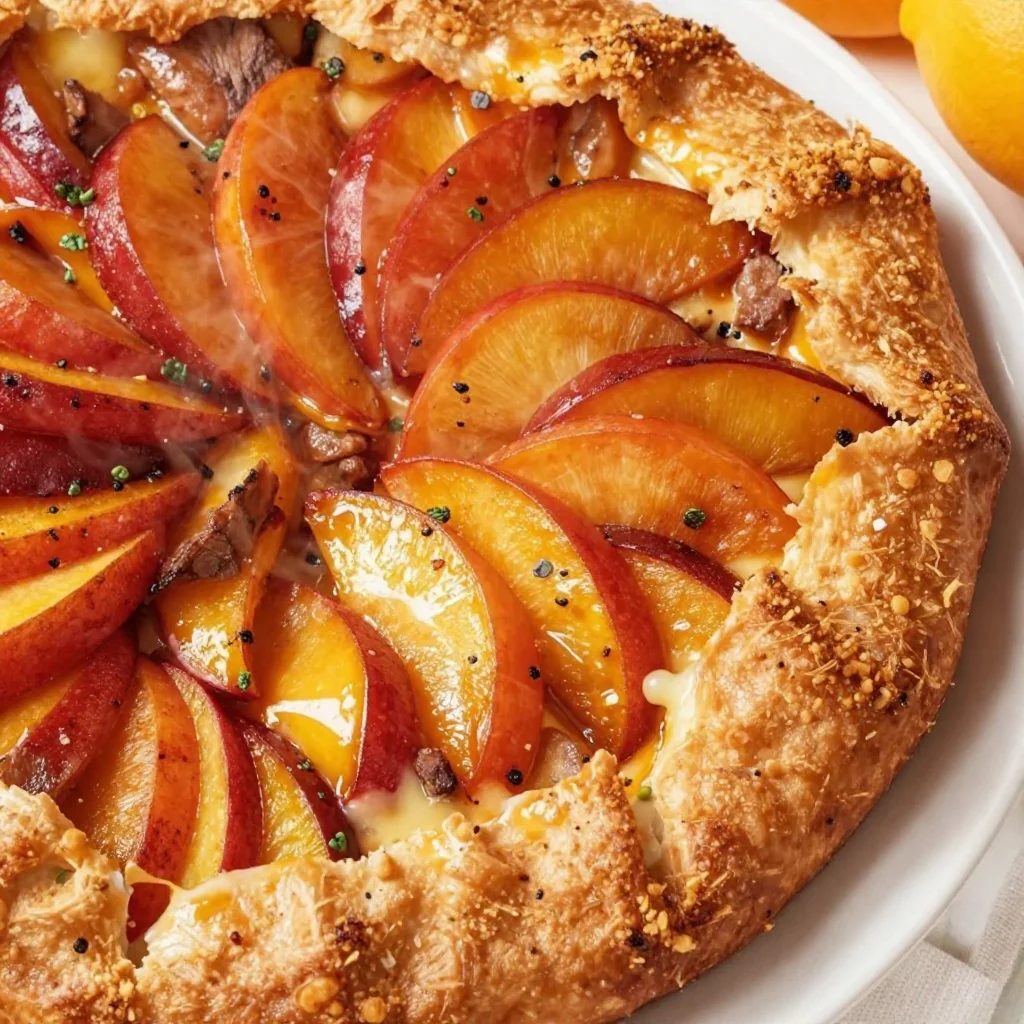
Seasonal Nectarine Galette: Quick Summer Dessert Recipe
Indulge in the Sweet Simplicity of a Nectarine Galette
Hello friends! Welcome back to the cozy corner of my kitchen. Today, we’re diving into a dish that embodies the essence of summer: the Nectarine Galette. This rustic dessert is not only a feast for the eyes but also an easygoing recipe that brings the charm of a fancy bakery right to your table. Imagine a flaky, buttery crust enveloping juicy, sweet nectarines, all beautifully rustic and just waiting for a scoop of vanilla ice cream on the side. Let’s roll our sleeves up and get to it!
The Story Behind the Galette
Growing up in a household where the kitchen was the heart of the home, many of my fondest memories are wrapped in the warmth of oven-baked goodies. One particular summer evening stands out in my mind—the sun setting, painting the sky in pastel hues, while my mother asked, “What do you want for dessert, Savannah?” Without hesitation, I yelled, “Peach galette!” Unfortunately, we had no peaches, but we had a bowl overflowing with nectarines from a recent trip to the farmer’s market.
So, we improvised! My mom and I dove into the kitchen, laughter echoing off the walls as we rolled out dough, sprinkled flour like confetti, and sliced nectarines, each one more glorious than the last. The smell of baking softened the summer night’s anticipation. The first bite was magical—sweet, tangy, and perfectly rustic! That evening, surrounded by family, sparked my love for this humble dessert, reminding me how simple ingredients can create something extraordinary. I’ve tweaked that original recipe over the years, but the spirit remains: uncomplicated, elegant, and utterly delicious.
Ingredients You’ll Need
Let’s gather our stars—these are the ingredients that’ll help us achieve a show-stopping Nectarine Galette:
-
2 cups all-purpose flour
The backbone of our galette, all-purpose flour gives the crust that perfect flaky texture. If you’re looking for a gluten-free option, try using a 1:1 gluten-free flour blend! -
1/2 cup unsalted butter, chilled and cubed
Butter is key to that flaky crust! I prefer unsalted to control the seasoning better. You can substitute it with coconut oil or vegan butter if you’re going dairy-free. -
1/4 cup sugar
This sweetens the dough slightly. For a more natural option, you might substitute it with coconut sugar or even honey in a pinch (just reduce the liquid in the dough slightly). -
1/4 teaspoon salt
A pinch of salt elevates the flavors. An essential ingredient, don’t skip this! -
6-8 nectarines, sliced
The star of the show! These nectarines bring a sweet and juicy punch. You can also mix in peaches, plums, or even apples if you want a flavor twist. -
1 teaspoon ground cinnamon
This warm spice enhances the sweetness of the nectarines beautifully. Feel free to swap it for nutmeg or allspice for a different kick! -
1 teaspoon vanilla extract
Vanilla adds a lovely depth. Don’t have any? A splash of almond extract will work wonders too! -
1-2 tablespoons sugar (for sprinkling)
A little extra sweetness on top to caramelize as it bakes. Try using brown sugar for a more caramelized finish! -
1 egg (for egg wash)
To create that golden, glossy finish on the crust. If you’re vegan, a plant-based milk would do the trick for brushing!
Let’s Get Cooking!
Are you ready to make some magic? Follow these steps and you’ll have a Nectarine Galette that you’ll want to make again and again.
-
Make the Dough
In a large bowl, combine the flour, 1/4 cup sugar, and salt. Add the cubed butter. Using your fingers, a pastry cutter, or two forks, gently work the butter into the flour mixture until it resembles coarse crumbs. This process is essential—don’t rush it! You want that lovely, crumbly texture. -
Chill the Dough
Once your mixture is ready, add about 4-5 tablespoons of cold water to the dough. Mix just until combined—it shouldn’t be sticky! Shape it into a disc, wrap in plastic, and pop it in the fridge for at least 30 minutes. Trust me, chilling allows the butter to firm up, resulting in the flakiest crust. -
Preheat the Oven
While the dough chills, preheat your oven to 400°F (200°C). A hot oven is vital for that perfect crust! -
Prepare the Nectarines
Slice your nectarines evenly and toss them in a bowl with the cinnamon, vanilla extract, and a tablespoon of sugar. Allow those juices to mix and mingle while the dough continues to chill. -
Roll Out the Dough
After chilling, on a lightly floured surface, roll out your dough into a rough circle, about 12 inches in diameter. Don’t stress about making it perfect—rustic is the name of the game! Transfer the rolled dough onto a parchment-lined baking sheet. -
Assemble the Galette
Arrange the sliced nectarines in the center of the dough, leaving about a 2-inch border. Fold the edges of the dough over the nectarines, creating a little enclosure—don’t worry if they peek out a bit! It adds to the charm. -
Brush and Sprinkle
Whisk the egg and brush it over the visible crust, then sprinkle with a coarse sugar. This step is what transforms your rustic galette into a showstopper with golden edges! -
Bake to Perfection
Pop your galette in the oven and bake for about 30-35 minutes, or until the crust is golden and the nectarines are bubbly. Your kitchen will smell divine, and you might have a hard time waiting! -
Cool Down
Once it’s out of the oven, let it cool for about 10 minutes before serving. This time allows it to set a bit more, making it easier to slice.
Serving Suggestions
Serving up this Nectarine Galette? Here’s a lovely idea: While it’s still warm, slice it into wedges and serve with a generous scoop of vanilla ice cream or a dollop of whipped cream. Garnish with a sprinkle of fresh mint for that extra pop of color and freshness. Trust me, a little texture from crushed nuts on top elevates it further while adding a delightful crunch!
Recipe Variations
Now, let’s get those creative juices flowing! Here are a few inspiring twists:
- Mixed Stone Fruits: Combine nectarines with peaches and plums for a vibrant fruit medley.
- Rustic Berry Galette: Swap nectarines for blueberries or raspberries. A little lemon zest in the filling can elevate the flavor!
- Spiced Autumn Variation: Add pumpkin spice seasoning with apples for a fab fall dessert!
- Nutty Addition: Sprinkle slivered almonds or chopped pistachios over your nectarines for a delightful crunch.
- Vegan Option: Substitute butter with coconut oil and use a plant-based milk for the egg wash.
Chef’s Notes
Over the years, this recipe has become a staple at gatherings and during the summer months when fruits shine their brightest. I recall an impromptu picnic at the park where I whipped up this galette. The reactions were priceless—spoonfuls of joy, smiles all around! One of my friends even asked if I had a pastry chef’s secret to share, and I chuckled; the truth is, my only secret is to love what you cook!
FAQs and Troubleshooting
Q1: My dough is too crumbly. What did I do wrong?
Don’t panic! You might need to add a tablespoon or two of cold water. Ensure not to overwork the dough; it should be slightly sticky but still hold together.
Q2: My nectarines are tough and not juicy. What gives?
It could be that the nectarines aren’t ripe enough. Make sure to choose ripe nectarines that yield slightly to pressure when you squeeze them for the best results.
Q3: Can I make this galette ahead of time?
Absolutely! You can make the dough a day in advance and store it in the refrigerator. Just don’t bake it until you’re ready to serve—it’s best when fresh!
Q4: How do I store leftovers?
Store any leftovers in an airtight container in the fridge for 2-3 days. Just pop it back in a warm oven for a few minutes to revive that crust!
Nutritional Info (Optional)
If you’re keeping track, a slice of this Nectarine Galette generally has around 250 calories, depending on the portion size and additional toppings. It’s a delightful treat worth every bite!
And there you have it! A delightful nectar-filled galette that’s perfect for summer days, family gatherings, or simply treating yourself. I hope you enjoy making it as much as I do. Remember, cooking should always feel like a joyful journey. So tie on that apron, gather your loved ones, and whip up this delightful recipe! Happy cooking!
PrintNectarine Galette

A rustic and easy-to-make dessert featuring a flaky crust and juicy nectarines, perfect for summer gatherings.
- Prep Time: 30 minutes
- Cook Time: 35 minutes
- Total Time: 65 minutes
- Yield: 8 servings 1x
- Category: Dessert
- Method: Baking
- Cuisine: American
- Diet: Vegetarian
Ingredients
- 2 cups all-purpose flour
- 1/2 cup unsalted butter, chilled and cubed
- 1/4 cup sugar
- 1/4 teaspoon salt
- 6–8 nectarines, sliced
- 1 teaspoon ground cinnamon
- 1 teaspoon vanilla extract
- 1–2 tablespoons sugar (for sprinkling)
- 1 egg (for egg wash)
Instructions
- Make the Dough: In a large bowl, combine flour, 1/4 cup sugar, and salt. Add cubed butter and work it into the flour mixture until it resembles coarse crumbs.
- Chill the Dough: Add 4-5 tablespoons of cold water until combined, shape into a disc, wrap in plastic, and refrigerate for at least 30 minutes.
- Preheat the Oven: While the dough chills, preheat oven to 400°F (200°C).
- Prepare the Nectarines: Toss sliced nectarines with cinnamon, vanilla extract, and a tablespoon of sugar.
- Roll Out the Dough: On a floured surface, roll out dough to a rough circle, about 12 inches in diameter.
- Assemble the Galette: Arrange nectarines in the center, folding the edges of the dough over, leaving some nectarines exposed.
- Brush and Sprinkle: Whisk the egg, brush the crust, and sprinkle with coarse sugar.
- Bake to Perfection: Bake for 30-35 minutes until the crust is golden and nectarines are bubbly.
- Cool Down: Let cool for about 10 minutes before serving.
Notes
Serve warm with vanilla ice cream or whipped cream, and garnish with fresh mint.
Nutrition
- Serving Size: 1 slice
- Calories: 250
- Sugar: 10g
- Sodium: 200mg
- Fat: 14g
- Saturated Fat: 8g
- Unsaturated Fat: 5g
- Trans Fat: 0g
- Carbohydrates: 30g
- Fiber: 2g
- Protein: 3g
- Cholesterol: 50mg
Keywords: nectarine galette, rustic dessert, summer dessert, easy recipe
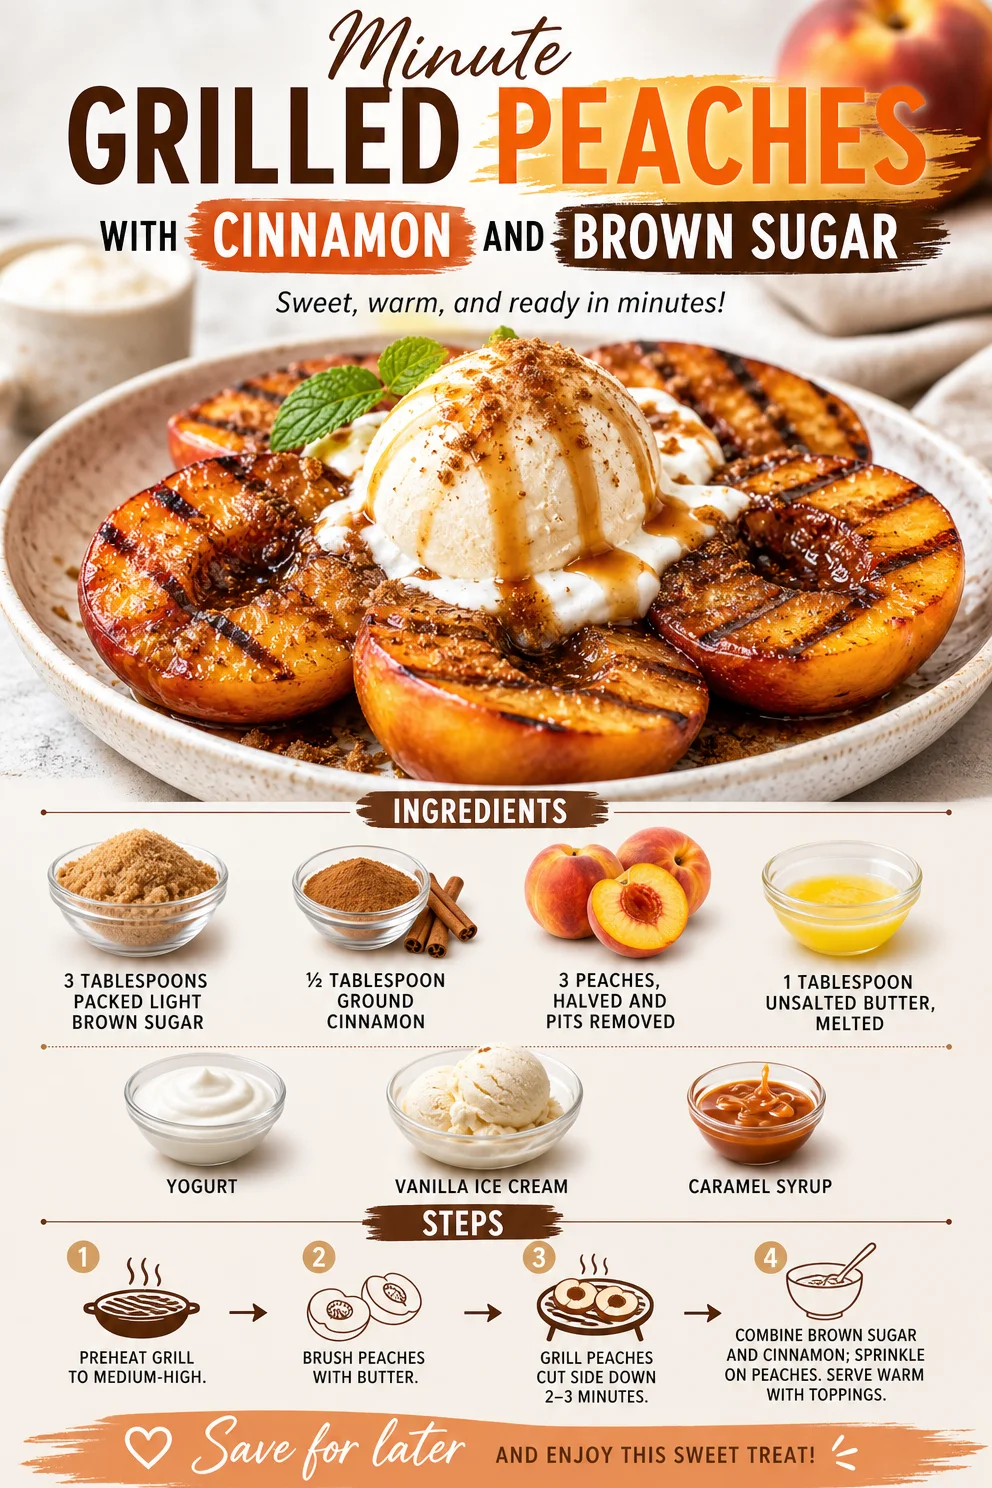
Minute Grilled Peaches with Cinnamon and Brown Sugar
Grilled Peaches with Cinnamon and Brown Sugar: A Sweet Summer Delight
Hello, culinary friends! I’m so delighted to welcome you back to the Ivory Apron kitchen. Today, we’re diving into a recipe that perfectly captures the warmth of summer and the joy of simplicity: Grilled Peaches with Cinnamon and Brown Sugar. If you’re a fan of desserts that feel elegant yet are incredibly easy to whip up, buckle in! This is going to become your new favorite go-to for gatherings, weeknight treats, or just a sweet pick-me-up on those warm summer evenings.
There’s something magical about grilled fruit. The heat transforms the natural sugars, giving them a caramelized flavor that’s utterly irresistible. When you thoughtfully pair that with a sprinkle of cinnamon and brown sugar, you elevate the experience to something truly special. Not to mention, when you serve these peaches with a dollop of creamy yogurt or a scoop of vanilla ice cream, you create a dessert that’s indulgent but still feels light.
Now, let’s grab our aprons and get cooking!
A Sweet Memory
As a child, summer meant family BBQs in my grandmother’s backyard. The sun would shimmer, and laughter filled the air while we played games and waited for the grilled feast to begin. One summer evening, my grandmother decided to experiment with grilling fruit. I remember watching in awe as she placed peach halves on the grill. The sizzle was music to my ears!
Once she sprinkled the grilled peaches with brown sugar and cinnamon, I could hardly contain my excitement. The aroma wafting from the grill was heavenly. We topped them with vanilla ice cream, and I can still recall that first bite—warm, gooey, and sweet, balanced with a hint of spice. Each mouthful tasted like sunshine and love. That memory crops up every summer, and it continues to inspire my love for grilling fruit, so I’m thrilled to share this recipe with you.
Ingredients
Let’s go over our simple, yet delicious ingredients for this beautiful dish. Here’s what you’ll need:
-
3 tablespoons packed light brown sugar
This provides a deep caramel flavor. If you don’t have brown sugar, you can substitute with white sugar mixed with a touch of molasses for that rich, dark sweetness. -
½ tablespoon ground cinnamon
A staple spice that adds warmth and fragrant sweetness. Feel free to substitute with nutmeg or allspice for a different twist. -
3 peaches, halved and pitted
Fresh, ripe peaches are ideal! If they’re not in season, you can use nectarines or even plums for a delightful change. -
1 tablespoon unsalted butter, melted
This buttery goodness adds richness and helps the sugar to caramelize beautifully. If you’re avoiding dairy, coconut oil works great as a substitute. -
Yogurt (optional)
A dollop of creamy yogurt, like Greek or vanilla, provides a nice contrast to the sweet peaches. If you’re dairy-free, consider almond or coconut yogurt! -
Vanilla ice cream (optional)
Who doesn’t love a scoop of ice cream? It adds a delightful creaminess. Swap it with dairy-free ice cream for a lighter option. -
Caramel syrup (optional)
A drizzle of caramel syrup elevates the dessert to new heights. For a healthier choice, consider a homemade date caramel.
Step-by-Step Instructions
Now, let’s get cooking! Follow along with these detailed steps for a delicious outcome:
-
Preheat the Grill
Heat your grill to medium-high. A well-heated grill will give your peaches those beautiful grill marks and a lovely caramelization. If you’re using a grill pan, make sure it’s hot too! -
Prepare the Peaches
While the grill heats, wash your peaches thoroughly. Halve each peach and carefully remove the pit. The peach halves should be intact so that they hold up on the grill. -
Make the Cinnamon Sugar
In a small bowl, combine the brown sugar and cinnamon. Mixing them together beforehand ensures an even distribution when grilling, creating that irresistible sweetness. -
Butter Those Peaches
Brush the cut sides of each peach with the melted butter. This helps in the caramelization process and enhances the flavors. Plus, it keeps the peaches from sticking to the grill. -
Sprinkle with Cinnamon Sugar
Generously sprinkle the cinnamon sugar mixture over the buttered side of each peach half. Don’t be shy! The sugar creates a delightful crust as they grill. -
Grill the Peaches
Place the peaches cut-side down on the grill. Grill for about 4-5 minutes without moving them, allowing grill marks to form and the sugars to caramelize. You can peek underneath to check for those beautiful char marks. -
Turn and Grill Again
Once nicely charred, carefully flip them over (use tongs for safety). Grill for an additional 2-3 minutes. You want them to be tender yet still hold their shape. -
Serve Immediately
Once done, remove the peaches from the grill. They’re best served warm! Top with a dollop of yogurt or a scoop of vanilla ice cream. Drizzle with caramel syrup for that extra touch of decadence.
Serving Suggestions
Plating is where you can let your creativity shine! Place the warm grilled peaches in the center of a shallow bowl or on a pretty plate. If you’re adding yogurt or ice cream, position a spoonful right next to the peaches. A light dusting of cinnamon or a sprinkle of chopped nuts could add a final touch. If you’re feeling fancy, why not add a sprig of fresh mint for an added pop of color?
Recipe Variations
This dish is wonderfully versatile! Here are a few twists to consider:
-
Grilled Peaches and Burrata: Top your peaches with creamy burrata cheese instead of ice cream for a sophisticated salad. Add fresh basil for a burst of flavor—yum!
-
Berry Compote: Whip up a quick berry compote to drizzle over your grilled peaches for an extra layer of flavor. Simply simmer mixed berries with a touch of sugar until they burst!
-
Maple Spice: Swap the brown sugar with maple syrup for a distinctly different sweetness. You can also use pumpkin spice instead of cinnamon for a fall twist.
-
Nutty Delight: Sprinkle chopped pistachios or almonds on top of your already delicious dish for a crunchy element that pairs perfectly with the soft peaches.
-
Cocoa Infusion: For a chocolatey twist, dust with some cocoa powder or drizzle melted dark chocolate over the top after grilling.
Chef’s Notes
I can’t tell you how many entertaining dinners have featured these grilled peaches at my table. They’ve evolved a bit—the first time I made them, I simply tossed on a bit of sugar and grilled without the butter. But that’s where the magic is! The melting butter takes things to another level.
And let me tell you; these delicious peaches are kid-favorites too! One summer, my nephew insisted on getting involved. He skipped the grill and opted to sprinkle the cinnamon sugar on the peaches—what a mess! But, oh, the joy on his face when he took that first bite was worth every bit of sugar that ended up on the floor! Cooking is as much about making memories as it is about creating delicious food.
FAQs and Troubleshooting
1. My peaches are too hard to grill. What should I do?
Choose ripe peaches for grilling, but if they’re still firm, simply give them a little more time on the grill. Alternatively, you can grill them for a few minutes longer, but keep an eye out to prevent them from burning.
2. What if my sugar is burning on the grill?
It’s important to monitor your grill temperature! If you notice the sugar is burning, lower the heat slightly or move them to a cooler part of the grill.
3. Can I make them ahead?
Grilled peaches are best served immediately, but if you have leftover, store them in an airtight container in the fridge. Reheat gently on the grill or in the microwave before serving.
4. How can I ensure perfect grill marks?
To get beautifully distinct grill marks, make sure the grill is well-preheated. Avoid moving the peaches once they’re placed on the grill for the first few minutes to let those marks develop.
Nutritional Info
Grilled peaches are relatively low in calories and rich in vitamins A and C. The brown sugar and butter do add some sweetness and fat, but when served with yogurt or ice cream, you create a delightful balance.
Thank you for stopping by the Ivory Apron kitchen today. I hope these grilled peaches inspire you to get outside, fire up the grill, and create some joyful memories of your own! Remember, cooking is about sharing love and good food, so gather your friends and family, and let’s carry on the delicious tradition. Happy cooking!
PrintGrilled Peaches with Cinnamon and Brown Sugar

A sweet summer dessert featuring caramelized grilled peaches topped with cinnamon and brown sugar, perfect for warm evenings.
- Prep Time: 15 minutes
- Cook Time: 10 minutes
- Total Time: 25 minutes
- Yield: 4 servings 1x
- Category: Dessert
- Method: Grilling
- Cuisine: American
- Diet: Vegetarian
Ingredients
- 3 tablespoons packed light brown sugar
- ½ tablespoon ground cinnamon
- 3 peaches, halved and pitted
- 1 tablespoon unsalted butter, melted
- Yogurt (optional)
- Vanilla ice cream (optional)
- Caramel syrup (optional)
Instructions
- Preheat the grill to medium-high.
- Prepare the peaches by washing them thoroughly and halving each one.
- Make the cinnamon sugar by combining brown sugar and cinnamon in a small bowl.
- Brush the cut sides of the peaches with melted butter.
- Sprinkle the cinnamon sugar mixture over the buttered peach halves.
- Place the peaches cut-side down on the grill and grill for 4-5 minutes.
- Turn the peaches over and grill for an additional 2-3 minutes.
- Serve immediately with yogurt or ice cream and a drizzle of caramel syrup.
Notes
These grilled peaches are best served warm and can be topped with yogurt, ice cream, or caramel syrup for added flavor.
Nutrition
- Serving Size: 1 peach half
- Calories: 150
- Sugar: 10g
- Sodium: 60mg
- Fat: 5g
- Saturated Fat: 3g
- Unsaturated Fat: 2g
- Trans Fat: 0g
- Carbohydrates: 25g
- Fiber: 2g
- Protein: 1g
- Cholesterol: 10mg
Keywords: grilled peaches, summer dessert, cinnamon, brown sugar, easy recipe
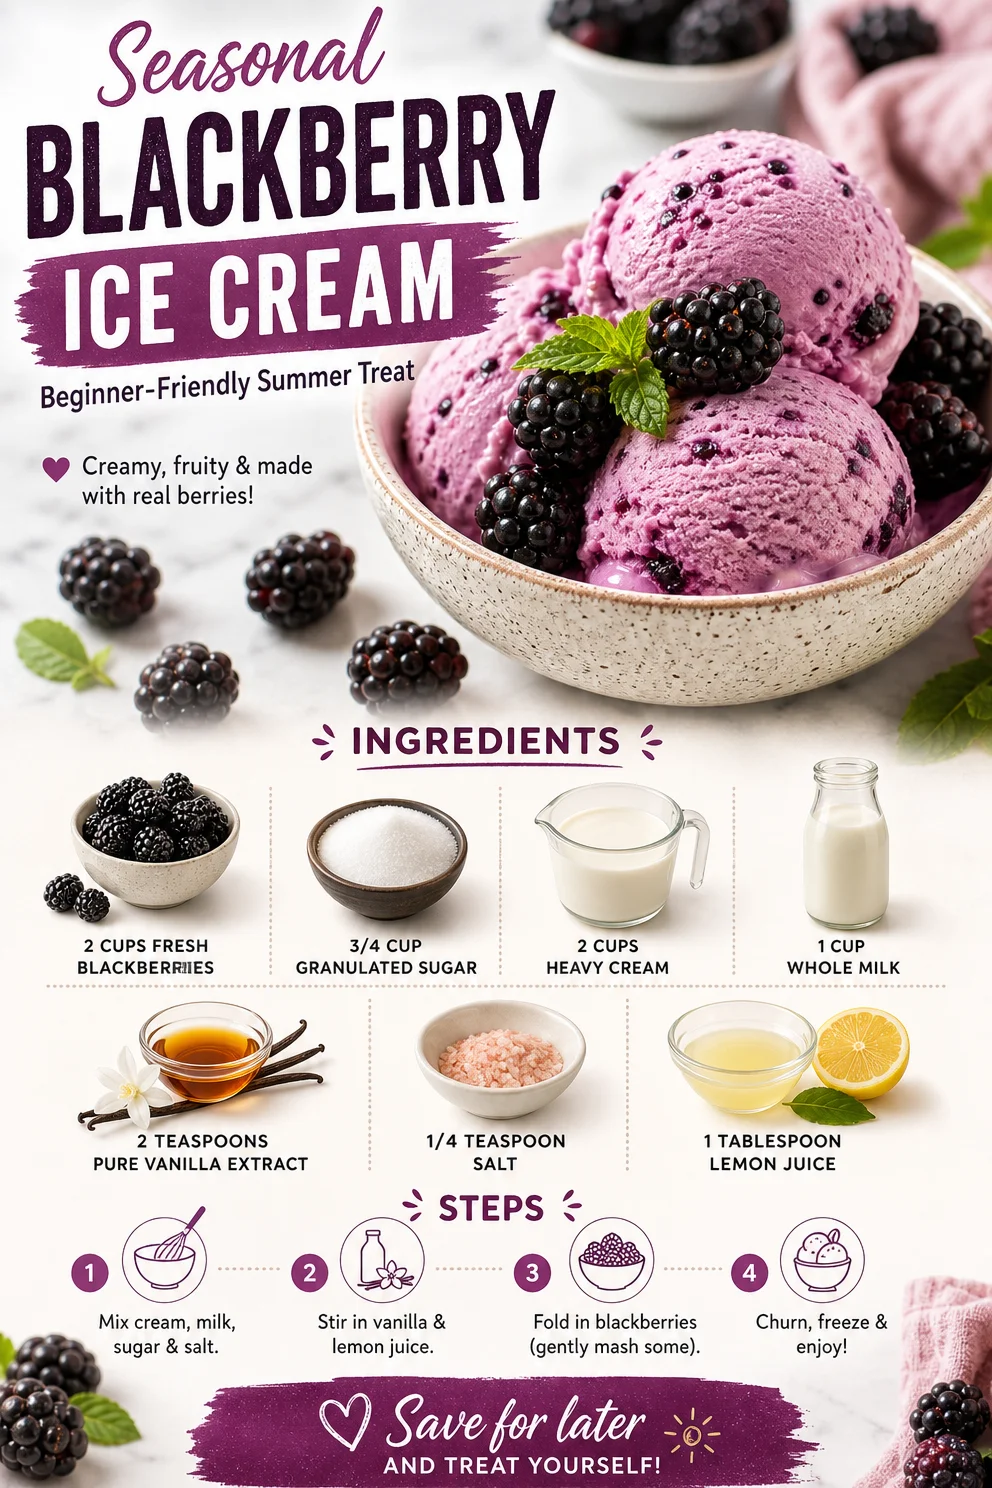
Seasonal Blackberry Ice Cream Beginner-Friendly Summer Treat
Homemade Fresh Blackberry Ice Cream: A Summer Treat to Savor
Ah, summer! The season of sun-kissed skin, backyard barbecues, and, of course, delightful homemade ice cream. There’s nothing quite like the feeling of digging into a cold, creamy scoop of ice cream on a hot day. Today, I’m thrilled to share one of my favorite summer recipes: Homemade Fresh Blackberry Ice Cream. It’s a colorful and delicious treat that encapsulates the essence of summer in every spoonful.
What I adore about this blackberry ice cream recipe is that it’s not just about the satisfying creaminess; it’s also an ode to nature’s candy—those juicy, ripe blackberries. When you make this ice cream, you’re embracing the sweet, tart flavors of summer while creating a dessert that impresses without overwhelming. Let’s dive into this recipe, where I’ll guide you step-by-step to ensure your homemade ice cream turns out beautifully. Ready? Let’s make some magic in the kitchen!
A Sweet Memory
Growing up in a small town, summer meant my grandma’s house was the hub for family gatherings. On lazy Sunday afternoons, our backyard turned into a vibrant carnival with laughter, games, and, of course, food. One of the staples was my grandma’s berry ice cream. She’d gather blackberries from her garden, and with a few simple ingredients, would whip up the creamiest ice cream I’d ever tasted. I still remember the thrill of picking berries with my cousins and then the family’s collective excitement as we waited for the ice cream to churn. The moment those generous scoops were dished out, it was pure bliss. Each bite brought back the sunny memories of our summer gatherings. Fast forward to today, and I still crave that icy delight whenever blackberries are in season.
Ingredients
Here’s everything you’ll need to create this sensational blackberry ice cream:
-
2 cups fresh blackberries
These juicy gems are the star of the show! If blackberries are not available, you can easily swap them for raspberries or blueberries for a similar flavor profile. -
3/4 cup granulated sugar
Sweetness is key! This amount offers a perfect balance, but feel free to adjust to your taste. You could even experiment with honey or agave for a different sweetness. -
2 cups heavy cream
For that luxuriously creamy texture. If you’re looking for a lighter version, half and half works well, but expect a slightly different texture. -
1 cup whole milk
Adds creaminess but also some volume. You can substitute skim milk, but keep in mind that the final texture will be less rich. -
2 teaspoons pure vanilla extract
Using pure vanilla extract brightens the flavor. I always recommend avoiding imitation vanilla; a little goes a long way! -
1/4 teaspoon salt
Just a pinch! This enhances the overall flavor and balances the sweetness beautifully. -
1 tablespoon lemon juice
Fresh lemon juice brightens up the whole mixture and enhances the blackberry flavor. Trust me on this one—it’s a game changer!
Step-by-Step Instructions
Let’s get churning! Here’s how you can make your fabulous blackberry ice cream.
-
Prepare the Blackberries
Start by rinsing your blackberries under cold water. Make sure to gently pat them dry. In a medium bowl, sprinkle about 2 tablespoons of the granulated sugar over the blackberries. Allow them to sit for about 10-15 minutes so the sugar can draw out their delicious juices, giving you a natural blackberry syrup. -
Mash and Strain
After the blackberries have marinated in sugar, take a fork and lightly mash them. You’re not looking for a puree—just enough to break some of them open and release their juice. Once mashed, pour the mixture through a fine-mesh sieve into another bowl. Press down on the solids to extract as much juice as possible, then set that bowl aside. -
Mix the Cream Base
In a large mixing bowl, whisk together the heavy cream, whole milk, remaining sugar (adjust to your taste), vanilla extract, salt, and lemon juice. The mixture should feel rich and silky. If you have an electric mixer, you can use it on low speed to blend everything seamlessly. -
Combine Blackberry Mixture
Add the blackberry juice to the cream mixture and stir gently to combine. If you prefer a few chunks of blackberries in your ice cream, you can fold them in at this point—adding texture that’s simply divine. -
Chill the Mixture
Cover the bowl with plastic wrap and refrigerate the mixture for at least 2 hours (or overnight if you’re a planner!). Chilling the mixture ensures a smoother texture once it’s churned. -
Churn the Ice Cream
Pour the chilled berry-cream mixture into your ice cream maker following the manufacturer’s instructions. If you don’t have an ice cream maker, you can still make this work! Pour the mixture into a large bowl and place it in the freezer. Every 30 minutes, take it out and use a fork to scrape and stir it, breaking up any ice crystals. Repeat this process until the ice cream is thickened and creamy, usually about 3-4 hours. -
Freeze to Firm Up
Once the ice cream reaches your desired consistency, transfer it to an airtight container and place it in the freezer for at least 4 hours to firm up fully.
Serving Suggestions
When it’s finally time to serve your homemade blackberry ice cream, consider a few easy ideas to elevate your dish! Serve it in beautiful bowls and consider adding a sprig of fresh mint on top for a pop of color and freshness. You can also drizzle some raspberry sauce or a balsamic reduction for a gourmet touch. And if you really want to impress, sandwich it between two soft cookies for a delightful ice cream sandwich!
Recipe Variations
-
Berry Medley: Try using a mix of blackberries, raspberries, and blueberries for a colorful twist on this classic recipe.
-
Coconut Blackberry Ice Cream: Swap half of the heavy cream for coconut cream for a tropical flavor.
-
Vegan Option: Use coconut milk or an almond milk base with agave syrup instead of sugar for a delicious vegan-friendly treat.
-
Chocolate Swirl: Stir in some melted dark chocolate for a decadent fudgy experience!
-
Spiced Blackberry: Add a dash of cinnamon or cardamom to the cream mixture for a unique warm flavor that complements the berries.
Chef’s Notes
Every summer, this blackberry ice cream recipe takes me back to those wonderful afternoons spent with my grandma. It’s funny how a simple treat can evoke so many feelings of nostalgia and joy. Over the years, I’ve tweaked this recipe to match my taste and lifestyle, experimenting with different fruits and flavor combinations. Each iteration has taught me something new about balancing flavors and textures. The beauty of homemade ice cream is that it evolves with you—allowing space for creativity without fear! Just remember, the key is always to have fun in the kitchen.
FAQs and Troubleshooting
Q: Can I use frozen blackberries instead of fresh?
A: Absolutely! Just make sure to thaw them completely and drain off excess liquid before proceeding with the recipe. Frozen berries may slightly alter the texture but still yield delicious results.
Q: My ice cream turned out icy. What went wrong?
A: This could happen if the mixture wasn’t chilled sufficiently before churning. Additionally, incorporating too much air during churning can create ice crystals. A few more folds in the mixture as it freezes can help.
Q: How long can I store the ice cream?
A: Homemade ice cream can last about 2-3 weeks in the freezer, though it may need some time to soften when you take it out before scooping!
Q: How can I prevent ice crystals from forming?
A: Make sure to blend your mixture thoroughly and store the ice cream in an airtight container. If you’re freezing it without an ice cream maker, frequent stirring every 30 minutes will help create a creamy texture by breaking up ice crystals.
Nutritional Info (optional)
While I believe in enjoying dessert, it’s also great to be mindful of what you’re consuming. Here’s a general overview (per serving of 1/2 cup):
- Calories: Approx. 250
- Fat: 17g
- Carbohydrates: 24g
- Sugar: 20g
- Protein: 3g
Indulging in homemade blackberry ice cream isn’t just food; it’s a celebration of summer’s sweetest moments. I hope this recipe finds a warm spot in your heart and kitchen. So, tie on your apron, gather your ingredients, and let’s create something delicious together! Cheers to summer and all its tasty treats!
PrintHomemade Fresh Blackberry Ice Cream

A delightful homemade blackberry ice cream that captures the essence of summer with every creamy scoop.
- Prep Time: 15 minutes
- Cook Time: 10 minutes
- Total Time: 385 minutes
- Yield: 4 servings 1x
- Category: Dessert
- Method: Churning
- Cuisine: American
- Diet: Vegetarian
Ingredients
- 2 cups fresh blackberries
- 3/4 cup granulated sugar
- 2 cups heavy cream
- 1 cup whole milk
- 2 teaspoons pure vanilla extract
- 1/4 teaspoon salt
- 1 tablespoon lemon juice
Instructions
- Prepare the blackberries by rinsing them under cold water and patting them dry. Sprinkle 2 tablespoons of sugar over them and let sit for 10-15 minutes.
- Mash the blackberries lightly with a fork to release juices, then strain through a fine-mesh sieve into another bowl.
- Mix the heavy cream, whole milk, remaining sugar, vanilla extract, salt, and lemon juice in a mixing bowl until rich and silky.
- Combine the blackberry juice with the cream mixture and stir gently. Optionally, fold in some blackberry chunks.
- Chill the mixture in the refrigerator for at least 120 minutes.
- Churn the chilled mixture in an ice cream maker according to the manufacturer’s instructions or freeze while stirring every 30 minutes for 3-4 hours.
- Freeze in an airtight container for at least 240 minutes before serving.
Notes
Consider serving with fresh mint, raspberry sauce, or as an ice cream sandwich between cookies.
Nutrition
- Serving Size: 1/2 cup
- Calories: 250
- Sugar: 20g
- Sodium: 50mg
- Fat: 17g
- Saturated Fat: 10g
- Unsaturated Fat: 7g
- Trans Fat: 0g
- Carbohydrates: 24g
- Fiber: 2g
- Protein: 3g
- Cholesterol: 70mg
Keywords: blackberry ice cream, summer dessert, homemade ice cream, berry dessert