Protein-Packed Creamy Peanut Butter Cup Chia Pudding
Creamy Peanut Butter Cup Chia Pudding: A Decadent Delight
Imagine this: It’s a late afternoon, the sunlight is filtering through your kitchen window, and you can smell the rich aroma of peanut butter wafting through the air. You’re craving something sweet but want to keep it healthy, too. Enter Creamy Peanut Butter Cup Chia Pudding! It’s the perfect blend of indulgence and nourishment, with a nutty twist that satisfies your sweet tooth without the guilt.
This pudding is a fantastic option for breakfast, a snack, or even dessert. Packed with omega-3 fatty acids, protein, and healthy fats, it’s as delightful for your body as it is for your taste buds. Plus, it’ll impress anyone you serve it to with its creamy texture and rich flavor, making it a fantastic addition to your hosting repertoire.
Now, let’s dive into why this dish holds such a special place in my heart and my kitchen!
A Nostalgic Taste of Home
Growing up, peanut butter was a staple in our household. My siblings and I would slather it on everything from fresh bananas to those classic white bread sandwiches, eagerly anticipating our next sweet fix. One of my fondest memories is from a summer afternoon when we concocted our first peanut butter dessert with mom—a no-bake pie that included layers of rich chocolate and creamy peanut butter.
That day sparked a love affair with the pairing, and since then, I’ve dedicated myself to finding ways to incorporate the flavors I adored into healthier options. When I stumbled upon chia seeds, I knew I had to create a pudding that could capture the essence of that nostalgic dessert while packing in plenty of nourishment. And voilà! The Creamy Peanut Butter Cup Chia Pudding was born.
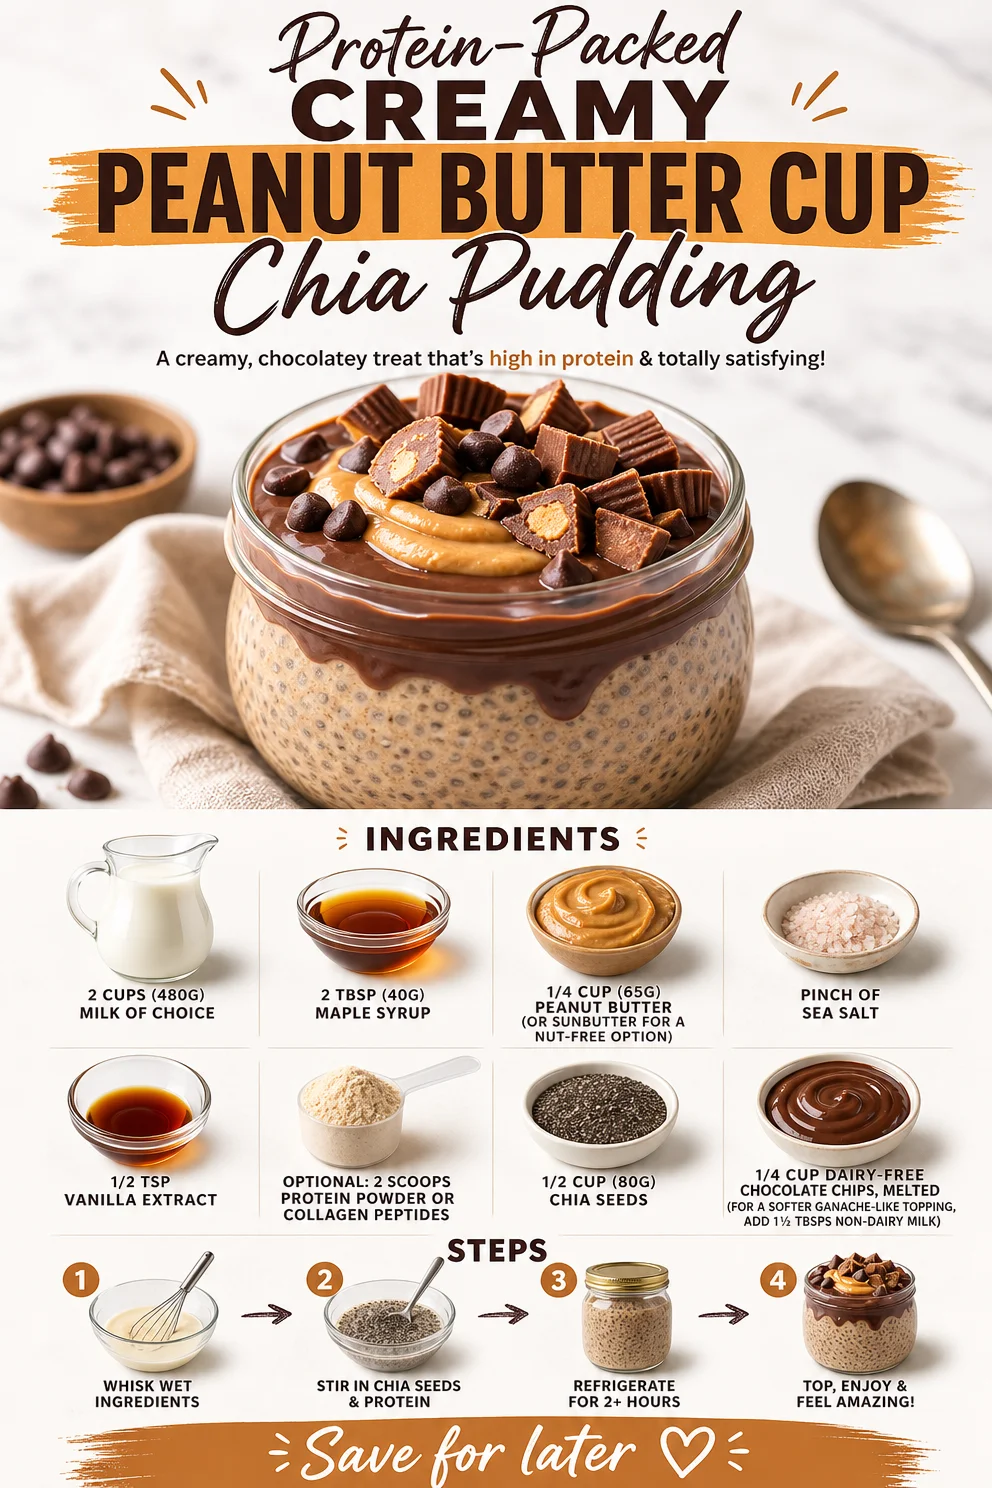
Ingredients
Let’s talk about what you’ll need for this delicious treat! Here’s your shopping list:
- 2 cups (480g) milk of choice: Use almond, coconut, soy, or dairy milk depending on your preference. Each will give a slightly different flavor and texture.
- 2 tbsp (40g) maple syrup: This adds a beautiful sweetness. If you’re looking for a lower-glycemic option, try using agave syrup or even stevia!
- 1/4 cup (65g) peanut butter: For the classic taste! If there are nut allergies or you prefer a different twist, feel free to use SunButter or almond butter.
- Pinch of sea salt: Enhances the flavor and balances the sweetness. Trust me; it makes a difference!
- 1/2 tsp vanilla extract: This adds warmth and depth to the pudding. For a different flavor profile, consider using almond extract.
- Optional: 2 scoops protein powder or collagen peptides: Perfect for adding an extra boost if you’re enjoying this as a post-workout treat.
- 1/2 cup (80g) chia seeds: Packed with fiber and omega-3s, these little guys are what give our pudding that delightful, creamy texture.
- 1/4 cup dairy-free chocolate chips, melted: For a chocolatey topping reminiscent of a peanut butter cup! For a softer consistency, add 1 ½ tbsp of non-dairy milk when melting.
Step-by-Step Instructions
Ready to make this decadent treat? Follow these easy steps to whip up your Creamy Peanut Butter Cup Chia Pudding.
-
Combine the Base Ingredients
In a medium bowl, combine your milk of choice, maple syrup, and peanut butter. Using a whisk, mix until the peanut butter is fully incorporated and there are no lumps. Pro tip: For easier mixing, you can warm the peanut butter slightly—this helps it blend smoothly! -
Add Flavor Enhancers
Sprinkle in the pinch of sea salt, vanilla extract, and protein powder (if using). Stir until everything is well combined. Taste! Adjust sweetness if needed by adding more maple syrup. -
Mix in the Chia Seeds
Add in those chia seeds! Stir well to ensure they’re evenly distributed throughout the mixture. Chia seeds are magical—they’ll swell and create that creamy pudding texture as they absorb the liquid. -
Let it Set
Cover the bowl with plastic wrap or a lid and place it in the fridge for at least 2 hours or overnight if you can wait. This is the patience-testing part, but trust me, it’s worth it! -
Melt the Chocolate
Once your pudding has set, it’s time to melt those chocolate chips. You can do this in a microwave-safe bowl in 30-second intervals, stirring in between, or use a double boiler. If you’re adding the option of non-dairy milk for a softer consistency, mix that in while you melt. -
Assemble and Serve
To serve, spoon the chia pudding into individual cups or small bowls. Drizzle the melted chocolate over the top like a beautiful finishing touch. You can even sprinkle a few extra chocolate chips for added indulgence!
Serving Suggestions
For an extra layer of delight, consider garnishing your pudding with a dollop of coconut whipped cream or a few slices of banana. Set it alongside a warm cup of coffee or tea, and you’ve created a lovely little indulgence that’s perfect for breakfast or dessert!
Recipe Variations
- Nut-Free Option: Swap peanut butter for sunflower seed butter (SunButter) to keep it nut-free.
- Chocolate Overload: Add cocoa powder to the base mix for a richer chocolate flavor.
- Fruity Twist: Mix in some mashed bananas or pureed berries to the base recipe for added sweetness and flavor.
- Spiced Up Pudding: Add a pinch of cinnamon or nutmeg to warm up the flavors.
- Vegan Delight: Ensure all ingredients are plant-based, like opting for coconut yogurt instead of milk.
Chef’s Notes
This recipe has evolved over time through experimentation! I’ve played around with different nut butters, variations of sweeteners, and even added mashed bananas for a fruitier take! The beauty of this pudding lies in its flexibility—it’s truly a canvas for your creativity. And if you’re anything like me, you may end up devouring a bowl (or two) before it even makes it to the fridge!
FAQs and Troubleshooting
-
Why did my chia pudding not thicken?
If your pudding didn’t thicken up, it could be that it didn’t have enough time to set. Chia seeds need enough time to absorb liquid (at least a couple of hours). If it’s too thin after setting, try mixing in a few more chia seeds and letting it sit longer. -
Can I use regular yogurt instead of milk?
Absolutely! You can replace milk with your favorite yogurt to create a thicker texture, but be aware that this may alter the pudding’s flavor slightly. -
What if the pudding is too sweet for me?
Each sweetener has a different level of intensity, so if you find it too sweet, cut back on the maple syrup, or add more milk and chia seeds to balance it out. -
How long will this pudding last?
Store the pudding in an airtight container in the refrigerator for up to 5 days. The flavors will continue to deepen and meld together as it sits!
Nutritional Info
This is an approximate estimate, varies by ingredient choices:
- Calories: 270
- Protein: 10g
- Carbs: 30g
- Fats: 15g
- Fiber: 10g
And there you have it! Your journey to making Creamy Peanut Butter Cup Chia Pudding is complete. This delectable dessert not only pleases the palate but allows you to reminisce about those simple joys of childhood. So, tie on that apron, gather your ingredients, and let’s create this timeless treat together! Enjoy every creamy, dreamy bite—because good food is all about the moments we share at the table. Happy cooking!
PrintCreamy Peanut Butter Cup Chia Pudding
A decadent yet healthy pudding combining peanut butter, chia seeds, and a touch of sweetness for a delightful treat.
- Prep Time: 10 minutes
- Cook Time: 0 minutes
- Total Time: 120 minutes
- Yield: 4 servings 1x
- Category: Dessert
- Method: Refrigeration
- Cuisine: American
- Diet: Vegetarian
Ingredients
- 2 cups (480g) milk of choice
- 2 tbsp (40g) maple syrup
- 1/4 cup (65g) peanut butter
- Pinch of sea salt
- 1/2 tsp vanilla extract
- Optional: 2 scoops protein powder or collagen peptides
- 1/2 cup (80g) chia seeds
- 1/4 cup dairy-free chocolate chips, melted
Instructions
- Combine the milk of choice, maple syrup, and peanut butter in a medium bowl. Whisk until smooth.
- Add the pinch of sea salt, vanilla extract, and protein powder (if using), and stir well.
- Mix in the chia seeds, ensuring they are evenly distributed throughout.
- Cover with plastic wrap and refrigerate for at least 2 hours or overnight.
- Melt the chocolate chips in a microwave or double boiler.
- Assemble by spooning the chia pudding into servings and drizzling melted chocolate over the top.
Notes
For a nut-free option, use sunflower seed butter instead of peanut butter. You can also add cocoa powder or fruits for variations.
Nutrition
- Serving Size: 1 serving
- Calories: 270
- Sugar: 8g
- Sodium: 170mg
- Fat: 15g
- Saturated Fat: 3g
- Unsaturated Fat: 10g
- Trans Fat: 0g
- Carbohydrates: 30g
- Fiber: 10g
- Protein: 10g
- Cholesterol: 0mg
Keywords: chia pudding, healthy dessert, peanut butter, vegan pudding

Creamy Vegan Mango Cheesecake Bars
Creamy Vegan Mango Cheesecake Bars
Hello, fellow foodies! 🌟 Today, we’re diving into a deliciously dreamy treat that’s perfect for just about any occasion. If you’re looking for something to impress your guests, elevate your gatherings, or simply pamper yourself during a quiet night in, I’ve got just the recipe for you: Creamy Vegan Mango Cheesecake Bars!
Now, you may be wondering, “How can cheesecake be vegan?” Well, let me tell you, the magic of plant-based ingredients allows for a creamy texture and delightful flavor that’ll have you coming back for seconds—and maybe thirds! These bars are not only decadent and delicious but also light and refreshing thanks to the tropical notes of luscious mango. And the best part? They’re super easy to whip up. Grab your apron, and let’s get started!
I created these bars because I believe dessert should be an experience—something that makes you nostalgic while also making you feel good. Just imagine biting into that velvety mango goodness, the creamy cashew filling melting in your mouth, with a hint of coconut that makes you feel like you’re on a sunny beach far away. Whether you’re planning a picnic, a summer party, or just a cozy night in, these bars are here to bring a bit of sunshine to your day. Let’s bring some tropical vibes to the kitchen!
Personal Story
I often think back to my childhood summers spent in my grandmother’s kitchen. She had this magical ability to turn the simplest ingredients into unforgettable treats. One of my favorites was her classic cheesecake; the way it would set just right in the fridge, creating that perfect blend of rich creaminess—something about it felt like home. Fast forward to adulthood, and I was craving that nostalgic taste, but with a twist that aligns with my plant-forward lifestyle.
The first time I made these mango cheesecake bars, I was struck by memories of those bright, sunny days. The vibrant yellow mango puree brought back the sweet essence of summer, almost like a sunny hug. I remember biting into one of those first bars, and I was immediately transported back to my grandmother’s kitchen. It’s a beautiful reminder of how food connects us to our past while allowing us to craft new experiences. From one nostalgia-filled dessert to another, this recipe is a celebration of flavor and memory. 🎉
Ingredients
-
2 cups cashews, soaked
Cashews provide a creamy texture and serve as the base for our cheesecake filling. Make sure to soak them in water for at least 4 hours (or overnight) to ensure they’re soft and blend easily. If you’re short on time, you can use boiling water for a quick soak (about an hour). -
1 cup mango puree
Mango brings that tropical sweetness and vibrant color. You can buy canned mango puree or blend fresh mango until smooth. If you’re looking for alternatives, try using other fruit purees like passionfruit or even banana for a different take! -
1/2 cup coconut milk
Coconut milk lends rich creaminess while adding a lovely subtle flavor. Use full-fat for extra richness, or if you’re looking for a lighter feel, opt for light coconut milk. Unsweetened almond milk can also work here, but you may want to compensate with a bit more fat from the cashews. -
1/4 cup agave syrup or maple syrup
This sweetener balances the richness of the cheesecake with a gentle sweetness. Maple syrup adds a delightful earthy note, while agave has a neutral flavor. Either option works wonderfully, so choose based on your personal preference! -
1/4 cup lemon juice
Fresh lemon juice brightens up the flavors and provides that classic cheesecake tang. For a different twist, try lime juice for a zesty variation. -
1 teaspoon vanilla extract
Vanilla is the secret ingredient that ties everything together, adding warmth to our cheesecake filling. Use pure vanilla extract for the best flavor—homemade vanilla bean paste can also add a delightful touch! -
1 cup almond flour (for the crust)
Almond flour gives the crust a nutty flavor while keeping things gluten-free. If you don’t have almond flour, you can use finely ground oats or a gluten-free flour blend as an alternative. -
2 tablespoons coconut oil (melted)
Coconut oil helps to bind the crust together and solidifies as it cools, creating that perfect texture. If you’re looking for a nut-free option, vegan margarine can work, too. -
2 tablespoons agave syrup or maple syrup (for the crust)
Just like in the filling, we’ll use some sweetener in our crust to tie the flavors together. This will help it firm up nicely while adding a touch of sweetness.
Step-by-Step Instructions
Step 1: Prepare the Cashews
Start by soaking your cashews in water for at least 4 hours (or overnight, if you have the time!). Once they’re nice and soft, drain and rinse them well. This step is crucial; it ensures our “cheese” filling blends smoothly into a creamy, dreamy mixture without any grit.
Step 2: Make the Crust
In a medium bowl, combine 1 cup of almond flour, 2 tablespoons melted coconut oil, and 2 tablespoons agave (or maple syrup). Mix until you have a crumbly texture that sticks together when pressed. If it feels too dry, add a tiny splash of water or more coconut oil.
Chef Tip: Line your baking dish with parchment paper for easy removal later on! Press the crust mixture firmly into the bottom of an 8-inch square pan to create an even layer. Use the back of a measuring cup to get it nice and compact.
Step 3: Blend the Filling
In a high-speed blender, combine the soaked cashews, 1 cup mango puree, 1/2 cup coconut milk, 1/4 cup agave, 1/4 cup lemon juice, and 1 teaspoon vanilla extract. Blend until completely smooth and creamy, scraping down the sides as needed.
Little Chef Hack: Taste the filling! Don’t be afraid to adjust sweetness or acidity to your preference. If you love more tanginess, add a bit more lemon juice. Prefer it sweeter? Toss in another drizzle of agave!
Step 4: Pour It All Together
Once the filling is smooth, pour it over the prepared crust in the baking dish. Gently spread it out to ensure it’s even.
Step 5: Chill, Chill, Chill!
Cover the dish with plastic wrap or a lid and place it in the freezer for at least 4 hours to set. For best results, chill overnight. This will help the bars firm up beautifully!
Step 6: Slice and Serve
Once fully set, remove the dish from the freezer and let it soften out for about 10 minutes before slicing. Use a sharp knife to cut it into squares or bars—dipping the knife in warm water first makes clean cuts easier!
Step 7: Final Touches
Feel free to garnish with extra mango slices, a sprinkle of shredded coconut, or even a drizzle of coconut cream for an added touch of elegance.
Serving Suggestions
When it’s time to serve these delightful mango cheesecake bars, plating matters! Arrange them on a beautiful platter, and consider adding edible flowers or fresh mint leaves for color. Pair with a light, sparkling beverage, like a fruity spritzer, to create an inviting atmosphere. These bars are perfect for sharing, so be sure to slice them nicely for your guests to enjoy!
Recipe Variations
-
Berry Swirl Variation: Add a berry swirl to the mango filling. Simply blend a cup of your favorite berries with a touch of sweetener and drop spoonfuls into the filling before freezing. Swirl gently with a knife to create a marbled effect.
-
Chocolate Crust: For a decadent twist, mix in 2 tablespoons of cocoa powder into the almond flour crust for a chocolatey base.
-
Spiced Version: Add warmth to the filling by incorporating a pinch of cinnamon or nutmeg. This will give it a cozy feel perfect for fall!
-
Nut-Free Alternative: Substitute almond flour with sunflower seed flour to make the crust nut-free, for those with allergies.
Chef’s Notes
I absolutely love how this vegan mango cheesecake bars recipe has evolved over time. I once tried using different tropical fruits, such as pineapple and passionfruit, and they all brought a unique twist to the classic flavor! Just the other day, I caught my niece trying to sneak a bite before dinner—clearly, these treats have a way of making themselves known. 😄
Also, I fondly remember the time I brought these to a picnic. They were a hit! People were raving and asking for the recipe, which is always such a flattering moment for a chef. Remember, food has a way of fostering connections, sparking joy, and creating memories, just as it did for me around Grandma’s table.
FAQs and Troubleshooting
1. Why are my cheesecake bars not setting?
Ensure you’ve allowed enough chilling time. If you’re still finding the texture is not firming up, it may be due to too much coconut milk. In future batches, cut back on the liquid a little more if needed.
2. Can I make these without refined sugar?
Absolutely! Both agave and maple syrup are natural sweeteners. You can also try using other alternatives like dates or monk fruit sweetener, just adjust the measurement and blend properly.
3. My crust is too crumbly – what went wrong?
This can happen if there isn’t enough wet ingredient to bind it together. Try adding a little more melted coconut oil or sweetener to hold things together.
4. How do I store leftovers?
These bars can be stored in an airtight container in the freezer for up to 3 months, or in the refrigerator for about a week. Just remember to slice them before freezing!
Of course, as with all recipes, feel free to get a little creative and make them your own. Cooking is about love, joy, and sharing those beautiful moments with those around you. So tie on that apron, gather your ingredients, and let’s make these Creamy Vegan Mango Cheesecake Bars together! 🍰✨
PrintCreamy Vegan Mango Cheesecake Bars

Deliciously creamy and refreshing vegan cheesecake bars made with luscious mango and a nutty crust, perfect for any occasion.
- Prep Time: 15 minutes
- Cook Time: 0 minutes
- Total Time: 240 minutes
- Yield: 16 servings 1x
- Category: Dessert
- Method: Chilling
- Cuisine: Vegan
- Diet: Vegan
Ingredients
- 2 cups cashews, soaked
- 1 cup mango puree
- 1/2 cup coconut milk
- 1/4 cup agave syrup or maple syrup
- 1/4 cup lemon juice
- 1 teaspoon vanilla extract
- 1 cup almond flour (for the crust)
- 2 tablespoons coconut oil, melted
- 2 tablespoons agave syrup or maple syrup (for the crust)
Instructions
- Prepare the cashews by soaking them in water for at least 4 hours. Drain and rinse well.
- Make the crust by combining almond flour, melted coconut oil, and agave in a bowl. Press into an 8-inch square pan.
- Blend the soaked cashews, mango puree, coconut milk, agave, lemon juice, and vanilla extract in a high-speed blender until smooth.
- Pour the filling over the prepared crust and spread evenly.
- Chill in the freezer for at least 4 hours or overnight.
- Slice the bars once set, allowing them to soften for 10 minutes before cutting.
- Serve garnished with mango slices or shredded coconut, if desired.
Notes
These bars can be stored in an airtight container in the freezer for up to 3 months, or in the refrigerator for about a week.
Nutrition
- Serving Size: 1 bar
- Calories: 200
- Sugar: 10g
- Sodium: 5mg
- Fat: 12g
- Saturated Fat: 6g
- Unsaturated Fat: 6g
- Trans Fat: 0g
- Carbohydrates: 24g
- Fiber: 3g
- Protein: 3g
- Cholesterol: 0mg
Keywords: vegan cheesecake, mango dessert, no-bake dessert, healthy sweet treat, dairy-free cheesecake

The Best Tiramisu Chia Pudding Recipe (Vegan, High Protein, Keto) | Healthy Sweets Recipes, Healthy Chia Pudding Recipes, Healthy Sweets
The Best Tiramisu Chia Pudding Recipe: A Healthy Twist on a Classic Favorite
Hey there, fellow foodies! Welcome back to my cozy corner of the kitchen at Ivory Apron. Today, I’m thrilled to share one of my absolute favorite recipes that brings a delightful twist to a classic dessert: Tiramisu Chia Pudding. Imagine all the indulgent flavors of traditional tiramisu—coffee, cocoa, and creamy goodness— packed into a healthy, vegan-friendly, high-protein, keto dessert. Sounds too good to be true? I promise you, it’s not!
Chia pudding has become somewhat of a hero in the healthy dessert world, and I’ve got to say, it’s perfect for those moments when you crave something sweet but don’t want to compromise on health. This treat is rich in omega-3 fatty acids from the chia seeds, easily made with plant-based ingredients, and won’t have you feeling like you’ve just consumed a brick in your stomach.
I vividly remember the first time I tried making tiramisu back in college. It was a last-minute decision for a dinner party that I somehow agreed to host. My friends were excited, and I was terrified! Armed with a flimsy recipe from a random magazine, I managed to whip up a dessert that slightly resembled the Italian classic—but not without a few hiccups! The coffee was too strong, and the ladyfingers turned out a bit soggy. But you know what? Everyone devoured it! That night ignited my passion for creating desserts that are not just delicious but also fun to make, and ever since, I’ve been on a mission to elevate everyday sweets like this Tiramisu Chia Pudding.
So, let’s dive into this easy, elegant, and oh-so-satisfying dessert. You’ll see why this recipe became a staple in my kitchen!
Personal Story
Speaking of college, there’s a specific memory that sticks with me. I remember my best friend, Julia, rushing over after hearing I was brave enough to tackle tiramisu. She arrived just as I was furiously whisking the cream (and I may or may not have underestimated the power of heavy whipping cream!). With two spoons and one dessert plate, we dug into my suspiciously lumpy concoction right before my guests arrived. What happened next still makes me laugh: we both ended up with chocolate smudged on our faces as we declared, “Well, at least it’s edible!”
Later that night, despite my early culinary mishaps, everyone was sharing stories and savoring each bite of my chaotic creation. That night reminded me of the magic of cooking: it’s not just about the food; it’s about the laughter, the camaraderie, and the memories created around the table. Fast forward to today, and I’m thrilled to share this Tiramisu Chia Pudding that cuts the fuss and maximizes the joy. Get ready to make some beautiful memories of your own!
Ingredients
Let’s gather our ingredients, shall we? Here’s what you’ll need to whip up this delightful Tiramisu Chia Pudding:
-
Chia Seeds (1/4 cup)
These tiny powerhouses are rich in fiber and omega-3 fatty acids. They’re the star of the show in this pudding! If you’re fresh out, you could try ground flaxseeds, but the texture won’t be quite the same. -
Unsweetened Almond Milk (1 cup)
A creamy, plant-based milk that forms the base of your pudding. If you prefer, any nut or oat milk will work just as well. Just avoid sweetened versions to keep our healthy vibe going! -
Maple Syrup or Agave Nectar (2-3 tablespoons)
A natural sweetener to give your pudding that lovely sweetness. Honey could be a substitute if you’re not strictly vegan—just remember, it’s a bit more viscous, so you may need to adjust the quantity slightly. -
Vanilla Extract (2 teaspoons)
A few drops of this fragrant elixir will elevate your pudding and add that aromatic richness. Pure vanilla extract is always a winner, but imitation will work too in a pinch. -
Coffee or Espresso (1/2 cup)
The lifeblood of traditional tiramisu! If you’re avoiding caffeine, a decaf version or even a coffee substitute could work to maintain that rich flavor. -
Cocoa Powder (2 tablespoons)
For that touch of chocolatey goodness. Make sure you use unsweetened cocoa for the best depth of flavor, but you could switch to carob powder if you want to experiment with a different taste. -
Coconut Cream (1/4 cup)
Whip this silky goodness to top your pudding for an extra luxurious feel. If you don’t have coconut cream, you can use full-fat coconut milk but be sure to chill it first to allow the cream to separate.
Step-by-Step Instructions
Now that we have all our ingredients ready, let’s roll up our sleeves and dive into the recipe!
Step 1: Mix the Wet Ingredients
In a medium-sized bowl, combine the almond milk, maple syrup (or agave), vanilla extract, and coffee. Whisk these glorious ingredients together until fully combined. This will be the flavorful base of your pudding.
Chef Hack: If you’re short on time, you can blend these ingredients in a blender! It’s quicker and gives it a super smooth consistency.
Step 2: Add Chia Seeds
Next, add the chia seeds to your wet mixture. Stir well to ensure that the seeds are evenly distributed and not clumping together. Chia seeds love to stick, so give them a good whirl!
Tip: Let the mixture rest for about 5 minutes and then stir again. This process helps ensure a lump-free pudding!
Step 3: Let It Thicken
Cover the bowl with plastic wrap or a lid and pop it into the fridge. Let it chill for at least 3-4 hours or, better yet, overnight. During this time, the chia seeds will absorb the liquid and transform your mixture into a delightful, creamy pudding.
Chef Insight: Overnight chilling is not just for convenience; it allows the flavors to meld together beautifully.
Step 4: Whip the Coconut Cream
While your pudding thickens, let’s prepare the coconut cream. Chill a can of coconut milk overnight, then scoop out the thick cream that separates at the top. In a bowl, whip the coconut cream using a hand whisk or electric mixer until fluffy. Taste it and add a touch of sweetener if desired.
Step 5: Layer it Up!
Once your chia pudding is ready, it’s assembly time! Grab your serving glasses (I love using clear ones to show off those beautiful layers). Start with a generous layer of chia pudding, then add a dollop of whipped coconut cream on top.
Next, dust with cocoa powder for that authentic tiramisu touch. Repeat the layers until you reach the top!
Little Chef Tip: For a fun surprise, add a sprinkle of chocolate shavings or crushed walnuts in between layers for added texture!
Step 6: Chill Again (If You Can Wait)
If you have the willpower (it’s hard!), let your assembled tiramisu chia pudding chill in the fridge for at least 30 minutes before serving. This helps the layers meld together even more, creating a harmonious flavor experience that’s just divine.
Serving Suggestions
When you’re ready to serve, I recommend presenting your Tiramisu Chia Pudding in individual glasses or jars for a charming touch. Finish with an additional dollop of whipped coconut cream and a sprinkle of cocoa powder right before serving. A few coffee beans on top can add a lovely visual element as well!
Recipe Variations
Now that you’ve mastered the basic Tiramisu Chia Pudding, feel free to get creative! Here are a few fun twists you can try:
-
Mocha Delight: Add a spoonful of cocoa powder directly into the chia mix for a more intense chocolate flavor.
-
Nuts About You: Throw in some finely chopped hazelnuts or almonds if you want that extra crunch and a nutty flavor reminiscent of traditional tiramisu.
-
Fruit Fusion: Layer in some fresh berries or banana slices between the pudding layers for a refreshing burst of flavor.
-
Spiced Up: Want a little warmth in your dessert? Add a pinch of cinnamon or nutmeg to the chia pudding mixture.
-
Dairy-Free Whipped Topping: If you want to switch it up, blend soaked cashews in place of coconut cream for a different creamy topping.
Chef’s Notes
Throughout my years of experimenting with various dessert recipes, I’ve learned that the beauty often lies in simplicity. This Tiramisu Chia Pudding encapsulates that idea perfectly, offering a sophisticated dessert that’s both easy to make and nourishing. Additionally, chia pudding recipes have a delightful adaptability; you can swap out ingredients based on what you have on hand.
Oh, and I have to mention this funny story! The first time I decided to impress a date with a dessert, I did the classic Tiramisu, and it ended up more like “Tira-mistake.” The mascarpone curdled because I added the coffee too quickly—it was a disaster! Needless to say, I kept my culinary adventures since then much simpler. This chia pudding recipe? No risk involved—just delicious results!
FAQs and Troubleshooting
-
Why did my chia pudding not thicken?
Ensure you’re using enough chia seeds and letting it sit for the right amount of time. If the pudding still seems runny, it may need a bit longer to set. -
Can I make this recipe in advance?
Absolutely! You can prepare the chia pudding a couple of days ahead and store it in the fridge. Just layer the coconut cream right before serving for the freshest taste. -
Is this dessert keto-friendly?
Yes, this recipe fits perfectly into a keto lifestyle! You’ll get that sweetness from the chia with low sugar content, especially if you choose low-carb sweeteners. -
How do I store leftovers?
Keep any leftovers in an airtight container in the fridge for up to 3-5 days. Just be sure to mix it up before serving again!
Nutritional Info (Optional)
For those mindful of their intake, here’s a rough breakdown per serving (based on 4 servings):
- Calories: 180
- Protein: 6g
- Carbohydrates: 25g
- Fiber: 12g
- Sugars: 6g
- Fat: 8g
And there you have it—the ultimate Tiramisu Chia Pudding recipe that’s bound to impress at any gathering (or just satisfy those late-night cravings!). I hope you enjoy making this delicious treat as much as I do—remember, cooking should be fun and fulfilling. Don your apron, gather some loved ones, and share your delightful creation!
Happy cooking, everyone! 🍽️✨
PrintTiramisu Chia Pudding

A healthy, vegan-friendly twist on the classic tiramisu, packed with flavors of coffee, cocoa, and creamy goodness—all in a delicious chia pudding.
- Prep Time: 15 minutes
- Cook Time: 0 minutes
- Total Time: 240 minutes
- Yield: 4 servings 1x
- Category: Dessert
- Method: Chilling
- Cuisine: Italian
- Diet: Vegan
Ingredients
- 1/4 cup Chia Seeds
- 1 cup Unsweetened Almond Milk
- 2–3 tablespoons Maple Syrup or Agave Nectar
- 2 teaspoons Vanilla Extract
- 1/2 cup Coffee or Espresso
- 2 tablespoons Cocoa Powder
- 1/4 cup Coconut Cream
Instructions
- Mix the almond milk, maple syrup, vanilla extract, and coffee in a bowl.
- Add chia seeds to the wet mixture and stir well.
- Cover with plastic wrap and refrigerate for at least 3-4 hours or overnight.
- Whip the chilled coconut cream until fluffy.
- Layer the chia pudding and coconut cream in serving glasses, dust with cocoa between layers.
- Chill for another 30 minutes before serving if you can wait.
Notes
For added texture, consider including chocolate shavings or crushed walnuts between layers.
Nutrition
- Serving Size: 1 serving
- Calories: 180
- Sugar: 6g
- Sodium: 100mg
- Fat: 8g
- Saturated Fat: 7g
- Unsaturated Fat: 1g
- Trans Fat: 0g
- Carbohydrates: 25g
- Fiber: 12g
- Protein: 6g
- Cholesterol: 0mg
Keywords: tiramisu, chia pudding, healthy dessert, vegan dessert, keto dessert