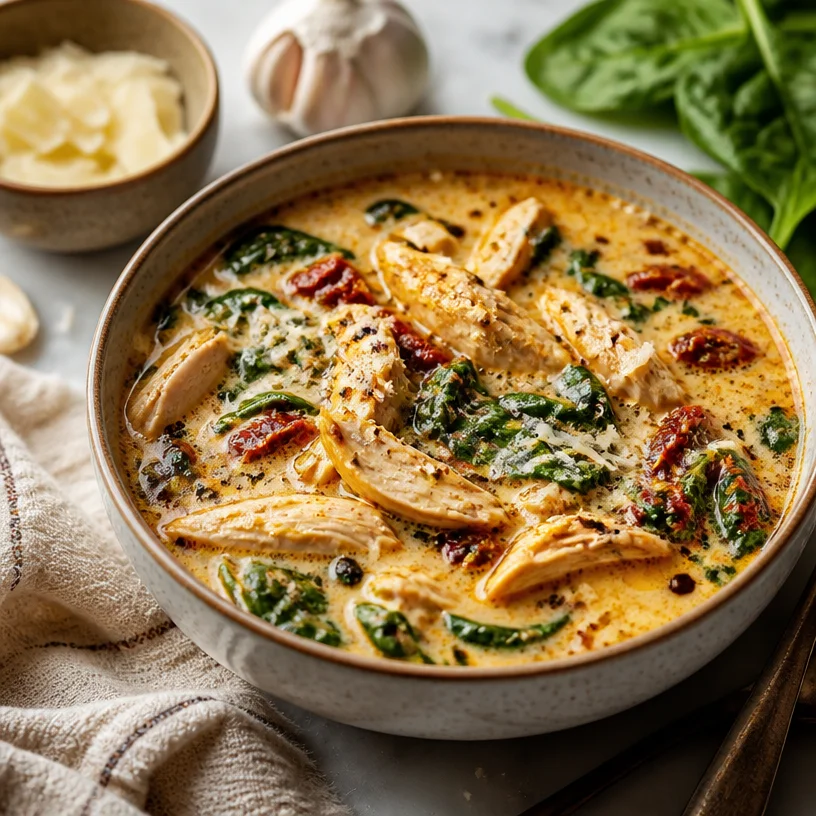
Weeknight One-Pot Marry-Me Chicken Soup in 25 Minutes
Marry Me Chicken Soup: A Love Story in a Bowl
Welcome to the kitchen, my friends! Today, I’m thrilled to share a dish that will not only warm your belly but also steal your heart. We’re diving into the delightful world of Marry Me Chicken Soup. As we step into cooking together, prepare to create a cozy comfort meal that’s perfect for chilly nights, special gatherings, or even just because! Gather your ingredients and let’s get started!
A Little Bit of Background
For me, cooking has always been about more than just following recipes; it’s a way of creating memories and building connections. One of my fondest memories involves a cozy evening spent with friends after a long work week. We were huddled in a small kitchen, laughter bouncing off the walls as I whisked together a lovely chicken soup. My friend Sarah, with her eagerness to help, unexpectedly added a twist: a generous sprinkle of sun-dried tomatoes, and the magic began.
When we sat down at the table and dug into what we lovingly called “Marry Me Chicken Soup,” I remembered how dedicated I was to crafting meals that not only tasted incredible but also brought people together. Each spoonful was rich and creamy, infused with the warmth of roasted garlic and the seasonal brightness of spinach. There’s something undeniably romantic about a meal that can wrap you in its embrace, and that night proved that good food could indeed open hearts.
Ingredients
Here’s what you’ll need to make this sumptuous Marry Me Chicken Soup:
-
Chicken Breast: This is your star protein! Lean yet flavorful, chicken breast offers a tender bite. Prefer dark meat? Feel free to substitute with chicken thighs for a deeper taste.
-
Sun-Dried Tomatoes: These little gems add a burst of umami and sweetness to your soup. If you don’t have them, you can use roasted red peppers; they’ll add a different but delightful flavor.
-
Spinach: Fresh or frozen, spinach brings a lovely green color and vital nutrients to our dish. If spinach isn’t your favorite, kale works too!
-
Garlic: Essential for depth and flavor, garlic adds aromatic warmth. Use fresh cloves for maximum impact, but minced garlic from a jar works in a pinch.
-
Parmesan Cheese: This brings a nutty, salty finish to the soup. For a dairy-free option, try nutritional yeast for a cheesy flavor without the cheese!
-
Cream: This lends that dreamy creaminess to our soup. If you’re looking for a lighter option, half-and-half or even coconut milk can be excellent substitutes.
-
Chicken Broth: The base of our soup — use homemade if you have it! Otherwise, low-sodium store-bought broth works well.
Step-by-Step Instructions
Now that we have our ingredients, it’s time to get cooking!
-
Prep the Chicken: Start by cutting your chicken breast into bite-sized pieces, about 1-inch cubes. This helps with even cooking. Season them generously with salt and pepper! A simple seasoning allows the flavor of the chicken to shine through.
-
Sauté the Aromatics: In a large pot, heat a tablespoon of olive oil over medium heat. Add minced garlic and sauté for about 30 seconds until it becomes fragrant. Don’t let it brown too much; we want sweet garlic goodness!
-
Cook the Chicken: Add your seasoned chicken pieces to the pot and sauté for about 5-7 minutes until they’re golden brown and cooked through. This is where you can kick the flavor up a notch; the fond (brown bits) left on the bottom of the pot adds depth to the soup.
-
Add the Sun-Dried Tomatoes: Toss in those sun-dried tomatoes and stir to combine. They will soften and infuse the dish with their lovely flavor.
-
Pour in the Broth: Now, it’s time to add your chicken broth. Pour in about 4 cups and bring everything to a simmer. This is when the magic happens—aromas will start wafting through your kitchen. Let it simmer for about 10 minutes to meld those flavors beautifully.
-
Incorporate Cream and Parmesan: Reduce the heat to low and stir in the cream and grated Parmesan cheese. Watch it swirl and transform the soup into a velvety masterpiece! Feel free to taste and adjust seasoning as needed — maybe a sprinkle more of salt or pepper.
-
Add Spinach: Finally, stir in the spinach, allowing it to wilt slightly. This will only take a minute or two!
-
Serve Hot: Dish up the soup while it’s hot! For extra flair, garnish with a sprinkle of more Parmesan or fresh herbs.
Serving Suggestions
For a truly charming presentation, ladle the soup into beautiful bowls and serve it alongside crusty bread or a simple green salad. A sprinkle of fresh parsley or basil on top will not only add a pop of color but also a fresh aroma that invites everyone to the table. Remember, the plate is your canvas; an inviting bowl of soup with a hunk of bread beside it creates a warm, welcoming vibe!
Recipe Variations
Spice things up with these fun twists:
-
Spicy Kick: Add a pinch of red pepper flakes for a little heat.
-
Herby Goodness: Fresh thyme or basil added during the simmering step can elevate the flavor profile beautifully.
-
Nut-Free/Seed-Free: Omit the Parmesan cheese altogether or use a nut-based cheese alternative to accommodate dietary restrictions.
-
Vegan Delight: Swap chicken with chickpeas or tofu, and use coconut cream or cashew cream for a vegan rendition.
-
Italian Flair: Add tortellini or another favorite pasta directly into the soup for a heartier meal.
Chef’s Notes
Ah, where do I even begin? This recipe has evolved beautifully over the years, and I still remember the first time I made it for my family. My aunt had just moved into the neighborhood, and I thought this soup would make her feel at home. Little did I know, it would become a family favorite! There were laughs, stories, and, of course, the one moment when someone decided to “help” with the garlic, and let’s just say we had robust flavors that night. Cooking is wild like that!
FAQs and Troubleshooting
1. Why did my soup curdle after adding cream?
For a smoother integration, try to heat the cream slightly before adding it to the soup. Always add it to the pot off the heat — this helps prevent curdling!
2. My soup is too thick; how can I fix it?
Simply add a bit more chicken broth or water to reach your desired consistency. Stir it in gradually until perfect!
3. Can I freeze this chicken soup?
Yes! The soup freezes beautifully. Just allow it to cool completely before transferring to an airtight container. Let it thaw in the fridge overnight before reheating.
4. How do I make it gluten-free?
This soup is naturally gluten-free, but if you want to add pasta, be sure to use gluten-free options.
Nutritional Info (Optional)
While I typically focus on the joy of cooking, here’s a quick glance at the nutritional aspects: this recipe is packed with protein from the chicken, beneficial vitamins from the spinach, and healthy fats from the cream, perfect for a balanced meal that warms your soul!
So there you have it! A cozy bowl of Marry Me Chicken Soup ready for you to enjoy. May this recipe bring warmth to your kitchen and love to the table. Until next time, happy cooking!
PrintMarry Me Chicken Soup
A cozy comfort meal infused with roasted garlic, sun-dried tomatoes, and creamy goodness, perfect for chilly nights.
- Prep Time: 15 minutes
- Cook Time: 30 minutes
- Total Time: 45 minutes
- Yield: 4 servings 1x
- Category: Soup
- Method: Stovetop
- Cuisine: Italian
- Diet: Nut-Free
Ingredients
- 1 lb Chicken Breast, cut into bite-sized pieces
- 1/2 cup Sun-Dried Tomatoes, chopped
- 2 cups Spinach, fresh or frozen
- 3 cloves Garlic, minced
- 1/2 cup Parmesan Cheese, grated
- 1 cup Cream
- 4 cups Chicken Broth
- 1 tbsp Olive Oil
- Salt and Pepper, to taste
Instructions
- Prep the chicken by cutting it into bite-sized pieces and seasoning generously with salt and pepper.
- Sauté the minced garlic in olive oil over medium heat for about 30 seconds until fragrant.
- Cook the seasoned chicken in the pot for about 5-7 minutes until golden brown and cooked through.
- Add the sun-dried tomatoes to the pot and stir to combine.
- Pour in the chicken broth and bring to a simmer, letting it cook for about 10 minutes.
- Incorporate the cream and Parmesan cheese, stirring to combine.
- Add the spinach and allow it to wilt for a minute.
- Serve hot, garnished with extra Parmesan or fresh herbs.
Notes
For a lighter option, substitute cream with half-and-half or coconut milk. Soup can be frozen for future meals.
Nutrition
- Serving Size: 1 bowl
- Calories: 400
- Sugar: 3g
- Sodium: 800mg
- Fat: 20g
- Saturated Fat: 10g
- Unsaturated Fat: 7g
- Trans Fat: 0g
- Carbohydrates: 15g
- Fiber: 2g
- Protein: 27g
- Cholesterol: 75mg
Keywords: chicken soup, Marry Me Chicken Soup, comfort food, Italian soup, creamy soup
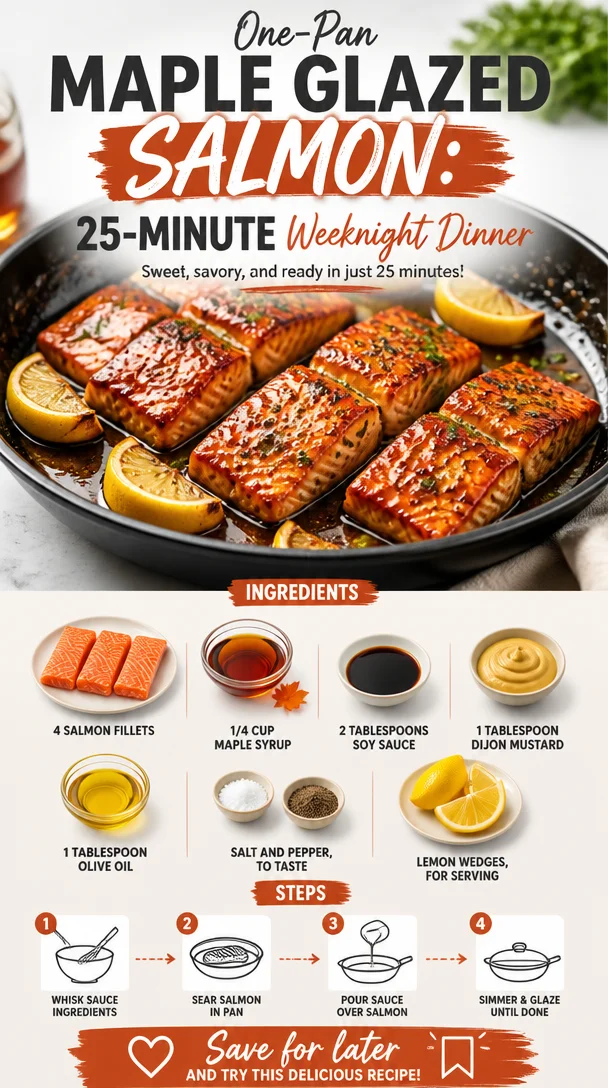
One-Pan Maple Glazed Salmon: 25-Minute Weeknight Dinner
Maple Glazed Baked Salmon: A Delightful Dish to Savor
Hello, my culinary friends! Today, I’m thrilled to share a recipe that truly exemplifies my philosophy of cooking with elegance without the intimidation factor. Enter the Maple Glazed Baked Salmon — a dish that merges sweet and savory in a way that will have your tastebuds dancing and your dinner guests raving. This recipe is not only delicious; it also comes together in a pinch, making it perfect for busy weeknights or last-minute dinner parties.
Picture this: you’re back from a long day, and the last thing you want to do is slave away at the stove. But you want to serve something impressive, something that feels personal and lovely. That’s where this salmon comes in. With just a handful of ingredients, a little bit of prep, and the wonderful transformation of baking, you can craft a dish that looks like it belongs in a fine-dining restaurant. So, grab your apron, and let’s dive into this culinary adventure!
My Personal Story: The First Glaze
I vividly remember the first time I made maple-glazed salmon. It was during a dreary winter evening, and I was longing for something bright and cheerful. I decided to host a small gathering for my friends to lift our spirits. On a whim, I concocted this glaze out of maple syrup, soy sauce, and a little Dijon mustard. The aroma wafting through the kitchen drew everyone in, lifting our moods even before we sat down to eat.
As my friends gathered around the table, I remember seeing their eyes widen with delight as I placed the salmon in front of them. What started as a simple dish quickly transformed into a highlight of our evening filled with laughter and good cheer. That first bite — oh, that beautiful balance of sweet maple and savory salmon — left a lasting impression. Ever since, this recipe has been a staple in my home. It’s a reminder that food can indeed bring us together and create warm memories that linger long after the last bite.
Ingredients
Now, let’s talk about what you need to bring this delightful dish to life. Here’s a breakdown of the ingredients:
-
4 salmon fillets
These should be fresh and preferably wild-caught. If you’re unable to find salmon, you can substitute with other fish like trout or arctic char. -
1/4 cup maple syrup
Pure maple syrup is the gold standard for this recipe, packing that sweet richness. If you’re in a pinch, you can use honey or agave nectar for an alternative flavor profile. -
2 tablespoons soy sauce
This adds a savory depth to the glaze. For a gluten-free option, use tamari. You can also try coconut aminos for a milder flavor. -
1 tablespoon Dijon mustard
The mustard provides a zesty kick that beautifully balances out the sweetness. If you’re in a bind, yellow mustard works too, but it’ll be less sophisticated. -
1 tablespoon olive oil
A drizzle of olive oil adds richness and helps with the cooking process. You can substitute it with avocado oil or melted coconut oil if needed. -
Salt and pepper to taste
Always taste your food! A pinch of salt and a touch of pepper will enhance the flavors beautifully. -
Lemon wedges for serving
Fresh lemon juice cuts through the richness of the salmon, adding a bright finish. Feel free to use lime if you prefer a citrus twist!
Step-by-Step Instructions
Let’s get cooking! Follow these steps, and you’ll have a beautifully glazed salmon that will impress anyone sitting around your table.
-
Preheat your oven to 375°F (190°C).
Preheating ensures even cooking. I recommend setting your timer for about 10 minutes after mixing your glaze to let the oven reach temperature while you prep! -
Prepare the baking dish.
Lightly grease a baking dish with a little olive oil to prevent the salmon from sticking. This also helps in non-slip plating later! -
Mix the maple glaze.
In a small bowl, whisk together the maple syrup, soy sauce, Dijon mustard, and olive oil until combined. This glaze is the heart of the recipe, so make sure to blend well for a smooth consistency. -
Season the salmon.
Place your salmon fillets in the prepared baking dish, skin side down (if you have skin-on fillets). Generously sprinkle with salt and pepper. Here, a light hand with the salt is best—the soy sauce already adds a nice salty touch. -
Dress the salmon with the glaze.
Pour the maple glaze over the salmon fillets. Use a brush or the back of a spoon to spread it evenly. This ensures every bite is full of that luscious flavor. -
Bake the salmon.
Place the baking dish in the preheated oven. Bake for about 15-20 minutes, or until the salmon flakes easily with a fork. It’s like magic watching that bright pink fillet turn into something beautifully succulent! -
Broil for a perfect finish (optional).
If you’d like a caramelized top, switch the oven to broil for the last 2-3 minutes. Keep a close eye during this step. You want that glaze to bubble just enough to create a gorgeous finish without burning! -
Let it rest.
Once out of the oven, allow the salmon to rest for a minute before serving. This will help retain moisture and allow those flavors to settle beautifully.
Serving Suggestions
Now that your salmon is cooked to perfection, it’s time to plate! Serve the maple glazed salmon with some lemon wedges on the side for that zesty touch. Pair it with vibrant sides like roasted asparagus or a fresh green salad drizzled with a light vinaigrette. These accompaniments not only complement the sweetness of the glaze but also elevate the entire meal presentation.
To create a stunning visual feast, consider placing the salmon on a colorful platter, garnished with fresh herbs like parsley or dill. A sprinkle of sesame seeds can also add a nice crunch and visual contrast!
Recipe Variations
Feeling adventurous? Here are some variations you can explore with this base recipe:
-
Herb-Infused Maple Glaze: Add fresh herbs like thyme or rosemary to your glaze for an earthy twist.
-
Spicy Maple Salmon: Stir in a teaspoon of chili flakes or sriracha to your glaze for a sweet and spicy combination.
-
Citrus Maple Glaze: Mix in some fresh orange or lime juice into the glaze for a zesty flavor profile.
-
Maple Mustard Crust: Before glazing, sprinkle the fillets with crushed nuts or breadcrumbs for a crunchy layer.
-
Sweet Potato & Kale Side: Serve with roasted sweet potatoes and sautéed kale for a beautiful, contrast-filled plate!
Chef’s Notes
This recipe has undergone quite the evolution in my kitchen! Initially, I used brown sugar instead of maple syrup. While it was delicious, I find that maple syrup offers a natural sweetness that really complements the salmon’s flavor without overwhelming it. And if there’s anything my cooking journey has taught me, it’s that simple tweaks can yield the most breathtaking results!
One time, I forgot to add the mustard to my glaze—cue panic! I quickly grabbed some balsamic vinegar instead, and let me tell you, the flavor explosion was unexpected but truly delightful! So don’t be afraid to experiment a little; cooking is all about finding what resonates with your palate.
FAQs and Troubleshooting
-
Can I use frozen salmon?
Absolutely! Just ensure it’s fully thawed and patted dry before marinating. If you bake it from frozen, increase the baking time by 5-10 minutes. -
How do I know when the salmon is done?
Perfectly baked salmon should flake easily with a fork and have an internal temperature of around 145°F (63°C). A good meat thermometer can be your best friend in the kitchen! -
What if the glaze burns?
If you notice the glaze starting to burn during baking or broiling, tent the salmon with aluminum foil to shield it from direct heat. -
Can I make the glaze ahead of time?
Absolutely! You can prepare the glaze up to a day in advance and store it in the fridge. Just give it a good whisk before using it.
Nutritional Info
While I don’t provide the exact nutritional information (as I believe in enjoying food in moderation!) I can share that this recipe is a fantastic source of omega-3 fatty acids from the salmon, along with a delightful mix of vitamins and minerals from the glaze ingredients.
Remember, cooking is not just about eating; it’s about enjoying the process, the flavors, and the company you gather. So, tie on that apron, invite over some friends, and enjoy the succulent heights of this Maple Glazed Baked Salmon. You’ve got this!
Let me know how yours turns out, and happy cooking! 🌟
PrintMaple Glazed Baked Salmon
A delightful dish that merges sweet and savory flavors, perfect for busy weeknights or dinner parties.
- Prep Time: 10 minutes
- Cook Time: 20 minutes
- Total Time: 30 minutes
- Yield: 4 servings 1x
- Category: Main Course
- Method: Baking
- Cuisine: American
- Diet: Pescatarian
Ingredients
- 4 salmon fillets
- 1/4 cup pure maple syrup
- 2 tablespoons soy sauce
- 1 tablespoon Dijon mustard
- 1 tablespoon olive oil
- Salt and pepper to taste
- Lemon wedges for serving
Instructions
- Preheat your oven to 375°F (190°C).
- Prepare the baking dish by lightly greasing it with olive oil.
- Mix the maple glaze in a small bowl: whisk together the maple syrup, soy sauce, Dijon mustard, and olive oil.
- Season the salmon fillets with salt and pepper in the greased baking dish.
- Dress the salmon with the glaze, spreading it evenly.
- Bake the salmon for about 15-20 minutes, until it flakes easily with a fork.
- Broil for the last 2-3 minutes for a caramelized top (optional).
- Let it rest before serving.
Notes
For a gluten-free option, substitute soy sauce with tamari. Feel free to experiment with herbs or spices in the glaze.
Nutrition
- Serving Size: 1 fillet
- Calories: 350
- Sugar: 15g
- Sodium: 400mg
- Fat: 12g
- Saturated Fat: 1.5g
- Unsaturated Fat: 10g
- Trans Fat: 0g
- Carbohydrates: 24g
- Fiber: 0g
- Protein: 30g
- Cholesterol: 70mg
Keywords: salmon, maple glaze, easy recipes, baked salmon, weeknight dinner
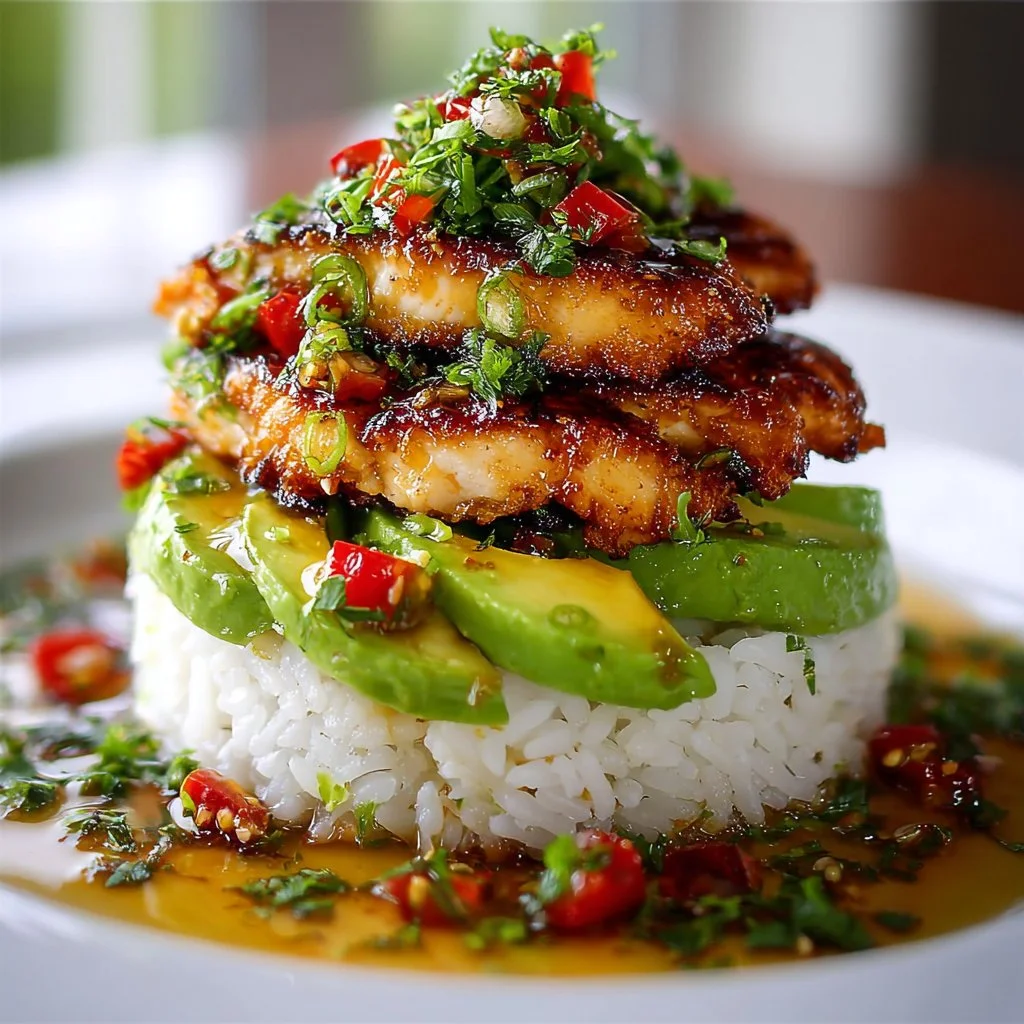
Honey Lime Chicken & Avocado Rice Stack – Irresistible 25-Minute Dinner
Honey Lime Chicken & Avocado Rice Stack – Irresistible 25-Minute Dinner
Hello, fellow food lovers! Are you ready to step into the kitchen for a quick yet delicious meal that’s as vibrant as a summer’s day? Today, I’m excited to share one of my absolute favorites: Honey Lime Chicken & Avocado Rice Stack. This dish is not only a cinch to whip up—taking just about 25 minutes from prep to plate—but it also bursts with flavor and color that will elevate your dining experience.
Picture this: succulent chicken breasts marinated in a zesty honey-lime mix, all laid atop fluffy rice and rich, creamy avocados. The sweet and tangy notes from the honey and lime marry beautifully with the freshness of the avocado and the inviting warmth of the rice. You’ve got a mini flavor explosion in every bite!
Now, I know that weeknight cooking can sometimes feel daunting, but that’s where I come in. This recipe embraces simplicity without sacrificing elegance, making it perfect for cozy dinners at home or when you need something special but quick to impress your guests. Plus, it’s a fantastic way to gather everyone around the table. Let’s dig in and set the stage for a meal that feels both rewarding and effortless.
Personal Story
One of my fondest memories that inspired this dish dates back to a sunny afternoon when I decided to host an impromptu backyard barbecue for my closest friends. With the grill fired up and the aromatic scent of marinated chicken wafting through the air, I felt a warmth of anticipation. As the chicken sizzled, I tossed together a vibrant avocado and rice salad, reminiscent of the ones we’d enjoy during summer picnics as kids. The laughter and chatter of my friends mingled with the gentle clinking of glasses—it was pure magic!
I remember plating the juicy honey lime chicken on a bed of fluffy rice, then layering on the diced avocado as a refreshing touch to create a stack. The smiles around the table said it all—everyone loved it! That day, I realized how food could transcend taste; it creates moments, nostalgia, and connections. And that’s exactly why I can’t wait to share this recipe with you. Each bite is a reminder of those sunny afternoons filled with laughter and love.
Ingredients
Here’s what you’ll need to create your Honey Lime Chicken & Avocado Rice Stack. Each ingredient contributes to the overall deliciousness and can often be swapped based on what you have at home!
-
2 Boneless, Skinless Chicken Breasts
The star of the show! Boneless and skinless make for quick cooking and easy eating. If you’re in a bind, feel free to use thighs for a richer flavor. -
2 Tablespoons Olive Oil
Extra virgin for elevated flavor, but any olive oil will do! This not only helps to prevent sticking but also adds a lovely richness to the chicken. -
Zest and Juice of 2 Limes
Fresh lime juice brightens up the dish, while the zest adds that extra aromatic touch. If limes aren’t available, lemons can work in a pinch! -
2 Tablespoons Honey
This natural sweetener balances the acidity of the lime beautifully. If you need a substitute, agave syrup works wonderfully too! -
2 Cloves Garlic, Minced
A little minced garlic goes a long way in adding depth to the marinade—that aromatic flavor really enhances the dish. Fresh is best, but garlic powder can work if you’re in a hurry. -
1/2 Teaspoon Ground Cumin
Earthy and warm, cumin brings a touch of spice to the mix. Just a sprinkle enhances the flavor profile, but don’t overdo it unless you’re a cumin lover! -
Salt and Black Pepper, to Taste
Essential seasoning! Always taste as you go to get that perfect seasoning balance. -
2 Cups Cooked White or Jasmine Rice
Fluffy rice forms a cozy base for layering. Leftovers or even microwave rice can save time if you’re in a major rush. -
2 Ripe Avocados, Diced
Creamy and delicious, avocados add richness to the stacks. Choose ripe ones for the best flavor—if they’re too firm, leave them a day or two on the counter. -
1 Tablespoon Fresh Cilantro, Chopped
This herb brightens and lifts the entire dish—definitely a must! If cilantro isn’t your thing, fresh parsley can be a good substitute. -
1/2 Cup Cherry Tomatoes, Finely Chopped (Optional)
A burst of color and sweetness! These can be omitted if you prefer, or swapped for diced bell peppers for a crunchy twist.
Step-by-Step Instructions
Let’s get cooking in just a few easy steps. Have that apron tied around your waist? Good! Here we go:
-
Marinate the Chicken: In a medium bowl, whisk together the olive oil, lime zest and juice, honey, minced garlic, cumin, salt, and black pepper. This marinade is your magic potion, infusing the chicken with incredible flavor. Place the chicken breasts in the bowl, coating them thoroughly, and let them marinate while you prep your other ingredients (or at least 10 minutes).
-
Cook the Chicken: Heat a skillet over medium-high heat. Once hot, add the marinated chicken breasts (discard any remaining marinade). Cook for about 5-7 minutes on each side or until the chicken is golden brown and the internal temperature reaches 165°F (75°C). This is key for that juicy texture. Pro tip: use a meat thermometer for accuracy!
-
Prepare Rice: If you’re using leftover rice, heat it up in the same skillet after the chicken is done, scraping up any little brown bits for extra flavor. If you’re using freshly cooked rice, fluff it with a fork and set aside.
-
Avocado Time: While the chicken cooks, cut your ripe avocados in half, remove the pit, and scoop the flesh out with a spoon. Dice it into bite-sized pieces and toss with a squeeze of lime juice (to keep it from browning) and a pinch of salt.
-
Plating the Stack: For a stunning presentation, take a shallow bowl or plate. Start with a generous scoop of rice at the bottom, creating a nice base. Slice the chicken breasts and lay them on top of the rice, then finish with the diced avocado and sprinkle the fresh cilantro for that finishing touch. If you’re feeling extra, toss in those cherry tomatoes for an added burst of flavor and color.
-
Enjoy: Gather your loved ones around the table, serve, and watch as they revel in the delightful layers of flavor and texture!
Serving Suggestions
To plate your Honey Lime Chicken & Avocado Rice Stack, consider using a wide, shallow bowl or a beautiful plate where all the colors can shine. Start with a scoop of rice and layer the sliced chicken on top. Then, add the diced avocado, finishing with a sprinkle of fresh cilantro and a few halved cherry tomatoes for a pop of color. A wedge of lime on the side makes for a lovely garnish and offers that extra zesty squeeze for those who crave it!
Recipe Variations
-
Grilled Chicken: Swap the skillet method for a grill for added smoky flavor. Just make sure to oil the grates!
-
Spicy Kick: Add some diced jalapeños or a sprinkle of chili flakes to the chicken marinade for a spicy twist!
-
Vegetarian Version: Replace chicken with grilled halloumi or a plant-based protein such as chickpeas or tofu, marinated in the same sweet-tangy dressing.
-
Nutty Flavor: Toss in some toasted pine nuts or sunflower seeds for a delightful crunch!
-
Different Rice: Use quinoa or cauliflower rice as a base for a low-carb option.
Chef’s Notes
Ah, this recipe has evolved beautifully over time! I remember when I first started experimenting with honey and lime as a marinade. Initially, I paired them with different proteins, but the chicken really took the spotlight and became a staple at dinners among friends. I have even used this technique to marinate shrimp and fish, and let me tell you, it’s divine! Life’s too short for boring meals, and this dish is one of those that just keeps evolving with every gathering I host. Plus, it’s a hit every time!
FAQs and Troubleshooting
1. What if my chicken is too dry?
Cooking chicken can be tricky! If your chicken turns out dry, ensure you’re not overcooking it by using a meat thermometer. You want a perfect 165°F! Also, letting the chicken rest for a few minutes off the heat allows the juices to redistribute.
2. Can I make this in advance?
Yes! You can marinate the chicken in the morning, and when you’re ready to eat, simply cook it up and assemble the stack. The rice can also be prepped ahead of time.
3. What can I do if my avocados are hard?
If your avocados aren’t ripe yet, place them in a brown paper bag with an apple or banana for a day or two; the ethylene gas will speed up the ripening process!
4. How do I store leftovers?
Leftovers can be refrigerated in an airtight container for up to 2 days. However, I recommend keeping avocado separate until you’re ready to serve to prevent browning.
Nutritional Info
This dish is not only delicious but also nutritious! A serving contains:
- Calories: 480
- Protein: 32g
- Carbohydrates: 37g
- Fat: 24g
- Fiber: 8g
But remember, nutritional values can vary based on your ingredients and serving sizes.
And there you have it, my beautiful friends! I hope you enjoy making and sharing this Honey Lime Chicken & Avocado Rice Stack as much as I do. It’s all about the joy of cooking and savoring the moments spent together at the table. So tie on your ivory apron, grab a glass of something sparkling, and let’s create some magic! Happy cooking!
PrintHoney Lime Chicken & Avocado Rice Stack
A vibrant and delicious 25-minute dinner with chicken marinated in honey-lime, served over fluffy rice and creamy avocado.
- Prep Time: 10 minutes
- Cook Time: 15 minutes
- Total Time: 25 minutes
- Yield: 4 servings 1x
- Category: Main Course
- Method: Skillet
- Cuisine: Mexican
- Diet: Gluten-Free
Ingredients
- 2 Boneless, Skinless Chicken Breasts
- 2 Tablespoons Olive Oil
- Zest and Juice of 2 Limes
- 2 Tablespoons Honey
- 2 Cloves Garlic, Minced
- 1/2 Teaspoon Ground Cumin
- Salt and Black Pepper, to Taste
- 2 Cups Cooked White or Jasmine Rice
- 2 Ripe Avocados, Diced
- 1 Tablespoon Fresh Cilantro, Chopped
- 1/2 Cup Cherry Tomatoes, Finely Chopped (Optional)
Instructions
- Marinate the Chicken: In a medium bowl, whisk together the olive oil, lime zest and juice, honey, minced garlic, cumin, salt, and black pepper. Place the chicken breasts in the bowl, coating them thoroughly, and let them marinate while you prep your other ingredients (or at least 10 minutes).
- Cook the Chicken: Heat a skillet over medium-high heat. Add the marinated chicken breasts (discard any remaining marinade). Cook for about 5-7 minutes on each side or until the chicken is golden brown and the internal temperature reaches 165°F (75°C).
- Prepare Rice: If you’re using leftover rice, heat it up in the same skillet after the chicken is done. If you’re using freshly cooked rice, fluff it with a fork and set aside.
- Avocado Time: While the chicken cooks, cut your ripe avocados in half, remove the pit, and scoop the flesh out with a spoon. Dice it into bite-sized pieces and toss with a squeeze of lime juice and a pinch of salt.
- Plating the Stack: Take a shallow bowl or plate. Start with a scoop of rice at the bottom, creating a base. Slice the chicken breasts and lay them on top of the rice, then finish with the diced avocado and sprinkle the fresh cilantro.
- Enjoy: Gather your loved ones around the table, serve, and watch as they revel in the delightful layers of flavor and texture!
Notes
Consider using a wide, shallow bowl for presentation. A wedge of lime on the side makes for a lovely garnish.
Nutrition
- Serving Size: 1 serving
- Calories: 480
- Sugar: 10g
- Sodium: 300mg
- Fat: 24g
- Saturated Fat: 4g
- Unsaturated Fat: 20g
- Trans Fat: 0g
- Carbohydrates: 37g
- Fiber: 8g
- Protein: 32g
- Cholesterol: 70mg
Keywords: chicken, avocado, honey lime, quick dinner, summer meal