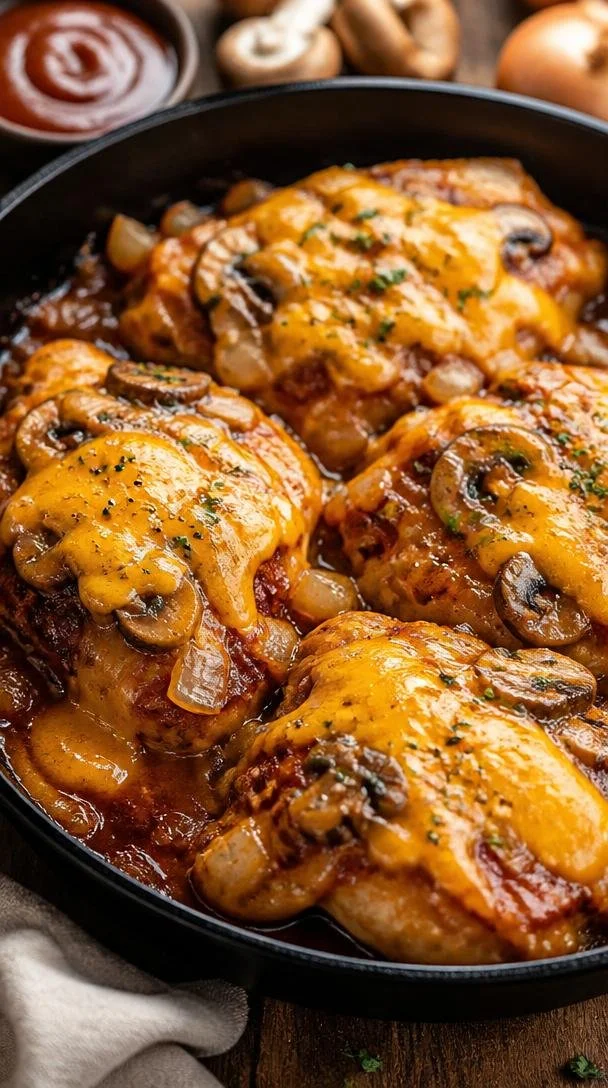
One-Pan Texas Roadhouse-Style Smothered Chicken Recipe
Discover the Comfort of Texas Roadhouse Smothered Chicken
Hello there, fellow food enthusiasts! If you’re anything like me, the moment you step into the kitchen, you feel a sense of magic in the air—an invitation to create something beautiful and delicious. Today, I’m thrilled to share with you a beloved recipe that makes my heart sing: Texas Roadhouse Smothered Chicken. This dish captures the spirit of comfort food, combining tender chicken breasts smothered in hearty sautéed mushrooms and onions, drenched in zesty BBQ sauce, and topped with gooey cheddar cheese. Imagine the aroma wafting through your kitchen—it’s pure bliss!
I stumbled upon this gem during a cozy dinner with friends one evening. We had finished our usual fare and started reminiscing about memorable meals, and someone brought up the irresistible flavors of Texas Roadhouse. The glow of the restaurant came alive in our minds—those fluffy rolls, the melted cinnamon butter, and of course, their fantastic Smothered Chicken. It became our mission to recreate this savory indulgence, and let me tell you, we succeeded beyond our wildest dreams!
In this blog post, I’ll guide you through my version of this dish, sprinkled with my personal kitchen insights and tips, so you can serve it at your next gathering—or simply for an incredible dinner at home. Let’s gather our ingredients, roll up our sleeves, and set the stage for a culinary adventure!
A Personal Story: Chicken Dreams
Let me take you back to a moment I’ll never forget. Picture this: A summer evening filled with laughter and clinking glasses as friends gathered in my backyard, the sun dipping low in the sky. I was fired up for a dinner party and decided to whip up my take on the Texas Roadhouse Smothered Chicken. With every dice of the onion and slice of mushroom, I felt the excitement build.
As the chicken sizzled on the skillet, the aromas danced around us, coaxing my guests closer to the kitchen. We shared stories, played games, and before long, the table was set, ready to embrace the deliciousness to come. When I finally plated the dishes, the blend of colors and textures made my heart swell with pride. Everyone took their first bites, and the delighted “Mmm’s” and “Wow’s” filled the air. That moment—a gathering woven together by good food and unforgettable company—reminded me why I love cooking so much.
Ingredients
Let’s dive into the key players of this recipe! Here’s what you’ll need:
-
4 boneless, skinless chicken breasts: The star of the show! They are lean, easy to work with, and soak up all the flavors beautifully. If you’re looking for a healthier option, you can substitute with turkey cutlets.
-
1 cup sliced mushrooms: These lend an earthy flavor and a lovely texture. If mushrooms aren’t your thing, try zucchini or bell peppers for a sweet crunch.
-
1 cup diced onions: Onions bring a foundation of flavor to the dish. They caramelize beautifully, adding a touch of sweetness. Green onions can be a lighter substitute if you prefer a milder taste.
-
1 cup shredded cheddar cheese: A must for that gooey, melty topping. Feel free to mix it up with your favorite cheese—Monterey Jack works fabulously here too!
-
1 cup BBQ sauce: This is where the magic happens! Use your favorite brand for a smoky, tangy flavor. You can also make your own if you’re feeling adventurous.
-
Salt and pepper to taste: Essential for enhancing the flavors of your dish. Experiment with sea salt or smoked salt for a twist.
-
2 tablespoons olive oil: Used for sautéing, olive oil brings a healthful fat to the mix while adding richness to the dish.
Step-by-Step Instructions
Alright, foodies, let’s get cooking! Follow these simple steps, and let’s bring this dish to life together.
-
Prep Your Chicken: Start by patting the chicken breasts dry with paper towels. This crucial step ensures they sear wonderfully and don’t steam in the pan. Season each breast generously with salt and pepper. Cooking is all about layers of flavor, and this is your first one!
-
Sear the Chicken: Heat 1 tablespoon of olive oil in a large skillet over medium-high heat. Once the oil is hot and shimmering, carefully add the seasoned chicken breasts to the pan. Sear them for about 5-7 minutes on each side until they’re beautifully golden brown. The goal here is to achieve a lovely crust while keeping the inside juicy! To avoid overcrowding, you may need to work in batches.
-
Cook the Onions and Mushrooms: Once the chicken is browned, remove it from the skillet and set aside. In the same pan, add the remaining tablespoon of olive oil. Toss in the diced onions and sliced mushrooms. Sauté for about 5 minutes or until they’re tender and the onions are translucent. This blend will bring a sweet, savory depth to our dish!
-
Mix in the BBQ Sauce: After the onions and mushrooms have cooked down, pour in the BBQ sauce right into the skillet. Stir well to combine and let it simmer for about 2 minutes. This step allows all those flavors to meld together and gives your sauce a chance to develop.
-
Return the Chicken to the Skillet: Nestle the chicken breasts back into the skillet, spooning some of that lovely sauce over the top. Let all the ingredients mingle over medium heat for another 5 minutes. The chicken will soak up all that BBQ goodness!
-
Time for Cheesy Goodness: Now, sprinkle the shredded cheddar cheese over the chicken and cover the skillet with a lid. This allows the cheese to melt beautifully, about 3-4 minutes will do the trick. The moment you lift that lid will be pure magic—the ooey-gooey sight is enough to make any foodie swoon.
-
Serve It Up: Once the cheese is melted and bubbly, your dish is ready to shine! Carefully transfer everything to a serving platter, and drizzle any remaining sauce from the skillet over the top to make it look even more delicious.
Serving Suggestions
To plate your Texas Roadhouse Smothered Chicken, I love serving it alongside creamy mashed potatoes or fluffy rice to soak up that divine sauce. A side of roasted vegetables adds color and nutrition, making your meal visually appealing. Remember, presentation matters! A sprinkle of fresh herbs, like parsley or chives, adds a pop of color and an aromatic finish.
Recipe Variations
Mix things up with these creative twists:
- Spicy Kick: Add sliced jalapeños or a dash of cayenne pepper to the BBQ sauce for a fiery version.
- Herb Infusion: Stir in fresh herbs like thyme or rosemary with the onions and mushrooms for an aromatic boost.
- Creamy Version: Add cream cheese (about 4 ounces) to the BBQ sauce for a richer, creamier texture.
- Flavor Swap: Try switching out BBQ sauce for a honey mustard or teriyaki sauce for a completely different flavor profile.
- Low-Carb Option: Substitute the chicken with cauliflower steaks for a vegetarian alternative that’s just as scrumptious.
Chef’s Notes
I’ve been making variations of this dish for years—my recipe has evolved from a simple BBQ chicken concept into a delightful smothered legend at my dinner parties! The most memorable moment? I once accidentally burned the BBQ sauce while distracted by a game of charades. To save face, I quickly created a new spicy version on the fly, and it was a hit! Don’t worry if something goes awry; sometimes those unplanned detours lead to the best culinary discoveries.
FAQs and Troubleshooting
Q: My chicken is dry; what did I do wrong?
A: Dry chicken often results from overcooking. To avoid this, always keep an eye on your cooking times and use a meat thermometer; chicken should reach an internal temperature of 165°F.
Q: Can I use frozen chicken?
A: Yes, but it’s best to thaw the chicken completely in the refrigerator before cooking for even results.
Q: What if I want to make this dish ahead of time?
A: You can prepare the dish up until the cheese melting step, then cover and refrigerate. When you’re ready to eat, simply finish by reheating in the oven until hot and adding cheese.
Q: Can I use a different sauce?
A: Absolutely! This dish is so versatile. Feel free to experiment with your favorite sauces or even a homemade sauce for a personal touch.
Nutritional Info
This dish averages about 380 calories per serving, depending on your ingredient choices and portion sizes. It’s packed with protein from the chicken and provides a good source of calcium from the cheese. To make it even healthier, consider serving with a lovely garden salad or some roasted veggies!
So, let’s tie on those aprons, gather your ingredients, and dive into this scrumptious journey. Cooking should be an enjoyable experience, filled with delightful aromas and, of course, great company. I hope you enjoy every bite of this Texas Roadhouse Smothered Chicken as much as I do! Happy cooking!
PrintTexas Roadhouse Smothered Chicken

Tender chicken breasts smothered in sautéed mushrooms and onions, drenched in zesty BBQ sauce, and topped with gooey cheddar cheese.
- Prep Time: 15 minutes
- Cook Time: 30 minutes
- Total Time: 45 minutes
- Yield: 4 servings 1x
- Category: Main Course
- Method: Sautéing
- Cuisine: American
- Diet: Omnivore
Ingredients
- 4 boneless, skinless chicken breasts
- 1 cup sliced mushrooms
- 1 cup diced onions
- 1 cup shredded cheddar cheese
- 1 cup BBQ sauce
- Salt and pepper to taste
- 2 tablespoons olive oil
Instructions
- Prep your chicken: Pat the chicken breasts dry and season with salt and pepper.
- Sear the chicken: Heat 1 tablespoon of olive oil in a skillet and sear the chicken for 5-7 minutes on each side.
- Cook the onions and mushrooms: Remove chicken, add remaining olive oil, sauté onions and mushrooms for 5 minutes.
- Mix in the BBQ sauce: Pour BBQ sauce into the skillet, stir, and let it simmer for 2 minutes.
- Return the chicken to the skillet: Nestle chicken back into sauce and cook for another 5 minutes.
- Time for cheesy goodness: Sprinkle cheddar cheese on top and cover until melted, about 3-4 minutes.
- Serve it up: Transfer to a serving platter and drizzle with remaining sauce.
Notes
Serve with creamy mashed potatoes or roasted vegetables for a complete meal.
Nutrition
- Serving Size: 1 serving
- Calories: 380
- Sugar: 10g
- Sodium: 800mg
- Fat: 15g
- Saturated Fat: 7g
- Unsaturated Fat: 6g
- Trans Fat: 0g
- Carbohydrates: 20g
- Fiber: 1g
- Protein: 35g
- Cholesterol: 85mg
Keywords: Texas Roadhouse, smothered chicken, comfort food, chicken recipe, BBQ chicken
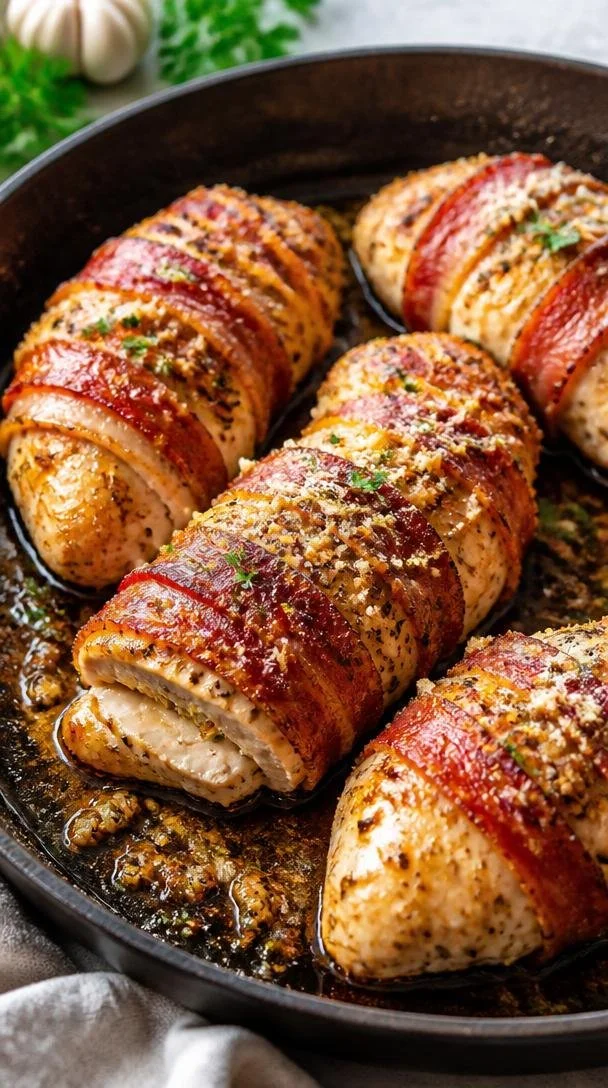
One-Pan Crispy Bacon-Wrapped Garlic Parmesan Chicken
Bacon Wrapped Garlic Parmesan Chicken: A Deliciously Indulgent Delight
Hello, lovely cooks! Are you ready to take your weeknight dinners to an entirely new level? Today, we’re diving into the mouthwatering world of Bacon Wrapped Garlic Parmesan Chicken. If you love juicy chicken breasts wrapped in crispy bacon and infused with garlicky goodness, then get ready for a harmonious blend of flavors that will have everyone at the dinner table asking for seconds!
Introduction
Let’s be honest: there’s something undeniably comforting about the combination of bacon and chicken. It’s like a warm hug on a plate. When I first ventured into the kitchen, I was on a quest for flavors that brought people together. One of my early culinary triumphs was discovering the magic of bacon-wrapped dishes. The way that rich, savory bacon enhances everything it touches is nothing short of genius. And when you add a sprinkle of Parmesan and the aromatic warmth of garlic, that’s when the transformation happens.
This dish is more than just a recipe; it’s an experience. Imagine the crackling sound as you slice into that crispy exterior, releasing the buttery aroma of garlic and the savory scent of cheese wafting through the air. It’s the kind of meal that beckons friends and family to gather ‘round the table, plates piled high, laughter bouncing off the walls. So tie on that ivory apron, ready your utensils, and let’s create a culinary masterpiece that feels just as elegant as it does reassuringly familiar.
Personal Story
It takes me back to a cozy winter evening a few years ago. I was hosting a dinner party to celebrate a friend’s birthday. The theme was comfort food, and I wanted to impress while keeping things easy. As I flipped through my recipe notes, I stumbled upon a bacon-wrapped chicken recipe I had scribbled down ages ago. It immediately sparked joy — I could picture the smiles on my friends’ faces when they took that first bite.
I decided to put a little twist on it and added heaps of garlic and Parmesan. The result? An unforgettable dish that stole the spotlight that night! Everyone gathered around, forks clinking against plates, sharing stories and laughter over smoky, cheesy bites of heaven. That night reaffirmed my love for creating not just meals, but shared experiences that linger long after the last bite is gone. That’s why I can’t wait to share this recipe with you!
Ingredients
Here’s what you’ll need to create your own Bacon Wrapped Garlic Parmesan Chicken:
-
4 boneless, skinless chicken breasts
Tender, juicy chicken serves as the foundation of our dish. Look for breasts that are plump and free of any additives for the best flavor. If you’re looking for a leaner option, you can substitute with turkey cutlets. -
8 slices of bacon
The star of the show! Choose thick-cut bacon for an irresistible crispy texture. Turkey bacon can be a lighter alternative, though the flavor will be slightly different. -
1/2 cup grated Parmesan cheese
Nutty and salty, Parmesan adds depth and richness. Freshly grated will give the best flavor, but you can use the pre-grated stuff if that’s what you have on hand. -
3 cloves garlic, minced
Fresh garlic packs a punch when it comes to flavor. Feel free to adjust the amount based on your love for garlic. If you’re short on fresh garlic, garlic powder works in a pinch! -
1 teaspoon garlic powder
Boosts that garlic flavor to the next level. If you’re aiming for a milder taste, you can reduce the amount used. -
1 teaspoon Italian seasoning
A blend of herbs like oregano, basil, and thyme adds a beautiful aroma. If you don’t have this on hand, dried herbs like oregano or basil alone can substitute just fine. -
Salt and pepper to taste
Don’t underestimate these seasonings! They help elevate the flavors of the chicken and cheese. -
Olive oil (for drizzling)
A touch of olive oil helps ensure that everything cooks beautifully and adds slightly fruity notes. Feel free to swap with avocado oil for a different flavor profile.
Step-by-Step Instructions
Ready to get cooking? Let’s get into the nitty-gritty of preparing your Bacon Wrapped Garlic Parmesan Chicken!
-
Preheat the Oven:
Start by preheating your oven to 400°F (200°C). This temperature provides a perfect environment for the bacon to become crispy while the chicken stays juicy. A hot oven means you’ll get that satisfying sizzle! -
Prepare the Chicken:
On a clean cutting board, take the chicken breasts and season both sides generously with salt, pepper, garlic powder, and Italian seasoning. Use your hands to rub the spices in; this helps to lock in all those fantastic flavors. -
Garlic and Parmesan Mixture:
In a small bowl, mix the minced garlic and grated Parmesan together. This will be what makes the chicken so delightful! If you love cheese (who doesn’t?), you can even double the Parmesan for extra creaminess. -
Stuff the Chicken:
Using a sharp knife, create a pocket in each chicken breast. Stuff each pocket with the delicious garlic and Parmesan mixture. Don’t worry if some cheese spills out; that will just create a yummy crust when it bakes! -
Wrap with Bacon:
Now for the fun part: the bacon! Take 2 slices of bacon for each chicken breast and wrap them around, overlapping slightly to cover the chicken completely. Use toothpicks to secure the ends if needed. This is where you can get creative — the more bacon, the better! -
Drizzle with Olive Oil:
Once wrapped, place the chicken breasts on a baking sheet lined with parchment paper (easy cleanup!). Drizzle a little olive oil over each piece to help the bacon crisp up beautifully. -
Bake Away:
Slide the baking sheet into your preheated oven and bake for about 30-35 minutes or until the bacon is golden brown and the chicken is cooked through (use a meat thermometer to check — it should read 165°F/74°C). This is a great time to prepare your sides! -
Rest and Serve:
Once they’re out of the oven, let the chicken rest for a few minutes. This step is crucial, as it allows the juices to redistribute, keeping the chicken moist and flavorful.
Serving Suggestions
For a beautiful presentation, slice the chicken on a bias and fan it out on a plate. You can toss some fresh parsley on top for color and a sprinkle of extra Parmesan for that “wow” factor. Serve alongside roasted veggies or a crisp salad for a rounded meal that looks good and tastes even better!
Recipe Variations
Feel like mixing things up? Here are a few creative twists on this recipe:
-
Herb Infusion: Add fresh herbs like thyme or rosemary to the garlic and Parmesan mixture for an aromatic boost. Fresh herbs elevate the flavors beautifully.
-
Spicy Kick: If you love heat, toss in some red pepper flakes to the garlic mixture. It’ll add an unexpected punch and kick up the flavor profile!
-
Stuffed with Spinach: For a nutrient boost, mix baby spinach in with the garlic and Parmesan before stuffing the chicken. It adds a touch of color and healthiness!
-
Cheese Swap: Try swapping the Parmesan for feta or mozzarella for a different cheesy experience. Each cheese brings its own unique character to the dish.
-
Glazing Options: Drizzle with a balsamic glaze right before serving for a tangy sweetness that perfectly complements the salty bacon!
Chef’s Notes
This recipe has evolved since I first tucked bacon around chicken in my college apartment — a simple dish that turned into my signature crowd-pleaser! One night, I even experimented with different cheeses and was shocked at how versatile it was! I once threw in some jalapeños for the ultimate flavor explosion during a family gathering. It was an instant hit!
Remember, cooking should be fun! Don’t be afraid to tweak things to make this dish your own. It’s the love and intention you put into cooking that makes every meal special.
FAQs and Troubleshooting
1. Why is my chicken dry after cooking?
Make sure not to overcook the chicken! Use a meat thermometer to reach the safe cooking temperature of 165°F/74°C. Also, letting it rest will keep the juices intact.
2. How do I know if my bacon is crispy enough?
Visually, the bacon should appear golden brown and crispy. If it’s still chewy, pop it back in the oven for an extra few minutes. Also, remember that bacon will crisp up a little more as it cools!
3. Can I prep this dish ahead of time?
Absolutely! You can wrap the chicken and store it in the fridge for up to 24 hours before cooking. Just make sure to bring it to room temperature before baking for even cooking.
4. What side dishes go well with this chicken?
This dish pairs beautifully with roasted vegetables, mashed potatoes, or a fresh garden salad. Feel free to mix and match based on your preference!
Nutritional Info
(Optional, adjust as needed based on the ingredients you use)
- Servings: 4
- Calories per serving: ~350 (calories vary based on the type of bacon and chicken)
- Protein: 30g
- Carbs: 2g
- Fat: 23g
Now, friends, you have all the tools, tips, and tricks you need to whip up this Bacon Wrapped Garlic Parmesan Chicken for a cozy dinner or a vibrant gathering. I hope you let the aroma of this delightful dish fill your kitchen and the laughter of loved ones fill your home. Happy cooking, and I can’t wait to hear about your delicious success at the table!
PrintBacon Wrapped Garlic Parmesan Chicken
Juicy chicken breasts wrapped in crispy bacon and infused with garlicky goodness, perfect for a comforting dinner.
- Prep Time: 15 minutes
- Cook Time: 35 minutes
- Total Time: 50 minutes
- Yield: 4 servings 1x
- Category: Main Course
- Method: Baking
- Cuisine: American
- Diet: Paleo
Ingredients
- 4 boneless, skinless chicken breasts
- 8 slices of bacon
- 1/2 cup grated Parmesan cheese
- 3 cloves garlic, minced
- 1 teaspoon garlic powder
- 1 teaspoon Italian seasoning
- Salt and pepper to taste
- Olive oil (for drizzling)
Instructions
- Preheat the oven to 400°F (200°C).
- Prepare the chicken by seasoning both sides with salt, pepper, garlic powder, and Italian seasoning.
- Mix minced garlic and grated Parmesan together in a bowl.
- Stuff each chicken breast with the garlic and Parmesan mixture.
- Wrap each chicken breast with 2 slices of bacon.
- Drizzle olive oil over each wrapped chicken.
- Bake in the oven for 30-35 minutes or until bacon is golden and chicken is cooked through.
- Rest for a few minutes before serving.
Notes
Feel free to experiment with different types of cheese and herbs for a unique twist.
Nutrition
- Serving Size: 1 serving
- Calories: 350
- Sugar: 1g
- Sodium: 600mg
- Fat: 23g
- Saturated Fat: 8g
- Unsaturated Fat: 10g
- Trans Fat: 0g
- Carbohydrates: 2g
- Fiber: 0g
- Protein: 30g
- Cholesterol: 90mg
Keywords: bacon, chicken, garlic, Parmesan, comfort food
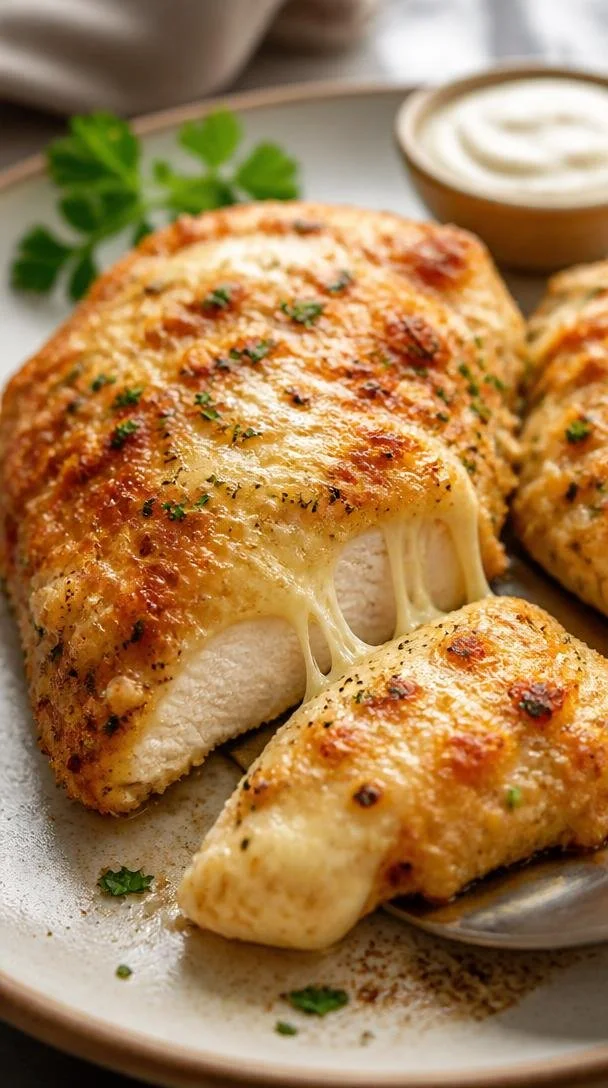
Beginner-friendly Copycat Longhorn Parmesan Crusted Chicken
Copycat Longhorn Parmesan Crusted Chicken: A Delicious Journey to Restaurant Favorites
Hello, my fellow food lovers! Today, we’re whisking you away on a culinary adventure that brings the delightful flavors of Longhorn Steakhouse right into your kitchen. If you’ve ever indulged in their mouthwatering Parmesan Crusted Chicken, you know exactly what I’m talking about—it’s rich, cheesy, and has that beautiful crispy texture that gets you every single time. What if I told you that you can recreate this gem at home with a few simple ingredients and some love? Let’s dive into this easy, fun, and utterly delicious recipe together!
A Kitchen Memory to Savor
Cooking has always been a way for me to connect with family, and this dish is no different. I remember the first time I tried Parmesan Crusted Chicken—it was during a family get-together, and I was swept away by the aroma filling the kitchen. My sister, who had been raving about this dish from Longhorn, finally brought her creation to our table. The moment I took my first bite, I couldn’t believe how simple yet extraordinary it was! It was crispy on the outside, tender on the inside, and packed with flavor.
As the evening unfolded, we laughed, shared stories, and reminisced about our childhood meals. That night, I promised myself to recreate it—make it my own, but still keep that magical essence. So, we’re cooking this together today, infusing our creations with those warm memories and making new ones. Let’s get ready to rock the kitchen!
Ingredients You’ll Need
Here’s what you’ll need for this delicious Copycat Longhorn Parmesan Crusted Chicken. Each ingredient has its own special job, and I’ll throw in some quick chef insights to make it all crystal clear:
-
4 boneless, skinless chicken breasts (about 6 oz each)
These beautiful cuts should be plump and fresh. If you can’t find boneless, skinless chicken breasts, you can totally use thighs or even turkey! Just adjust the cooking time slightly. -
2 tablespoons olive oil
A chef favorite! Olive oil adds moisture and flavor but feel free to swap it with melted butter for a richer taste—who doesn’t love butter? -
1 teaspoon garlic powder
This is your flavor booster! Garlic powder brings that wonderful garlicky aroma without the fuss of chopping fresh garlic. If you’re feeling adventurous, fresh minced garlic works too; just be cautious, as it can burn more easily. -
1 teaspoon paprika
Paprika adds a hint of sweetness and vibrant color. Smoked paprika will give your chicken a deeper, smoky flavor—perfect for those who like a little extra char! -
1 teaspoon Italian seasoning
A mix of your favorite herbs that is perfect for seasoning meat. No Italian seasoning? No problem! A mix of oregano, basil, and thyme would work beautifully too. -
½ teaspoon salt
Essential for flavor! Remember, you can always add more, but you can’t take it away, so start with less if you’re unsure. -
½ teaspoon black pepper
A pinch of black pepper wakes everything up—don’t skip it! If you’re feeling spicy, try using cayenne for a kick.
For the Parmesan Crust:
-
½ cup grated Parmesan cheese
Hello, cheesy goodness! Look for the fresh stuff (not the stuff in a can) for the best flavor. You can substitute with Pecorino Romano for a sharper taste. -
½ cup shredded provolone cheese (or mozzarella)
Provolone adds a beautiful creaminess, but mozzarella works perfectly as well. If you want extra ooey-gooey factor, mix both! -
¼ cup panko breadcrumbs
Here’s the secret to a perfectly crispy topping. Panko breadcrumbs are coarser than regular breadcrumbs, creating that lovely crunch. You can use crushed crackers if in a pinch! -
3 tablespoons mayonnaise
Sounds odd, doesn’t it? But this gives a luscious richness and helps everything bind together. Not a mayo fan? Substitute with Greek yogurt—it will keep it creamy! -
1 tablespoon sour cream
Just a little more tanginess to balance out all that flavor! You could skip this if you’re out, but it does enhance moisture. -
1 tablespoon fresh parsley (chopped) (optional for garnish)
A touch of freshness! It’s optional—but sprinkle some on top for that polished, restaurant-style finish!
Step-by-Step Instructions
Alright, it’s cooking time! Let’s bring this exquisite dish to life. Don your apron, roll up those sleeves, and let’s get cooking!
-
Preheat Your Oven
Start by preheating your oven to 400°F (200°C). This ensures that your chicken will cook evenly and the crust will crisp up beautifully. -
Prep the Chicken
Pat the chicken breasts dry with some paper towels. This helps the outside crisp up. Now, in a skillet, heat the olive oil over medium-high heat. Once the oil is shimmering, carefully add the chicken breasts. Sear them for about 4-5 minutes on each side until they’re golden brown. Tip: Don’t overcrowd the pan—work in batches if needed. This step builds flavor! -
Season the Chicken
While searing, season both sides of the chicken with garlic powder, paprika, Italian seasoning, salt, and black pepper. Let the spices infuse into the meat while it does its magic on the stovetop. -
Prepare the Crust Mixture
In a bowl, mix together the Parmesan cheese, provolone cheese, panko breadcrumbs, mayonnaise, sour cream, and parsley until combined. This cheesy goodness will be the star of your dish, so mix it until everything is integrated and looking luscious! -
Assemble
Lay the seared chicken breasts in a baking dish. Spoon the cheesy mixture generously on top of each chicken breast, spreading it evenly until they are fully coated. Chef Hack: Don’t be shy here—really pile it on for that delectable crust! -
Bake to Perfection
Once your chicken is ready to go, slide the baking dish into your preheated oven and bake for about 20-25 minutes or until the chicken is cooked through (with an internal temperature of 165°F). The cheese should be bubbly and golden brown. -
Finishing Touches
Once it’s out of the oven, let it rest for about 5 minutes. This allows the juices to redistribute in the chicken, keeping it tender. You can garnish with additional parsley for that fabulous pop of color!
Serving Suggestions
This Copycat Longhorn Parmesan Crusted Chicken is simply stunning when plated! Serve it alongside a crisp salad, steamed vegetables, or a creamy risotto for a fabulous meal. I like to drizzle a bit of balsamic reduction or a squeeze of lemon for that extra zing. And don’t forget to have your favorite wine ready—because this dish deserves to be celebrated!
Recipe Variations
Want to switch things up? Here are some fun ideas:
- Add Some Heat: Incorporate crushed red pepper flakes into the crust mixture for a spicy kick.
- Herb it Up: Swap out the parsley for fresh basil or thyme for a different herbal profile.
- Flavorful Add-In: Mix in some sun-dried tomatoes or spinach to the crust for a burst of flavor and color.
- Diet-Friendly: Make it keto by using almond flour instead of breadcrumbs and swap mayo for avocado for a creamy healthy twist.
- Gluten-Free Version: Use gluten-free panko or crushed gluten-free crackers, and you’ll have a delicious alternative that everyone can enjoy!
Chef’s Notes
I can’t get enough of this dish! It has evolved over the years as I’ve experimented with different cheeses and spices. One time, I even added a splash of white wine to the searing pan—not only does it provide flavor, but the aroma that fills your kitchen is simply divine. The great thing about this Copycat recipe is that it’s incredibly customizable—I’ve seen some people add a layer of bacon over the top. Who wouldn’t want that?
FAQs and Troubleshooting
-
Why is my crust soggy?
This can happen if the chicken is too wet before adding the crust. Make sure to pat it dry thoroughly after searing. -
What is the best way to store leftovers?
Store in an airtight container in the fridge for up to three days. Reheat gently in the oven to maintain that crispy crust! -
How can I adjust for thinner chicken breasts?
If your chicken breasts aren’t as thick, adjust the cooking time—check for doneness around 15-20 minutes. -
Can I make this ahead of time?
Absolutely! You can prep the chicken and crust mixture, assemble, and cover it in the fridge until you’re ready to pop it in the oven.
Nutritional Info
Note: Nutritional values can vary based on specific ingredients used and portion sizes. Always adjust according to your dietary needs and preferences!
Now that you have this inside scoop, you can make your very own Copycat Longhorn Parmesan Crusted Chicken! Here’s to creating beautiful memories around your table, eating delicious meals, and celebrating those simple joys of cooking. Happy cooking, and don’t forget to invite your friends and family over to share in the love. Let’s get that apron on and make magic happen!
PrintCopycat Longhorn Parmesan Crusted Chicken
Recreate the delicious flavors of Longhorn Steakhouse’s Parmesan Crusted Chicken at home with this easy recipe.
- Prep Time: 15 minutes
- Cook Time: 30 minutes
- Total Time: 45 minutes
- Yield: 4 servings 1x
- Category: Main Course
- Method: Baking
- Cuisine: American
- Diet: None
Ingredients
- 4 boneless, skinless chicken breasts (about 6 oz each)
- 2 tablespoons olive oil
- 1 teaspoon garlic powder
- 1 teaspoon paprika
- 1 teaspoon Italian seasoning
- ½ teaspoon salt
- ½ teaspoon black pepper
- ½ cup grated Parmesan cheese
- ½ cup shredded provolone cheese (or mozzarella)
- ¼ cup panko breadcrumbs
- 3 tablespoons mayonnaise
- 1 tablespoon sour cream
- 1 tablespoon fresh parsley (chopped) (optional for garnish)
Instructions
- Preheat your oven to 400°F (200°C).
- Pat the chicken breasts dry with paper towels and heat the olive oil in a skillet over medium-high heat. Add the chicken breasts and sear for 4-5 minutes on each side until golden brown.
- Season the chicken with garlic powder, paprika, Italian seasoning, salt, and black pepper while searing.
- Mix together the Parmesan cheese, provolone cheese, panko breadcrumbs, mayonnaise, sour cream, and parsley in a bowl until combined.
- Lay the seared chicken breasts in a baking dish and spoon the crust mixture generously on top.
- Bake in the preheated oven for 20-25 minutes or until the chicken is cooked through and the cheese is bubbly and golden brown.
- Rest the chicken for about 5 minutes before serving.
- Garnish with additional parsley if desired and enjoy!
Notes
Customize your recipe by adding crushed red pepper flakes or sun-dried tomatoes to the crust.
Nutrition
- Serving Size: 1 serving
- Calories: 450
- Sugar: 2g
- Sodium: 650mg
- Fat: 25g
- Saturated Fat: 10g
- Unsaturated Fat: 10g
- Trans Fat: 0g
- Carbohydrates: 30g
- Fiber: 1g
- Protein: 35g
- Cholesterol: 100mg
Keywords: chicken, parmesan, copycat recipe, Longhorn Steakhouse, easy recipe
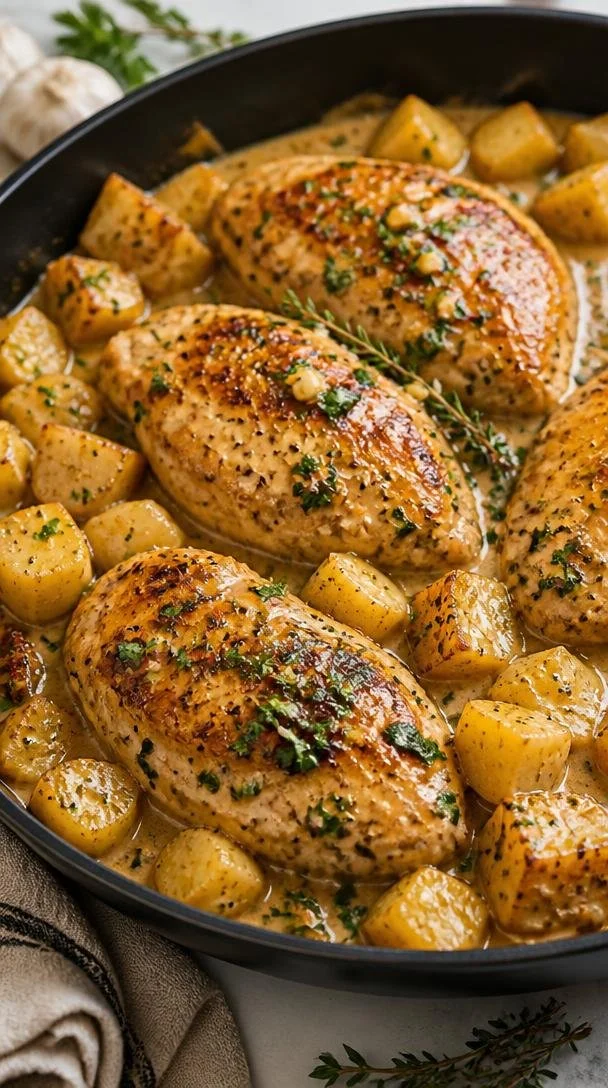
One-Pan Garlic Herb Chicken: Weeknight Dinner in 30 Minutes
Garlic Herb Chicken: A Flavorful Feast Awaits
Hello, my lovely foodie friends! Today, I’m excited to share a recipe that’s become a staple in my kitchen—Garlic Herb Chicken. Imagine succulent chicken breasts coated in a savory garlic herb mixture, seared to a perfect golden brown, and finished off in a rich, buttery broth. If that sounds mouth-watering, hold on to your aprons because this dish is as delightful to make as it is to eat!
A Flavorful Journey
Every dish has its story, and this one is dear to my heart. Growing up, Sundays were sacred in our household—an occasion we reserved for food, family, and fun. I vividly recall my mother bustling around the kitchen with her trusty apron tied snugly around her waist, effortlessly whipping up what she called “Sunday Special.” That dish often included her famous garlic chicken. The fragrant aroma of garlic and herbs filled the air, mingling with laughter and chatter as we all gathered at the table.
I remember the way she’d present the chicken, glistening with golden brown butter and fresh herbs, looking gorgeous yet so at home on our plates. Those moments around the dinner table taught me that cooking isn’t just about nourishing the body; it’s about nurturing connections. I started experimenting with her recipe, adding my own flair while still honoring those treasured flavors that made every Sunday feel like a celebration.
So, roll up your sleeves, and let’s travel back to that cozy kitchen with the sizzle of garlic in the air!
Ingredients You’ll Need
For this mouthwatering Garlic Herb Chicken, gather the following ingredients:
-
4 boneless skinless chicken breasts: Chicken breasts are easy to work with and absorb flavors beautifully. You can substitute with thighs for a juicier option.
-
3 tablespoons olive oil: A heart-healthy fat that enriches flavor. If you’re out, buttery avocado oil is a great substitute.
-
4 cloves garlic (minced): Garlic is the star of this dish, adding depth. If fresh garlic isn’t available, 1 teaspoon of garlic powder will do in a pinch.
-
2 tablespoons fresh parsley (chopped): This bright herb adds freshness. Dried parsley works too, but fresh is definitely a winner.
-
1 tablespoon fresh thyme leaves: Thyme provides earthy notes. Feel free to use rosemary or oregano as a substitute to mix things up!
-
2 tablespoons butter: Rich and creamy, butter takes this dish over the top. If you’re going dairy-free, use a vegan butter alternative.
-
1 cup chicken broth: Broth adds moisture and flavor. You can use vegetable broth for a lighter touch, or water in a pinch, but it won’t be as rich.
-
2 pounds russet potatoes: Perfect for mashing or roasting! If you prefer, swap them out for sweet potatoes for a different twist.
-
½ cup heavy cream: This provides creaminess; however, you can swap it with coconut cream for a dairy-free version.
-
2 tablespoons brown sugar: This helps to balance flavors. Honey or maple syrup are good alternatives if you’re looking for something different.
-
1 tablespoon balsamic vinegar: To add a tangy touch that complements the richness. Red wine or apple cider vinegar works nicely here too.
Step-by-Step Instructions
Now, let’s dive into the cooking process! Ready your apron—you’re going to want to keep it clean, but let’s be real, you might end up with a bit of flour on it!
-
Prep the Chicken: Start by patting your chicken breasts dry with paper towels. This ensures a good sear. Season both sides generously with salt and pepper. It’s the classic starter, but it’s key to building flavor!
-
Heat the Oil: In a large skillet over medium-high heat, add the olive oil. Let it heat until shimmering. It should sizzle when you add the chicken—it’s time to create a beautiful crust!
-
Sear the Chicken: Add the chicken breasts to the skillet. Don’t overcrowd the pan; you want that golden brown goodness. Sear for about 6-7 minutes on each side until cooked through and golden. You’re aiming for an internal temperature of 165°F (75°C).
-
Make it Flavorful: Once seared, remove the chicken from the skillet and let it rest on a plate. In that same skillet, lower the heat to medium and toss in the minced garlic, cooking until fragrant (about 1 minute). Be careful not to burn it!
-
Create the Base: Add the butter to the skillet, letting it melt and combine with the garlic. Next, pour in the chicken broth to deglaze the pan—scrape up those lovely brown bits!
-
Introduce Freshness: Stir in the fresh herbs (parsley and thyme), brown sugar, and balsamic vinegar, letting it gently simmer for about 2-3 minutes to blend those flavors beautifully.
-
Return the Chicken: Nestle the chicken back into the skillet, spooning some of the broth over the top. Cover the skillet and simmer for about 5 minutes for the chicken to absorb all that delicious flavor.
-
Creamy Finish: Lastly, turn off the heat and stir in the heavy cream, letting it meld into the sauce. Taste and adjust seasoning if necessary (more salt, pepper, or a hint of additional vinegar!).
Serving Suggestions
To serve your Garlic Herb Chicken, place each breast on a plate, spooning some of that luscious garlic sauce over the top. Add a generous serving of creamy mashed potatoes on the side and finish with a sprinkle of fresh parsley for that pop of color. It’s not just food; it’s a masterpiece worthy of any table!
Recipe Variations
Want to shake things up a bit? Here are some delicious variations you can try:
-
Lemon Garlic Chicken: Add a splash of fresh lemon juice and zest along with the cream for a bright twist.
-
Cheesy Herb Chicken: Mix in a handful of your favorite cheese (like parmesan or mozzarella) once the cream is added for a cheesy delight.
-
Spicy Garlic Chicken: Add a pinch of red pepper flakes or some sliced jalapeños when sautéing the garlic for a kick!
-
Herb-Infused Potatoes: Toss some chopped herbs into your mashed potatoes for an added flavor dimension.
-
One-Pan Wonder: Add seasonal vegetables like asparagus or bell peppers in the last 10 minutes of cooking for a complete, colorful meal.
Chef’s Notes
As I’ve evolved in my cooking journey, I’ve learned that garlic can either make or break a dish! Initially, I was heavy-handed with it, but I discovered that a balanced approach elevates the entire meal. Each bite should have harmonious flavors—certainly garlic-forward but never overwhelming! If you ever find yourself with leftover chicken (which is rare since it’s so good), chop it up for a delightful salad or wrap the next day.
FAQs and Troubleshooting
1. How do I know when the chicken is done?
The best way to check is using a meat thermometer. It should read 165°F (75°C).
2. My chicken came out dry; what happened?
Overcooking is usually to blame. Chicken breasts are lean and can dry out quickly, so pay close attention to cooking times.
3. Can I make this dish ahead of time?
Absolutely! Just store the cooked chicken in an airtight container in the fridge for up to 3 days. Reheat gently on the stove with a splash of broth or cream to keep it moist.
4. What can I serve with Garlic Herb Chicken?
Mashed potatoes are a classic choice, but you can also try rice pilaf, roasted vegetables, or a fresh seasonal salad for a delightful side.
Nutritional Info
While I didn’t dive into the nitty-gritty of calories and macros, this dish serves as a wholesome meal rich in protein and flavor. If you’re curious about specific nutritional values, I recommend using a nutrition calculator for more precise information based on your ingredient quantities.
So there you have it, my friends! A delightful and approachable Garlic Herb Chicken recipe awaits you. Whether it’s for a special occasion or just a Tuesday night, this dish is bound to please. Happy cooking, and remember: every meal is an opportunity to create memorable moments! Let’s set that table and gather those you love around it—because good food isn’t just about showing off; it’s about showing up.
PrintGarlic Herb Chicken

Succulent chicken breasts coated in a savory garlic herb mixture, seared to golden perfection, and finished in a rich buttery broth.
- Prep Time: 15 minutes
- Cook Time: 30 minutes
- Total Time: 45 minutes
- Yield: 4 servings 1x
- Category: Main Course
- Method: Baking
- Cuisine: Italian
- Diet: Paleo
Ingredients
- 4 boneless skinless chicken breasts
- 3 tablespoons olive oil
- 4 cloves garlic (minced)
- 2 tablespoons fresh parsley (chopped)
- 1 tablespoon fresh thyme leaves
- 2 tablespoons butter
- 1 cup chicken broth
- 2 pounds russet potatoes
- ½ cup heavy cream
- 2 tablespoons brown sugar
- 1 tablespoon balsamic vinegar
Instructions
- Prep the chicken: Pat your chicken breasts dry with paper towels and season with salt and pepper.
- Heat the oil: In a skillet over medium-high heat, add the olive oil and let it heat until shimmering.
- Sear the chicken: Add the chicken breasts and sear for 6-7 minutes on each side until cooked through and golden.
- Make it flavorful: Remove the chicken and cook the minced garlic in the skillet until fragrant.
- Create the base: Add the butter to melt, then pour in chicken broth and deglaze the pan.
- Introduce freshness: Stir in the fresh herbs, brown sugar, and balsamic vinegar, simmering for 2-3 minutes.
- Return the chicken: Nestle the chicken back in the skillet and cover, simmering for another 5 minutes.
- Creamy finish: Turn off the heat and stir in the heavy cream, adjusting seasoning as needed.
Notes
If you have leftover chicken, chop it up for a delightful salad. Adjust garlic to taste for flavor balance.
Nutrition
- Serving Size: 1 serving
- Calories: 400
- Sugar: 6g
- Sodium: 450mg
- Fat: 17g
- Saturated Fat: 7g
- Unsaturated Fat: 8g
- Trans Fat: 0g
- Carbohydrates: 32g
- Fiber: 4g
- Protein: 32g
- Cholesterol: 90mg
Keywords: chicken, garlic, herb, dinner, main course, savory
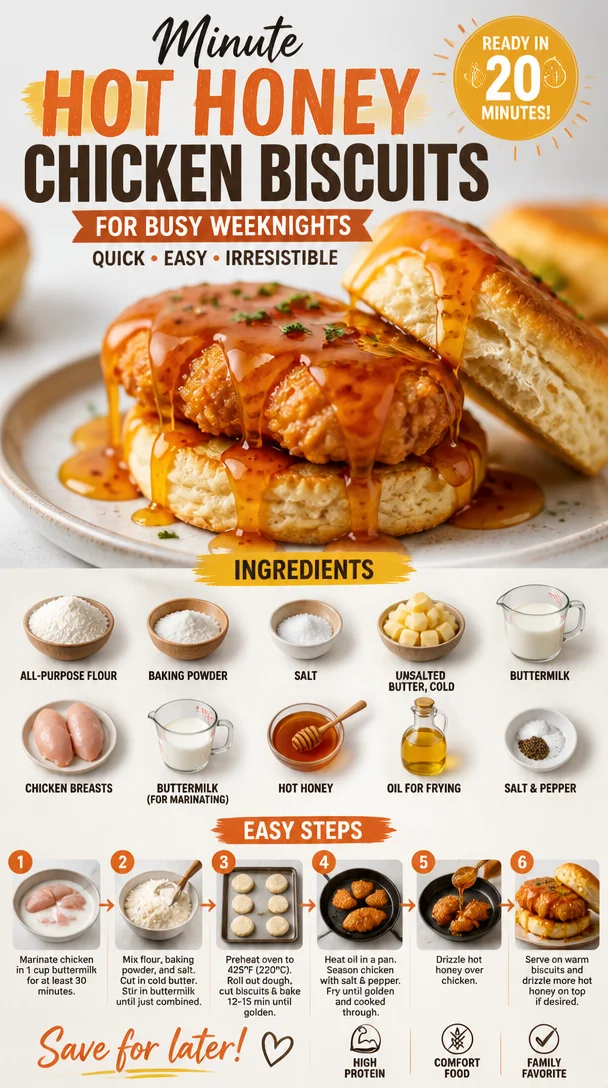
Minute Hot Honey Chicken Biscuits for Busy Weeknights
The Comfort of Home: Hot Honey Chicken Biscuits Recipe
Hello, fellow food lovers! Grab your apron and let’s dive into a kitchen adventure that’s all about warm flavors and comfort food. Today, I’m thrilled to share with you one of my ultimate favorites: Hot Honey Chicken Biscuits. This dish not only hits the spot but also carries a story of warmth, coziness, and a little bit of spice that I can’t wait to share!
Opening the Door to Nostalgia
You know those dishes that transport you back to a special moment in time? For me, that’s my Hot Honey Chicken Biscuits. Picture this: it’s a lazy Sunday afternoon, and the air is filled with a mix of sweet and spicy aromas wafting from the kitchen. I remember standing next to my grandmother as she stirred a pot of her renowned chicken marinade while the biscuits were perfectly rising in the oven. The combination of the crispy, flaky biscuits and the kick of heat in that honey sauce has always been a showstopper.
Back then, cooking wasn’t just about preparing meals; it was a way to gather our family around the table. The laughter, stories, and, of course, the delightful food. Those memories inspired me to develop this recipe that’s not only delicious but deeply meaningful. Every bite of these hot honey chicken biscuits is a comforting hug, reminiscent of cozy family gatherings and shared moments.
And the best part? You don’t need to be a seasoned chef to whip these up! Just a little love for cooking and an eagerness to create something special. So, let’s roll up our sleeves and embark on this culinary journey together!
Ingredients You’ll Need
Let’s gather our ingredients! Here’s what you’ll need to create these warm, scrumptious Hot Honey Chicken Biscuits:
- 2 cups all-purpose flour: The foundation for our biscuits. You can substitute with whole wheat flour for a nutty flavor or gluten-free blend for a gluten-free option.
- 1 tablespoon baking powder: This magical ingredient gives our biscuits that lovely lift! Baking soda can be a substitute—just remember to adjust the quantity.
- 1 teaspoon salt: It amplifies all the flavors. You can use kosher salt or sea salt if that’s what you have on hand.
- 1/4 cup unsalted butter, cold and cubed: For that flaky, tender texture. If you’re vegan or dairy-free, coconut oil or margarine works well.
- 3/4 cup buttermilk: This gives the biscuits richness and a tender crumb. If you don’t have buttermilk, mix 3/4 cup milk with 1 tablespoon of vinegar or lemon juice and let it sit for 5 minutes to sour.
- 2 chicken breasts, boneless and skinless: The star of our dish! Feel free to use chicken thighs for a juicier experience.
- 1 cup buttermilk (for marinating): Enhances the chicken’s flavor and tenderness. You can use plain yogurt if you’re out of buttermilk.
- 1 cup hot honey: This sweet and spicy mixture elevates the dish! You can create your own by mixing honey with chili flakes or use store-bought if it’s easier.
- Oil for frying: Choose a high smoke-point oil like canola or vegetable oil for frying.
- Salt and pepper to taste: Essential for seasoning to ensure every layer of flavor shines through!
Getting Cooking: Step-by-Step Instructions
Now that we have our ingredients all set, let’s get cooking! Here’s how to bring these delightful Hot Honey Chicken Biscuits to life.
-
Marinate the Chicken: Start by taking your beautifully trimmed chicken breasts and soaking them in 1 cup of buttermilk. This will help to tenderize the chicken and infuse it with flavor. Let it marinate for at least 30 minutes, but if you’re in the mood for marinading longer, go ahead and pop it in the fridge for a couple of hours. Trust me, your taste buds will thank you later!
-
Prepare the Biscuit Dough: In a large bowl, whisk together the all-purpose flour, baking powder, and salt. Ensure there are no lumps — we want a smooth dough, friends! Next, add the cold, cubed butter to the flour mixture. Use your fingers or a pastry cutter to blend until it resembles coarse crumbs – a little flakiness never hurt anyone!
-
Mix in the Buttermilk: Gradually add in the 3/4 cup of buttermilk and stir until just combined. Be careful not to overmix! We’re aiming for a dough that feels a little crumbly but comes together nicely. Turn it out onto a floured surface and pat it into a rectangle about 1-inch thick.
-
Cut the Biscuits: Using a biscuit cutter or a glass, cut out rounds from your dough. The key is to press straight down without twisting, which helps to maintain that lovely rise we want in our biscuits! Place the cut biscuits on a baking sheet lined with parchment paper. Don’t throw away the scraps—gather them and reform the dough to cut out more biscuits!
-
Fry the Chicken: While your biscuits are resting, it’s time to focus on that chicken! Take the marinated chicken from the buttermilk and season it with salt and pepper. Heat a skillet and pour in enough oil to cover the bottom. Fry the chicken for about 6-8 minutes on each side until golden brown and cooked through. The color should be inviting, and the aroma will be simply irresistible!
-
Glaze with Hot Honey: In a bowl, mix the hot honey with a touch of extra heat if you prefer—think chili flakes! Once the chicken is cooked, slather it all over with that glorious hot honey.
-
Bake the Biscuits: While you’re busy with the chicken, pop your biscuits into the oven at 425°F (220°C) and bake for about 12-15 minutes. You want them golden brown and just begging to be devoured!
Serving Suggestions
Now that we have an ensemble of warm, flaky biscuits and spicy honey-kissed chicken, it’s time to serve! I like to stack a biscuit high with a piece of the glazed chicken right on top. Drizzle a bit more hot honey over everything for that sweet, glossy finish. You can’t go wrong with adding a sprinkle of fresh herbs like parsley or chives for an extra pop of color and flavor. Serve alongside a simple green salad or some roasted vegetables, and you’ve got a meal fit for royalty!
Recipe Variations
Feeling adventurous? Here are a few fun twists and tweaks to make this recipe your own:
- Spicy Southern Style: Add cayenne pepper to your flour for that kick in the biscuits and use a spicy honey blend for the chicken for extra heat!
- Herbed Biscuits: Mix in fresh herbs like rosemary or thyme to the biscuit dough for an aromatic twist.
- Sweet and Savory: Use maple syrup instead of honey for a different sweet profile, and pair it with crispy bacon on the biscuit for that sweet-savory delight.
- Vegan Option: Substitute chicken with a vegan alternative, like crispy tofu or mushroom, and use almond milk with vinegar for the biscuit!
- BBQ Glaze: Swap out the hot honey for your favorite barbecue sauce for a smoky, sweet twist that pairs beautifully with the chicken!
Chef’s Notes
As with any cherished recipe, Hot Honey Chicken Biscuits holds a special place in my heart. This dish has evolved over time, especially thanks to different friends and family members who have inspired me along the way. I once hosted a dinner party where I forgot to marinate the chicken! I had to make do with an overnight marinade and was pleasantly surprised at how flavorful it turned out, proving sometimes happy accidents create the best dishes!
The beautiful thing about this recipe is its versatility — you can adjust it to suit your tastes or what’s in your pantry. So don’t stress too much about perfection. Let your instincts guide you, embrace those little quirks, and most importantly, have fun along the way!
FAQs and Troubleshooting
Here are some common questions you might have as you embark on this delicious cooking journey:
-
Why are my biscuits dense?
- This can happen if you overmix the dough or don’t use cold ingredients. Remember, a little lumpy is perfectly fine!
-
How do I keep the chicken from drying out?
- Marinating in buttermilk is key! Ensure your oil is hot enough for frying to keep it juicy. You can test it by dropping a small piece of dough into the oil—if it bubbles, you’re good to go!
-
Can I make the dough ahead of time?
- Absolutely! You can prepare the biscuit dough ahead and refrigerate it. Just be sure to roll and cut right before baking for maximum freshness!
-
What can I do with leftover biscuits?
- Those left-over biscuits can be stored in an airtight container for a day or two. Toast them up for breakfast the next day or turn them into a delightful biscuit sandwich!
Nutritional Info
If you’re curious, the nutritional information for a biscuit with chicken and hot honey roughly comes to about 600 calories per serving. Keep in mind; the exact numbers can change based on how much honey you use or if you choose to add extra toppings.
Now that you’ve got the full scoop on making Hot Honey Chicken Biscuits, I can’t wait for you to head into the kitchen and create this incredible dish. Remember, good food is all about making connections, both with the ingredients and the people around your table. So tie on that apron, pour yourself a drink, and let’s cook up some beautiful moments. Happy cooking, friends!
PrintHot Honey Chicken Biscuits

A comforting dish featuring flaky biscuits layered with marinated chicken glazed in a sweet and spicy hot honey sauce.
- Prep Time: 30 minutes
- Cook Time: 30 minutes
- Total Time: 60 minutes
- Yield: 4 servings 1x
- Category: Main Course
- Method: Frying and Baking
- Cuisine: American
- Diet: Non-Vegetarian
Ingredients
- 2 cups all-purpose flour
- 1 tablespoon baking powder
- 1 teaspoon salt
- 1/4 cup unsalted butter, cold and cubed
- 3/4 cup buttermilk
- 2 chicken breasts, boneless and skinless
- 1 cup buttermilk (for marinating)
- 1 cup hot honey
- Oil for frying
- Salt and pepper to taste
Instructions
- Marinate the chicken by soaking it in 1 cup of buttermilk for at least 30 minutes.
- Prepare the biscuit dough by whisking together flour, baking powder, and salt.
- Add cold cubed butter and blend until it resembles coarse crumbs.
- Mix in 3/4 cup of buttermilk until just combined and turn onto a floured surface.
- Cut out rounds from the dough using a biscuit cutter or glass.
- Fry the marinated chicken in oil for 6-8 minutes on each side until golden brown.
- Glaze the cooked chicken with hot honey.
- Bake the biscuits in a preheated oven at 425°F (220°C) for 12-15 minutes.
Notes
For extra flavor, consider adding herbs to the biscuit dough or using a spicy honey blend for glazing.
Nutrition
- Serving Size: 1 serving
- Calories: 600
- Sugar: 30g
- Sodium: 800mg
- Fat: 30g
- Saturated Fat: 10g
- Unsaturated Fat: 15g
- Trans Fat: 0g
- Carbohydrates: 45g
- Fiber: 2g
- Protein: 25g
- Cholesterol: 90mg
Keywords: chicken biscuits, hot honey, comfort food, fried chicken, easy recipe
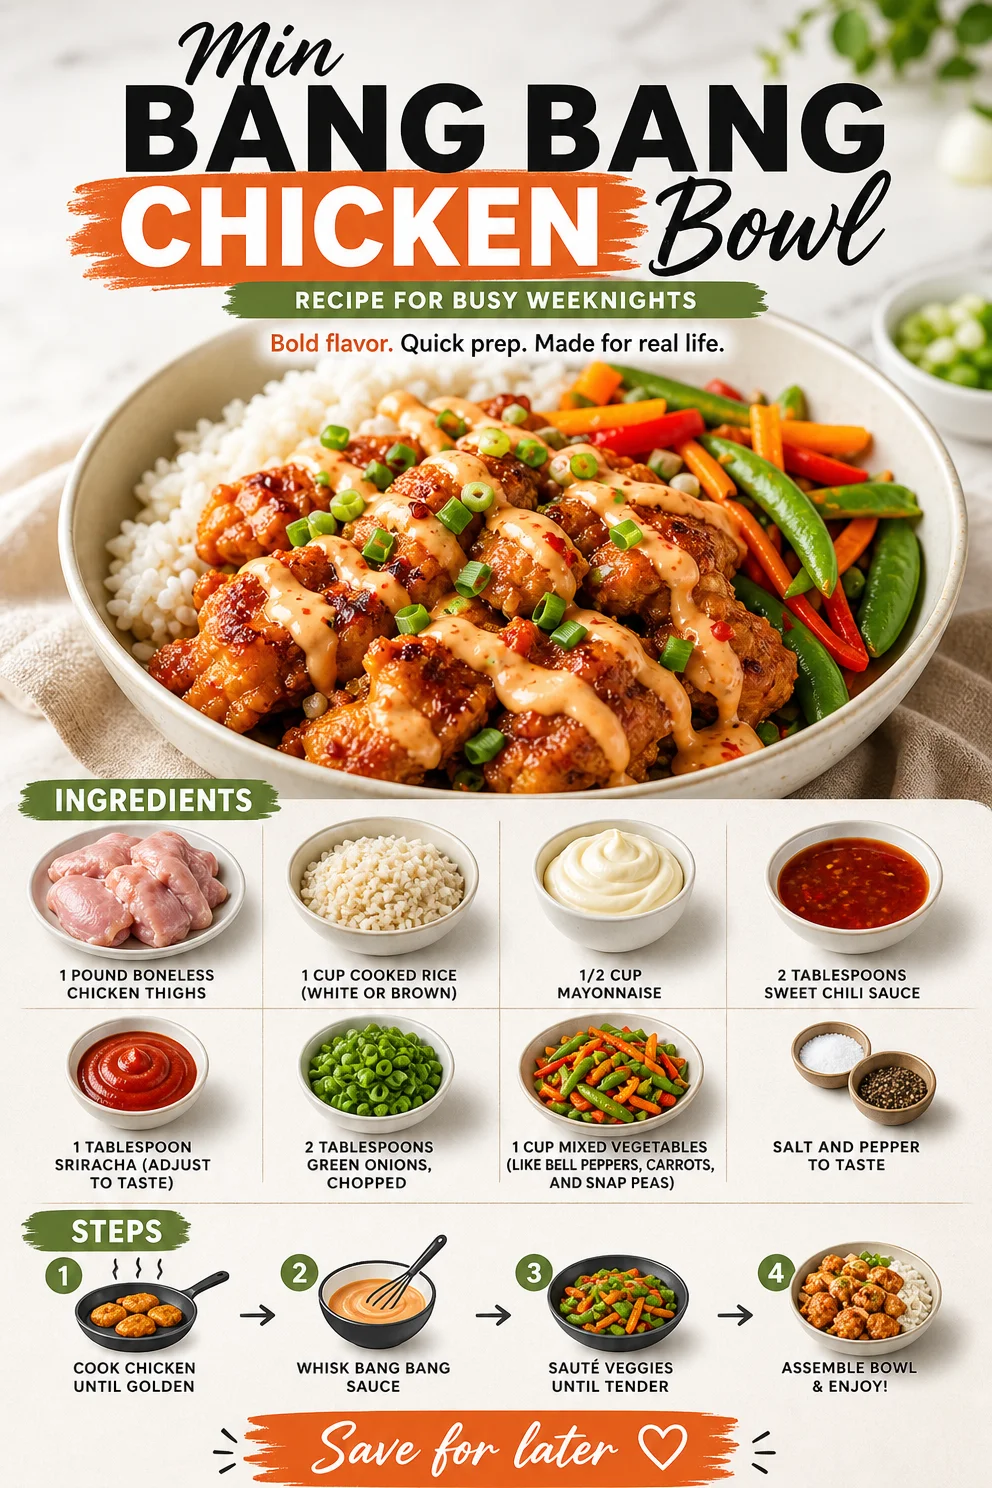
Min Bang Bang Chicken Bowl Recipe for Busy Weeknights
Bang Bang Chicken Bowl: A Flavorful Journey of Comfort and Confidence
Hello food lovers! I’m thrilled to have you here today. Let’s dive into a dish that’s not just delicious but also downright fun to make — the Bang Bang Chicken Bowl. If you’ve ever been to a bustling Asian street market or a cozy eatery serving fusion delights, you know what I mean. This dish is an irresistible balance of crispy chicken, creamy sauce, and fresh veggies, all served over fluffy rice, making it a complete meal that feels both comforting and exciting.
When I first created this recipe, I was inspired by the vibrant flavors and textures that tantalize your taste buds. It’s a bowl of happiness, really! This Bang Bang Chicken Bowl is not only a feast for the eyes but also a celebration of cooking with intention and joy. So, gather your apron and let’s make something mouthwateringly delicious together!
A Flavorful Memory
Let me take you back to a cozy evening a few years ago. I was hosting my closest friends for a casual dinner party — the kind where we didn’t overthink the menu but just went with what felt good. As the sun set, I decided to whip up something that would put smiles on everyone’s faces. That’s when I thought about bang bang chicken.
I had tried this dish at a local fusion restaurant and was in love with the perfect harmony of spicy, sweet, and creamy flavors. I knew I could recreate that same joy at home. So, I set to work in my kitchen, music playing, and the aroma of sautéing chicken filling the air. Everyone gathered around the table, eagerly waiting for that first bite. The laughter, the stories, and the clinking of glasses — it was one of those nights that reminded me why I adore cooking for others. And now, I’m excited to share this recipe with you, so you can create your own memorable moments!
Ingredients
Let’s get to the good part! Here’s your shopping list for this delightful bang bang chicken bowl. Each ingredient plays a vital role, plus I’ll share some handy tips along the way:
-
1 pound boneless chicken thighs
Why thighs? They’re juicy, tender, and don’t dry out as easily as chicken breasts. However, if you prefer white meat, feel free to substitute with boneless chicken breasts! -
1 cup cooked rice (white or brown)
Rice is the perfect base for this bowl. I love using brown rice for a nutty flavor and extra nutrition, but feel free to use jasmine or basmati for a fragrant twist! -
1/2 cup mayonnaise
This creamy component brings richness to our sauce. Want to lighten it up? Substitute with Greek yogurt for a tangy kick! -
2 tablespoons sweet chili sauce
This sauce adds a delightful sweetness with a hint of spice. You can find it in the international aisle of most grocery stores or make your own at home! -
1 tablespoon sriracha (adjust to taste)
Sriracha brings the heat! If you’re not a fan of spice, reduce the amount or use a milder hot sauce like Frank’s RedHot instead. -
2 tablespoons green onions, chopped
These add a fresh crunch and vibrant color. Chives are a tasty substitute if you have them on hand! -
1 cup mixed vegetables (like bell peppers, carrots, and snap peas)
Feel free to mix it up! Broccoli, zucchini, or even frozen stir-fry blends work beautifully here! -
Salt and pepper to taste
Seasoning is always key! Don’t skip this step—let the flavors shine!
Step-by-Step Instructions
Now, let’s move on to the fun part: the cooking! Here’s how to make your bang bang chicken bowl from start to finish, with some chef’s tips sprinkled in:
-
Prep Your Ingredients
- Before anything, wash and chop your veggies, slice the green onions, and get your chicken thighs ready. Having everything prepped saves time and helps you cook more confidently. Plus, it makes the process feel like a breeze when you don’t have to rush around!
-
Cook the Rice
- Whether you’re using a rice cooker, stovetop, or microwave, get that rice cooking according to package instructions. For brown rice, keep in mind it usually takes longer, around 40-45 minutes, to become perfectly fluffy. You can even make it ahead of time and just reheat for serving!
-
Sear the Chicken
- In a large skillet over medium-high heat, add a splash of oil. Once it’s shimmering, place the boneless chicken thighs in the pan. Cook them for about 5-7 minutes on each side, until they’re golden brown and cooked through (internal temperature should be 165°F). This is where you can get that beautiful crust!
-
Make the Bang Bang Sauce
- While the chicken cooks, mix the mayonnaise, sweet chili sauce, and sriracha in a bowl. Taste and adjust the spice level as desired. This sauce brings everything together, so don’t skimp on the flavor. A little more sweet chili? Go for it!
-
Add the Vegetables
- Once the chicken is cooked, remove it from the skillet and let it rest for a couple of minutes. In the same skillet, toss in your mixed vegetables. Sauté for about 3-4 minutes until they’re crisp-tender. This brings out their natural sweetness!
-
Slice the Chicken
- After the chicken has rested, slice it into bite-sized pieces. This is the moment when your kitchen starts to smell incredible, and you can’t help but feel proud of what you’ve created!
-
Assemble Your Bowls
- Now it’s time to bring it all together. Start with a scoop of rice in each bowl, add the sautéed veggies, top it off with those juicy chicken slices, and generously drizzle with the bang bang sauce. Don’t forget to sprinkle some chopped green onions on top for that gourmet touch!
-
Enjoy!
- Dive into your beautifully crafted bang bang chicken bowl and savor every bite. Trust me, the combination of flavors and textures will have you hooked.
Serving Suggestions
Plating matters, friends! To serve this dish, I like to place a mound of rice in the center of the bowl, then artfully arrange the sautéed vegetables around it. Gently fan the sliced chicken atop the rice, drizzle generously with bang bang sauce, and finish with green onions. A few sesame seeds or chopped cilantro could add extra flair if you’re feeling fancy!
Recipe Variations
Now, let’s talk about how you can customize this dish to suit your taste buds:
- Protein Variations: Swap out the chicken for shrimp, tofu, or even grilled steak for a different spin!
- Noodle Bowls: Use ramen or rice noodles instead of rice for a fun twist. Just toss them in with the veggies to warm them up!
- Add Fresh Herbs: Top your creation with fresh cilantro or basil for an aromatic burst.
- Cooked Greens: Toss in some spinach or kale while sautéing the veggies for added nutrition.
- Vegan Option: Use chickpeas or tempeh in place of chicken and substitute mayonnaise with avocado for creaminess.
Chef’s Notes
This recipe has evolved over the years, and every time I make it, I find new ways to add my personal touch. One time, I decided to add a splash of lime juice for an extra zing, and let me tell you, it took the flavors to another level! I love how you can really make this dish your own. Cooking is all about experimentation and having fun, so don’t be afraid to play around with it!
I also adore how this dish fits into busy weeknights or elegant gatherings alike. It’s versatile, which is why it often makes its way to my table.
FAQs and Troubleshooting
Here are some common questions you might have while making your bang bang chicken bowl, along with solutions:
-
Why is my chicken dry?
Overcooking is usually the culprit! Using boneless thighs helps, but always check for doneness at 165°F, so it’s juicy and tender. -
Can I make the sauce ahead of time?
Absolutely! The bang bang sauce can be prepared a day in advance. Just store it in an airtight container in the refrigerator. The flavors actually deepen overnight. -
How can I make this dish spicier?
Add more sriracha to the sauce or include some crushed red pepper flakes in your sautéed veggies for an extra kick! -
What do I do if I have leftover chicken?
Great question! Leftover chicken can be chopped up and added to salads, wraps, or grain bowls throughout the week.
Nutritional Info
This bang bang chicken bowl is not only tasty but can also be nutritious! Here’s a rough estimate per serving:
- Calories: 600
- Protein: 30g
- Carbohydrates: 60g
- Fat: 25g
- Fiber: 4g
Keep in mind the values will vary based on ingredient choices and portions.
And there you have it — a delightful Bang Bang Chicken Bowl that you can whip up in no time! I hope this recipe inspires you to gather your loved ones around the table and create some beautiful memories. After all, cooking is about connection and joy. Don’t forget to wear that apron with pride while you unleash your culinary creativity. Cheers to good food and great company! 🥂✨
PrintBang Bang Chicken Bowl

A delightful bowl combining crispy chicken, creamy bang bang sauce, and fresh vegetables over fluffy rice.
- Prep Time: 15 minutes
- Cook Time: 30 minutes
- Total Time: 45 minutes
- Yield: 4 servings 1x
- Category: Main Course
- Method: Sautéing
- Cuisine: Asian Fusion
- Diet: Non-Vegetarian
Ingredients
- 1 pound boneless chicken thighs
- 1 cup cooked rice (white or brown)
- 1/2 cup mayonnaise
- 2 tablespoons sweet chili sauce
- 1 tablespoon sriracha (adjust to taste)
- 2 tablespoons green onions, chopped
- 1 cup mixed vegetables (like bell peppers, carrots, and snap peas)
- Salt and pepper to taste
Instructions
- Prep your ingredients: Wash and chop veggies, slice green onions, and prepare chicken thighs.
- Cook the rice according to package instructions.
- Sear the chicken in a skillet over medium-high heat for 5-7 minutes on each side until golden brown.
- Make the bang bang sauce by mixing mayonnaise, sweet chili sauce, and sriracha in a bowl.
- Add mixed vegetables to the skillet and sauté for 3-4 minutes until crisp-tender.
- Slice the chicken into bite-sized pieces.
- Assemble the bowls with rice, sautéed veggies, sliced chicken, and drizzle with bang bang sauce. Top with chopped green onions.
- Enjoy!
Notes
Customize with your choice of protein or noodles. You can also prepare the bang bang sauce ahead of time.
Nutrition
- Serving Size: 1 serving
- Calories: 600
- Sugar: 6g
- Sodium: 600mg
- Fat: 25g
- Saturated Fat: 4g
- Unsaturated Fat: 15g
- Trans Fat: 0g
- Carbohydrates: 60g
- Fiber: 4g
- Protein: 30g
- Cholesterol: 90mg
Keywords: Bang Bang Chicken, Asian Cuisine, Comfort Food
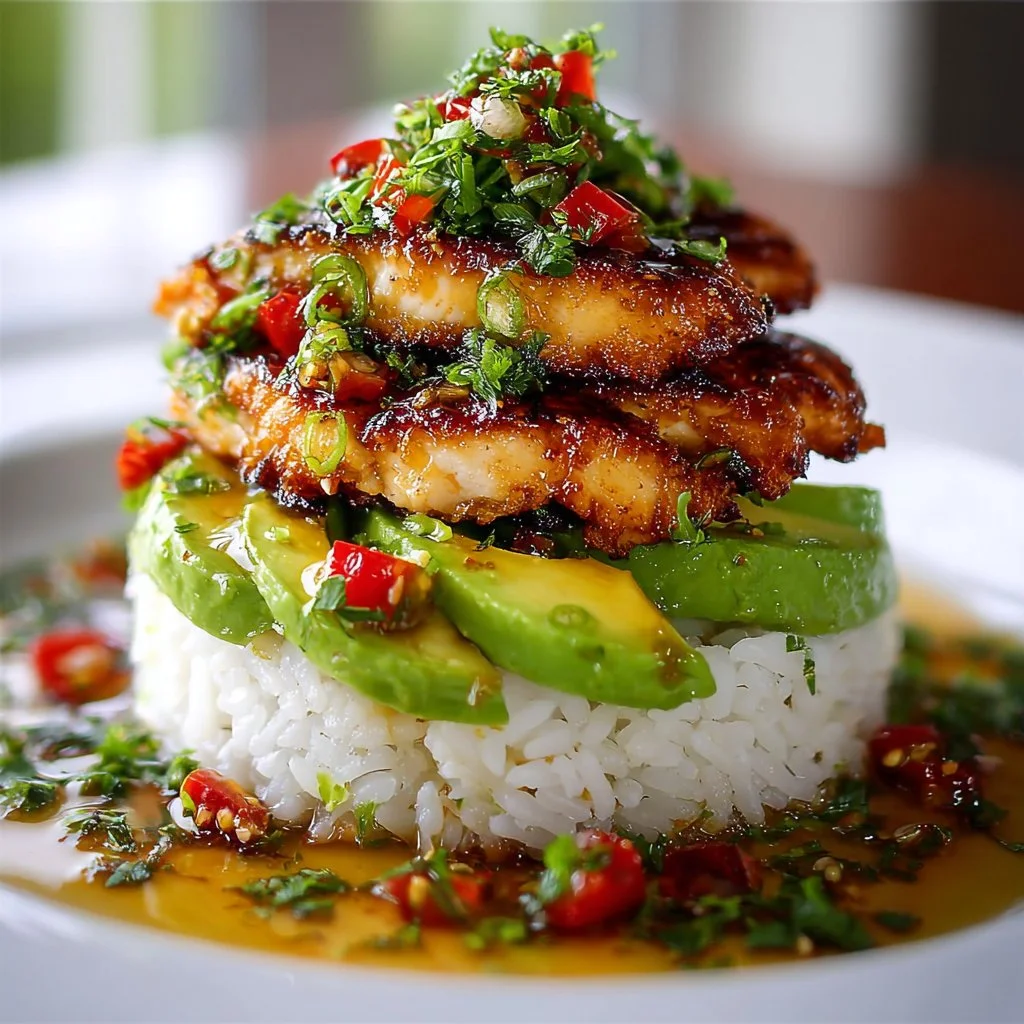
Honey Lime Chicken & Avocado Rice Stack – Irresistible 25-Minute Dinner
Honey Lime Chicken & Avocado Rice Stack – Irresistible 25-Minute Dinner
Hello, fellow food lovers! Are you ready to step into the kitchen for a quick yet delicious meal that’s as vibrant as a summer’s day? Today, I’m excited to share one of my absolute favorites: Honey Lime Chicken & Avocado Rice Stack. This dish is not only a cinch to whip up—taking just about 25 minutes from prep to plate—but it also bursts with flavor and color that will elevate your dining experience.
Picture this: succulent chicken breasts marinated in a zesty honey-lime mix, all laid atop fluffy rice and rich, creamy avocados. The sweet and tangy notes from the honey and lime marry beautifully with the freshness of the avocado and the inviting warmth of the rice. You’ve got a mini flavor explosion in every bite!
Now, I know that weeknight cooking can sometimes feel daunting, but that’s where I come in. This recipe embraces simplicity without sacrificing elegance, making it perfect for cozy dinners at home or when you need something special but quick to impress your guests. Plus, it’s a fantastic way to gather everyone around the table. Let’s dig in and set the stage for a meal that feels both rewarding and effortless.
Personal Story
One of my fondest memories that inspired this dish dates back to a sunny afternoon when I decided to host an impromptu backyard barbecue for my closest friends. With the grill fired up and the aromatic scent of marinated chicken wafting through the air, I felt a warmth of anticipation. As the chicken sizzled, I tossed together a vibrant avocado and rice salad, reminiscent of the ones we’d enjoy during summer picnics as kids. The laughter and chatter of my friends mingled with the gentle clinking of glasses—it was pure magic!
I remember plating the juicy honey lime chicken on a bed of fluffy rice, then layering on the diced avocado as a refreshing touch to create a stack. The smiles around the table said it all—everyone loved it! That day, I realized how food could transcend taste; it creates moments, nostalgia, and connections. And that’s exactly why I can’t wait to share this recipe with you. Each bite is a reminder of those sunny afternoons filled with laughter and love.
Ingredients
Here’s what you’ll need to create your Honey Lime Chicken & Avocado Rice Stack. Each ingredient contributes to the overall deliciousness and can often be swapped based on what you have at home!
-
2 Boneless, Skinless Chicken Breasts
The star of the show! Boneless and skinless make for quick cooking and easy eating. If you’re in a bind, feel free to use thighs for a richer flavor. -
2 Tablespoons Olive Oil
Extra virgin for elevated flavor, but any olive oil will do! This not only helps to prevent sticking but also adds a lovely richness to the chicken. -
Zest and Juice of 2 Limes
Fresh lime juice brightens up the dish, while the zest adds that extra aromatic touch. If limes aren’t available, lemons can work in a pinch! -
2 Tablespoons Honey
This natural sweetener balances the acidity of the lime beautifully. If you need a substitute, agave syrup works wonderfully too! -
2 Cloves Garlic, Minced
A little minced garlic goes a long way in adding depth to the marinade—that aromatic flavor really enhances the dish. Fresh is best, but garlic powder can work if you’re in a hurry. -
1/2 Teaspoon Ground Cumin
Earthy and warm, cumin brings a touch of spice to the mix. Just a sprinkle enhances the flavor profile, but don’t overdo it unless you’re a cumin lover! -
Salt and Black Pepper, to Taste
Essential seasoning! Always taste as you go to get that perfect seasoning balance. -
2 Cups Cooked White or Jasmine Rice
Fluffy rice forms a cozy base for layering. Leftovers or even microwave rice can save time if you’re in a major rush. -
2 Ripe Avocados, Diced
Creamy and delicious, avocados add richness to the stacks. Choose ripe ones for the best flavor—if they’re too firm, leave them a day or two on the counter. -
1 Tablespoon Fresh Cilantro, Chopped
This herb brightens and lifts the entire dish—definitely a must! If cilantro isn’t your thing, fresh parsley can be a good substitute. -
1/2 Cup Cherry Tomatoes, Finely Chopped (Optional)
A burst of color and sweetness! These can be omitted if you prefer, or swapped for diced bell peppers for a crunchy twist.
Step-by-Step Instructions
Let’s get cooking in just a few easy steps. Have that apron tied around your waist? Good! Here we go:
-
Marinate the Chicken: In a medium bowl, whisk together the olive oil, lime zest and juice, honey, minced garlic, cumin, salt, and black pepper. This marinade is your magic potion, infusing the chicken with incredible flavor. Place the chicken breasts in the bowl, coating them thoroughly, and let them marinate while you prep your other ingredients (or at least 10 minutes).
-
Cook the Chicken: Heat a skillet over medium-high heat. Once hot, add the marinated chicken breasts (discard any remaining marinade). Cook for about 5-7 minutes on each side or until the chicken is golden brown and the internal temperature reaches 165°F (75°C). This is key for that juicy texture. Pro tip: use a meat thermometer for accuracy!
-
Prepare Rice: If you’re using leftover rice, heat it up in the same skillet after the chicken is done, scraping up any little brown bits for extra flavor. If you’re using freshly cooked rice, fluff it with a fork and set aside.
-
Avocado Time: While the chicken cooks, cut your ripe avocados in half, remove the pit, and scoop the flesh out with a spoon. Dice it into bite-sized pieces and toss with a squeeze of lime juice (to keep it from browning) and a pinch of salt.
-
Plating the Stack: For a stunning presentation, take a shallow bowl or plate. Start with a generous scoop of rice at the bottom, creating a nice base. Slice the chicken breasts and lay them on top of the rice, then finish with the diced avocado and sprinkle the fresh cilantro for that finishing touch. If you’re feeling extra, toss in those cherry tomatoes for an added burst of flavor and color.
-
Enjoy: Gather your loved ones around the table, serve, and watch as they revel in the delightful layers of flavor and texture!
Serving Suggestions
To plate your Honey Lime Chicken & Avocado Rice Stack, consider using a wide, shallow bowl or a beautiful plate where all the colors can shine. Start with a scoop of rice and layer the sliced chicken on top. Then, add the diced avocado, finishing with a sprinkle of fresh cilantro and a few halved cherry tomatoes for a pop of color. A wedge of lime on the side makes for a lovely garnish and offers that extra zesty squeeze for those who crave it!
Recipe Variations
-
Grilled Chicken: Swap the skillet method for a grill for added smoky flavor. Just make sure to oil the grates!
-
Spicy Kick: Add some diced jalapeños or a sprinkle of chili flakes to the chicken marinade for a spicy twist!
-
Vegetarian Version: Replace chicken with grilled halloumi or a plant-based protein such as chickpeas or tofu, marinated in the same sweet-tangy dressing.
-
Nutty Flavor: Toss in some toasted pine nuts or sunflower seeds for a delightful crunch!
-
Different Rice: Use quinoa or cauliflower rice as a base for a low-carb option.
Chef’s Notes
Ah, this recipe has evolved beautifully over time! I remember when I first started experimenting with honey and lime as a marinade. Initially, I paired them with different proteins, but the chicken really took the spotlight and became a staple at dinners among friends. I have even used this technique to marinate shrimp and fish, and let me tell you, it’s divine! Life’s too short for boring meals, and this dish is one of those that just keeps evolving with every gathering I host. Plus, it’s a hit every time!
FAQs and Troubleshooting
1. What if my chicken is too dry?
Cooking chicken can be tricky! If your chicken turns out dry, ensure you’re not overcooking it by using a meat thermometer. You want a perfect 165°F! Also, letting the chicken rest for a few minutes off the heat allows the juices to redistribute.
2. Can I make this in advance?
Yes! You can marinate the chicken in the morning, and when you’re ready to eat, simply cook it up and assemble the stack. The rice can also be prepped ahead of time.
3. What can I do if my avocados are hard?
If your avocados aren’t ripe yet, place them in a brown paper bag with an apple or banana for a day or two; the ethylene gas will speed up the ripening process!
4. How do I store leftovers?
Leftovers can be refrigerated in an airtight container for up to 2 days. However, I recommend keeping avocado separate until you’re ready to serve to prevent browning.
Nutritional Info
This dish is not only delicious but also nutritious! A serving contains:
- Calories: 480
- Protein: 32g
- Carbohydrates: 37g
- Fat: 24g
- Fiber: 8g
But remember, nutritional values can vary based on your ingredients and serving sizes.
And there you have it, my beautiful friends! I hope you enjoy making and sharing this Honey Lime Chicken & Avocado Rice Stack as much as I do. It’s all about the joy of cooking and savoring the moments spent together at the table. So tie on your ivory apron, grab a glass of something sparkling, and let’s create some magic! Happy cooking!
PrintHoney Lime Chicken & Avocado Rice Stack
A vibrant and delicious 25-minute dinner with chicken marinated in honey-lime, served over fluffy rice and creamy avocado.
- Prep Time: 10 minutes
- Cook Time: 15 minutes
- Total Time: 25 minutes
- Yield: 4 servings 1x
- Category: Main Course
- Method: Skillet
- Cuisine: Mexican
- Diet: Gluten-Free
Ingredients
- 2 Boneless, Skinless Chicken Breasts
- 2 Tablespoons Olive Oil
- Zest and Juice of 2 Limes
- 2 Tablespoons Honey
- 2 Cloves Garlic, Minced
- 1/2 Teaspoon Ground Cumin
- Salt and Black Pepper, to Taste
- 2 Cups Cooked White or Jasmine Rice
- 2 Ripe Avocados, Diced
- 1 Tablespoon Fresh Cilantro, Chopped
- 1/2 Cup Cherry Tomatoes, Finely Chopped (Optional)
Instructions
- Marinate the Chicken: In a medium bowl, whisk together the olive oil, lime zest and juice, honey, minced garlic, cumin, salt, and black pepper. Place the chicken breasts in the bowl, coating them thoroughly, and let them marinate while you prep your other ingredients (or at least 10 minutes).
- Cook the Chicken: Heat a skillet over medium-high heat. Add the marinated chicken breasts (discard any remaining marinade). Cook for about 5-7 minutes on each side or until the chicken is golden brown and the internal temperature reaches 165°F (75°C).
- Prepare Rice: If you’re using leftover rice, heat it up in the same skillet after the chicken is done. If you’re using freshly cooked rice, fluff it with a fork and set aside.
- Avocado Time: While the chicken cooks, cut your ripe avocados in half, remove the pit, and scoop the flesh out with a spoon. Dice it into bite-sized pieces and toss with a squeeze of lime juice and a pinch of salt.
- Plating the Stack: Take a shallow bowl or plate. Start with a scoop of rice at the bottom, creating a base. Slice the chicken breasts and lay them on top of the rice, then finish with the diced avocado and sprinkle the fresh cilantro.
- Enjoy: Gather your loved ones around the table, serve, and watch as they revel in the delightful layers of flavor and texture!
Notes
Consider using a wide, shallow bowl for presentation. A wedge of lime on the side makes for a lovely garnish.
Nutrition
- Serving Size: 1 serving
- Calories: 480
- Sugar: 10g
- Sodium: 300mg
- Fat: 24g
- Saturated Fat: 4g
- Unsaturated Fat: 20g
- Trans Fat: 0g
- Carbohydrates: 37g
- Fiber: 8g
- Protein: 32g
- Cholesterol: 70mg
Keywords: chicken, avocado, honey lime, quick dinner, summer meal