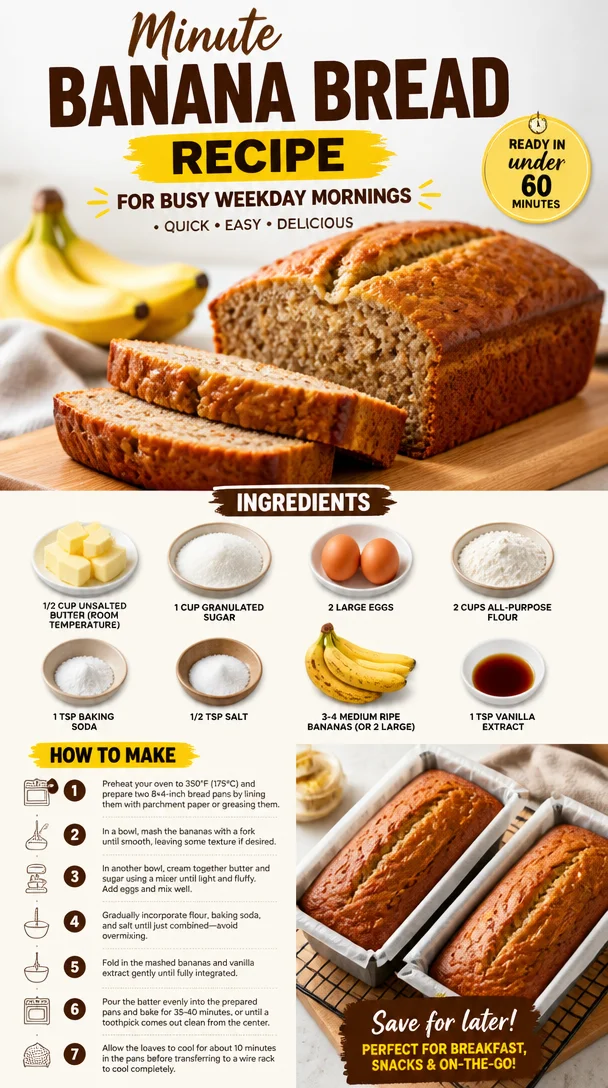
Minute Banana Bread Recipe for Busy Weekday Mornings
The Best Banana Bread Recipe: A Timeless Classic
Hello, lovely foodies! Today, I’m thrilled to share a recipe that holds a cherished spot in my heart—the best banana bread. It’s a classic that transforms those overripe bananas on your kitchen counter into a warm hug in loaf form. With every bite, you’ll experience the comforting flavors and aromas that evoke the essence of home. So grab your apron, and let’s get started!
A Slice of Nostalgia
Growing up, my grandmother’s kitchen was always filled with warm scents that beckoned everyone to linger. I can still picture her, a whirlwind of flour and laughter, whipping up her famous banana bread every time the kids visited. She had this incredible knack for turning simple ingredients into something magical. I remember the excitement of gathering around the table, bursting at the seams with family chatter, while the golden loaf cooled on the wire rack, tempting us with its sweetness.
One particular Saturday, we decided it would be fun to have a banana-bread bake-off. The smell of bananas and butter wafted through the house, and as the timer chimed, we discovered the delightful chaos of flour-covered countertops and giggles filling the air. While my attempt was slightly less than perfect—a bit too much baking soda and a touch too little sugar—my grandma’s banana bread was a masterpiece. That day remains a treasured memory, reminding me that cooking is not just about flavors; it’s about creating moments that we hold dear.
Ingredients
Let’s gather our ingredients to create that dream loaf of banana bread! Here’s what you’ll need:
-
1/2 cup unsalted butter (room temperature): Butter is essential for richness. If you don’t have unsalted on hand, you can use salted butter; just adjust the salt in the recipe accordingly.
-
1 cup granulated sugar: This adds sweetness and moisture. For a healthier twist, consider using coconut sugar or brown sugar for a more caramel-like flavor.
-
2 large eggs: Eggs provide structure and moisture. If you’re vegan, you can substitute with flax eggs (1 tablespoon of ground flaxseed mixed with 2.5 tablespoons of water for each egg).
-
2 cups all-purpose flour: This is the basis of your loaf. You can easily swap in whole wheat flour for a heartier flavor, or use gluten-free flour to cater to dietary needs.
-
1 tsp baking soda: This is crucial for leavening your bread. If you’re out, you can use baking powder instead—just double the amount!
-
1/2 tsp salt: A little salt enhances the sweetness and balances flavors.
-
3-4 medium ripe bananas (or 2 large): The star of the show! Choose bananas that are speckled and brown for the best sweetness and flavor. You can also substitute with applesauce (1/2 cup for every banana) if you want a unique twist.
-
1 tsp vanilla extract: This adds depth and warmth to the bread. Feel free to use almond extract for a more robust flavor!
Step-by-Step Instructions
Now onto the fun part—baking! Here’s how to transform these ingredients into a truly iconic banana bread.
-
Preheat your oven:
- Preheat your oven to 350°F (175°C). This ensures that the bread starts baking evenly right away!
-
Cream the butter and sugar:
- In a large mixing bowl, cream the room-temperature unsalted butter and granulated sugar together until light and fluffy. This usually takes about 3-5 minutes. Don’t rush this step; it’s essential for a light texture!
-
Add the eggs:
- Crack in the two large eggs one at a time, mixing well after each addition. You want to ensure they’re fully incorporated before adding more.
-
Mash the bananas:
- In a separate bowl, mash the ripe bananas with a fork until smooth. It’s okay to leave a few small lumps for texture. The riper the bananas, the sweeter your bread!
-
Combine banana and vanilla:
- Mix the mashed bananas and vanilla extract into the butter-sugar-egg mixture until well blended.
-
Dry ingredients time:
- In another bowl, whisk together the all-purpose flour, baking soda, and salt. This step ensures even distribution of the leavening agent.
-
Mix it all together:
- Gradually add the dry ingredients to the wet mixture, stirring until just combined. Try not to overmix! A few flour streaks are perfectly fine.
-
Pour into the pan:
- Pour the batter into a greased or parchment-lined 9×5-inch loaf pan. Use a spatula to smooth the top gently. This step is where you can sprinkle a bit of extra sugar or nuts on top for a delightful crunch!
-
Bake:
- Place your loaf in the preheated oven and bake for 60-70 minutes, or until a toothpick inserted in the center comes out clean. If the top begins to brown too quickly, you can tent it with aluminum foil during the last 15 minutes.
-
Cool it down:
- Once baked, remove from the oven and allow it to cool in the pan for about 10 minutes. Then transfer it to a wire rack and let it cool completely before slicing.
Serving Suggestions
Now that your banana bread is baked to perfection, how should you serve it? Here are a few ideas! Enjoy each slice fresh out of the oven for a cozy treat, or toast it lightly with a pat of butter for breakfast. A sprinkle of cinnamon or a drizzle of honey transforms this dish into a delightful morning treat. And if you’re feeling indulgent, consider serving it with a scoop of vanilla ice cream for a delightful dessert!
Recipe Variations
Want to bring a twist to your banana bread? Here are a few creative variations to explore:
-
Chocolate Chip Banana Bread: Add 1 cup of semi-sweet chocolate chips to the batter for a rich, decadent touch.
-
Nuts or Seeds: Incorporate 1/2 cup of walnuts, pecans, or sunflower seeds for added crunch and nutrition.
-
Spices: Sprinkle in a teaspoon of cinnamon or nutmeg for a warm, spiced flavor that’s perfect for autumn.
-
Coconut Banana Bread: Fold in 1/2 cup of unsweetened shredded coconut for a tropical twist.
-
Zucchini: Grate one small zucchini and add it for an extra boost of moisture and nutrients!
Chef’s Notes
Ah, banana bread—a true testament to the beauty of simplicity! This recipe has evolved over the years as I’ve experimented with different flavors and ingredients. I vividly recall a baking mishap when I mistakenly used too much baking soda, which transformed my loaf into a bouncy, almost rubbery disaster. Lesson learned! It was a (slightly embarrassing) reminder of the precision required in baking. Share your own kitchen flops in the comments; I know we all have them!
FAQs and Troubleshooting
-
Why is my banana bread too dense?
- Overmixing the batter can lead to dense bread. Mix just until combined for a lighter texture.
-
How can I store banana bread?
- Wrap your cooled banana bread in plastic wrap and store it at room temperature for up to three days. You can also freeze it for up to three months; just slice and freeze individual pieces for easy access!
-
My banana bread didn’t rise. What happened?
- Check the freshness of your baking soda. If it’s expired, your bread won’t rise properly.
-
Can I make mini banana breads?
- Absolutely! Divide the batter into mini loaf pans, reducing baking time to about 20-25 minutes.
Nutritional Info
(Serving size: 1 slice)
- Calories: 180
- Total Fat: 7g
- Saturated Fat: 4g
- Cholesterol: 30mg
- Sodium: 120mg
- Total Carbohydrates: 25g
- Dietary Fiber: 1g
- Sugars: 12g
- Protein: 2g
There you have it! The best banana bread recipe that’s not only delicious but also creates beautiful memories in the kitchen. I hope you enjoy baking this loaf as much as I enjoy sharing it with you. Tie on that apron, dive into those ripe bananas, and let’s make something wonderful together! Happy baking!
PrintThe Best Banana Bread Recipe: A Timeless Classic
A classic banana bread recipe that transforms overripe bananas into a comforting loaf, evoking nostalgia and home.
- Prep Time: 15 minutes
- Cook Time: 70 minutes
- Total Time: 85 minutes
- Yield: 1 loaf (about 12 slices) 1x
- Category: Dessert
- Method: Baking
- Cuisine: American
- Diet: Vegetarian
Ingredients
- 1/2 cup unsalted butter (room temperature)
- 1 cup granulated sugar
- 2 large eggs
- 2 cups all-purpose flour
- 1 tsp baking soda
- 1/2 tsp salt
- 3–4 medium ripe bananas (or 2 large)
- 1 tsp vanilla extract
Instructions
- Preheat your oven to 350°F (175°C).
- Cream the butter and sugar together until light and fluffy.
- Add the eggs one at a time, mixing well.
- Mash the ripe bananas until smooth.
- Combine the mashed bananas and vanilla into the batter.
- Whisk together the flour, baking soda, and salt.
- Mix the dry ingredients into the wet mixture until just combined.
- Pour the batter into a greased or parchment-lined loaf pan.
- Bake for 60-70 minutes, or until a toothpick comes out clean.
- Cool in the pan for 10 minutes, then transfer to a wire rack.
Notes
For variations, consider adding chocolate chips, nuts, spices, or even zucchini to the batter.
Nutrition
- Serving Size: 1 slice
- Calories: 180
- Sugar: 12g
- Sodium: 120mg
- Fat: 7g
- Saturated Fat: 4g
- Unsaturated Fat: 3g
- Trans Fat: 0g
- Carbohydrates: 25g
- Fiber: 1g
- Protein: 2g
- Cholesterol: 30mg
Keywords: banana bread, dessert, baking, comfort food, classic recipes

Low Carb Greek Yogurt Blueberry Muffins
Low Carb Greek Yogurt Blueberry Muffins: A Deliciously Wholesome Treat
Hello, lovely foodies! Today, I’m excited to share with you one of my go-to recipes for a tasty and healthy snack: Low Carb Greek Yogurt Blueberry Muffins! If you’re anything like me, you truly appreciate when you can indulge your cravings without compromising your health goals. These muffins are not only easy to make, but they’re also fluffy, flavorful, and perfect for breakfast, brunch, or a little afternoon pick-me-up.
Let’s get into it!
A Little Personal Touch
I often think back to the summer weekends spent at my grandparents’ cozy cabin, nestled by the lake. Mornings there were always filled with the delightful aroma of fresh-baked muffins wafting through the air. My grandmother would often let me help in the kitchen, teaching me her tried-and-true muffin techniques. It’s where I first fell in love with cooking, especially when it came to mixing and pouring batter, sneaking bites of warm blueberries fresh from the mixing bowl!
The tradition of muffin-making is something I’ve carried into adulthood, refined my techniques, and naturally, embraced my love for healthier alternatives. This recipe for Low Carb Greek Yogurt Blueberry Muffins channels those fond memories while also giving you a wholesome treat that doesn’t derail those healthy eating habits. The best part? You won’t even miss the carbs!
Ingredients
Let’s gather our ingredients and talk about why they matter!
-
4 eggs: These are the binding agents and will give the muffins a nice rise. If you’re vegan, you can substitute with flax eggs (1 tbsp ground flaxseed mixed with 3 tbsp water = 1 egg).
-
½ cup plain Greek yogurt: Not only does this provide moisture, but it also adds protein to keep you satisfied. If you’re looking for a dairy-free option, a similar amount of coconut yogurt works great!
-
1 tsp vanilla extract: This enhances the flavor, making your muffins taste delightful! Using pure vanilla extract is always preferred for its natural flavor, but imitation vanilla will work in a pinch.
-
3 cups almond flour: A fantastic low-carb alternative to regular flour, it gives these muffins a lovely nutty flavor. If you have a nut allergy, you might consider using sunflower seed flour.
-
⅔ cup Swerve sweetener: This zero-calorie sweetener is my secret weapon! It’s a great substitute for sugar and doesn’t affect blood sugar levels. If you prefer, feel free to use your favorite granulated sweetener, but keep in mind that the sweetness levels may vary.
-
1 tbsp baking powder: For that perfect rise in your muffins! Make sure your baking powder is fresh for the best results.
-
1+ cups fresh blueberries: These provide a burst of flavor and antioxidants. Frozen blueberries can also work, but make sure to thaw and drain them first.
Step-by-Step Instructions
Let’s dive into making these delightful muffins!
-
Preheat Your Oven: Start by preheating your oven to 350°F (175°C). This is essential for getting that perfect golden-brown top!
-
Mix the Wet Ingredients: In a large mixing bowl, crack the 4 eggs and whisk them well. Add in the ½ cup of Greek yogurt and the 1 tsp of vanilla extract. Mix until it’s creamy and smooth. This is the moment to blend in all those cozy flavors and textures!
-
Combine the Dry Ingredients: In another bowl, whisk together the 3 cups of almond flour, ⅔ cup Swerve sweetener, and 1 tbsp baking powder. Mixing your dry ingredients separately ensures that the baking powder is evenly distributed throughout the muffins.
-
Combine Wet and Dry Ingredients: Gradually add the dry mixture into the wet mixture. Stir gently until everything is well combined. Be careful not to overmix; just blend until no dry flour is visible. Overmixing can result in dense muffins, and we want them light and fluffy!
-
Fold in the Blueberries: Now comes the fun part—gently fold in the blueberries! Use a spatula to stir them in, being careful not to crush them. A blueberry explosion in your muffin is a joy you’ll want to savor.
-
Prepare the Muffin Tin: Line your muffin tin with paper liners or lightly grease each cup. This will help to avoid any sticking and make cleanup super easy!
-
Scoop the Batter: Using a large ice cream scoop or spoon, fill each muffin cup about ¾ full with the batter. This will allow them to rise beautifully without overflowing.
-
Bake to Perfection: Pop the muffin tin into the oven and bake for 20-25 minutes or until a toothpick inserted in the center comes out clean. The aroma wafting through your kitchen will be the best part—trust me!
-
Cool and Enjoy: Once baked, remove the muffins from the oven and let them cool in the pan for a few minutes before transferring them to a wire rack. This ensures they won’t steam and become soggy.
Serving Suggestions
These muffins are delightful fresh out of the oven, but they’re equally wonderful at room temperature or even slightly warmed with a bit of butter or Greek yogurt spread on top. Serve them on a beautiful platter with fresh berries and a drizzle of honey or a sprinkle of lemon zest for an elegant touch.
Recipe Variations
Feeling adventurous? Here are a few tasty twists on this classic recipe to keep things exciting:
- Lemon Blueberry Muffins: Add the zest of one lemon to the batter for a refreshing citrus flavor.
- Nutty Delight: Stir in a ½ cup of chopped nuts like walnuts or pecans to give your muffins a lovely crunch.
- Chocolate Chip Twist: Swap in some dark chocolate chips instead of or along with blueberries for a sweeter treat.
- Spiced Up: Add a teaspoon of cinnamon or nutmeg for a warm, cozy flavor profile.
- Savory Addition: Throw in some crumbled feta cheese and fresh herbs for a unique savory muffin perfect for brunch.
Chef’s Notes
Creating this recipe was such a joy! I’ve evolved it over time, gradually swapping out traditional ingredients for healthier alternatives without sacrificing taste. I once attempted to include protein powder for an extra boost, but let me tell you – the texture became quite like a brick! So, I focused on balancing richness and moisture with Greek yogurt. Trust me on this one; it’s tried and true!
FAQs and Troubleshooting
Here are some common questions and a few tips to ensure your muffins are a hit:
-
Why are my muffins dense?
Overmixing is often the culprit. Just mix until combined! -
Can I use frozen blueberries?
Yes, but be sure to thaw and drain them to prevent excess moisture in the batter. -
Do I need to let the batter sit?
Nope! You can bake immediately. Just get that oven preheated, and you’re good to go! -
What should I do if I want sweeter muffins?
Adjust the Swerve sweetener to your taste. Just keep in mind that the relevant sweetness can vary based on the brand.
Nutritional Info
(based on recipe serving size of 12 muffins)
- Calories: 140
- Fat: 10g
- Carbohydrates: 5g
- Fiber: 3g
- Protein: 6g
Conclusion
Cooking should be fun and stress-free, where you find joy in creating and sharing delightful meals. These Low Carb Greek Yogurt Blueberry Muffins not only pay homage to my childhood memories, but they are an excellent way to embrace a healthier lifestyle. I hope you find the same happiness making them as I do!
So tie on that apron and get ready to whip up something delicious! If you try these muffins, I’d love to hear your stories and any variations that you come up with. Happy baking, everyone! 🍽️
PrintLow Carb Greek Yogurt Blueberry Muffins

Deliciously wholesome low carb muffins made with Greek yogurt and blueberries, perfect for breakfast or a snack.
- Prep Time: 10 minutes
- Cook Time: 25 minutes
- Total Time: 35 minutes
- Yield: 12 muffins 1x
- Category: Snack
- Method: Baking
- Cuisine: Greek
- Diet: Low Carb, Vegetarian
Ingredients
- 4 eggs
- ½ cup plain Greek yogurt
- 1 tsp vanilla extract
- 3 cups almond flour
- ⅔ cup Swerve sweetener
- 1 tbsp baking powder
- 1+ cups fresh blueberries
Instructions
- Preheat your oven to 350°F (175°C).
- Mix the wet ingredients in a large bowl: crack the 4 eggs and whisk, then add ½ cup Greek yogurt and 1 tsp vanilla extract. Mix until creamy.
- Combine the dry ingredients in another bowl: whisk together 3 cups almond flour, ⅔ cup Swerve sweetener, and 1 tbsp baking powder.
- Combine the wet and dry ingredients, stirring gently until well combined.
- Fold in the blueberries gently with a spatula.
- Prepare the muffin tin by lining it with paper liners or greasing each cup.
- Scoop the batter into each muffin cup until about ¾ full.
- Bake for 20-25 minutes or until a toothpick comes out clean.
- Cool in the pan for a few minutes before transferring to a wire rack.
Notes
Serve warm with butter or Greek yogurt spread on top. Try variations like adding lemon zest, nuts, or chocolate chips.
Nutrition
- Serving Size: 1 muffin
- Calories: 140
- Sugar: 0g
- Sodium: 200mg
- Fat: 10g
- Saturated Fat: 1g
- Unsaturated Fat: 9g
- Trans Fat: 0g
- Carbohydrates: 5g
- Fiber: 3g
- Protein: 6g
- Cholesterol: 180mg
Keywords: low carb, muffins, blueberry, healthy snacks, Greek yogurt
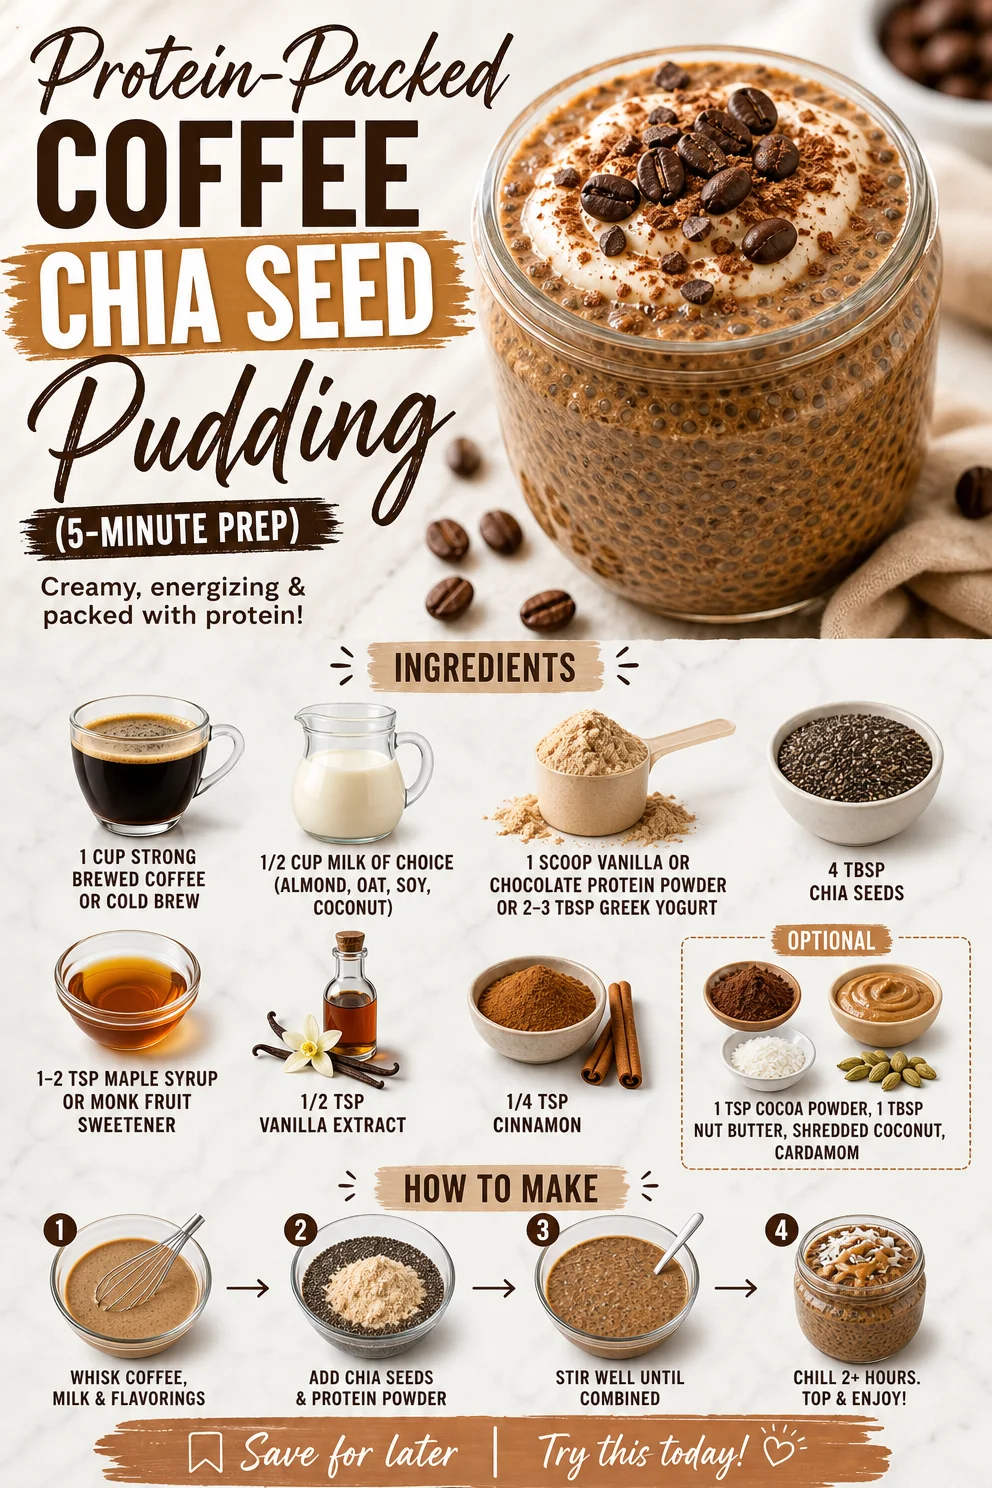
Protein-Packed Coffee Chia Seed Pudding (5-Minute Prep)
Coffee Chia Seed Pudding With Protein: A Deliciously Energizing Dessert
Hey there, fellow foodies! If you’re anything like me, mornings are a sacred time—a ritual filled with the warmth of coffee and the promise of a delicious day ahead. There’s something about the aroma of freshly brewed coffee that just sets the mood, right? Now, imagine taking that glorious cup of joe and transforming it into a decadent dessert that’s as nutritious as it is indulgent. Enter: Coffee Chia Seed Pudding with Protein!
This delightfully creamy, coffee-infused pudding is a game-changer when it comes to breakfast or dessert. Yes, you read that right—both! Not only does it give you that caffeine boost thanks to our good friend, coffee, but it also packs an extra punch with protein, fiber, and healthy fats from chia seeds. It’s like a cozy hug in a bowl that you can enjoy at any time of day!
I love making this chia pudding for those busy mornings when I want something quick, flavorful, and oh-so-satisfying. Just mix, let it set, and voila—you’ve got breakfast or a snack ready to go! My friends are always astonished when they try this recipe, asking me for the secret. Spoiler alert: it’s simple, and I can’t wait to share it with you.
So grab your apron and let’s dive into this easy, heartwarming recipe that brings together the best of coffee and chia. Trust me, you’re going to want to keep this in your back pocket for those moments when you just need a little pick-me-up!
Personal Story
Let’s rewind a bit to when I first discovered my love for chia seeds. It was a sunny Saturday morning, and I had decided to throw a little breakfast gathering for my closest friends. At the time, I had just become obsessed with trying out new recipes from my favorite food blog. One of the recipes that caught my eye was a simple chia seed pudding. But it was missing something—something rich and familiar. That’s when it hit me: coffee!
I brewed a strong pot of coffee, mixed it with chia seeds, and the rest was history. As my friends arrived, they were greeted by the rich aroma of coffee and the excitement of a brand-new recipe that I was presenting. One bite, and they were hooked! It became a staple at our gatherings, a sort of culinary bonding moment over cups of coffee and bowls of chia pudding. It’s that warm memory of joy and connection that inspires me to keep sharing this recipe. I’m so grateful that I get to recreate that experience in my kitchen and now yours!
Ingredients
Let’s get to the heart of this recipe! Here’s everything you’ll need to whip up this delectable Coffee Chia Seed Pudding with Protein:
-
1 cup strong brewed coffee or cold brew
The base of our pudding! Brew it strong for robust flavor. If you’re sensitive to caffeine, you can opt for decaf or a caffeine-free coffee alternative. -
1/2 cup milk of choice (almond, oat, soy, coconut)
This adds creaminess. Almond milk gives a nutty flavor, while coconut milk lends a tropical touch. Feel free to swap for water or a milk blend. -
1 scoop vanilla or chocolate protein powder or 2–3 tbsp Greek yogurt
For an extra protein boost! Choose a flavor that complements the coffee. Greek yogurt adds creaminess, while protein powder keeps it light. -
4 tbsp chia seeds
These tiny seeds are nutrient powerhouses! They thicken the pudding. If you don’t have chia seeds, you could try flax seeds, but the texture may differ. -
1–2 tsp maple syrup or monk fruit sweetener
A touch of sweetness! Maple syrup offers a comforting caramel note. For less sugar, use monk fruit sweetener as a sugar-free option. -
1/2 tsp vanilla extract
Enhances the overall flavor. A high-quality extract is preferred; it makes a noticeable difference in taste! -
1/4 tsp cinnamon
Adds warmth and spice. You can also try cardamom for an exotic twist if you’re feeling adventurous! -
Optional:
- 1 tsp cocoa powder: For a mocha-like flavor – just mix in with the chia seeds.
- 1 tbsp nut butter: Stir in almond or peanut butter for creaminess.
- Shredded coconut: For a sweet finish or as a garnish.
Step-by-Step Instructions
Alright, now that we have our ingredients lined up, let’s get cooking! This part is quick and easy, so you can whip this up in no time.
Step 1: Brew the Coffee
Start by brewing your coffee. Use a method you love—French press, pour-over, or drip. Aim for a strong brew, as it will be the backbone of your pudding. If you want a chilled version, prepare cold brew instead. Let it cool a bit before moving on!
Step 2: Mix Ingredients
In a medium mixing bowl, whisk together the brewed coffee, milk of your choice, protein powder or Greek yogurt, chia seeds, maple syrup, vanilla extract, and cinnamon. Grab your favorite whisk and mix until all the ingredients are well combined. It’s essential to ensure the chia seeds are evenly distributed to avoid clumps later.
Step 3: Let it Set
Once you’ve mixed everything, cover your bowl with plastic wrap or transfer the mixture into individual jars for those Instagram-worthy portions! Place it in your refrigerator for at least 4 hours or overnight if you want to wake up to this delightful treat. As it sits, the chia seeds will absorb the liquid and expand, giving it that pudding-like texture.
Step 4: Stir Up the Pudding
After it’s set, give the pudding a good stir. You might notice a few chia seeds floating at the top—don’t worry! Just mix it back in, and you’ll end up with a beautiful, thick consistency. If it feels a bit too thick, stir in a bit more milk to reach your desired creaminess.
Step 5: Serve and Enjoy!
Scoop the pudding into your favorite bowls or jars. Top each portion with a sprinkle of shredded coconut, a dollop of nut butter, or a dusting of cocoa powder. The presentation is key here—your little dish of goodness is about to wow anyone who sees it!
Serving Suggestions
Serving this Coffee Chia Seed Pudding is all about making it feel special! Layer in mason jars for a beautiful breakfast display, or serve in cute dessert glasses topped with fresh berries, nuts, or chocolate shavings. Drizzle a little extra maple syrup or a swirl of nut butter on top for that extra tantalizing touch. You could even pair it with a side of fresh fruit or a slice of banana bread for a delightful brunch ensemble!
Recipe Variations
Now, let’s mix things up a bit! Here are some creative variations you can try:
- Mocha Delight: Add 1 tsp cocoa powder into the mix for a chocolatey twist! Top with chocolate shavings for extra indulgence.
- Nutty Buddy: Swirl in your favorite nut butter—peanut, almond, or even cashew—for a protein-packed treat.
- Tropical Escape: Swap the coffee for coconut milk and add some fresh pineapple chunks and toasted coconut flakes for a tropical vibe.
- Spiced Delight: Experiment with spices! Try adding a pinch of nutmeg or cardamom for warmth.
- Vanilla Berry Bliss: Stir in a handful of blueberries or strawberries for a fresh, fruity addition!
Chef’s Notes
Oh, let me tell you, this recipe has certainly evolved over time! Initially, I started with just coffee and chia seeds, but as I explored flavors and textures, it grew into this customizable delight. One of the funniest moments came when I tried making it with a leftover cold brew from my brunch party. I wasn’t sure how it would turn out, but it ended up being the best pudding of all time! Now, I always encourage experimenting with flavors and ingredients!
Regardless of how you make it, the most important part is enjoying the process and sharing those lovely moments with friends and family. Cooking is all about connection, and this pudding is a perfect way to bond—trust me!
FAQs and Troubleshooting
Can I prepare this pudding ahead of time?
Absolutely! Chia pudding stores well in the refrigerator for up to 5 days. Just make sure to keep it covered so it stays fresh.
What if my pudding isn’t thickening?
If your pudding hasn’t thickened enough, it likely needs more time in the fridge. If you’re in a pinch, you can add an extra tablespoon of chia seeds and let it sit for another hour.
Can I omit the protein powder?
Yes! If you prefer or don’t have protein powder on hand, you can substitute with Greek yogurt, or simply enjoy it without for a lighter treat.
How can I add more sweetness?
Simply adjust the sweetness to your liking! Start with the suggested amount of maple syrup or sweetener, and then taste before adding more. You can also use a drizzle of honey or agave syrup if you like.
Nutritional Info
- Calories: Approximately 190 per serving (excluding toppings)
- Protein: 15g (depending on protein powder)
- Carbs: 20g
- Fats: 6g
- Fiber: 8g
Conclusion
And there you have it—your new go-to recipe for Coffee Chia Seed Pudding with Protein! It’s simple, elegant, and oh-so-good. I hope you absolutely love it as much as I do. The best part? You can personalize it while creating beautiful moments in the kitchen and around your table!
So tie on that apron, pour another cup of coffee, and enjoy this deliciously energizing treat that’s perfect for any occasion. Can’t wait to hear how you make it your own—happy cooking, everyone!
PrintCoffee Chia Seed Pudding With Protein
A deliciously energizing dessert that combines the richness of coffee with the nutritious benefits of chia seeds.
- Prep Time: 10 minutes
- Cook Time: 0 minutes
- Total Time: 240 minutes
- Yield: 4 servings 1x
- Category: Dessert
- Method: Refrigeration
- Cuisine: American
- Diet: Vegetarian
Ingredients
- 1 cup strong brewed coffee or cold brew
- 1/2 cup milk of choice (almond, oat, soy, coconut)
- 1 scoop vanilla or chocolate protein powder or 2–3 tbsp Greek yogurt
- 4 tbsp chia seeds
- 1–2 tsp maple syrup or monk fruit sweetener
- 1/2 tsp vanilla extract
- 1/4 tsp cinnamon
- Optional: 1 tsp cocoa powder, 1 tbsp nut butter, shredded coconut
Instructions
- Brew the Coffee: Start by brewing your coffee using your preferred method for a strong brew. Let it cool slightly.
- Mix Ingredients: In a medium bowl, whisk together the brewed coffee, milk, protein powder or Greek yogurt, chia seeds, maple syrup, vanilla extract, and cinnamon until well combined.
- Let it Set: Transfer the mixture to a bowl or jars, cover, and refrigerate for at least 4 hours or overnight.
- Stir Up the Pudding: After it’s set, stir to redistribute the chia seeds. Add more milk if needed to adjust the consistency.
- Serve and Enjoy!: Scoop into bowls and top with toppings like shredded coconut, nut butter, or cocoa powder.
Notes
Store this pudding in the refrigerator for up to 5 days in a covered container.
Nutrition
- Serving Size: 1 serving
- Calories: 190
- Sugar: 6g
- Sodium: 100mg
- Fat: 6g
- Saturated Fat: 1g
- Unsaturated Fat: 5g
- Trans Fat: 0g
- Carbohydrates: 20g
- Fiber: 8g
- Protein: 15g
- Cholesterol: 0mg
Keywords: coffee chia pudding, healthy dessert, protein pudding, vegan dessert, chia seeds
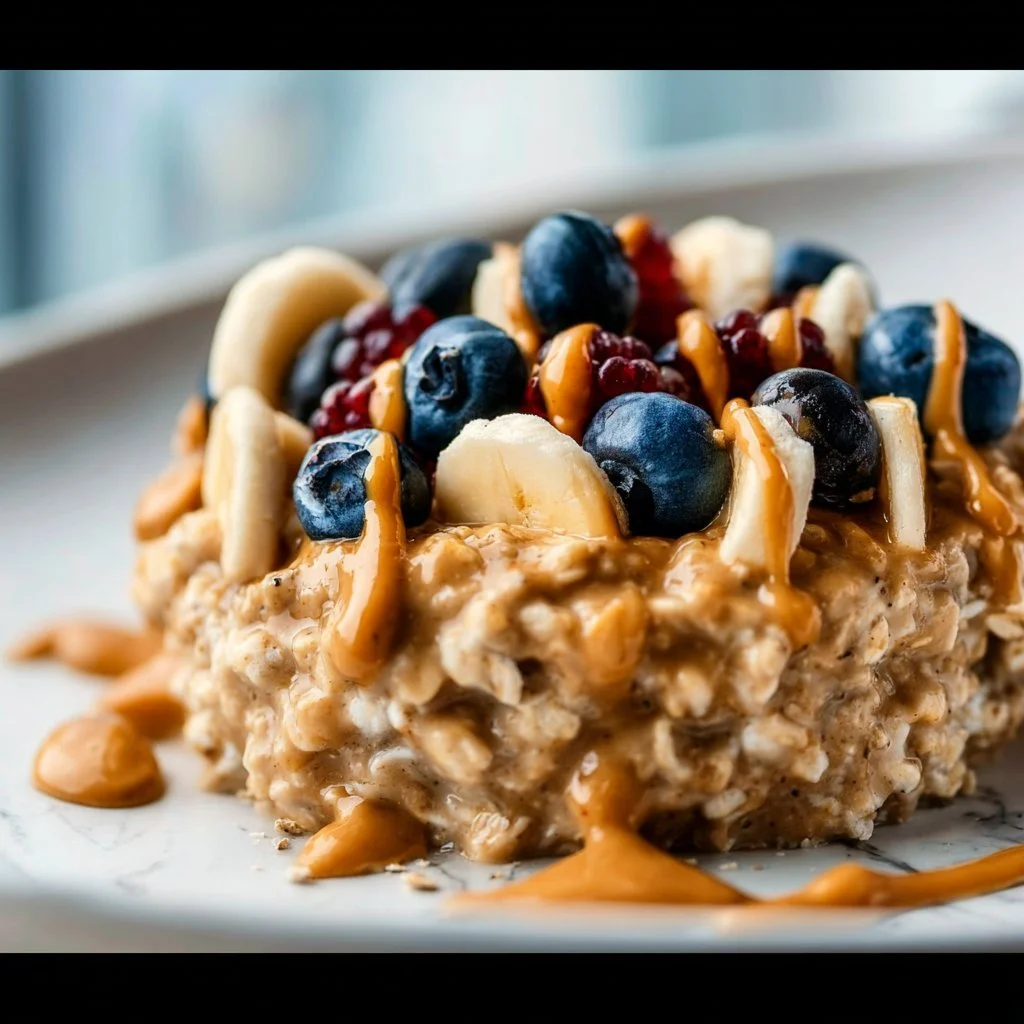
Peanut Butter Oatmeal
# Warm Up with Peanut Butter Oatmeal: A Cozy Classic

## Introduction

Hello, fellow foodies! Today, we’re diving into a dish that warms the heart and fuels the body — Peanut Butter Oatmeal. Oatmeal might seem humble at first glance, but let me tell you, when you add peanut butter into the mix, it transforms into a breakfast bowl of sheer joy! Whether you’re starting your day or need a comforting snack, this dish is packed with flavor, nutrition, and nostalgia.

Picture this: It’s a chilly morning, and the sunlight is streaming through the kitchen window, warming the wooden table where your family gathers. The aroma of toasted oats mingling with the rich, nutty scent of peanut butter wafts through the air. This isn’t just breakfast; it’s a hug in a bowl! With its creamy texture and delightful sweetness, this dish is bound to become a beloved staple in your home.

The beauty of Peanut Butter Oatmeal is in its simplicity and versatility. You can whip it up in a matter of minutes and customize it to your heart’s desire, whether it's adding a drizzle of honey, a handful of berries, or a sprinkle of cacao nibs. But enough about me raving — let’s get cooking!

## Personal Story

As a child, I remember weekends filled with the comforting routine of breakfast at my grandmother’s house. She’d often make oatmeal with a dollop of peanut butter, always served in her favorite, mismatched ceramic bowls. I can still hear her gentle hum as she stirred the oats on the stove, occasionally letting me sneak a taste of the warm, creamy goodness. Our kitchen was a whirlwind of laughter, stories, and yes, plenty of peanut butter!

Those mornings were magical; we shared stories while savoring the simple pleasures of life. Each bite of that oatmeal brought back memories of my grandmother encouraging my budding love for cooking. She would say, “Put your heart into it, and it will always taste good.” Now, every time I make Peanut Butter Oatmeal, I'm transported back to those cozy mornings, and I can’t help but smile. It’s not just the flavors but the memories that truly make this dish special.

## Ingredients

Here’s what you’ll need to whip up a bowl of Peanut Butter Oatmeal:

- **1 cup old-fashioned rolled oats**
  Old-fashioned oats bring a delightful chewiness to the dish. You can substitute with quick oats for a softer texture, although you may need to adjust the cooking time.

- **1 banana (sliced)**
  Bananas add natural sweetness and creaminess. If you prefer, substitute with apples or berries for a different flavor profile.

- **1 tablespoon chia seeds**
  These tiny seeds are power-packed with nutrients and help thicken the oatmeal. You can swap them for flaxseeds if you have those on hand.

- **1 teaspoon cinnamon**
  This spice adds warmth and depth to the oatmeal. If you’re feeling adventurous, try pumpkin pie spice or nutmeg for a twist.

- **Pinch of sea salt**
  A touch of salt enhances the flavors. You can use kosher salt or Himalayan pink salt – both are delicious!

- **3 cups water (or non-dairy milk or a blend of both)**
  Water is a basic staple, but if you want creamier oatmeal, use almond or oat milk. Coconut milk adds a lovely tropical flavor too!

- **2 tablespoons peanut butter**
  The star of the show! Creamy or crunchy peanut butter works; choose according to your preference. For a nut-free option, sunflower seed butter is fantastic.

## Step-by-Step Instructions

Alright, let’s get this peanut butter party started! Follow these steps, and you’ll be enjoying a hearty bowl of oatmeal in no time!

1. **Prepare the Pot**
   Grab a medium saucepan and place it on the stove. Heat over medium heat and add 3 cups of water or non-dairy milk to the pan. Now, let the liquid come to a gentle boil. Tidying up your workspace as you go makes cooking flow smoothly, so don’t forget to do that!

2. **Add the Oats**
   Once your liquid is bubbling away, add 1 cup of old-fashioned rolled oats into the pot. Give it a quick stir to avoid any clumping. This step is essential; it ensures your oats cook evenly, resulting in that perfect texture we love.

3. **Incorporate Chia Seeds & Cinnamon**
   Add in 1 tablespoon of chia seeds and 1 teaspoon of cinnamon. Stir well to combine everything! Those chia seeds will soak up some liquid, helping to thicken your oatmeal as it cooks. And the cinnamon? It’s the secret ingredient that adds warmth!

4. **A Pinch of Salt**
   Don’t skip this step! A pinch of sea salt brings out the sweetness in your oatmeal. Trust me on this; balance is everything! After adding the salt, lower the heat to medium-low.

5. **Let it Simmer**
   Allow the oatmeal to simmer for about 5–7 minutes, stirring occasionally. Keep an eye on the consistency; if it gets too thick, don’t hesitate to splash in a bit more water or milk. You want it creamy, not gluey!

6. **Add Bananas & Peanut Butter**
   When your oats are perfectly cooked and have absorbed most of the liquid, it’s time to stir in those sliced banana and 2 tablespoons of peanut butter. Watch those bananas melt into the oatmeal — it’s pure magic! Give everything a good mix until the peanut butter is fully incorporated.

7. **Taste and Adjust**
   Now’s the time to give it a taste! If you like it sweeter, feel free to drizzle in honey or maple syrup. If you prefer it creamier, add a splash more milk. I often find myself adjusting the flavors at this step, and it’s part of the fun!

8. **Serve Warm**
   Once you have the flavor right, remove the saucepan from the heat. Spoon the oatmeal into your favorite bowls, and get ready to enjoy!

## Serving Suggestions

When plating your Peanut Butter Oatmeal, it’s all about presentation! Top each bowl with extra banana slices, a sprinkle of chia seeds, and perhaps a drizzle of peanut butter — the more the merrier! A dusting of cinnamon or a small handful of chopped nuts elevates the visual appeal and adds a delightful crunch. If you have berries or chocolate chips, toss those on too! Remember, you eat with your eyes first!

## Recipe Variations

Ready to get creative? Here are a few delicious twists on the classic Peanut Butter Oatmeal:

1. **Chocolate Lovers' Delight**: Swirl in cocoa powder and top with chocolate chips for a rich, dessert-like breakfast.
2. **Berry Bliss**: Toss in a handful of fresh or frozen berries while cooking for a pop of color and flavor.
3. **Nutty Banana Crunch**: Replace peanut butter with almond or cashew butter and top with a mix of nuts for added crunch.
4. **Savory Spin**: Skip the sweetness and stir in sautéed spinach and a fried egg on top for a unique savory breakfast option.
5. **Matcha Oatmeal**: Stir in a teaspoon of matcha powder along with peanut butter for an earthy twist.

## Chef’s Notes

I have to admit, my love for oatmeal didn’t start off strong. As a child, it was often too plain or boring for my taste buds. But then, I discovered how a few simple ingredients could elevate that humble bowl into something extraordinary! From choosing quality oats to experimenting with toppings, I’ve learned that oatmeal can be a blank canvas for creativity.

This Peanut Butter Oatmeal has evolved over the years — my grandmother would’ve marveled at how we can now customize every element. I now make a big batch for meal prep and reheat portions throughout the week, scooping in fresh banana slices or adding a dollop of yogurt when I’m feeling fancy!

## FAQs and Troubleshooting

**1. My oatmeal turned out too watery. What did I do wrong?**
   No worries! If your oatmeal is too wet, simply return it to a medium heat and let it simmer for a few more minutes. This will help evaporate the excess liquid.

**2. How can I make my oatmeal sweeter without added sugar?**
   Ripe bananas or a splash of maple syrup can naturally sweeten your dish. You can also stir in a tablespoon of apple sauce for added sweetness and moisture!

**3. Can I make this with steel-cut oats?**
   Absolutely! Just keep in mind that steel-cut oats take longer to cook, usually around 20-25 minutes. Adjust your liquid ratios and cooking time accordingly.

**4. How do I store leftovers?**
   After cooking, let your oatmeal cool and store it in an airtight container in the refrigerator for up to 3 days. Add a splash of milk upon reheating to bring back that creamy texture.

## Nutritional Info

Each serving of Peanut Butter Oatmeal is rich in fiber, healthy fats, and protein, making it a wholesome choice to fuel your day. For a single serving, you can expect approximately:
- Calories: 350
- Protein: 12g
- Carbohydrates: 50g
- Fat: 14g
- Fiber: 10g

Happy cooking, friends! Now, who’s ready to enjoy a cozy bowl of Peanut Butter Oatmeal? Tie on your apron, and let’s keep the warm memories rolling.
Peanut Butter Oatmeal
A cozy and nutritious breakfast bowl featuring old-fashioned oats and creamy peanut butter.
- Prep Time: 5 minutes
- Cook Time: 10 minutes
- Total Time: 15 minutes
- Yield: 1 serving 1x
- Category: Breakfast
- Method: Stovetop
- Cuisine: American
- Diet: Vegetarian
Ingredients
- 1 cup old-fashioned rolled oats
- 1 banana (sliced)
- 1 tablespoon chia seeds
- 1 teaspoon cinnamon
- Pinch of sea salt
- 3 cups water (or non-dairy milk or a blend of both)
- 2 tablespoons peanut butter
Instructions
- Prepare the pot: Grab a medium saucepan and place it on the stove. Heat over medium heat and add 3 cups of water or non-dairy milk. Let the liquid come to a gentle boil.
- Add the oats: Once your liquid is bubbling, add 1 cup of old-fashioned rolled oats. Stir to avoid clumping.
- Incorporate chia seeds & cinnamon: Add 1 tablespoon of chia seeds and 1 teaspoon of cinnamon. Stir well to combine.
- Add a pinch of salt: Incorporate a pinch of sea salt and lower the heat to medium-low.
- Let it simmer: Allow the oatmeal to simmer for about 5–7 minutes, stirring occasionally.
- Add bananas & peanut butter: Stir in sliced banana and 2 tablespoons of peanut butter when oats are cooked.
- Taste and adjust: Check the flavor and sweetness, adding honey or maple syrup if desired.
- Serve warm: Spoon the oatmeal into bowls and top with extra banana slices and toppings of your choice.
Notes
Top with extra banana slices, chia seeds, and a drizzle of peanut butter for added flavor.
Nutrition
- Serving Size: 1 serving
- Calories: 350
- Sugar: 10g
- Sodium: 150mg
- Fat: 14g
- Saturated Fat: 3g
- Unsaturated Fat: 11g
- Trans Fat: 0g
- Carbohydrates: 50g
- Fiber: 10g
- Protein: 12g
- Cholesterol: 0mg
Keywords: breakfast, oatmeal, peanut butter, healthy, quick
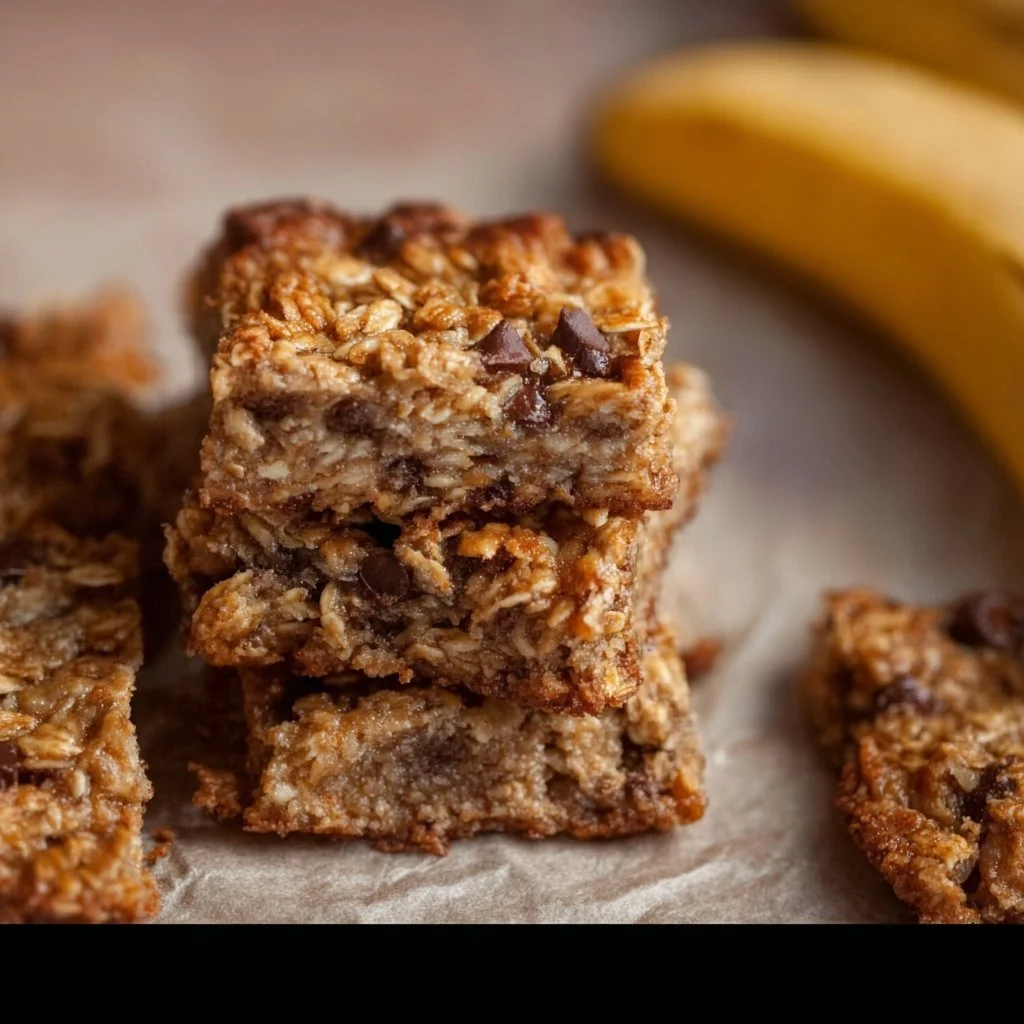
Banana Oatmeal Bars
# Delightful Banana Oatmeal Bars: Your Go-To Recipe for Taste and Tradition

## Introduction

Hello, my fellow food enthusiasts! If there’s one recipe that warms my heart and brings back a flood of treasured memories, it’s these scrumptious **Banana Oatmeal Bars**. Not only are they packed with wholesome ingredients, but they also make for a delightful treat any time of the day. Morning snack? Check. Afternoon pick-me-up? Absolutely. Late-night indulgence? You bet!

Let me take you on a little adventure through this easy-to-make recipe that straight up celebrates the beloved banana in all of its glory. Think about the irresistible aroma of baked goods wafting through the kitchen and the sight of golden oatmeal bars. Who can resist that? Making these bars is as much about the process as it is about the product, so roll up your sleeves, and let’s have a blast creating this delicious snack together!

These bars are a hit with everyone—from kids head over heels for the chocolate chips, to adults looking for a healthy option to satisfy their cravings. Whether you’re meal prepping for the week or needing something quick to grab on the go, trust me, these Banana Oatmeal Bars will tick all the boxes!

Moreover, they are incredibly versatile—you can make them gluten-free, nut-free, or even vegan based on your dietary preferences. It’s a win-win situation! And the best part? You might just discover that this recipe becomes a staple in your kitchen, much like it has in mine.

So, are you ready to dive in and create these delightful bars? Grab your apron, and let’s get started!

## Personal Story

Ah, the simple banana. For me, this fruit has been a symbol of comfort and nostalgia, dating back to my childhood. I vividly remember my grandma's kitchen, a cozy haven filled with warmth, laughter, and a whole lot of baking. One of her favorite recipes was her famous banana bread, and every Saturday, we'd earmark our afternoon for baking. As the bananas turned into a velvety batter, we'd sing along to our favorite tunes, waiting for that irresistible hum of anticipation as it baked away in the oven.

Fast forward to today: the flavors and memories of those golden afternoons still linger in my heart and have inspired me to incorporate that sweetness into these Banana Oatmeal Bars. They remind me of the love that was baked into every loaf, and every time I share this recipe, I can’t help but think of my grandma’s infectious laughter echoing off the walls. Those cherished moments in the kitchen are a reminder that the simplest recipes often bring our loved ones together.

## Ingredients

Let’s gather the ingredients for our mouthwatering Banana Oatmeal Bars! Here’s what you’ll need:

- **1½ cups mashed bananas (approx. 3 bananas)**
  *Choose ripe bananas for that natural sweetness and creamy texture. If you don’t have enough ripe bananas, you can combine mashed ripe with a bit of applesauce for balance.*

- **½ cup nut butter (e.g., peanut butter or almond butter)**
  *Nut butter adds richness and binding. If you prefer a nut-free version, swap it with sunflower seed butter or tahini!*

- **2 cups rolled oats**
  *Rolled oats are essential for that chewy texture. For a gluten-free option, ensure you have certified gluten-free oats.*

- **1 teaspoon cinnamon**
  *A warm spice that enhances the overall flavor. If you want to change it up, try adding a pinch of nutmeg for an extra kick!*

- **1 teaspoon vanilla extract**
  *This adds lovely depth to your bars. You can also use almond extract for a unique twist!*

- **3 tablespoons maple syrup**
  *Pure maple syrup serves as a natural sweetener. Honey or agave syrup can work as a substitute, but the flavor will vary slightly.*

- **1 cup chocolate chips**
  *Who doesn’t love a bit of chocolate? Dark chocolate chips pack a punch, but feel free to use white chocolate or even dried fruit for a healthier spin.*

- **½ teaspoon salt**
  *Salt amplifies all the flavors, so don’t skip it! A flurry of sea salt on top before baking can elevate your bars even more.*

Feel free to customize these ingredients based on what you have on hand. The best part of cooking is making a recipe your own!

## Step-by-Step Instructions

Now that we have our ingredients ready, let’s get cooking! Follow along to create these scrumptious bars.

1. **Preheat the Oven**:
   Preheat your oven to 350°F (175°C) and line an 8x8-inch baking dish with parchment paper. Allowing the oven to heat fully ensures even baking. Plus, who doesn’t love the excitement of the warm kitchen ahead of time?

2. **Mash the Bananas**:
   In a large bowl, mash the ripe bananas with a fork until smooth. You want a few chunks for texture, but aim for a mostly creamy experience. Let their sweetness inspire you!

3. **Mix in Nut Butter**:
   Add the nut butter to the mashed bananas, and stir until well combined. There’s something so satisfying about the combination of these two ingredients; it’s like a hug for your tastebuds! If your nut butter is thick, give it a quick microwave for a few seconds to loosen it up.

4. **Add the Sweetener and Flavor**:
   Pour in the maple syrup, vanilla extract, and sprinkle in the cinnamon and salt. Stir until everything is incorporated. Taste the mixture at this point—it should be sweet and aromatic. Adjust if necessary!

5. **Combine the Oats**:
   Next, gently fold in the rolled oats until everything is evenly mixed. This step is crucial for achieving that perfect chewy texture. It’s like embracing a warm blanket of oats and bananas!

6. **Chocolate Chip Magic**:
   Finally, fold in the chocolate chips. Save a handful to sprinkle on top for an extra treat. Mixing the chocolate chips while the batter is still slightly warm will help them melt ever so slightly, giving you gooey pockets of chocolate bliss throughout your bars.

7. **Bake to Perfection**:
   Spoon the mixture into the prepared baking dish and spread it evenly. Bake for about **25-30 minutes**, or until the edges begin to turn golden and a toothpick inserted into the center comes out clean. The aroma wafting through your kitchen will have everyone eagerly awaiting their first bite!

8. **Cool and Slice**:
   Once baked, let the bars cool in the pan for a few minutes before lifting them out. Allow to cool completely on a wire rack. Slice into squares and get ready to enjoy!

### A Little Chef Hack:
If you like extra crispy edges (who doesn’t?), consider baking these bars in a smaller pan for a denser texture!

## Serving Suggestions

I love to serve these Banana Oatmeal Bars either plain or with a dollop of Greek yogurt on the side for a delightful pairing. A sprinkle of nuts or seeds on top also offers a bit of crunch and makes them look irresistible. If you feel like being fancy, drizzle a bit more maple syrup or a sprinkle of cinnamon before serving—that'll definitely impress your guests!

## Recipe Variations

These Banana Oatmeal Bars are incredibly versatile. Here are some fun variations to switch things up:

1. **Nuts Galore**:
   Add ½ cup of chopped walnuts or pecans for a delightful crunch and an extra layer of flavor.

2. **Fruity Twist**:
   Mix in some chopped apples or blueberries to complement the bananas.

3. **Spiced Up**:
   Experiment with different spices, such as ginger or pumpkin spice, for a seasonal twist.

4. **Coconut Love**:
   Toss in some shredded unsweetened coconut for a tropical vibe.

5. ** Vega-licious**:
   To make vegan Banana Oatmeal Bars, simply ensure the chocolate chips are dairy-free and substitute maple syrup with agave nectar.

## Chef’s Notes

I have to admit, I’ve had my fair share of kitchen experiments that didn’t go as planned! There was one time when I boldly decided to throw in a bunch of super ripe pears, thinking I could use them up. Let’s just say, the end result was a rather mushy mess. But through every flop, I’ve learned the creative process in the kitchen is where the magic happens, and these Banana Oatmeal Bars emerged as a true treasure! They have truly evolved and become a crowd-pleaser in my home, a go-to recipe for any occasion—be it breakfast on the run, an afternoon snack, or dessert!

## FAQs and Troubleshooting

1. **Can I pre-make the mix?**
   Absolutely! You can prepare the mixture a day ahead, store it in an airtight container, and bake it fresh the next day.

2. **My bars turned out too mushy—what happened?**
   If the bananas were extra ripe, that might be the culprit. Make sure to measure accurately, and perhaps try letting it bake a bit longer if you prefer a firmer texture.

3. **How do I know when the bars are done?**
   Look for slightly golden edges and use the toothpick test—if it comes out clean, they’re ready to go!

4. **Can I freeze these bars?**
   Yes! They freeze beautifully. Wrap individual bars in plastic wrap, place them in a freezer-safe container, and enjoy them whenever you need a tasty treat!

## Nutritional Info

*Calorie count may vary based on specific ingredients used.*
- Serving size: 1 bar
- Calories: ~150
- Protein: 4g
- Carbs: 20g
- Fat: 6g
- Fiber: 3g

---

There you have it—a delightful recipe that’s equal parts practical and nostalgic! I hope you’ll enjoy whipping up these Banana Oatmeal Bars as much as I do. Tie on your apron and bake with love; remember, sharing the fruits of your labor is one of life’s greatest pleasures. Happy cooking!
Delightful Banana Oatmeal Bars
Scrumptious Banana Oatmeal Bars packed with wholesome ingredients. Perfect for breakfast, snacks, or dessert.
- Prep Time: 15 minutes
- Cook Time: 30 minutes
- Total Time: 45 minutes
- Yield: 12 servings 1x
- Category: Snack
- Method: Baking
- Cuisine: American
- Diet: Vegetarian
Ingredients
- 1½ cups mashed bananas (approx. 3 bananas)
- ½ cup nut butter (e.g., peanut butter or almond butter)
- 2 cups rolled oats
- 1 teaspoon cinnamon
- 1 teaspoon vanilla extract
- 3 tablespoons maple syrup
- 1 cup chocolate chips
- ½ teaspoon salt
Instructions
- Preheat the oven to 350°F (175°C) and line an 8×8-inch baking dish with parchment paper.
- Mash the ripe bananas with a fork until smooth, keeping a few chunks for texture.
- Add the nut butter to the mashed bananas and stir until well combined.
- Pour in the maple syrup, vanilla extract, and sprinkle in the cinnamon and salt. Stir until everything is incorporated.
- Combine the rolled oats until everything is evenly mixed.
- Fold in the chocolate chips, saving a handful to sprinkle on top.
- Bake for about 25-30 minutes or until the edges turn golden and a toothpick comes out clean.
- Cool in the pan for a few minutes, lift out, and allow to cool completely on a wire rack before slicing.
Notes
For extra crispy edges, consider baking in a smaller pan. These bars freeze beautifully for future treats!
Nutrition
- Serving Size: 1 bar
- Calories: 150
- Sugar: 8g
- Sodium: 160mg
- Fat: 6g
- Saturated Fat: 1g
- Unsaturated Fat: 5g
- Trans Fat: 0g
- Carbohydrates: 20g
- Fiber: 3g
- Protein: 4g
- Cholesterol: 0mg
Keywords: banana bars, oatmeal bars, healthy snacks, gluten-free, vegan options, baking