
Blueberry Cream Cheese Bars: Quick, Creamy Summer Recipe
Blueberry Cream Cheese Bars: An Incredible Ultimate Recipe
Hello fellow food lovers! Today, we’re diving into the world of desserts, specifically a delight that sings of summer and makes your heart feel like it’s dancing—Blueberry Cream Cheese Bars. Picture this: a buttery, flaky crust cradling a velvety cream cheese filling, all topped with luscious blueberries. It’s a symphony of flavors that are as beautiful as a sunset, and I can’t wait to share this recipe with you. So grab your apron, roll up those sleeves, and let’s make something magical together!
A Sweet Little Memory
As I sit here reflecting on my love for these Blueberry Cream Cheese Bars, I’m transported back to a summer afternoon spent at my grandmother’s house. The sun was just dipping low in the sky, casting a golden glow on everything, and the air was filled with the sweet scent of blooming flowers. Grandma had just returned from the farmer’s market with the juiciest blueberries, and I remember the excitement of helping her in the kitchen.
She would have me mix the creamy cheese filling, and I can still hear her guidance ringing in my ears: “Savannah, cooking is all about love and intention!” After we poured the gooey mixture over the crust, we piled on those bright berries. I can still taste that perfect bite—sweet, creamy, and oh-so-light. It felt like a hug from the inside. Now, whenever I make these bars, I’m reminded of those sweet moments and the joy of creating something delicious for the people I love. It’s more than just a recipe; it’s a connection to warmth and nostalgia.
Ingredients
Let’s talk ingredients! Each one plays a vital role in creating the alchemy of flavors and textures that make these bars shine. Here’s what you’ll need:
For the Crust:
-
1 ½ cups all-purpose flour
This is the backbone of your crust. If you want a gluten-free option, you can substitute with almond flour or a gluten-free blend. Just note that the texture might slightly vary! -
½ cup granulated sugar
Adds sweetness to balance the tart blueberries. You can use coconut sugar for a more caramel-like flavor. -
½ cup unsalted butter, melted
Provides that rich, creamy flavor essential for a decadent crust. If you’re dairy-free, coconut oil will work beautifully here. -
¼ teaspoon salt
Enhances the overall flavor and balances the sweetness. Always essential in baking!
For the Cream Cheese Filling:
-
8 ounces cream cheese, softened
This creates the smooth, creamy base. Choose a high-quality cream cheese for the best flavor. If you’re avoiding dairy, cashew cream can be a clever substitute. -
1 cup powdered sugar
Sweetens the filling without that grainy texture granulated sugar might add. You can also make your own by blending granulated sugar finely in a blender. -
1 teaspoon vanilla extract
Adds warmth and depth to your filling. If you’re feeling adventurous, use almond extract for a fun twist. -
2 large eggs
These bind the filling and give it that lovely, custardy texture. For a vegan version, try using aquafaba (the liquid from chickpeas).
For the Blueberry Topping:
-
2 cups fresh blueberries
The star of the show! Fresh is best, but you can also use frozen blueberries—just thaw them and pat dry to avoid excess moisture. -
1 tablespoon cornstarch
This helps thicken the juices released by the blueberries. Arrowroot starch can be an alternative if you prefer a non-GMO option. -
1 tablespoon lemon juice
Brightens and elevates the blueberries’ flavor. Lime juice can be used if you want a different citrus twist. -
2 tablespoons granulated sugar
Just the right amount of sweetness to complement the tartness of the blueberries. Adjust based on your preference, especially if your berries are particularly sweet.
Step-by-Step Instructions
Are you ready to get cooking? Let’s turn those beautiful ingredients into an incredible treat!
1. Preheat Your Oven
Start by preheating your oven to 350°F (175°C). Preheating is crucial because it ensures that your bars bake evenly. If you toss the batter into a cold oven, it could lead to uneven baking.
2. Prepare the Crust
In a medium bowl, mix together the flour, granulated sugar, melted butter, and salt until combined. You want a crumbly mixture that holds together when pressed. If it feels too dry, add a splash of water. Lightly press this mixture into the bottom of a greased 9×9 inch baking dish. Don’t be afraid to get your hands in there; this is where the love happens! Bake for 10-12 minutes until it’s lightly golden. This layer doesn’t need to be fully cooked yet, but it should start to set.
3. Make the Cream Cheese Filling
While the crust is baking, let’s whip up that luscious cream cheese filling! In a mixing bowl, add softened cream cheese, powdered sugar, vanilla extract, and eggs. Beat until smooth and creamy. This is the time to channel your inner pastry chef; the goal is a perfectly velvety texture. Don’t worry if you have a few tiny lumps; they’ll bake out.
4. Pour the Cream Cheese Mixture
Once your crust is out of the oven and has cooled slightly, pour the cream cheese mixture on top, spreading it out evenly. This is where the magic begins, as the filling will create a creamy landscape atop your crust!
5. Prepare the Blueberry Topping
In a medium bowl, mix blueberries with cornstarch, lemon juice, and granulated sugar. Toss gently until the blueberries are evenly coated. This step not only adjusts the sweetness but also helps the blueberries maintain their shape during baking.
6. Add the Blueberries
Gently spoon the blueberry mixture over the cream cheese filling. Use a spatula or the back of a spoon to spread them out evenly. No need to overdo it—let those berries shine!
7. Bake!
Bake everything in the oven for about 35-40 minutes, or until the filling is set and the blueberries are bubbly. The bars will puff slightly and then settle as they cool. If you see the edges turning golden, you’re in great shape!
8. Let It Cool
Once out of the oven, allow the bars to cool completely in the pan. This helps them firm up for cleaner slicing later. Patience, my friend—good things come to those who wait! Chill in the fridge for at least a couple of hours (or overnight if you can resist) for perfect texture and flavor.
Serving Suggestions
When it’s time to serve, slice the bars into squares for that perfect bite! You can serve them chilled straight from the fridge or at room temperature. A dusting of powdered sugar or a dollop of whipped cream adds a lovely finish if you’re feeling fancy. Pair them with a scoop of vanilla ice cream for a little extra indulgence, or alongside a cup of iced tea for a delightful afternoon treat!
Recipe Variations
Feeling adventurous? Here are a few creative twists you can try with these Blueberry Cream Cheese Bars:
- Add Zest! Incorporate lemon or lime zest into the cream cheese filling for a zesty kick.
- Nutty Crust: Add chopped nuts or switch to almond flour for a nutty twist in the crust.
- Berry Medley: Use a mix of berries—raspberries, strawberries, or blackberries—in place of blueberries.
- Chocolate Drizzle: After cooling, drizzle melted dark chocolate on top of the bars for an irresistible treat.
- Spice It Up: Add a pinch of cinnamon or nutmeg to the cream cheese filling for a warm, aromatic flavor profile.
Chef’s Notes
These Blueberry Cream Cheese Bars hold a special place in my heart, and over the years, they’ve been through their share of kitchen adventures. I once tried to make them with a graham cracker crust, thinking I was being oh-so-creative, but let me tell you, nothing beats the buttery goodness of a traditional crust. It’s the little things like that which remind me to stick to what works!
Another fun story? The time I accidentally swapped granulated sugar for salt in the blueberry topping. You can imagine the surprised reactions at dinner! That’s why double-checking ingredients is a must—learn from my blunders!
FAQs and Troubleshooting
1. My crust is too crumbly! What did I do wrong?
This can happen if you didn’t add enough butter or if you overworked the dough. Ensure you blend everything until just combined, and consider adding a touch more melted butter next time.
2. The cream cheese filling is too lumpy!
Ensure your cream cheese is softened properly (room temperature is key). You can use a mixer to beat it until creamy, making sure not to overmix after adding the eggs.
3. Why are my blueberries sinking?
Sinking can happen if your blueberries are too wet. Rinse them and dry well before tossing them with cornstarch. Alternatively, fold some of the blueberries into the cream cheese mixture for a layered effect!
4. Can I freeze these bars?
Absolutely! These bars freeze wonderfully. Just wrap them tightly in plastic wrap and then foil, and they’ll be good in the freezer for up to three months. Thaw in the fridge before serving.
Nutritional Info
While I don’t always stress the numbers, I know it can be useful to some! A typical serving (based on 16 squares) is approximately:
- Calories: 220
- Total Fat: 12g
- Saturated Fat: 7g
- Carbohydrates: 25g
- Sugars: 12g
- Protein: 3g
And there you have it—an incredible recipe for Blueberry Cream Cheese Bars that are sure to impress! Whether it’s for a summer picnic or a cozy evening at home, these bars bring joy and sweetness to any moment. Thank you for cooking alongside me today! Let’s make magic happen in the kitchen, one delicious bite at a time. Happy baking!
PrintBlueberry Cream Cheese Bars

Delightful Blueberry Cream Cheese Bars with a buttery crust and creamy filling, bringing a taste of summer into every bite.
- Prep Time: 15 minutes
- Cook Time: 50 minutes
- Total Time: 65 minutes
- Yield: 16 servings 1x
- Category: Dessert
- Method: Baking
- Cuisine: American
- Diet: Vegetarian
Ingredients
- 1 ½ cups all-purpose flour
- ½ cup granulated sugar
- ½ cup unsalted butter, melted
- ¼ teaspoon salt
- 8 ounces cream cheese, softened
- 1 cup powdered sugar
- 1 teaspoon vanilla extract
- 2 large eggs
- 2 cups fresh blueberries
- 1 tablespoon cornstarch
- 1 tablespoon lemon juice
- 2 tablespoons granulated sugar
Instructions
- Preheat your oven to 350°F (175°C).
- In a medium bowl, mix together the flour, granulated sugar, melted butter, and salt until combined. Press the mixture into a greased 9×9 inch baking dish and bake for 10-12 minutes.
- While the crust is baking, prepare the cream cheese filling by beating together softened cream cheese, powdered sugar, vanilla extract, and eggs until smooth.
- Pour the cream cheese mixture over the crust once cooled slightly.
- In another bowl, mix blueberries with cornstarch, lemon juice, and granulated sugar until coated.
- Spread the blueberry mixture over the cream cheese layer.
- Bake for about 35-40 minutes or until the filling is set and the blueberries are bubbly.
- Cool completely in the pan before slicing into squares.
Notes
These bars can be frozen for up to three months. Thaw in the fridge before serving.
Nutrition
- Serving Size: 1 square
- Calories: 220
- Sugar: 12g
- Sodium: 150mg
- Fat: 12g
- Saturated Fat: 7g
- Unsaturated Fat: 3g
- Trans Fat: 0g
- Carbohydrates: 25g
- Fiber: 1g
- Protein: 3g
- Cholesterol: 50mg
Keywords: Blueberry, Cream Cheese, Dessert, Bars, Summer, Baking
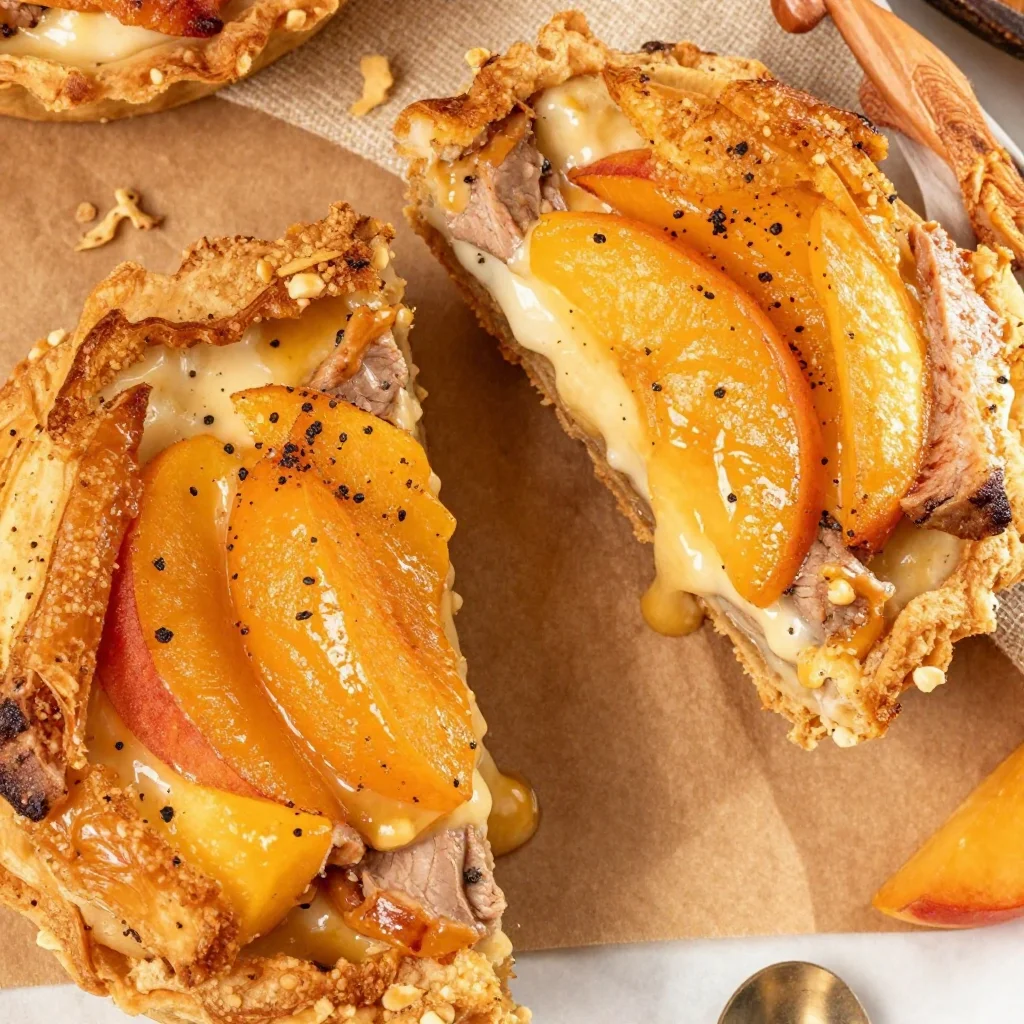
Ingredient Mini Peach Cream Cheese Tarts in 20 Minutes
Mini Peach and Cream Cheese Tarts: A Slice of Summer Bliss
Hello, my dear friends! Today, I’m thrilled to share a delightful treat that embodies summer sweetness and a touch of elegance: Mini Peach and Cream Cheese Tarts. These tarts are the perfect marriage of rich cream cheese and juicy, ripe peaches, all wrapped up in flaky puff pastry. Imagine your kitchen filled with the aroma of baked pastry and cinnamon while you indulge in these bite-sized delights.
Cooking is all about creating memories, and I’m excited to take you on this journey. So, tie on your apron, grab your favorite drink, and let’s dive into this scrumptious recipe that’ll have your taste buds singing!
A Slice of My Childhood
Growing up, summer meant peach season. Our local farm would host a peach-picking day, and I can still recall the thrill of plucking those fuzzy gems right from the tree. As we loaded up our baskets, my mother would talk about her favorite peach desserts, each story woven with laughter and love. One afternoon, after a long day of picking, she surprised us all with a batch of mini tarts, topped with fresh fruit and a creamy filling.
Those tarts were little miracles! Each bite was a memory, a warm hug on a sunny afternoon. As I watched my family gather around the table, enjoying those tarts, I realized that food has an incredible power to connect us. That’s why I wanted to recreate something similar here—an easy yet impressive treat that encourages you to gather your loved ones and share stories over something delicious.
Ingredients
For these Mini Peach and Cream Cheese Tarts, you’ll need the following ingredients:
-
Puff Pastry: This flaky pastry is the perfect base for our tarts. If you don’t have puff pastry on hand, you can use pie crust or even phyllo dough for a different texture. Just remember to pre-bake it according to the package instructions.
-
Fresh Peaches, Sliced: The star of the show! Ripe, juicy peaches bring sweetness and color. If peaches are out of season, feel free to use nectarines or even canned peaches (drained) in a pinch.
-
Cream Cheese Slices: Cream cheese adds that luscious, creamy texture we all crave. For a lighter option, consider using Neufchâtel cheese or a vegan cream cheese alternative.
-
Cinnamon: This spice not only warms the flavor but also enhances the natural sweetness of peaches. For a twist, you could try nutmeg or allspice instead.
-
Lemon Juice: A splash of lemon juice brightens up the flavors and keeps the peaches from browning. If you don’t have lemon, lime juice works nicely too.
-
Honey: This natural sweetener adds a touch of sweetness without overwhelming the dish. Maple syrup or agave nectar can be good substitutes if you prefer.
Each ingredient works together harmoniously, creating a balance of flavors that’s absolutely irresistible.
Step-by-Step Instructions
Now, let’s get down to business! Follow these steps for crafting your Mini Peach and Cream Cheese Tarts:
-
Preheat Your Oven: Start by preheating your oven to 400°F (200°C). The warm air will help your tarts puff up beautifully, creating that flaky texture we love.
-
Prepare the Puff Pastry: Roll out your puff pastry on a lightly floured surface. It should be about ¼ inch thick. Using a round cutter (or a glass), cut out circles—about 3 to 4 inches in diameter. You should have enough for a dozen mini tarts. Place the pastry circles on a parchment-lined baking sheet.
Chef’s Tip: If you want an extra golden finish, brush the edges of the pastry with an egg wash (1 beaten egg mixed with a splash of water).
-
Pre-bake the Pastry: Prick the centers of each pastry circle with a fork to prevent it from puffing up too much. Bake in the preheated oven for 8-10 minutes, or until they are lightly golden.
-
Craft the Filling: While the pastry is baking, it’s time to prep the filling. In a small bowl, combine your cream cheese, honey, and a splash of lemon juice. Beat everything together until smooth. You want it to be creamy and spreadable.
Little Hack: If your cream cheese is too firm, pop it in the microwave for a few seconds to soften it up!
-
Slice the Peaches: Take your fresh peaches and slice them into thin wedges. If peaches are really ripe, you might want to chill them slightly to make slicing easier.
-
Assemble the Tarts: Once the pastry is done and has cooled for a few moments, spread a generous layer of cream cheese mixture in the center of each tart. Then, carefully arrange the peach slices on top in a circular pattern. Sprinkle a light dusting of cinnamon over the peaches for that warm spice flavor.
-
Final Bake: Return the tarts to the oven and bake for an additional 5-7 minutes, until everything is warmed through and your kitchen is filled with an intoxicating aroma. The peaches should be tender but not mushy.
-
Cool and Serve: Let the tarts cool on the baking sheet before transferring them to a serving platter. Drizzle a little extra honey on top for that added touch of sweetness.
Serving Suggestions
To make your presentation shine, serve these Mini Peach and Cream Cheese Tarts on a beautiful platter, garnished with fresh mint leaves or edible flowers for that touch of whimsy. Pair them with a scoop of vanilla ice cream or a dollop of whipped cream for an extra indulgent experience. Perfect for a summer gathering or a cozy family dessert night!
Recipe Variations
Feel free to get creative with this recipe! Here are a few variations you might enjoy:
-
Berry Medley: Swap out the peaches for mixed berries like strawberries, blueberries, and raspberries for a delightful twist.
-
Spiced Up: Add a pinch of cardamom to the cream cheese filling for an exotic flavor profile.
-
Nutty Delight: Top the tarts with crushed almonds or pecans before baking for added crunch.
-
Chocolate Drizzle: Finish with a drizzle of melted chocolate for something truly decadent.
-
Gluten-Free Option: Use gluten-free puff pastry to make this treat accessible for everyone.
Chef’s Notes
As always, each time I whip up these tarts, I remember that sunny day in the orchard with my family. Cooking isn’t just about food; it’s about those feelings of nostalgia and connection. These Mini Peach and Cream Cheese Tarts have become a summer staple in my kitchen, and I hope they will become a cherished recipe in yours too!
FAQs and Troubleshooting
-
What if my puff pastry gets soggy?
- Make sure to prick the pastry before baking and avoid overloading with the cream cheese filling.
-
Can I make the filling ahead of time?
- Absolutely! Prepare the cream cheese mixture a day in advance, but keep it stored in the fridge, covered. Assemble the tarts just before baking.
-
How do I store leftover tarts?
- Store any leftover tarts in an airtight container in the fridge for up to 2 days. They taste best fresh, so enjoy them ASAP!
-
How do I know when the peaches are ripe?
- Look for peaches that are slightly soft to the touch but not mushy. They should have a fragrant aroma, signaling sweetness!
Nutritional Info
While I won’t bore you with all the numbers, these Mini Peach and Cream Cheese Tarts are a lovely balance of indulgence and fresh ingredients. Each tart is a delightful treat and can definitely be enjoyed in moderation as part of a balanced diet!
I hope you enjoyed this culinary journey into my kitchen! These Mini Peach and Cream Cheese Tarts are not just about satisfying your sweet tooth; they’re about making memories, sharing love, and connecting with the people around you. So gather your ingredients, bring your friends together, and let’s create something beautiful. Happy baking, friends! 🍑✨
PrintMini Peach and Cream Cheese Tarts

A delightful treat that combines rich cream cheese with juicy peaches wrapped in flaky puff pastry.
- Prep Time: 15 minutes
- Cook Time: 20 minutes
- Total Time: 35 minutes
- Yield: 12 servings 1x
- Category: Dessert
- Method: Baking
- Cuisine: American
- Diet: Vegetarian
Ingredients
- 1 sheet Puff Pastry
- 2 Fresh Peaches, sliced
- 4 oz Cream Cheese, sliced
- 1 tsp Cinnamon
- 1 tbsp Lemon Juice
- 2 tbsp Honey
Instructions
- Preheat your oven to 400°F (200°C).
- Prepare the puff pastry by rolling it out to ¼ inch thickness and cutting circles of 3 to 4 inches.
- Pre-bake the pastry circles for 8-10 minutes until lightly golden.
- Craft the filling by combining the cream cheese, honey, and lemon juice until smooth.
- Slice your peaches into thin wedges.
- Assemble the tarts by spreading the cream cheese mixture on each pastry and topping with peach slices.
- Return the tarts to the oven and bake for an additional 5-7 minutes.
- Cool the tarts on a baking sheet before serving.
Notes
Serve with mint leaves or edible flowers and pair with ice cream or whipped cream for a perfect treat.
Nutrition
- Serving Size: 1 tart
- Calories: 200
- Sugar: 10g
- Sodium: 150mg
- Fat: 10g
- Saturated Fat: 5g
- Unsaturated Fat: 4g
- Trans Fat: 0g
- Carbohydrates: 22g
- Fiber: 1g
- Protein: 3g
- Cholesterol: 15mg
Keywords: peach tarts, cream cheese, dessert, summer, baking