
Ingredient Blueberry Lemon Popsicles: Quick Summer Treat
Cool Off with Homemade Blueberry Lemon Popsicles: A Delightful Summer Treat
Summer is here, and you know what that means — it’s time to embrace the sun, relax by the pool, and indulge in some refreshing homemade treats! Today, I want to share with you one of my all-time favorite recipes: Blueberry Lemon Popsicles. Picture this: a sunny afternoon, the scent of fresh blueberries wafting through the kitchen, and the anticipation of biting into a creamy, tangy popsicle. Doesn’t that sound delightful?
These popsicles aren’t just a treat; they’re an experience. Made with juicy blueberries and the zesty kick of fresh lemon juice, they strike the perfect balance of sweet and tart. And the best part? They are incredibly simple to make and can be enjoyed by the whole family. Plus, you can get a little creative with them and make them your own! So, grab your popsicle molds and let’s dive into the delicious world of Blueberry Lemon Popsicles.
A Nostalgic Memory
I have such fond memories of summer afternoons growing up. My siblings and I would dash out of the house, giggling and shouting as we raced to the ice cream truck hovering just around the corner. But my favorite treats weren’t always those store-bought ice cream bars — no, my heart belonged to the homemade popsicles my mom would whip up. She would toss together fresh fruits with the absolute minimum of ingredients and freeze them in quirky molds. The process was always messy and so much fun; we’d blend and pour, smothering our hands in sticky juiciness.
As we would sit on our porch or run through the sprinklers, those popsicles were the perfect antidote to the summer heat. They were sweet, flavorful, and full of love — just like these Blueberry Lemon Popsicles. Each time I make them, it brings back that rush of nostalgia, and I can’t help but smile at the memories. Now, I’m passing down this delightful tradition to you, because everyone deserves a favorite popsicle recipe in their life!
Ingredients
-
3 cups Blueberries (fresh or frozen): Blueberries are the star of the show here, providing that sweet burst of flavor. If you’re using frozen blueberries, they’ll work just as well. I often like one cup frozen and two cups fresh for that perfect balance of flavors and textures.
-
2 Tablespoons Fresh Lemon Juice (½ of a lemon): Freshly squeezed lemon juice brightens the popsicles and adds a refreshing tartness that perfectly complements the sweetness of the blueberries. You can adjust this amount based on your taste preferences!
-
¼-⅓ cup Honey (depending on how sweet your berries are): Honey adds a natural sweetness, but it’s flexible based on the berries you’re using. Feel free to swap with maple syrup or agave for a vegan option!
Step-by-Step Instructions
-
Prep Your Ingredients: Start by rinsing your fresh blueberries under cool water. If you’re using frozen blueberries, there’s no need to thaw them — they’ll blend just perfectly frozen! Squeeze the juice from your lemon and set it all aside.
-
Blend It All Together: In a blender, combine your blueberries, fresh lemon juice, and honey. Blend on high for about 30 seconds or until you achieve a smooth consistency. If you like a little chunkiness (I sure do!), pulse a few times to leave some blueberry bits intact.
-
Taste & Adjust: Here’s where the magic happens! Taste your mixture to see if it needs more sweetness or lemon — everyone’s taste buds are different! If it’s sweet enough but still lacking that zesty kick, squeeze in a little more lemon juice.
-
Fill the Molds: Carefully pour your blueberry mixture into popsicle molds, leaving a bit of space at the top for expansion while freezing (trust me, that’s a fun mess you want to avoid!). You can add in extra blueberries or lemon zest here if you’re feeling fancy.
-
Insert Sticks: If your molds have a slot for popsicle sticks, place them in now. If they don’t, just freeze them about 1-2 hours until semi-firm before inserting the sticks. This ensures they stay standing without sinking!
-
Freeze: Pop those molds into the freezer for at least 4-6 hours, or overnight if you can hold off on that sweet, refreshing treat!
-
Unmold the Popsicles: Once frozen solid, it’s time for the fun part! Run warm water over the outside of your molds for a few seconds to loosen them up. Gently pull them out — voilà, your popsicles are ready to enjoy!
Serving Suggestions
These Blueberry Lemon Popsicles are lovely served on their own, but feel free to get creative! Serve them in fun bowls or on colorful napkins, perhaps with a sprig of mint for a pop of color. They also pair wonderfully with a sparkling lemonade for those hot summer gatherings; it’s all about setting the mood!
Recipe Variations
- Berry Blend Pops: Swap out some blueberries for raspberries or strawberries for a mixed berry twist.
- Yogurt Pops: For a creamy texture, blend in some Greek yogurt or coconut yogurt for a nourishing treat.
- Herbed Lemon Pops: Infuse with a bit of fresh basil or mint for an aromatic touch. It’s wonderfully refreshing!
- Lower Sugar Option: Replace honey with mashed ripe bananas or use stevia for a lower-calorie treat.
- Coconut Cream: Add a layer of coconut cream before pouring in the blueberry mixture for a tropical flair.
Chef’s Notes
Looking back, I can’t help but chuckle at the first time I attempted these popsicles. I was overzealous with the lemon juice, thinking more would elevate the flavor — let’s just say “pucker up” doesn’t quite express the experience! Over time, I’ve learned that balance is key, and I’m excited to share that knowledge with you.
This recipe has evolved into a family favorite, as it’s easily adaptable and can cater to everyone’s preferences. I’ve made them with other fruits, drizzled melted chocolate on top, and had so much fun experimenting — each batch becomes a delicious creation to enjoy on a sunny day.
FAQs and Troubleshooting
Q: What should I do if my popsies won’t come out of the mold?
A: If your popsicles are stuck, try running warm water over the outside of the mold for a few seconds. This will help loosen them and make removal a breeze!
Q: Can I use sweetened frozen blueberries?
A: Absolutely! Just be cautious with the amount of honey you add, as these might already be sweet enough.
Q: How long do these popsicles last in the freezer?
A: They typically stay good for about 1-2 months if stored properly in an airtight container, but let’s be honest — they’ll be gone long before that!
Q: Can I use something other than honey for sweetness?
A: Yes, you can use maple syrup, agave nectar, or even coconut sugar! Just keep in mind it may slightly alter the flavor profile.
Nutritional Info
Per popsicle (based on 10 servings):
- Calories: 55
- Total Fat: 1g
- Carbohydrates: 14g
- Sugars: 11g
- Protein: <1g
There you have it! The ultimate guide to making scrumptious Blueberry Lemon Popsicles that are sure to bring joy and refreshment to your summer days. I can’t wait for you to try this recipe and create your special memories around the table — or in the sun, I should say. Happy popsicle-making, friends! 🌞🍦
PrintBlueberry Lemon Popsicles

A refreshing homemade treat made with juicy blueberries and zesty lemon juice, perfect for hot summer days.
- Prep Time: 10 minutes
- Cook Time: 0 minutes
- Total Time: 360 minutes
- Yield: 10 servings 1x
- Category: Dessert
- Method: Freezing
- Cuisine: American
- Diet: Vegetarian
Ingredients
- 3 cups Blueberries (fresh or frozen)
- 2 Tablespoons Fresh Lemon Juice
- ¼–⅓ cup Honey
Instructions
- Prep your ingredients: Start by rinsing your fresh blueberries under cool water. If you’re using frozen blueberries, there’s no need to thaw them.
- Blend it all together: In a blender, combine your blueberries, fresh lemon juice, and honey. Blend on high for about 30 seconds.
- Taste & adjust: Taste your mixture to see if it needs more sweetness or lemon.
- Fill the molds: Carefully pour your blueberry mixture into popsicle molds, leaving space at the top for expansion.
- Insert sticks: If your molds have a slot for popsicle sticks, place them in now.
- Freeze: Pop those molds into the freezer for at least 4-6 hours.
- Unmold the popsicles: Once frozen solid, run warm water over the outside of your molds for a few seconds.
Notes
These popsicles can be served on their own or paired with a sparkling lemonade for summer gatherings. Experiment with ingredients for different flavors!
Nutrition
- Serving Size: 1 popsicle
- Calories: 55
- Sugar: 11g
- Sodium: 1mg
- Fat: 1g
- Saturated Fat: 0g
- Unsaturated Fat: 0g
- Trans Fat: 0g
- Carbohydrates: 14g
- Fiber: 1g
- Protein: <1g
- Cholesterol: 0mg
Keywords: popsicles, blueberry, lemon, summer treat, homemade, dessert

Ingredient Coconut Popsicles: Quick Creamy Summer Treat
Beat the Heat with Irresistible Coconut Popsicles
Hello fellow food lovers! Today, I’m over the moon to share a recipe that not only cools you down on those sizzling summer days, but also transports you straight to a tropical paradise with every bite. Yes, you guessed it — we’re making luscious Coconut Popsicles! These delightful frozen treats are creamy, dreamy, and packed with sunshine flavors.
Imagine taking a bite of a coconut popsicle, and instantly feeling like you’re sipping a piña colada on a sun-drenched beach. This recipe brings back all those summer vibes! Whether you’re lounging by the pool, hosting a casual backyard gathering, or just want to treat yourself after a long day, these popsicles fit the bill beautifully.
Now, let’s roll up our sleeves and dive into the fun of making Coconut Popsicles. This recipe is not only simple but also customizable, so let’s get our ingredients lined up and our taste buds ready for some serious flavor-packed goodness!
A Sweet Tropical Memory
Let me take you back to a cherished summer memory of mine. I was visiting my grandmother on her little island, where the air was filled with the scent of salt and sunshine. Every afternoon, after a long day of beachcombing and collecting seashells, we would retreat to her quaint kitchen to make the most refreshing treats. My grandmother would whip up her famous coconut popsicles using fresh coconut milk, the kind that was creamy enough to make your taste buds do a happy dance.
I remember the joy on my cousin’s faces as they eagerly awaited the popsicles to freeze. We would choose our favorite toppings—chunks of fresh fruit, a sprinkle of shredded coconut—while giggling about the adventures we had that day. That sense of warmth, laughter, and shared moments is what inspired me to recreate that recipe and share it with you. Let’s make some sweet summer memories of our own with these Coconut Popsicles!
Ingredients You’ll Need
Before we get cooking, let’s gather everything we need to make these heavenly Coconut Popsicles! Here’s a quick rundown:
-
1 can coconut milk
A creamy base that gives these popsicles their indulgent texture. For a lighter version, you can substitute it with almond milk, although the flavor will be different. -
1/2 cup coconut cream
This adds richness and depth. If you can’t find it, you can use extra coconut milk, but the popsicles will be less creamy. -
1/4 cup agave syrup or maple syrup
A touch of sweetness to perfectly balance the flavors. Feel free to swap with honey, but keep in mind that the flavor will vary slightly. -
1/4 cup lime juice
Freshly squeezed lime juice enhances the tropical vibes and adds a zesty kick. You could even use lemon juice if that’s what you have on hand. -
Zest of 1 lime
This will elevate the lime flavor. Don’t skip it! If you love those bright notes, add zest from an extra lime for more flavor! -
Pinch of salt
Just a hint of salt rounds out the sweetness and makes the flavor pop.
Step-by-Step Instructions
Alright, let’s get to the fun part! Here’s how to bring these Coconut Popsicles to life:
-
Combine Ingredients
In a mixing bowl, combine the coconut milk, coconut cream, agave syrup (or maple syrup), lime juice, lime zest, and a pinch of salt. Whisk everything together until it’s smooth and well blended. Feel free to taste the mixture at this point. If you prefer it sweeter, add a tad more syrup! -
Pour into Molds
Once your mixture is perfectly creamy, slowly pour it into popsicle molds. Be careful not to overfill them, as the mixture will expand when freezing. Leave about half an inch of space at the top. If you don’t have molds, small paper cups work just as well. Just insert popsicle sticks (or even spoons) into the center. -
Freeze
Pop your molds into the freezer for about 4-6 hours, or until they’re completely frozen. To speed things up, you could freeze them overnight – that way, they’re all set for a daytime surprise! -
Unmold Your Popsicles
Once the popsicles are frozen solid, take them out and run warm water over the outside of the molds for a few seconds. This helps loosen them up. Gently pull on the sticks to remove them from the molds. -
Enjoy!
These popsicles are best enjoyed immediately, but you can store any extras in a zip-top freezer bag for a rainy day. Just make sure they’re well-wrapped so they don’t get icy!
As you enjoy your coconut popsicles, remember: the key is to savor each bite. These popsicles are not just a treat; they’re a reminder to take time for yourself and embrace the sweetness of life!
Serving Suggestions
To amp up the presentation, place your coconut popsicles on a tray lined with fresh tropical fruits like pineapple and mango. You can sprinkle shredded coconut on top, or drizzle with a bit of melted chocolate for an extra indulgent touch. Serve with a glass of refreshing coconut water or a fruity cocktail, and you’ve instantly elevated your gathering!
Recipe Variations
Get creative with these Coconut Popsicles! Here are a few fun twists to try:
-
Tropical Fruit Pops: Fold in small chunks of fruits like mango, pineapple, or berries before pouring the mixture into molds.
-
Chocolate Dipped Pops: After unmolding, dip your popsicles in melted dark or white chocolate and then roll them in shredded coconut or crushed nuts.
-
Minty Fresh: Add a handful of fresh mint leaves to the blender when making your coconut mixture for an invigorating twist.
-
Fruity Swirl: Mix pureed fruits like raspberries or strawberries into your coconut mixture for a beautiful swirl effect.
-
Dairy-Free Option: Substitute the coconut cream with cashew cream for a nutty flavor and creamy consistency.
Now, the possibilities are endless! The only limit is your imagination!
Chef’s Notes
These Coconut Popsicles have come a long way since my grandmother’s original recipe. I’ll never forget the first time I added lime juice — it was like fireworks exploded in my mouth! Over the years, I’ve adjusted the sweetness and experimented with different fruits and flavors, but the heart of the recipe remains the same — simplicity and a splash of joy.
A funny kitchen story: One summer, I decided to surprise my friends with these popsicles during a heatwave. I got so carried away with my blender that I forgot to secure the lid! You can guess what happened next—let’s say my kitchen looked like a coconut hurricane had swept through! Lesson learned: always remember to blend with the lid on!
FAQs and Troubleshooting
Q: How do I store leftover popsicles?
A: Simply place them in a zip-top freezer bag, removing as much air as possible to avoid freezer burn. They’ll keep well for up to a month!
Q: My popsicles are hard as rocks! What can I do?
A: If your popsicles freeze too hard, try letting them sit at room temperature for a few minutes before unmolding. This will soften the edges and make them easier to remove.
Q: Can I make these without coconut milk?
A: You can, though using a non-coconut dairy alternative might change the flavor profile. Almond, cashew, or soy milk can work, but the texture may be less creamy.
Q: How can I make these popsicles vegan?
A: Great question! Simply ensure that the sweetener used is agave syrup, as honey is not vegan. All other ingredients in this recipe are naturally vegan.
That’s it for our Coconut Popsicles — a simple, refreshing, and oh-so-delicious treat that will surely brighten your day. Whether you’re enjoying them on a sunny afternoon or sharing them at a gathering, these popsicles are bound to be a hit. So tie on your apron, grab your mixing bowl, and let’s create a little tropical magic together! Cheers to summer!
PrintCoconut Popsicles

Delicious and creamy coconut popsicles that transport you to a tropical paradise, perfect for summer days.
- Prep Time: 15 minutes
- Cook Time: 0 minutes
- Total Time: 240 minutes
- Yield: 8 servings 1x
- Category: Dessert
- Method: Freezing
- Cuisine: Tropical
- Diet: Vegan
Ingredients
- 1 can coconut milk
- 1/2 cup coconut cream
- 1/4 cup agave syrup or maple syrup
- 1/4 cup lime juice
- Zest of 1 lime
- Pinch of salt
Instructions
- Combine ingredients in a mixing bowl: coconut milk, coconut cream, agave syrup, lime juice, lime zest, and a pinch of salt. Whisk until smooth.
- Pour the mixture into popsicle molds, leaving space at the top.
- Freeze the molds for about 240-360 minutes, or until completely frozen.
- Unmold the popsicles by running warm water over the outside of the molds and gently pulling on the sticks.
- Enjoy! Best served immediately, but can be stored in a zip-top freezer bag for later.
Notes
For added creativity, try folding in chunks of fruits or dipping in chocolate!
Nutrition
- Serving Size: 1 popsicle
- Calories: 150
- Sugar: 8g
- Sodium: 5mg
- Fat: 9g
- Saturated Fat: 8g
- Unsaturated Fat: 1g
- Trans Fat: 0g
- Carbohydrates: 16g
- Fiber: 0g
- Protein: 1g
- Cholesterol: 0mg
Keywords: coconut, popsicles, summer, dessert, vegan, tropical

Blueberry Cream Cheese Bars: Quick, Creamy Summer Recipe
Blueberry Cream Cheese Bars: An Incredible Ultimate Recipe
Hello fellow food lovers! Today, we’re diving into the world of desserts, specifically a delight that sings of summer and makes your heart feel like it’s dancing—Blueberry Cream Cheese Bars. Picture this: a buttery, flaky crust cradling a velvety cream cheese filling, all topped with luscious blueberries. It’s a symphony of flavors that are as beautiful as a sunset, and I can’t wait to share this recipe with you. So grab your apron, roll up those sleeves, and let’s make something magical together!
A Sweet Little Memory
As I sit here reflecting on my love for these Blueberry Cream Cheese Bars, I’m transported back to a summer afternoon spent at my grandmother’s house. The sun was just dipping low in the sky, casting a golden glow on everything, and the air was filled with the sweet scent of blooming flowers. Grandma had just returned from the farmer’s market with the juiciest blueberries, and I remember the excitement of helping her in the kitchen.
She would have me mix the creamy cheese filling, and I can still hear her guidance ringing in my ears: “Savannah, cooking is all about love and intention!” After we poured the gooey mixture over the crust, we piled on those bright berries. I can still taste that perfect bite—sweet, creamy, and oh-so-light. It felt like a hug from the inside. Now, whenever I make these bars, I’m reminded of those sweet moments and the joy of creating something delicious for the people I love. It’s more than just a recipe; it’s a connection to warmth and nostalgia.
Ingredients
Let’s talk ingredients! Each one plays a vital role in creating the alchemy of flavors and textures that make these bars shine. Here’s what you’ll need:
For the Crust:
-
1 ½ cups all-purpose flour
This is the backbone of your crust. If you want a gluten-free option, you can substitute with almond flour or a gluten-free blend. Just note that the texture might slightly vary! -
½ cup granulated sugar
Adds sweetness to balance the tart blueberries. You can use coconut sugar for a more caramel-like flavor. -
½ cup unsalted butter, melted
Provides that rich, creamy flavor essential for a decadent crust. If you’re dairy-free, coconut oil will work beautifully here. -
¼ teaspoon salt
Enhances the overall flavor and balances the sweetness. Always essential in baking!
For the Cream Cheese Filling:
-
8 ounces cream cheese, softened
This creates the smooth, creamy base. Choose a high-quality cream cheese for the best flavor. If you’re avoiding dairy, cashew cream can be a clever substitute. -
1 cup powdered sugar
Sweetens the filling without that grainy texture granulated sugar might add. You can also make your own by blending granulated sugar finely in a blender. -
1 teaspoon vanilla extract
Adds warmth and depth to your filling. If you’re feeling adventurous, use almond extract for a fun twist. -
2 large eggs
These bind the filling and give it that lovely, custardy texture. For a vegan version, try using aquafaba (the liquid from chickpeas).
For the Blueberry Topping:
-
2 cups fresh blueberries
The star of the show! Fresh is best, but you can also use frozen blueberries—just thaw them and pat dry to avoid excess moisture. -
1 tablespoon cornstarch
This helps thicken the juices released by the blueberries. Arrowroot starch can be an alternative if you prefer a non-GMO option. -
1 tablespoon lemon juice
Brightens and elevates the blueberries’ flavor. Lime juice can be used if you want a different citrus twist. -
2 tablespoons granulated sugar
Just the right amount of sweetness to complement the tartness of the blueberries. Adjust based on your preference, especially if your berries are particularly sweet.
Step-by-Step Instructions
Are you ready to get cooking? Let’s turn those beautiful ingredients into an incredible treat!
1. Preheat Your Oven
Start by preheating your oven to 350°F (175°C). Preheating is crucial because it ensures that your bars bake evenly. If you toss the batter into a cold oven, it could lead to uneven baking.
2. Prepare the Crust
In a medium bowl, mix together the flour, granulated sugar, melted butter, and salt until combined. You want a crumbly mixture that holds together when pressed. If it feels too dry, add a splash of water. Lightly press this mixture into the bottom of a greased 9×9 inch baking dish. Don’t be afraid to get your hands in there; this is where the love happens! Bake for 10-12 minutes until it’s lightly golden. This layer doesn’t need to be fully cooked yet, but it should start to set.
3. Make the Cream Cheese Filling
While the crust is baking, let’s whip up that luscious cream cheese filling! In a mixing bowl, add softened cream cheese, powdered sugar, vanilla extract, and eggs. Beat until smooth and creamy. This is the time to channel your inner pastry chef; the goal is a perfectly velvety texture. Don’t worry if you have a few tiny lumps; they’ll bake out.
4. Pour the Cream Cheese Mixture
Once your crust is out of the oven and has cooled slightly, pour the cream cheese mixture on top, spreading it out evenly. This is where the magic begins, as the filling will create a creamy landscape atop your crust!
5. Prepare the Blueberry Topping
In a medium bowl, mix blueberries with cornstarch, lemon juice, and granulated sugar. Toss gently until the blueberries are evenly coated. This step not only adjusts the sweetness but also helps the blueberries maintain their shape during baking.
6. Add the Blueberries
Gently spoon the blueberry mixture over the cream cheese filling. Use a spatula or the back of a spoon to spread them out evenly. No need to overdo it—let those berries shine!
7. Bake!
Bake everything in the oven for about 35-40 minutes, or until the filling is set and the blueberries are bubbly. The bars will puff slightly and then settle as they cool. If you see the edges turning golden, you’re in great shape!
8. Let It Cool
Once out of the oven, allow the bars to cool completely in the pan. This helps them firm up for cleaner slicing later. Patience, my friend—good things come to those who wait! Chill in the fridge for at least a couple of hours (or overnight if you can resist) for perfect texture and flavor.
Serving Suggestions
When it’s time to serve, slice the bars into squares for that perfect bite! You can serve them chilled straight from the fridge or at room temperature. A dusting of powdered sugar or a dollop of whipped cream adds a lovely finish if you’re feeling fancy. Pair them with a scoop of vanilla ice cream for a little extra indulgence, or alongside a cup of iced tea for a delightful afternoon treat!
Recipe Variations
Feeling adventurous? Here are a few creative twists you can try with these Blueberry Cream Cheese Bars:
- Add Zest! Incorporate lemon or lime zest into the cream cheese filling for a zesty kick.
- Nutty Crust: Add chopped nuts or switch to almond flour for a nutty twist in the crust.
- Berry Medley: Use a mix of berries—raspberries, strawberries, or blackberries—in place of blueberries.
- Chocolate Drizzle: After cooling, drizzle melted dark chocolate on top of the bars for an irresistible treat.
- Spice It Up: Add a pinch of cinnamon or nutmeg to the cream cheese filling for a warm, aromatic flavor profile.
Chef’s Notes
These Blueberry Cream Cheese Bars hold a special place in my heart, and over the years, they’ve been through their share of kitchen adventures. I once tried to make them with a graham cracker crust, thinking I was being oh-so-creative, but let me tell you, nothing beats the buttery goodness of a traditional crust. It’s the little things like that which remind me to stick to what works!
Another fun story? The time I accidentally swapped granulated sugar for salt in the blueberry topping. You can imagine the surprised reactions at dinner! That’s why double-checking ingredients is a must—learn from my blunders!
FAQs and Troubleshooting
1. My crust is too crumbly! What did I do wrong?
This can happen if you didn’t add enough butter or if you overworked the dough. Ensure you blend everything until just combined, and consider adding a touch more melted butter next time.
2. The cream cheese filling is too lumpy!
Ensure your cream cheese is softened properly (room temperature is key). You can use a mixer to beat it until creamy, making sure not to overmix after adding the eggs.
3. Why are my blueberries sinking?
Sinking can happen if your blueberries are too wet. Rinse them and dry well before tossing them with cornstarch. Alternatively, fold some of the blueberries into the cream cheese mixture for a layered effect!
4. Can I freeze these bars?
Absolutely! These bars freeze wonderfully. Just wrap them tightly in plastic wrap and then foil, and they’ll be good in the freezer for up to three months. Thaw in the fridge before serving.
Nutritional Info
While I don’t always stress the numbers, I know it can be useful to some! A typical serving (based on 16 squares) is approximately:
- Calories: 220
- Total Fat: 12g
- Saturated Fat: 7g
- Carbohydrates: 25g
- Sugars: 12g
- Protein: 3g
And there you have it—an incredible recipe for Blueberry Cream Cheese Bars that are sure to impress! Whether it’s for a summer picnic or a cozy evening at home, these bars bring joy and sweetness to any moment. Thank you for cooking alongside me today! Let’s make magic happen in the kitchen, one delicious bite at a time. Happy baking!
PrintBlueberry Cream Cheese Bars

Delightful Blueberry Cream Cheese Bars with a buttery crust and creamy filling, bringing a taste of summer into every bite.
- Prep Time: 15 minutes
- Cook Time: 50 minutes
- Total Time: 65 minutes
- Yield: 16 servings 1x
- Category: Dessert
- Method: Baking
- Cuisine: American
- Diet: Vegetarian
Ingredients
- 1 ½ cups all-purpose flour
- ½ cup granulated sugar
- ½ cup unsalted butter, melted
- ¼ teaspoon salt
- 8 ounces cream cheese, softened
- 1 cup powdered sugar
- 1 teaspoon vanilla extract
- 2 large eggs
- 2 cups fresh blueberries
- 1 tablespoon cornstarch
- 1 tablespoon lemon juice
- 2 tablespoons granulated sugar
Instructions
- Preheat your oven to 350°F (175°C).
- In a medium bowl, mix together the flour, granulated sugar, melted butter, and salt until combined. Press the mixture into a greased 9×9 inch baking dish and bake for 10-12 minutes.
- While the crust is baking, prepare the cream cheese filling by beating together softened cream cheese, powdered sugar, vanilla extract, and eggs until smooth.
- Pour the cream cheese mixture over the crust once cooled slightly.
- In another bowl, mix blueberries with cornstarch, lemon juice, and granulated sugar until coated.
- Spread the blueberry mixture over the cream cheese layer.
- Bake for about 35-40 minutes or until the filling is set and the blueberries are bubbly.
- Cool completely in the pan before slicing into squares.
Notes
These bars can be frozen for up to three months. Thaw in the fridge before serving.
Nutrition
- Serving Size: 1 square
- Calories: 220
- Sugar: 12g
- Sodium: 150mg
- Fat: 12g
- Saturated Fat: 7g
- Unsaturated Fat: 3g
- Trans Fat: 0g
- Carbohydrates: 25g
- Fiber: 1g
- Protein: 3g
- Cholesterol: 50mg
Keywords: Blueberry, Cream Cheese, Dessert, Bars, Summer, Baking
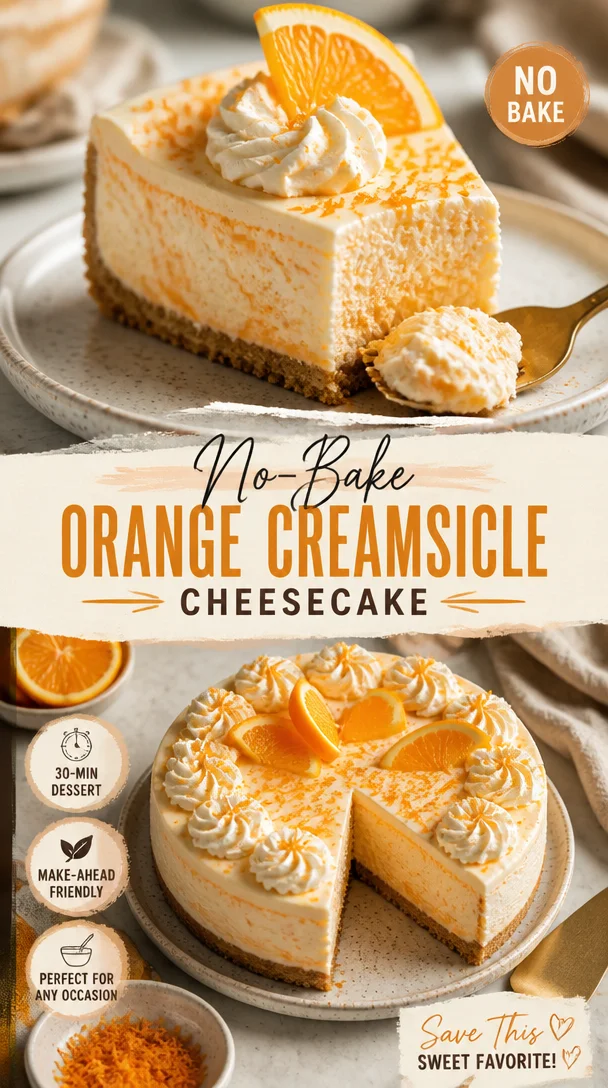
No-Bake Orange Creamsicle Cheesecake
No-Bake Orange Creamsicle Cheesecake: A Deliciously Nostalgic Treat
Hello, fellow food lovers! Today, we’re diving into the sunny world of desserts with a delightful No-Bake Orange Creamsicle Cheesecake. This sweet treat takes me back to lazy summer days filled with the joyful scents of citrus and the satisfying crunch of a graham cracker crust. If you’ve ever enjoyed the nostalgia of an ice cream truck rolling down your street on a hot summer day, this cheesecake might just be your new favorite dessert. So grab your apron, because we’re about to create something wonderfully refreshing and dreamy!
Personal Story
Growing up, my summers were always marked by the sound of the ice cream truck. Like most kids, I raced to the front yard, hoping to snag some pocket change from my parents to grab a cool treat. The creamsicle was a standout, with its bright orange exterior and creamy, dreamy center. It was a flavor that seemed to capture sunshine—totally irresistible! Fast forward to my kitchen adventures as an adult, I wanted to recreate that same joy, but with a twist. Thus, the No-Bake Orange Creamsicle Cheesecake was born! It’s an embodiment of those blissful days—the perfect refreshment for a summer gathering, or really any occasion that calls for a taste of nostalgia. Trust me, when you make this for your friends and family, you’ll not only fill their bellies, but you’ll also warm their hearts!
Ingredients
Here’s what you’ll need to whip up this beautiful cheesecake:
-
1 (3 ounce) box orange jello
The secret to that zesty orange flavor! If you don’t have jello on hand, a little orange juice concentrate can be a substitute. -
1 cup boiling water
This helps dissolve the jello easily. No boiling water? Hot tap water will work in a pinch, but it’s not quite as effective. -
2 cups Graham Cracker crumbs (about 14 sheets)
These form the crispy base of the cheesecake—a must-have! For a gluten-free option, use gluten-free graham crackers. -
6 tablespoons unsalted butter, melted
Butter brings richness and binds the crumbs together. Coconut oil can serve as a dairy-free alternative! -
Pinch of salt
A little pinch lifts the flavors and balances the sweetness. You could use a tiny bit of sea salt or even omit it if you prefer. -
2 (8 ounce) blocks cream cheese, softened
Bring this to room temperature for a creamy texture. Neufchâtel cheese can lighten up the recipe if you’d like! -
1 1/2 cups powdered sugar, divided
This sweetens the mixture—definitely a key ingredient! If you want a less sweet version, you can reduce this amount. -
2 cups heavy whipping cream
Whipping cream makes the cheesecake light and fluffy—so dreamy! If you want a non-dairy option, coconut cream works wonders. -
1/2 teaspoon vanilla extract
For that little extra depth of flavor! You can use almond extract for a unique twist. -
Zest of 1 orange (optional)
This adds an extra burst of orange flavor and color! Feel free to skip if you’re in a rush; this cheesecake is plenty delicious as is.
Step-by-Step Instructions
Let’s get into the heart of this recipe! Follow these steps for a perfectly creamy, light cheesecake that captures all that orange dreams are made of:
-
Dissolve the Jello
In a small mixing bowl, combine the orange jello powder with the boiling water. Stir until the mixture is fully dissolved. This will be your flavor powerhouse! Set it aside to cool slightly while we prepare the crust. -
Prepare the Crust
In a medium mixing bowl, combine the Graham cracker crumbs, melted butter, and a pinch of salt. Mix until the crumbs are fully coated and resemble wet sand. Transfer this mixture to a 9-inch springform pan. Press firmly into the bottom to create an even layer. Use the bottom of a measuring cup to help you get a sturdy crust! -
Beat the Cream Cheese
In a large mixing bowl, beat the softened cream cheese with an electric mixer on medium speed until smooth and creamy. This process is key—overlook it, and you might have lumps. Remember to scrape down the sides of the bowl periodically to ensure everything is evenly incorporated. -
Sweeten It Up
Gradually add in 1 cup of powdered sugar while continuing to mix. Beat until fully combined and creamy. Taste it here! You can adjust the sweetness if needed. -
Incorporate the Whipping Cream
In a separate bowl, whip the heavy cream until stiff peaks form—that’s your perfect whipped cream! Use a spatula to fold this into your cream cheese mixture gently; it will lighten up the texture beautifully. Aim for a light, airy mix, but be careful not to deflate it! -
Add the Jello Mixture
Now, gently fold in the cooled jello mixture and the vanilla extract. This step is where the magic happens! Combine thoroughly, but be gentle—this is what keeps your cheesecake fluffy. -
Zest it Up (Optional)
If you’re feeling adventurous, add the orange zest here for an extra citrusy kick. Fold it in carefully to maintain that lightness. -
Pour and Chill
Transfer the cheesecake mixture into the prepared crust, smoothing the top with a spatula. Cover it with plastic wrap and refrigerate for at least 4 hours, or ideally overnight. This will set it to perfection!
Serving Suggestions
When it’s time to unveil your masterpiece, carefully remove the springform pan. You can serve it as-is for a simple presentation, or dress it up a bit! Garnish slices with fresh orange slices, a dollop of whipped cream, or even a sprinkle of extra orange zest for a dazzling finish. You might even consider pairing this cheesecake with a refreshing herbal tea or a glass of sparkling water to balance the sweetness.
Recipe Variations
- Fruit Toppings: Top each slice with fresh berries or a citrus salad for a colorful burst of flavor.
- Chocolate Drizzle: For a fun twist, drizzle melted chocolate over the top before serving. Orange and chocolate are a match made in heaven!
- Coconut Cream: Replace half the cream cheese with coconut cream for a tropical vibe.
- Lower Sugar: Swap out the powdered sugar for a sugar substitute if you’re monitoring your sugar intake.
- Add Spice: Try adding a pinch of nutmeg or cinnamon to the cream cheese mixture for a different flavor profile that complements the orange beautifully!
Chef’s Notes
This No-Bake Orange Creamsicle Cheesecake is not only delicious but incredibly versatile! While I’ve used orange jello for that nostalgic flavor, experimenting with lemon or even cherry jello can yield fantastic results. It’s transformed at the drop of a hat, and I love introducing new flavors based on the season or my mood! One time, I used leftover summer fruit to make a layer on top, which turned out to be a delightful surprise for my dinner guests. Just remember, while this cheesecake looks elegant, the simplicity of making it is part of the charm. Enjoy the process as much as the result!
FAQs and Troubleshooting
1. Why is my cheesecake not setting?
If your cheesecake isn’t setting, it may need more time in the fridge. Make sure you let it chill for at least 4 hours, but overnight is best for ideal firmness.
2. Can I use a different type of crust?
Absolutely! You can use any cookie crust or even a nut crust. Just make sure to adjust the butter accordingly depending on your choice.
3. My cream cheese is lumpy; what did I do wrong?
To prevent lumpy cream cheese, make sure it’s at room temperature before beating. Cold cream cheese doesn’t blend well!
4. How long will this cheesecake last in the refrigerator?
The No-Bake Orange Creamsicle Cheesecake will keep well covered in the fridge for about 4-5 days—perfect for keepers of leftovers!
Nutritional Info
(Nutritional content will vary based on portion size and ingredient brands, so it’s always good to calculate it based on your specific ingredients.)
So, there you have it! A No-Bake Orange Creamsicle Cheesecake that’s as easy to make as it is joyful to eat. Invite your friends over, savor a slice, and relive the carefree delight of summer all year long. Happy baking, and remember: good food is best shared! Cheers!
PrintNo-Bake Orange Creamsicle Cheesecake

A delightful and nostalgic no-bake cheesecake that captures the refreshing flavors of orange creamsicles, perfect for summer gatherings.
- Prep Time: 20 minutes
- Cook Time: 0 minutes
- Total Time: 240 minutes
- Yield: 8 servings 1x
- Category: Dessert
- Method: No-Bake
- Cuisine: American
- Diet: Vegetarian
Ingredients
- 1 (3 ounce) box orange jello
- 1 cup boiling water
- 2 cups graham cracker crumbs (about 14 sheets)
- 6 tablespoons unsalted butter, melted
- Pinch of salt
- 2 (8 ounce) blocks cream cheese, softened
- 1 1/2 cups powdered sugar, divided
- 2 cups heavy whipping cream
- 1/2 teaspoon vanilla extract
- Zest of 1 orange (optional)
Instructions
- Dissolve the Jello: In a small mixing bowl, combine the orange jello powder with the boiling water. Stir until fully dissolved and set aside to cool.
- Prepare the Crust: In a medium mixing bowl, combine the graham cracker crumbs, melted butter, and a pinch of salt. Mix until the crumbs resemble wet sand, then press firmly into a 9-inch springform pan.
- Beat the Cream Cheese: In a large mixing bowl, beat the softened cream cheese until smooth. Scrape down the sides to ensure an even texture.
- Sweeten It Up: Gradually add 1 cup of powdered sugar and mix until fully combined and creamy. Adjust sweetness if necessary.
- Incorporate the Whipping Cream: In a separate bowl, whip the heavy cream until stiff peaks form. Gently fold into the cream cheese mixture.
- Add the Jello Mixture: Gently fold in the cooled jello mixture and vanilla extract, combining thoroughly yet gently.
- Zest it Up (Optional): Fold in orange zest for an extra burst of flavor, if using.
- Pour and Chill: Transfer the cheesecake mixture into the prepared crust, smoothing the top. Cover and refrigerate for at least 4 hours, preferably overnight.
Notes
Garnish slices with fresh orange slices or a dollop of whipped cream for extra flair. This cheesecake can also be varied with different jello flavors and toppings.
Nutrition
- Serving Size: 1 slice
- Calories: 400
- Sugar: 27g
- Sodium: 300mg
- Fat: 28g
- Saturated Fat: 16g
- Unsaturated Fat: 8g
- Trans Fat: 0g
- Carbohydrates: 38g
- Fiber: 1g
- Protein: 4g
- Cholesterol: 65mg
Keywords: cheesecake, no-bake, orange, dessert, summer, creamy, nostalgic
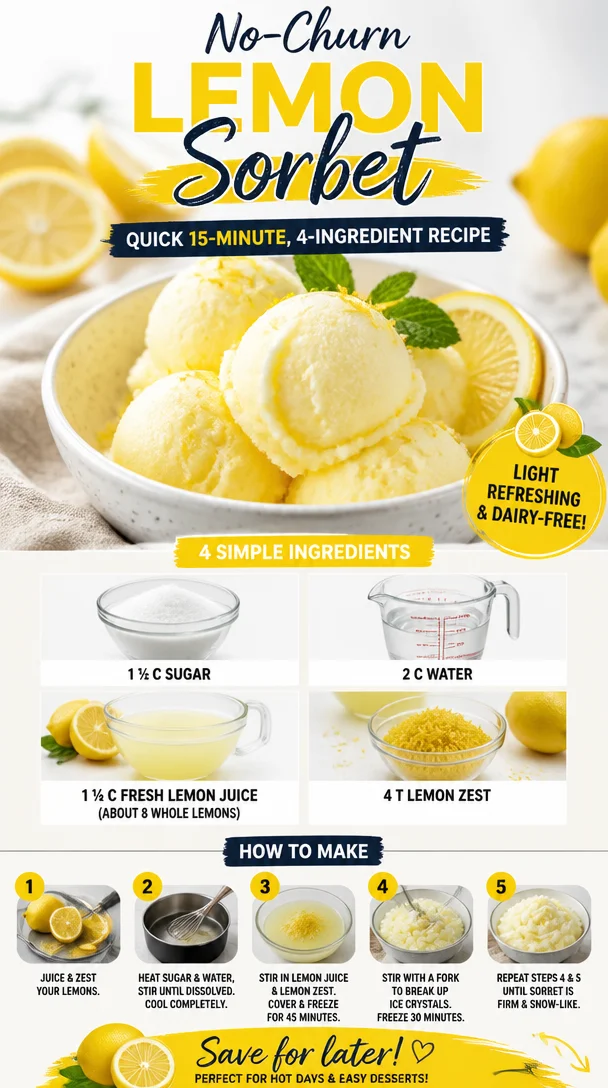
No-Churn Lemon Sorbet: Quick 15-Minute, 4-Ingredient Recipe
The Ultimate No-Ice Cream Maker Lemon Sorbet Recipe
Hello, fellow foodies! It’s Savannah from Ivory Apron, and I’m so excited to share a refreshing recipe that transports me to idyllic summer days — Lemon Sorbet. This dessert is not only incredibly simple to make, but it also brings a burst of sunshine to your table, regardless of the season. You won’t need any fancy equipment; all you need is a few pantry staples and a little bit of time.
Whether you’re wrapping up a dinner party or just trying to provide a sweet finish to a weekday meal, lemon sorbet is the perfect palate cleanser and a delightful treat that everyone will adore. Let’s dive into this simple yet elegant recipe!
A Dash of Nostalgia
Back when I was a child, summers meant long, sun-drenched days filled with family BBQs and laughter. My grandmother had this magical little lemon sorbet recipe that we all awaited each summer. I can still picture the cheerful yellow of the sorbet served in those quaint dishware she saved for special occasions. As my family and I took our first bites, the flavors danced on our tongues like a refreshing breeze wafting through the warm air.
Now, as a recipe creator, those memories encourage me to whip up sorbet every summer. Every spoonful is a nostalgic journey, and I love sharing it with friends and family, just like my grandma did. Let’s recreate those sweet memories together with this recipe that is both effortless and rewarding!
Ingredients You’ll Need
To make this delightful lemon sorbet, gather these ingredients:
-
1 ½ cups of sugar
This acts as the sweetener to balance the tartness of the lemons. You can substitute with half the amount of honey or agave syrup for a different flavor profile that adds a lovely depth. -
2 cups of water
Essential for creating a simple syrup when combined with sugar. If you want a more herbal note, consider using herbal teas like chamomile or mint as the liquid base. -
1 ¼ cups of fresh lemon juice (approximately 8 whole lemons)
Fresh is best! The acidity and brightness of the lemons provide a refreshing zing. In a pinch, you might use bottled lemon juice, but trust me, fresh lemons elevate the flavor immensely. -
4 tablespoons of lemon zest
This zest adds an extra layer of lemony goodness and aroma. If you’re out of lemons, you could use the zest of limes for a tropical twist.
Step-by-Step Instructions
Let’s get to the fun part — making the sorbet! Follow these steps to achieve a smooth, luscious lemon sorbet without needing an ice cream maker.
-
Make the Simple Syrup
In a medium saucepan over medium heat, combine the 2 cups of water and 1 ½ cups of sugar. Stir gently until the sugar dissolves completely. This should take about 3-5 minutes. You want the mixture to come to a gentle simmer — no need to boil vigorously! Once the sugar has dissolved, remove it from the heat and let it cool. -
Juice the Lemons
While your syrup is cooling, it’s time to juice the lemons! Roll them on the countertop for a few seconds to release more juice. Cut the lemons in half and use a citrus juicer or your hands to extract 1 ¼ cups of fresh lemon juice. Strain the juice to remove seeds and pulp if desired for a smoother texture. -
Combine
Once the syrup is at room temperature, mix in the fresh lemon juice and 4 tablespoons of lemon zest. This combination is the heart of your sorbet! Give it a good stir to ensure all ingredients meld beautifully. -
Pour and Freeze
Pour the lemon mixture into a shallow dish, preferably a metal pan as it conducts heat better to freeze faster. Cover it with plastic wrap. Place it in your freezer for about 4-5 hours. You want the mixture to be solid, but not rock-hard. -
Scrape for Fluffiness
After 4-5 hours, take the dish out of the freezer. Using a fork, scrape the frozen layer to break it up. This will give your sorbet that light, fluffy texture. If you prefer a creamier consistency, you can blend the mixture briefly in a food processor. -
Final Freeze
Return the sorbet to the freezer for an additional 2 hours to firm up. Trust me; it’ll be worth the wait!
Serving Suggestions
Once your lemon sorbet is ready to serve, scoop it into charming bowls or elegant glasses. A sprig of fresh mint or a twist of lemon peel can elevate the presentation. Serve this sorbet as a stand-alone dessert or alongside a fruit salad or a slice of cake for added flair.
Recipe Variations
Feeling adventurous? Here are a few creative twists you can add to the classic lemon sorbet:
- Berry Lemon Sorbet: Blend in some pureed berries like strawberries or raspberries before freezing for a vibrant twist.
- Minty Lemon Sorbet: Add a handful of muddled fresh mint leaves to the mixture, giving your sorbet a refreshing herbaceous finish.
- Ginger Lemon Sorbet: Grate fresh ginger and add it for a zesty and spicy kick.
- Honey Lemon Sorbet: Swap sugar with honey (use about 1 cup as it’s sweeter) for a unique flavor profile and added health benefits.
- Creamy Lemon Sorbet: Stir in a bit of coconut cream or yogurt for a richer texture.
Chef’s Notes
This recipe holds a special place in my kitchen because it harkens back to those sun-soaked summers spent with my grandmother. As I refine it, I’ve learned that adjusting the sweetness to your taste is completely normal! Depending on the tartness of your lemons, you might want to add a bit more sugar — that’s the beauty of cooking! Feel free to experiment a bit and find the right balance for you.
And fun fact: I once made this sorbet for a big family gathering and forgot to set a timer. When I finally remembered it, I rushed to the kitchen in a panic, but to my delight, it turned out perfectly! A little spontaneity can sometimes lead to the most delightful surprises in cooking.
FAQs and Troubleshooting
-
My sorbet is too hard. What can I do?
If your sorbet is rock-hard, let it sit at room temperature for about 10 minutes before scooping. You can also blend it in a food processor with a splash of water or juice to soften it up. -
Can I use store-bought lemon juice?
Yes, while fresh lemons are best for flavor, if in a pinch, bottled juice can work. Just ensure it’s 100% lemon juice with no added sugars or preservatives. -
What if I don’t have a shallow dish?
A shallow dish helps the mixture freeze evenly, but you can use any container. If using a deeper container, check the sorbet more frequently and scrape it with a fork as it freezes. -
Can I make it ahead of time?
Absolutely! This lemon sorbet can be made a few days in advance. Just give it a good scrape before serving!
And there you have it — a refreshing, chic, and utterly delightful lemon sorbet that’s perfect for any occasion. It’s a beautiful way to wrap up a meal or simply cool down on a warm day. There’s something undeniably special about whipping up something so simple yet stunning. So, tie on your apron, grab those lemons, and let’s make some delicious memories together! Cheers to crafting culinary magic!
PrintThe Ultimate No-Ice Cream Maker Lemon Sorbet
A refreshing lemon sorbet that is simple to make and a perfect palate cleanser.
- Prep Time: 10 minutes
- Cook Time: 15 minutes
- Total Time: 150 minutes
- Yield: 4 servings 1x
- Category: Dessert
- Method: Freezing
- Cuisine: American
- Diet: Vegan
Ingredients
- 1 ½ cups of sugar
- 2 cups of water
- 1 ¼ cups of fresh lemon juice (approximately 8 whole lemons)
- 4 tablespoons of lemon zest
Instructions
- Make the Simple Syrup: In a medium saucepan over medium heat, combine the 2 cups of water and 1 ½ cups of sugar. Stir gently until the sugar dissolves completely, about 3-5 minutes. Remove from heat and let cool.
- Juice the Lemons: Roll them on the countertop to release more juice. Cut in half and extract 1 ¼ cups of fresh lemon juice. Strain to remove seeds and pulp if desired.
- Combine the cooled syrup with the fresh lemon juice and 4 tablespoons of lemon zest. Stir to mix.
- Pour the mixture into a shallow dish and cover with plastic wrap. Freeze for about 4-5 hours until solid but not rock-hard.
- Scrape the mixture with a fork to achieve a fluffy texture. Optionally, blend briefly in a food processor for creaminess.
- Final Freeze: Return the sorbet to the freezer for an additional 2 hours to firm up.
Notes
Adjust sweetness to your taste depending on the tartness of the lemons. This sorbet can be made a few days in advance.
Nutrition
- Serving Size: 1 serving
- Calories: 180
- Sugar: 36g
- Sodium: 5mg
- Fat: 0g
- Saturated Fat: 0g
- Unsaturated Fat: 0g
- Trans Fat: 0g
- Carbohydrates: 46g
- Fiber: 0g
- Protein: 0g
- Cholesterol: 0mg
Keywords: lemon sorbet, dessert, vegan, refreshing, summer treat
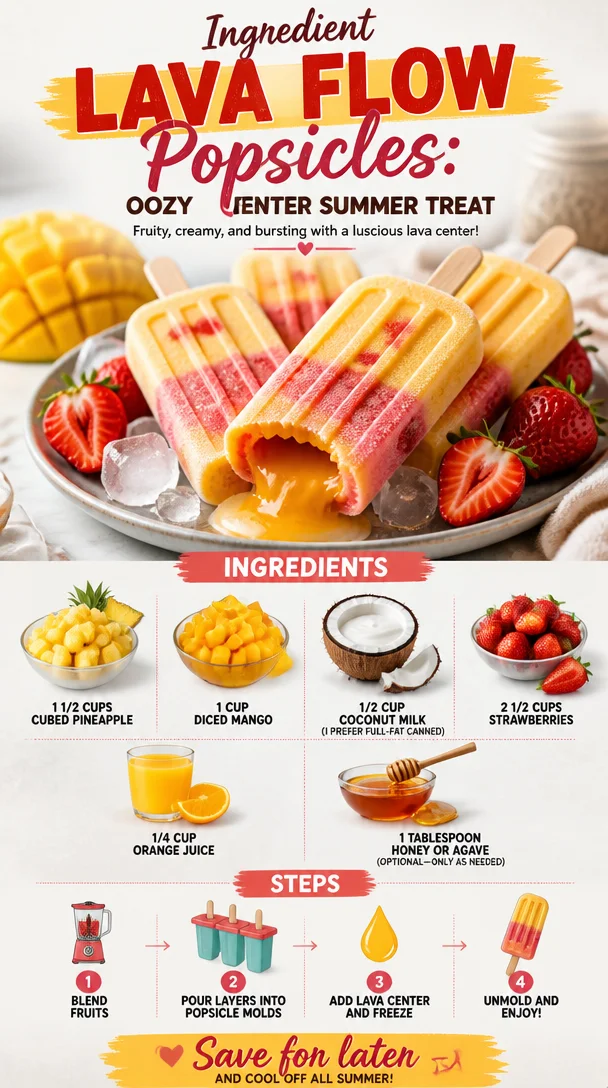
Ingredient Lava Flow Popsicles: Oozy Center Summer Treat
Dive into Delight: Lava Flow Popsicles
Introduction
Hello, food lovers! Are you feeling the heat of summer? If so, there’s nothing quite like a refreshing treat to keep things cool while satisfying your sweet tooth. Today, I’m excited to share with you a recipe that’s bursting with tropical flavors and nostalgic memories—Lava Flow Popsicles! These delightful frozen creations not only tantalize your taste buds but also transport you straight to a sun-kissed beach with each bite.
Picture yourself lounging in the sun, ocean waves crashing in the distance, while you indulge in these stunning popsicles. With their vibrant colors and layers of fruit, they’re as fun to make as they are to eat. Plus, they’re a fantastic activity to involve the little ones in. Have them help you blend, pour, and, of course, taste! You’ll not only create a delicious treat together but also memories that will last a lifetime.
If you’re looking for something simple, refreshing, and oh-so-tasty, you’re in the right place. These Lava Flow Popsicles require minimal ingredients and effort, but oh, do they deliver on flavor! Whether you need a way to cool down on a hot summer day, want to impress guests at your next gathering, or simply crave a healthy dessert option, these popsicles are your perfect solution. So, let’s roll up our sleeves, grab our ingredients, and bring a splash of summer into our kitchens!
Personal Story
I still remember the first time I had a lava flow drink—sipping on it while soaking in the sun at a beachside bar, surrounded by palm trees and laughter. The bartender artfully layered the vibrant colors, and I marveled at how something so delightful could also look like a work of art! I instantly fell in love with the blend of coconut, strawberry, and the golden notes of pineapple and mango. It felt like summer in a glass!
Years later, when I started experimenting with popsicle recipes, the lava flow drink quickly came to mind. I couldn’t shake the thought of creating a frozen dessert that mirrored those sun-drenched memories—all while being easy enough to whip up in my kitchen. The Lava Flow Popsicles were born from this inspiration—bringing a touch of nostalgia to every bite while keeping things super simple and downright delicious. Now, every time I make these pops, I’m reminded of that blissful day by the beach, evoking warm vibes and blissful summer memories. Let’s channel that tropical energy together as we make these delightful popsicles!
Ingredients
-
1 1/2 cups cubed pineapple
Sweet, juicy pineapple adds the perfect tropical touch. You can use fresh or canned pineapple, but make sure it’s packed in juice rather than syrup for a healthier option. -
1 cup diced mango
Mango provides a lovely sweetness and a beautiful golden color. Frozen mango is a great substitute if you don’t have fresh mango on hand—just let it thaw a bit before blending. -
1/2 cup coconut milk (I prefer full-fat canned)
This creamy addition creates that luscious texture we adore. Full-fat coconut milk works best for a richer flavor, but you can also use light coconut milk for a lighter option. -
2 1/2 cups strawberries
Strawberries bring that bright red color and a flavorful tang. Fresh strawberries are fantastic, but if they’re out of season, frozen strawberries work well too—just defrost them first. -
1/4 cup orange juice
A splash of orange juice brightens the flavors and adds a refreshing zing. Freshly squeezed is always best, but store-bought works in a pinch! -
1 Tablespoon honey or agave (optional – only as needed)
Adjust the sweetness to your liking! If your fruit is very sweet, you may not need any sweetener, but honey or agave is a great addition if you want to enhance the flavor.
Step-by-Step Instructions
-
Prep Your Ingredients
Start by gathering all your fruits. If you’re using fresh pineapple and mango, peel and chop them into cubes. For strawberries, remove the stems and chop any large ones in half. This makes blending a breeze! -
Blend the Pineapple Layer
In a blender, combine the cubed pineapple and half of the coconut milk. Blend until smooth and creamy. Taste and see if it needs a bit of sweetness; if so, add honey or agave. -
Prepare the Mango Layer
Next, rinse out the blender (or wipe it down if you’re feeling lazy). Add in the mango chunks and the rest of the coconut milk. Blend until creamy. This layer should be luxurious and smooth! -
Create the Strawberry Layer
Now, it’s strawberry time! Add the strawberries to the cleaned blender along with the orange juice. Blend until well-combined. You might notice a delicious tang here; that’s what we want! -
Layer Your Popsicles
Grab your popsicle molds and start layering! Begin with a couple of tablespoons of the pineapple mixture, then add the mango layer. It’s okay if they mix a bit; that’s part of the charm! Finally, top with the strawberry layer. Continue this until the molds are filled, leaving a little space at the top for expansion. -
Insert Sticks and Freeze
If your popsicle molds come with lids, put them on. Otherwise, insert popsicle sticks directly into the molds. Place them in the freezer for at least 4-6 hours or until fully frozen. If you’re feeling impatient (we’ve all been there), try giving them a few hours and then testing one! -
Unmold and Enjoy!
Once the popsicles are frozen, run warm water over the outside of the molds to help release them easily. Serve these up right away—they won’t last long once your guests (or family!) get a taste!
Serving Suggestions
To display your Lava Flow Popsicles, arrange them upright in a colorful bowl filled with ice for a fun presentation! You can also serve them on wooden boards with tropical-themed decorations, like slices of fresh fruit and a sprig of mint for an elegant touch. The vibrant colors speak for themselves, so let them shine!
Recipe Variations
- Berry Burst: Swap out the strawberries for blueberries or raspberries for a different fruit combo!
- Citrus Splash: Instead of orange juice, try lemon or lime for a zesty twist.
- Creamy Coconut: Use more coconut milk in the pineapple or mango layers for an extra creamy popsicle!
- Tropical Additions: Add a handful of spinach to the mango layer for a vibrant green, nutrient-packed boost!
- Boozy Popsicles: For an adult twist, add a splash of rum or coconut flavored liqueur to the coconut milk.
Chef’s Notes
I love how versatile this recipe can be! Over the years, I’ve played around with different fruits and layers, discovering that almost any combination works beautifully. One time, I got adventurous and added a splash of passion fruit puree for an explosion of flavor—talk about tropical bliss!
Here’s a fun kitchen story: the first time I attempted to make these popsicles, I was eager to show them off at a summer gathering. However, I completely forgot to check the freezer! They were still liquid when it was time to serve. Let’s just say, there was a lot of laughter as we enjoyed a colorful fruit slush instead!
FAQs and Troubleshooting
1. My popsicles won’t come out of the molds, what do I do?
Running the molds under warm water for a few seconds should help release the popsicles. If they’re still stuck, let them sit for a moment, and try again.
2. Can I make these ahead of time?
Absolutely! Lava Flow Popsicles store well in the freezer for about 3 weeks. Just wrap them in plastic wrap or place them in a zip-top bag to prevent freezer burn.
3. What if I don’t have popsicle molds?
No molds, no problem! Use paper cups and wooden sticks or even ice cube trays for mini pops—it will work just fine!
4. Can I use frozen fruit?
Definitely! Frozen fruit is a fantastic option, but be sure to let it thaw slightly before blending to get the right consistency.
Nutritional Info
These popsicles are not only a delightful treat but also a healthier choice compared to store-bought desserts. Each popsicle is made primarily from fruit and coconut milk, providing a dose of vitamins, minerals, and healthy fats. For a specific nutritional breakdown, feel free to calculate based on the quantities given, but you can rest assured they’re a guilt-free indulgence!
With this Lava Flow Popsicle recipe, you’re all set for a slice of summer bliss, any time of year. I can’t wait for you to try these and share your tropical moments. Cheers to sweet memories and even sweeter treats! 🍍✨
PrintLava Flow Popsicles
Refreshing and vibrant Lava Flow Popsicles bursting with tropical flavors—perfect for cooling down on hot summer days!
- Prep Time: 15 minutes
- Cook Time: 0 minutes
- Total Time: 360 minutes
- Yield: 8 servings 1x
- Category: Dessert
- Method: Freezing
- Cuisine: Tropical
- Diet: Vegan
Ingredients
- 1 1/2 cups cubed pineapple
- 1 cup diced mango
- 1/2 cup full-fat coconut milk
- 2 1/2 cups strawberries
- 1/4 cup orange juice
- 1 Tablespoon honey or agave (optional)
Instructions
- Prep your ingredients by gathering all fruits and chopping as needed.
- Blend the pineapple layer, mixing cubed pineapple with half the coconut milk until smooth.
- Prepare the mango layer by blending mango chunks with the remaining coconut milk.
- Create the strawberry layer by blending strawberries with orange juice.
- Layer your popsicles by starting with a pineapple mixture, then adding mango, and topping with the strawberry layer.
- Insert popsicle sticks and freeze for at least 4-6 hours.
- Unmold the popsicles by running warm water over the molds and enjoy!
Notes
These popsicles can be stored in the freezer for about 3 weeks. You can also use different fruit combinations or even add a splash of rum for an adult twist.
Nutrition
- Serving Size: 1 popsicle
- Calories: 150
- Sugar: 18g
- Sodium: 5mg
- Fat: 6g
- Saturated Fat: 5g
- Unsaturated Fat: 1g
- Trans Fat: 0g
- Carbohydrates: 25g
- Fiber: 3g
- Protein: 1g
- Cholesterol: 0mg
Keywords: popsicles, summer treat, tropical dessert, healthy dessert, refreshing snacks

Key Lime Pie Yogurt Bark Recipe
Key Lime Pie Yogurt Bark Recipe: A Flavorful and Fun Treat
Hello, dear friends! Today, I’m incredibly excited to share a recipe that captures the vibrant flavors of summer and the spirit of fun gatherings—Key Lime Pie Yogurt Bark! If you’re looking for a refreshing treat that is as easy to make as it is delicious, you’re in the right place. This delightful dessert is perfect for those hot days when all you want to do is kick back, relax, and enjoy something light yet satisfying.
Imagine biting into a creamy, tangy mixture that transports you straight to a beachside café in Key West. Layered with the flavors of zesty lime and topped with crunchy bits of graham crackers and toasted coconut, this yogurt bark not only tastes divine but also looks beautiful when served. Plus, it’s made with wholesome ingredients, offering a dessert you can feel good about sharing!
So, grab your apron, and let’s whip up this tasty treat together.
A Sweet Slice of Nostalgia
Let me share a fond memory related to key lime pie. It takes me back to childhood summers spent in my grandmother’s cozy kitchen. She was a master baker, always filling her home with the scent of freshly baked goodies. One of my favorite moments was when she would let me help make her famous key lime pie. I loved squeezing those limes, watching the vibrant green juice flow, and feeling like a real chef as we whipped the filling together.
After we popped it into the fridge, we’d always sneak a taste of the filling before it was set. That zesty sweetness, that perfect balance—it’s a flavor that forever holds a special place in my heart. It also taught me the importance of using fresh ingredients and the joy that comes from creating something beautiful in the kitchen.
So, l loved the idea of turning that nostalgic pie into a healthier, no-bake treat that everyone could enjoy. The result? Our Key Lime Pie Yogurt Bark! This treat embodies those cherished memories while being simple to create and delightful to eat.
Ingredients
Here’s what you’ll need to create this scrumptious Key Lime Pie Yogurt Bark:
-
2.5 cups Greek yogurt
A great source of protein and creaminess. You can use plain, non-fat or low-fat Greek yogurt for a creamier texture. Looking for a dairy-free option? Go for your favorite dairy-free yogurt! -
3.5 tbsp key lime juice
This brings the signature tangy flavor of key lime pie! If you can’t find key limes, regular limes can work in a pinch, although the flavor will be slightly different. -
2 tbsp powdered Swerve (or 1 tbsp honey)
This sweetener keeps the bark light and healthy. Adjust the sweetness as per your taste. If you prefer honey, just keep in mind it will add a bit of floral flavor. -
1 teaspoon vanilla extract
This addition enhances the overall flavor, bringing in a warm note that complements the tartness of the lime. -
1 tablespoon lime zest
Zest is your secret weapon for adding vibrant flavor without extra liquid. It adds brightness and a cheerful yellow hue. -
1/3 cup crushed gluten-free graham crackers
I love using Simple Mills Honey Cinnamon Sweet Thins for their perfect crunch and subtle sweetness, making your bark feel extra special! -
1/4 cup toasted coconut
Unsweetened coconut adds a lovely chewiness and a hint of tropical flavor. You can toast it in the oven for a few minutes for a nutty aroma. -
1 scoop vanilla protein powder
This is optional but adds an extra punch of protein. Feel free to use regular or a dairy-free option if you prefer.
Step-by-Step Instructions
Ready to make some delicious Key Lime Pie Yogurt Bark? Let’s dive in with these simple steps!
Step 1: Prepare the Base
Start by grabbing a large mixing bowl. Add your Greek yogurt, key lime juice, powdered Swerve (or honey), vanilla extract, and lime zest. Now, the fun part—grab your whisk and start mixing! You want to achieve a smooth, creamy consistency that’s well combined. This is the base of your bark, so take a moment to admire the beautiful pale green color!
Tip: Taste your mixture and adjust the sweetness as needed. Key limes can vary in tartness, so a quick taste test ensures you’re hitting the right notes.
Step 2: Mix in the Crunch
Once your yogurt mixture is perfectly creamy, it’s time to fold in the texture. Add the crushed gluten-free graham crackers and toasted coconut to the bowl. Gently fold everything together, allowing the toppings to integrate without breaking apart too much.
Note: If you want a crunchier bark, save some of the graham cracker and coconut to sprinkle on top!
Step 3: Spread and Freeze
Line a baking sheet with parchment paper. Pour your creamy mixture onto the parchment and spread it out to about 1/2-inch thickness. You want it to be uniform so that it freezes evenly.
Chef’s Hack: Use an offset spatula for a beautifully smooth surface to make slicing easier later on!
Step 4: Freeze and Set
Once your yogurt mixture is spread out, pop it into the freezer. It will need about 4-6 hours to set completely. I often make this the night before, allowing it to freeze overnight for the best results.
Tip: If you find yourself waiting impatiently, take this time to prepare for serving—maybe whip up some fresh whipped cream or slice some fresh fruit!
Step 5: Slice and Serve
Once frozen, take the bark out of the freezer and let it sit for about 5-10 minutes to soften slightly. This makes slicing easier. Using a sharp knife or pizza cutter, cut the bark into squares or irregular pieces—however you like it!
Insider Tip: For a fun presentation, drizzle a little melted dark chocolate on top or a few extra sprinkles of lime zest.
Serving Suggestions
For serving, arrange your Key Lime Pie Yogurt Bark on a lovely platter or cutting board. I enjoy garnishing it with lime slices or additional toasted coconut for that extra tropical flair. You can also serve it alongside a dollop of whipped cream for an elevated dessert feel.
And don’t forget to have some fun serving utensils on hand—a bright cake knife or colorful serving plates can really make your dessert pop!
Recipe Variations
Want to mix things up? Here are some fun twists you can try with your Key Lime Pie Yogurt Bark:
-
Berry Swirl: Fold in fresh raspberries or blueberries for an additional layer of flavor and color!
-
Coconut Lime: Replace the vanilla protein powder with coconut-flavored protein for an extra tropical vibe.
-
Chili-Lime Twist: For a little kick, sprinkle some chili powder before freezing for a spicy contrast.
-
Nutty Delight: Add crushed nuts like macadamias or almonds for an additional crunch.
-
Dairy-Free Delight: Swap the Greek yogurt for your favorite dairy-free yogurt, coconut yogurt provides a rich and creamy base!
Chef’s Notes
As I dove into experimenting with this recipe, I realized that Key Lime Pie Yogurt Bark is a representation of summer for me—light, refreshing, and brimming with flavor. Over the years, I’ve made it countless times, tweaking it here and there until I found the perfect balance of tartness and sweetness.
One of my funniest mishaps happened when I accidentally grabbed salt instead of sugar—let me tell you, my family’s faces were priceless! Now I always double-check those labels!
We’ve all had those “oops!” moments in the kitchen, but it’s the laughter shared around the table that makes cooking all the more joyful.
FAQs and Troubleshooting
1. What if my yogurt bark isn’t setting properly?
If it’s been in the freezer long enough (4-6 hours) and seems too soft, it may be due to excess liquid in the yogurt. Make sure you’re using a thick Greek yogurt to avoid this issue.
2. Can I use regular limes instead of key limes?
Absolutely! While key limes provide that classic flavor, regular limes work just as well in this recipe. Adjust the sweetness based on your taste!
3. How should I store any leftovers?
Store leftover bark in an airtight container in the freezer for up to two weeks. Just separate layers with parchment paper to avoid sticking.
4. Can I make this bark ahead of time?
Yes! This delicious treat freezes wonderfully, making it an excellent option for meal prep or entertaining. Just be sure to let it sit for a few minutes before slicing!
Nutritional Info (if applicable)
While not calculated in detail here, this yogurt bark is a healthier dessert alternative, packed with protein from Greek yogurt and beneficial fats from coconuts. The use of powdered swerve or honey instead of granulated sugar makes it a light treat that anyone can enjoy.
And there you have it, my friends—your road map to delightful Key Lime Pie Yogurt Bark! This recipe is sure to become a favorite at your summer gatherings or simply enjoyed on a cozy evening at home. Remember, no matter how delicious the dessert, it’s the memories created around the table that makes it truly special. Happy cooking!
PrintKey Lime Pie Yogurt Bark

A refreshing and easy-to-make treat capturing the vibrant flavors of summer, perfect for hot days and gatherings.
- Prep Time: 15 minutes
- Cook Time: 0 minutes
- Total Time: 360 minutes
- Yield: 8 servings 1x
- Category: Dessert
- Method: Freezing
- Cuisine: American
- Diet: Healthy
Ingredients
- 2.5 cups Greek yogurt
- 3.5 tbsp key lime juice
- 2 tbsp powdered Swerve (or 1 tbsp honey)
- 1 teaspoon vanilla extract
- 1 tablespoon lime zest
- 1/3 cup crushed gluten-free graham crackers
- 1/4 cup toasted coconut
- 1 scoop vanilla protein powder (optional)
Instructions
- Prepare the Base: In a large mixing bowl, combine Greek yogurt, key lime juice, powdered Swerve (or honey), vanilla extract, and lime zest. Mix until smooth and creamy.
- Mix in the Crunch: Fold in crushed gluten-free graham crackers and toasted coconut gently.
- Spread and Freeze: Line a baking sheet with parchment paper, pour the mixture, and spread to about 1/2-inch thickness.
- Freeze and Set: Place in the freezer for 4-6 hours until set.
- Slice and Serve: Allow to soften for 5-10 minutes, then cut into squares and enjoy.
Notes
For serving, garnish with lime slices or whipped cream. Leftovers can be stored in an airtight container in the freezer for up to two weeks.
Nutrition
- Serving Size: 1 piece
- Calories: 150
- Sugar: 6g
- Sodium: 30mg
- Fat: 5g
- Saturated Fat: 3g
- Unsaturated Fat: 2g
- Trans Fat: 0g
- Carbohydrates: 20g
- Fiber: 1g
- Protein: 6g
- Cholesterol: 15mg
Keywords: key lime pie, yogurt bark, summer dessert, healthy treat, no-bake dessert
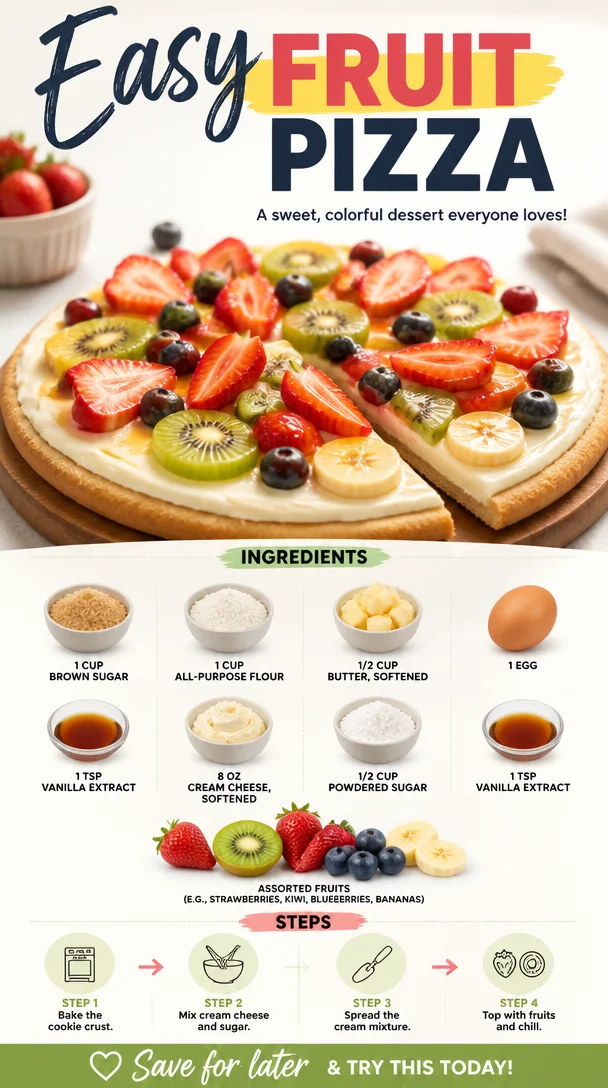
Easy Fruit Pizza
Easy Fruit Pizza: A Sweet Slice of Nostalgia
Hello, foodies! Gather round, because today, we’re diving into the world of colorful, fruity deliciousness with an Easy Fruit Pizza recipe that’s sure to bring a smile to your face and warmth to your kitchen. If you’re looking to impress at your next gathering or simply want an exciting dessert that’s a breeze to whip up, you’re in the right place!
Growing up, my summers were loaded with family gatherings, and fruit pizza was the star of the show. Every time it made an appearance, it drew everyone in like moths to a flame. The beautiful colors, the sweet aroma, and that glorious crunch followed by creamy delight—what’s not to love? I remember helping my mom in the kitchen, meticulously layering the vibrant fruits. We laughed, we talked about our day, all the while the kitchen was filled with that unmistakable fragrance of baked goodness. It was those little moments, standing beside her, that ignited my passion for cooking. I loved how a dessert could bring us together and create memories that linger long after the last bite is finished.
So, with all of that sentiment swirling around, let’s get rolling with this delightful Easy Fruit Pizza that’s just as much fun to make as it is to eat!
Ingredients
Here’s what you’ll need to create this masterpiece. I’ve even added a few chef insights to help you along the way:
-
1 cup brown sugar
- This adds sweetness and a hint of caramel flavor to your crust. If you’re in a pinch, you can substitute it with white sugar mixed with a touch of molasses for similar results.
-
1 cup all-purpose flour
- The base for our cookie crust. Whole wheat flour works too for a nuttier flavor and added fiber!
-
1/2 cup butter, softened
- This gives richness and helps create that melt-in-your-mouth texture. If you prefer a lighter version, you can use coconut oil or a vegan butter substitute.
-
1 egg
- Binding agent for our crust. For a vegan option, unsweetened applesauce (1/4 cup) or ground flaxseed mixed with water (1 tbsp flaxseed + 2.5 tbsp water) can do the trick!
-
1 tsp vanilla extract
- Adds a warm flavor. Don’t skip this! For an extra touch, try almond extract instead for a delightful twist.
-
8 oz cream cheese, softened
- The creamy center that holds it all together. You can use Greek yogurt for a tangy swap or a dairy-free cream cheese alternative if you’re lactose intolerant.
-
1/2 cup powdered sugar
- Sweetens the cream cheese layer. You can make your own powdered sugar by blending regular granulated sugar until super fine!
-
1 tsp vanilla extract (again!)
- Just a little more for the cream cheese mixture. You can also play around with citrus zest for a vibrant twist.
-
Assorted fruits (e.g., strawberries, kiwi, blueberries, bananas)
- The more, the merrier! Feel free to use whatever seasonal fruits you adore. Pineapple, peaches, or even mango can elevate your pizza to tropical levels.
Step-by-Step Instructions
Alright, let’s get down to business and make some fruit pizza!
-
Preheat the Oven
- Preheat your oven to 350°F (175°C). This ensures your cookie crust will bake evenly and come out golden brown.
-
Make the Cookie Crust
- In a mixing bowl, cream together 1/2 cup of softened butter and 1 cup of brown sugar until it’s light and fluffy—about 2-3 minutes.
- Add the egg and 1 tsp of vanilla extract into the bowl, mixing until fully incorporated.
- Gradually add 1 cup of all-purpose flour. It may look a little crumbly initially, but keep mixing until it forms a dough. You’re looking for a nice, cohesive ball of goodness!
-
Bake the Crust
- Spread the dough onto a pizza stone or a greased baking sheet, shaping it into a round circle (about 12 inches in diameter). Use your hands or a spatula to get it nice and smooth.
- Pop it into the preheated oven for 12-15 minutes or until it’s golden around the edges. Don’t you just love that smell wafting through the kitchen?
-
Prepare the Cream Cheese Layer
- While the crust is cooling, beat the softened cream cheese until it turns creamy and smooth—about 2 minutes.
- Add in 1/2 cup of powdered sugar and the remaining tsp of vanilla extract. Mix until well blended. Taste it! Add a pinch more sugar if you like it sweeter. It’s always fun to adjust based on your preferences.
-
Assemble Your Fruit Pizza
- Once the crust has completely cooled, spread the cream cheese mixture evenly over the top. Use an offset spatula or the back of a spoon to make this easy.
- Now, the fun part! Arrange your assorted fruits atop the cream cheese layer like a colorful tapestry. Be creative—overlapping the fruits can add a beautiful visual touch!
-
Final Touches
- If you want to get extra fancy, drizzle a little honey or maple syrup over the top for added sweetness and shine. You could also sprinkle some fresh mint for an aromatic finish!
-
Chill and Serve
- For the best experience, pop your fruit pizza in the fridge for about an hour before serving to let all those flavors meld together.
Serving Suggestions
When it comes to serving, slice your fruit pizza into wedges, just like you would a pizza. You could also use cookie cutters to make fun shapes if you’re feeling playful! Serve it all on a beautiful platter, and you immediately elevate the experience. Add a sprig of mint on the side for a pop of green—totally Instagram-worthy!
Recipe Variations
Let’s explore ways you can personalize your fruit pizza:
-
Berry Bonanza: Use a mix of raspberries, strawberries, and blueberries for a vibrant red, white, and blue theme!
-
Tropical Twist: Swap traditional fruits for tropical ones like mango, pineapple, and passion fruit for an island vibe.
-
Chocolate Drizzle: Melt some dark chocolate and drizzle it over the fruit for a decadent addition!
-
Nutty Delight: Top your fruit pizza with slivered almonds or chopped pecans for a crunchy texture.
-
Zesty Lemon: Add lemon curd under your cream cheese layer for a refreshing zing!
Chef’s Notes
This Easy Fruit Pizza has been a cherished recipe in my family for years. I vividly remember my first attempt at making it solo when I was around ten. Let’s just say it turned out more like a fruit salad on a cookie than a pizza! But that mishap didn’t deter me; it fueled my love for experimenting.
Over the years, I’ve played around with various toppings and cream cheese combinations. I particularly enjoy adding zesty lime or orange to the cream cheese layer for an added kick. This recipe has evolved, just like my culinary journey, and it reminds me that perfection isn’t the goal; it’s all about having fun and enjoying the process!
FAQs and Troubleshooting
1. My cookie crust is too crumbly. What did I do wrong?
- It might be that your butter wasn’t softened enough or that your flour measurement was a bit too generous. Always be sure to spoon flour into your measuring cup and level it off for accuracy.
2. Can I make the cream cheese layer ahead of time?
- Absolutely! You can prepare the cream cheese mixture a day in advance. Just store it in your fridge and spread it on the crust when you’re ready to serve.
3. How long will the fruit pizza last?
- Enjoy it within 2-3 days for the best texture. After that, the fruits may start to weep and soften.
4. Can I freeze the fruit pizza?
- I recommend not freezing it once topped with fruit due to the moisture release. However, you can freeze the baked crust for later use—just thaw and add toppings when you’re ready to serve!
I hope this Easy Fruit Pizza recipe becomes a lovely addition to your kitchen repertoire, sparking joy and delicious memories as it did for me. Remember, it’s all about the love and joy of gathering around the table. Happy cooking, and let’s keep creating beautiful moments together! 🍕✨
PrintEasy Fruit Pizza
A colorful and delightful dessert that’s fun to make and perfect for gatherings, featuring a creamy layer and an assortment of fresh fruits.
- Prep Time: 15 minutes
- Cook Time: 15 minutes
- Total Time: 30 minutes
- Yield: 8 servings 1x
- Category: Dessert
- Method: Baking
- Cuisine: American
- Diet: Vegetarian
Ingredients
- 1 cup brown sugar
- 1 cup all-purpose flour
- 1/2 cup butter, softened
- 1 egg
- 1 tsp vanilla extract
- 8 oz cream cheese, softened
- 1/2 cup powdered sugar
- 1 tsp vanilla extract (again!)
- Assorted fruits (e.g., strawberries, kiwi, blueberries, bananas)
Instructions
- Preheat the Oven: Preheat your oven to 350°F (175°C).
- Make the Cookie Crust: Cream together 1/2 cup butter and 1 cup brown sugar until light and fluffy. Add the egg and 1 tsp vanilla, mixing until incorporated. Gradually add 1 cup all-purpose flour until it forms a dough.
- Bake the Crust: Spread the dough onto a pizza stone or a greased baking sheet into a 12-inch circle. Bake for 12-15 minutes or until golden around the edges.
- Prepare the Cream Cheese Layer: Beat the softened cream cheese until creamy. Add 1/2 cup powdered sugar and the remaining tsp of vanilla, mixing until well blended.
- Assemble Your Fruit Pizza: Spread the cream cheese mixture over the cooled crust and arrange assorted fruits on top.
- Chill and Serve: Chill in the fridge for about an hour before serving.
Notes
Feel free to personalize with your favorite fruits or toppings. A drizzle of honey or chocolate adds a delightful touch!
Nutrition
- Serving Size: 1 slice
- Calories: 320
- Sugar: 18g
- Sodium: 300mg
- Fat: 15g
- Saturated Fat: 8g
- Unsaturated Fat: 5g
- Trans Fat: 0g
- Carbohydrates: 43g
- Fiber: 2g
- Protein: 4g
- Cholesterol: 40mg
Keywords: fruit pizza, dessert recipe, summer dessert, colorful dessert, easy recipe
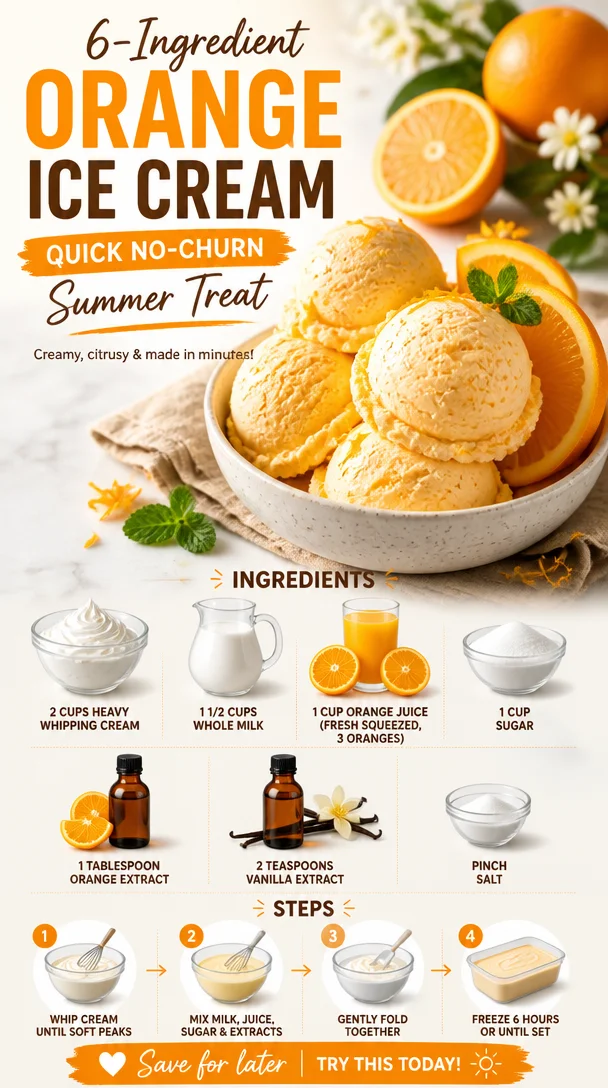
Ingredient Orange Ice Cream: Quick No-Churn Summer Treat
The Creamy Sunshine of Summer: Homemade Orange Ice Cream Recipe
There’s something magical about homemade ice cream that brings a smile to everyone’s face. It’s a simple pleasure, a labor of love, and a nostalgic taste of summer wrapped in a sweet, creamy dream. Today, I’m excited to share my Orange Ice Cream recipe with you – a vibrant, refreshing treat that’s perfect for warm days and a delightful way to gather family and friends around the table.
This Orange Ice Cream will not only cool you down but also evoke the joy of summer picnics and family gatherings. Imagine yourself lounging on the porch, the sun setting in a blaze of orange and pink, with a bowl of this luscious ice cream in hand. I still remember the first time I made this recipe; it was during a family barbecue, and everyone was so excited about the sweet citrus flavor that they couldn’t resist coming back for seconds (and thirds!).
This isn’t just any frozen dessert; it’s a creamy embrace, a scoop of sunshine to brighten your day. Ready to roll up your sleeves? Let’s dive into the delicious world of homemade Orange Ice Cream!
A Taste of Nostalgia
I can still picture it: a backyard full of laughter, the smell of grilled burgers wafting through the air, and my grandma pulling out the old ice cream maker from the back of the pantry. It had a few dents and a faded paint job, but to me, it was a treasure chest of sweet memories. Every summer, she’d gather the family for homemade ice cream day, a tradition we all eagerly anticipated. She’d mix the ingredients by hand, and I remember how the kitchen would be filled with the zesty aroma of fresh oranges.
As she patiently cranked away, we’d gather round, eyes wide with excitement, waiting for that delicious treat to reveal itself. When it finally emerged, creamy and perfectly orange, we knew it was worth the wait. Each scoop was a celebration of summer—the citrus notes bursting with flavor, each bite reminding us of sun-kissed days and carefree moments spent together.
Making this Orange Ice Cream transports me back to those cherished summers, and I love sharing this joyful recipe with friends and family. It’s not just about the ice cream; it’s about creating memories. So tie on your apron, and let’s make some of our own!
Ingredients
Here’s a list of everything you’ll need to create this delicious treat:
-
2 cups heavy whipping cream
The star of the show! This is what gives our ice cream that luxurious, creamy texture. If you want something lighter, you can substitute half-and-half, but the end result won’t be quite as rich. -
1 1/2 cups whole milk
This balances the creaminess and keeps the texture smooth. If you’re looking for a lower-fat version, you can use 2% milk, but it might be slightly less creamy. -
1 cup orange juice (fresh squeezed, about 3 oranges)
Fresh is key here! The bright flavor from freshly squeezed oranges can’t be beaten. If you’re short on time, use 100% pure orange juice without added sugars for a quicker option. -
1 cup sugar
This sweetens the deal! If you’re looking to cut down on sugar, you can try using agave syrup or honey, but keep in mind the balance of flavors may shift a bit. -
1 tablespoon orange extract
This boosts the orange flavor! If you find yourself without orange extract, vanilla extract can substitute, imparting a different kind of flavor but still very tasty. -
2 teaspoons vanilla extract
A classic addition that rounds out the flavors beautifully. You could also experiment with almond extract for a twist! -
Pinch of salt
A touch of salt enhances the sweetness and balances the flavors. Don’t skip it; it makes a difference!
Step-by-Step Instructions
Now that we’ve gathered our ingredients, let’s whip up this delicious Orange Ice Cream!
-
Mix the Base: In a large mixing bowl, whisk together the heavy whipping cream, whole milk, and granulated sugar. Keep whisking until the sugar fully dissolves. This step is crucial for a smooth finish—no one likes grainy ice cream!
-
Add the Citrus: Pour in the fresh orange juice, orange extract, vanilla extract, and a pinch of salt. Mix gently but thoroughly—this is where the flavor magic happens! Tasting your mixture at this point is key; it should be sweet and bursting with citrus goodness.
-
Chill the Mixture: Cover your bowl and place it in the fridge for at least one hour. This allows the flavors to meld beautifully! If you’re in a hurry, chilling for 30 minutes will work, but I promise the extra time is worth it.
-
Churn the Ice Cream: After chilling, pour the mixture into your ice cream maker and churn according to the manufacturer’s instructions. Most machines take about 20-30 minutes to churn to a soft-serve consistency. Pro tip: If you don’t have an ice cream maker, you can use a blender; just blend your mixture until smooth, pour it into a container, and freeze it, stirring every 30 minutes for the first 2-3 hours to break up ice crystals.
-
Freeze to Firm Up: Once churned, transfer the ice cream to a lidded container and freeze for at least 4 hours, or until firm. If you like a softer ice cream, feel free to eat it right away after churning—it will have a lovely, soft, scoopable texture!
-
Serve and Enjoy: Scoop into bowls, add your favorite toppings, and dig in! I love adding a sprinkle of zest or a slice of fresh orange for that extra pop of color!
Serving Suggestions
For the perfect serving experience, scoop your Orange Ice Cream into chilled bowls for that ultra-refreshing feel. A few sprigs of fresh mint or a thin slice of orange on the edge can elevate the look of your dish while adding a pop of color. Feeling extra fancy? A drizzle of honey or a sprinkle of crushed pistachios on top adds a delightful crunch that perfectly complements the creamy texture.
Recipe Variations
- Citrus Blast: Mix in zest from lemons or limes for a tangy twist.
- Creamy Dreamsicle: Add a swirl of vanilla ice cream to create a dreamy creamsicle effect.
- Orange Chocolate Delight: Fold in some dark chocolate chips or orange-infused chocolate shavings for an indulgent treat.
- Tropical Vibes: Combine orange juice with pineapple juice for a fruity tropical ice cream!
- Dairy-Free Option: Swap out the cream and milk for coconut cream and almond milk for a delicious dairy-free treat.
Chef’s Notes
Having fun in the kitchen can come with its fair share of mishaps! One time, I thought I’d be clever and try adding a batch of frozen berries to my orange ice cream. Let’s just say, “swampy orange” wasn’t quite the look I was going for. That’s the beauty of experimenting, though; if you try something new, you can learn what works and what doesn’t! My Orange Ice Cream recipe has evolved over the years, and I find new ways to put a twist on it with every batch. It’s all about making it your own!
FAQs and Troubleshooting
-
Why is my ice cream icy?
If your ice cream has ice crystals, it’s likely due to not enough fat in your base or not mixing it often enough while it freezes. Make sure to use full-fat cream and stir if you’re not using an ice cream maker! -
My mixture isn’t sweet enough. What can I do?
Taste your mixture before churning! If it’s lacking sweetness, feel free to add a little more sugar or honey until it hits just right. -
Can I make this without an ice cream maker?
Yes! If you don’t have an ice cream maker, simply blend your mixture until smooth, pour it into a freezer-safe container, and freeze, stirring every 30 minutes for the first few hours to break up ice crystals. -
How long does homemade ice cream last?
If properly stored in an airtight container, this Orange Ice Cream will last about 2-3 weeks in the freezer. However, I doubt it’ll last that long—it’s too delicious not to devour!
Nutritional Info
While homemade ice cream can be a tasty indulgence, moderation is key. This Orange Ice Cream will typically have around 240 calories per ½ cup serving, with about 14 grams of fat, 21 grams of carbohydrates, and 3 grams of protein. Nutritional values can vary based on substitutions and portion sizes, so always feel free to adjust according to your dietary needs!
There you have it – a delectable, refreshing Orange Ice Cream recipe that’s perfect for summer. I can’t wait for you to try this and create your own memories in the kitchen. Whether you’re enjoying it on your porch or serving it at a family gathering, I hope it brings as much joy to you as it has to me. So grab your ingredients, tie on that apron, and let’s make some kitchen magic happen together!
PrintHomemade Orange Ice Cream
A vibrant and refreshing Orange Ice Cream recipe, perfect for warm summer days.
- Prep Time: 15 minutes
- Cook Time: 0 minutes
- Total Time: 5 hours 15 minutes
- Yield: 8 servings 1x
- Category: Dessert
- Method: Churning
- Cuisine: American
- Diet: Vegetarian
Ingredients
- 2 cups heavy whipping cream
- 1 1/2 cups whole milk
- 1 cup orange juice (fresh squeezed, about 3 oranges)
- 1 cup sugar
- 1 tablespoon orange extract
- 2 teaspoons vanilla extract
- Pinch of salt
Instructions
- Mix the Base: In a large mixing bowl, whisk together the heavy whipping cream, whole milk, and granulated sugar until the sugar fully dissolves.
- Add the Citrus: Pour in the fresh orange juice, orange extract, vanilla extract, and a pinch of salt. Mix gently.
- Chill the Mixture: Cover your bowl and place it in the fridge for at least one hour.
- Churn the Ice Cream: Pour the mixture into your ice cream maker and churn according to the manufacturer’s instructions.
- Freeze to Firm Up: Transfer the ice cream to a lidded container and freeze for at least 4 hours.
- Serve and Enjoy: Scoop into bowls, add your favorite toppings, and dig in!
Notes
Serve with fresh mint or a slice of orange for added freshness. For a touch of elegance, drizzle with honey or sprinkle with crushed pistachios.
Nutrition
- Serving Size: 1/2 cup
- Calories: 240
- Sugar: 21g
- Sodium: 50mg
- Fat: 14g
- Saturated Fat: 8g
- Unsaturated Fat: 3g
- Trans Fat: 0g
- Carbohydrates: 21g
- Fiber: 0g
- Protein: 3g
- Cholesterol: 50mg
Keywords: orange ice cream, homemade ice cream, summer dessert, creamy dessert
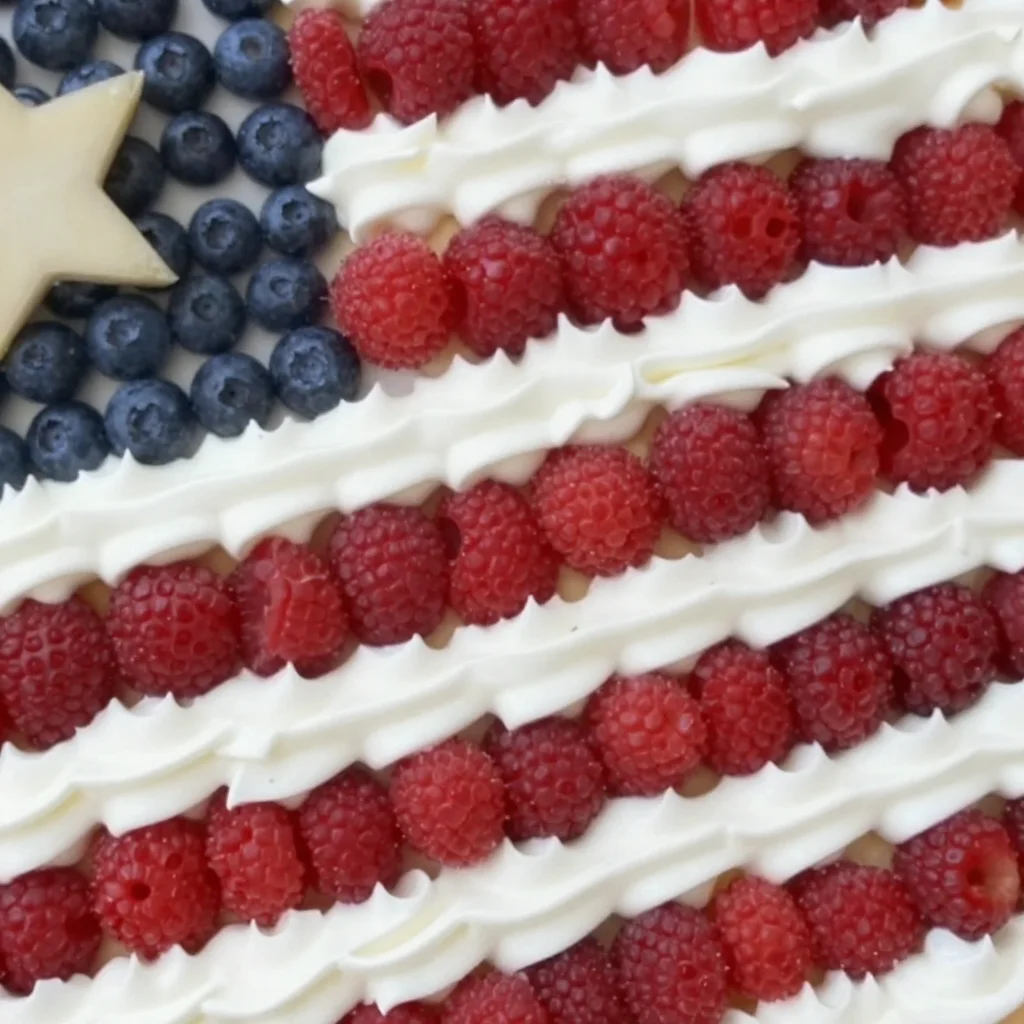
Patriotic Fruit Pizza: Quick 15-Minute American Flag Dessert
American Flag Fruit Pizza: A Slice of Summer Joy
Hello there, kitchen adventurers! Savannah Pierce here, and today I’m excited to whip up one of my absolute favorite treats: the American Flag Fruit Pizza. This dish is a dazzling dessert that’s perfect for summer celebrations, picnics, or just a fun night in with friends. It brings together the delicious flavors of a fruity topping, creamy richness, and that classic cookie base that everyone loves — all while looking like a culinary masterpiece. So grab your aprons, and let’s get started on this stunning dessert that’s bound to impress!
A Slice of Nostalgia
As I reminisce about family gatherings during the summer months, I can’t help but remember those vibrant barbecues filled with laughter, sunshine, and the sweet scent of my grandma’s fruit pizza wafting from the kitchen. I was always drawn to the colorful layers of grapes, strawberries, and blueberries arranged to resemble the American flag. It was more than just a dessert; it was a tradition! Grandma would let me help assemble the pieces, showing me how to layer the fruits just right to create that beautiful flag.
Now, every time I make this dessert, it brings me back to those carefree days of childhood. As I spread the creamy layer and arrange the fruits, I can almost hear her laughter echo in the kitchen. This American Flag Fruit Pizza is a joyful reminder that food is about connection, celebration, and the love we share around the table.
Ingredients
Before we dive into the cooking process, let’s gather our delicious ingredients. Here’s what you’ll need for this vibrant American Flag Fruit Pizza:
-
1 tube Refrigerated Sugar Cookie Dough (16.5 oz)
This cookie dough provides a sweet, buttery base for our fruit pizza. If you’re feeling adventurous, you can swap it for a homemade sugar cookie recipe! -
8 oz Cream Cheese (softened)
Cream cheese adds a rich and creamy texture to our pizza topping. If you’re looking for a lighter option, try using Greek yogurt for a tangy twist! -
2/3 cup Sugar
A little sweetness goes a long way in balancing out the flavors. You can reduce the sugar for a less sweet pizza, or use a sugar substitute if you’re watching your sugar intake. -
1 teaspoon Vanilla
This adds a lovely aromatic flavor to the cream cheese layer. Feel free to experiment with almond extract for a unique flavor profile! -
8 oz Whipped Topping (thawed)
This gives our dessert a light, fluffy texture. You can substitute it with homemade whipped cream if you prefer a more natural option. -
12 oz Fresh Raspberries (about 3 to 4 cups)
Raspberries add a burst of color and tartness. If they aren’t in season, strawberries make a great substitute, or you can use a combination of both! -
1 dry pint Fresh Blueberries (about 2 cups)
Blueberries bring a beautiful hue and a mild sweetness. For variety, consider adding blackberries, which would also look amazing!
Step-by-Step Instructions
Now that we have our ingredients, let’s jump into the steps to create this beautiful American Flag Fruit Pizza!
-
Preheat Your Oven
Preheat your oven to 350°F (175°C). This step is crucial for ensuring that our sugar cookie base bakes evenly. While it warms up, it’s a good moment to prepare your baking sheet by lining it with parchment paper for easier cleanup later. -
Bake the Cookie Base
Open that tube of refrigerated sugar cookie dough and spread it evenly onto the prepared baking sheet. Use your fingers to pat it down into a large rectangle, about a quarter of an inch thick. This is the canvas for our delicious toppings! Bake for about 12-15 minutes or until the edges are golden brown. -
Cool the Cookie Base
Once it’s out of the oven, allow it to cool completely on the baking sheet. Patience is key here; if you try to spread the cream cheese layer on when it’s still warm, it might melt too much and change the texture. -
Mix the Cream Cheese Layer
In a mixing bowl, combine the softened cream cheese, sugar, and vanilla. Use a hand mixer (or a whisk if you’re feeling strong!) to blend until smooth and creamy. This step is where the magic happens! You want it fluffy and well-combined, so take your time here to get that perfect consistency. -
Fold in the Whipped Topping
Gently fold in the thawed whipped topping, being careful not to deflate the mixture. This airy layer will bring texture and lightness to our dessert, making it truly irresistible! -
Spread the Cream Cheese Mixture
Once your cookie base has cooled, it’s time to spread that creamy layer over the top. Use a spatula to ensure an even layer across the entire cookie, reaching all the corners. The cream cheese mixture not only tastes divine but will also act as the adhesive for our beautiful fruit toppings. -
Arrange the Fruit
Here comes the fun part! Use the fresh raspberries to create the stripes of the flag, lining them up in rows across the top. Next, position the blueberries in the upper left corner to represent the stars. You can create a 3×5 grid for a true American flag feel, or you can just sprinkle them around. Don’t be afraid to express your artistic flair here; the more colorful, the better! -
Chill Your Creation
Once you’ve arranged your fruit, place the dessert in the refrigerator for at least one hour. This will help the flavors meld together and firm up the cream cheese layer. Plus, chill desserts are always a hit during hot summer days! -
Slice and Serve
When you’re ready to serve, cut it into squares or triangles, depending on your presentation preferences. Trust me; you’ll want to make sure every slice has a bit of that delicious fruit topping!
Serving Suggestions
For serving, plate your American Flag Fruit Pizza on a beautiful platter, or keep it rustic by cutting it directly on the baking sheet. Garnish with a sprig of fresh mint for a pop of color and a hint of freshness. It also looks gorgeous with some extra whipped topping drizzled around the plate. Whatever you choose, just make sure it’s inviting and reflects the fun spirit of the dish!
Recipe Variations
Want to get a little creative with this classic? Here are a few variations:
- Different Fruit: Swap out raspberries for strawberries or add kiwi slices for a vibrant green accent in the flag!
- Gluten-Free: Use gluten-free sugar cookie dough for a version that everyone can enjoy.
- Dairy-Free: Try coconut cream in place of cream cheese and whipped topping for a dairy-free alternative. Just whip well for that fluffy texture.
- Zesty Kick: Add a teaspoon of lemon or lime juice into the cream cheese mixture for a refreshing citrus twist.
- Chocolate Lovers: Drizzle some melted chocolate over the top for an indulgent touch that’s sure to please!
Chef’s Notes
Creating this fruit pizza has become a cherished tradition in my home. With each passing year, I try to improve upon my technique or elevate the flavors while still keeping it simple. It reminds me of those sunny days with my grandma and the joy of sharing food with family and friends. Sometimes, when I’m feeling adventurous, I play around with berry compotes or even add a sprinkle of lemon zest to the cookie dough for a unique spin!
Every time I serve this dessert, I see the same look of delight on everyone’s faces, just like the first time I introduced it to my guests. It magically brings people together, and I can’t help but smile. Plus, it’s great for any celebration, from the 4th of July to birthday parties!
FAQs and Troubleshooting
1. My cookie base turned out too tough. What went wrong?
Overbaking will lead to a tough base, so be sure to keep an eye on it and remove it when it’s just golden around the edges.
2. Can I use canned fruit instead?
Absolutely! Just be sure to drain it very well to avoid excess moisture that could make the cream cheese soggy.
3. How do I store leftovers?
This dessert is best eaten fresh, but you can keep it covered in the refrigerator for up to 2 days. Just know it may lose some of its vibrant fruit appearance!
4. My whipped topping didn’t fluff up. What did I do wrong?
Make sure your cream cheese is softened adequately, and don’t rush this step. If it’s too cold, it will be lumpy and won’t whip properly.
Nutritional Info
While I won’t delve deeply into numbers here, remember that every slice of this festive treat comes packed with a serving of fresh fruits, so you can feel a little less guilty while indulging in something sweet!
And there you have it, my friends! Whether you’re channeling nostalgia, celebrating freedom, or just craving a delightful dessert, the American Flag Fruit Pizza is your go-to recipe. I hope you enjoy making it as much as I do, and remember: it’s all about the love you pour into your cooking. Happy baking, and let’s keep gathering around our tables, creating beautiful memories one slice at a time!
PrintAmerican Flag Fruit Pizza
A dazzling dessert featuring a fruity topping on a creamy sugar cookie base, perfect for summer celebrations.
- Prep Time: 15 minutes
- Cook Time: 15 minutes
- Total Time: 60 minutes
- Yield: 12 servings 1x
- Category: Dessert
- Method: Baking
- Cuisine: American
- Diet: Vegetarian
Ingredients
- 1 tube Refrigerated Sugar Cookie Dough (16.5 oz)
- 8 oz Cream Cheese (softened)
- 2/3 cup Sugar
- 1 teaspoon Vanilla
- 8 oz Whipped Topping (thawed)
- 12 oz Fresh Raspberries (about 3 to 4 cups)
- 1 dry pint Fresh Blueberries (about 2 cups)
Instructions
- Preheat your oven to 350°F (175°C) and prepare your baking sheet with parchment paper.
- Open the tube of refrigerated sugar cookie dough and spread it evenly onto the prepared baking sheet, then bake for about 12-15 minutes.
- Cool the cookie base completely on the baking sheet.
- Mix the softened cream cheese, sugar, and vanilla until smooth and creamy.
- Fold in the thawed whipped topping gently.
- Spread the cream cheese mixture evenly over the cooled cookie base.
- Arrange the fresh raspberries to create the stripes, and position the blueberries in the upper left corner.
- Chill the dessert in the refrigerator for at least one hour.
- Slice and serve your American Flag Fruit Pizza on a beautiful platter.
Notes
Garnish with fresh mint for added freshness. This dessert can be adapted with different fruits or sugar substitutes.
Nutrition
- Serving Size: 1 slice
- Calories: 350
- Sugar: 20g
- Sodium: 200mg
- Fat: 15g
- Saturated Fat: 8g
- Unsaturated Fat: 5g
- Trans Fat: 0g
- Carbohydrates: 45g
- Fiber: 3g
- Protein: 5g
- Cholesterol: 30mg
Keywords: fruit pizza, summer dessert, American flag dessert, festive dessert, cookie base dessert