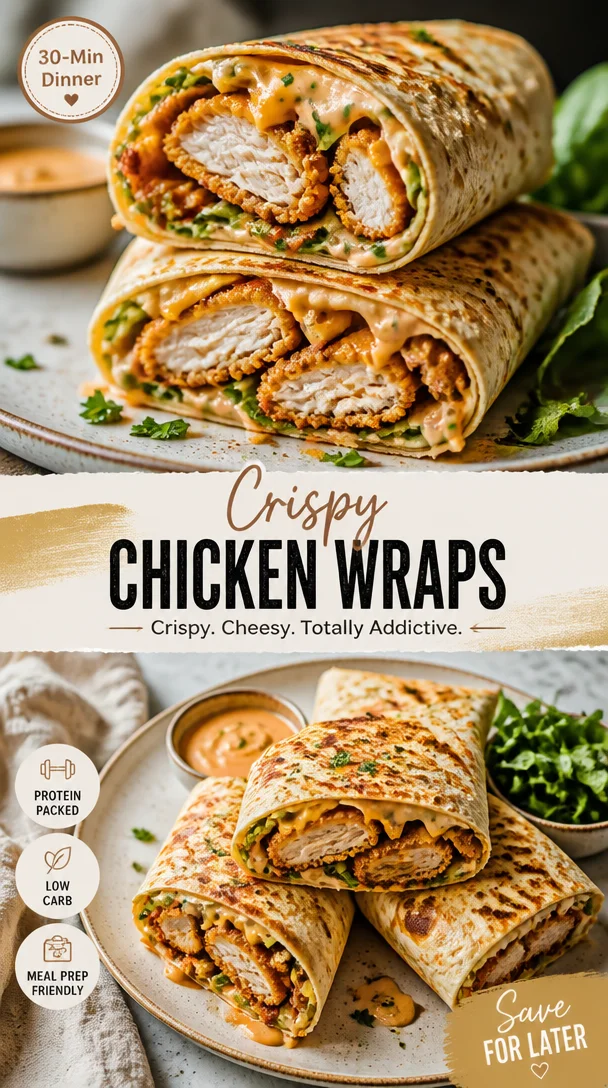
Crispy Chicken Wraps
Crispy Chicken Wraps: A Delightful Journey to Flavor Town
Hello, fellow foodies! If you’re searching for the perfect easy-to-make dish that delivers on both taste and texture, look no further! Today, we’re diving into the delightful world of Crispy Chicken Wraps, a dish that’s not only satisfying but also packed with crispy goodness, fresh vegetables, and your favorite sauces. Imagine biting into a warm, crunchy wrap filled with juicy chicken, crisp lettuce, and a zingy sauce—sounds divine, right? So grab your apron, and let’s make some delicious memories together!
A Nostalgic Culinary Adventure
As I reflect on the meals that have brought me the most joy, Crispy Chicken Wraps always sneak into my mind. I fondly remember summer nights spent with my family in our backyard, where laughter filled the air, and the grill was our favorite gathering spot. My dad would whip up his famous fried chicken, and we would all await the crunchy delight. Although my version is oven-baked and offers a healthier twist, the essence of crispy, juicy chicken is ever-present. I recall one particularly fun evening when we had a build-your-own wrap night, where everyone could customize their wraps with various toppings. Watching my younger siblings go wild with toppings was a cherished sight, and it made me appreciate how food can bring people together. Those wraps weren’t just meals; they were vessels of laughter and connection, a true celebration of simple joys.
Ingredients That Shine
Let’s gather our ingredients before we embark on this crispy journey! Here’s what you’ll need:
-
2 large chicken breasts (boneless, skinless)
The star of our dish! Chicken breasts are lean and easy to work with. You can also use chicken thighs for a juicier option. -
1 cup all-purpose flour
This helps create a crispy coating. For a gluten-free version, substitute with almond flour or gluten-free flour. -
2 large eggs
Acting as a binding agent for the coating—beaten well. Flaxseed meal mixed with water can serve as a vegan substitute. -
1 cup breadcrumbs (or panko)
These provide that crunch we crave! Panko creates a lighter, crispier texture, but regular breadcrumbs work just fine too. -
1 teaspoon salt
Essential for bringing out flavors. Feel free to experiment with flavored salts for an added twist. -
1 teaspoon black pepper
A classic pairing with chicken. You can swap this with cayenne pepper for a kick of heat! -
1 teaspoon garlic powder
For that savory depth! Fresh garlic can be used but will alter the texture slightly. -
1 teaspoon paprika
Adding subtle smokiness and color; smoked paprika can enhance the flavor even more. -
4 large tortillas
The vessel for our wrap! Whole wheat or spinach tortillas give a lovely flavor and color contrast. -
1 cup lettuce (shredded)
Adds a fresh crunch. You can swap for spinach or kale if you prefer. -
1 large tomato (sliced)
Brings juiciness and freshness. Any seasonal tomato will do, or even roasted tomatoes for a different take. -
1/2 cup mayonnaise or ranch sauce
For creamy goodness! Greek yogurt or a dairy-free option can replace it for a healthier variant. -
1/2 cup shredded cheddar cheese
Because cheese makes everything better! Feel free to substitute with your favorite cheese—feta or pepper jack can add other dimensions of flavor. -
1/2 cup cooking oil
To ensure that crispy exterior! Avocado oil or coconut oil also work well as healthier options.
Cooking Steps: Crispy Goodness Awaits
Now that we have our ingredients ready let’s dive into the cooking steps. Follow along, and I promise you’ll be thrilled with the results!
-
Prep Your Chicken: Start by slicing the chicken breasts into strips or bite-sized pieces. This not only cuts down on cooking time but also makes for easier wrapping later. If you want, you can marinate them in a mix of spices and a splash of buttermilk for extra tenderness!
-
Set Up Your Breading Station: In three separate bowls, arrange your flour mixed with salt, beaten eggs, and breadcrumbs. Set these up like a little assembly line. This step will make your life so much easier; no mess, no stress!
-
Coat the Chicken: Take each piece of chicken and dip it into the flour first, shaking off any excess. Next, dunk it into the eggs and then coat it thoroughly with breadcrumbs. Make sure each piece is well covered—this is where the crispy magic happens!
-
Heat the Oil: In a non-stick skillet, add enough cooking oil to cover the bottom. Heat it over medium heat until the oil is hot. You can test it by dropping a breadcrumb in; it should sizzle nicely. Keeping the oil at the right temperature is crucial to achieve that golden color without overcooking the chicken!
-
Fry the Chicken: Carefully place your breaded chicken pieces into the hot oil, giving them enough space to fry evenly. Don’t overcrowd the pan! Fry for about 4-5 minutes on each side or until golden and cooked through. A little tip: Avoid flipping too soon, or the coating may come off. Patience is a virtue!
-
Drain the Excess Oil: Once cooked, transfer your chicken to a plate lined with paper towels to absorb any excess oil. This ensures the chicken stays crispy and isn’t greasy.
-
Warm the Tortillas: While the chicken is draining, quickly warm your tortillas in a dry skillet over low heat for about 30 seconds on each side. Warming them makes them more pliable and helps prevent tearing.
-
Assemble Your Wraps: Now comes the fun part! Place a generous scoop of shredded lettuce in the center of the tortilla. Top with crispy chicken, sliced tomatoes, a drizzle of your sauce of choice, and sprinkle shredded cheese on top.
-
Wrap It Up: Fold the sides of the tortilla toward the center, then roll from the bottom up, tucking in all the delicious fillings. Use a toothpick to secure them if they’re uncooperative (no shame in that game!).
Serving Suggestions: Pretty on a Plate
Presentation is everything, my friends! Serve your Crispy Chicken Wraps on a beautiful platter, perhaps with a side of crispy sweet potato fries or a fresh garden salad. For an added touch, you can drizzle a little extra sauce over the top and garnish with fresh herbs like parsley or cilantro. It makes the dish pop visually and adds a splash of color!
Recipe Variations: Get Creative
Feel free to have fun with this recipe! Here are some delicious variations you can try:
-
Buffalo Chicken Wraps: Toss the cooked chicken in buffalo sauce before assembling for a spicy kick!
-
Veggie Wraps: Skip the chicken and load your wrap with grilled veggies like zucchini, bell peppers, and mushrooms for a hearty, vegetarian option.
-
Mediterranean Wraps: Add feta cheese, olives, and a drizzle of tzatziki sauce for a Mediterranean twist.
-
Southwestern Chicken Wraps: Mix black beans, corn, and avocado with the chicken for a fiesta of flavors!
-
Breakfast Wraps: Swap the chicken for scrambled eggs and add crumbled sausage, cheese, and a splash of hot sauce for a hearty breakfast option.
Chef’s Notes: Kitchen Shenanigans
Whenever I think of crispy chicken, I can’t help but recall a hilarious incident involving an oversized cooking spoon. Picture this: I was trying to coat the chicken in breadcrumbs, and the spoon flung across the kitchen, sending breadcrumbs everywhere while my mischievous dog darted in to "help." It’s moments like these that remind me cooking isn’t always about perfection; it’s about enjoying the process! Over time, my recipe has evolved with these little mishaps, perfecting the method and spreading a little joy in the kitchen with every wrap.
FAQs and Troubleshooting
Let’s address some common questions and potential hiccups you might encounter!
-
My chicken isn’t crispy! What went wrong?
Ensure your oil is hot enough before adding the chicken. If it’s not hot, the coating will absorb oil and become soggy rather than crispy. -
How do I stop my wraps from falling apart?
Properly wrapping the tortillas is crucial. Make sure you fold in the sides tightly while rolling. If it’s still an issue, using toothpicks can help secure them until you’re ready to serve. -
Can I bake these wraps instead?
Absolutely! Preheat your oven to 400°F (200°C), place your assembled wraps seam-side down on a baking sheet, and bake for about 15-20 minutes or until crispy. -
What can I serve as a side?
Sweet potato fries, carrot sticks, or a refreshing coleslaw make excellent companions to these wraps, balancing the meal beautifully.
Nutritional Info (Optional)
While indulgent, these wraps can fit into a balanced meal plan. Depending on the ingredients and sauces you select, each wrap gives approximately:
- Calories: ~450-500 per wrap
- Protein: 35g
- Carbohydrates: 35g
- Fat: 20g
Feel free to adjust the ingredients to meet your dietary needs!
And there you have it! A delightful journey through Crispy Chicken Wraps that will bring warmth and joy to your table. Cooking should be a celebration, so tie on that apron and let’s create beautiful moments, one delicious wrap at a time! Enjoy every crunchy, flavor-packed bite!
PrintCrispy Chicken Wraps

A delightful journey to flavor town with easy-to-make crispy chicken wraps packed with juicy chicken, fresh vegetables, and delicious sauces.
- Prep Time: 15 minutes
- Cook Time: 20 minutes
- Total Time: 35 minutes
- Yield: 4 servings 1x
- Category: Main Course
- Method: Frying
- Cuisine: American
- Diet: None
Ingredients
- 2 large chicken breasts (boneless, skinless)
- 1 cup all-purpose flour
- 2 large eggs (beaten)
- 1 cup breadcrumbs (or panko)
- 1 teaspoon salt
- 1 teaspoon black pepper
- 1 teaspoon garlic powder
- 1 teaspoon paprika
- 4 large tortillas
- 1 cup lettuce (shredded)
- 1 large tomato (sliced)
- 1/2 cup mayonnaise or ranch sauce
- 1/2 cup shredded cheddar cheese
- 1/2 cup cooking oil
Instructions
- Prep Your Chicken: Start by slicing the chicken breasts into strips or bite-sized pieces.
- Set Up Your Breading Station: In three separate bowls, arrange your flour mixed with salt, beaten eggs, and breadcrumbs.
- Coat the Chicken: Take each piece of chicken and dip it into the flour first, then dunk in the eggs and coat with breadcrumbs.
- Heat the Oil: In a non-stick skillet, add enough cooking oil and heat it over medium heat until hot.
- Fry the Chicken: Carefully place the breaded chicken pieces into the hot oil, frying for about 4-5 minutes on each side.
- Drain the Excess Oil: Transfer the cooked chicken to a plate lined with paper towels.
- Warm the Tortillas: Quickly warm your tortillas in a dry skillet over low heat for about 30 seconds on each side.
- Assemble Your Wraps: Place shredded lettuce in the center of the tortilla, topping with crispy chicken, sliced tomatoes, sauce, and cheese.
- Wrap It Up: Fold the sides of the tortilla toward the center, then roll from the bottom up, securing with a toothpick if needed.
Notes
Experiment with various sauces and toppings to customize your wraps. Serve with sides like sweet potato fries or garden salad for a complete meal.
Nutrition
- Serving Size: 1 wrap
- Calories: 450
- Sugar: 2g
- Sodium: 800mg
- Fat: 20g
- Saturated Fat: 5g
- Unsaturated Fat: 10g
- Trans Fat: 0g
- Carbohydrates: 35g
- Fiber: 2g
- Protein: 35g
- Cholesterol: 160mg
Keywords: crispy chicken wraps, easy chicken recipe, homemade wraps, chicken tortilla wraps, delicious chicken
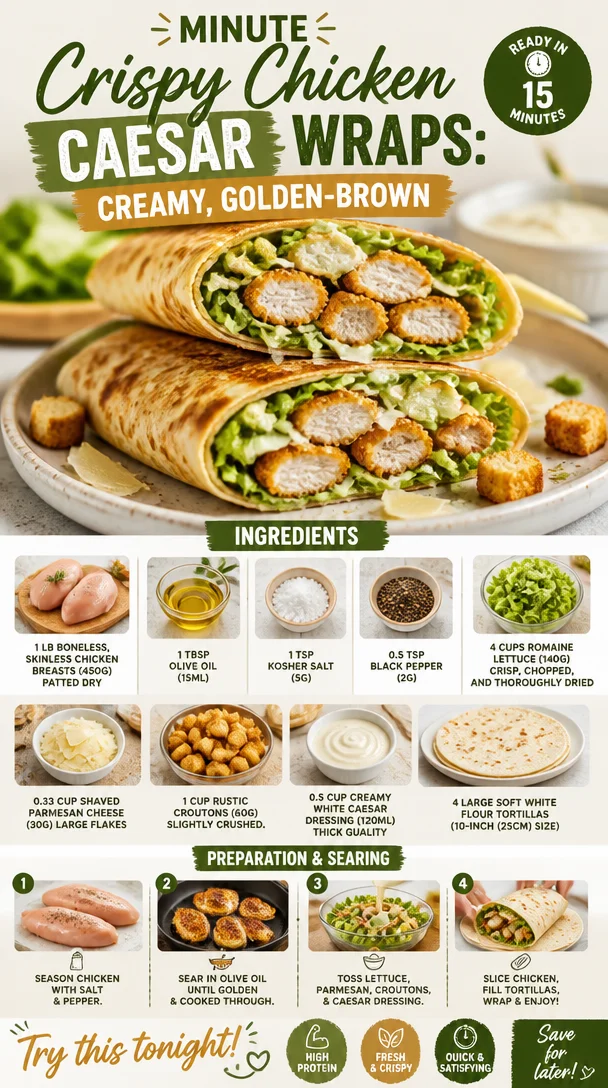
Minute Crispy Chicken Caesar Wraps: Creamy, Golden-Brown
Ultimate Chicken Caesar Wraps: Crispy, Creamy, and Golden-Brown
Hello, fellow food enthusiasts! I’m thrilled to share one of my absolute favorite recipes with you today—the Ultimate Chicken Caesar Wraps. These wraps are the perfect marriage of crispy and creamy, bringing you restaurant-quality flavor straight to your kitchen. Whether you’re in the mood for a quick weeknight dinner or a delightful lunch, this recipe will leave you feeling satisfied and inspired. So, let’s roll up our sleeves and dive into cooking together!
Personal Story
I vividly remember my first experience with a classic Caesar salad. As a child, my mom would take me to this lovely little bistro that had the most amazing homemade Caesar dressing. The aroma of garlic and freshly squeezed lemon would waft through the air as we sat at our small table adorned with a simple checkered tablecloth. I loved watching the waiter toss the salad right in front of us, adding crunchy croutons and a shower of Parmesan cheese that sent my taste buds into a delightful frenzy.
Fast forward to today, and I still crave those flavors! But you know me—I love taking things to the next level, so why not wrap up all that creamy, crispy goodness in a tortilla? And just like that, the Ultimate Chicken Caesar Wrap was born! Each bite is not only a tribute to those beautiful bistro memories but also a delicious celebration of easy cooking and effortless entertaining.
Ingredients
-
1 lb boneless, skinless chicken breasts (450g), patted dry
So versatile and lean! You can substitute chicken thighs for a richer flavor and juicier bite. If you’re looking for a plant-based option, consider grilled portobello mushrooms. -
1 tbsp olive oil (15ml)
A splash of olive oil adds richness and helps the chicken develop a beautiful golden crust. Feel free to swap it with avocado oil for a higher smoke point and a light flavor. -
1 tsp kosher salt (5g)
This simple ingredient enhances the overall flavor of the chicken. Sea salt can also work well here but adjust the amount as for strength. -
0.5 tsp black pepper (2g)
This adds a lovely warmth and a bit of spice to your wrap. If you’re after something a little more adventurous, smoked paprika is a fantastic alternative. -
4 cups romaine lettuce (140g), crisp, chopped, and thoroughly dried
Romaine offers a lovely crunch that pairs perfectly with creamy dressing. Iceberg lettuce can be a good alternative, but I’d skip leafy varieties like spinach as they can wilt fast. -
0.33 cup shaved parmesan cheese (30g)
Parmigiano-Reggiano is worth splurging on if you’re feeling fancy. In a pinch, Pecorino Romano offers a nice, tangy alternative. -
1 cup rustic croutons (60g), slightly crushed
These provide a satisfying crunch. You can make your own by toasting day-old bread with olive oil and garlic or buy store-bought for convenience. -
0.5 cup creamy white Caesar dressing (120ml)
Always go for a high-quality dressing. If you’re looking for lower fat, a yogurt-based dressing can provide creaminess without all the calories. -
4 large soft white flour tortillas (10-inch/25cm size)
Perfect for holding all the delicious fillings without tearing. Corn tortillas can be a gluten-free option, or you can try whole wheat for a heartier bite!
Step-by-Step Instructions
-
Prepare the Chicken:
Start by heating your skillet over medium-high heat. While it’s warming up, season your chicken breasts on both sides with kosher salt and black pepper. Now, drizzle a tablespoon of olive oil into the heated skillet and watch it shimmer—this is your golden canvas! -
Cook the Chicken:
Place the chicken in the skillet, cooking for about 6-7 minutes on one side until it turns beautifully golden. Here’s a little chef hack: avoid moving the chicken around too much as it cooks. Let it sear properly for that perfect crust. Once it’s golden, flip it over and cook on the other side for an additional 6-7 minutes or until the internal temperature reaches 165°F (75°C). Use a meat thermometer for accuracy! -
Rest the Chicken:
Remove the chicken from the skillet and let it rest on a cutting board for about 5 minutes. This is crucial as it allows the juices to redistribute, ensuring your chicken stays moist and flavorful. -
Slice the Chicken:
Once rested, slice the chicken into thin strips. Don’t sweat it if some bits are thicker than others; it just adds character and a homemade touch! -
Assemble the Wraps:
Lay out your tortillas on a clean surface. Start by placing a generous handful of chopped romaine lettuce in the center of each tortilla. Follow up with sliced chicken, a sprinkle of shaved Parmesan, and some slightly crushed croutons for that satisfying crunch. Drizzle the creamy Caesar dressing over the top—don’t be shy! -
Wrap it Up:
Now for the fun part! Fold in the sides of the tortilla over the filling, then roll it tightly from one end to the other. Voila! You’ve created a beautifully wrapped Chicken Caesar masterpiece. -
Toast the Wraps (optional):
If you love a little warmth, place the wrapped tortillas in the skillet for a minute on each side until they’re lightly toasted. This makes the wraps extra delicious and adds even more crunch!
Serving Suggestions
When serving your Ultimate Chicken Caesar Wraps, cut them diagonally in half for an inviting presentation. You can arrange them on a platter with an extra drizzle of Caesar dressing on the side for dipping. For a pop of color and freshness, add a side of vibrant cherry tomatoes or crunchy carrot sticks. Remember, creating a warm and inviting atmosphere is half the fun!
Recipe Variations
- Vegetarian Option: Replace the chicken with grilled zucchini and bell peppers for a delightful veggie twist.
- Spicy Caesar: Add red pepper flakes or a splash of hot sauce to your Caesar dressing for an exciting kick.
- Avocado Lovers: Slice some ripe avocado to layer into your wrap for an extra creamy dimension and healthy fats.
- Grain-Free: Swap the flour tortillas with lettuce leaves or large collard greens for a refreshing, gluten-free wrap.
Chef’s Notes
Oh, how these wraps have evolved! Initially, they were just a quick lunch option. But after countless dinner parties and potlucks where they received rave reviews, they became a staple in my entertaining arsenal. And you wouldn’t believe how easy they are to customize! My friends often reference them as the “Swiss Army knife of wraps”—you can dress them up or down, depending on your vibe.
Funny story—one time, I was in a hurry and decided to grill the chicken while juggling a call from my mom! Long story short, I ended up with charred chicken and had to tweak my recipe on the fly. But if there’s one thing I’ve learned, it’s that cooking is all about embracing the unexpected!
FAQs and Troubleshooting
1. My chicken is dry—what went wrong?
Overcooking can lead to dry chicken. Always cook until it reaches 165°F (75°C) and let it rest afterward.
2. Can I make the wraps ahead of time?
Absolutely! Prepare the filling in advance, but it’s best to assemble the wraps just before serving to keep the tortillas from getting soggy.
3. What if I can’t find croutons?
No worries! You can use toasted nuts or seeds for a crunchy element. Peanuts or sunflower seeds work beautifully in a pinch.
4. How do I make them gluten-free?
Simply swap out the flour tortillas for gluten-free wraps or large lettuce leaves to keep the flavors intact.
Nutritional Info
For those keeping track, each Ultimate Chicken Caesar Wrap contains approximately:
- Calories: 450
- Protein: 35g
- Carbs: 34g
- Fat: 24g
Of course, values will vary based on your specific ingredients and portion sizes!
So, there you have it! The Ultimate Chicken Caesar Wraps are as delightful in flavor as they are in texture and visual appeal. Whether you’re hosting friends or enjoying a cozy night in, these wraps will surely impress. Let’s gather around the table and create something beautiful—together! Happy cooking, everyone!
PrintUltimate Chicken Caesar Wraps

Crispy and creamy chicken Caesar wraps that bring restaurant-quality flavor straight to your kitchen.
- Prep Time: 15 minutes
- Cook Time: 15 minutes
- Total Time: 30 minutes
- Yield: 4 servings 1x
- Category: Main Course
- Method: Cooking
- Cuisine: American
- Diet: None
Ingredients
- 1 lb boneless, skinless chicken breasts (450g), patted dry
- 1 tbsp olive oil (15ml)
- 1 tsp kosher salt (5g)
- 0.5 tsp black pepper (2g)
- 4 cups romaine lettuce (140g), crisp, chopped, and thoroughly dried
- 0.33 cup shaved parmesan cheese (30g)
- 1 cup rustic croutons (60g), slightly crushed
- 0.5 cup creamy white Caesar dressing (120ml)
- 4 large soft white flour tortillas (10-inch/25cm size)
Instructions
- Prepare the chicken: Heat your skillet over medium-high heat. Season chicken breasts with salt and pepper, then drizzle olive oil into the skillet.
- Cook the chicken: Place chicken in the skillet and cook for 6-7 minutes per side until golden and internal temperature reaches 165°F (75°C).
- Rest the chicken: Remove from skillet and let it rest on a cutting board for 5 minutes.
- Slice the chicken: After resting, slice the chicken into thin strips.
- Assemble the wraps: Lay tortillas out, add romaine, sliced chicken, shaved Parmesan, croutons, and Caesar dressing.
- Wrap it up: Fold sides of tortilla and roll tightly from one end to the other.
- Toast the wraps (optional): Toast in the skillet for 1 minute on each side until lightly golden.
Notes
Serve with a drizzle of Caesar dressing on the side and a side of cherry tomatoes or carrot sticks.
Nutrition
- Serving Size: 1 wrap
- Calories: 450
- Sugar: 3g
- Sodium: 600mg
- Fat: 24g
- Saturated Fat: 6g
- Unsaturated Fat: 12g
- Trans Fat: 0g
- Carbohydrates: 34g
- Fiber: 2g
- Protein: 35g
- Cholesterol: 70mg
Keywords: chicken caesar wraps, easy lunch, quick dinner, recipe, wraps
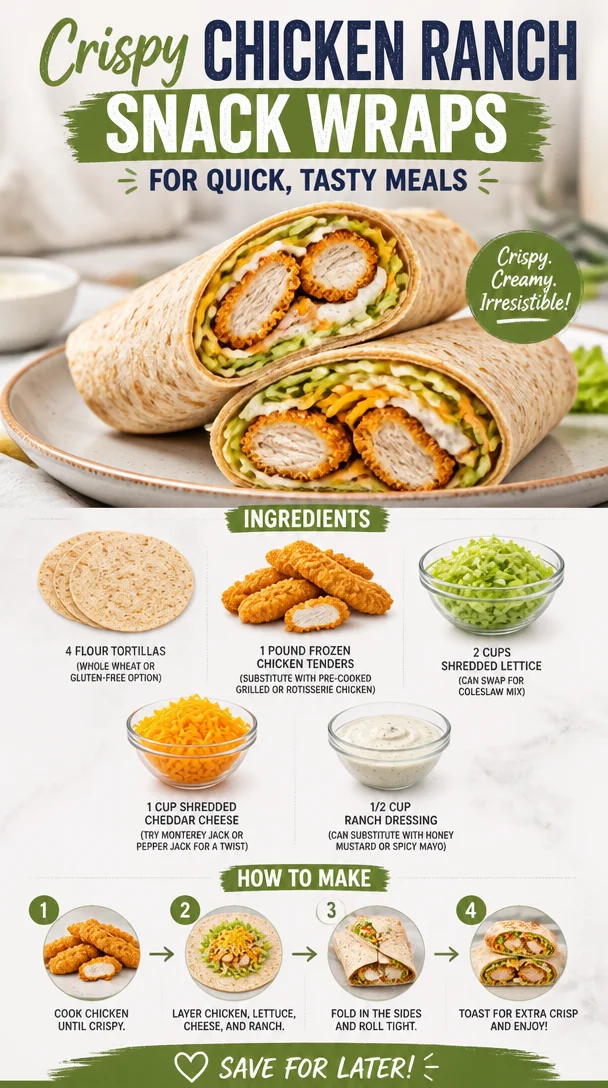
Crispy Chicken Ranch Snack Wraps for Quick, Tasty Meals
Crispy Chicken Ranch Snack Wraps for Quick, Tasty Meals
Hello, friends! Today, we’re diving into a recipe that is a total game changer for quick meals—Crispy Chicken Ranch Snack Wraps. Picture this: it’s a busy weeknight, friends are coming over, or maybe you’ve just had a long day at work. You want to whip up something that feels satisfying yet doesn’t require hours in the kitchen. These snack wraps are not only fast to prepare but also deliver an explosion of flavor in every bite! Trust me, once you fold these up, you’ll wonder where these wraps have been all your life!
Introduction: The Perfect Snack Wrap Solution
One of the things I love most about cooking is its ability to bring comfort and joy, especially when life gets busy. Growing up, there was nothing better than coming home to the smell of something delicious cooking in the kitchen. My mom always had a knack for turning simple ingredients into fabulous meals that felt like a hug from the inside.
When I created my quick Crispy Chicken Ranch Snack Wraps, I wanted to capture that very same feeling: warmth, comfort, and satisfaction—minus the hassle. Now, let’s be honest—when you grab a wrap, you’re grabbing more than just food. You’re grabbing ease, fun, and a little bit of nostalgia. Whether it’s a quick lunch on the go or a crowd-pleasing appetizer for your next gathering, these wraps deliver on all fronts.
The crispy chicken tender, the crunch of fresh lettuce, the creaminess of ranch dressing, and the oozy, melty cheese all come together beautifully, creating layers of texture and flavor that will leave you coming back for more. Let’s get rolling (pun intended!) and whip up a batch of these delightful wraps, shall we?
Personal Story: A Taste of Nostalgia
One of my fondest memories in the kitchen revolves around my college days. I was living with two roommates, and let me tell you, we were all about easy meals that could fuel our late-night study sessions. One of our go-to "late-night hacks" was to throw frozen chicken tenders in the oven, bake them to crispy perfection, and load them into tortillas with all our favorite toppings.
We would gather around the kitchen table, and amid laughter and lighthearted debates over who made the best dip, those humble chicken wraps became our late-night tradition. They sat delicately on our plates, drizzled with ranch dressing, and every bite was bursting with flavor. Those wraps not only fed our tired bodies; they brought us closer together, creating memories that stand the test of time.
Fast forward to today, and I am thrilled to offer you a version of that nostalgic recipe—Crispy Chicken Ranch Snack Wraps—perfect for any occasion, big or small!
Ingredients
Here’s what you’ll need to create your Crispy Chicken Ranch Snack Wraps:
-
4 small flour tortillas
Soft and pliable, flour tortillas are the classic choice. If you’re looking for a healthier twist, opt for whole wheat or even gluten-free alternatives to accommodate dietary preferences. -
1 pound frozen chicken tenders
These are your quick and easy protein source! If you’re in a pinch, feel free to swap them out with pre-cooked grilled chicken or shredded rotisserie chicken for even less prep time. -
2 cups shredded lettuce
Crisp and refreshing, shredded lettuce adds a fantastic crunch. Alternatively, you can use coleslaw mix for a delicious twist that includes added flavor and texture. -
1 cup shredded cheddar cheese
Cheddar is a classic for good reason—it melts beautifully! For a unique flavor profile, experiment with Monterey Jack or even spicy pepper jack cheese to kick things up a notch. -
1/2 cup ranch dressing
Creamy and tangy, ranch dressing is the star of the show here! But if you’re looking for something different, don’t hesitate to substitute it with honey mustard or spicy mayo to match your taste buds.
Step-by-Step Instructions
Let’s roll up our sleeves and get started on these snack wraps!
-
Preheat the Oven: First things first, take a moment to preheat your oven to 400°F (200°C). This will ensure those chicken tenders turn out beautifully crispy.
-
Prepare Your Chicken: Spread the frozen chicken tenders on a baking sheet lined with parchment paper. Bake according to the package instructions—usually about 20-25 minutes—until golden brown and crispy. Flip them halfway through for even cooking. This is where the magic happens!
Tip: While the chicken is baking, you can use this time to chop your veggies and set up your wrap station.
-
Chop & Prep: While the chicken is baking, grab your lettuce and shred it (if it’s not pre-shredded). Feel free to add some diced tomatoes or finely chopped red onions for extra flavor if you’re feeling adventurous.
-
Warm Those Tortillas: Wrap your tortillas in aluminum foil and place them in the oven during the last 5 minutes of the chicken cooking time. Alternatively, you can pop them in the microwave for about 15 seconds to make them warm and supple.
-
Layer It Up: Once your chicken is crispy and your tortillas are warm, it’s time to assemble! Start by placing a warm tortilla on a plate. Lay down a few chicken tenders in the center (about 2-3), followed by a generous handful of shredded lettuce and about 2 tablespoons of cheese.
Chef’s insight: The order of your fillings matters! Place the chicken first to create a sturdy base and prevent your wrap from getting soggy.
-
Dress It: Drizzle your ranch dressing over the top of your fillings, adding however much you like—go big or go home, right?
-
Wrap It Up: Here comes the fun part! Start folding the sides of the tortilla inwards, then roll it up tightly from the bottom. If it feels like it’s going to burst, that’s a good sign—more deliciousness inside!
-
Slice & Enjoy: Finally, slice your wrap in half diagonally for that perfect presentation. Serve alongside extra ranch dressing for dipping, and you’re set!
Chef’s hack: If you want to make it even more fun, you can secure the wraps with a toothpick, or personalize them with colorful skewers before serving!
Serving Suggestions
To elevate your wrap experience, I love serving these crispy chicken ranch wraps on a wooden platter, alongside a colorful array of veggies like baby carrots, cherry tomatoes, and cucumber slices. Lay a few small bowls filled with various dips—think guacamole, salsa, or even a zesty yogurt dip—to create a fun DIY station for your guests. Everyone loves choosing their own adventure!
Recipe Variations
Here are a few fun variations to switch things up:
-
Buffalo Chicken Wrap: Toss the cooked chicken tenders in buffalo sauce for a spicy kick.
-
Mediterranean Style: Substitute ranch with tzatziki sauce, add some cucumber and feta to the mix.
-
Loaded Veggie Wrap: Skip the chicken altogether and load up on grilled veggies, black beans, and avocado.
-
Southwestern Flair: Add corn, black beans, and a dollop of chipotle mayo for a smoky twist.
-
Breakfast Wrap: Scramble some eggs and add them in for a breakfast version, perfect for brunch!
Chef’s Notes
Every time I make these wraps, I can’t help but smile at how simple yet satisfying they are. I remember one time during a particularly busy week, I turned these crispy wraps into an impromptu feast by inviting friends over for a “make-your-own” wrap night. We set up a toppings bar and let everyone personalize their creations. It turned a casual dinner into a lively evening of laughter and cheer. It’s a fun reminder that cooking should be about connecting and enjoying the moment!
FAQs and Troubleshooting
-
Can I use cooked chicken instead of frozen tenders?
Absolutely! Pre-cooked grilled chicken or leftover rotisserie chicken works splendidly. Just warm it through before adding it to your wraps. -
What if my tortillas are breaking?
Warming them is key! If they still break, consider using fresher tortillas or a type with a bit more elasticity, like whole wheat. -
Can I prepare these in advance?
For the best taste and texture, I recommend assembling them fresh. However, you can prep the ingredients (like chopping veggies) a few hours ahead of time. -
How do I keep them crispy?
To maintain that crispy texture, avoid overstuffing your wraps and ensure your chicken is well-cooked and crispy. Serving them immediately after assembling is also a must!
Nutritional Info
While I don’t have specific nutritional info handy, I encourage you to consider the ingredients you choose. Whole wheat tortillas and serving with fresh veggies can elevate the health factor while still keeping it delicious!
There you have it—my Crispy Chicken Ranch Snack Wraps, ready to fit seamlessly into your lifestyle! They’re quick to prepare, share a few laughs over, and serve as a blank canvas for your creativity. So tie on that apron and let’s make some enjoyable moments around the dinner table. Happy cooking, foodie friends!
PrintCrispy Chicken Ranch Snack Wraps

Quick and flavorful Crispy Chicken Ranch Snack Wraps perfect for busy weeknights or gatherings.
- Prep Time: 10 minutes
- Cook Time: 25 minutes
- Total Time: 35 minutes
- Yield: 4 servings 1x
- Category: Snack
- Method: Baking
- Cuisine: American
- Diet: None
Ingredients
- 4 small flour tortillas
- 1 pound frozen chicken tenders
- 2 cups shredded lettuce
- 1 cup shredded cheddar cheese
- 1/2 cup ranch dressing
Instructions
- Preheat the oven to 400°F (200°C).
- Prepare the frozen chicken tenders on a baking sheet lined with parchment paper and bake according to package instructions (20-25 minutes). Flip halfway through.
- Chop your lettuce (and other desired veggies).
- Warm tortillas in aluminum foil in the oven during the last 5 minutes of cooking the chicken.
- Layer a tortilla with chicken tenders, lettuce, and cheese.
- Dress with ranch dressing.
- Wrap tightly by folding the sides and rolling from the bottom.
- Slice in half diagonally and serve with extra ranch dressing.
Notes
Warm tortillas before wrapping for best results. Use pre-cooked chicken for even quicker prep time.
Nutrition
- Serving Size: 1 wrap
- Calories: 350
- Sugar: 2g
- Sodium: 800mg
- Fat: 20g
- Saturated Fat: 5g
- Unsaturated Fat: 10g
- Trans Fat: 0g
- Carbohydrates: 30g
- Fiber: 2g
- Protein: 15g
- Cholesterol: 50mg
Keywords: snack wrap, chicken wraps, quick meal, crispy chicken, ranch dressing
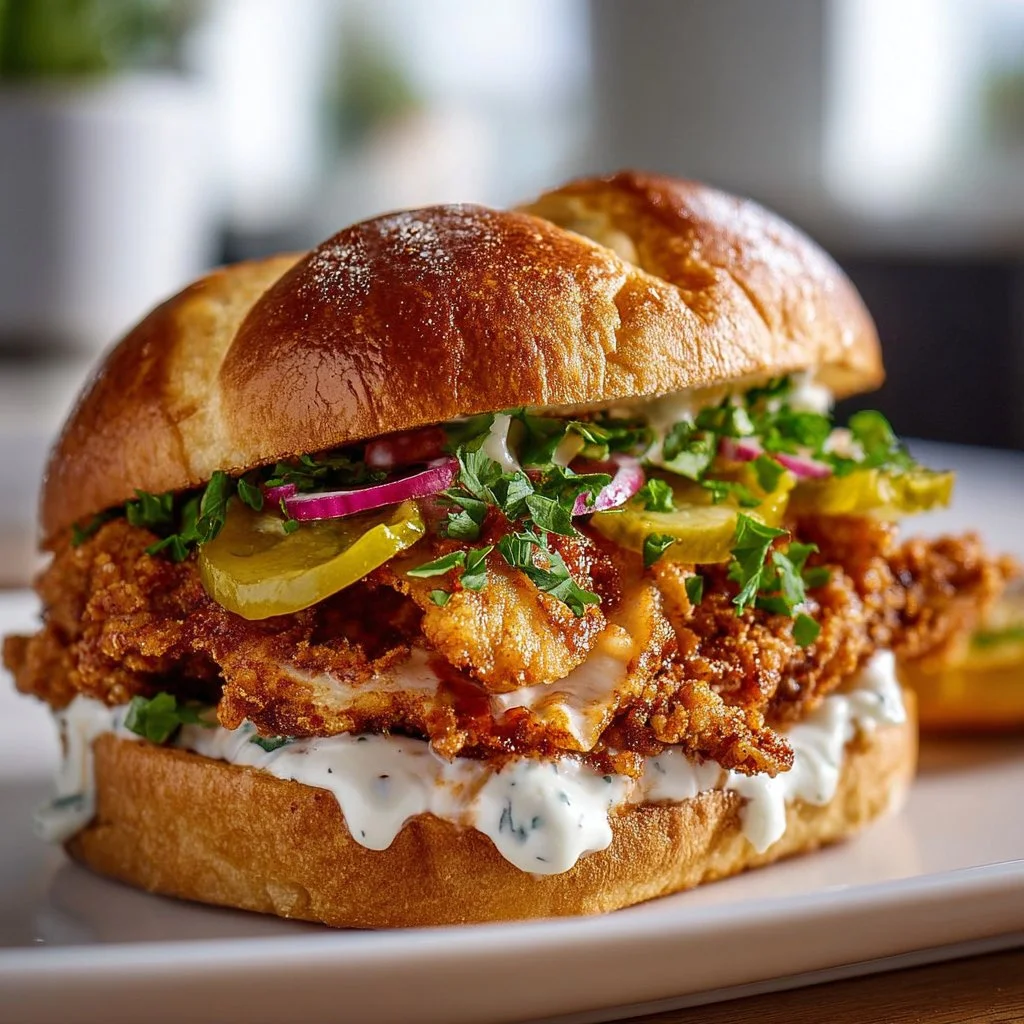
Cajun Crispy Chicken Sandwich with Garlic Aioli: Irresistibly Juicy!
Cajun Crispy Chicken Sandwich with Garlic Aioli: Irresistibly Juicy!
Hello, food friends! Are you ready to step into my kitchen and whip up something wonderfully delicious? Today, we’re diving into a dish that’s not only crispy and juicy, but it also carries a little bit of Southern flair. That’s right — we’re making a Cajun Crispy Chicken Sandwich with Garlic Aioli! This beauty will have your taste buds dancing the second you take a bite.
Nothing beats the satisfying crunch of a well-fried chicken sandwich paired with just the right amount of spice — and let me tell you, this sandwich has it all. Just imagine: tender chicken breasts marinated in smooth buttermilk, coated in a perfect blend of Cajun spices, deep-fried to golden perfection, and topped off with a luscious garlic aioli that adds just the right kick. Oh, and don’t forget the fresh lettuce and juicy tomatoes on a fluffy brioche bun!
Now, back when I first experimented with this recipe, I was just beginning to cook more seriously. I was sitting down for dinner one rainy evening with friends, and we wanted something that felt comforting, yet a bit adventurous. Burgers were an option, but we all craved something crispier, flavorful, and with plenty of character. That’s when I tossed the idea of a fried chicken sandwich into the ring, but I needed more than just the basics — I wanted a dish that told a story.
After some back-and-forth experimenting, I settled on a Cajun twist. The spices, the flavors — they brought me back to a road trip I took to New Orleans, where I relished the rich culinary heritage of the South. There’s magic in the combination of spices and fresh ingredients, and the moment you bite into this sandwich, you’ll be right there with me. So, let’s roll up our sleeves and get cooking!
Personal Story
I fondly remember a family road trip we took down to Louisiana. From the moment we crossed the state line, the air was filled with the fragrant aroma of spices wafting through the window. Our first stop was a bustling roadside cafe. It was there that I had my first bite of a truly authentic fried chicken sandwich. The crispy exterior gave way to juicy chicken, enhanced by tart pickles and that secret sauce that just tied everything together.
At that moment, I knew I wanted to encapsulate those bold flavors in my own kitchen. What I didn’t know was that it would lead to countless dinner parties, laughter-filled gatherings, and many happy friends leaving with full bellies and big smiles. Fast forward to today, I’ve crafted my own twist that honors that nostalgic sandwich. So let’s recreate that moment together in your kitchen!
Ingredients
Let’s break down the wonderful ingredients that will transform simple chicken breasts into a spectacular milestone of flavor:
For the Chicken:
- 2 boneless, skinless chicken breasts: The stars of our show! They’ll soak up all the flavor and become juicy crunchy enjoyment. If you’re looking to switch it up, thinly sliced chicken thighs are a fantastic substitute!
- 1 cup buttermilk: Key for marinating our chicken to keep it tender and moist. You can use regular milk with a splash of vinegar or lemon juice as a quick buttermilk substitute!
- 1 tablespoon Cajun seasoning: This is where the magic happens. If you don’t have Cajun seasoning on hand, don’t fret! You can make a quick blend using paprika, cayenne pepper, and garlic powder.
- 1 cup all-purpose flour: The base for our crispy coating! If you’re avoiding gluten, use a gluten-free flour blend and tweak your proportions a bit.
- 1 teaspoon paprika: Just a little for added depth of flavor.
- 1 teaspoon garlic powder: Because what’s a good fried chicken sandwich without some garlicky goodness?
- 1 teaspoon onion powder: Enhances the savory flavor profile of our breading.
- 1/2 teaspoon salt: Essential for seasoning!
- 1/2 teaspoon black pepper: For a bit of warmth without overpowering the flavor.
- Vegetable oil for frying: Peanut oil is an excellent option if you’d like a higher smoke point and a clean taste.
For the Garlic Aioli:
- 1/2 cup mayonnaise: The creamy base of our sauce. If you’re feeling adventurous, you can substitute with Greek yogurt for a healthier option!
- 2 cloves garlic, minced: Fresh garlic to create that punchy flavor.
- 1 tablespoon lemon juice: Adds a touch of acidity to brighten the aioli.
- 1/2 teaspoon salt: Balances out the flavors.
- 1/4 teaspoon black pepper: Just a whisper to tie it all together.
For Assembly:
- 4 brioche buns: Soft, buttery, and perfect for holding everything together.
- Leafy romaine lettuce: Adds a crisp freshness to your sandwich.
- Sliced tomatoes: Juicy and vibrant, they create a beautiful contrast against the crispy chicken.
Step-by-Step Instructions
Ready to cook? Let’s turn up the heat!
Step 1: Marinate the Chicken
Start by placing your chicken breasts in a mixing bowl. Pour in the buttermilk and sprinkle in the Cajun seasoning. This marinade tenderizes the chicken and infuses it with that delicious flavor. Let it soak for at least 30 minutes; if you have time, let it sit in the fridge for a few hours.
Step 2: Make the Garlic Aioli
While the chicken is marinating, let’s whip up that addictive garlic aioli. In a small bowl, combine mayonnaise, minced garlic, lemon juice, salt, and black pepper. Mix until smooth and creamy. Don’t taste it yet, or you might find it hard to stop! Cover and place it in the fridge to let those flavors mingle.
Step 3: Prepare the Breading Station
In three separate bowls, create your breading station:
- In the first bowl, mix together the flour, paprika, garlic powder, onion powder, salt, and black pepper.
- In the second bowl, set aside the remaining buttermilk.
- Leave the third bowl empty for the chicken once it’s coated!
Step 4: Heat the Oil
In a deep skillet or pan, pour in enough vegetable oil to submerge a chicken breast (about 1-2 inches deep), and heat over medium-high heat. Use a thermometer if you have one; you’re looking for about 350°F. To test the oil, drop a pinch of flour into the pan—if it sizzles, you’re good to go!
Step 5: Bread the Chicken
Remove the chicken breasts from the buttermilk marinade and let excess buttermilk drip off. Dredge each chicken breast in the seasoned flour, making sure to coat evenly on both sides. Give it a gentle shake to remove any excess flour. Now, place it on the empty plate.
Step 6: Fry Away!
Carefully lower the breaded chicken into the hot oil. Fry for about 5–7 minutes on each side or until golden brown and cooked through (internal temperature should reach 165°F). If your chicken is browning too quickly, lower the heat. You want it crispy, not burnt!
Step 7: Drain and Rest
Once fried to perfection, remove the chicken and place it on a wire rack or paper towel-lined plate to drain any excess oil. Give it a few minutes to rest; this helps keep it juicy!
Step 8: Toast the Buns
While the chicken is resting, it’s time to toast the brioche buns. You can do this in a dry skillet over medium heat or pop them under the broiler for a quick minute or two. Just keep an eye on them—they toast up quickly!
Serving Suggestions
Now comes the fun part! On the bottom half of each toasted brioche bun, place a generous spoonful of garlic aioli. Next, pile on that crispy chicken, followed by leafy romaine lettuce and juicy tomato slices. Top with the other half of the bun, and there you have it—your irresistibly juicy Cajun crispy chicken sandwich is all assembled!
Recipe Variations
Feeling creative? Here are a few delicious twists you can try:
- Spicy Cajun: Add a dash of hot sauce to the buttermilk marinade for an extra kick!
- BBQ Chicken Sandwich: Replace the garlic aioli with your favorite barbecue sauce and top with pickles.
- Mediterranean Twist: Substitute the Cajun seasoning with dried herbs like thyme and oregano, and serve with tzatziki instead of aioli.
- Vegan Version: Use eggplant slices or cauliflower steaks coated in the same breading, baking them instead of frying.
- Cheesy Delight: Top your sandwich with a slice of melting cheddar or pepper jack cheese for some ooey-gooey bliss.
Chef’s Notes
Every recipe tells a story, and this one has definitely evolved over time! Initially, I made this dish with just basic seasoning, but as I experimented, I discovered how richness and bold spices could elevate the experience. One hilarious story comes to mind: the first time I made this, I mistook cayenne for chili powder and ended up with quite the spicy surprise! Friends were sweating (and loving it), and now I can’t help but add a little extra heat every time I cook it.
FAQs and Troubleshooting
1. Why did my chicken come out dry?
If your chicken is dry, it could be due to overcooking. Make sure to use a meat thermometer for accuracy, and let it rest after frying!
2. Can I bake the chicken instead of frying?
Absolutely! To bake, preheat the oven to 400°F, place the breaded chicken on a baking sheet, spray with cooking oil, and bake for about 20–25 minutes or until cooked through, flipping halfway through.
3. What if my aioli is too garlicky?
If you find your aioli too strong, balance it out by adding a little more mayonnaise or a squeeze of lemon juice to cut through the flavor.
4. How can I make this spicy?
Add some cayenne pepper to the Cajun mix or toss in sliced jalapeños with the lettuce and tomatoes for an added punch!
So there you have it! With vibrant flavors, crispy texture, and that irresistible garlic aioli, this Cajun Crispy Chicken Sandwich will become a staple in your home. Whether it’s for a weeknight dinner or a weekend gathering, everyone will be lining up for seconds. So tie on your apron, turn on some tunes, and enjoy this culinary journey to flavor town.
Happy cooking, and as always, let’s keep making beautiful moments around the table! 🥳
PrintCajun Crispy Chicken Sandwich with Garlic Aioli
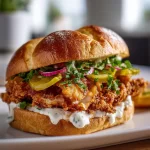
Irresistibly juicy Cajun crispy chicken sandwich served with a luscious garlic aioli, fresh lettuce, and sliced tomatoes on a fluffy brioche bun.
- Prep Time: 30 minutes
- Cook Time: 20 minutes
- Total Time: 50 minutes
- Yield: 4 servings 1x
- Category: Main Course
- Method: Frying
- Cuisine: Southern
- Diet: None
Ingredients
- 2 boneless, skinless chicken breasts
- 1 cup buttermilk
- 1 tablespoon Cajun seasoning
- 1 cup all-purpose flour
- 1 teaspoon paprika
- 1 teaspoon garlic powder
- 1 teaspoon onion powder
- 1/2 teaspoon salt
- 1/2 teaspoon black pepper
- Vegetable oil for frying
- 1/2 cup mayonnaise
- 2 cloves garlic, minced
- 1 tablespoon lemon juice
- 1/2 teaspoon salt
- 1/4 teaspoon black pepper
- 4 brioche buns
- Leafy romaine lettuce
- Sliced tomatoes
Instructions
- Marinate the chicken by placing it in a bowl with buttermilk and Cajun seasoning for at least 30 minutes.
- Make the garlic aioli by mixing mayonnaise, minced garlic, lemon juice, salt, and black pepper in a bowl; refrigerate.
- Prepare a breading station with flour mixture in one bowl, buttermilk in the second, and an empty plate for coated chicken.
- Heat vegetable oil in a deep skillet over medium-high heat to 350°F.
- Bread the chicken by dredging each breast in flour before placing on a plate.
- Fry the chicken for 5–7 minutes on each side until golden brown and cooked through.
- Drain the fried chicken on a wire rack or paper towel-lined plate.
- Toast the brioche buns in a skillet or under the broiler until golden.
- Assemble the sandwiches by spreading garlic aioli on the buns, adding crispy chicken, lettuce, and tomatoes.
Notes
For added spice, consider adding hot sauce to the buttermilk marinade or using cayenne pepper in the breading. Adjust aioli’s garlic level to taste.
Nutrition
- Serving Size: 1 sandwich
- Calories: 450
- Sugar: 3g
- Sodium: 800mg
- Fat: 24g
- Saturated Fat: 4g
- Unsaturated Fat: 18g
- Trans Fat: 0g
- Carbohydrates: 40g
- Fiber: 2g
- Protein: 22g
- Cholesterol: 80mg
Keywords: Cajun, chicken sandwich, garlic aioli, fried chicken

Crispy Chicken Bacon Ranch Wrap
Crispy Chicken Bacon Ranch Wrap: A Flavorful Adventure
Hello, lovely food enthusiasts! Today, we’re diving into a recipe that’s not just a meal, but a joyful culinary experience—Crispy Chicken Bacon Ranch Wraps. Imagine this: golden, crunchy chicken, crisp bacon that delights your taste buds, all snuggled up in a soft flour tortilla with fresh lettuce, juicy tomatoes, and a drizzle of creamy ranch dressing. It’s a dish that effortlessly combines comfort food with a touch of elegance, making it an ideal choice for both casual nights and special gatherings.
When I first created this recipe, I wanted something that packed a punch in flavor while still being easy enough to whip up on a busy weeknight. I firmly believe that cooking should never feel like a chore. Instead, it should be a delightful adventure. And what better way to embark on that journey than with these wraps? They’re customizable, satisfying, and serve as a fantastic hand-held meal that everyone adores!
So, grab your apron, pour yourself a fizzy drink, and let’s get those senses ignited with this fun and delicious way to enjoy crispy chicken and bacon in a wrap!
Personal Story
Let me take you back a little—many years ago, I had a group of friends who were all about game nights. We’d gather every Friday, snuggled up with cozy blankets, excitement crackling in the air as we dove into board games and, of course, a feast! On one of those fateful evenings, I decided to try my hand at making crispy chicken wraps, inspired by my love for wrapping food in delightful and creative ways.
After navigating a minor kitchen disaster that involved too much oil and a hyper cat (long story!), I finally pulled together a platter of wraps that turned heads and had my friends going back for seconds (and thirds!). That night was filled with laughter and delicious bites, and it reminded me of how food can truly forge memories. To this day, when I make these crispy chicken bacon ranch wraps, I’m transported back to those carefree evenings of joy, wonder, and an undeniable love for food that brings people together.
Ingredients
Let’s get cookin’! Here’s what you’ll need for these delightful wraps:
-
2 boneless, skinless chicken breasts
These are the stars of the show! They’ll be coated, fried, and transformed into crispy deliciousness. If you want to switch things up, turkey breasts or even tofu work well as substitutes. -
6 strips of bacon
Crispy, smoky goodness that adds flavor and depth. Feel free to swap it out for turkey bacon or leave it out entirely for a vegetarian delight! -
1 cup all-purpose flour
This is essential for breading your chicken. You can use gluten-free flour if needed, but it might change the texture a bit. -
1 cup buttermilk
This magical ingredient adds moisture and a slight tang to the chicken. If you’re out, you can make a quick substitute by adding a tablespoon of vinegar to regular milk. -
1 teaspoon garlic powder
Adds a lovely garlicky punch. Fresh minced garlic could work too, so go for what you love! -
1 teaspoon onion powder
A staple in my spice cabinet! It enhances the flavor without overpowering. -
1 teaspoon paprika
This gives a mild sweetness and beautiful color. Smoked paprika can add a lovely twist! -
1 teaspoon salt
Essential for flavor. Remember that too much salt can make it taste overly seasoned, so feel free to adjust to your taste. -
1/2 teaspoon black pepper
Adds a bit of heat and enhances the other flavors. You can use white pepper for a more subtle flavor. -
1 cup panko breadcrumbs
For that ultra-crispy texture. Regular breadcrumbs can be used, but panko will always provide that extra crunch! -
Vegetable oil, for frying
A must for achieving that golden, crispy exterior. Canola or peanut oil would also be great substitutes! -
4 large flour tortillas
Wrap it all up in these delicious blankets. Whole wheat or spinach tortillas can be a healthy alternative! -
1 cup shredded lettuce
Fresh greens for crunch! Feel free to be adventurous and use arugula or spinach. -
1 cup diced tomatoes
Bring juicy sweetness and color; you can mix it up with diced avocados or roasted red peppers if you fancy! -
1 cup shredded cheddar cheese
Who doesn’t love cheese? You can sub it with Monterey Jack or pepper jack cheese for a spicy kick! -
1/4 cup ranch dressing
The creamy finish that brings everything together. Homemade ranch would be fabulous if you have the time (and the ingredients) to whip it up!
Step-by-Step Instructions
Ready to create some kitchen magic? Here’s how to whip up these heavenly wraps:
-
Get Prepped: Start by gathering all your ingredients and equipment—this is the time to shine! Make sure you have a cleaning station for the raw chicken to avoid cross-contamination.
-
Prep the Chicken: Pat the chicken breasts dry and cut them into thin strips. This will ensure they cook evenly and become crispy! If they’re too thick, they might lose that golden crunch.
-
Marinate the Chicken: In a large bowl, combine the buttermilk, garlic powder, onion powder, paprika, salt, and pepper. Toss in the chicken strips and let them soak for at least 30 minutes. This step is crucial for tenderness and flavor. If possible, let it marinate for a few hours or even overnight for an extra flavor boost!
-
Bread the Chicken: Set up a breading station: put the flour in one bowl, the marinated chicken in the buttermilk mixture, and the panko breadcrumbs in another. Roll each piece of chicken in the flour, then dip it in buttermilk again, and finally coat it in panko, pressing down gently for an even layer.
-
Cook the Bacon: In a skillet over medium heat, cook the bacon until crispy. Once done, place it on paper towels to drain excess grease, but don’t discard that delicious bacon fat! You can use it to fry your chicken for added flavor.
-
Fry the Chicken: In the same skillet, add about 1/2 inch of vegetable oil and heat it to 350°F (175°C). Carefully add the breaded chicken to the hot oil in batches—do not overcrowd the pan! Fry for about 3-4 minutes on each side or until golden brown and cooked through. Use a thermometer to make sure they reach an internal temperature of 165°F (74°C).
-
Let it Rest: Once your chicken is crispy, let it rest on a wire rack over paper towels to catch any drips. This keeps the coating crispy!
-
Assemble Your Wrap: It’s finally time to assemble! Warm your tortillas slightly in a pan or microwave. Start with a generous handful of shredded lettuce, followed by diced tomatoes, cheese, and, of course, your crispy chicken strips and bacon.
-
Add the Ranch: Drizzle the ranch dressing on top of your filling. This is where the magic truly happens! If you’re feeling adventurous, sprinkling a bit of extra paprika on top adds a beautiful touch.
-
Wrap It Up: Fold the ends of the tortilla inwards and then roll tightly from the bottom. Voila! Your crispy chicken bacon ranch wrap is ready for devouring!
Serving Suggestions
For presentation, serve your wraps neatly cut in half, showcasing their colorful fillings. Lay them on a bright cutting board or a plate with a side of extra ranch for dipping! Consider adding a sprinkle of fresh herbs like parsley or cilantro on the plate for a pop of color and freshness.
Recipe Variations
- Spicy Kick: Add jalapeños or a sprinkle of cayenne pepper to the chicken mixture for a fiery bite!
- Mediterranean Twist: Replace the ranch dressing with tahini sauce and add chopped cucumbers and feta cheese for a delightful spin.
- BBQ Chicken Bacon Ranch Wrap: Swap out ranch dressing for your favorite BBQ sauce and toss some coleslaw in there for crunch!
- Vegan Option: Use plant-based chicken and vegan bacon or leave out the bacon entirely, and replace ranch with a dairy-free alternative.
- Crunchy Veggie Addition: Toss in sliced bell peppers, shredded carrots, or radishes for an extra crunch and burst of color!
Chef’s Notes
As a chef who loves experimentation, I’m always jazzing up this wrap based on what I have on hand or what’s in season. There was one time I added avocado to the mix, and let me tell you, the creaminess was a game changer!
And don’t even get me started on leftovers! If you find yourself with extra chicken, toss it into a salad or pasta for a quick meal. These wraps are also fantastic for meal prep—just keep all the elements separate until you’re ready to eat!
FAQs and Troubleshooting
-
Why is my chicken not crispy?
If your chicken isn’t crispy, it could be due to too much moisture from the buttermilk or oil temperature being too low. Make sure to pat dry the chicken before marinating to reduce excess moisture and heat your oil properly. -
Can I bake the chicken instead of frying it?
Absolutely! For a healthier version, you can bake the coated chicken at 400°F (200°C) for about 20-25 minutes or until golden brown. Just remember to spray with a bit of cooking oil to help it crisp! -
What can I do with leftovers?
Any leftover wraps can be stored in an airtight container in the fridge for about 3 days. Just reheat in a toaster oven or bake for a few minutes to regain that crispy texture! -
Can I make these wraps ahead of time?
You can prep the ingredients ahead of time, but I recommend assembling them just before you want to serve to keep everything fresh and crispy.
Nutritional Info
While I won’t give you the precise nutritional breakdown, I can tell you that this delightful wrap is rich in protein and packed with delicious flavors that are sure to energize you. Feel free to adjust ingredients to match your dietary preferences, and as always, moderation is key!
And there you have it! A complete journey through crispy chicken bacon ranch wraps that’ll have you feeling like a rockstar in the kitchen. Remember, cooking is all about creating joy—both for you and those you’re sharing with. So, roll up those sleeves, enjoy the process, and savor the moments spent around the table. Happy cooking!
PrintCrispy Chicken Bacon Ranch Wrap

A delightful wrap featuring golden crispy chicken, smoky bacon, fresh vegetables, and creamy ranch dressing, all snugly wrapped in a flour tortilla.
- Prep Time: 15 minutes
- Cook Time: 25 minutes
- Total Time: 40 minutes
- Yield: 4 servings 1x
- Category: Main Course
- Method: Frying
- Cuisine: American
- Diet: Non-Vegetarian
Ingredients
- 2 boneless, skinless chicken breasts
- 6 strips of bacon
- 1 cup all-purpose flour
- 1 cup buttermilk
- 1 teaspoon garlic powder
- 1 teaspoon onion powder
- 1 teaspoon paprika
- 1 teaspoon salt
- 1/2 teaspoon black pepper
- 1 cup panko breadcrumbs
- Vegetable oil, for frying
- 4 large flour tortillas
- 1 cup shredded lettuce
- 1 cup diced tomatoes
- 1 cup shredded cheddar cheese
- 1/4 cup ranch dressing
Instructions
- Get Prepped: Start by gathering all your ingredients and equipment.
- Prep the Chicken: Pat the chicken breasts dry and cut them into thin strips.
- Marinate the Chicken: In a large bowl, combine the buttermilk, garlic powder, onion powder, paprika, salt, and pepper. Toss in the chicken strips and let them soak for at least 30 minutes.
- Bread the Chicken: Set up a breading station and coat each piece of chicken in flour, then buttermilk, and finally panko breadcrumbs.
- Cook the Bacon: In a skillet over medium heat, cook the bacon until crispy and drain on paper towels.
- Fry the Chicken: In the same skillet, heat about 1/2 inch of vegetable oil to 350°F (175°C) and fry the breaded chicken until golden brown, about 3-4 minutes per side.
- Let it Rest: Place the fried chicken on a wire rack over paper towels.
- Assemble Your Wrap: Warm your tortillas and layer in lettuce, tomatoes, cheese, chicken, and bacon.
- Add the Ranch: Drizzle ranch dressing over the filling.
- Wrap It Up: Fold the ends of the tortilla inwards and roll tightly from the bottom.
Notes
For extra crunch, use panko breadcrumbs. Customize with your favorite vegetables or sauces!
Nutrition
- Serving Size: 1 wrap
- Calories: 500
- Sugar: 3g
- Sodium: 800mg
- Fat: 30g
- Saturated Fat: 10g
- Unsaturated Fat: 15g
- Trans Fat: 0g
- Carbohydrates: 45g
- Fiber: 3g
- Protein: 25g
- Cholesterol: 80mg
Keywords: chicken wrap, bacon wrap, ranch wrap, crispy chicken, easy dinner