
Oreo Cheesecake
Indulge in Decadence: The Ultimate Oreo Cheesecake Recipe
Hello, fellow food lovers! Today, I’m excited to share with you a recipe that’s near and dear to my heart—Oreo Cheesecake. If you love the rich creaminess of classic cheesecake and the delightful crunch of Oreos, then this dessert is about to sweep you off your feet. Think of it as a delicious hug in dessert form.
A Slice of Nostalgia
Let me take you back to a sunny afternoon when I was in my late teens. My best friend and I decided it was time for a baking showdown. Both of us had an affinity for sweets, especially anything chocolatey. After some epic back-and-forth banter, we both settled on the idea of making cheesecake. But not just any cheesecake—an Oreo cheesecake.
Strapped with aprons and armed with ample bags of Oreos, we turned our tiny kitchen into a bustling bakery. There was flour flying, laughter echoing, and maybe a minor meltdown when we nearly burnt the crust. But moments like these create the best memories. After hours of mixing and mastering our cheesecakes, we finally sat down to taste the fruits of our labor. The creamy, rich filling blended flawlessly with the chocolatey crunch of the Oreos. It was pure magic! Thus began my love affair with cheesecake, filled with experiments, tweaks, and, of course, a sprinkle of joyful chaos.
Ingredients
Here’s what you’ll need for this decadent Oreo Cheesecake, along with some handy tips:
-
63 Oreos: The star of the show! Use regular Oreos for the classic chocolate flavor. If you want to switch it up, try using golden Oreos or mint-flavored ones for a twist!
-
2 tablespoons unsalted butter: This adds richness to the crust. You can substitute with coconut oil for a dairy-free option.
-
16 oz cream cheese, softened: Make sure it’s at room temperature for a smooth, creamy consistency when mixing. You can use a full-fat or even a lighter cream cheese if preferred, just avoid non-fat versions, as they won’t yield the same richness.
-
1 cup granulated sugar: This balances the creaminess. If you’re cutting down on sugar, you can use a sugar substitute like stevia, but keep in mind it may alter the texture a bit.
-
1 teaspoon vanilla extract: A natural vanilla extract enhances the flavor. If you’re in a pinch, you can use imitation vanilla, but the taste will differ slightly.
-
4 large eggs: Make sure they’re at room temperature to help the cheesecake bake evenly. If you’re vegan, you can substitute this with flax eggs (1 tablespoon ground flaxseed mixed with 2.5 tablespoons water per egg, let sit for 5 minutes).
-
1 cup heavy cream: This gives the cheesecake a luscious texture. You can use whipped coconut cream for a dairy-free version.
-
1 cup chocolate chips: Semi-sweet or dark chocolate adds a wonderful richness. For an even sweeter bite, opt for milk chocolate chips.
Step-by-Step Instructions
Let’s dive into the delightful process of creating this Oreo Cheesecake!
-
Prep Your Space: Preheat your oven to 325°F (160°C). This ensures even cooking right from the get-go. Meanwhile, grab a 9-inch springform pan, grease it lightly, and set it aside.
-
Make the Crust: In a food processor, combine 36 Oreos (yes, we’re using half the package!) and pulverize them into fine crumbs. This is the moment when you can really let loose—feel free to sneak a few bites of Oreos; you deserve it! Once crushed, add the melted butter and pulse until the mixture resembles wet sand. Transfer the mixture to your prepared pan, and press it firmly into the bottom and slightly up the sides. You want a sturdy crust here! Bake for about 10 minutes, then allow to cool while you whip up the filling.
-
Cheesecake Filling: In a large mixing bowl, beat the softened cream cheese with an electric mixer until smooth and creamy. This is where patience comes in; a well-beaten cream cheese is the key to avoiding lumps in your cheesecake. Gradually add in the sugar and continue to mix. Once combined, add in the vanilla extract, and mix until combined. One by one, mix in the eggs, making sure each one is fully incorporated. Scrape down the sides of the bowl as needed.
-
Add the Heavy Cream: Pour in the heavy cream, and mix until it’s all silky and blended. For an added touch, briefly stir in half of the crushed remaining Oreos (the other half will go on top later).
-
Assemble the Cheesecake: Carefully pour the cheesecake filling over the cooled crust, smoothing out the top with a spatula. Pop it in the oven for about 60–70 minutes. You want the edges to be set, but the center should still have a slight jiggle when you gently shake it. Don’t worry; it will firm up as it cools!
-
Cool and Chill: After baking, turn the oven off and crack the oven door. Allow the cheesecake to cool in the oven for about an hour (this prevents cracking). Then transfer it to a wire rack to cool completely. Once cooled, cover it and chill in the fridge for at least 4 hours, or preferably overnight. The waiting is tough, but trust me—it’s worth it!
-
Ultimate Topping: Before serving, melt the chocolate chips in a microwave-safe bowl, heating in short bursts of 20 seconds so you don’t scorch them. Drizzle this melted goodness over the chilled cheesecake. Crumble the remaining Oreos and sprinkle them on top for that extra crunch. And voila—your cheesecake is now ready to shine!
Serving Suggestions
Slice your Oreo cheesecake with a sharp knife and serve it on beautiful plates. I love dolloping some whipped cream on each slice and a sprinkle of crushed Oreos for that extra touch. You might also lay down a bed of fresh raspberries or strawberries alongside each slice for a delightful contrast in flavor and presentation. If you’re feeling extra fancy, serve with a side of chocolate sauce for drizzling!
Recipe Variations
Feel free to get creative with this Oreo cheesecake. Here are a few variations to inspire you:
-
Mint Oreo Cheesecake: Use mint-flavored Oreos and add a splash of peppermint extract to the filling for a refreshing twist.
-
Peanut Butter Lovers: Swirl in some creamy peanut butter into the filling before baking for a delightful peanut butter Oreo cheesecake.
-
Pumpkin Spice: Mix in half a cup of pumpkin puree and a teaspoon of pumpkin spice for a festive flavor in the fall.
-
Nutty Delight: Incorporate crushed nuts like pecans or walnuts in the crust for a delightful crunch.
-
Low-Sugar Option: Replace sugar with a sugar substitute and follow the previous substitution tips to create a healthier version.
Chef’s Notes
This recipe has followed me through countless family dinners, birthdays, and celebrations. I remember once forgetting to take my cheesecake out of the oven in time and being left with an extremely jiggly center. So, I wrapped it in chocolate ganache and called it a “molten cheesecake.” It was a hit! While baking can come with some surprises, learning to pivot and adapt can lead to delightful kitchen adventures.
Over the years, I’ve perfected this Oreo cheesecake, slowly tweaking the ratios and playing with flavors. It’s funny how a recipe can evolve, much like our culinary skills!
FAQs and Troubleshooting
-
Why did my cheesecake crack? Cracks can happen when the cheesecake is baked at too high a temperature or if it cools too quickly. To prevent this, make sure to bake it low and slow, and let it cool gradually in the oven.
-
Can I make this cheesecake in advance? Absolutely! In fact, it’s best to make this cheesecake a day ahead. The flavors meld beautifully after chilling overnight.
-
How do I know when the cheesecake is done? The edges should be set with a slight jiggle in the middle. It will continue to firm up as it cools.
-
What’s the best way to cut a cheesecake? For clean slices, use a sharp knife and dip it in hot water, then wipe it dry before cutting each piece. This helps achieve that perfect, clean edge!
Nutritional Info (optional)
Serves: 12
Calories per slice: Approximately 440 calories
Total Fat: 30g
Saturated Fat: 18g
Carbohydrates: 36g
Sugar: 26g
Protein: 6g
Thank you for stopping by today, fellow foodies! I can’t wait to see your take on this Oreo Cheesecake. Remember, the kitchen is the heart of the home, so embrace the joy of cooking, and always keep experimenting. Until next time, happy baking, and don’t forget to gather your loved ones around the table—after all, that’s what great food is all about!
PrintOreo Cheesecake

Indulge in the rich creaminess of this classic Oreo Cheesecake, combining the delightful crunch of Oreos with a smooth filling.
- Prep Time: 30 minutes
- Cook Time: 70 minutes
- Total Time: 4 hours 30 minutes
- Yield: 12 servings 1x
- Category: Dessert
- Method: Baking
- Cuisine: American
- Diet: Vegetarian
Ingredients
- 63 Oreos
- 2 tablespoons unsalted butter
- 16 oz cream cheese, softened
- 1 cup granulated sugar
- 1 teaspoon vanilla extract
- 4 large eggs
- 1 cup heavy cream
- 1 cup chocolate chips
Instructions
- Preheat your oven to 325°F (160°C).
- Combine 36 Oreos in a food processor and pulverize into fine crumbs.
- Add the melted butter and pulse until resembling wet sand.
- Transfer the mixture to the prepared pan, pressing it firmly into the bottom.
- Bake for about 10 minutes, then allow to cool.
- Beat the softened cream cheese with an electric mixer until smooth.
- Add in the sugar and vanilla extract, mixing until combined.
- Incorporate the eggs one by one, mixing fully.
- Pour in the heavy cream and mix until silky.
- Pour the cheesecake filling over the cooled crust.
- Bake for about 60–70 minutes.
- Cool the cheesecake in the oven for about an hour.
- Chill in the fridge for at least 4 hours.
- Melt the chocolate chips and drizzle over the cheesecake before serving.
- Crumble the remaining Oreos and sprinkle on top.
Notes
Serve with whipped cream and fresh berries for an extra touch.
Nutrition
- Serving Size: 1 slice
- Calories: 440
- Sugar: 26g
- Sodium: 400mg
- Fat: 30g
- Saturated Fat: 18g
- Unsaturated Fat: 8g
- Trans Fat: 0g
- Carbohydrates: 36g
- Fiber: 1g
- Protein: 6g
- Cholesterol: 90mg
Keywords: Oreo, Cheesecake, Dessert, Chocolate, Baking
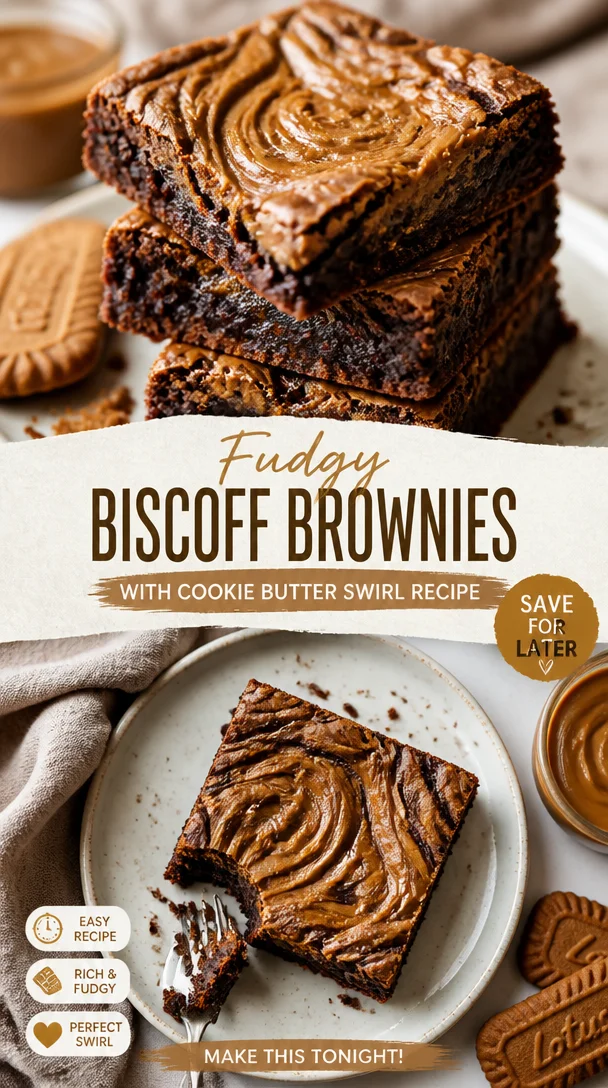
Fudgy Biscoff Brownies with Cookie Butter Swirl Recipe
Indulge in Decadence: Biscoff Brownies Recipe
Welcome to the sweet escape that is decadent Biscoff brownies! Today, we’re diving into a recipe that beautifully marries rich, fudgy chocolate with that irresistible, spiced flavor of Biscoff cookie butter. If you’re a fan of brownies and love the warm, comforting taste of those iconic cookies, you’re in for a treat!
Most people think of brownies as a basic dessert, but I see them as a canvas for creativity. The first time I combined Biscoff cookie butter with brownies, I was instantly transported back to my childhood kitchen, where flour would dust the countertops and the sweet smell of sugar wafted through the air. It was a happy chaos of laughter and cookies, and you know what? That joyous energy is what I want to capture here today.
These brownies are not just a dessert; they’re an experience—a way to share joy, to gather friends, and to create sweet memories. So, apron on? Let’s jump into this delicious adventure!
Personal Story: The Magic of Brownies
Growing up, our family had a tradition of baking every Sunday. Each week, we would alternate treats—sometimes cookies, sometimes cakes, and of course, brownies. Those gooey delights were always my favorite. I fondly remember the excitement when my mom would pull them out of the oven, their tops all crackly and their insides undeniably decadent.
One Sunday, inspired by the lingering scent of spices from a box of Biscoff cookies, I decided to experiment. The day was gray, but as the brownies baked, the aroma flooded our small kitchen and brightened up the whole space. My siblings and I devoured them as soon as they were cool enough to touch, and we all agreed that the mix of chocolate and Biscoff was an instant classic. From that day forward, I’ve made those brownies countless times, and they’ve become a staple at family gatherings, holiday parties, and any time we just need a little sweet pick-me-up.
Ingredients
Here’s what you’ll need to create these luscious Biscoff brownies:
-
3/4 cup Biscoff cookie butter
The star of the show! This creamy spread adds a unique flavor that’s both sweet and spiced. You can substitute with other cookie butters if you’re in a pinch but nothing quite beats the original. -
1/2 cup light or dark brown sugar (packed)
This sugar adds depth and moisture to the brownies. If needed, feel free to use coconut sugar for a slightly different flavor. -
1/2 cup granulated sugar
This sugar balances the richness of the brownie while helping it rise. If watching your sugar intake, consider using a stevia blend. -
2 large eggs
Eggs provide structure. Make sure they’re at room temperature for the best results. -
1 large egg yolk
Adding an extra yolk contributes to that fudgy texture we all crave in brownies. You can omit this if you’re allergic, though the texture will be a bit different. -
1 tablespoon vanilla extract
This adds warmth to the flavors. Always use pure vanilla for the best aroma and taste. -
10 tablespoons unsalted butter
The butter creates richness. If you’re looking for a lactose-free version, try using coconut oil. -
2/3 cup + 1/4 cup semi-sweet chocolate chips
The chocolate chips add pockets of melty goodness. You can play with milk or dark chocolate to suit your taste. -
1/4 cup unsweetened Dutch cocoa powder
Cocoa powder intensifies the chocolate flavor. Don’t substitute with sweetened cocoa; we want control of that sweetness! -
2/3 cup + 1 tablespoon all-purpose flour
Flour gives structure. Be careful not to pack it too tightly when measuring! Spoon it into your measuring cup and level it off for accurate results. -
1 teaspoon espresso powder
A secret ingredient! Espresso powder enhances the chocolate flavor without making the brownies taste like coffee. Feel free to omit if you’re not a fan of coffee. -
1/2 teaspoon fine sea salt
Just a touch! Salt amplifies the sweet flavors in desserts. Always use fine salt for even distribution. -
4-5 Biscoff cookies (for the top)
These add a delicious decorative crunch! You can also use crushed-up Oreos or graham crackers for a different twist. -
Extra cookie butter (for the top)
Who doesn’t want a little more of the good stuff? Drizzling a bit on top before serving adds that touch of elegance.
Step-by-Step Instructions
Ready to whip up these delicious Biscoff brownies? Let’s get to it!
-
Preheat Your Oven: Set your oven to 350°F (175°C). This step is crucial—starting out with a properly heated oven ensures your brownies bake evenly and achieve that perfect fudgy texture!
-
Prepare Your Pan: Line an 8×8-inch baking pan with parchment paper, allowing some overhang for easy removal later. This trick saves you from wrestling with the brownies when it’s time to slice them!
-
Melt the Butter and Cookie Butter: In a medium saucepan over low heat, combine the unsalted butter and cookie butter. Stir occasionally until melted and smooth, then remove from heat. If you’re in a hurry, feel free to melt it in the microwave in intervals of about 20-30 seconds.*
-
Mix Sugars: In a mixing bowl, whisk together the light brown sugar and granulated sugar. Gradually add the melted butter mixture and stir until well combined. The warmth of the butter helps dissolve the sugars, making for a smoother final batter.
-
Incorporate Eggs: Add in the two large eggs and the additional egg yolk. Mix until fully incorporated—this step is vital for a soft texture, so take your time here!
-
Add Vanilla: Stir in the vanilla extract—believe me, it’ll elevate the flavor of your brownies to heavenly levels.
-
Combine Dry Ingredients: In another bowl, whisk together the flour, cocoa powder, espresso powder, and salt. Gradually add this dry mix to your wet ingredients, folding gently until just combined. Tip: Be careful not to overmix, or your brownies may end up a little tough!
-
Fold in Chocolate Chips: Gently fold in the 2/3 cup of chocolate chips. Seeing those little gems speckled throughout your brownie batter will make your heart sing.
-
Pour into the Pan: Pour the brownie batter into the prepared baking pan, using a spatula to spread it evenly. This is where you can get a little creative—press one or two of those Biscoff cookies into the top, and add a drizzle of extra cookie butter if you’re feeling adventurous!
-
Sprinkle More Chocolate Chips: Top with the remaining 1/4 cup of chocolate chips for that molten chocolate goodness throughout.
-
Bake: Place the pan in the oven and bake for 25-30 minutes. Start checking for doneness at the 25-minute mark—stick a toothpick into the center; if it comes out with a few moist crumbs, they’re ready! Remember, the brownies will continue to cook a bit once taken out of the oven, so don’t overbake!
-
Cool and Cut: Remove the brownies from the oven and let them cool in the pan for about 10 minutes. Then, using the parchment paper’s overhang, lift them out and let them cool on a wire rack. Once fully cooled, cut into squares. The hardest part? Waiting to dig in!
Serving Suggestions
For an impressive presentation, serve these brownies warm with a scoop of vanilla ice cream or a dollop of whipped cream on top. You can also sprinkle a little extra sea salt for that delightful sweet-plus-salty combination, or even drizzle more Biscoff cookie butter over each square for a decadent finish. The possibilities are as delightful as the tastes!
Recipe Variations
Feeling adventurous? Here are a few creative twists you can try:
- Nutty Biscoff: Add chopped walnuts or pecans for a crunchy texture.
- Minty Bliss: Substitute half of the chocolate chips with mint chips for a refreshing flavor.
- Nut Butter Brownies: Replace Biscoff with almond or peanut butter for a classic PB&J twist.
- Vegan Option: Use flax eggs and coconut oil instead of eggs and butter for a vegan version.
- Spiced Up: Add a pinch of cinnamon or ginger to the batter for a cozy fall flavor.
Chef’s Notes
These Biscoff brownies are an adaptation of a classic recipe, one I’ve made countless times with variations of my own. The addition of Biscoff cookie butter turned a traditional treat into something truly special and memorable. If you have any extra cookies left, crush them to use as a topping or even a crunchy base for other desserts. The beauty of these brownies is their versatility; with just a few tweaks, they can fit perfectly with any occasion. Oh, and don’t be surprised when they disappear in mere moments—trust me, they’re a crowd-pleaser!
FAQs and Troubleshooting
Q: Why are my brownies cakey instead of fudgy?
A: This could be due to overmixing the batter or adding too much flour. Be sure to measure carefully and mix just until combined.
Q: Can I freeze these brownies?
A: Absolutely! Once cooled, wrap them tightly in plastic wrap and store in an airtight container. They can last in the freezer for up to three months.
Q: How can I tell when my brownies are done?
A: A toothpick inserted into the center should come out with a few moist crumbs. If it’s clean or nearly clean, that means they might be overbaked.
Q: Can I use a different type of cookie butter?
A: Definitely! While Biscoff is a personal favorite, other flavors like Speculoos or even Nutella can offer a fun twist!
Nutritional Info (Optional)
For those curious about nutritional aspects, here’s a quick breakdown per serving (based on a 12-serving batch):
- Calories: ~220
- Fat: 12g
- Carbs: 28g
- Protein: 3g
- Sugars: 18g
Remember that these numbers may vary based on specific brands and substitutions used.
So, there you have it! An indulgent recipe for Biscoff brownies that truly honors the joy of cooking and sharing. I hope you try this recipe and savor every bite. Remember, cooking is all about creating moments—let those brownie bites be some of the sweetest! Now, who’s ready to tie on an apron and get started? ❤️
PrintBiscoff Brownies

Decadent brownies infused with rich chocolate and the irresistible flavor of Biscoff cookie butter.
- Prep Time: 15 minutes
- Cook Time: 30 minutes
- Total Time: 45 minutes
- Yield: 12 servings 1x
- Category: Dessert
- Method: Baking
- Cuisine: American
- Diet: Vegetarian
Ingredients
- 3/4 cup Biscoff cookie butter
- 1/2 cup light or dark brown sugar (packed)
- 1/2 cup granulated sugar
- 2 large eggs
- 1 large egg yolk
- 1 tablespoon vanilla extract
- 10 tablespoons unsalted butter
- 2/3 cup + 1/4 cup semi-sweet chocolate chips
- 1/4 cup unsweetened Dutch cocoa powder
- 2/3 cup + 1 tablespoon all-purpose flour
- 1 teaspoon espresso powder
- 1/2 teaspoon fine sea salt
- 4–5 Biscoff cookies (for the top)
- Extra cookie butter (for the top)
Instructions
- Preheat your oven to 350°F (175°C).
- Prepare an 8×8-inch baking pan lined with parchment paper.
- Melt the butter and cookie butter together in a saucepan over low heat.
- Mix the light brown sugar and granulated sugar together in a bowl, then add the melted butter mixture.
- Incorporate the eggs and egg yolk, mixing until fully combined.
- Add the vanilla extract and stir it in.
- Combine the flour, cocoa powder, espresso powder, and salt in another bowl, then gradually fold into the wet ingredients.
- Fold in the chocolate chips.
- Pour the batter into the prepared pan and top with Biscoff cookies and more chocolate chips.
- Bake for 25-30 minutes, checking for doneness.
- Cool in the pan for 10 minutes before transferring to a wire rack.
- Cut into squares and enjoy!
Notes
Serve warm with a scoop of vanilla ice cream or a dollop of whipped cream for an indulgent treat.
Nutrition
- Serving Size: 1 serving
- Calories: 220
- Sugar: 18g
- Sodium: 200mg
- Fat: 12g
- Saturated Fat: 7g
- Unsaturated Fat: 5g
- Trans Fat: 0g
- Carbohydrates: 28g
- Fiber: 2g
- Protein: 3g
- Cholesterol: 70mg
Keywords: Biscoff, Brownies, Chocolate, Dessert

Peach Pie Cruffins: Flaky, Gooey Summer Breakfast Treat
Peach Pie Cruffins: A Delightful Twist on a Classic Treat
Welcome, baking enthusiasts! Today, we’re embarking on a delicious journey to create something that’s bound to impress: Peach Pie Cruffins! Now, you might be wondering, what’s a cruffin? Well, my friends, it’s the delightful lovechild of a croissant and a muffin, filled with sweet peach pie filling and baked to golden perfection. This recipe is all about indulgence without the intimidation. So, grab your apron and let’s get baking!
A Whiff of Nostalgia
Let me take you back to my childhood. Growing up, my Grandma used to make the most delectable peach pie every summer when the fruit was at its peak. The aroma would fill her cozy kitchen, mingling with the sound of laughter and the clinking of dishes. Those pies became a tradition—not just a dessert, but a celebration of family and the joys of sharing a table.
When it came to summer gatherings, nothing could compare to the golden crust, sweet and spiced peach filling, and the whipped cream dolloped generously on top. But as I grew older, I started to think about how I could put a twist on that beloved classic. That’s when the cruffin idea hit me! Combining the flaky, layered texture of a croissant with the fruity memories of my grandma’s pie? Absolute genius!
That’s the beauty of cooking, isn’t it? It allows us to honor our past while exploring new flavors and techniques. So, let’s dive in and create something that not only tastes divine but also tells a story of summer sweetness.
Ingredients
Here’s what you’ll need to create these scrumptious Peach Pie Cruffins:
-
1 package puff pastry sheets (thawed)
The star of our show! Puff pastry gives these cruffins their signature flaky layers and airy texture. If you don’t have puff pastry, you can try using crescent roll dough, but the texture will be different. -
1 can (15 oz peach pie filling)
Easy and sweet! This convenient filling simplifies the process. If you’re feeling adventurous, you can make your own filling from fresh peaches—just cook them down with some sugar, cinnamon, and a squeeze of lemon juice. -
2 tablespoons granulated sugar (optional)
This is for those who love it a little sweeter. You can adjust this depending on your taste or omit it entirely if you prefer a more natural flavor. -
1 teaspoon ground cinnamon
Cinnamon adds a warm, comforting flavor that perfectly complements the peaches. Use freshly ground cinnamon for the best flavor, or try pumpkin spice for a fun twist! -
1 egg (for egg wash)
This will give your cruffins that beautiful golden-brown finish. If you’re vegan, you can use a bit of non-dairy milk or aquafaba for a similar effect. -
1 tablespoon water
Simply mixed with the egg for our wash. You can swap this for milk for a richer finish. -
½ cup powdered sugar
We’ll whip this into a glaze for the final touch. If you’re watching your sugar, coconut sugar can work in a pinch, though it will alter the color. -
1 tablespoon milk or cream (for glaze)
This will help you achieve that silky glaze. Feel free to use your plant-based milk options for a dairy-free version!
Step-by-Step Instructions
Now, let’s get our hands floury and bring these cruffins to life!
-
Prep Work
Preheat your oven to 400°F (200°C). Line a muffin tin with paper liners or grease it lightly to prevent sticking. This is key for our cruffins to have that perfect shape! -
Roll Out the Puff Pastry
Take your thawed puff pastry sheets out and roll them out lightly on a floured surface. We want to stretch them just a bit to ensure they’re ready for layers. You’ll want to roll them out to about 12×12 inches. If they’re slightly uneven, don’t worry—this adds character! -
Apply the Sugar and Cinnamon
In a small bowl, mix your granulated sugar and cinnamon together. Sprinkle this mixture evenly over the rolled-out pastry. This is the magic layer that transforms our cruffins into something truly special! -
Add the Peach Filling
Spread the peach pie filling over the cinnamon-sugar layer. Use a spatula to ensure an even spread, leaving about half an inch of pastry around the edges. Don’t go overboard—too much filling might cause spillage but, hey, if that happens, consider it a rustic touch! -
Shape the Cruffins
Starting from one edge, carefully roll the pastry up like a jelly roll or cinnamon roll, ensuring it stays tight. Once rolled, slice the log into about 6-8 equal pieces. This is where the beautiful layers come together! -
Position in the Muffin Tin
Place each rolled piece (cut side up) into the muffin tin. Make sure to give them a little space; they will puff up and spread as they bake! -
Egg Wash
In a small bowl, whisk together the egg and water. Brush this mixture gently over the tops of your cruffins to give them that irresistible golden sheen. (Remember, don’t get it on the edges; we want those to puff up nicely!) -
Bake
Pop those beauties in the preheated oven and bake for 20-25 minutes, or until they’re golden brown and flaky. Your kitchen is about to smell like summer! -
Prepare the Glaze
While the cruffins are baking, mix your powdered sugar and milk/cream until smooth to create the glaze. If you allow it to sit, it will thicken a bit, making it easier to drizzle. -
Finish and Serve
Once the cruffins are done baking, let them cool for a few minutes in the tin, then transfer them to a wire rack. Drizzle the glaze over the still-warm cruffins and watch it melt into all those flaky layers!
Serving Suggestions
To elevate the experience, serve these cruffins alongside a scoop of vanilla ice cream or a dollop of whipped cream. You could even add fresh peach slices for a lovely garnish that screams summertime. A hint of mint on top will give it that pop of color and freshness!
Recipe Variations
Feeling creative? Here are a few ideas to switch up this delightful treat:
-
Berry Medley: Swap the peach pie filling for a mixture of your favorite berries. Blueberries and raspberries are a delicious combo!
-
Savory Spin: Try a savory version with spinach, feta, and sun-dried tomatoes for a brunch twist!
-
Nutty Add-In: Stir in some crushed pecans or walnuts with the peach filling for extra crunch and flavor.
-
Spiced Twist: Add a dash of nutmeg or cloves to your cinnamon-sugar mix for a seasonal twist.
Chef’s Notes
These Peach Pie Cruffins have become a staple in my kitchen. Over the years, I’ve experimented with different fillings and even tried making my own puff pastry (talk about a labor of love!). Each attempt has brought its own delightful results, but there’s something comforting about the simplicity of using store-bought pastry and canned filling.
Whenever I serve these at gatherings, they spark joy and nostalgia. They remind me of my grandma’s kitchen, where love was always the main ingredient. Plus, they’re always a hit—I’ve yet to see one survive the first round!
FAQs and Troubleshooting
Q: My cruffins didn’t rise as much as I hoped. What went wrong?
A: This can happen if your puff pastry was overworked or if the oven temperature was too low. Ensure your pastry is kept cool until you’re ready to bake, and make sure your oven is thoroughly preheated.
Q: Can I use fresh peaches instead of canned filling?
A: Absolutely! Just cook down the fresh peaches with sugar, a bit of cinnamon, and a little cornstarch to thicken it up before spreading it on the pastry.
Q: How do I store leftovers?
A: Keep them in an airtight container at room temperature for up to 2 days. You can also refrigerate them for a few more days but reheat them slightly to regain some of that flakiness.
Q: Can I freeze these cruffins?
A: Yes! You can freeze them before baking or after. Just make sure they’re completely cool, then wrap them well in plastic wrap. Bake them straight from the freezer; just add a few extra minutes to the cooking time!
Nutritional Info (Optional)
While this recipe is all about indulgence, a serving contains approximately:
- Calories: 250
- Total Fat: 12g
- Carbohydrates: 32g
- Sugars: 10g
- Protein: 3g
These values can vary based on portions and specific ingredients used.
And there you have it—a delightful Peach Pie Cruffin that melds together the best of flavors, memories, and rich textures. Thank you for joining me on this culinary adventure! I can’t wait to see how yours turn out. Don’t forget to tie on your apron and bring a bit of love to your table—the world could always use a little more of that! Happy baking!
PrintPeach Pie Cruffins

A delightful twist on a classic peach pie, these Peach Pie Cruffins combine flaky croissant-like pastry with sweet peach filling.
- Prep Time: 15 minutes
- Cook Time: 25 minutes
- Total Time: 40 minutes
- Yield: 6-8 servings 1x
- Category: Dessert
- Method: Baking
- Cuisine: American
- Diet: Vegetarian
Ingredients
- 1 package puff pastry sheets (thawed)
- 1 can (15 oz) peach pie filling
- 2 tablespoons granulated sugar (optional)
- 1 teaspoon ground cinnamon
- 1 egg (for egg wash)
- 1 tablespoon water
- ½ cup powdered sugar
- 1 tablespoon milk or cream (for glaze)
Instructions
- Preheat your oven to 400°F (200°C). Line a muffin tin with paper liners or grease it lightly.
- Roll out the thawed puff pastry sheets onto a floured surface to about 12×12 inches.
- Mix the granulated sugar and cinnamon in a small bowl, then sprinkle over the rolled-out pastry.
- Spread the peach pie filling evenly over the cinnamon-sugar layer.
- Roll the pastry up tightly and slice into 6-8 equal pieces.
- Place each piece cut side up into the muffin tin.
- Whisk together the egg and water for the egg wash, then brush over the tops of the cruffins.
- Bake for 20-25 minutes until golden brown and flaky.
- Mix the powdered sugar and milk/cream to create the glaze.
- Let the cruffins cool for a few minutes, then drizzle with glaze.
Notes
Serve warm with a scoop of vanilla ice cream or a dollop of whipped cream for an extra treat.
Nutrition
- Serving Size: 1 cruffin
- Calories: 250
- Sugar: 10g
- Sodium: 100mg
- Fat: 12g
- Saturated Fat: 6g
- Unsaturated Fat: 4g
- Trans Fat: 0g
- Carbohydrates: 32g
- Fiber: 1g
- Protein: 3g
- Cholesterol: 30mg
Keywords: peach pie, cruffins, dessert, summer baking, croissant, cozy dessert