Garlic Bread Rolls
Embrace the Comfort: Homemade Garlic Bread Rolls
Hello, fellow food lovers! Today, we’re diving into the world of homemade Garlic Bread Rolls—a recipe that’ll elevate your meals and warm your heart. Imagine biting into a soft, pillowy roll, bursting with the rich flavors of garlic and parsley, paired with a golden, buttery crust. If that doesn’t make you swoon, I don’t know what will!
There’s something so enchanting about the aroma of freshly baked bread wafting through the kitchen. It’s like a warm hug for your senses, inviting everyone to gather around and share in the love. I can’t wait to share this scrumptious recipe with you! Whether it’s a cozy weeknight dinner or a festive gathering, these Garlic Bread Rolls will have your guests feeling right at home.
The Heart of the Kitchen: A Personal Story
Let me take you back to my childhood kitchen, where I first discovered the magic of bread-making. I can still picture the flour-covered countertop and my mother, donned in her trusty ivory apron, guiding me with a patient smile. One rainy afternoon, we decided to whip up her famous garlic rolls for dinner. The sound of the dough rising and the delightful aroma of roasting garlic was intoxicating.
While we baked, we laughed and shared stories—I even remember my little brother sneaking bites of the dough when he thought no one was looking (sneaky little hands!). When those rolls finally came out of the oven, they were golden brown and shimmering with butter. The whole family gathered at the table, and with each bite, we created memories that I cherish to this day.
That experience ignited my passion for cooking and hosting. And now, I’m so thrilled to share that magic with you through these Garlic Bread Rolls. Let’s roll up our sleeves and make some kitchen magic together!
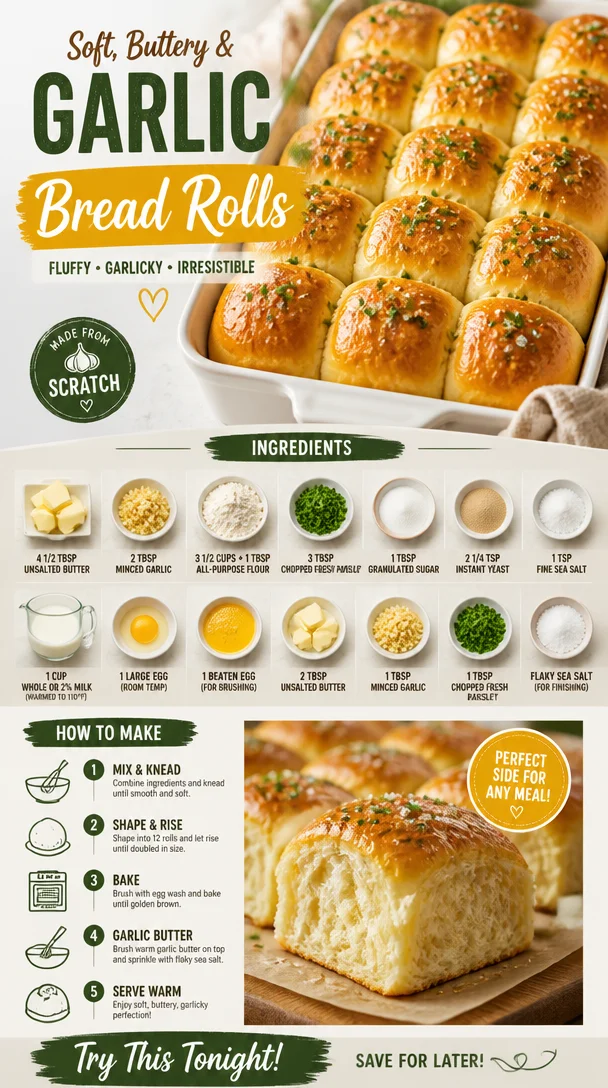
Ingredients: The Building Blocks of Flavor
Here’s what you’ll need for your utterly delightful Garlic Bread Rolls:
- 4 1/2 tablespoons unsalted butter: This adds richness and moisture. You can substitute with olive oil for a lighter flavor.
- 2 tablespoons minced garlic: Fresh is best! You can use garlic powder if you’re in a pinch—1 teaspoon should do.
- 3 1/2 cups + 1 tablespoon all-purpose flour: Flour is the backbone of your rolls! Make sure to measure accurately; spoon the flour into the measuring cup and level it off. For a gluten-free option, try a 1:1 baking blend.
- 3 tablespoons chopped fresh parsley: This brightens the flavor and adds a pop of color. Dried parsley works too, but use less since it’s more concentrated.
- 1 tablespoon granulated sugar: This helps with browning and yeast activation. Honey or maple syrup can be a natural substitute.
- 2 1/4 teaspoons instant yeast: Instant yeast is a game-changer because you can mix it directly with the dry ingredients. If you only have active dry yeast, let it bloom in warm milk for about 5-10 minutes first.
- 1 teaspoon fine sea salt: Essential for flavor balance. Don’t skip this!
- 1 cup whole or 2% milk (warmed to 110°F): This hydrates the dough. If you need a dairy-free alternative, unsweetened almond or oat milk will work well.
- 1 large egg (room temperature): This enriches the dough, giving it a lovely texture.
- 1 beaten egg, for brushing the tops: This creates that beautiful golden finish on your rolls.
- 2 tablespoons unsalted butter: More butter to brush on the rolls post-bake for that extra deliciousness!
- 1 tablespoon minced garlic: Yes, more garlic! This adds a buttery, garlicky glaze on top.
- 1 tablespoon chopped fresh parsley: Because we fancy! This adds freshness to the finishing touch.
- Flaky sea salt (for finishing): A sprinkle of flaky salt elevates the flavor and makes those rolls extra special.
Step-by-Step Instructions: Roll with Me
-
Prepare Your Dough:
In a large mixing bowl, combine 3 1/2 cups of all-purpose flour, granulated sugar, instant yeast, and sea salt. Give it a good mix with a whisk to make sure everything is evenly incorporated. -
Add the Wet Ingredients:
Now, let’s bring our dough to life! Add the warmed milk, room temperature egg, and 4 1/2 tablespoons of softened unsalted butter to the flour mixture. Using a spatula or your hands, mix until a shaggy dough forms. -
Kneading:
Lightly flour your countertop and dump the dough onto it. Knead for about 6-8 minutes, or until the dough is smooth and elastic. If it’s sticky, sprinkle a little more flour as needed. Don’t worry; kneading is a great way to channel any stress. -
First Rise:
Place the kneaded dough in a greased bowl and cover it with a clean kitchen towel. Let it rise in a warm place for about 1 hour, or until it has doubled in size. Pro tip: try turning your oven on for 1 minute, then turning it off before placing the dough inside—proven cozy spot for rising! -
Shape Your Rolls:
Once the dough has risen, punch it down to release the air, and sprinkle in the minced garlic and chopped parsley. Mix gently until incorporated. Then, divide the dough into 12 equal pieces and shape each piece into a roll. -
Second Rise:
Place the shaped rolls close together in a greased 9×13-inch baking dish. Cover them again with the kitchen towel and let them rise for another 30-45 minutes. You want them to be puffy and almost touching. -
Preheat Your Oven:
While the rolls are rising, preheat your oven to 375°F (190°C). A hot oven is critical for that golden crust! -
Egg Wash:
Once they’ve risen beautifully, brush the tops with the beaten egg to enhance browning. -
Bake:
Pop those rolls in the oven and let them bake for about 20-25 minutes or until they’re golden brown and sound hollow when tapped on the bottom. -
Garlic Butter Glaze:
In a small saucepan, melt 2 tablespoons of butter over low heat and stir in the additional minced garlic and parsley. Once the rolls are out of the oven, brush this glorious mixture over the top and sprinkle with flaky sea salt.
Serving Suggestions: Plating with Love
These Garlic Bread Rolls are best served warm and fresh out of the oven. To plate, arrange them in a lovely basket lined with a clean kitchen towel for rustic charm. Serve them alongside your favorite pasta, soups, or simply enjoy them on their own with a drizzle of olive oil or balsamic vinegar. Trust me, they’ll be the star of the show!
Recipe Variations: Get Creative!
- Cheesy Garlic Rolls: Add shredded mozzarella or parmesan to the dough or on top before baking for a melty surprise!
- Herb-Infused Rolls: Mix in chopped fresh rosemary or thyme instead of parsley for an aromatic twist.
- Whole Wheat Option: Swap half of the all-purpose flour with whole wheat flour to introduce a nuttier flavor and more fiber.
- Garlic-Herb Butter: Mix in dried Italian herbs for an extra burst of flavor in your garlic butter glaze.
- Sweet Garlic Rolls: Add a hint of cinnamon and sugar to your dough for a sweet take on these rolls, perfect for breakfast!
Chef’s Notes: A Slice of Kitchen Life
Oh, where do I begin? These rolls have a special place in my heart because they remind me of family and the simple joy of cooking together. Over the years, I’ve played around with different garlic and herb combinations, and sometimes I add a splash of white wine to the dough for depth.
Funny story—one Christmas, I decided to showcase these at our dinner. I was so excited that I accidentally doubled the garlic in the glaze! Let’s just say it turned into a garlic fest that still gets talked about during family gatherings. Lesson learned—sometimes, less is more, but it sure made for a memorable holiday!
FAQs and Troubleshooting
-
Why are my rolls dense?
If your rolls turned out dense, it could be due to insufficient kneading or not allowing enough rise time. Be sure to knead until smooth and give them adequate time to rise; patience is key! -
Can I prepare the dough in advance?
Absolutely! You can prepare the dough up to the first rise, punch it down, store it in the fridge overnight, and shape the rolls the next day. Just allow them to come to room temperature before the second rise. -
What if my rolls don’t brown properly?
If your rolls aren’t browning as they should, ensure your oven is properly preheated. An egg wash not only adds golden color but also a crispy crust, so don’t skip it! -
Can I freeze these rolls?
Yes! After baking and cooling, freeze them in an airtight bag. When you’re ready to eat, pop the frozen rolls in a preheated oven at 350°F (175°C) for about 10-15 minutes.
Nutritional Info
For those who are health-conscious, a single roll packs roughly 180 calories, with a balance of carbohydrates, fats, and proteins, thanks to the butter and egg. Remember, it’s all about balance—indulging in these rolls once in a while will bring happiness into your kitchen!
There you have it—your go-to recipe for Garlic Bread Rolls that are destined to impress! Cooking should be a joyous adventure, and I hope this recipe inspires you to gather your loved ones around the table. So, tie on that apron, sprinkle in some love, and enjoy each delicious bite. Happy baking!
PrintHomemade Garlic Bread Rolls
Delight in these soft, pillowy garlic bread rolls, bursting with flavor and perfect for any meal.
- Prep Time: 15 minutes
- Cook Time: 25 minutes
- Total Time: 90 minutes
- Yield: 12 servings 1x
- Category: Side Dish
- Method: Baking
- Cuisine: Italian
- Diet: Vegetarian
Ingredients
- 4 1/2 tablespoons unsalted butter
- 2 tablespoons minced garlic
- 3 1/2 cups + 1 tablespoon all-purpose flour
- 3 tablespoons chopped fresh parsley
- 1 tablespoon granulated sugar
- 2 1/4 teaspoons instant yeast
- 1 teaspoon fine sea salt
- 1 cup whole or 2% milk, warmed to 110°F
- 1 large egg, room temperature
- 1 beaten egg, for brushing the tops
- 2 tablespoons unsalted butter, melted, for brushing
- 1 tablespoon minced garlic, for glaze
- 1 tablespoon chopped fresh parsley, for glaze
- Flaky sea salt, for finishing
Instructions
- Prepare your dough: In a large mixing bowl, combine flour, sugar, instant yeast, and salt. Mix well.
- Add the warmed milk, egg, and unsalted butter to the flour mixture. Mix until shaggy dough forms.
- Knead the dough on a floured countertop for about 6-8 minutes until smooth and elastic.
- Place the kneaded dough in a greased bowl and cover it. Let it rise in a warm place for about 60 minutes.
- Shape your rolls: Punch down the risen dough, add minced garlic and parsley, mix gently, and divide into 12 pieces, shaping each into a roll.
- Place the rolls in a greased baking dish, cover, and let them rise for another 30-45 minutes.
- Preheat your oven to 375°F (190°C).
- Brush the tops of the rolls with beaten egg.
- Bake for 20-25 minutes until golden brown.
- Melt butter in a saucepan, stir in garlic and parsley, then brush over rolls and sprinkle with flaky sea salt.
Notes
These rolls are best served warm and can be frozen after baking for later enjoyment. For a twist, try adding cheese or different herbs.
Nutrition
- Serving Size: 1 roll
- Calories: 180
- Sugar: 1g
- Sodium: 300mg
- Fat: 7g
- Saturated Fat: 4g
- Unsaturated Fat: 3g
- Trans Fat: 0g
- Carbohydrates: 23g
- Fiber: 1g
- Protein: 4g
- Cholesterol: 15mg
Keywords: garlic bread, rolls, homemade bread, vegetarian, side dish