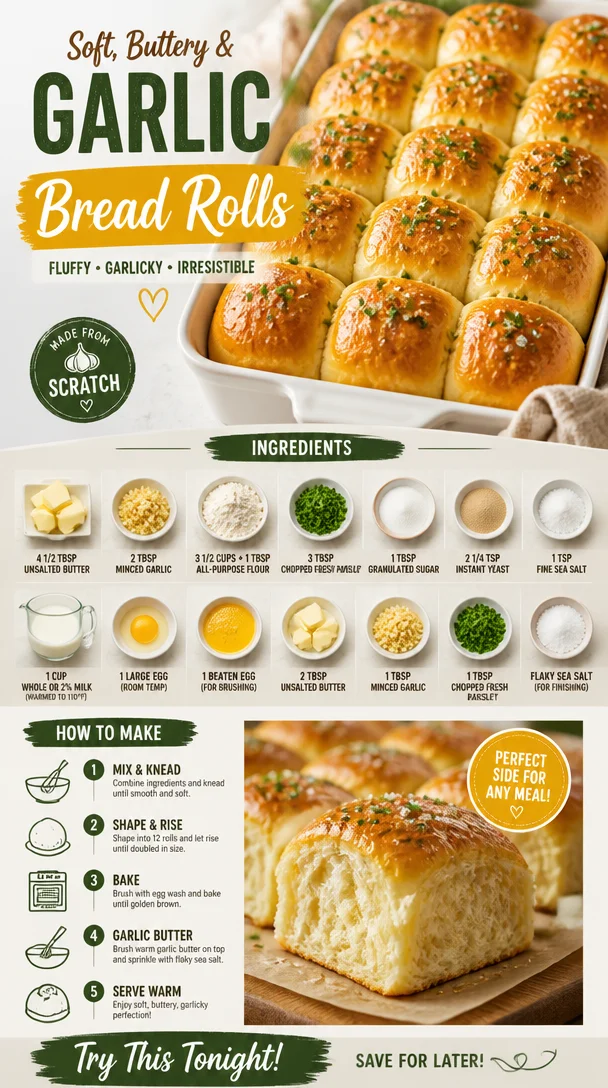
Garlic Bread Rolls
Embrace the Comfort: Homemade Garlic Bread Rolls
Hello, fellow food lovers! Today, we’re diving into the world of homemade Garlic Bread Rolls—a recipe that’ll elevate your meals and warm your heart. Imagine biting into a soft, pillowy roll, bursting with the rich flavors of garlic and parsley, paired with a golden, buttery crust. If that doesn’t make you swoon, I don’t know what will!
There’s something so enchanting about the aroma of freshly baked bread wafting through the kitchen. It’s like a warm hug for your senses, inviting everyone to gather around and share in the love. I can’t wait to share this scrumptious recipe with you! Whether it’s a cozy weeknight dinner or a festive gathering, these Garlic Bread Rolls will have your guests feeling right at home.
The Heart of the Kitchen: A Personal Story
Let me take you back to my childhood kitchen, where I first discovered the magic of bread-making. I can still picture the flour-covered countertop and my mother, donned in her trusty ivory apron, guiding me with a patient smile. One rainy afternoon, we decided to whip up her famous garlic rolls for dinner. The sound of the dough rising and the delightful aroma of roasting garlic was intoxicating.
While we baked, we laughed and shared stories—I even remember my little brother sneaking bites of the dough when he thought no one was looking (sneaky little hands!). When those rolls finally came out of the oven, they were golden brown and shimmering with butter. The whole family gathered at the table, and with each bite, we created memories that I cherish to this day.
That experience ignited my passion for cooking and hosting. And now, I’m so thrilled to share that magic with you through these Garlic Bread Rolls. Let’s roll up our sleeves and make some kitchen magic together!
Ingredients: The Building Blocks of Flavor
Here’s what you’ll need for your utterly delightful Garlic Bread Rolls:
- 4 1/2 tablespoons unsalted butter: This adds richness and moisture. You can substitute with olive oil for a lighter flavor.
- 2 tablespoons minced garlic: Fresh is best! You can use garlic powder if you’re in a pinch—1 teaspoon should do.
- 3 1/2 cups + 1 tablespoon all-purpose flour: Flour is the backbone of your rolls! Make sure to measure accurately; spoon the flour into the measuring cup and level it off. For a gluten-free option, try a 1:1 baking blend.
- 3 tablespoons chopped fresh parsley: This brightens the flavor and adds a pop of color. Dried parsley works too, but use less since it’s more concentrated.
- 1 tablespoon granulated sugar: This helps with browning and yeast activation. Honey or maple syrup can be a natural substitute.
- 2 1/4 teaspoons instant yeast: Instant yeast is a game-changer because you can mix it directly with the dry ingredients. If you only have active dry yeast, let it bloom in warm milk for about 5-10 minutes first.
- 1 teaspoon fine sea salt: Essential for flavor balance. Don’t skip this!
- 1 cup whole or 2% milk (warmed to 110°F): This hydrates the dough. If you need a dairy-free alternative, unsweetened almond or oat milk will work well.
- 1 large egg (room temperature): This enriches the dough, giving it a lovely texture.
- 1 beaten egg, for brushing the tops: This creates that beautiful golden finish on your rolls.
- 2 tablespoons unsalted butter: More butter to brush on the rolls post-bake for that extra deliciousness!
- 1 tablespoon minced garlic: Yes, more garlic! This adds a buttery, garlicky glaze on top.
- 1 tablespoon chopped fresh parsley: Because we fancy! This adds freshness to the finishing touch.
- Flaky sea salt (for finishing): A sprinkle of flaky salt elevates the flavor and makes those rolls extra special.
Step-by-Step Instructions: Roll with Me
-
Prepare Your Dough:
In a large mixing bowl, combine 3 1/2 cups of all-purpose flour, granulated sugar, instant yeast, and sea salt. Give it a good mix with a whisk to make sure everything is evenly incorporated. -
Add the Wet Ingredients:
Now, let’s bring our dough to life! Add the warmed milk, room temperature egg, and 4 1/2 tablespoons of softened unsalted butter to the flour mixture. Using a spatula or your hands, mix until a shaggy dough forms. -
Kneading:
Lightly flour your countertop and dump the dough onto it. Knead for about 6-8 minutes, or until the dough is smooth and elastic. If it’s sticky, sprinkle a little more flour as needed. Don’t worry; kneading is a great way to channel any stress. -
First Rise:
Place the kneaded dough in a greased bowl and cover it with a clean kitchen towel. Let it rise in a warm place for about 1 hour, or until it has doubled in size. Pro tip: try turning your oven on for 1 minute, then turning it off before placing the dough inside—proven cozy spot for rising! -
Shape Your Rolls:
Once the dough has risen, punch it down to release the air, and sprinkle in the minced garlic and chopped parsley. Mix gently until incorporated. Then, divide the dough into 12 equal pieces and shape each piece into a roll. -
Second Rise:
Place the shaped rolls close together in a greased 9×13-inch baking dish. Cover them again with the kitchen towel and let them rise for another 30-45 minutes. You want them to be puffy and almost touching. -
Preheat Your Oven:
While the rolls are rising, preheat your oven to 375°F (190°C). A hot oven is critical for that golden crust! -
Egg Wash:
Once they’ve risen beautifully, brush the tops with the beaten egg to enhance browning. -
Bake:
Pop those rolls in the oven and let them bake for about 20-25 minutes or until they’re golden brown and sound hollow when tapped on the bottom. -
Garlic Butter Glaze:
In a small saucepan, melt 2 tablespoons of butter over low heat and stir in the additional minced garlic and parsley. Once the rolls are out of the oven, brush this glorious mixture over the top and sprinkle with flaky sea salt.
Serving Suggestions: Plating with Love
These Garlic Bread Rolls are best served warm and fresh out of the oven. To plate, arrange them in a lovely basket lined with a clean kitchen towel for rustic charm. Serve them alongside your favorite pasta, soups, or simply enjoy them on their own with a drizzle of olive oil or balsamic vinegar. Trust me, they’ll be the star of the show!
Recipe Variations: Get Creative!
- Cheesy Garlic Rolls: Add shredded mozzarella or parmesan to the dough or on top before baking for a melty surprise!
- Herb-Infused Rolls: Mix in chopped fresh rosemary or thyme instead of parsley for an aromatic twist.
- Whole Wheat Option: Swap half of the all-purpose flour with whole wheat flour to introduce a nuttier flavor and more fiber.
- Garlic-Herb Butter: Mix in dried Italian herbs for an extra burst of flavor in your garlic butter glaze.
- Sweet Garlic Rolls: Add a hint of cinnamon and sugar to your dough for a sweet take on these rolls, perfect for breakfast!
Chef’s Notes: A Slice of Kitchen Life
Oh, where do I begin? These rolls have a special place in my heart because they remind me of family and the simple joy of cooking together. Over the years, I’ve played around with different garlic and herb combinations, and sometimes I add a splash of white wine to the dough for depth.
Funny story—one Christmas, I decided to showcase these at our dinner. I was so excited that I accidentally doubled the garlic in the glaze! Let’s just say it turned into a garlic fest that still gets talked about during family gatherings. Lesson learned—sometimes, less is more, but it sure made for a memorable holiday!
FAQs and Troubleshooting
-
Why are my rolls dense?
If your rolls turned out dense, it could be due to insufficient kneading or not allowing enough rise time. Be sure to knead until smooth and give them adequate time to rise; patience is key! -
Can I prepare the dough in advance?
Absolutely! You can prepare the dough up to the first rise, punch it down, store it in the fridge overnight, and shape the rolls the next day. Just allow them to come to room temperature before the second rise. -
What if my rolls don’t brown properly?
If your rolls aren’t browning as they should, ensure your oven is properly preheated. An egg wash not only adds golden color but also a crispy crust, so don’t skip it! -
Can I freeze these rolls?
Yes! After baking and cooling, freeze them in an airtight bag. When you’re ready to eat, pop the frozen rolls in a preheated oven at 350°F (175°C) for about 10-15 minutes.
Nutritional Info
For those who are health-conscious, a single roll packs roughly 180 calories, with a balance of carbohydrates, fats, and proteins, thanks to the butter and egg. Remember, it’s all about balance—indulging in these rolls once in a while will bring happiness into your kitchen!
There you have it—your go-to recipe for Garlic Bread Rolls that are destined to impress! Cooking should be a joyous adventure, and I hope this recipe inspires you to gather your loved ones around the table. So, tie on that apron, sprinkle in some love, and enjoy each delicious bite. Happy baking!
PrintHomemade Garlic Bread Rolls
Delight in these soft, pillowy garlic bread rolls, bursting with flavor and perfect for any meal.
- Prep Time: 15 minutes
- Cook Time: 25 minutes
- Total Time: 90 minutes
- Yield: 12 servings 1x
- Category: Side Dish
- Method: Baking
- Cuisine: Italian
- Diet: Vegetarian
Ingredients
- 4 1/2 tablespoons unsalted butter
- 2 tablespoons minced garlic
- 3 1/2 cups + 1 tablespoon all-purpose flour
- 3 tablespoons chopped fresh parsley
- 1 tablespoon granulated sugar
- 2 1/4 teaspoons instant yeast
- 1 teaspoon fine sea salt
- 1 cup whole or 2% milk, warmed to 110°F
- 1 large egg, room temperature
- 1 beaten egg, for brushing the tops
- 2 tablespoons unsalted butter, melted, for brushing
- 1 tablespoon minced garlic, for glaze
- 1 tablespoon chopped fresh parsley, for glaze
- Flaky sea salt, for finishing
Instructions
- Prepare your dough: In a large mixing bowl, combine flour, sugar, instant yeast, and salt. Mix well.
- Add the warmed milk, egg, and unsalted butter to the flour mixture. Mix until shaggy dough forms.
- Knead the dough on a floured countertop for about 6-8 minutes until smooth and elastic.
- Place the kneaded dough in a greased bowl and cover it. Let it rise in a warm place for about 60 minutes.
- Shape your rolls: Punch down the risen dough, add minced garlic and parsley, mix gently, and divide into 12 pieces, shaping each into a roll.
- Place the rolls in a greased baking dish, cover, and let them rise for another 30-45 minutes.
- Preheat your oven to 375°F (190°C).
- Brush the tops of the rolls with beaten egg.
- Bake for 20-25 minutes until golden brown.
- Melt butter in a saucepan, stir in garlic and parsley, then brush over rolls and sprinkle with flaky sea salt.
Notes
These rolls are best served warm and can be frozen after baking for later enjoyment. For a twist, try adding cheese or different herbs.
Nutrition
- Serving Size: 1 roll
- Calories: 180
- Sugar: 1g
- Sodium: 300mg
- Fat: 7g
- Saturated Fat: 4g
- Unsaturated Fat: 3g
- Trans Fat: 0g
- Carbohydrates: 23g
- Fiber: 1g
- Protein: 4g
- Cholesterol: 15mg
Keywords: garlic bread, rolls, homemade bread, vegetarian, side dish

Korean Cucumber Salad: 15-Minute Crunchy Tangy Side Dish
Korean Cucumber Salad: An Incredible Ultimate Recipe for an Amazing Side Dish
Hello, fellow food lovers! Let’s talk about a dish that’s refreshing, vibrant, and incredibly versatile—Korean Cucumber Salad. You might be wondering, “Why cucumbers?” Well, not only are they crisp and hydrating, but they also serve as the perfect canvas for a burst of flavors that truly awaken your taste buds. Trust me; one bite of this salad will transport you straight to a lively Korean barbecue or a cherished family gathering!
Personal Story
I can still remember the first time I tasted a fabulous Korean Cucumber Salad. It was at a bustling little restaurant in downtown Seoul, where my friends and I huddled together, elbows on the table, eagerly sharing plates. The tangy, slightly spicy, and wonderfully aromatic salad danced on my tongue, balancing perfectly with the rich meats we devoured. What made it even more memorable was the warmth of the surrounding laughter and chatter, creating an atmosphere that felt like home, even in a distant city.
Years later, I found myself recreating that same salad in my kitchen. As I sliced into the cucumbers, the memories flooded back; all the experiences—new and old—that food can evoke are simply magical. So join me as we recreate this delightful dish! It’s more than just a salad; it’s a story, a memory, and a celebration of flavor.
Ingredients
Here’s what you’ll need for this delicious Korean Cucumber Salad:
-
2 large cucumbers (Korean or Persian): These varieties are sweeter and crisper than regular cucumbers. If you can’t find them, feel free to substitute with English cucumbers.
-
1 teaspoon salt: This helps draw out moisture from the cucumbers, creating a lovely texture. Don’t skip it!
-
2 tablespoons rice vinegar: Adds that perfect tang. If you prefer a milder acidity, you could use apple cider vinegar.
-
1 tablespoon soy sauce: For a savory umami punch. You can opt for tamari if you’re looking for a gluten-free option.
-
1 tablespoon chili flakes (or gochugaru for authentic flavor): This spice varies in heat, so adjust to your taste. Gochugaru offers a rich red color and a smoky depth.
-
1 teaspoon sugar: Balances the acidity of the vinegar. If you prefer a healthier alternative, honey or agave could work nicely.
-
1 tablespoon sesame oil: This adds a nutty aroma. If you’re cooking for someone with a sesame allergy, feel free to substitute with olive oil.
-
1 tablespoon sesame seeds: These add a delightful crunch and a bit of nuttiness. Toast them lightly for an extra burst of flavor!
-
2 green onions, finely chopped: These bring a fresh bite and a splash of color to the salad.
-
1 garlic clove, minced (optional): This adds depth and flavor, but if you’re not a garlic fan, feel free to omit it.
Step-by-Step Instructions
-
Prep the Cucumbers:
Start by washing the cucumbers thoroughly. If you’re using Persian or Korean cucumbers, there’s no need to peel them; their skin is tender and adds extra flavor. For English cucumbers, you may choose to peel them if you prefer a milder taste. Cut them in half lengthwise, and then slice them into thin half-moons. The thinner the slices, the quicker they will pickle and become delicious! -
Salt the Cucumbers:
In a large bowl, combine the cucumbers and salt. Toss gently to coat them evenly. Let them sit for about 15–20 minutes. This process will draw out excess moisture and help keep your salad crisp. While you wait, feel free to hum along to your favorite cooking playlist! -
Prepare the Dressing:
In a separate bowl, whisk together the rice vinegar, soy sauce, chili flakes (or gochugaru), sugar, sesame oil, and minced garlic (if using). Taste your dressing. It should be a perfect balance of tangy, salty, and a touch sweet. Adjust the flavors as needed—add a pinch more sugar or an extra splash of vinegar if desired. -
Combine Cucumbers and Dressing:
Once your cucumbers have released some water, drain the excess liquid. Add the cucumbers into the bowl with your dressing. Toss everything together until the cucumbers are well-coated. -
Final Touches:
Add in your chopped green onions and sesame seeds. Give it one last gentle toss to incorporate. At this stage, you can also let it marinate for an additional 10-15 minutes for the flavors to meld beautifully, although it’s perfectly delightful immediately after mixing!
Serving Suggestions
To serve, scoop the salad into a beautiful bowl, perhaps one that’s a bit rustic to complement the charming nature of the dish. Garnish with a few extra sesame seeds and a sprinkle of green onions for that extra pop of color. This salad pairs brilliantly with grilled meats, rice dishes, or even as a stunning starter to any Asian-inspired meal.
Recipe Variations
-
Add Protein: Toss in some cooked shrimp or grilled chicken for a more substantial salad.
-
Spicy Twist: For extra heat, add a splash of Korean chili paste or a few slices of fresh chili peppers.
-
Vegan Version: Stick to the original recipe, but use tamari instead of soy sauce for gluten-free needs.
-
Herbaceous Delight: Add finely chopped cilantro or mint for an extra layer of freshness.
-
Creamy Fun: Mix in a tablespoon of Greek yogurt for a creamy version that’s rich and refreshing!
Chef’s Notes
What I love about this Korean Cucumber Salad is its incredible adaptability. Over the years, I’ve played with different flavor profiles, but I always return to this classic version. I once had a mishap where I accidentally added too much vinegar—whoops! A sprinkle of sugar saved the day, teaching me that sometimes, improvisation leads to the best discoveries.
FAQs and Troubleshooting
1. My salad turned out too salty; what went wrong?
If your cucumbers were salted too long, they might absorb more salt than intended. Always remember to drain and rinse your cucumbers if you feel they are too salty before adding the dressing.
2. Can I make this salad ahead of time?
You can prep the cucumbers and the dressing separately ahead of time. Just mix them together about 30 minutes before serving for the best flavor.
3. What can I do if it’s too tangy?
Add a bit more sugar to balance the acidity. You can also mix in some additional cucumbers if you have them on hand.
4. Should I refrigerate the salad?
Yes, keeping it in the fridge for a few hours before serving helps the flavors meld beautifully. Just be sure to eat it within a day or two for the best texture!
Nutritional Info
While I’ve focused on the deliciousness of this recipe, it’s also important to keep in mind that this salad is low in calories yet full of flavor! Each serving is refreshingly light, making it a guilt-free addition to your meals.
So there you have it, folks! A beautiful, crisp, and flavorful Korean Cucumber Salad that’s perfect for any occasion. It’s not just a side dish; it’s a celebration of fresh ingredients and delightful memories. Let’s get cooking! 🍽️
PrintKorean Cucumber Salad

A refreshing and vibrant Korean Cucumber Salad that serves as the perfect side dish, bursting with flavors that awaken your taste buds.
- Prep Time: 20 minutes
- Cook Time: 0 minutes
- Total Time: 20 minutes
- Yield: 4 servings 1x
- Category: Side Dish
- Method: No Cook
- Cuisine: Korean
- Diet: Vegan
Ingredients
- 2 large cucumbers (Korean or Persian)
- 1 teaspoon salt
- 2 tablespoons rice vinegar
- 1 tablespoon soy sauce
- 1 tablespoon chili flakes (or gochugaru)
- 1 teaspoon sugar
- 1 tablespoon sesame oil
- 1 tablespoon sesame seeds
- 2 green onions, finely chopped
- 1 garlic clove, minced (optional)
Instructions
- Start by washing the cucumbers thoroughly. Cut them in half lengthwise, and then slice them into thin half-moons.
- In a large bowl, combine the cucumbers and salt. Toss gently to coat them evenly. Let them sit for about 15-20 minutes.
- In a separate bowl, whisk together the rice vinegar, soy sauce, chili flakes (or gochugaru), sugar, sesame oil, and minced garlic (if using).
- Once your cucumbers have released some water, drain the excess liquid. Add the cucumbers into the bowl with your dressing. Toss everything together.
- Add in your chopped green onions and sesame seeds. Give it one last gentle toss.
Notes
This salad pairs brilliantly with grilled meats or as a starter to any Asian-inspired meal. Can be made ahead of time for best flavor.
Nutrition
- Serving Size: 1 serving
- Calories: 100
- Sugar: 2g
- Sodium: 300mg
- Fat: 7g
- Saturated Fat: 1g
- Unsaturated Fat: 5g
- Trans Fat: 0g
- Carbohydrates: 12g
- Fiber: 2g
- Protein: 3g
- Cholesterol: 0mg
Keywords: Korean salad, cucumber salad, refreshing side dish
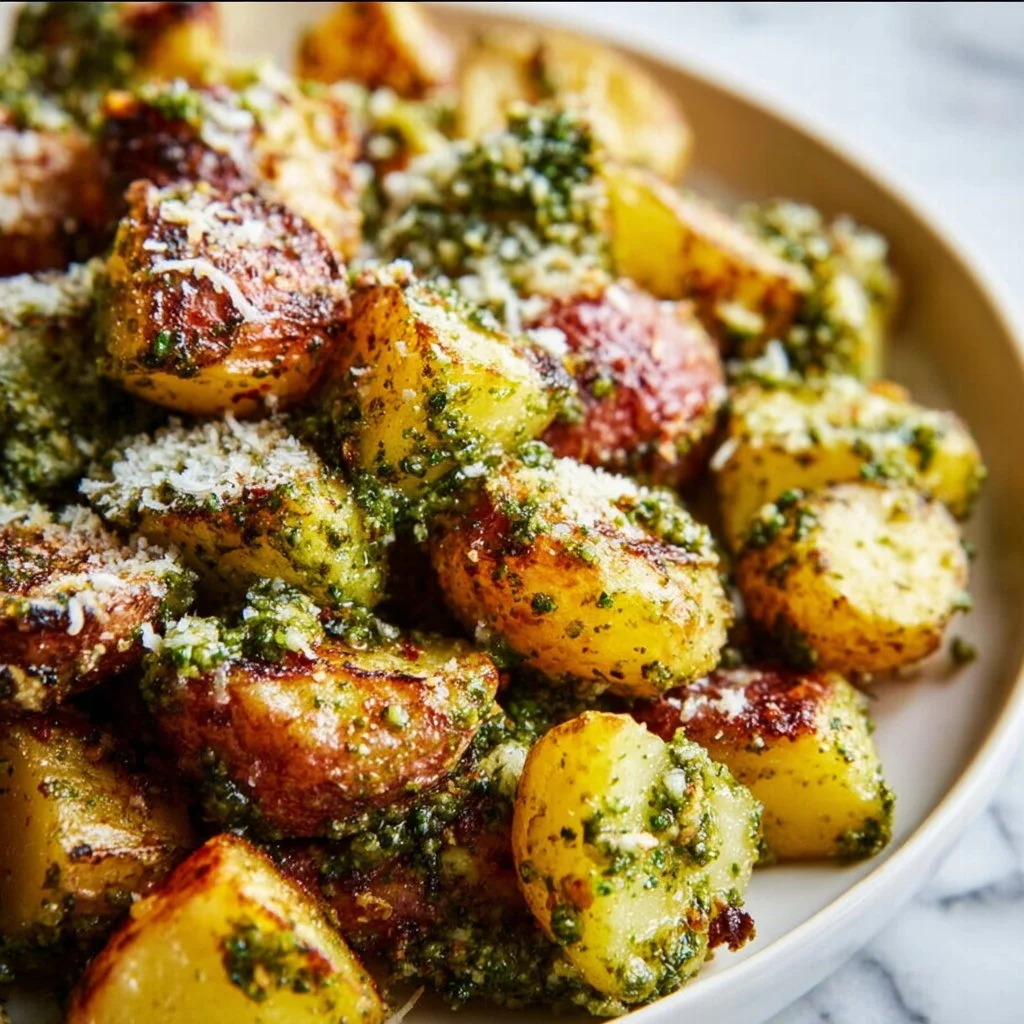
Parmesan Pesto Roasted Potatoes
Parmesan Pesto Roasted Potatoes: Simple Elegance on Your Plate
Hello and welcome to Ivory Apron! I’m so excited to share one of my favorite side dishes with you today: Parmesan Pesto Roasted Potatoes. I mean, who doesn’t just adore potatoes? They’re versatile, comforting, and when cooked right, they can take on a life of their own on the plate! And what’s better than the warm, garlicky aroma of potatoes roasting in the oven, all while being dressed in a vibrant basil pesto and a generous sprinkle of zesty Parmesan cheese? It feels like a hug in food form, don’t you think?
What I love about this recipe—and cooking in general—is that it strikes that perfect balance between simplicity and sophistication. With just a handful of ingredients, you can create a dish that looks and tastes like a gourmet treat. Imagine serving these beauties at your next dinner gathering, proudly announcing that "I made these!" Trust me, your guests will be raving!
So, grab your apron, preheat that oven, and let’s dive into this culinary adventure. Because cooking should be fun, delicious, and totally approachable—just like your favorite gatherings around the table. Let’s get started!
Personal Story
As a child, the kitchen was my playground. My parents encouraged me to explore new flavors and techniques, and I remember the first time I made roasted potatoes on my own—I was about ten years old! It was a simple recipe with only olive oil and salt, but as I pulled them out of the oven, the crispiness was magical. Inspired by my love for flavors, I decided to jazz it up with some pesto and Parmesan one day, after a friend of mine brought over a jar of her homemade basil pesto. Right then and there, the idea for these Parmesan Pesto Roasted Potatoes was born!
Standing proudly by the oven with my little apron on, I couldn’t contain my excitement as I watched the potatoes transform into golden bites of perfection. As the aroma wafted through the house, my siblings gathered in the kitchen, all eyes wide with anticipation. When it came time to taste, I watched their faces light up; it was a moment of pure joy. It reminded me that food isn’t just about sustenance; it’s about creating memories, igniting laughter, and sharing love around the table. Those roasted potatoes became a family favorite, and honestly, they still are! I can’t wait for you to experience the same joy these delightful bites can bring!
Ingredients
To whip up these delightful Parmesan Pesto Roasted Potatoes, you’ll need the following ingredients:
-
4 Medium Potatoes:
- Choose Yukon Gold for their buttery texture and flavor, or Russets for a fluffier inside. Don’t forget to scrub and clean them well! If you’re short on time, baby potatoes work too—they’re adorable and cook faster!
-
1/4 Cup Pesto:
- Store-bought or homemade, pesto brings vibrant flavor to the table. If you’re feeling adventurous, you can substitute with sun-dried tomato pesto or make a nut-free basil pesto using nutritional yeast.
-
1/2 Cup Grated Parmesan Cheese:
- These cheese flakes get crispy in the oven and add a salty, savory depth. If you’re going dairy-free, try nutritional yeast or a vegan Parmesan alternative for a similar taste!
-
Olive Oil:
- A good drizzle enhances flavor and ensures even roasting. Extra virgin olive oil is my go-to, but you can use avocado oil for a different flavor profile.
-
Salt and Pepper to Taste:
- Always taste as you go! Freshly cracked black pepper adds a nice kick, while sea salt highlights all those wonderful flavors.
Step-by-Step Instructions
Ready to bring your kitchen to life? Let’s dive into the magic of creating these roasted potatoes!
-
Preheat Your Oven:
- Preheat your oven to 425°F (220°C). This step is essential for achieving that lovely, golden-brown crust we adore. It’s like waking up your oven for a delicious day of cooking!
-
Prepare the Potatoes:
- Wash and scrub your potatoes to remove any grit. Then, chop them into bite-sized pieces—about 1-inch cubes. The uniformity in size ensures they cook evenly. Remember, sharp knives are your best friends!
-
Season to Perfection:
- In a large mixing bowl, toss the chopped potatoes with a couple of tablespoons of olive oil, a pinch of salt, and freshly ground black pepper. This coats each potato nicely, ensuring every bite is seasoned. Plus, we’ll be adding the pesto and cheese later!
-
Add the Pesto:
- Pour in the pesto and mix until the potatoes are beautifully coated. Don’t be shy; you want that vibrant green to hug each potato piece!
-
Cheese the Potatoes (Deliciously!):
- Sprinkle the grated Parmesan cheese over the pesto-coated potatoes and give them one final toss. This is where the magic happens—the cheese will crisp up beautifully in the oven.
-
Prepare for Roasting:
- Spread the potatoes evenly on a baking sheet lined with parchment paper. Avoid overcrowding to give each potato space to brown. Trust me; this will give you that desired crispy texture.
-
Roast Away:
- Place the baking sheet in the preheated oven and roast for about 30–35 minutes. Halfway through, give them a gentle toss to ensure even cooking. You’ll know they’re ready when they’re golden and crispy on the outside and tender on the inside.
-
Final Touches:
- Once out of the oven, taste for seasoning—add more salt or pepper if needed. A squeeze of fresh lemon juice or a sprinkle of more fresh basil also elevates the flavor profile beautifully!
Serving Suggestions
These Parmesan Pesto Roasted Potatoes are just waiting to steal the spotlight! Serve them piping hot alongside your favorite protein—think herb-crusted chicken, grilled steak, or even a beautifully roasted veggie platter. Either way, the potatoes become the star of the meal.
For a fun presentation, you can scatter fresh herbs like basil or parsley on top before serving. And remember, using a white serving dish can make the vibrant greens and yellows of your dish pop! It’s all about that beautiful plating!
Recipe Variations
Ready to get creative? Here are some fun variations you can try:
-
Herbed Variants: Add fresh chopped rosemary or thyme to the potatoes before roasting for an aromatic twist.
-
Spicy Kick: Toss in a pinch of red pepper flakes with the pesto for a delightful heat.
-
Add Veggies: Incorporate halved cherry tomatoes or bell pepper slices for an extra pop of color and flavor.
-
Crispy Toppings: Top with crispy fried onions or bread crumbs for an added crunch.
-
Cheesy Goodness: Mix in crumbled feta or goat cheese for a tangy twist!
Chef’s Notes
Over the years, I’ve tweaked this recipe a few times, and it has become a go-to in my kitchen. One funny story that always makes me smile is when I made these for a large family gathering. I was so excited that I may or may not have thrown in a bit too much pesto! Let me tell you—what resulted was an overly green dish that had everyone talking! We all laughed, but hey, it turned out delicious and was a hit nonetheless!
Cooking is all about experimenting and having fun. Don’t stress if things don’t turn out exactly as planned; embrace them as part of your kitchen journey!
FAQs and Troubleshooting
-
Why are my potatoes not crispy?
- Ensure enough space on the baking sheet. Overcrowding can make them steam instead of roast. Also, dry them well after washing to avoid excess moisture!
-
Can I prepare these potatoes ahead of time?
- Absolutely! You can chop the potatoes and combine them with pesto and cheese a few hours ahead. Just cover and refrigerate, then roast right before serving.
-
What if I don’t have pesto?
- No worries! You can substitute with a mixture of olive oil, garlic, fresh herbs, and a splash of lemon juice to brighten the flavor.
-
How do I store leftovers?
- Store any leftovers in an airtight container in the refrigerator for up to 3 days. Reheat them in the oven for a few minutes to regain that crispy texture!
Nutritional Info (optional)
While I focus on flavor, I understand many of you consider nutrition too. Here’s a rough estimate per serving (based on 4 servings):
- Calories: 250
- Fat: 12g
- Carbohydrates: 30g
- Protein: 7g
- Fiber: 3g
Cooking should be an experience to savor, filled with warmth and memories. I hope this Parmesan Pesto Roasted Potatoes recipe brings just that to your table. I can’t wait for you to try it! Remember, the heart of the kitchen lies in sharing love, laughter, and food—so let’s keep those aprons ties and those pots simmering. Happy cooking! 🍽️
PrintParmesan Pesto Roasted Potatoes
Delicious roasted potatoes dressed in vibrant basil pesto and topped with crispy Parmesan cheese.
- Prep Time: 15 minutes
- Cook Time: 30 minutes
- Total Time: 45 minutes
- Yield: 4 servings 1x
- Category: Side Dish
- Method: Roasting
- Cuisine: Italian
- Diet: Vegetarian
Ingredients
- 4 Medium Potatoes (Yukon Gold or Russets)
- 1/4 Cup Pesto (store-bought or homemade)
- 1/2 Cup Grated Parmesan Cheese
- Olive Oil
- Salt and Pepper to Taste
Instructions
- Preheat your oven to 425°F (220°C).
- Prepare the potatoes by washing, scrubbing, and chopping them into 1-inch cubes.
- Season the potatoes in a large bowl with olive oil, salt, and pepper.
- Add the pesto and mix until the potatoes are well coated.
- Sprinkle the grated Parmesan cheese over the potatoes and toss again.
- Prepare a baking sheet lined with parchment paper and spread the potatoes evenly.
- Roast in the oven for about 30–35 minutes, tossing halfway through.
- Final touches: Once out of the oven, taste for seasoning and adjust if needed.
Notes
Feel free to add fresh herbs or a squeeze of lemon juice for added flavor.
Nutrition
- Serving Size: 1 serving
- Calories: 250
- Sugar: 1g
- Sodium: 400mg
- Fat: 12g
- Saturated Fat: 4g
- Unsaturated Fat: 6g
- Trans Fat: 0g
- Carbohydrates: 30g
- Fiber: 3g
- Protein: 7g
- Cholesterol: 30mg
Keywords: roasted potatoes, pesto, vegetarian side dish