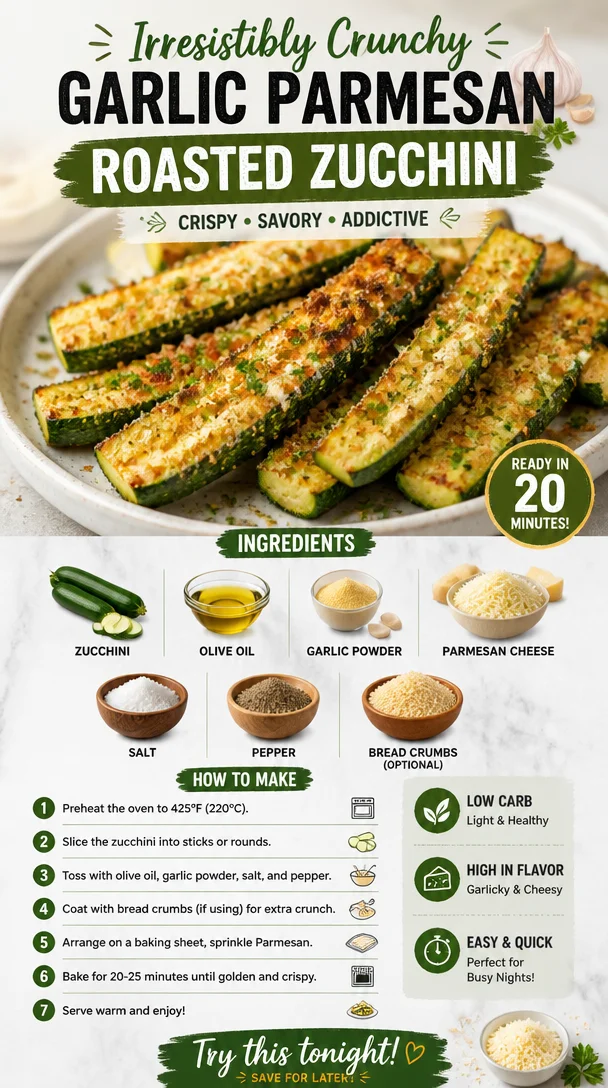
Irresistibly Crunchy Garlic Parmesan Roasted Zucchini
Irresistibly Crunchy Garlic Parmesan Roasted Zucchini
Hello dear friends! If you’re like me and love to whip up simple yet extraordinary dishes, then today’s recipe for Irresistibly Crunchy Garlic Parmesan Roasted Zucchini is just what you need. This delightful vegetable side dish is not only easy to prepare, but it also packs a punch of flavor that elevates any meal. Zucchini, with its tender crunch, is transformed into golden bites of goodness that are perfectly seasoned and absolutely satisfying!
Introduction
Zucchini often gets a bad rap for being bland or unexciting, but I’m here to tell you that, with the right approach, it can be a showstopper at your dinner table! Imagine this: it’s a beautiful summer evening, and you’ve got friends gathered around, possibly with a glass of Chardonnay in hand. You bring out a dish of perfectly roasted zucchini, golden and crunchy, with that irresistible garlic and Parmesan aroma wafting through the air. The first bite is met with gasps of delight. What once was a humble vegetable is now a star of the show!
When preparing this dish, I want you to feel the joy and ease of cooking in your own kitchen. The best part? It’s all about transforming something simple into something fabulous! You’ll shock your guests and impress your family with just a handful of ingredients and… dare I say it? minimal effort. So, let’s get started and make some culinary magic happen with this utterly scrumptious recipe.
Personal Story
I fondly remember the summer evenings of my childhood, running through our backyard with my siblings while the sun dipped low and the air filled with the scent of freshly mowed grass and grilled food. My mom often cooked zucchini, slicing it up and tossing it on the grill with her signature garlic seasoning. It was that perfect balance of charred on the outside, yet tender on the inside, and I couldn’t get enough! Although I may have preferred dessert at the time, those roasted zucchini pieces linger in my mind as a staple of warmth and togetherness around the dinner table.
As I grew older, my love for cooking blossomed, and I rediscovered how versatile zucchini could be. I began experimenting with various seasonings and techniques, and that’s when I created this restaurant-quality dish right in my kitchen. Trust me, friends, these roasted zucchini bites will become a staple at your table just as they did at mine.
Ingredients
Here’s what you’ll need to create these delectable bites:
-
Zucchini: Opt for firm and shiny zucchini. They should be medium-sized; too big can mean a watery texture. If you’re in a pinch, yellow squash works beautifully as a substitute!
-
Olive Oil: This is your essential fat for roasting. Its fruity flavor enhances the dish while helping achieve a lovely golden color. If you’re looking for a lighter option, avocado oil is a great choice!
-
Garlic Powder: For that unmistakable garlicky flavor. If desired, fresh minced garlic can also do the trick—just use about a clove or two.
-
Parmesan Cheese: Aged and sharper in flavor, Parmesan adds a nutty richness. If you’re dairy-free, try nutritional yeast for a similar cheesy flavor without the lactose.
-
Salt: Essential for bringing out all the flavors. Feel free to experiment with flavored salts, such as garlic salt or herb-infused salts.
-
Pepper: A dash of freshly cracked black pepper adds that extra bit of warmth. Have fun with it! Try using chili flakes for a spicy kick!
-
Bread Crumbs (optional): Want extra crunch? Toss in some breadcrumbs! Use panko for a lighter, airier texture, or go for seasoned breadcrumbs for added flavor!
Step-by-Step Instructions
Now that we have our ingredients lined up, let’s get cooking! Follow these simple steps, and I promise you’ll end up with zucchini that will have everyone asking for seconds.
-
Preheat Your Oven: Set that oven to 425°F (220°C). A hot oven is essential for achieving that crispy texture we’re all after.
-
Prep the Zucchini:
- Wash your zucchini, then slice it into rounds about ½ inch thick. If you’re feeling fancy, cut them into batons for a more elegant presentation!
- Think about using slightly bigger pieces to maximize that crunchy edge!
-
Toss with Olive Oil:
- In a large mixing bowl, drizzle about 2 tablespoons of olive oil over your zucchini slices.
- Give them a good toss, ensuring every piece is coated. A quick chef’s tip: If you’re using your hands, take this moment to get a little messy! Feel that olive oil coating each slice.
-
Season Generously:
- Now, sprinkle in about 1 teaspoon of garlic powder, and season with salt and pepper to taste. Toss it again, adding more olive oil if needed to ensure everything is evenly coated.
- Pro tip: When you season, go light at first; you can always add more later!
-
Add the Parmesan:
- This is the moment you’ve been waiting for! Grab that grated Parmesan and sprinkle it generously over the zucchini. Toss to evenly coat.
- If you want that crunchy topping, add your breadcrumbs here too!
-
Spread on a Baking Sheet:
- Line a baking sheet with parchment paper for easy cleanup (and to keep those zucchini from sticking). Spread the zucchini out in a single layer—you don’t want them to steam; you want them to roast!
-
Roast to Perfection:
- Pop them in the oven and roast for about 20-25 minutes, turning them halfway through. You’re looking for a golden-brown color and a crispy texture—heavenly!
- Keep an eye on them; the last few minutes matter! Once they look deliciously crispy, they’re ready to shine.
-
Final Touches:
- Once out of the oven, let them sit for a minute or two. Feel free to sprinkle a bit more Parmesan or fresh herbs like parsley or basil over them before serving for that finishing touch!
Serving Suggestions
Serving these roasted zucchini pieces is a breeze—place them right in the center of the table! Arrange them on a beautiful platter. For an extra touch, garnish with fresh herbs and a light drizzle of olive oil or balsamic glaze for added sophistication. They make an excellent side dish to grilled meats, pasta, or even tucked into a warm pita.
Recipe Variations
Feel free to play around with this recipe! Here are a few tasty twists you can try:
-
Italian Herb Zucchini: Add Italian seasoning or fresh rosemary to the olive oil mix for an extra layer of flavor.
-
Spicy Zucchini: Toss in a pinch of cayenne pepper or chili flakes for a bit of heat.
-
Cheesy Zucchini Bake: Layer the zucchini in a baking dish with marinara sauce and mozzarella cheese for a hearty twist on baked zucchini.
-
Vegan Version: Skip the cheese and add a sprinkle of nutritional yeast for a cheesy flavor without the dairy.
-
Mediterranean Zucchini: Incorporate sundried tomatoes, olives, and feta cheese for a Mediterranean flair.
Chef’s Notes
You know, it’s funny how recipes evolve over time. This one started as a simple roasted zucchini with basic seasonings, but I couldn’t resist the allure of making it crispy and cheesy! I also had a couple of mishaps along the way—like that one time I accidentally loaded too much garlic! Let me tell you, the aroma! It was heavenly but left me with slightly vampire-repelling vibes!
Always keep experimenting and improvising; cooking is as much about creativity as it is about following a recipe. You’ll find your unique sparkle in the kitchen, just like I did!
FAQs and Troubleshooting
-
Why are my zucchini slices mushy?
Make sure to slice them evenly and don’t overcrowd the baking sheet. Roasting too many together can result in steaming rather than crispy roasting. Always give them space! -
How can I ensure even cooking?
Turn your zucchini halfway through roasting. Keeping an eye on them during the last few minutes is vital for ensuring they do not overcook! -
My zucchini didn’t crisp up, what happened?
If they didn’t brown, it could be due to too much liquid in the zucchini. Always dry your slices well after washing them and consider salting them before roasting to draw out excess moisture! -
Can I prepare zucchini ahead of time?
Absolutely! Prep your zucchini and toss it in the olive oil and seasonings a few hours in advance, storing it in the fridge. Roasting right before serving will keep them crispy!
Nutritional Info
While nutrition may vary based on specific ingredients, here’s a general breakdown per serving (not including any optional toppings):
- Calories: 120
- Protein: 6g
- Carbohydrates: 7g
- Fat: 9g
Now that you’re armed with this delicious recipe, I can’t wait for you to dive in and start creating your own culinary moments! Remember, cooking should always be fun, approachable, and above all, a way to connect with those you love around the table. Happy cooking!
PrintIrresistibly Crunchy Garlic Parmesan Roasted Zucchini
A delightful vegetable side dish featuring zucchini that is roasted to golden perfection with garlic and Parmesan.
- Prep Time: 10 minutes
- Cook Time: 25 minutes
- Total Time: 35 minutes
- Yield: 4 servings 1x
- Category: Side Dish
- Method: Roasting
- Cuisine: Italian
- Diet: Vegetarian
Ingredients
- 2 medium Zucchini, sliced into ½ inch rounds
- 2 tablespoons Olive Oil
- 1 teaspoon Garlic Powder
- ½ teaspoon Salt
- ¼ teaspoon Pepper
- ¼ cup Parmesan Cheese, grated
- ¼ cup Bread Crumbs (optional)
Instructions
- Preheat your oven to 425°F (220°C).
- Prep the zucchini by washing and slicing it into rounds.
- Toss the zucchini with olive oil in a large mixing bowl.
- Season generously with garlic powder, salt, and pepper.
- Add the grated Parmesan and breadcrumbs, if using, and toss to coat.
- Spread the zucchini on a lined baking sheet in a single layer.
- Roast for 20-25 minutes, turning halfway through, until golden brown and crispy.
- Let sit for a minute before serving, optionally garnishing with more Parmesan or fresh herbs.
Notes
For extra flavor, try adding Italian herbs or chili flakes to the seasoning.
Nutrition
- Serving Size: 1 serving
- Calories: 120
- Sugar: 2g
- Sodium: 300mg
- Fat: 9g
- Saturated Fat: 3g
- Unsaturated Fat: 5g
- Trans Fat: 0g
- Carbohydrates: 7g
- Fiber: 2g
- Protein: 6g
- Cholesterol: 10mg
Keywords: garlic, zucchini, parmesan, roasted vegetables, side dish
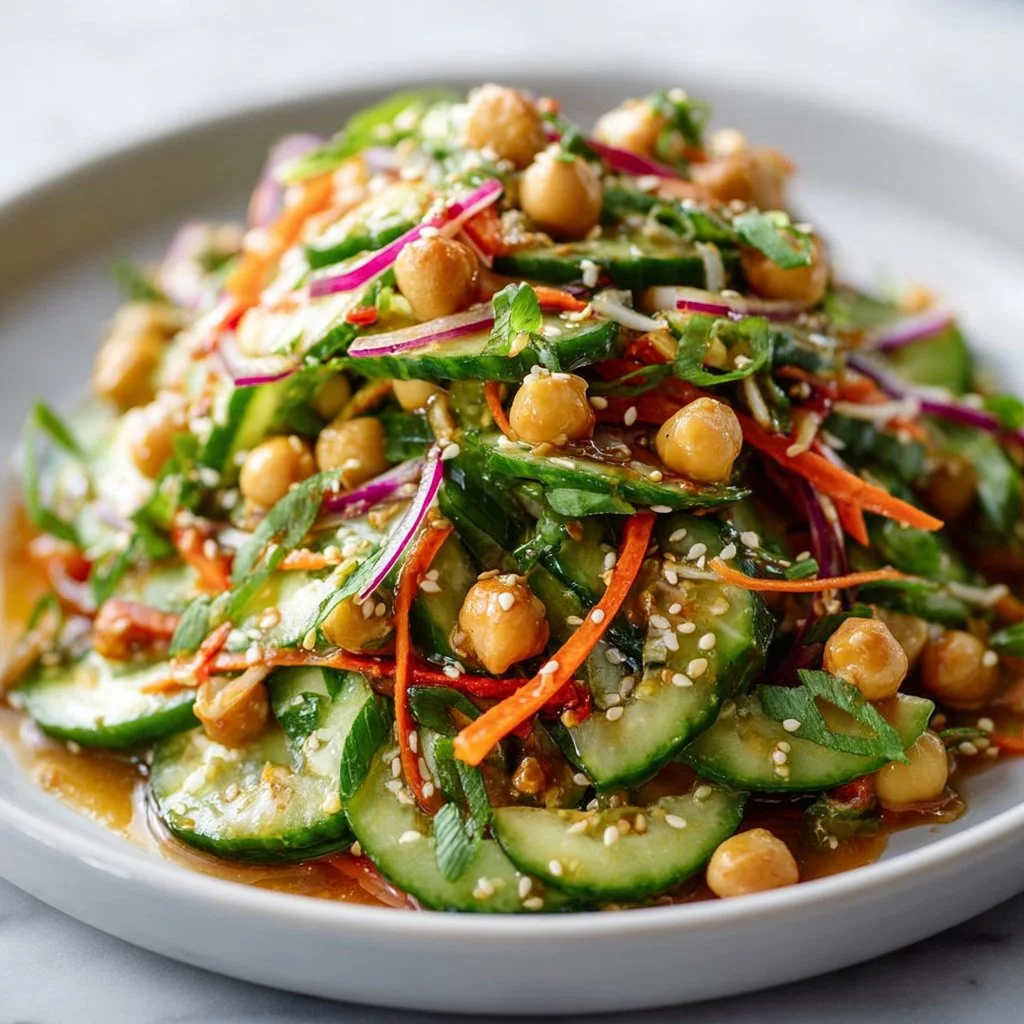
Asian Cucumber and Chickpea Slaw with Sesame Dressing
Refreshing Asian Cucumber and Chickpea Slaw with Sesame Dressing
Hello, my fellow food lovers! Today, let’s take a trip to the kitchen where I’ll show you how to create a vibrant, fresh dish that will make your taste buds dance — Asian Cucumber and Chickpea Slaw with Sesame Dressing. This recipe is one of my go-to favorites for those days when I crave something light yet satisfying. It’s packed with flavor, color, and crunch; perfect as a side dish or even a main event on your table.
There’s something truly magical about a colorful plate of food that transports us to far-off lands, isn’t there? As someone who’s always loved modulating flavors and textures, I appreciate how a simple dish can have layers of complexity, much like life! This slaw is a beautiful harmony combining the crispness of fresh cucumbers and carrots with the hearty texture of chickpeas. Topped with a nutty sesame dressing, it’ll be a crowd-pleaser at any gathering, from casual lunches to lavish dinner parties.
With all that vibrancy, you might think this recipe is complex or challenging, but let me reassure you — it’s a breeze! I’ll walk you through each step, offer some chef tips, and help you master the art of this delightful dish. By the time we’re done, you’ll not only be equipped with a fresh recipe but also with inspiration to whip up this slaw any time you crave a burst of flavor!
So grab your apron and your favorite knife, and let’s dive into the joys of cooking together.
Personal Story
Whenever I think about cucumber slaw, I’m transported back to my childhood, specifically to summer evenings spent at my grandmother’s house. She had this magical garden where she grew fresh cucumbers and vibrant carrots among other vegetables. One hot July evening, she invited the whole family over for dinner. As the sun set, casting a warm golden hue across the table, she pulled out a giant bowl of cucumber slaw, vibrant and glistening with dressing.
The refreshing crunch as we dug in was simply divine! I remember her telling us about how she mixed up various dressings, capturing flavors from her travels to Asia. This slaw was not only a side dish; it was a connection — a blend of memories and love, served from her heart to ours. And every bite was a testament to how simple ingredients could create something magical. That evening shaped how I view cooking — as a way to connect with others and craft memories.
Ingredients
Here’s what you’ll need to get started on this delicious slaw:
-
2 cups shredded cucumber
Cucumbers add a refreshing crunch. I recommend using English cucumbers or Persian cucumbers for their sweetness and lesser seeds. If you’re looking for a substitute, try zucchini for a similar texture. -
1 cup shredded carrots
Carrots bring sweetness and vibrant color. You can use pre-shredded carrots for convenience, but freshly grated truly enhances the flavor. If you don’t have carrots, shredded bell peppers can be a colorful alternative. -
1 can (15 oz) chickpeas, drained and rinsed
Chickpeas are the star of this dish, providing protein and heartiness. Rinsing is essential to get rid of excess sodium. If you’re short on time, canned beans work perfectly! If avoiding legumes, consider cooked quinoa or edamame as a substitute for protein. -
1/4 cup thinly sliced red onion
Red onions add a sharpness that beautifully complements the slaw. If raw onion is too strong for you, soak them in cold water for 10 minutes to mellow the flavor. -
1/4 cup chopped cilantro
Cilantro adds a bright, herby flavor. It’s worth it to chop fresh herbs, but if you’re not a fan or have allergies, parsley is a great substitute. -
2 tablespoons sesame oil
Sesame oil is aromatic and nutty, making it a staple in Asian cuisines. You can replace it with another oil, like avocado oil, but you’ll miss that unique flavor. -
1 tablespoon rice vinegar
Rice vinegar adds a softly sweet acidity. If you’re out, apple cider vinegar can work in a pinch, but cut back slightly since it’s more potent. -
1 tablespoon soy sauce
Soy sauce delivers umami richness. For a gluten-free version, use tamari, or for a low-sodium option, pick a reduced-sodium soy sauce. -
1 teaspoon honey
Honey adds just a touch of sweetness. If you’re vegan, swap it out for agave syrup or maple syrup. -
1 teaspoon grated ginger
Fresh ginger adds a warm, spicy note. If fresh ginger isn’t available, a pinch of ground ginger will suffice, but I always recommend fresh if you can. -
1 clove garlic, minced
Garlic enhances the slaw with its aromatic flavors. For a milder taste, use garlic powder instead, adjusting to your preferences. -
1 tablespoon sesame seeds
Toasted sesame seeds on top add a delightful crunch and a nutty finish. You can also use sunflower seeds if sesame seeds aren’t handy.
Step-by-Step Instructions
Now that we have our ingredients ready, let’s cook this slaw up with some fun tips along the way!
Step 1: Prep Your Vegetables
- Start by washing your cucumbers and carrots thoroughly. If you’re using whole cucumbers, peel them if you prefer a milder flavor. Next, slice the cucumbers into thin rounds, then into strips to achieve that fun shredded profile. You can also use a box grater or food processor to slice your carrots quickly.
Step 2: Shred and Combine
- Once your cucumbers and carrots are prepped, toss them into a large mixing bowl.
- Add in the canned chickpeas (don’t forget to rinse and drain!). Follow with the sliced red onion and chopped cilantro, making sure everything is beautifully mixed and full of color. Give it a gentle toss to combine without smashing the chickpeas!
Step 3: Make the Dressing
- In a separate bowl, whisk together the sesame oil, rice vinegar, soy sauce, honey, grated ginger, and minced garlic. This dressing is a blend of savory, sweet, and tangy; the perfect way to elevate your slaw. If you love it a touch more acidic, add another splash of rice vinegar.
Step 4: Combine Slaw and Dressing
- Drizzle the dressing over the vegetable mixture. Gently fold everything together until the veggies are coated in that scrumptious sauce. Don’t stir too aggressively — we want the chickpeas to remain whole!
Step 5: Let It Rest
- Here’s a great chef hack: Allow your slaw to rest in the fridge for at least 20 minutes before serving. This helps the flavors meld and makes for a more delicious dish! If you’re in a pinch, a quick 10-minute chill will help too.
Step 6: Serve
- When ready to serve, sprinkle the toasted sesame seeds on top for added crunch and presentation.
Serving Suggestions
To serve this delightful slaw, present it in a large, colorful bowl to showcase all those vibrant ingredients. Pair it with grilled meats for a hearty meal or serve it as a delightful side at your next barbecue. Don’t be afraid to adorn the table with some extra lime wedges for that zesty pop right before digging in!
Recipe Variations
Feel free to get creative! Here are a few ideas to switch up the recipe:
- Spicy Twist: Add some Sriracha or red pepper flakes to the dressing for a spicy kick!
- Noodle Bowl: Toss the slaw with cooked soba noodles or rice vermicelli for a wholesome meal.
- Asian Fusion: Swap out chickpeas for shredded cabbage and add shredded chicken or tofu for a twist.
- Fruity Addition: Add in chopped mango or diced apples for a sweet, fruity contrast.
- Herb Swaps: Experiment with fresh basil or mint in place of cilantro for a unique flavor profile.
Chef’s Notes
As with many recipes, this slaw has evolved in my kitchen over the years. I initially focused on traditional Asian flavors, but I soon realized that it worked beautifully with various ingredients I found at local farmers’ markets. The beauty of slaws like this one is their versatility. On lazy days, I’ve even thrown in leftover roasted vegetables or grains, quickly transforming it into a full meal!
And let me tell you, the first time I served this dish at a dinner party, it was met with rave reviews — everyone kept asking for the recipe! I love how cooking can create moments like that — the connection between people, food, and stories ignites joy in our lives.
FAQs and Troubleshooting
Q: Can I make this slaw ahead of time?
A: Absolutely! This slaw holds up well in the fridge. Just keep in mind to add the sesame seeds right before serving for that crunch!
Q: What if I have leftovers?
A: Leftover slaw makes a great topping for sandwiches or tacos! It can last in the fridge for about 3 days, but it’s always best fresh.
Q: Can I use frozen chickpeas?
A: Yes, if you’ve cooked your chickpeas and frozen them, just thaw, rinse, and they’ll work great!
Q: Can I skip the onion or garlic?
A: Sure! Adjust to your taste; omit or use scallions for a milder flavor or garlic-infused oil as a substitute.
Nutritional Info (Optional)
While I don’t focus solely on the nutritional aspects of my recipes, you’ll find that this slaw is not only delicious but also nutritious. It’s packed with fiber, vitamins, and plant-based protein thanks to the chickpeas and veggies. For those monitoring calories, each serving contains roughly 150 calories.
So there you have it! We’ve taken a simple idea and created something that not only tastes wonderful but also feels great to make. Once you serve this slaw, you’ll understand why it became a staple in my family and why it will for yours too! Appreciate the little moments as you share this dish with loved ones around your table. Happy cooking! 🎉
PrintRefreshing Asian Cucumber and Chickpea Slaw with Sesame Dressing
A vibrant, fresh Asian slaw featuring cucumbers, chickpeas, and a nutty sesame dressing that’s perfect for any meal.
- Prep Time: 15 minutes
- Cook Time: 0 minutes
- Total Time: 35 minutes
- Yield: 4 servings 1x
- Category: Salad
- Method: No-Cook
- Cuisine: Asian
- Diet: Vegan
Ingredients
- 2 cups shredded cucumber
- 1 cup shredded carrots
- 1 can (15 oz) chickpeas, drained and rinsed
- 1/4 cup thinly sliced red onion
- 1/4 cup chopped cilantro
- 2 tablespoons sesame oil
- 1 tablespoon rice vinegar
- 1 tablespoon soy sauce
- 1 teaspoon honey
- 1 teaspoon grated ginger
- 1 clove garlic, minced
- 1 tablespoon sesame seeds
Instructions
- Prep Your Vegetables by washing and slicing cucumbers and carrots.
- Shred and combine cucumbers, carrots, chickpeas, red onion, and cilantro in a large mixing bowl.
- Make the dressing by whisking together sesame oil, rice vinegar, soy sauce, honey, ginger, and garlic in a separate bowl.
- Combine slaw and dressing by drizzling the dressing over the vegetable mixture and folding gently.
- Let it rest in the fridge for at least 20 minutes before serving.
- Serve with toasted sesame seeds on top for added crunch.
Notes
Add a splash of lime juice for extra zest and consider adding Sriracha for a spicy twist!
Nutrition
- Serving Size: 1 cup
- Calories: 150
- Sugar: 4g
- Sodium: 320mg
- Fat: 7g
- Saturated Fat: 1g
- Unsaturated Fat: 6g
- Trans Fat: 0g
- Carbohydrates: 22g
- Fiber: 6g
- Protein: 5g
- Cholesterol: 0mg
Keywords: cucumber slaw, chickpea salad, sesame dressing, Asian cuisine, vegan recipe