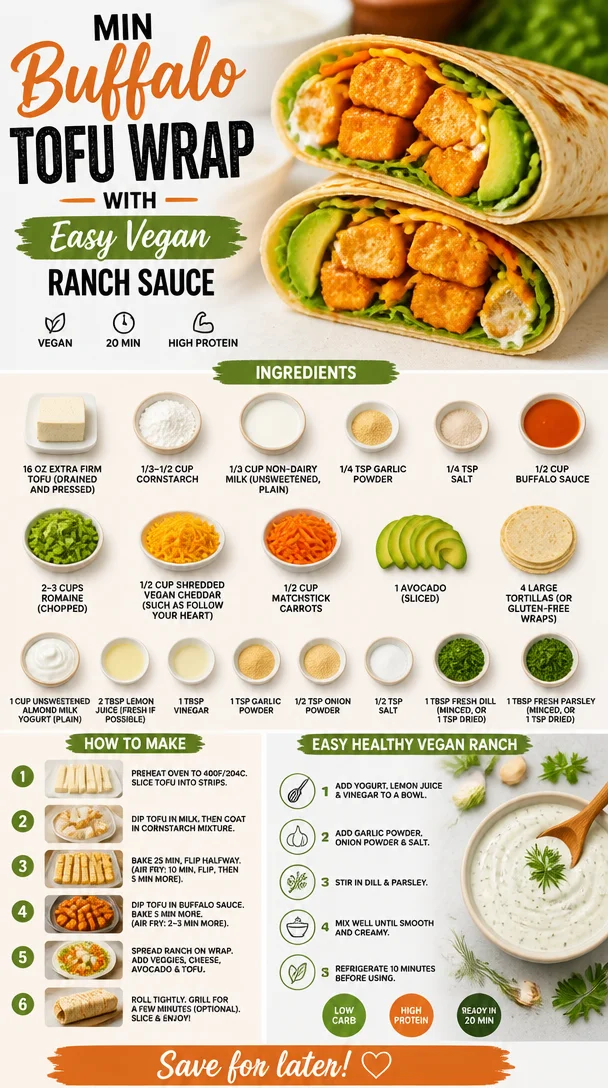
Min Buffalo Tofu Wrap with Easy Vegan Ranch Sauce
Buffalo Tofu Wraps with Easy Vegan Ranch
Introduction
Hey there, my food-loving friends! Today, I’m so excited to share a recipe that has become a staple in my kitchen: Buffalo Tofu Wraps with Easy Vegan Ranch. This dish is a glorious celebration of bold flavors and vibrant colors, perfect for those busy weeknights or when you want something delightful yet stress-free. It’s also a fantastic choice for gatherings, impressing both vegans and non-vegans alike.
I remember the first time I tried buffalo tofu wings at a local vegan cafe. I was skeptical at first; tofu wings? Really? But one bite changed everything. The crispy coating, the tangy heat of the buffalo sauce, and the cool creaminess of ranch dressing created a flavor explosion that had me craving more. It struck me that these components could easily transition into a wrap to make it even more filling and shareable! So, armed with the idea, I rushed home to create my own version of this dish. Spoiler alert: it was a huge hit, and I still make it regularly for get-togethers and casual dinners alike.
You’re going to love how straightforward this recipe is, with steps that lead you to quickly pop these wraps on the table. Let’s roll up our sleeves, tie on our aprons, and get cooking!
Personal Story
Let me take you back to a crisp fall evening a few years ago. I had invited over friends for a casual movie night, and I wanted to whip up something both satisfying and a bit different. Inspired by my newfound love for buffalo tofu, I decided to create these wraps. As the scent of frying tofu filled my kitchen, it brought back memories of my childhood, when my family would gather around the dinner table, sharing stories and laughter.
As I prepared, I laughed at how my kitchen was a delightful mess—spices scattered, veggie peels on the counter, and the sound of laughter escaping the living room where my friends waited in anticipation. The first wrap came together beautifully, and as I took my first satisfying bite, it felt like I was elevating not only my cooking but also the joy of gathering together. These wraps quickly became a beloved dish in my recipe repertoire, and they’ll surely find a special place in yours too!
Ingredients
Here’s what you’ll need to whip up these scrumptious Buffalo Tofu Wraps, along with a few insights to keep in mind:
-
16 oz block extra firm tofu (drained and pressed)
Tofu is a fantastic protein source and perfect for absorbing flavors. Extra firm is essential for that crispy texture. If you can’t find extra firm, you can use firm—just be careful to press it well to remove excess moisture. -
1/3–1/2 cup cornstarch
This is the magic ingredient for achieving a crispy coating. If you prefer a different texture, you can substitute with arrowroot powder or tapioca starch. -
1/3 cup non-dairy milk (unsweetened, plain)
This helps create a light batter. Almond milk, soy milk, or oat milk work like a charm! Choose whatever fits your dietary preference. -
1/4 tsp garlic powder
A must-have for flavor! If you adore garlic, feel free to double this. -
1/4 tsp salt
Essential for enhancing flavors. Adjust according to your taste! -
1/2 cup buffalo sauce
Choose your favorite brand! Want less heat? Pick a milder buffalo sauce or mix in a bit of ketchup. -
2-3 cups romaine (chopped)
Fresh, crunchy greens add a refreshing touch to the wraps. Feel free to swap with spinach or kale if you prefer. -
1/2 cup shredded vegan cheddar (such as Follow Your Heart)
This gives a cheesy flavor without the dairy. You can skip this if you want a lighter wrap or use nutritional yeast as a flavor enhancer. -
1/2 cup matchstick carrots
These add a beautiful crunch! If you’re short on time, buy pre-packaged matchstick carrots. -
1 avocado (sliced)
Creamy and rich, avocados elevate the meal. For a little zing, add a squeeze of lime over the slices! -
4 large tortillas (or gluten-free wraps)
Whole wheat or gluten-free, both work beautifully. A thicker wrap ensures everything holds together well. -
1 cup unsweetened almond milk yogurt (plain)
This is the base for your ranch dressing. Plain coconut yogurt or soy yogurt would work here too. -
2 tbsp lemon juice (fresh if possible)
A fresh-squeezed lemon gives brightness to your dressing. If you don’t have lemon, vinegar is a solid substitute. -
1 tbsp vinegar
This adds a tangy depth; apple cider vinegar is an excellent option. -
1 tsp garlic powder
More garlic goodness! Add more if you’re a fan. -
1/2 tsp onion powder
For a savory punch! Feel free to use fresh diced onion instead. -
1/2 tsp salt
To taste; you can also use garlic salt for added flavor. -
1 tbsp fresh dill (minced, or 1 tsp dried)
Fresh dill brings brightness; you can switch it out for fresh chives or parsley. -
1 tbsp fresh parsley (minced, or 1 tsp dried)
A touch of freshness that completes the ranch. Use any herbs that excite you!
Step-by-Step Instructions
Let’s dive into the cooking process! Follow along, and I promise, it’ll be a breeze.
-
Prepare Your Tofu
Start by draining your tofu and pressing it to remove excess moisture. The longer you press, the firmer the tofu will be! I usually wrap it in a clean kitchen towel or paper towels, place it on a plate, and set something heavy on top for about 15-20 minutes. -
Cut the Tofu
Once pressed, slice the tofu into bite-sized cubes or sticks. A sharp knife is your best friend here! -
Make the Tofu Coating
In a medium bowl, combine the cornstarch, garlic powder, and salt. Add the non-dairy milk and mix until smooth. Your batter should be thick enough to coat the tofu, so adjust your cornstarch and milk ratio accordingly if needed! -
Coat the Tofu
Toss the tofu pieces in this batter until well-coated. This step is crucial for that amazing crispiness; make sure each piece gets its fair share! -
Heat the Oil
In a large non-stick skillet, pour in a tablespoon of oil and heat it over medium heat. You want it hot enough that when you drop a small piece of tofu in, it sizzles! -
Fry the Tofu
Carefully add the battered tofu to the hot skillet in a single layer. Cook for about 3-4 minutes on each side until golden and crispy. Avoid overcrowding the pan; you want that lovely sear! -
Coat with Buffalo Sauce
Once your tofu is golden, remove it from the skillet and place it in a bowl. Pour the buffalo sauce over the tofu, tossing gently to coat each piece. This is where the magic happens! -
Prepare the Vegan Ranch
In a small bowl, mix the almond yogurt, lemon juice, vinegar, garlic powder, onion powder, salt, dill, and parsley. Whisk until combined and creamy. Take a moment to taste it and adjust the seasoning to your liking—this ranch is all about personalization! -
Assemble the Wraps
Take one tortilla and layer it with a handful of romaine, a big scoop of your buffalo tofu, a sprinkle of carrots, a slice of avocado, and a drizzle of your vegan ranch. Don’t be shy—fill it up! -
Wrap It Up
Fold the sides of the tortilla in toward the center, then roll it up from the bottom. Voila! Your wrap is ready to enjoy. If you’re feeling fancy, you can toast it in the skillet for an extra crispy touch.
Serving Suggestions
To serve these tasty wraps, cut them in half on a diagonal and display them on a colorful platter. You could accompany them with extra vegan ranch for dipping, sliced veggies, or even a simple green salad. It’s all about creating your own little spread that makes your gathering feel special!
Recipe Variations
Feeling adventurous? Here are a few exciting twists to keep your wraps fresh and flavorful:
- Spicy Buffalo Ranch: Add a few drops of hot sauce to your vegan ranch for an extra kick!
- Mediterranean Twist: Swap the buffalo sauce for a garlic tahini sauce and add roasted red peppers and olives for a fresh twist.
- BBQ Tofu Wrap: Change it up by using BBQ sauce instead of buffalo for a sweeter, smoky flavor.
- Add More Greens: Throw in some spinach, arugula, or even some sprouts for added freshness and nutrition.
- Stuff more veggies: Sautéed bell peppers or onions are a fantastic addition!
Chef’s Notes
Each time I make these Buffalo Tofu Wraps, I’m reminded of how versatile they are. I love to experiment with whatever’s in my fridge! Sometimes I’ll throw in roasted zucchini or even some quinoa for an added texture. Oh! And back to the frying—my first attempts were a little messy, with oil spattering everywhere. I learned to keep my calm (and my splatter guard handy!). The journey in this cooking adventure is what makes it fun—embrace those kitchen oops moments!
FAQs and Troubleshooting
Q: My tofu didn’t get crispy—what went wrong?
A: This could be from moisture left in the tofu—make sure you press out as much water as possible and try to fry it in a single layer in the pan.
Q: Can I bake the tofu instead of frying it?
A: Absolutely! Preheat your oven to 400°F (200°C), place the coated tofu on a baking sheet lined with parchment paper, and bake for about 25-30 minutes, flipping halfway through.
Q: Is there a gluten-free option for the wraps?
A: Yes! Just use gluten-free tortillas or wraps, and you’re all set!
Q: Can I make the ranch dressing ahead of time?
A: Yes! The vegan ranch can be made a day in advance; it’ll actually develop even more flavor as it sits. Just keep it in an airtight container in the fridge.
Nutritional Info
Per wrap (without additional veggies):
- Calories: Approximately 350
- Protein: 15g
- Carbohydrates: 38g
- Fat: 15g
- Fiber: 6g
These Buffalo Tofu Wraps are not only delicious but offer a satisfying balance of protein, healthy fats, and lots of fresh vegetables.
So there you have it, folks! Buffalo Tofu Wraps with Easy Vegan Ranch—easy to make, a joy to serve, and oh-so-delicious. Tie on that apron, gather your ingredients, and create some culinary magic! Happy cooking!
PrintBuffalo Tofu Wraps with Easy Vegan Ranch
Delicious and healthy Buffalo Tofu Wraps filled with crispy tofu, fresh veggies, and creamy vegan ranch dressing.
- Prep Time: 20 minutes
- Cook Time: 20 minutes
- Total Time: 40 minutes
- Yield: 4 servings 1x
- Category: Main Course
- Method: Frying
- Cuisine: American
- Diet: Vegan
Ingredients
- 16 oz block extra firm tofu (drained and pressed)
- 1/3–1/2 cup cornstarch
- 1/3 cup non-dairy milk (unsweetened, plain)
- 1/4 tsp garlic powder
- 1/4 tsp salt
- 1/2 cup buffalo sauce
- 2–3 cups romaine (chopped)
- 1/2 cup shredded vegan cheddar
- 1/2 cup matchstick carrots
- 1 avocado (sliced)
- 4 large tortillas (or gluten-free wraps)
- 1 cup unsweetened almond milk yogurt (plain)
- 2 tbsp lemon juice (fresh if possible)
- 1 tbsp vinegar
- 1 tsp garlic powder
- 1/2 tsp onion powder
- 1/2 tsp salt
- 1 tbsp fresh dill (minced, or 1 tsp dried)
- 1 tbsp fresh parsley (minced, or 1 tsp dried)
Instructions
- Prepare Your Tofu: Start by draining your tofu and pressing it to remove excess moisture for about 15-20 minutes.
- Cut the Tofu: Slice the tofu into bite-sized cubes or sticks.
- Make the Tofu Coating: In a bowl, combine cornstarch, garlic powder, and salt. Add non-dairy milk and mix until smooth.
- Coat the Tofu: Toss tofu pieces in the batter until well-coated.
- Heat the Oil: In a non-stick skillet, heat a tablespoon of oil over medium heat until hot.
- Fry the Tofu: Cook the battered tofu for about 3-4 minutes on each side until golden and crispy.
- Coat with Buffalo Sauce: Toss the cooked tofu in a bowl with buffalo sauce until well-coated.
- Prepare the Vegan Ranch: Mix almond yogurt, lemon juice, vinegar, garlic powder, onion powder, salt, dill, and parsley in a bowl until creamy.
- Assemble the Wraps: Layer romaine, buffalo tofu, carrots, avocado, and ranch on a tortilla.
- Wrap It Up: Fold the sides in and roll from the bottom. Optionally, toast in the skillet for extra crispiness.
Notes
Feel free to customize the wraps with additional veggies or sauces!
Nutrition
- Serving Size: 1 wrap
- Calories: 350
- Sugar: 5g
- Sodium: 400mg
- Fat: 15g
- Saturated Fat: 2g
- Unsaturated Fat: 10g
- Trans Fat: 0g
- Carbohydrates: 38g
- Fiber: 6g
- Protein: 15g
- Cholesterol: 0mg
Keywords: tofu wraps, buffalo tofu, vegan ranch, easy recipe
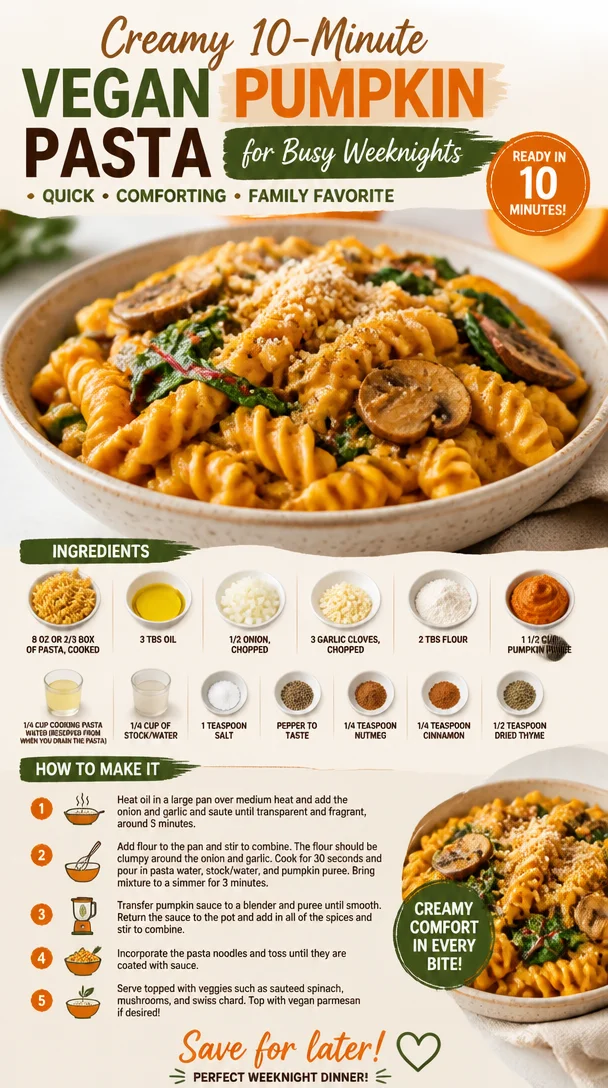
Creamy 10-Minute Vegan Pumpkin Pasta for Busy Weeknights
10-Minute Vegan Pumpkin Pasta: A Delightful Fall Favorite
Hello, fellow foodies! Welcome back to my kitchen, where I’m always excited to share my latest culinary creation. Today, we’re diving into the wonderful world of quick and cozy meals with none other than my 10-Minute Vegan Pumpkin Pasta!
As the leaves turn and autumn rolls in, there’s nothing quite like the warm, comforting flavors of pumpkin to usher in the season. This dish is not only perfect for a busy weeknight dinner but also offers that comforting vibe we all crave as we gather around the table. Ready to embrace some deliciousness? Let’s get cooking!
Personal Story: A Cozy Autumn Tradition
Every year, as the days grow shorter and the air turns crisp, I can’t help but think back to my childhood. My family had this delightful little tradition where we’d gather to carve pumpkins and roast the seeds, setting the stage for all things fall. What sticks out most, though, is the time my sister and I, armed with our little aprons, attempted to concoct our own pumpkin pasta from scratch. We were ambitious, using everything from the pumpkin guts to the last drop of cream. Sure, it was a chaotic mess, but it was filled with laughter, a few flour explosions, and some surprisingly tasty results! That day ignited my passion for making shared meals easy and enjoyable, regardless of skill or time constraints.
Fast forward to today, and I’ve channeled that love into this quick, vegan pasta that embodies all the rich flavors of fall. Let’s bring that comforting feel into your kitchen with this 10-minute wonder!
Ingredients
Let’s take a look at the ingredients you’ll need. Each one is essential for creating this delectable dish, and I’ll share some helpful tips along the way:
-
8 oz or 2/3 box of pasta, cooked
Use any pasta you like! I often opt for whole wheat or gluten-free options to suit different dietary needs. Just remember, if you’re using lentil or chickpea pasta, cooking time may vary slightly. -
3 tablespoons oil
Olive oil is my go-to for its flavor and health benefits, but feel free to use avocado oil or coconut oil if you prefer a milder taste. -
1/2 onion, chopped
Yellow or white onions work beautifully here. For a milder flavor, you can switch to shallots. -
3 garlic cloves, chopped
Garlic adds zest and warmth to the dish. If you’re a fan of garlic, don’t hesitate to throw in an extra clove! -
2 tablespoons flour
This helps to thicken our sauce. You can use all-purpose flour or a gluten-free alternative like cornstarch or chickpea flour. -
1 1/2 cups pumpkin puree
Canned pumpkin is super convenient, but if you’re feeling adventurous, you can roast fresh pumpkin and puree it yourself. Just scoop out the seeds, roast it until soft, and blend! -
1/4 cup cooking pasta water
This liquid is gold when it comes to adding flavor to sauces. Don’t forget to save it before draining your pasta! -
1/4 cup stock or water
Vegetable broth can add depth, but water will work just fine if you’re in a pinch. -
1 teaspoon salt
A must for enhancing the flavors in your dish. Adjust to your taste preference. -
Pepper to taste
Freshly cracked black pepper adds a lovely warmth; feel free to add as much as you like! -
1/4 teaspoon nutmeg
A hint of nutmeg complements pumpkin beautifully. It’s the secret ingredient that makes this dish sing! -
1/4 teaspoon cinnamon
Cinnamon rounds out the sweetness of the pumpkin and adds a cozy touch. -
1/2 teaspoon dried thyme
Adds an earthy component. Fresh thyme is also delightful if you have it on hand!
Step-by-Step Instructions
Let’s bring this pumpkin pasta to life! Here’s your day in the kitchen:
-
Cook your pasta
Start by boiling a pot of salted water. Add your pasta and cook according to package instructions until al dente, usually about 8–10 minutes. Make sure to reserve 1/4 cup of the cooking water before draining! -
Sauté the aromatics
In a large skillet, heat the olive oil over medium heat. Add the chopped onion and sauté for about 3-4 minutes until translucent and fragrant. Add the garlic in the last minute, cooking until soft. This step is essential for that lovely base flavor! -
Thicken it up
Stir in the flour, letting it cook for about a minute, creating a roux. This will help thicken your sauce. Don’t rush this; the flour needs a moment to cook. You’ll notice it starts to form a paste. -
Bring in the star—pumpkin!
Slowly whisk in the pumpkin puree along with the stock or water, mixing until you have a smooth consistency. If it feels too thick, add a splash more liquid until you reach your desired consistency. It should be creamy but not too heavy. -
Season it right
Add in the reserved pasta water, salt, pepper, nutmeg, cinnamon, and thyme. Stir well, allowing the flavors to meld together. Give it a taste here; if it feels like it needs a little kick, go crazy with those spices! -
Combine and serve
Toss your cooked pasta into the skillet, mixing everything thoroughly until each piece is coated in that luscious sauce. You can sprinkle a bit more pasta water in if it looks dry.
Serving Suggestions
Plating this dish should feel effortless, like a warm hug at the end of a long day. Transfer a generous serving of pasta onto a plate or into a shallow bowl. Finish it off with a sprinkle of freshly cracked pepper and perhaps a dash of extra thyme or a swirl of olive oil for that extra flair.
Pair it with a green salad or some crusty bread for a complete meal that feels cozy yet sophisticated.
Recipe Variations
Let’s get creative! Here are a few twists you can try with this recipe:
- Spicy Pumpkin Pasta: Add a pinch of red pepper flakes for a nice kick.
- Herbed Pumpkin Pasta: Mix in fresh herbs like sage or parsley for an herbal touch.
- Creamy Vegan Version: Replace some of the pumpkin puree with cashew cream for an extra creamy texture.
- Protein Boost: Add cooked chickpeas or lentils to round out the meal and add protein.
- Mushroom Delight: Stir in sautéed mushrooms for a hearty addition.
Chef’s Notes
Every recipe holds a special place in my heart, and this one is no exception. It has evolved quite a bit over the years. Initially, it started as a trial and error experience, but through each round of flavor testing, I learned that simplicity is key. Though the original version was more complex, I found that a straightforward approach allows the pumpkin’s natural sweetness and warmth to shine without getting lost in heavy ingredients.
Also, I can’t resist telling you about the time I mistook pumpkin spice for cinnamon! Let’s just say the kitchen ended up smelling pretty festive – much to my surprise!
FAQs and Troubleshooting
1. What type of pasta works best?
You can use any pasta! I love penne or fusilli for this recipe based on their ability to catch that delightful sauce.
2. Can I use fresh pumpkin instead of canned?
Absolutely! Roast the pumpkin until tender, then puree it for an even fresher flavor.
3. My sauce is too thick; how can I fix it?
No worries! Just add a splash more of the reserved pasta water to loosen it up.
4. How do I store leftovers?
Store in an airtight container in the fridge for up to 3 days. Reheat on the stove with a splash of water or broth to keep it creamy.
Nutritional Info
While exact numbers may vary based on portion sizes and specific ingredients used, here’s a rough breakdown of per serving:
- Calories: approx. 350
- Protein: 10g
- Net Carbs: 60g
- Fat: 10g
This quick and easy 10-Minute Vegan Pumpkin Pasta is a celebration of fall’s flavors and autumn comfort. I’m so excited for you to try this! Remember, cooking should bring joy, laughter, and togetherness—so tie on your apron and let’s make some magic in the kitchen!
Happy cooking! 🍂💛
Print10-Minute Vegan Pumpkin Pasta

A quick and cozy meal that celebrates the comforting flavors of fall with pumpkin pasta, perfect for busy weeknight dinners.
- Prep Time: 5 minutes
- Cook Time: 5 minutes
- Total Time: 10 minutes
- Yield: 4 servings 1x
- Category: Main Course
- Method: Cooking
- Cuisine: Italian
- Diet: Vegan
Ingredients
- 8 oz (or 2/3 box) pasta, cooked
- 3 tablespoons olive oil
- 1/2 onion, chopped
- 3 garlic cloves, chopped
- 2 tablespoons flour
- 1 1/2 cups pumpkin puree
- 1/4 cup cooking pasta water
- 1/4 cup stock or water
- 1 teaspoon salt
- Pepper to taste
- 1/4 teaspoon nutmeg
- 1/4 teaspoon cinnamon
- 1/2 teaspoon dried thyme
Instructions
- Cook your pasta: Boil a pot of salted water, add the pasta, and cook according to package instructions until al dente, usually about 8–10 minutes. Reserve 1/4 cup of the cooking water before draining.
- Sauté the aromatics: In a large skillet, heat the olive oil over medium heat. Add the chopped onion and sauté for about 3-4 minutes until translucent. Add the garlic in the last minute, cooking until soft.
- Thicken it up: Stir in the flour and let it cook for about a minute to form a roux.
- Bring in the star—pumpkin!: Whisk in the pumpkin puree along with the stock or water, mixing until smooth. Adjust with more liquid if too thick.
- Season it right: Add in the reserved pasta water, salt, pepper, nutmeg, cinnamon, and thyme. Stir well and taste.
- Combine and serve: Toss your cooked pasta into the skillet and mix until each piece is coated in sauce.
Notes
Serve with freshly cracked pepper and a sprinkle of thyme or a swirl of olive oil for extra flair. Pairs well with a green salad or crusty bread.
Nutrition
- Serving Size: 1 serving
- Calories: 350
- Sugar: 6g
- Sodium: 400mg
- Fat: 10g
- Saturated Fat: 1g
- Unsaturated Fat: 8g
- Trans Fat: 0g
- Carbohydrates: 60g
- Fiber: 4g
- Protein: 10g
- Cholesterol: 0mg
Keywords: pumpkin pasta, vegan pasta, quick meals, fall recipes, cozy dinner

Vegan Mango Bread: One-Bowl, 30-Minute Breakfast Bake
Vegan Mango Bread: A Sweet Slice of Paradise
Hello, fellow food enthusiasts! If you’ve ever enjoyed the glorious, sun-kissed sweetness of a ripe mango, you’ll absolutely love this Vegan Mango Bread. Today, I’m thrilled to share with you a brilliant recipe that merges the delightful flavors of mango with the warmth of homemade bread. Whether you enjoy it for breakfast, as a snack, or as a comforting dessert, this lush loaf is sure to impress.
Why Mango Bread?
I’ll tell you why mango bread has a special place in my heart. Growing up, my grandmother had a mango tree in her backyard—it was like having our own little tropical paradise. Every summer, we would gather as a family under that tree, picking ripe, juicy mangoes and savoring the juicy goodness right there. The smell of sweet mangoes would fill the air, mingling with laughter and the sound of stories being shared. It was pure magic.
One hot afternoon, my grandmother surprised us with mango bread made from freshly picked mangoes. As the loaf baked, that familiar fruity aroma enveloped our home, drawing us all to the kitchen like moths to a flame. We took our first bites, and it was an explosion of flavor! The sweetness of the mangoes combined with warm spices and a tender crumb made it unforgettable. I still remember those sunny afternoons, and that’s why I created my vegan version of this beloved classic.
This Vegan Mango Bread recipe is light, fluffy, and has just the right touch of sweetness from the mango. Plus, the punch of cardamom will transport you straight to a sunny day, enjoying the warmth surrounded by love. Let’s dive into the ingredients!
Ingredients
Here’s what you’ll need for this luscious loaf:
-
2 cups flour
(I used unbleached all-purpose flour, but whole wheat flour also works well for a heartier texture. For a gluten-free option, look for a 1:1 gluten-free flour blend.) -
1 tsp baking powder
(This helps the bread rise to fluffy perfection. Always check the expiration date to ensure freshness!) -
1 tsp baking soda
(Works together with the baking powder to create lift in the bread.) -
1/4 tsp salt
(A little pinch of salt enhances the flavors and balances the sweetness of the mango.) -
1 tbsp corn starch
(This is our secret ingredient for a tender crumb. If you don’t have corn starch, you can replace it with an equal amount of arrowroot powder.) -
3/4 cup sugar
(I prefer organic cane sugar for its subtle flavor. You can swap it with coconut sugar for a deeper, caramel-like taste, or use a sugar substitute for a lower-calorie option.) -
2 tsp ground cardamom
(A warm and aromatic spice that adds a lovely depth. If you’re not a cardamom fan, try cinnamon or nutmeg instead!) -
1/4 cup avocado oil
(A neutral oil that adds moisture to our loaf. Other vegetable oils, like canola or grapeseed oil, would work fine.) -
2 cups mango puree
(You can use canned puree or make your own from fresh mangoes. If you’re using fresh mangoes, peel them, chop them up, and blend until smooth. Choose ripe mangoes for maximum sweetness!)
With these simple yet powerful ingredients, we’re about to create something truly special. Let’s get cooking!
Step-by-Step Instructions
-
Preheat Your Oven:
Preheat your oven to 350°F (175°C). This is where the magic happens, so make sure to get it nice and cozy! -
Mix Dry Ingredients:
In a large mixing bowl, whisk together the flour, baking powder, baking soda, salt, corn starch, sugar, and ground cardamom. This dry mix is where all the wonderful flavors develop. Make sure there are no lumps in the mixture! -
Combine Wet Ingredients:
In another bowl, mix together the avocado oil and the mango puree until smooth. This is YOUR time to shine—this mixture will create a luscious moist loaf that is bound to be delightful. -
Blend It Together:
Pour the wet mixture into the dry ingredients and gently fold until just combined. Overmixing will lead to a dense loaf, and we want a light and airy texture! It’s okay if there are a few lumps—embrace the imperfect beauty of homemade goodness! -
Prep the Pan:
Grease a 9×5-inch loaf pan with a little avocado oil or line it with parchment paper for easy removal. Your neighbors will thank you when the heavenly scent wafts through the air—everyone loves a generous loaf of mango bread! -
Pour and Smooth:
Transfer your batter into the prepared loaf pan. Use a spatula to smooth out the top. This is also a great moment to channel your inner artist—perhaps sprinkle a touch more cardamom on top for an elegant finish! -
Bake to Perfection:
Bake for 50-60 minutes or until a toothpick inserted into the center comes out clean. The kitchen aroma will be heavenly, and trust me—waiting will be the hardest part! -
Cool Down:
Once baked, remove the loaf from the oven, and let it cool in the pan for about 10 minutes. Then, carefully transfer it to a wire rack to cool completely. This step is crucial for allowing that signature fluffy texture to settle in. -
Slice it Up:
Once cooled, slice yourself a generous piece and enjoy it fresh. The smell alone is enough to need no further encouragement!
Serving Suggestions
For a beautiful presentation, serve your Vegan Mango Bread on a rustic wooden board. You can drizzle a bit of agave or maple syrup on top and sprinkle some toasted coconut flakes or crushed nuts (like almonds or pistachios) for an extra touch. How about pairing a slice with a dollop of coconut whip or plant-based butter? It’s an ideal winter treat or a summer delight!
Recipe Variations
-
Coconut Mango Bread:
Add shredded coconut to the batter for a tropical twist. -
Nutty Delight:
Fold in chopped walnuts or pecans for added crunch and flavor. -
Mango Chocolate Chip:
A handful of dairy-free chocolate chips makes for a decadent touch. -
Zesty Lime:
Add zest from one lime to the batter for a refreshing citrus kick. -
Spicy Kick:
A pinch of cayenne pepper offers a great contrast to the sweetness of the mango!
Chef’s Notes
You know, every time I make this bread, it brings back memories of those sweltering afternoons spent in the backyard with my grandma. I can still hear her laughter and feel the warmth of the sun on my back. When I first tried to recreate that mango bread, I struggled—like many of us do in the kitchen—but each attempt brought me closer to the magic of those childhood days. We all have our kitchen blunders, don’t we? The trick is to embrace them, and you’ll surely end up perfecting your own lovely version of this recipe.
FAQs and Troubleshooting
1. What if my mango puree isn’t sweet enough?
If you find your mangoes aren’t super sweet, you can add more sugar to the batter or mix in a touch of maple syrup for sweetness.
2. Can I use frozen mangoes?
Absolutely! Just ensure they’re thawed and well-drained before blending into puree.
3. Why is my bread dense?
This can happen if you overmix the batter or if your leavening agents (baking powder and baking soda) are old. Make sure they’re fresh, and mix until just combined.
4. How do I store leftover mango bread?
Wrap it tightly in plastic wrap or aluminum foil and store it at room temperature for 2-3 days, or refrigerate it for up to a week. You can also freeze slices for later enjoyment!
Nutritional Info
Note: Nutritional information may vary based on specific ingredients used and portion sizes.
- Calories: Approximately 200 per slice
- Protein: 2g
- Carbohydrates: 30g
- Fat: 8g
- Fiber: 1g
And there you have it, a delightful recipe for Vegan Mango Bread that’s sure to bring a smile to your face and warmth to your table. I hope you enjoy making this sweet treat as much as I do! Remember, cooking is all about love, joy, and a sprinkle of creativity. Tie on that apron, and let’s see what magic you create in your kitchen! Enjoy! 🍞✨
PrintVegan Mango Bread

A delightful and light Vegan Mango Bread that merges the sweetness of mango with warm spices, perfect for any time of the day.
- Prep Time: 15 minutes
- Cook Time: 60 minutes
- Total Time: 75 minutes
- Yield: 10 servings 1x
- Category: Dessert
- Method: Baking
- Cuisine: Vegan
- Diet: Vegan
Ingredients
- 2 cups flour (unbleached all-purpose or whole wheat)
- 1 tsp baking powder
- 1 tsp baking soda
- 1/4 tsp salt
- 1 tbsp corn starch
- 3/4 cup sugar
- 2 tsp ground cardamom
- 1/4 cup avocado oil
- 2 cups mango puree
Instructions
- Preheat your oven to 350°F (175°C).
- Mix together the flour, baking powder, baking soda, salt, corn starch, sugar, and ground cardamom in a large mixing bowl.
- Combine the avocado oil and mango puree in another bowl until smooth.
- Blend the wet mixture into the dry ingredients and gently fold until just combined.
- Prep a 9×5-inch loaf pan by greasing it with avocado oil or lining it with parchment paper.
- Pour the batter into the prepared loaf pan and smooth the top with a spatula.
- Bake for 50-60 minutes or until a toothpick inserted into the center comes out clean.
- Cool the loaf in the pan for about 10 minutes before transferring it to a wire rack to cool completely.
- Slice the cooled loaf and enjoy fresh.
Notes
For added flavor, consider variations like coconut mango bread or mango chocolate chip.
Nutrition
- Serving Size: 1 slice
- Calories: 200
- Sugar: 10g
- Sodium: 150mg
- Fat: 8g
- Saturated Fat: 1g
- Unsaturated Fat: 7g
- Trans Fat: 0g
- Carbohydrates: 30g
- Fiber: 1g
- Protein: 2g
- Cholesterol: 0mg
Keywords: Vegan, Mango, Bread, Dessert, Healthy
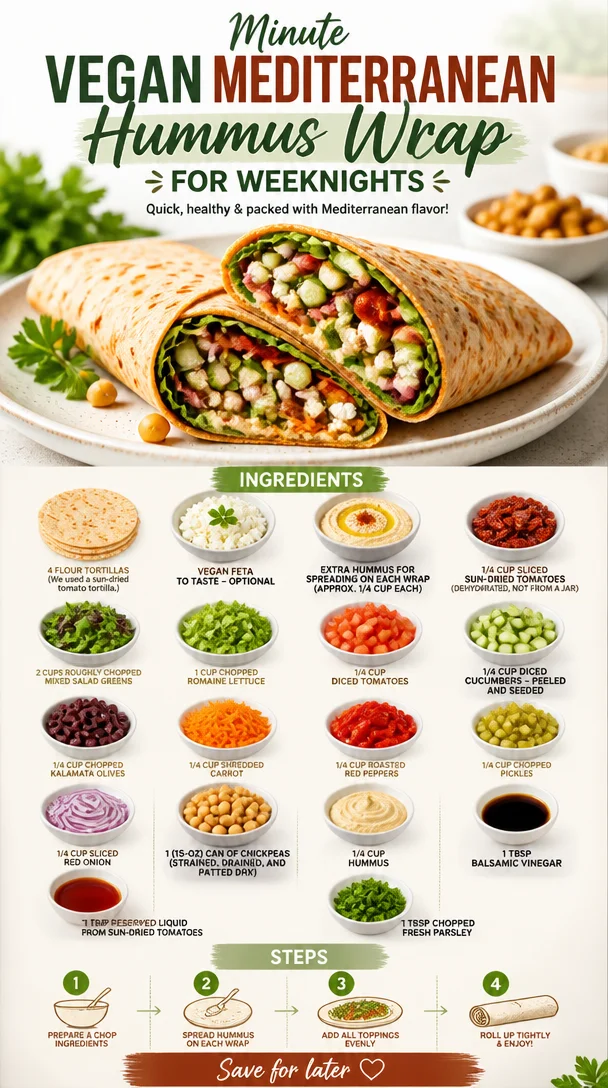
Minute Vegan Mediterranean Hummus Wrap for Weeknights
Vegan Mediterranean Hummus Wrap: A Flavorful Journey
Hello and welcome back to my kitchen! Today, we’re venturing into the vibrant world of Mediterranean cuisine with a recipe that’s as colorful as it is delicious: Vegan Mediterranean Hummus Wraps! If you’ve been looking for a dish that marries simplicity and flavor while embracing the bounties of fresh ingredients, this one’s for you.
These wraps are loaded with fresh veggies, hearty chickpeas, and that creamy, dreamy hummus we all know and love. Not only is this recipe vegan, but it’s also perfect for meal prep, lunchboxes, or a quick and satisfying dinner after a busy day. Let’s dive into this enchanting recipe and I promise, you’ll leave feeling inspired!
My Mediterranean Memory
Let me take you on a little trip down memory lane. I still remember the first time I tasted Mediterranean cuisine. I was at a quaint little café with a friend who raved about their wraps. With each bite, I was transported! The harmonious blend of flavors—crunchy vegetables, rich spices, and that velvety hummus—was absolutely mesmerizing.
I remember how we lingered over our plates, laughing and sharing stories about our day, all while sipping on bright, refreshing lemonade. That experience ignited my passion for cooking and brought me to create comforting yet elegant dishes that celebrate such rich culinary experiences. And now, I want to share that joy with you through these Vegan Mediterranean Hummus Wraps. Let’s create our own beautiful moments around the table!
Ingredients
Here’s what you’ll need to make these vibrant wraps:
-
4 large flour tortillas (Tip: I used a sun-dried tomato tortilla for added flavor, but feel free to choose your favorite!)
-
Vegan feta to taste (optional) (If you want that cheesy burst, this adds a wonderful salty bite, but it’s great without it too!)
-
Extra hummus for spreading (Approx. 1/4 cup for each wrap; because, honestly, who doesn’t love hummus?)
-
1/4 cup sliced sun-dried tomatoes (Opt for dehydrated for deeper flavor; if you’re using those from a jar, just drain them well.)
-
2 cups roughly chopped mixed salad greens (Get creative here! Spinach, arugula, and kale are all great options.)
-
1 cup chopped romaine lettuce (Adds that delightful crunch we all crave.)
-
1/4 cup diced tomatoes (Use fresh tomatoes for a burst of juiciness; cherry tomatoes make a wonderful substitute!)
-
1/4 cup diced cucumbers (Peeled and seeded; for an extra crunch. If you love texture, leave the skin on!)
-
1/4 cup chopped kalamata olives (For those briny, bold flavors; if you’re not a fan of olives, capers work well too.)
-
1/4 cup shredded carrot (Adds sweetness and color. Pre-shredded options are available if you’re in a rush!)
-
1/4 cup roasted red peppers (They bring smoky depth. You can roast your own or buy them jarred—just be sure to drain well.)
-
1/4 cup chopped pickles (Adds a zingy crunch that elevates the dish.)
-
1/4 cup sliced red onion (A little punch of flavor; soak them in cold water for 10 minutes to mellow if you like.)
-
1 15-oz can of chickpeas (Strained, drained, and patted dry; make sure to pat them well to avoid soggy wraps.)
-
1/4 cup hummus (Use your favorite store-bought or homemade for full control over flavors.)
-
1 Tbsp balsamic vinegar (For that sweet tang. A splash of lemon juice would work too!)
-
1 Tbsp reserved liquid from sun-dried tomatoes (Enhances flavor—don’t skip this part!)
-
1 Tbsp chopped fresh parsley (For a fresh, herbaceous finish; basil or dill would also be fantastic!)
Step-by-Step Instructions
Let’s walk through this delightful recipe, step by step, so you can nail it right in your own kitchen!
-
Prep Your Ingredients: Start by gathering all your veggies and equipment. Clean and chop your tomatoes, cucumbers, olives, and any other veggies you’re using. Remember, a sharp knife does wonders! Plus, it’s safer.
-
Make the Filling: In a mixing bowl, combine your chickpeas, diced cucumbers, diced tomatoes, kalamata olives, shredded carrots, roasted red peppers, pickles, and red onion. Drizzle in 1 tablespoon of balsamic vinegar and 1 tablespoon of the reserved liquid from the sun-dried tomatoes. Gently mix, and here’s the fun part—get in there with your hands! This ensures everything is coated evenly. If you want a little more zest, toss in some lemon juice or even a splash of your favorite hot sauce for a kick.
-
Prepare Your Tortillas: Lay your tortillas flat on a clean surface. Spread about 1/4 cup of your favorite hummus across each tortilla. Remember, this is where the flavor begins! Feel free to use a butter knife or even the back of a spoon for an even spread.
-
Layer on the Goodness: Now it’s time to assemble! Start with a generous handful of mixed greens, followed by a cup of your chickpea filling. If you’re adding vegan feta, sprinkle it on top now. Pro tip: don’t overstuff! You want to be able to roll them up neatly without any filling escaping.
-
Rolling Your Wrap: Fold the sides in towards your filling, then roll from the bottom up, tucking in as you go. It might take a little practice, but you’ll get the hang of it! If you find your tortillas tearing too easily, just give them a quick zap in the microwave (about 10-15 seconds) to soften.
-
Cut and Serve: Once rolled tightly, cut each wrap in half diagonally. Voilà! You have beautiful, colorful wraps ready for plating.
-
Presentation Tip: Serve these delightful wraps with an extra dollop of hummus on the side, a sprinkle of fresh parsley, and maybe even a few extra olives for garnish on a rustic wooden board. Your guests will think you’re a culinary magician!
Recipe Variations
Feel like switching things up? Here are some fun twists to make this recipe your own:
- Spicy Kick: Add sliced jalapeños or a spicy hummus variant to bring the heat.
- Mediterranean Grain Bowl: Skip the wraps and serve everything over a bed of quinoa or farro for a nutritious bowl option.
- Herbed Avocado: Swap your hummus with a smooth avocado spread and sprinkle everything with fresh dill or cilantro.
- Crunchy Nuts: Toss in some chopped almonds or walnuts for a satisfying crunch.
- Seasonal Twist: Use roasted seasonal vegetables like zucchini or bell peppers for a fresh twist based on what’s in season.
Chef’s Notes
This recipe has been a constant in my kitchen for years! I love how versatile it is and how it can evolve with seasonal ingredients. One time, I added roasted sweet potatoes on a whim, and let me tell you, it was a game-changer! Also, if you ever have leftover filling, use it as a salad topping or even in a grain bowl the next day—it’s a great way to minimize waste and keep your meals exciting.
FAQs and Troubleshooting
1. My wraps keep unrolling; what do I do?
- A tight roll is key! Make sure to tuck in the sides while rolling and not to overfill. If you’re still having trouble, secure with a toothpick or parchment paper.
2. Can I make this wrap ahead of time?
- Absolutely! Assemble your wraps, wrap them tightly in foil or parchment, and store them in the fridge for up to 2 days. Just know that the veggies may release some moisture, so it’s best enjoyed fresh.
3. What if I want to make these gluten-free?
- It’s easy! Just swap out the flour tortillas for gluten-free wraps, and you’re good to go.
4. I’m not a fan of chickpeas; what can I use instead?
- No problem! Try black beans, lentils, or edamame for a protein-packed twist.
Nutritional Info (Optional)
While I won’t harp on numbers too much, each wrap generally yields a balanced mix of protein, healthy fats, and tons of vitamins from those lovely fresh vegetables. A great meal option for anyone looking to enjoy delicious and nourishing food!
So there you have it—a fantastic, versatile, and scrumptious Vegan Mediterranean Hummus Wrap! I hope you take a moment to gather your ingredients, tie on your apron, and create this with your loved ones. Remember, cooking is about bringing joy, love, and a touch of elegance to the everyday. Happy cooking, friends!
PrintVegan Mediterranean Hummus Wrap
A vibrant wrap filled with fresh veggies, hearty chickpeas, and creamy hummus, perfect for meal prep or a quick lunch.
- Prep Time: 15 minutes
- Cook Time: 0 minutes
- Total Time: 15 minutes
- Yield: 4 servings 1x
- Category: Main Course
- Method: No Cooking
- Cuisine: Mediterranean
- Diet: Vegan
Ingredients
- 4 large flour tortillas
- Vegan feta to taste (optional)
- Extra hummus for spreading (Approx. 1/4 cup for each wrap)
- 1/4 cup sliced sun-dried tomatoes
- 2 cups roughly chopped mixed salad greens
- 1 cup chopped romaine lettuce
- 1/4 cup diced tomatoes
- 1/4 cup diced cucumbers
- 1/4 cup chopped kalamata olives
- 1/4 cup shredded carrot
- 1/4 cup roasted red peppers
- 1/4 cup chopped pickles
- 1/4 cup sliced red onion
- 1 15-oz can of chickpeas
- 1/4 cup hummus
- 1 Tbsp balsamic vinegar
- 1 Tbsp reserved liquid from sun-dried tomatoes
- 1 Tbsp chopped fresh parsley
Instructions
- Prep your ingredients: Start by gathering all your veggies and equipment. Clean and chop your tomatoes, cucumbers, olives, and any other veggies you’re using.
- Make the filling: In a mixing bowl, combine your chickpeas, diced cucumbers, diced tomatoes, kalamata olives, shredded carrots, roasted red peppers, pickles, and red onion. Drizzle in balsamic vinegar and reserved liquid from sun-dried tomatoes.
- Prepare your tortillas: Lay your tortillas flat and spread about 1/4 cup of hummus across each tortilla.
- Layer on the goodness: Start with a handful of mixed greens, followed by a cup of chickpea filling. If using vegan feta, sprinkle it on top.
- Rolling your wrap: Fold the sides in towards your filling and roll from the bottom up, tucking in as you go.
- Cut and serve: Once rolled tightly, cut each wrap in half diagonally.
Notes
For added flavor, use sun-dried tomato tortillas. Enjoy with extra hummus on the side.
Nutrition
- Serving Size: 1 wrap
- Calories: 280
- Sugar: 4g
- Sodium: 350mg
- Fat: 10g
- Saturated Fat: 1g
- Unsaturated Fat: 8g
- Trans Fat: 0g
- Carbohydrates: 40g
- Fiber: 8g
- Protein: 10g
- Cholesterol: 0mg
Keywords: vegan, mediterranean, wraps, healthy lunch, meal prep
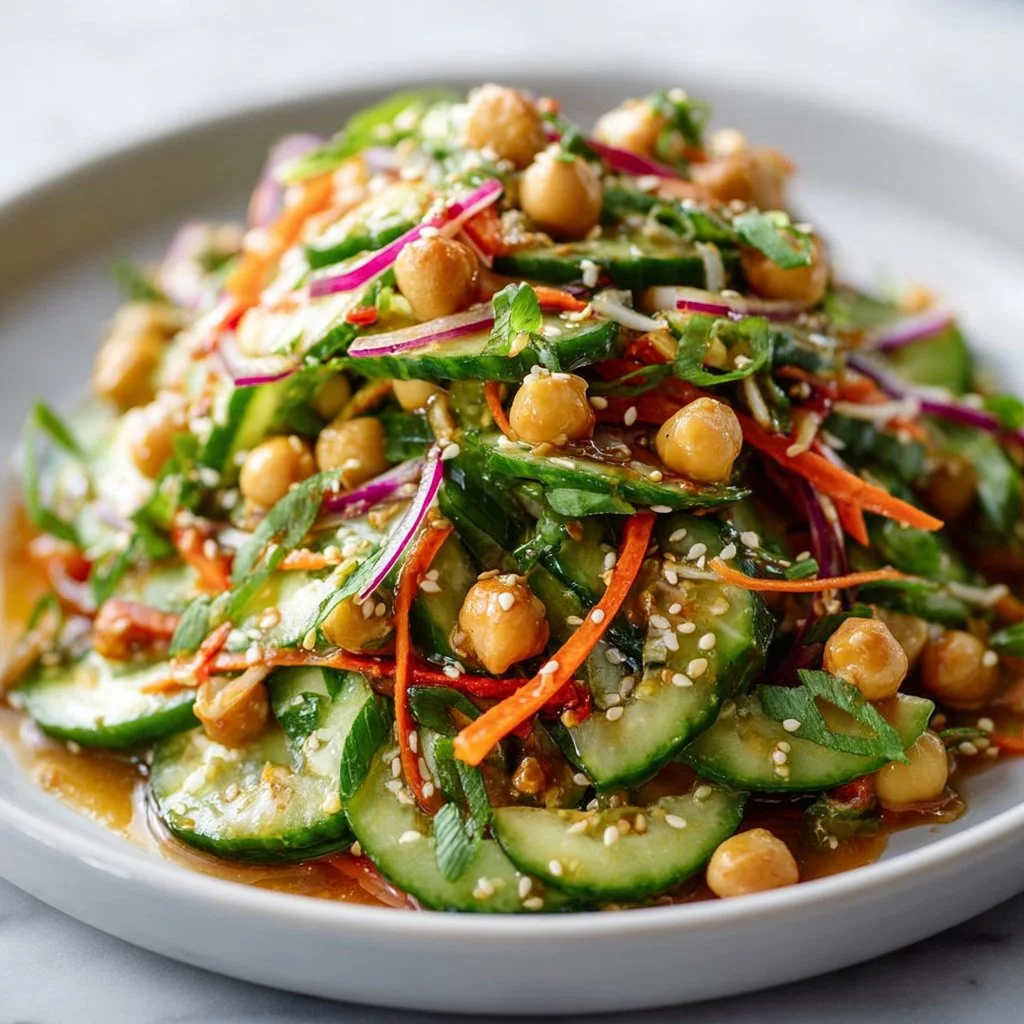
Asian Cucumber and Chickpea Slaw with Sesame Dressing
Refreshing Asian Cucumber and Chickpea Slaw with Sesame Dressing
Hello, my fellow food lovers! Today, let’s take a trip to the kitchen where I’ll show you how to create a vibrant, fresh dish that will make your taste buds dance — Asian Cucumber and Chickpea Slaw with Sesame Dressing. This recipe is one of my go-to favorites for those days when I crave something light yet satisfying. It’s packed with flavor, color, and crunch; perfect as a side dish or even a main event on your table.
There’s something truly magical about a colorful plate of food that transports us to far-off lands, isn’t there? As someone who’s always loved modulating flavors and textures, I appreciate how a simple dish can have layers of complexity, much like life! This slaw is a beautiful harmony combining the crispness of fresh cucumbers and carrots with the hearty texture of chickpeas. Topped with a nutty sesame dressing, it’ll be a crowd-pleaser at any gathering, from casual lunches to lavish dinner parties.
With all that vibrancy, you might think this recipe is complex or challenging, but let me reassure you — it’s a breeze! I’ll walk you through each step, offer some chef tips, and help you master the art of this delightful dish. By the time we’re done, you’ll not only be equipped with a fresh recipe but also with inspiration to whip up this slaw any time you crave a burst of flavor!
So grab your apron and your favorite knife, and let’s dive into the joys of cooking together.
Personal Story
Whenever I think about cucumber slaw, I’m transported back to my childhood, specifically to summer evenings spent at my grandmother’s house. She had this magical garden where she grew fresh cucumbers and vibrant carrots among other vegetables. One hot July evening, she invited the whole family over for dinner. As the sun set, casting a warm golden hue across the table, she pulled out a giant bowl of cucumber slaw, vibrant and glistening with dressing.
The refreshing crunch as we dug in was simply divine! I remember her telling us about how she mixed up various dressings, capturing flavors from her travels to Asia. This slaw was not only a side dish; it was a connection — a blend of memories and love, served from her heart to ours. And every bite was a testament to how simple ingredients could create something magical. That evening shaped how I view cooking — as a way to connect with others and craft memories.
Ingredients
Here’s what you’ll need to get started on this delicious slaw:
-
2 cups shredded cucumber
Cucumbers add a refreshing crunch. I recommend using English cucumbers or Persian cucumbers for their sweetness and lesser seeds. If you’re looking for a substitute, try zucchini for a similar texture. -
1 cup shredded carrots
Carrots bring sweetness and vibrant color. You can use pre-shredded carrots for convenience, but freshly grated truly enhances the flavor. If you don’t have carrots, shredded bell peppers can be a colorful alternative. -
1 can (15 oz) chickpeas, drained and rinsed
Chickpeas are the star of this dish, providing protein and heartiness. Rinsing is essential to get rid of excess sodium. If you’re short on time, canned beans work perfectly! If avoiding legumes, consider cooked quinoa or edamame as a substitute for protein. -
1/4 cup thinly sliced red onion
Red onions add a sharpness that beautifully complements the slaw. If raw onion is too strong for you, soak them in cold water for 10 minutes to mellow the flavor. -
1/4 cup chopped cilantro
Cilantro adds a bright, herby flavor. It’s worth it to chop fresh herbs, but if you’re not a fan or have allergies, parsley is a great substitute. -
2 tablespoons sesame oil
Sesame oil is aromatic and nutty, making it a staple in Asian cuisines. You can replace it with another oil, like avocado oil, but you’ll miss that unique flavor. -
1 tablespoon rice vinegar
Rice vinegar adds a softly sweet acidity. If you’re out, apple cider vinegar can work in a pinch, but cut back slightly since it’s more potent. -
1 tablespoon soy sauce
Soy sauce delivers umami richness. For a gluten-free version, use tamari, or for a low-sodium option, pick a reduced-sodium soy sauce. -
1 teaspoon honey
Honey adds just a touch of sweetness. If you’re vegan, swap it out for agave syrup or maple syrup. -
1 teaspoon grated ginger
Fresh ginger adds a warm, spicy note. If fresh ginger isn’t available, a pinch of ground ginger will suffice, but I always recommend fresh if you can. -
1 clove garlic, minced
Garlic enhances the slaw with its aromatic flavors. For a milder taste, use garlic powder instead, adjusting to your preferences. -
1 tablespoon sesame seeds
Toasted sesame seeds on top add a delightful crunch and a nutty finish. You can also use sunflower seeds if sesame seeds aren’t handy.
Step-by-Step Instructions
Now that we have our ingredients ready, let’s cook this slaw up with some fun tips along the way!
Step 1: Prep Your Vegetables
- Start by washing your cucumbers and carrots thoroughly. If you’re using whole cucumbers, peel them if you prefer a milder flavor. Next, slice the cucumbers into thin rounds, then into strips to achieve that fun shredded profile. You can also use a box grater or food processor to slice your carrots quickly.
Step 2: Shred and Combine
- Once your cucumbers and carrots are prepped, toss them into a large mixing bowl.
- Add in the canned chickpeas (don’t forget to rinse and drain!). Follow with the sliced red onion and chopped cilantro, making sure everything is beautifully mixed and full of color. Give it a gentle toss to combine without smashing the chickpeas!
Step 3: Make the Dressing
- In a separate bowl, whisk together the sesame oil, rice vinegar, soy sauce, honey, grated ginger, and minced garlic. This dressing is a blend of savory, sweet, and tangy; the perfect way to elevate your slaw. If you love it a touch more acidic, add another splash of rice vinegar.
Step 4: Combine Slaw and Dressing
- Drizzle the dressing over the vegetable mixture. Gently fold everything together until the veggies are coated in that scrumptious sauce. Don’t stir too aggressively — we want the chickpeas to remain whole!
Step 5: Let It Rest
- Here’s a great chef hack: Allow your slaw to rest in the fridge for at least 20 minutes before serving. This helps the flavors meld and makes for a more delicious dish! If you’re in a pinch, a quick 10-minute chill will help too.
Step 6: Serve
- When ready to serve, sprinkle the toasted sesame seeds on top for added crunch and presentation.
Serving Suggestions
To serve this delightful slaw, present it in a large, colorful bowl to showcase all those vibrant ingredients. Pair it with grilled meats for a hearty meal or serve it as a delightful side at your next barbecue. Don’t be afraid to adorn the table with some extra lime wedges for that zesty pop right before digging in!
Recipe Variations
Feel free to get creative! Here are a few ideas to switch up the recipe:
- Spicy Twist: Add some Sriracha or red pepper flakes to the dressing for a spicy kick!
- Noodle Bowl: Toss the slaw with cooked soba noodles or rice vermicelli for a wholesome meal.
- Asian Fusion: Swap out chickpeas for shredded cabbage and add shredded chicken or tofu for a twist.
- Fruity Addition: Add in chopped mango or diced apples for a sweet, fruity contrast.
- Herb Swaps: Experiment with fresh basil or mint in place of cilantro for a unique flavor profile.
Chef’s Notes
As with many recipes, this slaw has evolved in my kitchen over the years. I initially focused on traditional Asian flavors, but I soon realized that it worked beautifully with various ingredients I found at local farmers’ markets. The beauty of slaws like this one is their versatility. On lazy days, I’ve even thrown in leftover roasted vegetables or grains, quickly transforming it into a full meal!
And let me tell you, the first time I served this dish at a dinner party, it was met with rave reviews — everyone kept asking for the recipe! I love how cooking can create moments like that — the connection between people, food, and stories ignites joy in our lives.
FAQs and Troubleshooting
Q: Can I make this slaw ahead of time?
A: Absolutely! This slaw holds up well in the fridge. Just keep in mind to add the sesame seeds right before serving for that crunch!
Q: What if I have leftovers?
A: Leftover slaw makes a great topping for sandwiches or tacos! It can last in the fridge for about 3 days, but it’s always best fresh.
Q: Can I use frozen chickpeas?
A: Yes, if you’ve cooked your chickpeas and frozen them, just thaw, rinse, and they’ll work great!
Q: Can I skip the onion or garlic?
A: Sure! Adjust to your taste; omit or use scallions for a milder flavor or garlic-infused oil as a substitute.
Nutritional Info (Optional)
While I don’t focus solely on the nutritional aspects of my recipes, you’ll find that this slaw is not only delicious but also nutritious. It’s packed with fiber, vitamins, and plant-based protein thanks to the chickpeas and veggies. For those monitoring calories, each serving contains roughly 150 calories.
So there you have it! We’ve taken a simple idea and created something that not only tastes wonderful but also feels great to make. Once you serve this slaw, you’ll understand why it became a staple in my family and why it will for yours too! Appreciate the little moments as you share this dish with loved ones around your table. Happy cooking! 🎉
PrintRefreshing Asian Cucumber and Chickpea Slaw with Sesame Dressing
A vibrant, fresh Asian slaw featuring cucumbers, chickpeas, and a nutty sesame dressing that’s perfect for any meal.
- Prep Time: 15 minutes
- Cook Time: 0 minutes
- Total Time: 35 minutes
- Yield: 4 servings 1x
- Category: Salad
- Method: No-Cook
- Cuisine: Asian
- Diet: Vegan
Ingredients
- 2 cups shredded cucumber
- 1 cup shredded carrots
- 1 can (15 oz) chickpeas, drained and rinsed
- 1/4 cup thinly sliced red onion
- 1/4 cup chopped cilantro
- 2 tablespoons sesame oil
- 1 tablespoon rice vinegar
- 1 tablespoon soy sauce
- 1 teaspoon honey
- 1 teaspoon grated ginger
- 1 clove garlic, minced
- 1 tablespoon sesame seeds
Instructions
- Prep Your Vegetables by washing and slicing cucumbers and carrots.
- Shred and combine cucumbers, carrots, chickpeas, red onion, and cilantro in a large mixing bowl.
- Make the dressing by whisking together sesame oil, rice vinegar, soy sauce, honey, ginger, and garlic in a separate bowl.
- Combine slaw and dressing by drizzling the dressing over the vegetable mixture and folding gently.
- Let it rest in the fridge for at least 20 minutes before serving.
- Serve with toasted sesame seeds on top for added crunch.
Notes
Add a splash of lime juice for extra zest and consider adding Sriracha for a spicy twist!
Nutrition
- Serving Size: 1 cup
- Calories: 150
- Sugar: 4g
- Sodium: 320mg
- Fat: 7g
- Saturated Fat: 1g
- Unsaturated Fat: 6g
- Trans Fat: 0g
- Carbohydrates: 22g
- Fiber: 6g
- Protein: 5g
- Cholesterol: 0mg
Keywords: cucumber slaw, chickpea salad, sesame dressing, Asian cuisine, vegan recipe
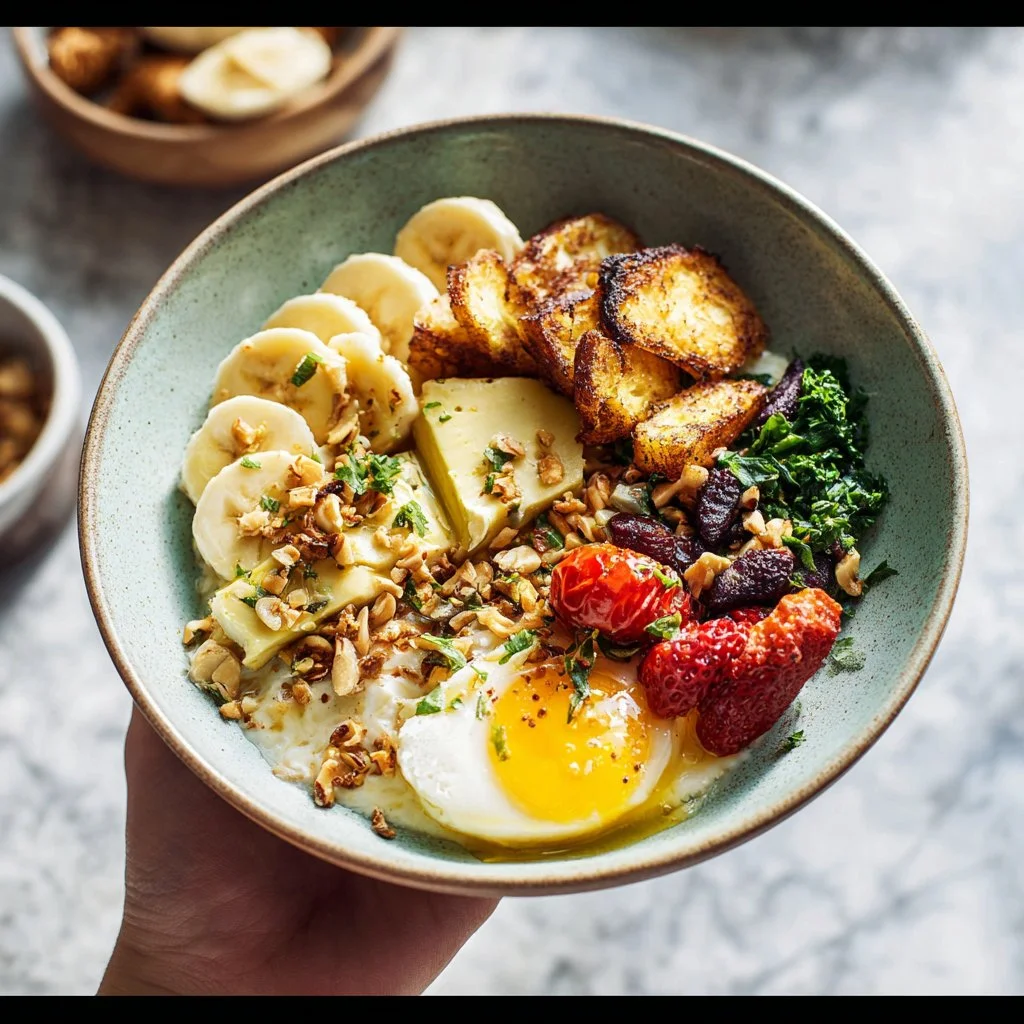
Savoury vegan breakfast bowl
# Savory Vegan Breakfast Bowl: A Morning Delight with a Twist

## Introduction

Good morning, kitchen adventurers! Today, I'm so excited to share with you one of my absolute favorite breakfast recipes: the savory vegan breakfast bowl. This dish is vibrant, nourishing, and packed with wholesome goodness that will fuel your day. Perfect for lazy weekends, busy weekdays, or anytime you want to start your morning off right, this breakfast bowl is not just a meal; it’s an experience.

Imagine waking up, the sun just starting to creep through your kitchen window, a gentle glow lighting up the countertop where you set your ingredients. You grab your trusty olive oil and those lush cherry tomatoes on the vine, each burst of flavor promising a delightful start to your day. The best part? This bowl is not only vegan, it’s also remarkably easy to whip up, proving that you don't need to compromise on flavor to eat plant-based.

As I go through the steps, I want you to feel empowered and inspired. Cooking is all about intention and warmth, and this meal is perfect for gathering loved ones around your table—whether it's your family, friends, or even just the joy of cooking for yourself. So, grab your apron, and let’s dive into this delicious creation that makes breakfast feel like a celebration!

## Personal Story

Let me take you back to one of my most cherished memories in the kitchen—one that perfectly encapsulates my love for breakfast bowls. It was a crisp Saturday morning a few years ago, and I decided to host a brunch gathering for my closest friends. I wanted to create something that was both impressive and approachable, something that would spark joy and conversation.

As I chopped tomatoes and sautéed spinach, the aroma filled the room, drawing everyone into the kitchen. We laughed, shared stories from the week, and reminisced about our favorite breakfast spots around town. I remember serving each of my friends their own personalized breakfast bowl, the colors vibrant and inviting. Watching them savor each bite, sharing their thoughts on the flavors, and seeing them enjoy this simple dish made my heart swell.

That day, I realized that food has this incredible ability to bring people together. It’s not just about nourishment; it’s about connection and joy. This savory vegan breakfast bowl became a staple in my home, a recipe I could share and adjust to suit every guest and occasion. I hope it brings you just as much warmth and delight in your own kitchen!

## Ingredients

Here’s what you’ll need to create your very own savory vegan breakfast bowl, alongside some quick insights and substitutions to make your cooking experience even smoother:

- **Olive oil**: This healthy fat is perfect for sautéing and adds a lovely richness. For a twist, use avocado oil or coconut oil.
- **Cherry tomatoes on the vine**: Their sweet, juicy flavor really pops in this dish. If they aren’t in season, feel free to use canned tomatoes instead; just drain them first.
- **Cooked small potatoes (250 g / 9 oz), halved**: Use pre-cooked small potatoes for ease, or simply roast some new potatoes. Sweet potatoes work beautifully too!
- **Salt and black pepper**: To enhance all the flavors! Always taste as you go to get that perfect balance.
- **Baby spinach (100 g / 3.5 oz)**: Fresh spinach makes the bowl vibrant and nutritious. Kale or Swiss chard can be great substitutes, just remember that they may require a bit more cooking time.
- **Large shallot, finely diced**: Shallots offer a subtle sweetness. If you're in a pinch, yellow onion or even green onions can work here.
- **Garlic clove, finely diced**: A must for flavor! Use garlic powder if you don’t have fresh garlic on hand—just adjust the amount to taste.
- **Silken firm tofu (300 g / 10.5 oz)**: This creamy base gives a fluffy texture to the dish. For a firmer option, use pressed regular tofu.
- **Turmeric (¼ tsp)**: A beautiful golden spice with health benefits and a subtle earthiness. Adjust according to your preference; it goes a long way!
- **Black salt (¼ tsp)**: This has a delightful, eggy taste that lifts the flavor profile. Regular sea salt works too, but for the authentic flavor, try to find black salt.
- **Ripe avocado (½, cut in half)**: Creamy, dreamy goodness to top your bowl! If avocados aren't ripe, feel free to substitute with guacamole or tahini for creaminess.

## Step-by-Step Instructions

1. **Heat the pan**: Start by drizzling a tablespoon of olive oil into a large skillet over medium heat. Wait for the oil to shimmer—not too hot, or it will smoke!

2. **Sauté the shallots and garlic**: Toss in the finely diced shallot and garlic, stirring gently. Sauté them for about 3-4 minutes until the shallots turn translucent. This is where the magic begins, and your kitchen starts to smell incredible!

3. **Add those potatoes**: Next, add the halved cooked potatoes to the pan. Season them with a pinch of salt and black pepper, and let them sauté for about 5-7 minutes until they are golden and crispy on the edges. This crispy texture will add a delightful contrast to your bowl.

4. **Toss in the cherry tomatoes**: As the potatoes are turning golden brown, toss in the cherry tomatoes. Cook them for another 3-5 minutes until they start to burst and release their juices, adding sultry sweetness to the mix.

5. **Add the spinach**: Stir in the baby spinach and cook it down just until wilted—this only takes a minute or two. That vibrant green color signals that all your nutritional goodness is in the pan!

6. **Prepare the tofu**: While the vegetables are cooking, it’s time to handle the star of the show—the silken tofu! You'll want to drain it first and then give it a good press to remove excess moisture. Then, crumble it into the skillet with the vegetables.

7. **Spice it up**: Sprinkle in your turmeric and black salt. Gently fold everything together, cooking for another 3-5 minutes until the tofu is warmed through and has absorbed those lovely flavors.

8. **Taste and adjust**: This is the perfect moment to taste your creation! Adjust the seasoning with extra salt or black pepper as needed.

9. **Plate it up**: Scoop generous servings into your favorite bowls. Don’t be shy! This dish is all about abundance.

10. **Top with avocado**: Finally, take that lovely half avocado you prepared at the beginning and add it on top. You could even give it a sprinkle of salt and a dash of lime juice for an extra zing!

## Serving Suggestions

When it comes to plating your savory breakfast bowl, remember that presentation matters! Use a wide, shallow bowl to showcase the vibrant colors of your ingredients. Arrange the tofu and veggies artfully in a mound, and top with the avocado half. A light drizzle of olive oil or a sprinkle of fresh herbs can take it to the next level. Don’t forget the napkins—this bowl is meant to be enjoyed!

## Recipe Variations

Feel free to get creative with your breakfast bowl! Here are a few variations to consider:

- **Spicy kick**: Add jalapeños or red pepper flakes when cooking the vegetables for a delightful heat.
- **Herbed delight**: Experiment with fresh herbs like basil, cilantro, or parsley to bring a fresh burst of flavor.
- **Grain-based bowl**: Swap out the potatoes for cooked quinoa or brown rice for a different texture.
- **Extra protein**: Add a scoop of your favorite vegan protein source, like chickpeas or lentils, for a heartier meal.
- **Cheesy goodness**: Sprinkle in some nutritional yeast as you cook for a cheesy flavor without any dairy.

## Chef’s Notes

One of my favorite things about this recipe is its versatility! Over the years, I've mixed it up based on whatever seasonal ingredients were fresh at the farmer's market. Once, I even added roasted bell peppers and asparagus for a spring twist! It’s a joy to see how a simple concept can evolve with the seasons.

And oh, the kitchen adventures I’ve had! I once accidentally grabbed the cayenne instead of turmeric—the result was fiery! Thankfully, my friends and I laughed our way through it. Cooking is about embracing those ‘oops’ moments; they often lead to the best memories.

## FAQs and Troubleshooting

**1. My tofu isn't blending well—what did I do wrong?**
Make sure to use silken firm tofu for the best texture. If it seems too dry, a little water or plant-based milk can help achieve that creamy consistency!

**2. Can I meal-prep this breakfast bowl?**
Absolutely! You can prepare the tofu-vegetable mixture ahead of time and store it in the fridge for 3-4 days. Just reheat and add fresh toppings before serving.

**3. I don’t like cherry tomatoes—what can I use instead?**
If tomatoes aren’t your thing, roasted red peppers, diced zucchini, or even sautéed mushrooms can provide that burst of flavor and moisture you’re looking for.

**4. What if I can’t find black salt?**
No worries! You can use regular sea salt, but it won’t have the same eggy flavor. If you want to mimic that, add a dash of smoked paprika for a slightly different taste.

## Nutritional Info (approximate)

- Calories: 400 per serving
- Protein: 15g
- Fat: 22g
- Carbohydrates: 35g
- Fiber: 8g

---

I hope this savory vegan breakfast bowl becomes a staple in your home as it has in mine! Cooking is all about connection and joy—that's the heart behind Ivory Apron. So gather your ingredients, let your creativity flow, and please share your breakfast bowl creations with me! Happy cooking!
Savory Vegan Breakfast Bowl
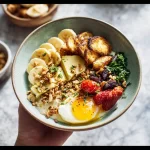
A nourishing and vibrant breakfast bowl packed with wholesome ingredients, perfect for starting your day off right.
- Prep Time: 15 minutes
- Cook Time: 30 minutes
- Total Time: 45 minutes
- Yield: 4 servings 1x
- Category: Breakfast
- Method: Sautéing
- Cuisine: Vegan
- Diet: Vegan
Ingredients
- 1 tablespoon olive oil
- 200 g cherry tomatoes on the vine
- 250 g cooked small potatoes, halved
- Salt and black pepper, to taste
- 100 g baby spinach
- 1 large shallot, finely diced
- 1 garlic clove, finely diced
- 300 g silken firm tofu
- ¼ teaspoon turmeric
- ¼ teaspoon black salt
- ½ ripe avocado, cut in half
Instructions
- Heat the pan: Start by drizzling a tablespoon of olive oil into a large skillet over medium heat. Wait for the oil to shimmer.
- Sauté the shallots and garlic: Toss in the finely diced shallot and garlic, stirring gently. Sauté for about 3-4 minutes until the shallots turn translucent.
- Add those potatoes: Add the halved cooked potatoes to the pan. Season them with a pinch of salt and black pepper, and let them sauté for about 5-7 minutes until golden and crispy.
- Toss in the cherry tomatoes: As the potatoes turn golden brown, toss in the cherry tomatoes and cook for another 3-5 minutes.
- Add the spinach: Stir in the baby spinach and cook until wilted, about 1-2 minutes.
- Prepare the tofu: Drain the silken tofu and crumble it into the skillet with the vegetables.
- Spice it up: Sprinkle in your turmeric and black salt. Gently fold everything together, cooking for another 3-5 minutes.
- Taste and adjust: Taste your creation and adjust the seasoning with extra salt or black pepper as needed.
- Plate it up: Scoop generous servings into your favorite bowls.
- Top with avocado: Add the avocado half on top and sprinkle with salt and lime juice if desired.
Notes
Feel free to customize with seasonal vegetables or herbs to make it your own.
Nutrition
- Serving Size: 1 bowl
- Calories: 400
- Sugar: 6g
- Sodium: 500mg
- Fat: 22g
- Saturated Fat: 3g
- Unsaturated Fat: 19g
- Trans Fat: 0g
- Carbohydrates: 35g
- Fiber: 8g
- Protein: 15g
- Cholesterol: 0mg
Keywords: vegan breakfast, breakfast bowl, healthy breakfast, plant-based recipe