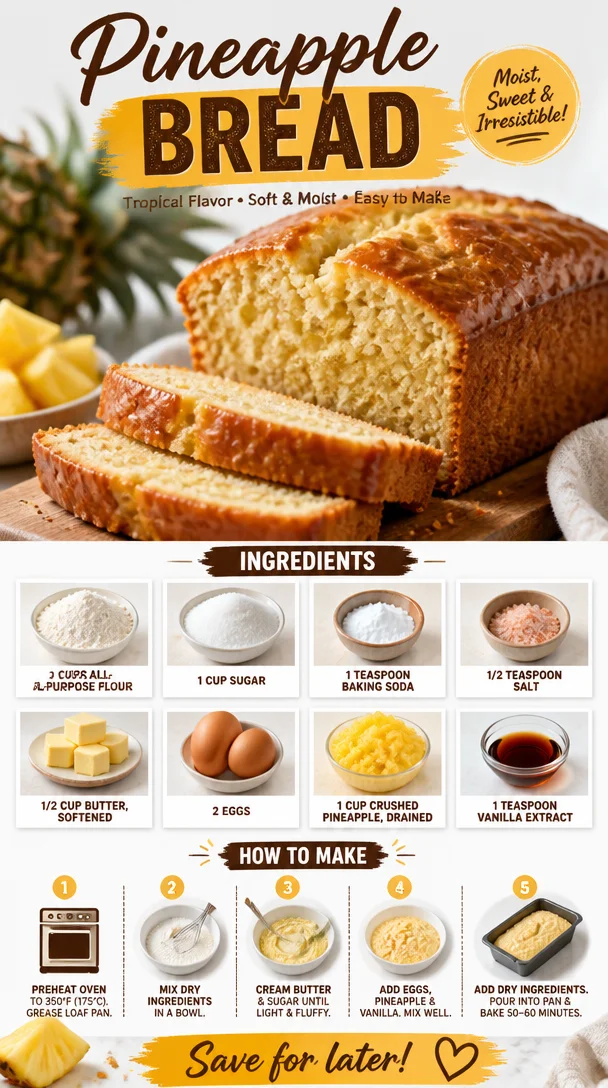
Pineapple Bread
A Slice of Sunshine: Pineapple Bread Recipe
Hello, fellow foodies! Whether you’re an experienced home chef or just starting your culinary journey, there’s something magical about baking. The aroma wafting through your kitchen, the gentle hum of your mixer—it’s as if your kitchen transforms into a cozy haven filled with warmth and creativity. Today, I’m excited to share a delightful recipe that embodies both sweetness and nostalgia—Pineapple Bread.
Picture this: it’s a bright summer afternoon, and the sun is shining through your kitchen window. The tantalizing scent of freshly baked bread made with juicy pineapple fills the air, evoking memories of family gatherings and carefree summer days. Pineapple Bread is not only incredibly easy to make but also a fantastic way to bring a tropical twist to your baking repertoire. Trust me when I say, once you get a taste of this succulent bread, you’ll be dreaming of sun-soaked beaches and endless summers no matter the season!
This recipe is perfect for breakfast, a snack, or even dessert—any time of the day is a good reason for a slice of this fruity, sweet delight. You won’t believe how simple it is, and I promise you’ll have your friends and family asking for more!
Let’s dive into this fruity adventure and make our kitchen feel like a tropical paradise!
My Pineapple Connection
Ah, Pineapple Bread! My connection to this treat goes way back to my childhood. I still remember weekends spent at my grandmother’s kitchen; the sun beaming through the curtains while she whipped up her famous Pineapple Bread. The way she’d mix the batter gently, humming softly to herself, created a rhythm that felt so comforting.
One day, I decided I wanted to help—not just to stir, but to learn the secret to that magical bread. I climbed up on a sturdy kitchen stool, and Grandma handed me the task of pouring in the crushed pineapple. The moment that juicy fruit met the batter was a revelation; I watched as the mixture transformed, realizing that cooking is more than following a recipe—it’s an experience laden with joy, love, and memories.
That Pineapple Bread recipe became synonymous with family gatherings. It was a favorite at picnics, birthday parties, and holiday celebrations. Now, I want to pass that same love and joy onto you with this easy and delightful Pineapple Bread recipe!
Ingredients
Let’s gather our ingredients. For this delightful Pineapple Bread, you’ll need:
-
2 cups all-purpose flour: This is your base for the bread. You can use whole wheat flour for a nuttier flavor or a gluten-free flour mix if you’re avoiding gluten.
-
1 cup sugar: Sweetness is key here! If you prefer, you can substitute coconut sugar for a hint of caramel flavor or reduce it to ¾ cup for a less sweet version.
-
1 teaspoon baking soda: This will give your bread a lovely rise. Make sure it’s fresh for the best results!
-
½ teaspoon salt: Just a pinch enhances all the flavors and balances the sweetness.
-
½ cup butter, softened: Butter creates a rich, tender crumb in the bread. Coconut oil or applesauce can be used for a dairy-free alternative.
-
2 eggs: They provide structure and moisture. You can substitute flax eggs (1 tbsp flaxseed meal + 2.5 tbsp water per egg) for a vegan option.
-
1 cup crushed pineapple, drained: The star of the show! Make sure to drain it well to prevent excess moisture; you can also use fresh pineapple for a fresher flavor.
-
1 teaspoon vanilla extract: For that beautiful aroma and depth of flavor. Feel free to add a splash extra if you love vanilla as much as I do!
Chef Insight
Having quality ingredients is key to delivering a mouthwatering dish. When selecting your pineapple, go for ripe, sweet fruit to ensure a luscious flavor that shines through.
Step-by-Step Instructions
Ready to bake? Grab your apron, and let’s get started!
-
Preheat the oven to 350°F (175°C). This is crucial for ensuring your bread bakes evenly and beautifully!
-
Prepare your baking pan. Grease a 9×5 inch loaf pan with butter or cooking spray. This will keep the bread from sticking and makes for easy cleanup later!
-
Mix dry ingredients. In a medium bowl, whisk together the flour, sugar, baking soda, and salt until well combined. This distributes the leavening agents and ensures your bread rises evenly!
-
Cream the butter. In a large mixing bowl, cream the softened butter until it’s light and fluffy. This usually takes about 2-3 minutes with an electric mixer. It’s a step you don’t want to skip, as it helps incorporate air into the batter for a fluffy texture.
-
Add the eggs and vanilla. Beat in the eggs one at a time, mixing well after each addition. Then, add in the vanilla extract! This is where your kitchen will start to smell wonderful.
-
Incorporate the crushed pineapple. Gently fold in the crushed pineapple. The mixture might seem a little wet, but that’s exactly what we want for a moist bread!
-
Combine wet and dry ingredients. Now, gradually add the dry ingredients into the wet mixture, stirring gently until just combined. Be careful not to overmix; a few lumps are perfectly fine!
-
Pour into the pan. Scrape the batter into your prepared loaf pan, smoothing the top with a spatula. Now’s the time to get creative—with a sprinkle of chopped nuts or coconut on top if you’d like!
-
Bake! Place the loaf in the preheated oven and bake for about 60 minutes or until a toothpick inserted in the center comes out clean. It might take a few extra minutes depending on your oven, but trust me—it’s worth the wait!
-
Cool & Enjoy! Once baked, remove the bread from the oven and let it cool in the pan for about 10 minutes before transferring it to a wire rack to cool completely. This step is tough, I know, but it’ll be worth it when you slice it warm later!
Chef Tips
- Testing for doneness: To ensure your bread is perfectly baked, give it a gentle shake. If it doesn’t jiggle, it’s ready.
- Storage: Wrap any leftover bread in plastic wrap and keep it at room temperature for about 2-3 days. You can also freeze slices for later—just make sure to wrap them tightly!
Serving Suggestions
Once your Pineapple Bread is cool, it’s time to slice into this dreamy creation! Serve a thick slice warm, perhaps spread with a bit of softened cream cheese or coconut spread for an extra delicious flair. Consider garnishing with some fresh fruit or even a sprig of mint for a refreshing touch!
Perfect for breakfast with coffee, an afternoon snack, or even a light dessert for dinner—it pairs beautifully with a scoop of vanilla ice cream or a dollop of whipped cream. Trust me; your friends will devour it in no time!
Recipe Variations
-
Nutty Delight: Add ½ cup of chopped pecans or walnuts for an added crunch and nutty flavor.
-
Coconut Twist: Mix in some shredded coconut to elevate that tropical vibe. Who doesn’t love coconut with pineapple?
-
Spice it up: Add a ½ teaspoon of cinnamon or nutmeg to the dry ingredients for a warm, comforting twist.
-
Zest it up: A tablespoon of orange or lemon zest can brighten the flavor and add a refreshing kick.
-
Fruity Fusion: Try adding ½ cup of blueberries or chopped strawberries for a delightful fruit medley!
Chef’s Notes
As I’ve made this bread through the years, I’ve found it’s one of those recipes that carries love from one kitchen to another. I’ve tweaked it in various ways, either by using whatever fruit is in season or playing around with different types of flours. Sometimes, I even reminisce about Grandma’s version and feel compelled to add a touch of nostalgia; I’ll bake this bread for family gatherings or simply to share with friends who need a bit of sunshine in their lives.
Honestly, every time I bake this bread, it feels like a warm hug from Grandma wrapped in golden slices. And that, my dear friends, is what cooking is all about—the stories we weave around the meals we make!
FAQs and Troubleshooting
1. My bread didn’t rise! What happened?
Make sure your baking soda is fresh! If your leavening agent is older, it might not work as effectively, resulting in a flat loaf.
2. Why is my Pineapple Bread too moist?
It could be due to excess moisture in the crushed pineapple. Make sure to drain it thoroughly before adding it to the batter.
3. Can I replace the eggs?
Absolutely! For each egg, use 1 tablespoon of flaxseed meal mixed with 2.5 tablespoons of water and let it sit until it forms a gel-like consistency.
4. How can I make this a low-sugar recipe?
You can reduce the sugar to ¾ cup, use a sugar substitute like monk fruit, or even omit it altogether if you have sweeter pineapple!
Nutritional Info (optional)
(Nutritional information can vary based on ingredient specifics and serving sizes, but a rough estimate for one slice of Pineapple Bread is: 200-250 calories, 8g fat, 35g carbohydrates, and 2g protein.)
And there you have it, a beautiful recipe for Pineapple Bread that’ll bring sunshine to your kitchen, no matter the season! Remember, cooking is about joy and connection, so gather those you love around your table and share this slice of happiness. With each bite, you’re wrapping your loved ones in warmth and affection—a gift that’s truly timeless. Happy baking!
PrintA Slice of Sunshine: Pineapple Bread Recipe
Delightful and easy-to-make Pineapple Bread that brings a tropical twist to your baking, perfect for breakfast, snacks or dessert.
- Prep Time: 15 minutes
- Cook Time: 60 minutes
- Total Time: 75 minutes
- Yield: 12 servings 1x
- Category: Dessert
- Method: Baking
- Cuisine: Tropical
- Diet: Vegetarian
Ingredients
- 2 cups all-purpose flour
- 1 cup sugar
- 1 teaspoon baking soda
- ½ teaspoon salt
- ½ cup butter, softened
- 2 eggs
- 1 cup crushed pineapple, drained
- 1 teaspoon vanilla extract
Instructions
- Preheat the oven to 350°F (175°C).
- Prepare your baking pan by greasing a 9×5 inch loaf pan with butter or cooking spray.
- Mix dry ingredients: In a medium bowl, whisk together the flour, sugar, baking soda, and salt until well combined.
- Cream the butter: In a large mixing bowl, cream the softened butter until light and fluffy.
- Add the eggs and vanilla, beating in the eggs one at a time, mixing well after each.
- Incorporate the crushed pineapple by folding it gently into the mixture.
- Combine the wet and dry ingredients, stirring gently until just combined.
- Pour the batter into your prepared loaf pan, smoothing the top with a spatula.
- Bake for about 60 minutes or until a toothpick inserted in the center comes out clean.
- Cool in the pan for about 10 minutes before transferring to a wire rack to cool completely.
Notes
Wrap any leftover bread in plastic wrap and keep at room temperature for 2-3 days. Freeze slices for later.
Nutrition
- Serving Size: 1 slice
- Calories: 250
- Sugar: 8g
- Sodium: 180mg
- Fat: 10g
- Saturated Fat: 5g
- Unsaturated Fat: 4g
- Trans Fat: 0g
- Carbohydrates: 35g
- Fiber: 1g
- Protein: 2g
- Cholesterol: 35mg
Keywords: Pineapple Bread, Tropical Dessert, Easy Baking
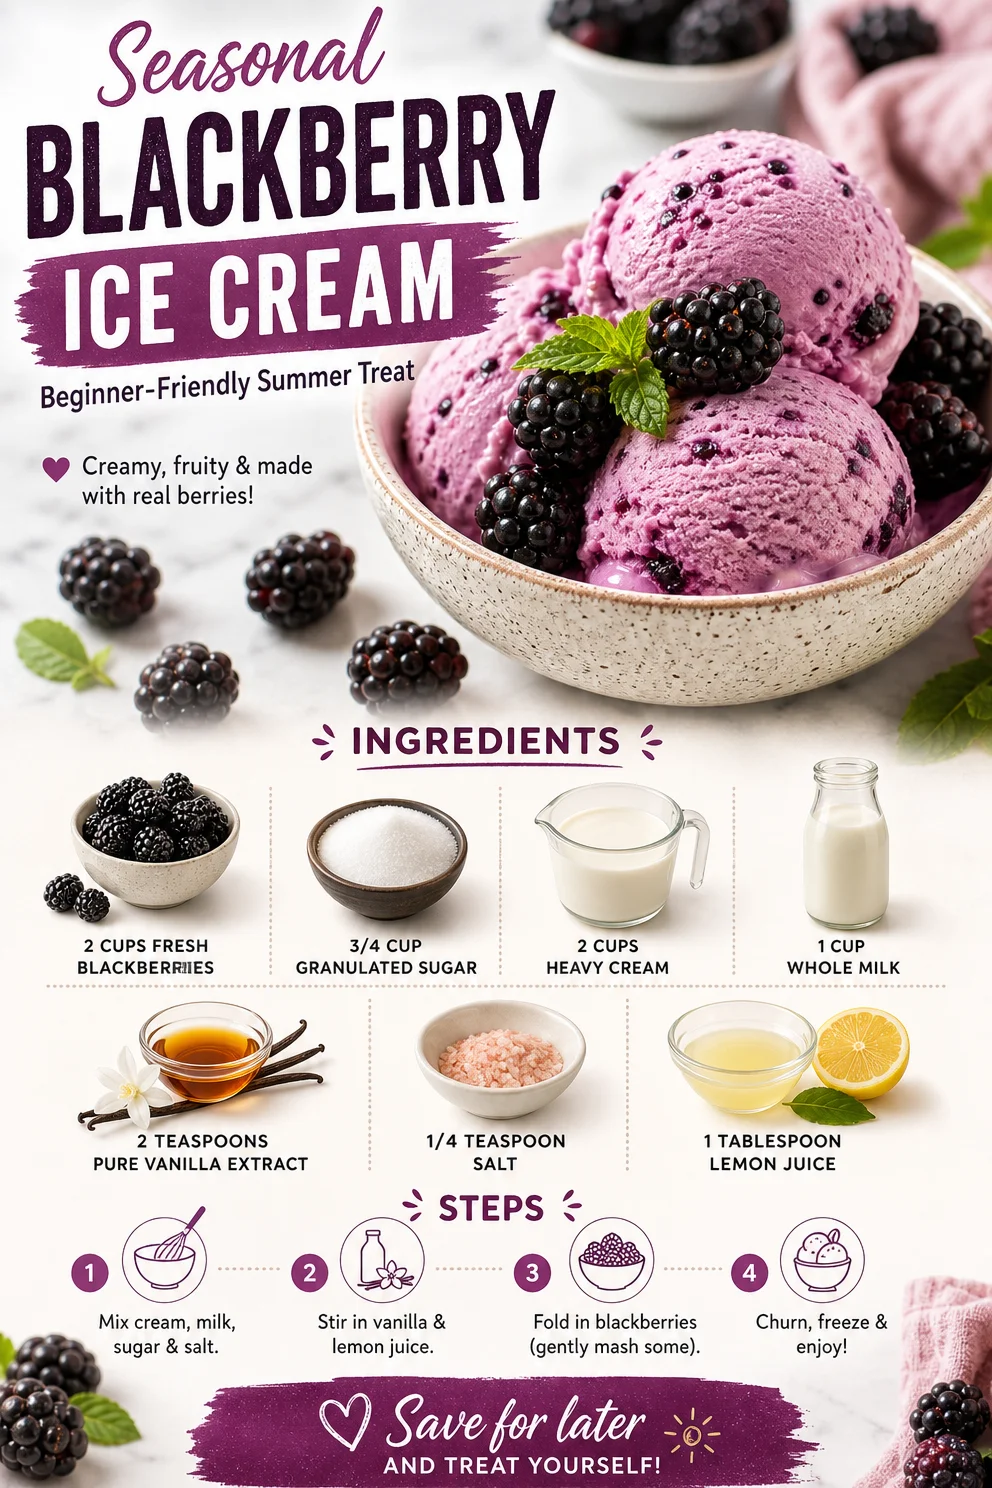
Seasonal Blackberry Ice Cream Beginner-Friendly Summer Treat
Homemade Fresh Blackberry Ice Cream: A Summer Treat to Savor
Ah, summer! The season of sun-kissed skin, backyard barbecues, and, of course, delightful homemade ice cream. There’s nothing quite like the feeling of digging into a cold, creamy scoop of ice cream on a hot day. Today, I’m thrilled to share one of my favorite summer recipes: Homemade Fresh Blackberry Ice Cream. It’s a colorful and delicious treat that encapsulates the essence of summer in every spoonful.
What I adore about this blackberry ice cream recipe is that it’s not just about the satisfying creaminess; it’s also an ode to nature’s candy—those juicy, ripe blackberries. When you make this ice cream, you’re embracing the sweet, tart flavors of summer while creating a dessert that impresses without overwhelming. Let’s dive into this recipe, where I’ll guide you step-by-step to ensure your homemade ice cream turns out beautifully. Ready? Let’s make some magic in the kitchen!
A Sweet Memory
Growing up in a small town, summer meant my grandma’s house was the hub for family gatherings. On lazy Sunday afternoons, our backyard turned into a vibrant carnival with laughter, games, and, of course, food. One of the staples was my grandma’s berry ice cream. She’d gather blackberries from her garden, and with a few simple ingredients, would whip up the creamiest ice cream I’d ever tasted. I still remember the thrill of picking berries with my cousins and then the family’s collective excitement as we waited for the ice cream to churn. The moment those generous scoops were dished out, it was pure bliss. Each bite brought back the sunny memories of our summer gatherings. Fast forward to today, and I still crave that icy delight whenever blackberries are in season.
Ingredients
Here’s everything you’ll need to create this sensational blackberry ice cream:
-
2 cups fresh blackberries
These juicy gems are the star of the show! If blackberries are not available, you can easily swap them for raspberries or blueberries for a similar flavor profile. -
3/4 cup granulated sugar
Sweetness is key! This amount offers a perfect balance, but feel free to adjust to your taste. You could even experiment with honey or agave for a different sweetness. -
2 cups heavy cream
For that luxuriously creamy texture. If you’re looking for a lighter version, half and half works well, but expect a slightly different texture. -
1 cup whole milk
Adds creaminess but also some volume. You can substitute skim milk, but keep in mind that the final texture will be less rich. -
2 teaspoons pure vanilla extract
Using pure vanilla extract brightens the flavor. I always recommend avoiding imitation vanilla; a little goes a long way! -
1/4 teaspoon salt
Just a pinch! This enhances the overall flavor and balances the sweetness beautifully. -
1 tablespoon lemon juice
Fresh lemon juice brightens up the whole mixture and enhances the blackberry flavor. Trust me on this one—it’s a game changer!
Step-by-Step Instructions
Let’s get churning! Here’s how you can make your fabulous blackberry ice cream.
-
Prepare the Blackberries
Start by rinsing your blackberries under cold water. Make sure to gently pat them dry. In a medium bowl, sprinkle about 2 tablespoons of the granulated sugar over the blackberries. Allow them to sit for about 10-15 minutes so the sugar can draw out their delicious juices, giving you a natural blackberry syrup. -
Mash and Strain
After the blackberries have marinated in sugar, take a fork and lightly mash them. You’re not looking for a puree—just enough to break some of them open and release their juice. Once mashed, pour the mixture through a fine-mesh sieve into another bowl. Press down on the solids to extract as much juice as possible, then set that bowl aside. -
Mix the Cream Base
In a large mixing bowl, whisk together the heavy cream, whole milk, remaining sugar (adjust to your taste), vanilla extract, salt, and lemon juice. The mixture should feel rich and silky. If you have an electric mixer, you can use it on low speed to blend everything seamlessly. -
Combine Blackberry Mixture
Add the blackberry juice to the cream mixture and stir gently to combine. If you prefer a few chunks of blackberries in your ice cream, you can fold them in at this point—adding texture that’s simply divine. -
Chill the Mixture
Cover the bowl with plastic wrap and refrigerate the mixture for at least 2 hours (or overnight if you’re a planner!). Chilling the mixture ensures a smoother texture once it’s churned. -
Churn the Ice Cream
Pour the chilled berry-cream mixture into your ice cream maker following the manufacturer’s instructions. If you don’t have an ice cream maker, you can still make this work! Pour the mixture into a large bowl and place it in the freezer. Every 30 minutes, take it out and use a fork to scrape and stir it, breaking up any ice crystals. Repeat this process until the ice cream is thickened and creamy, usually about 3-4 hours. -
Freeze to Firm Up
Once the ice cream reaches your desired consistency, transfer it to an airtight container and place it in the freezer for at least 4 hours to firm up fully.
Serving Suggestions
When it’s finally time to serve your homemade blackberry ice cream, consider a few easy ideas to elevate your dish! Serve it in beautiful bowls and consider adding a sprig of fresh mint on top for a pop of color and freshness. You can also drizzle some raspberry sauce or a balsamic reduction for a gourmet touch. And if you really want to impress, sandwich it between two soft cookies for a delightful ice cream sandwich!
Recipe Variations
-
Berry Medley: Try using a mix of blackberries, raspberries, and blueberries for a colorful twist on this classic recipe.
-
Coconut Blackberry Ice Cream: Swap half of the heavy cream for coconut cream for a tropical flavor.
-
Vegan Option: Use coconut milk or an almond milk base with agave syrup instead of sugar for a delicious vegan-friendly treat.
-
Chocolate Swirl: Stir in some melted dark chocolate for a decadent fudgy experience!
-
Spiced Blackberry: Add a dash of cinnamon or cardamom to the cream mixture for a unique warm flavor that complements the berries.
Chef’s Notes
Every summer, this blackberry ice cream recipe takes me back to those wonderful afternoons spent with my grandma. It’s funny how a simple treat can evoke so many feelings of nostalgia and joy. Over the years, I’ve tweaked this recipe to match my taste and lifestyle, experimenting with different fruits and flavor combinations. Each iteration has taught me something new about balancing flavors and textures. The beauty of homemade ice cream is that it evolves with you—allowing space for creativity without fear! Just remember, the key is always to have fun in the kitchen.
FAQs and Troubleshooting
Q: Can I use frozen blackberries instead of fresh?
A: Absolutely! Just make sure to thaw them completely and drain off excess liquid before proceeding with the recipe. Frozen berries may slightly alter the texture but still yield delicious results.
Q: My ice cream turned out icy. What went wrong?
A: This could happen if the mixture wasn’t chilled sufficiently before churning. Additionally, incorporating too much air during churning can create ice crystals. A few more folds in the mixture as it freezes can help.
Q: How long can I store the ice cream?
A: Homemade ice cream can last about 2-3 weeks in the freezer, though it may need some time to soften when you take it out before scooping!
Q: How can I prevent ice crystals from forming?
A: Make sure to blend your mixture thoroughly and store the ice cream in an airtight container. If you’re freezing it without an ice cream maker, frequent stirring every 30 minutes will help create a creamy texture by breaking up ice crystals.
Nutritional Info (optional)
While I believe in enjoying dessert, it’s also great to be mindful of what you’re consuming. Here’s a general overview (per serving of 1/2 cup):
- Calories: Approx. 250
- Fat: 17g
- Carbohydrates: 24g
- Sugar: 20g
- Protein: 3g
Indulging in homemade blackberry ice cream isn’t just food; it’s a celebration of summer’s sweetest moments. I hope this recipe finds a warm spot in your heart and kitchen. So, tie on your apron, gather your ingredients, and let’s create something delicious together! Cheers to summer and all its tasty treats!
PrintHomemade Fresh Blackberry Ice Cream

A delightful homemade blackberry ice cream that captures the essence of summer with every creamy scoop.
- Prep Time: 15 minutes
- Cook Time: 10 minutes
- Total Time: 385 minutes
- Yield: 4 servings 1x
- Category: Dessert
- Method: Churning
- Cuisine: American
- Diet: Vegetarian
Ingredients
- 2 cups fresh blackberries
- 3/4 cup granulated sugar
- 2 cups heavy cream
- 1 cup whole milk
- 2 teaspoons pure vanilla extract
- 1/4 teaspoon salt
- 1 tablespoon lemon juice
Instructions
- Prepare the blackberries by rinsing them under cold water and patting them dry. Sprinkle 2 tablespoons of sugar over them and let sit for 10-15 minutes.
- Mash the blackberries lightly with a fork to release juices, then strain through a fine-mesh sieve into another bowl.
- Mix the heavy cream, whole milk, remaining sugar, vanilla extract, salt, and lemon juice in a mixing bowl until rich and silky.
- Combine the blackberry juice with the cream mixture and stir gently. Optionally, fold in some blackberry chunks.
- Chill the mixture in the refrigerator for at least 120 minutes.
- Churn the chilled mixture in an ice cream maker according to the manufacturer’s instructions or freeze while stirring every 30 minutes for 3-4 hours.
- Freeze in an airtight container for at least 240 minutes before serving.
Notes
Consider serving with fresh mint, raspberry sauce, or as an ice cream sandwich between cookies.
Nutrition
- Serving Size: 1/2 cup
- Calories: 250
- Sugar: 20g
- Sodium: 50mg
- Fat: 17g
- Saturated Fat: 10g
- Unsaturated Fat: 7g
- Trans Fat: 0g
- Carbohydrates: 24g
- Fiber: 2g
- Protein: 3g
- Cholesterol: 70mg
Keywords: blackberry ice cream, summer dessert, homemade ice cream, berry dessert