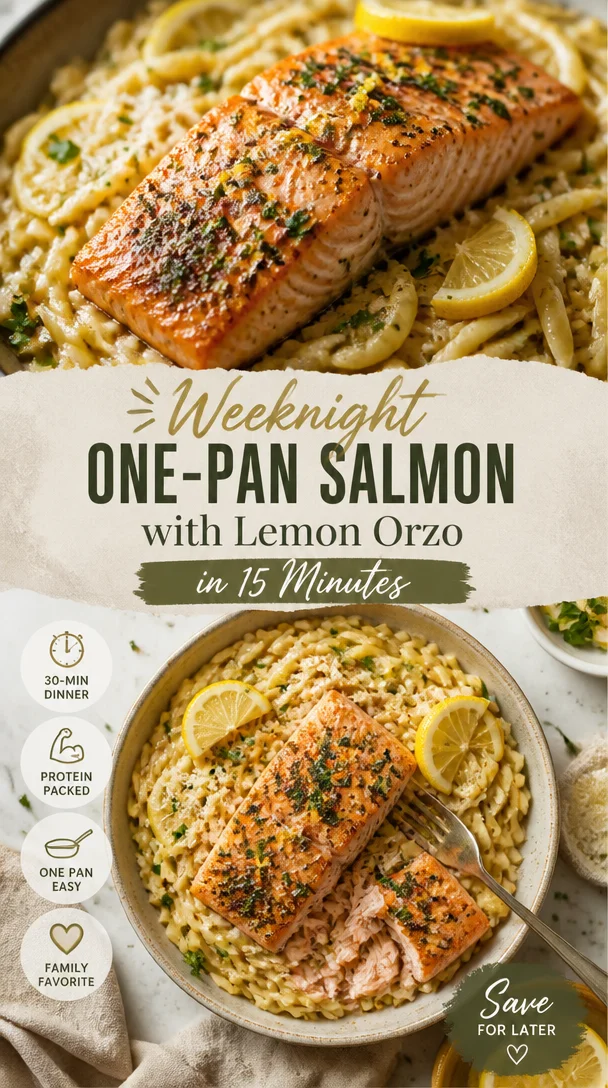
Weeknight One-Pan Salmon with Lemon Orzo in 15 Minutes
One Skillet Salmon with Lemon Orzo: A Dinner to Remember
Hello, friends! It’s Savannah here, your culinary companion from Ivory Apron, excited to whip up a delightful dish that will bring warmth to your table and smiles to your guests. Today, we’re diving headfirst into the world of One Skillet Salmon with Lemon Orzo. This dish is not just a meal; it’s a gathering of flavors, memories, and a sprinkling of love.
Picture this: You’ve had a long day, and the last thing on your mind is spending hours in the kitchen. But what if I told you that in less than 30 minutes, you could craft a stunning, flavorful dinner that looks like you’ve spent hours in the kitchen? Let’s break it down! This One Skillet Salmon is flaked, juicy, and perfectly seasoned, resting on a bed of creamy lemon orzo infused with vibrant spinach and finished with a sprinkle of Parmesan. It’s a straightforward yet elevated meal that feels like a hug on a plate.
I don’t know about you, but cooking has always been a way for me to express love and creativity. There’s something inherently joyful about sharing food, and I believe that every dish tells a story. Whether you’re making it for a special occasion or a cozy weeknight dinner, this One Skillet Salmon will surely become a beloved staple!
A Splash of Nostalgia: My Cooking Journey with Salmon
Growing up, my family hosted some of the most memorable gatherings. As a child, I remember watching my mother expertly handle salmon fillets, her special recipe always drawing family and friends to our dining table. Salmon wasn’t just a meal; it was a symbol of love — lovingly prepared to nourish our bodies and souls.
One summer evening, while the grill was sizzling, my mom decided to try something different, bringing the Mediterranean flavors directly into our kitchen. She tossed in some lemon and fresh herbs, and I swear the kitchen transformed into a fragrant oasis. I was enchanted! That night, we gathered around the table, that unforgettable aroma swirling around us. The combination of moist salmon with tangy lemon reminded me that cooking can create cherished memories.
It’s memories like these that drive my passion for cooking and sharing delicious recipes. Inspired by my mother’s creativity, I’ve refined my approach over the years, making it approachable and elegant at the same time. And trust me, this One Skillet Salmon with Lemon Orzo is bound to spark joy and a sense of togetherness — just like my childhood memories!
Ingredients: All You Need for Deliciousness
Let’s get into the heart of our dish! Here’s what you will need:
-
4 skinless salmon fillets: The star of this dish! Go for fresh or frozen (thawed) fillets. Salmon is packed with healthy fats, and the skinless option makes for easy eating. If salmon isn’t your thing, feel free to use another firm fish like cod or halibut.
-
1 tsp salt (divided): Salt is essential for enhancing the flavors of our dish. You can adjust to your taste preferences.
-
1 tsp coarsely ground black pepper (divided): Freshly ground pepper adds a deeper flavor profile. If you prefer less heat, use a pinch of white pepper instead.
-
1 tsp sweet paprika: This adds a lovely warmth and color to the salmon. Smoked paprika works beautifully here if you enjoy a smoky flavor!
-
1 tsp garlic powder: For that wonderful garlic flavor without the fuss. You can substitute with fresh minced garlic if you prefer.
-
1 tbsp olive oil: A rich, smooth oil to cook our salmon. Feel free to use avocado oil for higher heat tolerance.
-
1 tsp unsalted butter: This will enhance the richness of our dish. Margarine is also an option if you need to keep it dairy-free.
-
1 yellow onion (finely chopped): A classic aromatic that builds the foundation of our flavors. You can use shallots for a milder, sweeter flavor.
-
3 garlic cloves (minced): Garlic lovers rejoice! Fresh garlic adds such depth. If you’re short on time, pre-minced garlic works too.
-
1 cup dry orzo pasta: This small pasta cooks quickly and absorbs flavors beautifully. If you prefer gluten-free, substitute with rice or quinoa.
-
1 tsp dried thyme: This herb brings earthy notes. Fresh thyme is a lovely upgrade if you have it on hand!
-
3 cups low sodium chicken broth: A flavorful base for our orzo. Vegetable broth can be used for a vegetarian option.
-
5 ounces baby spinach: For color and goodness! You can swap with kale or arugula if preferred.
-
Juice from ½ lemon: Freshly squeezed lemon juice brightens the dish. Lime juice could work as an alternative for a twist.
-
½ cup grated Parmesan: For a bit of cheesy goodness! Nutritional yeast is a great vegan alternative.
-
Freshly ground black pepper (for serving): A finishing touch to elevate flavors.
-
Chili flakes (for serving): If you enjoy a bit of spice, these are perfect for a boost! Or totally omit if you’d like.
Step-by-Step Instructions: Let’s Cook!
Now that we have everything prepped, it’s time to bring our dish to life. Grab your apron, and let’s get started!
-
Season the Salmon: Start by patting your salmon fillets dry with a paper towel. This helps to achieve that beautiful crust. Season the fillets on both sides with ½ tsp salt, ½ tsp pepper, sweet paprika, and garlic powder. This seasoning will infuse the fish with fantastic flavor!
-
Heat the Skillet: In a large, deep skillet, heat the olive oil and butter over medium-high heat. Allow the butter to melt and bubble slightly, creating a beautiful base for cooking.
-
Sear the Salmon: Gently place the salmon fillets skin-side down (or side down if skinless) in the skillet. It’s important not to overcrowd the pan; if your skillet isn’t large enough, sear in batches. Cook for about 3-4 minutes without moving them until they develop a crispy exterior and beautiful color. Watch out for splatters!
-
Flip and Cook Through: Carefully flip the salmon fillets using a spatula and cook for another 2-3 minutes until they are opaque and cooked through. Transfer to a plate and cover loosely with foil to keep warm.
-
Sauté the Aromatics: In that same skillet, add the chopped onion and cook for 3-4 minutes until it’s soft and slightly caramelized. Stir in the minced garlic and dried thyme, cooking for an additional minute until fragrant—your kitchen should smell divine!
-
Add the Orzo: Next, throw in your dry orzo pasta and toss it around in the onion and garlic mixture. This step allows the pasta to absorb all that lovely flavor and get slightly toasted. Cook for about a minute.
-
Combine with Broth: Pour in 3 cups of chicken broth and bring it to a gentle simmer. Stir to combine, ensuring the orzo is submerged. Cook for about 10 minutes or until the orzo is tender and much of the liquid is absorbed. Stir occasionally to prevent sticking.
-
Incorporate Spinach and Lemon: Once the orzo is cooked, fold in the baby spinach, lemon juice, and Parmesan. Stir until the spinach wilts down and the cheese melts into that creamy goodness you desire. Adjust seasoning with salt and pepper to taste.
-
Serve: Flake the salmon and nestle it on top of your lemony orzo. Drizzle with a bit of olive oil, sprinkle with freshly cracked black pepper, and a pinch of chili flakes if desired. Your table is now ready to welcome guests or simply treat yourself to a nourishing homecooked meal!
Serving Suggestions: Plating with Love
For serving, I love using a wide, shallow bowl to showcase the vibrant colors of the dish. Start by spooning a generous mound of the lemon orzo mixture in the center, creating a cozy nest. Gently lay the perfectly seared salmon on top, allowing the golden crust to shine! Finish with a good sprinkle of Parmesan and a squeeze of fresh lemon. A sprig of fresh thyme on top adds a lovely finishing touch!
Recipe Variations: Play with Flavors
-
Herb Upgrade: Experiment with fresh herbs like dill or parsley instead of thyme for a different flavor profile.
-
Mediterranean Twist: Add sun-dried tomatoes and olives to the orzo for a Mediterranean flair.
-
Creamy Delight: Stir in a bit of heavy cream or cream cheese for a richer and creamier sauce.
-
Seafood Trio: Mix in shrimp or scallops along with the salmon for a seafood extravaganza!
-
Veggie Power: Toss in other sautéed vegetables, like bell peppers and zucchini, for added texture and nutrition.
Chef’s Notes: A Dash of Wisdom
This One Skillet Salmon has become one of my go-to recipes for weeknight dinners and entertaining alike. It’s versatile and can evolve based on your tastes and what you have in your pantry. I fondly remember making it for my friend’s birthday last year — nothing like a delicious meal to celebrate!
A little secret? Don’t forget to taste and adjust your seasoning during cooking. Cooking is all about making it your own and allowing your palate to guide you!
FAQs and Troubleshooting: Let’s Solve Your Questions!
Q: What if my salmon sticks to the skillet?
A: Ensure your pan is adequately heated before adding the salmon, and make sure to use enough oil. Letting the salmon cook without moving it around helps develop that lovely crust!
Q: Can I use whole wheat orzo?
A: Absolutely! Whole wheat orzo will add a nutty flavor and a touch of extra fiber while maintaining the dish’s integrity.
Q: How do I know when my salmon is cooked through?
A: Salmon is perfect when it flakes easily with a fork and is opaque throughout. You can also use a food thermometer; the internal temperature should reach 145°F (63°C).
Q: Can I make this dish in advance?
A: The orzo can be made ahead, but I recommend cooking the salmon fresh to maintain its texture. Reheat gently if needed, and enjoy!
Nutritional Info (Optional)
If you’re interested in the nutritional benefits of your meal, a serving of One Skillet Salmon with Lemon Orzo is approximately:
- Calories: 540
- Protein: 35g
- Fat: 22g
- Carbohydrates: 48g
- Fiber: 3g
Conclusion
And there you have it, friends! One Skillet Salmon with Lemon Orzo—a beautiful, quick dinner that’s sure to impress, whether you’re hosting or treating yourself. It’s all about the time spent together, creating memories, and of course, delicious food. I can’t wait to hear how your meal turns out! As always, tie on your apron, pour a glass of something bubbly, and enjoy the magic of cooking. Welcome to my kitchen — I’m honored to share this journey with you!
PrintOne Skillet Salmon with Lemon Orzo
A delicious, quick dish featuring perfectly seasoned salmon over creamy lemon orzo with spinach and Parmesan.
- Prep Time: 10 minutes
- Cook Time: 20 minutes
- Total Time: 30 minutes
- Yield: 4 servings 1x
- Category: Main Course
- Method: Skillet
- Cuisine: Mediterranean
- Diet: Pescatarian
Ingredients
- 4 skinless salmon fillets
- 1 tsp salt (divided)
- 1 tsp coarsely ground black pepper (divided)
- 1 tsp sweet paprika
- 1 tsp garlic powder
- 1 tbsp olive oil
- 1 tsp unsalted butter
- 1 yellow onion (finely chopped)
- 3 garlic cloves (minced)
- 1 cup dry orzo pasta
- 1 tsp dried thyme
- 3 cups low sodium chicken broth
- 5 ounces baby spinach
- Juice from ½ lemon
- ½ cup grated Parmesan
- Freshly ground black pepper (for serving)
- Chili flakes (for serving)
Instructions
- Season the salmon: Pat fillets dry, season with ½ tsp salt, ½ tsp pepper, paprika, and garlic powder.
- Heat the skillet: In a large skillet, heat olive oil and butter over medium-high heat.
- Sear the salmon: Place the fillets skin-side down in the skillet and cook for 3-4 minutes without moving.
- Flip and cook through: Carefully flip and cook for another 2-3 minutes until opaque.
- Sauté the aromatics: Add onion and cook for 3-4 minutes until soft. Stir in garlic and thyme for another minute.
- Add the orzo: Toss dry orzo in the onion mixture and cook for about a minute.
- Combine with broth: Pour in chicken broth and simmer for about 10 minutes or until the orzo is tender.
- Incorporate spinach and lemon: Fold in spinach, lemon juice, and Parmesan; season to taste.
- Serve: Flake salmon over orzo and garnish with olive oil, pepper, and chili flakes.
Notes
Taste and adjust seasoning as needed. This dish can be served with a variety of vegetables or pasta alternatives.
Nutrition
- Serving Size: 1 serving
- Calories: 540
- Sugar: 3g
- Sodium: 560mg
- Fat: 22g
- Saturated Fat: 5g
- Unsaturated Fat: 15g
- Trans Fat: 0g
- Carbohydrates: 48g
- Fiber: 3g
- Protein: 35g
- Cholesterol: 60mg
Keywords: salmon, orzo, one skillet, easy dinner, Mediterranean recipe

Minute Meal-Prep Stuffed Bell Peppers (One-Pan)
Stuffed Bell Peppers: An Elegant Comfort Food for Every Table
Hello, fellow foodies! Today, we’re diving into a dish that’s not just a staple of cozy family dinners but also a canvas for creativity in the kitchen: Stuffed Bell Peppers. These vibrant vegetables, when filled with a delicious medley of ingredients, transform into a feast for the eyes and the stomach! Plus, they’re as fun to make as they are to eat. So roll up your sleeves, tie on your apron, and let’s create something wonderful together.
Introduction
Have you ever had that moment in the kitchen where you create something so delicious that the entire family gathered around the table falls silent in awe? That’s the magic of cooking, my friends. Stuffed bell peppers are reminiscent of my early kitchen adventures, where I learned that cooking isn’t merely about following a recipe—it’s about storytelling and connection.
These beauties are not only colorful and appetizing but also incredibly versatile. You can stuff them with whatever your heart desires! Classic beef and rice, zesty chicken and quinoa, or even a hearty vegetarian mix. They’re essentially blank canvases ready for you to paint your culinary masterpiece.
When you serve stuffed bell peppers, the world seems a little brighter. Their joyful colors contrast beautifully on any table, inviting guests to dig in and enjoy. It’s a beautiful small act of hospitality, transforming a simple meal into a memorable experience.
So, let’s get cooking! You’ll find a delightful combination of flavors and textures in this stuffed peppers recipe, and I promise it’s easy enough for any level of cook.
Personal Story
I remember the first time I made stuffed bell peppers. It was a rainy Saturday afternoon when my mom casually mentioned she could use some help in the kitchen. I was only about ten years old, and even though I had spent time observing her culinary skills, I wasn’t quite ready for the spotlight. But how could I resist the warm aroma of onions sizzling away?
We decided to turn those beautiful, shiny bell peppers into stuffed marvels. I was so excited! With it being an impromptu cooking class, my mom taught me how to cut the peppers with care, ensuring I didn’t slice my fingers (thanks, mom!). The best part was stuffing them with passion and laughter, sneaking bites of the flavorful filling as we prepared.
Fast forward to now, and I still make these peppers, perhaps with a few more culinary skills under my belt. Each time I whip them up, I’m reminded of those carefree afternoons filled with love and laughter. And now it’s my pleasure to share this beloved recipe so you can create your own memories around the table!
Ingredients
To create these delicious stuffed bell peppers, gather the following ingredients:
-
4 bell peppers: Choose your favorite colors—red, yellow, or green. Each adds its own unique flavor. If you’re short on bell peppers, zucchini or eggplant can be a fun alternative!
-
1 cup cooked rice: It acts as the base of our filling. You can use white, brown, or even cauliflower rice for a low-carb option.
-
1 pound ground beef: This gives a hearty texture. If you prefer leaner meat, turkey or chicken works beautifully too!
-
1 cup chopped vegetables: Think onions, diced tomatoes, or corn. Fresh veggies add crunch and nutrition. Got leftover veggies? Chop them up and toss them in!
-
1 cup shredded cheese: Cheddar, mozzarella, or pepper jack for a kick! Cheese makes everything better, but you can omit it for a dairy-free option.
-
Salt and pepper to taste: Always important for balancing flavors!
-
1 teaspoon garlic powder: A quick and easy way to add mouthwatering flavor.
-
1 teaspoon onion powder: It complements the fresh onions or can stand in if you’re out.
-
1 tablespoon olive oil: For sautéing the vegetables, adding a healthy touch!
Step-by-Step Instructions
Ready to stuff some peppers? Here’s a simple step-by-step guide that’ll have you looking like a pro in no time!
-
Preheat Your Oven: Start by preheating your oven to 375°F (190°C). This is key for getting those peppers nice and tender while the filling gets melty and magical.
-
Prepare the Peppers: Cut the tops off your bell peppers and scoop out the seeds. Don’t toss those tops! Finely chop them and add to your filling later. (Tip: If your peppers won’t stand upright, don’t be afraid to trim a bit off the bottom—just be careful not to create a hole!)
-
Sauté the Vegetables: In a skillet, heat the olive oil over medium heat. Add the chopped peppers, onions (if you’re using them), garlic powder, and onion powder. Sauté for about 5-7 minutes until they soften. This will bring out their natural sweetness.
-
Add the Meat: Crumble in the ground beef, seasoning it with salt and pepper. Cook until it’s browned and no longer pink. (Chef’s hack: Use a wooden spoon to break up the meat for even cooking!)
-
Combine the Filling: Once the meat is nicely browned, turn off the heat and stir in the cooked rice and any additional chopped veggies. If you’re feeling extra saucy, this is when you could mix in some salsa or diced tomatoes for added moisture.
-
Cheese It Up: Fold in half of your shredded cheese into the filling mix. This gives it that creamy texture and helps bind everything together.
-
Stuff Those Peppers: Generously spoon the filling into each bell pepper, pressing it down gently to pack it in. Don’t be shy—overfilling is encouraged!
-
Top with Cheese: Place the stuffed peppers upright in a baking dish and sprinkle the remaining cheese on top (the more cheese, the better!).
-
Bake Them: Cover the dish with foil and bake at 375°F for about 25 minutes. Then, remove the foil and bake for another 10-15 minutes until the peppers are tender and the cheese is bubbly and golden.
-
Rest and Serve: Let them cool for a few minutes before serving. This helps the flavors settle and makes them easier to handle.
Serving Suggestions
For an inviting presentation, arrange the stuffed peppers on a large plate or a wooden serving board. Serve alongside a fresh green salad or some garlic bread. Drizzle with a little olive oil or balsamic glaze for added sparkle. And don’t forget those little touches—a sprinkle of fresh herbs like parsley or cilantro for color and vibrance!
Recipe Variations
-
Mexican Style: Swap the rice for quinoa and add spices like cumin and chili powder. Top with avocado and fresh cilantro for a twist!
-
Mediterranean Delight: Use feta cheese, olives, and cooked couscous for a Mediterranean spin. Finish with a squeeze of lemon juice for brightness.
-
Vegetarian Version: Replace the beef with black beans or lentils. Add in extra veggies like mushrooms, spinach, or zucchini.
-
Spicy Kick: Mix in jalapeños or spicy sausage for those who love a little heat!
-
Comfort Food Classic: Stir in a can of tomato soup into the stuffing for a creamy, comforting surprise.
Chef’s Notes
Ah, stuffed peppers have come a long way since my mom and I first whipped them up! Initially, I was all about the classic beef and rice method. However, over the years, I began exploring different combinations, opening up a world of possibilities. Whether you decide to use leftovers, create a vegetarian option, or even play with spices, this recipe is truly foolproof!
Remember, don’t stress about perfection; cooking should be fun! There are days when the stuffing spills out of the peppers while baking, and that’s OK! It just adds more flavor to the pan. And if a few bits fall onto the plate, that just means more for tasting!
FAQs and Troubleshooting
-
What if my peppers are too firm after baking?
If you prefer softer peppers, simply extend the baking time by 10 minutes. You can also steam the peppers in the microwave for a couple of minutes before stuffing them. -
Can I prepare these ahead of time?
Absolutely! You can prepare the stuffed peppers and store them in the fridge for up to 24 hours before baking. Just add a few extra minutes to the cooking time. -
What’s the best way to reheat leftovers?
Place the peppers in a baking dish with a little splash of water to keep them moist and cover with foil. Heat at 350°F for about 15-20 minutes, or until warmed through. -
How do I choose the right bell peppers?
Look for firm, unblemished peppers with shiny skin—these are the freshest. Heavier peppers usually have thicker walls and more flesh for stuffing!
Nutritional Info
For a rough estimate: Each stuffed pepper contains approximately 350 calories, 20g of protein, and 15g of fat (depending on the chosen ingredients). They are a hearty meal packed with vegetables!
And there you have it—your ultimate guide to making stunning stuffed bell peppers! With this recipe, not only do you get to enjoy a beautiful meal, but you also get to create cherished moments with those around your table. Remember, each dish is an opportunity for love and laughter. So gather those you care about, and let’s make something magical together. Cheers to cooking with the heart!
PrintStuffed Bell Peppers

Colorful and hearty stuffed bell peppers made with a delicious filling of beef, rice, and fresh vegetables, perfect for family dinners!
- Prep Time: 15 minutes
- Cook Time: 30 minutes
- Total Time: 45 minutes
- Yield: 4 servings 1x
- Category: Main Course
- Method: Baking
- Cuisine: American
- Diet: Mixed
Ingredients
- 4 bell peppers (any color)
- 1 cup cooked rice
- 1 pound ground beef
- 1 cup chopped vegetables (onions, diced tomatoes, corn)
- 1 cup shredded cheese (cheddar, mozzarella, or pepper jack)
- Salt and pepper to taste
- 1 teaspoon garlic powder
- 1 teaspoon onion powder
- 1 tablespoon olive oil
Instructions
- Preheat your oven to 375°F (190°C).
- Prepare the peppers by cutting off the tops and scooping out the seeds, saving the tops for later.
- Sauté the vegetables in a skillet with olive oil over medium heat for 5-7 minutes.
- Add the ground beef and season with salt and pepper, cooking until browned.
- Combine the cooked rice and any additional vegetables into the skillet, mixing well.
- Cheese it up by folding in half of the shredded cheese into the filling.
- Stuff the mixture into the peppers, pressing down gently.
- Top the peppers with the remaining cheese.
- Bake for 25 minutes covered with foil, then uncover and bake for an additional 10-15 minutes.
- Rest for a few minutes, then serve warm.
Notes
Feel free to customize the filling with whatever leftover vegetables you have or try different spices for a unique flavor!
Nutrition
- Serving Size: 1 stuffed pepper
- Calories: 350
- Sugar: 5g
- Sodium: 400mg
- Fat: 15g
- Saturated Fat: 6g
- Unsaturated Fat: 8g
- Trans Fat: 0g
- Carbohydrates: 40g
- Fiber: 4g
- Protein: 20g
- Cholesterol: 60mg
Keywords: stuffed peppers, comfort food, family dinner, bell peppers, easy recipes

Creamy Rosemary Cod with Potatoes: One-Pan Weeknight Dinner
Creamy Rosemary Cod with Potatoes: A Simple Elegance
Hello there, my culinary friends! I can’t tell you how excited I am to share this delightful recipe for Creamy Rosemary Cod with Potatoes. This dish embodies everything I love about cooking: it’s elegant yet approachable, comforting yet refined. Cooking should be a joy, not a chore, and I’m here to guide you through this delicious journey.
Imagine this: It’s a cool evening, the sun has set, and a soft golden light spills through your kitchen. You’ve set the table with your favorite plates, perhaps a sprig of rosemary casually tossed onto each one for a touch of class. The enticing scent of creamy rosemary sauce fills the air, making everyone feel instantly at home. The aroma wafts in from the kitchen as you pull out a dish that looks not only stunning but also speaks of love and care. That’s the magic of cooking – it brings people together, and with this recipe, you’ll be the host that everyone raves about!
So, let’s dive into making this dish that highlights the flaky, tender cod beautifully complemented by the creamy sauce and perfect potatoes. It’s an instant classic that’s sure to make your weeknights brighter and your dinner guests impressed. Ready? Let’s go!
A Taste of Nostalgia
When I think of cod, I instantly transport back to my childhood kitchen, where my grandmother would prepare our family meals. She had a knack for taking simple ingredients and turning them into something extraordinary. I can still smell the rosemary she would chop by hand, its earthy aroma mingling with the rich creaminess of the sauces she would whip up. One of my fondest memories is of staying over at her house, watching her cook dinner while sharing stories and laughter. She taught me that food is more than just nourishment; it’s about connection.
One particular evening, she prepared a creamy fish dish that turned out to be a magical blend of flavors, and my taste buds danced with delight! That dish stayed with me over the years, bubbling to the surface every time I saw fresh cod at the market. I promised myself I would recreate her dish, but with my twist — hence, the birth of this Creamy Rosemary Cod with Potatoes! This recipe brings back those cherished memories while adding my unique flair, and I hope it does the same for you.
Ingredients
Let’s gather our star players for this dish! Here’s what you’ll need:
-
4 cod fillets
Cod is buttery and mild, perfect for absorbing flavors. If cod isn’t available, you can easily substitute it with haddock or tilapia. -
4 medium potatoes, peeled and diced
Potatoes add heartiness to the dish. I recommend using Yukon Gold for their buttery flavor. If you’re looking for a healthier option, sweet potatoes are a delightful alternative! -
1 cup heavy cream
This is what makes our sauce luxuriously creamy. If you prefer a lighter version, substitute with half-and-half or coconut cream for a dairy-free option. -
2 tablespoons fresh rosemary, chopped
Fresh rosemary gives this dish its aromatic flair. If you only have dried rosemary on hand, use 1 tablespoon instead. Remember that dried herbs are more potent! -
2 tablespoons olive oil
Olive oil is our go-to for sautéing; it adds depth to our dish. For a different flavor kick, you could swap this with garlic-infused oil. -
Salt and pepper to taste
Always season your dishes! This is your chance to bring out those beautiful flavors. Feel free to experiment with other spices like paprika or lemon zest for added zest!
Step-by-Step Instructions
Now, let’s get into the nitty-gritty of creating this culinary masterpiece together!
-
Prep the Ingredients
Start by washing, peeling, and dicing your potatoes into even-sized cubes for uniform cooking. This ensures they all cook at the same pace—no one wants mushy potatoes on their plate! -
Parboil the Potatoes
In a pot of salted boiling water, throw in the diced potatoes and let them bubble away for about 5-7 minutes until they begin to soften. You want them tender but not mushy! Drain and set aside. -
Sauté the Cod
In a large skillet, heat the olive oil over medium heat. Season your cod fillets with salt and pepper on both sides. Carefully lay them in the hot skillet. Cook for 3-4 minutes on each side, or until they flake easily with a fork. You want a nice golden crust on each side!Chef Tip: If you notice the fillets browning too fast, dial down the heat a bit. Patience is key in ensuring that beautiful crust!
-
Make the Creamy Sauce
Once your cod is cooked to perfection, remove it from the skillet and set aside. In the same skillet, add the parboiled potatoes and sauté them for about 2-3 minutes. Then pour in the heavy cream and sprinkle in the chopped rosemary. Let it simmer gently until the cream starts thickening, which takes about 3-4 minutes. Don’t forget to scrape up any delicious bits left in the pan – that’s where all the flavor lives! -
Combine and Serve
Gently return the cod to the skillet, spooning that luscious creamy rosemary sauce over the fillets. Let it cook together for another minute, allowing the cod to soak in all those flavors. You can set the heat to low to keep everything warm and inviting. -
Plate It Up!
Serve your Creamy Rosemary Cod with Potatoes on a beautiful platter! Drizzle some extra sauce over the top and garnish with fresh rosemary sprigs for that “wow” factor. Presentation is key, but remember, it’s about the love you put into it!
Serving Suggestions
To elevate your dining experience, pair this dish with a simple green salad drizzled with lemon vinaigrette or some sautéed greens. Serve it alongside crusty bread for dunking in that heavenly sauce. Pour a crisp glass of white wine, like a Sauvignon Blanc, to complement the flavors beautifully.
Recipe Variations
Feeling adventurous? Here are a few twists to switch up the flavors:
-
Lemon Zest
Add a teaspoon of lemon zest to the sauce for a brightness that dances on your palate. -
Spinach and Garlic
Toss in some fresh spinach and minced garlic to the cream sauce for a vibrant and earthy touch. -
Mushroom Medley
Sauté some mushrooms along with the potatoes for a rich umami flavor that pairs well with the cod. -
Coconut Curry
Swap the heavy cream for coconut milk and add curry powder for an exotic flair! -
Herbed Parmesan Topping
Sprinkle some grated Parmesan cheese over the top before serving for an extra layer of decadence.
Chef’s Notes
Cooking is an art, and art is always evolving! This recipe started as a heartfelt tribute to my grandmother’s cooking but transformed as I experimented. Each time, I’d tweak ingredients or add my own spin. One time, I accidentally overcooked the cod while talking to a friend on the phone, and though disappointed, it turned out that a few more minutes in the pan gave it a wonderfully charred flavor that I’d never planned but came to love! Cooking is full of happy accidents, and those unpredictable moments often lead to delightful discoveries. So embrace each step with a pinch of joy!
FAQs and Troubleshooting
Q: What if my cod ends up dry?
A: Ensure you’re cooking it just until it flakes easily with a fork. Overcooking is common, so take it out of the pan as soon as it’s done!
Q: Can I make this ahead of time?
A: Absolutely! You can prepare everything and combine it just before serving for the best flavor. Simply reheat gently to avoid overcooking the fish.
Q: What sides pair well with this dish?
A: A light salad or roasted vegetables would complement the creamy flavors beautifully. You could also serve it with a side of quinoa or couscous!
Q: Can I use frozen cod?
A: Yes! Just make sure to thaw and pat it dry before cooking for the best results. Frozen fish can be just as delicious when cooked properly!
Nutritional Info
For those watching their nutritional intake, here’s a quick rundown per serving (estimation):
- Calories: 500
- Protein: 32g
- Fat: 35g
- Carbohydrates: 30g
Remember that these can vary based on specific ingredients and serving sizes.
Now that we’ve made this Creamy Rosemary Cod with Potatoes together, I hope you feel inspired to tie on that apron, embrace your creativity, and gather your loved ones around the table. Cooking is about so much more than the food on the plate; it’s about the memories we create. Enjoy every moment, and happy cooking, my foodie friends!
PrintCreamy Rosemary Cod with Potatoes

A delightful dish featuring flaky cod fillets in a creamy rosemary sauce served with hearty potatoes.
- Prep Time: 15 minutes
- Cook Time: 20 minutes
- Total Time: 35 minutes
- Yield: 4 servings 1x
- Category: Main Course
- Method: Sautéing
- Cuisine: American
- Diet: Gluten Free
Ingredients
- 4 cod fillets
- 4 medium potatoes, peeled and diced
- 1 cup heavy cream
- 2 tablespoons fresh rosemary, chopped
- 2 tablespoons olive oil
- Salt and pepper to taste
Instructions
- Prep the ingredients by washing, peeling, and dicing your potatoes into even-sized cubes.
- Parboil the potatoes in a pot of salted boiling water for about 5-7 minutes until they begin to soften. Drain and set aside.
- Sauté the cod in a large skillet with olive oil over medium heat, seasoning with salt and pepper. Cook for 3-4 minutes on each side.
- Make the creamy sauce by adding the parboiled potatoes to the same skillet, sautéing for 2-3 minutes, then adding heavy cream and rosemary. Let it simmer for 3-4 minutes.
- Combine the cod back into the skillet, spooning the sauce over it, and let it cook for another minute.
- Plate the dish beautifully, drizzling with extra sauce and garnishing with fresh rosemary sprigs.
Notes
Serve with a green salad or crusty bread and a glass of Sauvignon Blanc.
Nutrition
- Serving Size: 1 serving
- Calories: 500
- Sugar: 3g
- Sodium: 500mg
- Fat: 35g
- Saturated Fat: 20g
- Unsaturated Fat: 10g
- Trans Fat: 0g
- Carbohydrates: 30g
- Fiber: 3g
- Protein: 32g
- Cholesterol: 100mg
Keywords: cod, rosemary, creamy sauce, potatoes, seafood