Minute Monster Meatball Sliders for Weeknight Feasts
Monster Meatball Sliders: A Fun and Flavorful Feast
Hello, foodies! If you’re ready to take your dining experiences to a new level of fun and flavor, then you’re in for a treat! Today, I’m absolutely thrilled to share one of my all-time favorite recipes that perfectly combines nostalgia with a dash of creativity: Monster Meatball Sliders! These sliders are not only delicious but also incredibly fun to serve — perfect for parties, family gatherings, or even a cozy movie night at home.
As I was developing this recipe, I couldn’t help but reminisce about the weekend get-togethers at my grandmother’s house. Her kitchen was always filled with the incredible aroma of rich tomato sauce simmering on the stove, and giant meatballs rolling around like they had a life of their own! The atmosphere was always lively, filled with laughter and animated conversations over plates piled high with spaghetti and homemade meatballs.
Inspired by those cherished memories, I wanted to create something that encapsulated the childhood warmth of those gatherings but with a twist that would bring a smile to everyone’s face — hence the Monster Meatball Sliders! Imagine a perfectly seasoned meatball, snugly tucked into a fluffy slider bun, all topped off with gooey mozzarella and a touch of marinara. With a bit of creativity, these sliders become a playful dish that even the littlest foodies will adore. So, let’s dig in and get our hands a bit messy!
A Fond Kitchen Memory
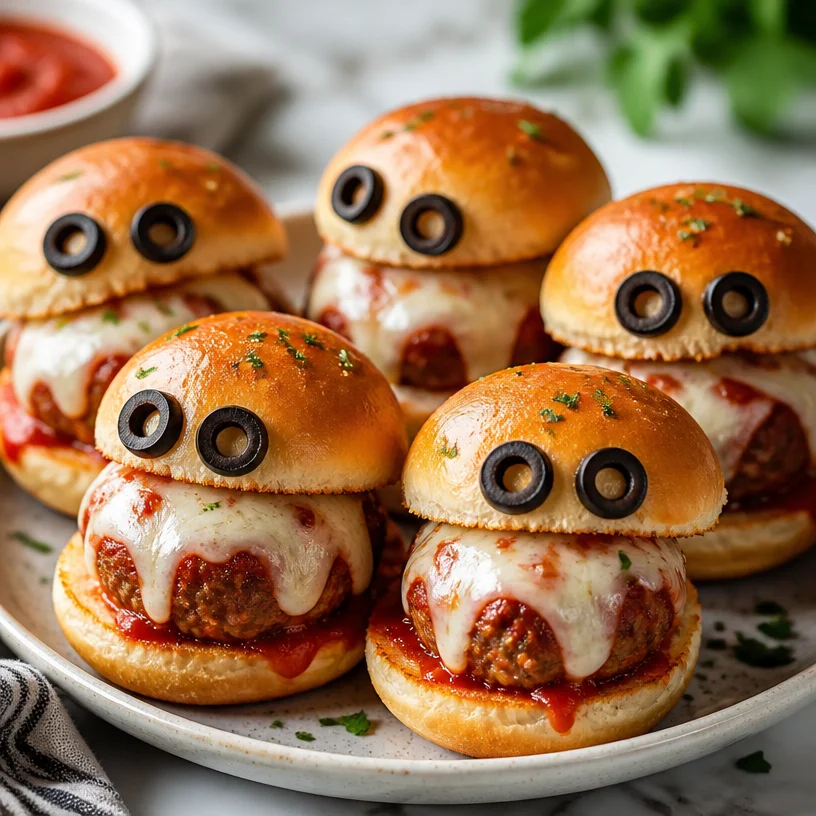
One sunny afternoon while experimenting with recipes, I came across a few leftover meatballs from a previous dinner party. Rather than letting them go to waste, I decided to transform them into sliders. I can still picture the surprised faces of my friends when I plopped these glorious little sandwiches in front of them, complete with olive “eyes” and a light-hearted monster theme. Everyone couldn’t help but laugh and immediately dug in!
That day lit a little spark inside me — food isn’t just about sustenance; it’s about creating an experience, a memory that brings people together. These Monster Meatball Sliders became a staple at my gatherings, a fun way to evoke joy around the table. The blend of classic flavors with a whimsical presentation makes this dish a delightful addition to any table.
Ingredients
To make your Monster Meatball Sliders, you’ll need the following ingredients:
- Meatballs:
- You can use store-bought or homemade meatballs. If you’re feeling adventurous, making them from scratch using ground beef, breadcrumbs, cheese, and seasoning will elevate this dish immensely!
- Slider Buns:
- Opt for soft slider buns or mini brioche rolls. These add just the right touch of sweetness and texture. For a gluten-free option, use gluten-free buns or lettuce wraps.
- Mozzarella:
- Fresh mozzarella balls (bocconcini) work wonderfully for that melt-in-your-mouth factor. If you want something sharper, use provolone or cheddar for a flavor twist!
- Marinara Sauce:
- A good-quality marinara sauce is essential. You can easily swap this with pesto or a homemade tomato sauce for added flair.
- Olive Eyes:
- Black olives are perfect for creating those adorable little eyes! Feel free to use green olives for a pop of color or skip them altogether if you’re not a big olive fan.
Step-by-Step Instructions
Let’s get cooking! Follow these simple steps, and you’ll be well on your way to crafting your very own Monster Meatball Sliders.
-
Preheat the Oven:
- Begin by preheating your oven to 375°F (190°C). A warm oven is essential for that toasty bun experience!
-
Prepare the Meatballs:
- If you’re making your own meatballs, mix together your ground meat, breadcrumbs, eggs, minced garlic, and Italian seasoning. Roll them into golf ball-sized rounds. If you’re using store-bought, just set them aside while you prepare the rest.
-
Bake the Meatballs:
- Place your meatballs on a baking sheet lined with parchment paper. Bake them for about 20 minutes or until they are browned and cooked through. This step helps to lock in moisture and flavor!
-
Heat the Marinara Sauce:
- While the meatballs are baking, gently heat your marinara sauce in a small saucepan over medium heat. I sometimes like to add a pinch of red pepper flakes for that extra kick!
-
Assemble the Sliders:
- Once your meatballs are ready, slice your slider buns in half. Spread a spoonful of marinara sauce on the bottom half of each slider bun. Then, place a meatball on top, followed by a generous layer of mozzarella.
-
Melt the Cheese:
- Place the sliders in the oven for about 5-7 minutes until the cheese is bubbly and golden. This is the time to grab a kitchen towel and get ready to plate!
-
Add the Olive Eyes:
- Once out of the oven, use a toothpick or skewer to add two black olives to each slider — our deliciously cute monster eyes! It’s all about the presentation here—get creative!
-
Complete the Sliders:
- Top off each slider with the other half of the bun, and voilà! Your delicious Monster Meatball Sliders are ready to be devoured.
Serving Suggestions
When it comes to serving these sliders, I love to plate them on a large wooden board or platter for that family-style feel. You can add a sprinkle of fresh parsley or dried oregano on top for a garnish, and serve with extra marinara for dipping. Pair these sliders with a crisp green salad or a side of sweet potato fries to round out the meal.
Recipe Variations
Looking to mix it up a bit? Here are some fun variations to try:
- Buffalo Style: Toss your meatballs in buffalo sauce prior to baking for a zesty spin, and top with blue cheese crumbles instead of mozzarella.
- Vegetarian Option: Substitute meatballs with a plant-based meatball or roasted vegetables with spices to create a veggie-friendly version.
- Beachy Flavor: Use seafood meatballs made with crab or shrimp, and serve with a zesty lemon aioli!
- Cheesy Goodness: Go wild with cheese! Mix in cheddar or pepper jack instead of mozzarella for a flavorful punch.
Chef’s Notes
One of the first times I made these sliders, I thought I’d impress everyone with a fancy herb-infused sauce. However, I realized my friends loved the simple, comforting flavors of classic marinara more than anything else! It’s a reminder that sometimes simplicity wins, and that’s perfectly okay. If I could share one piece of advice, it’s to never hesitate to experiment, but also honor the classics that bring back nostalgic memories!
FAQs and Troubleshooting
-
What if my meatballs are dry?
- If your meatballs turn out dry, ensure you’re not overcooking them. Drizzling a bit of olive oil or adding moisture (like milk) to the mixture can help too!
-
Can I make this ahead of time?
- Absolutely! You can make the meatballs and sauce ahead of time, store them in the fridge, and assemble the sliders just before serving for that warm, fresh taste.
-
What are some good sides to pair with these sliders?
- Fresh salads, crispy fries, or even a charcuterie board work wonderfully. You’ll want something light to balance the hearty sliders.
-
How can I make this gluten-free?
- Simply swap out traditional breadcrumbs for gluten-free breadcrumbs, and check that your slider buns are gluten-free!
Nutritional Info
While I don’t always focus on the numbers, if you’re curious, a typical Monster Meatball Slider has approximately 250 calories, 12g protein, and 15g of fat per serving. Adjust portions based on your needs!
And there you have it—your guide to crafting delightful Monster Meatball Sliders! I hope this recipe brings as much joy to your table as it has to mine. Don your apron, roll up those sleeves, and let the kitchen festivities begin. Celebrate the art of cooking and the joy of eating together. Until next time, happy cooking!
PrintMonster Meatball Sliders

Fun and delicious sliders featuring seasoned meatballs, mozzarella, and marinara sauce served in fluffy buns, perfect for parties or family gatherings.
- Prep Time: 15 minutes
- Cook Time: 30 minutes
- Total Time: 45 minutes
- Yield: 4 servings
- Category: Appetizer
- Method: Baking
- Cuisine: American
- Diet: None
Ingredients
- Meatballs (store-bought or homemade)
- Soft slider buns or mini brioche rolls
- Fresh mozzarella balls (bocconcini)
- Good-quality marinara sauce
- Black olives for eyes
Instructions
- Preheat the oven to 375°F (190°C).
- Prepare the meatballs by mixing ground meat, breadcrumbs, eggs, minced garlic, and Italian seasoning, rolling them into golf ball-sized rounds.
- Bake the meatballs on a parchment-lined baking sheet for about 20 minutes or until browned.
- Heat the marinara sauce in a small saucepan over medium heat.
- Assemble the sliders by slicing the buns, spreading marinara, and adding a meatball and mozzarella.
- Melt the cheese in the oven for 5-7 minutes until bubbly.
- Add two black olives to each slider for eyes.
- Complete the sliders by placing the other half of the bun on top.
Notes
Feel free to experiment with meatball variations, including buffalo style or vegetarian options.
Nutrition
- Serving Size: 1 slider
- Calories: 250
- Sugar: 3g
- Sodium: 600mg
- Fat: 15g
- Saturated Fat: 7g
- Unsaturated Fat: 6g
- Trans Fat: 0g
- Carbohydrates: 20g
- Fiber: 1g
- Protein: 12g
- Cholesterol: 30mg
Keywords: meatball sliders, party food, fun recipes, family gathering, comfort food
Philly Cheesesteak Sliders
Philly Cheesesteak Sliders: A Hearty Delight for Any Gathering
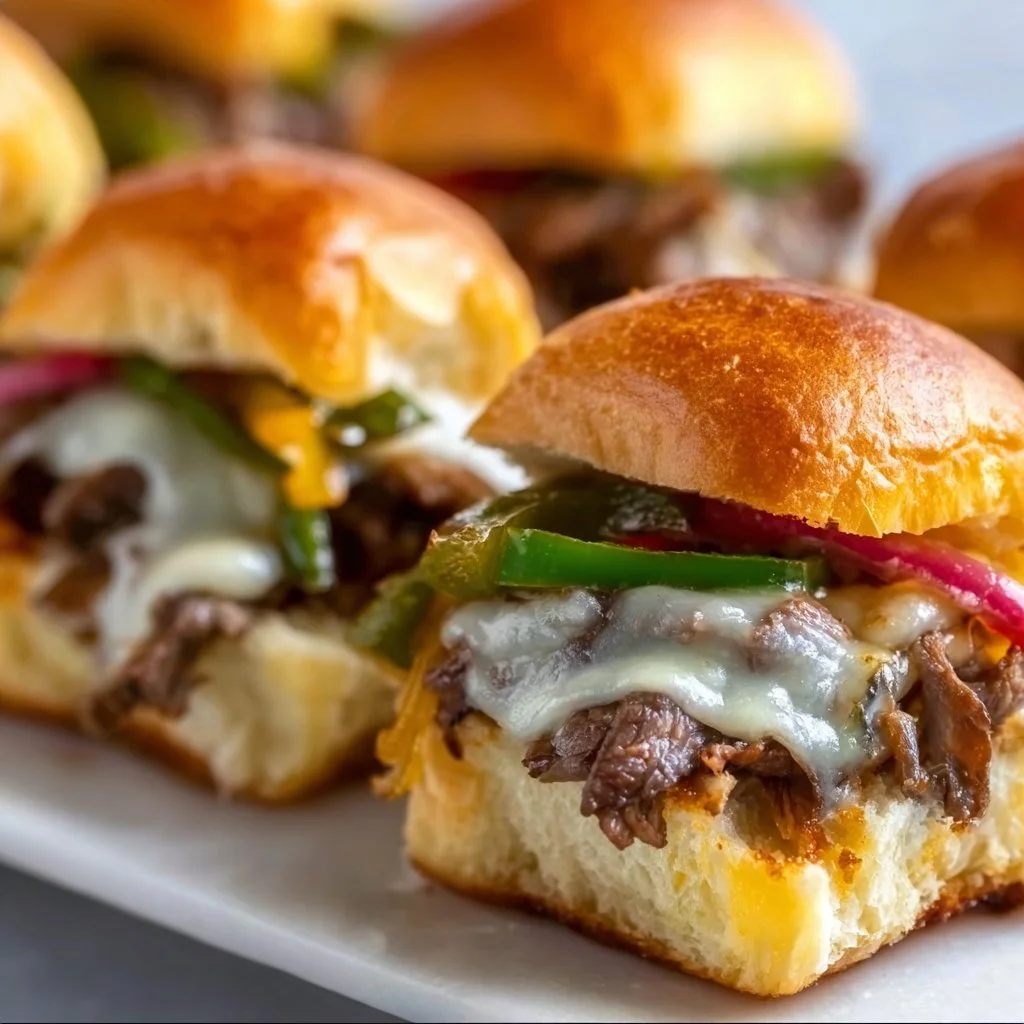
Hey there, food enthusiasts! Today, we’re diving into a scrumptious recipe that’s sure to be the star of your next gathering: Philly Cheesesteak Sliders! Imagine this: the aroma of sizzling beef, sweet caramelized onions, and vibrant green peppers wafting through your kitchen, inviting everyone to gather around for a bite of something truly delicious. Whether it’s game day, a casual get-together, or just a way to make a weeknight dinner feel a bit more special, these sliders are the ideal comfort food.
But what is it about a hot, melty cheesesteak that brings everyone together? In a world full of gourmet options, there’s something delightful about sinking your teeth into a modest slider that packs in layers of flavor, nostalgia, and loads of cheese. I’ll guide you through every step of this delicious journey, sharing tips and tricks that’ll make you feel like a pro in your own kitchen. So, roll up those sleeves, and let’s get to work on these iconic little bites that pack big flavor!
Personal Story
Ah, cheesesteaks – they remind me of my college days. I remember a late-night escapade with friends, the kind that started with laughter and ended with a quest for a bite to eat after too many hours in the library. We stumbled into a small, bustling diner where the sandwiches were crafted with love and more than a little elbow grease. I distinctly recall the moment I bit into my first cheesesteak. The rich beef, gooey cheese, and soft roll combined in a cheerful explosion of flavor, and I was instantly hooked! Fast forward many years, and I’ve taken that love and transformed it into these sliders. They capture all the essence of that unforgettable night, but in a size that’s perfect for sharing. Plus, they’re easy to make, meaning we can keep the party going without a fuss!
Ingredients
Let’s gather our ingredients! Each element plays a vital role in achieving that classic Philly cheesesteak flavor. Here’s what you’ll need:
-
1 lb ground beef
This is the heart of our sliders! You can substitute it with ground turkey or chicken for a lighter option, or use plant-based beef for a vegetarian twist. -
1 onion, chopped
Sweet or yellow onions are perfect for caramelizing. If you’re a fan of a bit more crunch and color, try adding red onions instead! -
1 green bell pepper, chopped
Provides that fresh crunch and vibrant color! Feeling adventurous? Swap it out for a red, yellow, or even a spicy pepper for a kick. -
8 oz provolone cheese, sliced
Melty, stretchy cheese is a must! You can use mozzarella or even a sharp cheddar for a different flavor profile. -
12 slider buns
Classic soft dinner rolls work beautifully, but you can use whole wheat or gluten-free buns as well. -
1/2 cup mayonnaise
This creamy base adds a delightful richness. For a zingy twist, mix in a touch of Dijon mustard! -
1 tablespoon Worcestershire sauce
Adds depth of flavor. If you’re avoiding soy, look for a soy-free alternative for a similar umami taste. -
Salt and pepper to taste
Essential seasonings that elevate every layer of flavor. -
Butter for greasing
For that beautiful golden finish on your buns!
Step-by-Step Instructions
Now that we’ve gathered everything, let’s get cooking! Here’s how to create these sliders from scratch:
-
Prep Your Ingredients: Start by chopping your onion and green bell pepper. Having everything ready to go is a game-changer, especially when you’re cooking with eager dinner guests waiting in the next room!
-
Sauté the Veggies: In a skillet over medium heat, melt some butter. Add the chopped onion and green bell pepper. Sauté for about 5-7 minutes until they are soft and caramelized. This step not only makes the onions sweet but helps develop flavors that will marry perfectly with the beef.
-
Brown the Beef: Add the ground beef to the skillet with the onion and pepper mixture. Cook until browned, breaking it apart with a wooden spoon as it cooks—approximately 8-10 minutes. Add Worcestershire sauce, salt, and pepper to taste. This is where the fun starts—watch as the flavors combine into a beautiful savory mix.
-
Assemble the Sliders: Preheat your oven to 350°F (175°C). Grease a baking dish with butter then slice the slider buns in half. Place the bottom halves in the dish. Layer your beef and veggie mixture generously on top, followed by slices of provolone cheese. You can’t have too much cheese, right? Top it off with the other half of the buns.
-
Add the Mayonnaise: Spread the mayonnaise on the top of the slider buns. This might seem unconventional, but it creates a creamy, decadent topping that takes these sliders to the next level.
-
Bake to Perfection: Brush the tops of the buns lightly with more melted butter, then pop them into the oven for about 15-20 minutes. You’re waiting for the cheese to become gooey, and the tops become golden brown. The smell alone will have everyone gathering in the kitchen!
-
Serve and Enjoy: Once out of the oven, let the sliders cool for a couple of minutes. They can be a bit messy when hot, but they are definitely worth the wait!
Each of these steps comes with its own little chef hacks. Don’t be shy to taste as you go—seasoning is key! And trust me, your kitchen will smell divine.
Serving Suggestions
To plate these glorious sliders, simply cut them apart and serve them on a festive platter. You can garnish them with fresh herbs like parsley or even some pickled jalapeños for an extra zing. Serve with a side of crispy potato chips or a fresh green salad for a complete meal. The combination of textures will leave everyone wanting more!
Recipe Variations
Now, let’s get a little creative! Here are a few twists to keep things exciting:
-
Mushroom and Swiss Sliders: Replace the beef with sautéed mushrooms and use Swiss cheese.
-
BBQ Cheesesteak: Mix in a bit of your favorite barbecue sauce for a sweet and smoky flavor profile.
-
Spicy Cheese Sauce: Add a jalapeño cheese sauce instead of provolone for a spicy kick!
-
Veggie Delight: Swap out the beef for lentils or chickpeas and add in your favorite veggies for a plant-based feast.
-
Mediterranean Twist: Use feta cheese, add olives, and replace the Worcestershire with a splash of lemon juice for a light, zesty option.
Chef’s Notes
I’ve made these sliders countless times, and they always bring back the warm feelings of gathering with friends and family. One time, I even made a giant version—a cheesesteak “cake” for a birthday party! It was as messy as it was delicious, and a huge hit. Just remember, these sliders are all about comfort and enjoyment—don’t stress too much about perfection. Remember, it’s all about the company and the memories you create around the table.
FAQs and Troubleshooting
-
Can I make the sliders ahead of time?
Absolutely! You can prepare the filling ahead and assemble them before baking. Just pop them in the oven when you’re ready to serve. -
What if my sliders are dry?
This can happen if the beef is overcooked. Always monitor it to retain moisture. Also, the mayo helps keep them juicy! -
Can I use different buns?
Yes, feel free to experiment with baguettes, pita bread, or even lettuce wraps for a low-carb option. -
How do I store leftovers?
Store any leftovers in an airtight container in the fridge. They’re great reheated in the oven or even the microwave for a quick snack!
Nutritional Info (Optional)
While I haven’t added nutritional info specifically, as a guideline, a typical Philly cheesesteak slider provides an excellent source of protein, fats from the cheese, and carbohydrates from the buns. For a healthier twist, consider the variations provided above!
Well, there you have it, my friends! A delicious guide to making scrumptious Philly Cheesesteak Sliders. They’re easy, fun, and sure to impress anyone who takes a bite. So, grab your apron and let’s create some unforgettable moments around the dinner table! Happy cooking! 🍽️
PrintPhilly Cheesesteak Sliders

Hearty Philly cheesesteak sliders packed with flavor and perfect for any gathering.
- Prep Time: 15 minutes
- Cook Time: 30 minutes
- Total Time: 45 minutes
- Yield: 6 servings 1x
- Category: Appetizer
- Method: Baking
- Cuisine: American
- Diet: None
Ingredients
- 1 lb ground beef
- 1 onion, chopped
- 1 green bell pepper, chopped
- 8 oz provolone cheese, sliced
- 12 slider buns
- 1/2 cup mayonnaise
- 1 tablespoon Worcestershire sauce
- Salt and pepper to taste
- Butter for greasing
Instructions
- Prep your ingredients: Start by chopping your onion and green bell pepper.
- Sauté the veggies: In a skillet over medium heat, melt some butter. Add the chopped onion and green bell pepper. Sauté for about 5-7 minutes.
- Brown the beef: Add the ground beef to the skillet with the onion and pepper mixture. Cook until browned, approximately 8-10 minutes.
- Assemble the sliders: Preheat your oven to 350°F (175°C). Grease a baking dish with butter then slice the slider buns in half.
- Add the mayonnaise: Spread the mayonnaise on the top of the slider buns.
- Bake to perfection: Brush the tops of the buns lightly with melted butter, then pop them into the oven for about 15-20 minutes.
- Serve and enjoy: Once out of the oven, let the sliders cool for a couple of minutes.
Notes
Feel free to experiment with different types of cheese or add spices to the beef for extra flavor.
Nutrition
- Serving Size: 1 slider
- Calories: 400
- Sugar: 3g
- Sodium: 500mg
- Fat: 18g
- Saturated Fat: 7g
- Unsaturated Fat: 9g
- Trans Fat: 1g
- Carbohydrates: 30g
- Fiber: 1g
- Protein: 20g
- Cholesterol: 50mg
Keywords: philly cheesesteak, sliders, comfort food, easy appetizer, party food