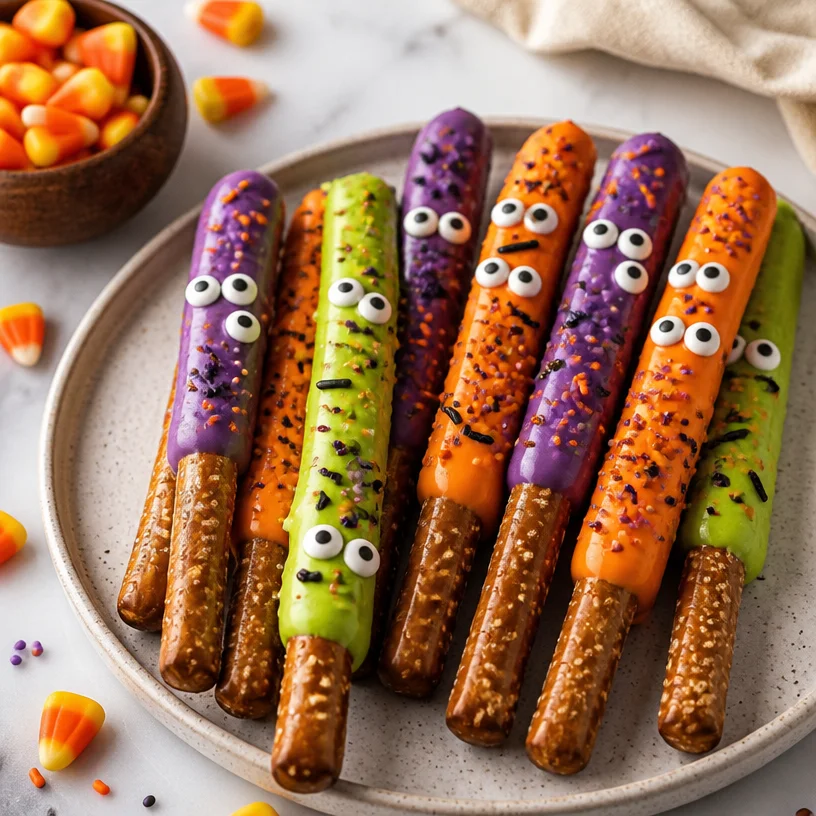
Monster Pretzel Rods: 5-Ingredient Crispy Party Treats
Monster Pretzel Rods: A Spooktacular Delight
Welcome to the thrilling world of Monster Pretzel Rods! If you’re looking for a whimsical treat that’s perfect for parties, Halloween celebrations, or simply a delightful snack that brings smiles, you’re in the right place. These crunchy, chocolate-dipped pretzel rods are not only fun to make, but they also allow your creativity to run wild.
Imagine hosting a Halloween bash, and as your guests walk through the door, they’re greeted by a platter of these adorable monster creations. With gooey, colorful candy melts transforming simple pretzel rods into frightfully fun snacks, it’s an experience that will leave you and your guests snickering with glee.
Here’s a little secret: Whenever I whip these up, I’m reminded of my childhood days where we would get together with friends to craft spooky snacks for Halloween. We’d gather around the kitchen table, the air filled with laughter, candy wrappers, and a slightly chaotic addition of sprinkles. Those moments of creativity and joy fueled my passion for cooking and entertaining, and every time I make Monster Pretzel Rods, it takes me back to those wonderful days.
So put on your favorite apron, tie your hair back, and let’s make some delightful, creepy Monster Pretzel Rods together!
Personal Story: A Spooky Tradition
I vividly remember the first time I made these Monster Pretzel Rods with my best friend, Jess. It was a few days before Halloween, and we had the grand idea of creating the ultimate spooky snack for our annual neighborhood party. Armed with a selection of candy melts, sprinkles, and of course, the ever-important pretzel rods, we transformed our kitchen into a chaotic candy wonderland.
We melted chocolate in a makeshift double boiler (because who needs fancy equipment, right?) and laughed as we dipped our pretzels, covered them in sprinkles, and stuck on candy eyes. I’ll never forget the moment Jess accidentally dropped a pretzel rod into the bowl of candy melts, sending a delightful splatter everywhere. Our culinary masterpiece may not have looked perfect, but it was ours, and that made it taste even better.
As we plated them up, we couldn’t stop giggling at our creation—half monster, half masterpiece. We took them to the party and watched as the kids devoured them, their faces lighting up with delight. Moments like those reminded me of the joy of cooking: it’s not about perfection, but the memories we create in the kitchen.
Ingredients
To make your own Monster Pretzel Rods, you’ll need the following ingredients:
- Pretzel Rods (12 count): The perfect crunchy base for our monsters—these sturdy snacks can hold up under all that delicious candy.
- Candy Melts (2-3 bags, assorted colors): This is where the magic happens! Choose vibrant colors like green, orange, purple, or black. If you can’t find candy melts, you can use chocolate chips as a substitute, but they may require some tempering.
- Candy Eyes (1 bag): You can find these at any craft store or online. They add a delightful touch and help your pretzels come to life!
- Sprinkles (various colors and shapes): Think Halloween! Look for spider or pumpkin-shaped sprinkles, or use a mix of colors for a fun, festive flair.
- Edible Glitter (optional): For an extra spooky shimmer! This is purely for aesthetic and can be left out if you prefer a more classic look.
Substitution Tips
- Gluten-Free Option: Use gluten-free pretzel rods for this recipe; they work just as well and guarantee everyone can enjoy them.
- Dairy-Free Option: Look for dairy-free candy melts, which are increasingly available in stores.
- Nuts: For those allergic to nuts, make sure to check labels on all candy decorations.
Step-by-Step Instructions
Step 1: Gather Your Ingredients
First things first, gather all your ingredients and set up a work station. Make sure to cover your surface with parchment paper—it simplifies the cleanup and gives you a place to set your completed pretzels.
Step 2: Melt Your Candy Melts
In a microwave-safe bowl, place your candy melts (about one bag at first). Microwave them in 30-second intervals, stirring in between until they’re smooth and melted. This typically takes about 1.5-2 minutes total. Pro tip: If your candy melts are too thick, add a teaspoon of coconut oil or shortening to thin them out.
Step 3: Dip the Pretzel Rods
Now comes the fun part! Take each pretzel rod, dip it into the melted candy, and gently swirl it to coat evenly. Allow any excess to drip off before laying it on the parchment paper. Don’t worry if it doesn’t look perfect; the sprinkles will do the rest!
Step 4: Load on the Sprinkles
While the candy coating is still wet, grab your sprinkles and shower them over the dipped pretzel. I like to do this over a bowl or plate to catch any leftover sprinkles to reuse later. If you’re using edible glitter, sprinkle that on too!
Step 5: Attach the Eyes
Carefully press two candy eyes onto the pretzel while the candy coating is still tacky. This is where they become monsters!
Step 6: Let Them Set
Place your completed pretzel rods to the side on the parchment paper and allow them to set up. You can speed this up by placing them in the refrigerator for about 10-15 minutes.
Step 7: Serve or Store
Once they’re completely set, your Monster Pretzel Rods are ready to be served! Enjoy them instantly or store them in an airtight container for a few days. Trust me; they’ll disappear faster than you can say “Boo!”
Serving Suggestions
When it comes to serving Monster Pretzel Rods, you can go all out or keep it simple. For a festive touch, arrange them in a tall glass like a bouquet, or lay them flat on a charming platter with some decorative spider web cotton as a backdrop. Don’t forget to add a few themed decorations or a fun sign saying, “Monster Treats Ahead!”
Recipe Variations
- Monster Mummies: Use white candy melts to coat the pretzels, then pipe on dark chocolate stripes to resemble mummy wrappings.
- Spooky Ghosts: Dip the pretzels in white candy melts and stick mini marshmallows on top as heads. Use chocolate icing to add ghostly eyes and mouths.
- Frankenstein’s Treats: Coat half of the pretzel in green candy melts, and once set, use black chocolate to create messy hair and facial features.
- Seasonal Switch: Change up your sprinkles according to the season! Use red and green for Christmas or pastel colors for Easter.
- Peanut Butter Delight: Dip the pretzel in melted peanut butter before coating in chocolate for an added nutty flavor.
Chef’s Notes
Every time I make these Monster Pretzel Rods, I chuckle at the “monstrous” shapes that come out! It’s amazing how a mere pretzel can be transformed into something so fun. I remember a time when I got a bit too ambitious and tried to create a multi-eyed monster. Let’s just say it ended up looking more comical than scary! The kitchen was full of laughter, and that’s what cooking is all about—having fun, making memories, and enjoying the company around you.
Over the years, I’ve honed this recipe, of course. I’ve discovered that different food colorings can dramatically change the vibe of your rods—deep orange feels like fall, while bright pink screams celebrations.
FAQs and Troubleshooting
-
Why did my candy melts seize up?
- This can happen if water gets into the candy melts; make sure your bowls and utensils are completely dry. To rescue them, you can add a little coconut oil to help thin them out.
-
Can I use regular chocolate instead of candy melts?
- Yes! If you prefer dark or milk chocolate, feel free to use it. Just remember that they might need to be tempered to prevent blooming.
-
What can I do if my sprinkles won’t stick?
- Make sure to sprinkle them on while the coating is still wet. If they dry, they won’t stick. Alternatively, you can lightly spray the coated pretzel with cooking spray before adding sprinkles.
-
How long do these treats keep?
- If stored in an airtight container, these treats can last about a week, although I promise they won’t last that long once you set them out!
Nutritional Info
While I always focus on the joy of cooking and sharing, it’s good to be mindful of our indulgences. Each Monster Pretzel Rod generally contains around 150 calories, with varying numbers based on the type of coating used and the amount of sprinkles added.
Ready to create some chaos in your kitchen? Grab those pretzel rods, let’s whip up some Monster Pretzel Rods, and get ready to wow your friends and family with a treat that’s as delightful to make as it is to eat! Remember, cooking is a celebration of creativity and community, so embrace the fun and let your inner child shine! Happy cooking!
PrintMonster Pretzel Rods
Whimsical and crunchy chocolate-dipped pretzel rods decorated to look like playful monsters, perfect for Halloween parties.
- Prep Time: 15 minutes
- Cook Time: 10 minutes
- Total Time: 25 minutes
- Yield: 4 servings 1x
- Category: Dessert
- Method: No-Cook
- Cuisine: American
- Diet: Vegetarian
Ingredients
- 12 Pretzel Rods
- 2–3 bags Candy Melts (assorted colors)
- 1 bag Candy Eyes
- Sprinkles (various colors and shapes)
- Edible Glitter (optional)
Instructions
- Gather your ingredients and set up a work station.
- Melt your candy melts in a microwave-safe bowl in 30-second intervals, stirring until smooth.
- Dip each pretzel rod in the melted candy, allowing excess to drip off.
- Load on the sprinkles while the candy coating is still wet.
- Attach candy eyes onto the pretzel.
- Let them set on parchment paper or place in the refrigerator for 10-15 minutes.
- Serve or store in an airtight container for a few days.
Notes
For gluten-free and dairy-free options, substitute as needed. Enjoy creating spooky variations like Monster Mummies or Spooky Ghosts!
Nutrition
- Serving Size: 1 serving
- Calories: 150
- Sugar: 20g
- Sodium: 200mg
- Fat: 6g
- Saturated Fat: 3g
- Unsaturated Fat: 3g
- Trans Fat: 0g
- Carbohydrates: 21g
- Fiber: 1g
- Protein: 1g
- Cholesterol: 0mg
Keywords: Halloween treats, Monster snacks, Pretzel rods, Chocolate dip, Fun desserts
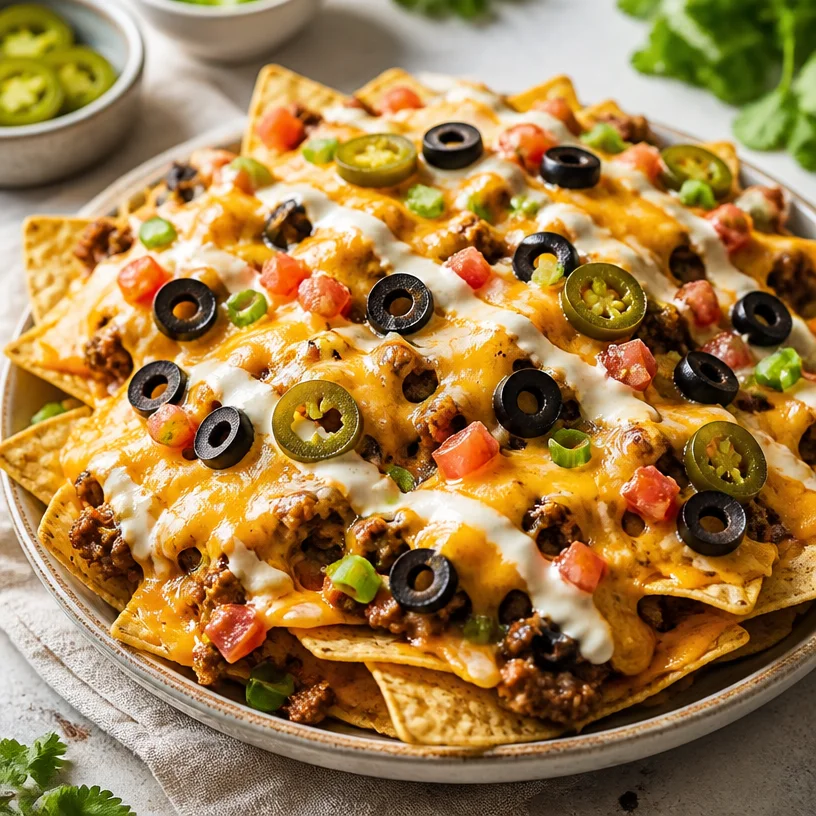
Monster Nachos
Introducing Monster Nachos: The Ultimate Comfort Food
Hello, nacho lovers! If you’re anything like me, no gathering is complete without a glorious platter of nachos, piled high with all the goodies. That crispy crunch paired with ooey-gooey cheese creates a symphony in your mouth that’s hard to resist! Today, we’re diving deep into the art of crafting Monster Nachos — a dish that’s perfect for game nights, casual hangouts, or simply elevating your Netflix-and-chill snacks.
Why are these nachos called "Monster"? Because we’re stacking them high, pushing the limits of what nachos can be! Grab your favorite blanket, pour yourself a drink, and let’s get ready to chip away at this deliciousness together.
Nachos hold a special place in my heart. They remind me of those carefree afternoons spent around the table with friends, plates overflowing with cheesy magic, laughter echoing, and the occasional heated debate over whether pineapple belongs on pizza (spoiler: it does!). There was one summer night when my friends and I decided to host an impromptu movie marathon. One of us whipped out a bag of tortilla chips and some leftover cheese, and before we knew it, our simple snack morphed into an elaborate nacho feast layered with varying flavors and textures. We got a little creative with toppings, and the result? A nacho creation that propelled our movie night to legendary status.
Speaking of legendary, let’s dive into the ingredients for these Monster Nachos!
Ingredients
To create your own mountain of nacho goodness, you’ll need the following ingredients:
-
Tortilla Chips: The foundation of your nachos! Opt for sturdy chips that can hold up the weight of all those toppings. If you want to make your own, simply cut corn tortillas into triangles and bake until crispy.
-
Cheese: A nacho classic! Use a mix of sharp cheddar for flavor and a bit of Monterey Jack for meltiness. Need a substitute? Try vegan cheese or a mix of nutritional yeast and cashew cream for a dairy-free option.
-
Olives: Black olives add a briny flavor that contrasts beautifully with the cheese. If you’re not an olive fan, try pickled jalapeños or banana peppers for a zesty kick.
-
Jalapeños: Fresh or pickled, they bring the heat! If you like it mild, remove the seeds and membranes. For more spice, keep them intact. Alternatively, you could use diced green chilis for a smoky touch.
These ingredients are just the beginning. The beauty of nachos is their versatility — you can dress them up or down based on what you love or have on hand.
Step-by-Step Instructions
Ready to craft your Monster Nachos? Let’s bring it all together. Follow these step-by-step instructions for a nacho experience that’ll have your friends begging for the recipe!
-
Preheat Your Oven: Start off by preheating your oven to 400°F (200°C). This is essential! You want your nachos to come out bubbly and golden.
-
Layer the Chips: On a large baking sheet, spread out a generous layer of tortilla chips. Make sure they’re overlapping a bit — this allows for even cheese distribution.
-
Add Cheese: Now, sprinkle a healthy layer of your cheese mix over the chips. Don’t hold back! This is where the magic really starts. The more cheese, the better, right?
-
Toppings Time!: Scatter the olives and jalapeños over the cheese. Get creative! You could also toss in some diced tomatoes, corn, or cooked ground beef for added protein.
-
Bake: Place the baking sheet in the preheated oven and bake for about 10-15 minutes, or until the cheese is bubbly and starting to brown. Keep a close eye so it doesn’t overcook!
-
Final Touches: Once baked, remove the nachos from the oven. Before serving, consider drizzling with fresh salsa or guacamole, and perhaps a sprinkle of fresh cilantro for an aromatic finish.
Chef Tip: When layering, think about contrast! Make sure chips are covered in cheese and toppings, or you’ll end up with some sad, naked chips at the end!
Serving Suggestions
Your Monster Nachos are looking gooey and gorgeous — now, how do you serve them? I love to transfer my nachos to a large, rustic wooden board for that communal feel. Use a large spoon to scoop up some toppings as you serve — no one wants to miss out on the cheese!
For a fun twist, place small bowls of toppings like guacamole, sour cream, and pico de gallo around your nacho platter. This way, your guests can customize their bites, making it a truly interactive experience.
Recipe Variations
Want to mix things up? Here are a few creative variations to take your Monster Nachos to the next level:
-
BBQ Chicken Nachos: Add shredded BBQ chicken for a smoky twist! Layer it underneath the cheese for ultimate flavor.
-
Mediterranean Nachos: Swap out traditional toppings for feta cheese, roasted red peppers, and a drizzle of tzatziki sauce — a fresh and tangy alternative.
-
Loaded Veggie Nachos: Load them up with black beans, corn, diced bell peppers, and avocado for a hearty meatless option.
-
Buffalo Chicken Nachos: Use shredded rotisserie chicken tossed in buffalo sauce. Top with blue cheese crumbles for a spicy flavor bomb.
-
Breakfast Nachos: Layer with scrambled eggs, cherry tomatoes, avocado, and a drizzle of hot sauce. Perfect for brunch!
Chef’s Notes
Over the years, my Monster Nachos recipe has gotten quite the makeover! Initially, I started with just cheese and jalapeños, but as my taste evolved, so did my nachos. I’ve added everything from savory meats to fresh herbs, and you can bet my nachos have become a crowd favorite at every party!
I once had a New Year’s Eve bash where someone mistakenly grabbed a handful of nachos thinking they were chips! Let’s just say, it made for a hilarious moment when the person realized it wasn’t just a chip. The laughter that ensued? Priceless!
FAQs and Troubleshooting
1. My cheese didn’t melt well! What went wrong?
Make sure you’re using cheese that’s known for melting well, like cheddar or Monterey Jack. If you’re shredding it yourself, avoid pre-shredded cheese, which often has anti-caking agents that can hinder meltiness.
2. How do I prevent soggy nachos?
To avoid soggy chips, ensure your toppings (like salsa or guacamole) are served on the side, or use them sparingly. Always layer cheese on top to create a protective layer for the chips.
3. Can I make these in advance?
Prepare your chips and toppings ahead of time, but assemble and bake right before serving. Nachos are best enjoyed fresh!
4. What if I don’t have an oven?
No worries! You can make these nachos in an air fryer or even on the stovetop. Just layer the ingredients in a pan and cover with a lid to melt the cheese.
Nutritional Info
Although nachos are meant to be a delicious indulgence, moderation is key! Depending on how many toppings you add, a serving of these Monster Nachos can range around 300-500 calories. But hey, it’s all about enjoyment and sharing good food!
In Conclusion
There you have it, friends! Your ultimate guide to Monster Nachos, where every bite is a celebration of flavor and creativity. Cooking should always feel approachable and fun, just like these nachos! So gather your ingredients, invite some friends over, and let the nacho magic unfold.
At the end of the day, it’s not just about the nachos; it’s about the memories you create around the table. Here’s to good food and even better company! Cheers!
PrintMonster Nachos: The Ultimate Comfort Food
A glorious platter of nachos piled high with toppings, perfect for gatherings and movie nights.
- Prep Time: 10 minutes
- Cook Time: 15 minutes
- Total Time: 25 minutes
- Yield: 6 servings
- Category: Appetizer
- Method: Baking
- Cuisine: Mexican
- Diet: Vegetarian
Ingredients
- Tortilla Chips
- Sharp Cheddar Cheese
- Monterey Jack Cheese
- Black Olives
- Jalapeños
Instructions
- Preheat your oven to 400°F (200°C).
- Layer the chips on a large baking sheet, overlapping them for even cheese distribution.
- Add a generous sprinkle of cheese mix over the chips.
- Scatter olives and jalapeños over the cheese, adding any additional toppings you like.
- Bake for about 10-15 minutes until the cheese is bubbly and golden.
- Remove from oven and drizzle with salsa or guacamole, garnishing with cilantro if desired.
Notes
Try variations like BBQ chicken, Mediterranean, or breakfast nachos!
Nutrition
- Serving Size: 1 serving
- Calories: 400
- Sugar: 1g
- Sodium: 500mg
- Fat: 24g
- Saturated Fat: 10g
- Unsaturated Fat: 12g
- Trans Fat: 0g
- Carbohydrates: 35g
- Fiber: 4g
- Protein: 12g
- Cholesterol: 30mg
Keywords: nachos, comfort food, appetizer, party food, cheese
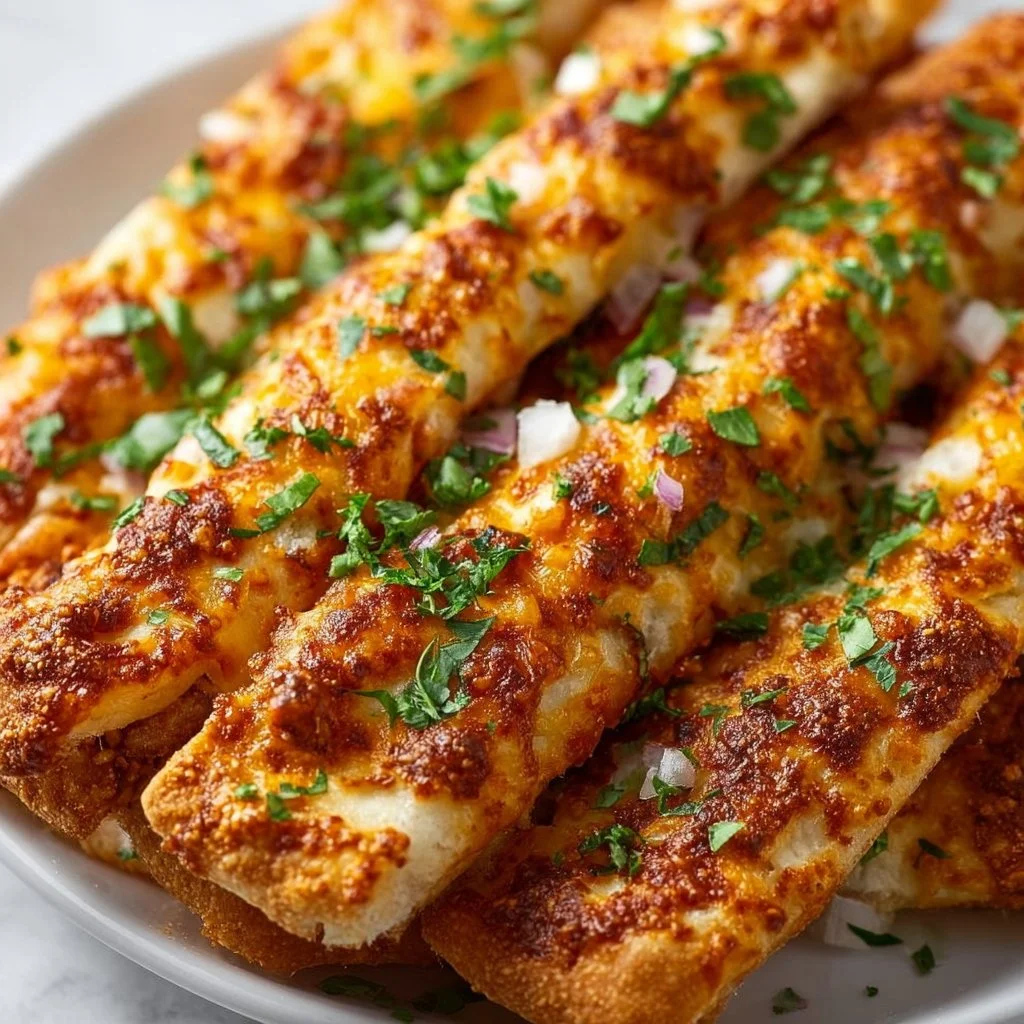
Crispy 15-Minute Cheesy Taco Sticks: Weeknight Snack
Cheesy Taco Sticks: A Flavorful Twist on a Comfort Classic
Welcome to my kitchen, food lovers! Today, I’m super excited to share a dish that will not only bring joy to your taste buds but also remind you of those cozy family gatherings where laughter and delicious aromas filled the air. I’m talking about Cheesy Taco Sticks!
These delectable bites are the perfect blend of savory ground beef, zesty taco seasoning, and gooey cheese, all wrapped in warm, fluffy pizza dough. It’s a recipe that combines the beloved flavors of tacos and pizza to create a fun, handheld treat that’s a hit with both kids and adults alike. Whether you’re hosting a dinner party, having a game night with friends, or just craving something irresistibly tasty on a weeknight, these Cheesy Taco Sticks are sure to be the star of the show!
So grab your apron and let’s dive into this cheesy culinary adventure together!
My Taco Story
Growing up, Taco Tuesdays were a sacred family ritual in my home. My mom would whip up her famous taco filling, which always seemed to have that magical flavor that only moms can create. After dinner, we’d gather at the table, each person crafting their own taco creations with all the relevant toppings — shredded lettuce, diced tomatoes, and oh, the mountains of cheese!
But it wasn’t just about the food; it was about the time spent together. I fondly remember sneaking little bites of the taco filling before it even made it to the table and my sister and I trying to outdo each other with the tallest taco stacks. Fast forward a few years, and I’d often find myself experimenting with leftovers, one evening transforming our beloved tacos into a whimsical party snack. That’s how these Cheesy Taco Sticks came to life—a delightful twist on a nostalgic favorite that instantly transports me back to those laughter-filled evenings.
Ingredients
Here’s what you’ll need to whip up your own batch of Cheesy Taco Sticks:
-
1 lb ground beef (or turkey)
- Ground beef is classic for this recipe, but feel free to substitute it with ground turkey for a leaner option. For a vegetarian twist, try crumbled tempeh or lentils.
-
1 packet taco seasoning
- This seasoning blend is a game-changer! You can use store-bought or make your own with chili powder, garlic powder, onion powder, cumin, and paprika.
-
1 cup shredded cheese (cheddar or Mexican blend)
- Cheddar adds a wonderful sharpness, but a Mexican blend gives that authentic taco flavor. For a dairy-free option, try cashew cheese or nutritional yeast for a cheesy flavor.
-
1 package refrigerated pizza dough
- Store-bought pizza dough saves time, but feel free to make your own! You can even use crescent roll dough for a flaky twist.
-
Salsa (for dipping)
- Salsa adds a fresh zing. Choose your heat level—mild, medium, or hot!
-
Sour cream (for dipping)
- A cooling contrast to the spiced taco filling. For a dairy-free alternative, use coconut cream or a cashew-based sour cream.
-
Chopped green onions (optional, for garnish)
- These add a pop of color and fresh flavor.
Step-by-Step Instructions
Let’s get cooking! Follow these steps closely, and you’ll have those Cheesy Taco Sticks ready for everyone to enjoy in no time.
-
Preheat Your Oven: Set your oven to 375°F (190°C). This allows it to reach the perfect temperature while you prepare your ingredients.
-
Cook the Ground Beef: In a skillet over medium-high heat, add your ground beef (or turkey). Cook until browned, about 7-10 minutes. As it cooks, use a spatula to break it into small pieces. This ensures you’ll have evenly cooked filling in every bite!
-
Season It Up: Once your meat is cooked, drain any excess fat, if necessary. Now sprinkle in the taco seasoning and stir well. Add about 1/3 cup of water and let the mixture simmer for an additional 3-5 minutes. This allows the flavors to meld beautifully!
-
Prepare Your Dough: While your meat simmers, open the package of pizza dough. Lightly flour your countertop and roll out the dough. You want it to be about 1/4 inch thick. If you’re using crescent roll dough, just seal the seams together.
-
Assemble the Taco Sticks: Using a pizza cutter, cut the dough into rectangles—about 3 inches by 4 inches is perfect. On one half of each rectangle, spoon a heaping tablespoon of your taco filling, then sprinkle a generous amount of cheese on top.
-
Seal It Up: Fold the dough over to enclose the filling, pressing the edges with a fork to seal them well. This is crucial! You don’t want that cheesy goodness leaking out while they bake.
-
Bake to Perfection: Line a baking sheet with parchment paper, and place your sealed taco sticks on top. Brush with a little bit of olive oil or melted butter for that gorgeous golden finish. Bake for 15-20 minutes, or until they’re puffed up and beautifully golden brown on top.
-
Serve with Love: Once they’re out of the oven, allow the Cheesy Taco Sticks to cool for a few minutes. Serve them hot with salsa and sour cream for dipping, and don’t forget the chopped green onions for that extra touch!
Serving Suggestions
I love to serve these Cheesy Taco Sticks on a large platter, with colorful bowls of salsa and sour cream for dipping. You can garnish with fresh cilantro or diced avocado for an extra colorful presentation. Your guests will be drawn to this vibrant display, and each bite will taste even better when paired with good company and laughter.
Recipe Variations
Feeling adventurous? Here are a few ways to mix things up:
-
Spicy Twist: Add diced jalapeños to your taco filling for a kick. You can also mix some diced green chilies into your cheese blend for extra flavor.
-
Vegetarian Option: Swap the meat for black beans or sautéed veggies like bell peppers and corn for a hearty vegetarian dish.
-
Different Cheeses: Experiment with Monterey Jack or pepper jack cheese for a creamier or spicier filling. Experimenting is part of the fun!
-
Herb-Infused: Add fresh herbs like cilantro or oregano to the taco mixture for a burst of freshness.
-
Sweet and Savory: Fold in some caramelized onions or even pineapple for a unique twist!
Chef’s Notes
These Cheesy Taco Sticks have evolved over time as I’ve played with different fillings and dough options. I once experimented by using leftover chili as a filling, and let me tell you, it was a hit! It’s one of the great things about cooking: it’s all about creativity and making it your own. They’ve become a staple in my home, serving as a bridge to connect generations through food.
Oh, and don’t be surprised if you find yourself snacking on the filling straight from the skillet! It’s hard to resist that savory goodness!
FAQs and Troubleshooting
1. My taco sticks burst open while baking. What happened?
This usually happens if they were overfilled or not sealed properly. Make sure to press the edges firmly with a fork and avoid overstuffing them.
2. Can I make these ahead of time?
Absolutely! You can assemble the Cheesy Taco Sticks, place them on a baking sheet, cover them tightly with plastic wrap, and refrigerate for a few hours before baking. Add a few extra minutes to the baking time!
3. How do I store leftovers?
If you have any leftovers (highly unlikely, but just in case!), store them in an airtight container in the fridge for up to 3 days. Reheat in the oven or air fryer for best results!
4. What can I serve alongside these?
These pairs wonderfully with a simple side salad, tortilla chips, or even some Mexican rice. It’s a complete meal that’s easy to customize!
Nutritional Info
While I typically focus on taste, I know the nutritional aspect can be important too. Here’s a rough estimate per Cheesy Taco Stick depending on the specific ingredients used:
- Calories: 200-250
- Protein: 12-15g
- Carbohydrates: 20-25g
- Fat: 10-15g
And there you have it, my friend: a delicious adventure into the world of Cheesy Taco Sticks! Cooking should be fun and accessible, and I’m thrilled to be your guide. So tie on that apron, gather your ingredients, and let’s create some memorable moments around your table! Happy cooking!
PrintCheesy Taco Sticks
A flavorful twist on classic tacos and pizza, these Cheesy Taco Sticks combine savory ground beef, zesty seasoning, and gooey cheese wrapped in warm pizza dough.
- Prep Time: 15 minutes
- Cook Time: 20 minutes
- Total Time: 35 minutes
- Yield: 4 servings 1x
- Category: Appetizer
- Method: Baking
- Cuisine: Mexican
- Diet: Omnivore
Ingredients
- 1 lb ground beef (or turkey)
- 1 packet taco seasoning
- 1 cup shredded cheese (cheddar or Mexican blend)
- 1 package refrigerated pizza dough
- Salsa (for dipping)
- Sour cream (for dipping)
- Chopped green onions (optional, for garnish)
Instructions
- Preheat your oven to 375°F (190°C).
- Cook the ground beef in a skillet over medium-high heat until browned, about 7-10 minutes.
- Season the meat with taco seasoning, add 1/3 cup of water, and simmer for 3-5 minutes.
- Prepare your pizza dough by rolling it out on a lightly floured countertop.
- Assemble by cutting the dough into rectangles, adding taco filling and cheese to one half.
- Seal the edges by folding the dough over and pressing it with a fork.
- Bake for 15-20 minutes until golden brown.
- Serve with salsa and sour cream.
Notes
Feel free to customize with different fillings and dips. These can be made ahead of time and stored in the fridge.
Nutrition
- Serving Size: 1 stick
- Calories: 200
- Sugar: 1g
- Sodium: 600mg
- Fat: 12g
- Saturated Fat: 5g
- Unsaturated Fat: 7g
- Trans Fat: 0g
- Carbohydrates: 25g
- Fiber: 2g
- Protein: 15g
- Cholesterol: 40mg
Keywords: taco sticks, cheesy snacks, comfort food, easy appetizers, game day recipes