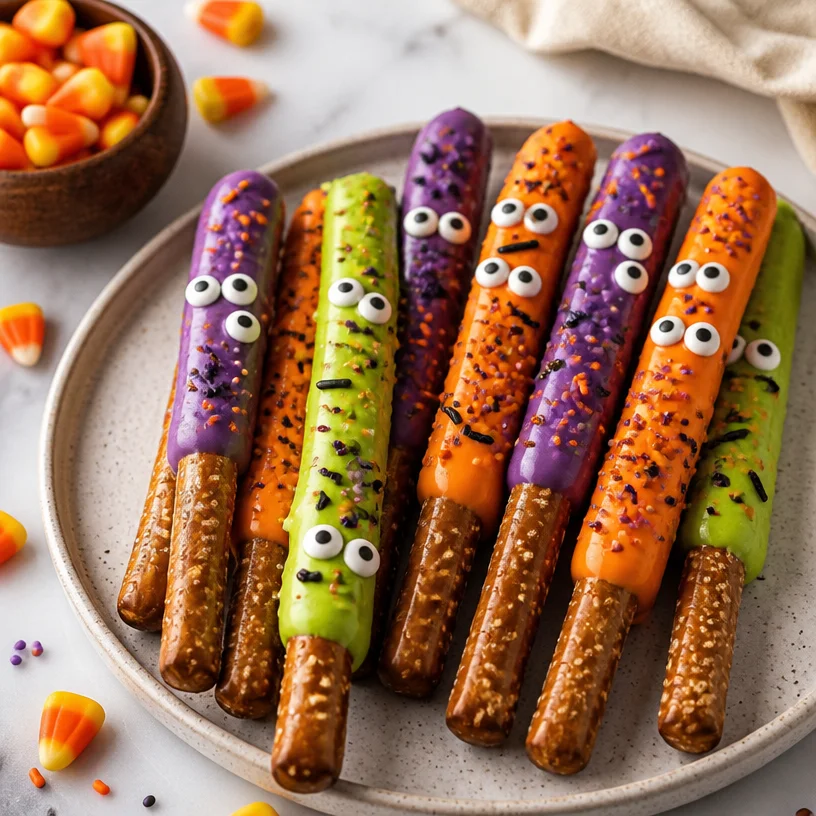
Monster Pretzel Rods: 5-Ingredient Crispy Party Treats
Monster Pretzel Rods: A Spooktacular Delight
Welcome to the thrilling world of Monster Pretzel Rods! If you’re looking for a whimsical treat that’s perfect for parties, Halloween celebrations, or simply a delightful snack that brings smiles, you’re in the right place. These crunchy, chocolate-dipped pretzel rods are not only fun to make, but they also allow your creativity to run wild.
Imagine hosting a Halloween bash, and as your guests walk through the door, they’re greeted by a platter of these adorable monster creations. With gooey, colorful candy melts transforming simple pretzel rods into frightfully fun snacks, it’s an experience that will leave you and your guests snickering with glee.
Here’s a little secret: Whenever I whip these up, I’m reminded of my childhood days where we would get together with friends to craft spooky snacks for Halloween. We’d gather around the kitchen table, the air filled with laughter, candy wrappers, and a slightly chaotic addition of sprinkles. Those moments of creativity and joy fueled my passion for cooking and entertaining, and every time I make Monster Pretzel Rods, it takes me back to those wonderful days.
So put on your favorite apron, tie your hair back, and let’s make some delightful, creepy Monster Pretzel Rods together!
Personal Story: A Spooky Tradition
I vividly remember the first time I made these Monster Pretzel Rods with my best friend, Jess. It was a few days before Halloween, and we had the grand idea of creating the ultimate spooky snack for our annual neighborhood party. Armed with a selection of candy melts, sprinkles, and of course, the ever-important pretzel rods, we transformed our kitchen into a chaotic candy wonderland.
We melted chocolate in a makeshift double boiler (because who needs fancy equipment, right?) and laughed as we dipped our pretzels, covered them in sprinkles, and stuck on candy eyes. I’ll never forget the moment Jess accidentally dropped a pretzel rod into the bowl of candy melts, sending a delightful splatter everywhere. Our culinary masterpiece may not have looked perfect, but it was ours, and that made it taste even better.
As we plated them up, we couldn’t stop giggling at our creation—half monster, half masterpiece. We took them to the party and watched as the kids devoured them, their faces lighting up with delight. Moments like those reminded me of the joy of cooking: it’s not about perfection, but the memories we create in the kitchen.
Ingredients
To make your own Monster Pretzel Rods, you’ll need the following ingredients:
- Pretzel Rods (12 count): The perfect crunchy base for our monsters—these sturdy snacks can hold up under all that delicious candy.
- Candy Melts (2-3 bags, assorted colors): This is where the magic happens! Choose vibrant colors like green, orange, purple, or black. If you can’t find candy melts, you can use chocolate chips as a substitute, but they may require some tempering.
- Candy Eyes (1 bag): You can find these at any craft store or online. They add a delightful touch and help your pretzels come to life!
- Sprinkles (various colors and shapes): Think Halloween! Look for spider or pumpkin-shaped sprinkles, or use a mix of colors for a fun, festive flair.
- Edible Glitter (optional): For an extra spooky shimmer! This is purely for aesthetic and can be left out if you prefer a more classic look.
Substitution Tips
- Gluten-Free Option: Use gluten-free pretzel rods for this recipe; they work just as well and guarantee everyone can enjoy them.
- Dairy-Free Option: Look for dairy-free candy melts, which are increasingly available in stores.
- Nuts: For those allergic to nuts, make sure to check labels on all candy decorations.
Step-by-Step Instructions
Step 1: Gather Your Ingredients
First things first, gather all your ingredients and set up a work station. Make sure to cover your surface with parchment paper—it simplifies the cleanup and gives you a place to set your completed pretzels.
Step 2: Melt Your Candy Melts
In a microwave-safe bowl, place your candy melts (about one bag at first). Microwave them in 30-second intervals, stirring in between until they’re smooth and melted. This typically takes about 1.5-2 minutes total. Pro tip: If your candy melts are too thick, add a teaspoon of coconut oil or shortening to thin them out.
Step 3: Dip the Pretzel Rods
Now comes the fun part! Take each pretzel rod, dip it into the melted candy, and gently swirl it to coat evenly. Allow any excess to drip off before laying it on the parchment paper. Don’t worry if it doesn’t look perfect; the sprinkles will do the rest!
Step 4: Load on the Sprinkles
While the candy coating is still wet, grab your sprinkles and shower them over the dipped pretzel. I like to do this over a bowl or plate to catch any leftover sprinkles to reuse later. If you’re using edible glitter, sprinkle that on too!
Step 5: Attach the Eyes
Carefully press two candy eyes onto the pretzel while the candy coating is still tacky. This is where they become monsters!
Step 6: Let Them Set
Place your completed pretzel rods to the side on the parchment paper and allow them to set up. You can speed this up by placing them in the refrigerator for about 10-15 minutes.
Step 7: Serve or Store
Once they’re completely set, your Monster Pretzel Rods are ready to be served! Enjoy them instantly or store them in an airtight container for a few days. Trust me; they’ll disappear faster than you can say “Boo!”
Serving Suggestions
When it comes to serving Monster Pretzel Rods, you can go all out or keep it simple. For a festive touch, arrange them in a tall glass like a bouquet, or lay them flat on a charming platter with some decorative spider web cotton as a backdrop. Don’t forget to add a few themed decorations or a fun sign saying, “Monster Treats Ahead!”
Recipe Variations
- Monster Mummies: Use white candy melts to coat the pretzels, then pipe on dark chocolate stripes to resemble mummy wrappings.
- Spooky Ghosts: Dip the pretzels in white candy melts and stick mini marshmallows on top as heads. Use chocolate icing to add ghostly eyes and mouths.
- Frankenstein’s Treats: Coat half of the pretzel in green candy melts, and once set, use black chocolate to create messy hair and facial features.
- Seasonal Switch: Change up your sprinkles according to the season! Use red and green for Christmas or pastel colors for Easter.
- Peanut Butter Delight: Dip the pretzel in melted peanut butter before coating in chocolate for an added nutty flavor.
Chef’s Notes
Every time I make these Monster Pretzel Rods, I chuckle at the “monstrous” shapes that come out! It’s amazing how a mere pretzel can be transformed into something so fun. I remember a time when I got a bit too ambitious and tried to create a multi-eyed monster. Let’s just say it ended up looking more comical than scary! The kitchen was full of laughter, and that’s what cooking is all about—having fun, making memories, and enjoying the company around you.
Over the years, I’ve honed this recipe, of course. I’ve discovered that different food colorings can dramatically change the vibe of your rods—deep orange feels like fall, while bright pink screams celebrations.
FAQs and Troubleshooting
-
Why did my candy melts seize up?
- This can happen if water gets into the candy melts; make sure your bowls and utensils are completely dry. To rescue them, you can add a little coconut oil to help thin them out.
-
Can I use regular chocolate instead of candy melts?
- Yes! If you prefer dark or milk chocolate, feel free to use it. Just remember that they might need to be tempered to prevent blooming.
-
What can I do if my sprinkles won’t stick?
- Make sure to sprinkle them on while the coating is still wet. If they dry, they won’t stick. Alternatively, you can lightly spray the coated pretzel with cooking spray before adding sprinkles.
-
How long do these treats keep?
- If stored in an airtight container, these treats can last about a week, although I promise they won’t last that long once you set them out!
Nutritional Info
While I always focus on the joy of cooking and sharing, it’s good to be mindful of our indulgences. Each Monster Pretzel Rod generally contains around 150 calories, with varying numbers based on the type of coating used and the amount of sprinkles added.
Ready to create some chaos in your kitchen? Grab those pretzel rods, let’s whip up some Monster Pretzel Rods, and get ready to wow your friends and family with a treat that’s as delightful to make as it is to eat! Remember, cooking is a celebration of creativity and community, so embrace the fun and let your inner child shine! Happy cooking!
PrintMonster Pretzel Rods
Whimsical and crunchy chocolate-dipped pretzel rods decorated to look like playful monsters, perfect for Halloween parties.
- Prep Time: 15 minutes
- Cook Time: 10 minutes
- Total Time: 25 minutes
- Yield: 4 servings 1x
- Category: Dessert
- Method: No-Cook
- Cuisine: American
- Diet: Vegetarian
Ingredients
- 12 Pretzel Rods
- 2–3 bags Candy Melts (assorted colors)
- 1 bag Candy Eyes
- Sprinkles (various colors and shapes)
- Edible Glitter (optional)
Instructions
- Gather your ingredients and set up a work station.
- Melt your candy melts in a microwave-safe bowl in 30-second intervals, stirring until smooth.
- Dip each pretzel rod in the melted candy, allowing excess to drip off.
- Load on the sprinkles while the candy coating is still wet.
- Attach candy eyes onto the pretzel.
- Let them set on parchment paper or place in the refrigerator for 10-15 minutes.
- Serve or store in an airtight container for a few days.
Notes
For gluten-free and dairy-free options, substitute as needed. Enjoy creating spooky variations like Monster Mummies or Spooky Ghosts!
Nutrition
- Serving Size: 1 serving
- Calories: 150
- Sugar: 20g
- Sodium: 200mg
- Fat: 6g
- Saturated Fat: 3g
- Unsaturated Fat: 3g
- Trans Fat: 0g
- Carbohydrates: 21g
- Fiber: 1g
- Protein: 1g
- Cholesterol: 0mg
Keywords: Halloween treats, Monster snacks, Pretzel rods, Chocolate dip, Fun desserts
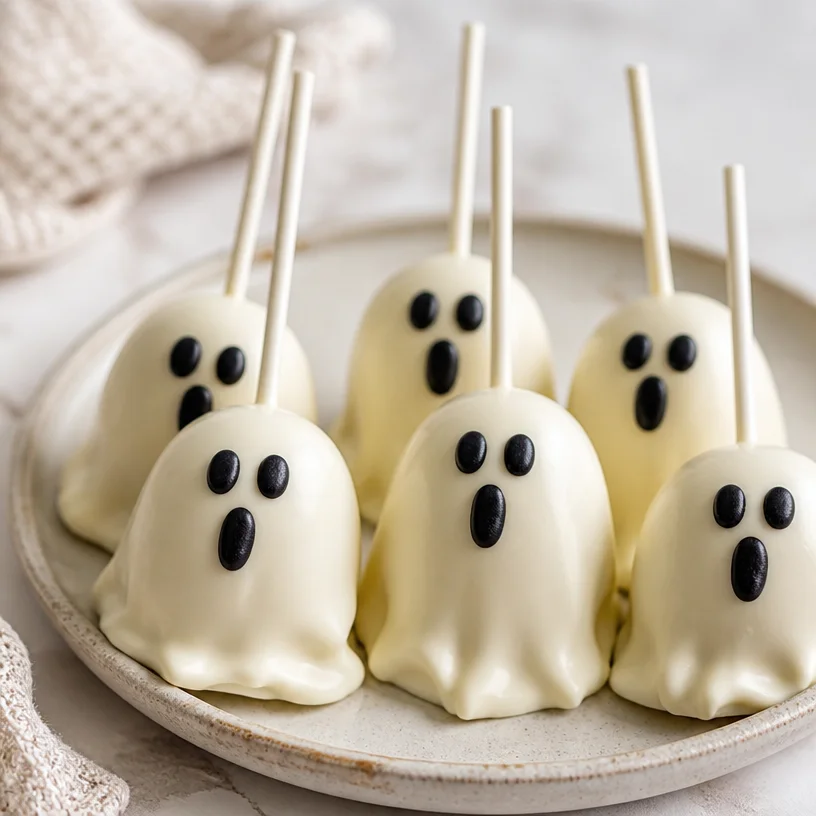
Spooky Ghost Marshmallow Pops: Quick Halloween Treats
Ghost Marshmallow Pops: A Sweet Treat for Spooky Nights
Welcome, my fellow foodies! I’m so excited to have you here, baking your way into the spirit of Halloween with a treat that’s not only delicious but also a fun, festive activity for everyone. Today, we’ll be diving into the delightfully spooky world of Ghost Marshmallow Pops. These whimsically adorable treats are perfect for Halloween parties, school bake sales, or even cozy nights in with a good movie and a warm blanket. Grab your apron, and let’s get started!
Creating these little ghostly delights is extremely simple, allowing you to channel your inner child while simultaneously impressing guests with your culinary creativity. The beautiful thing about these pops is their versatility — they can be as simple or as fancy as you like! Plus, they’re so much fun to make that you can easily involve the kiddos for a thrilling family bonding experience. Are you ready? Let’s whip up some Ghost Marshmallow Pops and create a treat that will haunt your friends and family in the best way possible!
A Sweet Memory from the Past
As I stand here mixing up those creamy white chocolate and setting marshmallows on skewers, I can’t help but recall a delightful Halloween from my childhood. My friends and I gathered at my house, which, of course, was transformed into a haunted mansion. We decorated cupcakes and whipped up all kinds of spooky snacks. I remember one particular moment vividly; my mom brought out these cute marshmallow pops she had decorated to resemble little ghosts. Every bite was a delightful combination of sweet marshmallow and rich chocolate, and I remember giddy laughter filling the room. It was moments like these that sparked my love for cooking and entertaining.
Now, every Halloween, I try to rekindle that same spirit and charm by making Ghost Marshmallow Pops. Each bite is not just a treat; it’s a memory wrapped in flavor! Whether you’re planning a big Halloween bash or just want to add a sprinkle of fun to your family dinner, these pops are sure to do the trick.
Ingredients
Here’s what you’ll need to conjure up these ghostly delights:
-
Marshmallows:
- The star of the show! Look for nice, fluffy marshmallows (regular size works best). You can also swap them for mini marshmallows if you prefer smaller ghosts or want to make a variety.
-
White Chocolate:
- Use high-quality white chocolate chips or melts for an easy melt-and-dip. If you’re feeling adventurous, you can substitute with white chocolate almond bark. Just remember, the smoother the chocolate, the easier the dipping!
-
Black Icing or Chocolate (for eyes):
- This is where the personality of your ghosts comes to life! You can use store-bought black icing in a tube for precision, or have fun tempering some dark chocolate and dabbing on little dots for eyes. Feel free to get creative! Mini chocolate chips or edible eyes work too.
-
Lollipop Sticks or Skewers:
- These are essential for turning our marshmallows into pops! Lollipop sticks give a more professional look, but wooden skewers work just fine too. If you want to keep things simple, you can also skip the stick and just leave the marshmallows as sweet little bites.
Step-by-Step Instructions
Now, let’s get down to the fun part — making our Ghost Marshmallow Pops! Here’s a detailed guide to ensure you nail it:
-
Prep Your Workspace:
- Before you dive into melting chocolate, clear off a space in the kitchen, and gather all your ingredients. Lay down some parchment paper on a baking sheet for your completed pops. This will help prevent sticking!
-
Melt the White Chocolate:
- In a microwave-safe bowl, add your white chocolate. Heat in 30-second intervals, stirring in between until the chocolate is completely melted and smooth. Make sure not to overheat, as this can cause the chocolate to seize.
-
Skewer the Marshmallows:
- Take your lollipop sticks or skewers and gently insert them into the marshmallows, about halfway through. They should stand up straight and not wobble much. This process is simple, but take your time — you don’t want to push too hard and break the marshmallow.
-
Dip the Marshmallows:
- Holding the skewer, dip each marshmallow into the melted white chocolate, letting the excess drip off. You want a nice, even coating. If you’d like a thicker layer, you can dip them twice after the first layer has cooled for a minute.
-
Set on Parchment:
- Place the dipped marshmallows onto your parchment-lined baking sheet. This is your time to get artistic — feel free to twirl or tilt the marshmallows as you go to create a ghostly swirl shape!
-
Add the Eyes:
- While the chocolate is still soft, take your black icing or melted chocolate and carefully dot two little eyes onto each ghost. They don’t have to be perfect; a little irregularity makes them more charming and fun!
-
Let Them Set:
- Allow your Ghost Marshmallow Pops to set at room temperature, or you can speed up the process by placing them in the refrigerator for about 10-15 minutes until the chocolate hardens.
-
Enjoy!
- Serve these pops at your next gathering, or simply enjoy them yourself while watching your favorite Halloween movie. Treat yourself to an adorable sculptural snack!
Serving Suggestions
To plate your Ghost Marshmallow Pops, stick them in a simple mason jar filled with festive candies or popcorn for a charming centerpiece at your Halloween party. Alternatively, you can lean them against each other on a decorative platter for a spooky display. Either way, a little sprinkle of edible glitter or Halloween-themed confetti will add the finishing touch to your spooky treats!
Recipe Variations
If you’d like to shake things up, here are a few creative twists and variations for your Ghost Marshmallow Pops:
-
Drizzle of Chocolate:
- After dipping in white chocolate, you can drizzle dark chocolate or orange-colored candy melts over the top for a fun contrast.
-
Flavored Marshmallows:
- Try using flavored marshmallows, such as pumpkin spice or chocolate mint, for a different taste twist!
-
Sprinkle Toppings:
- While the chocolate is still wet, try sprinkling some crushed graham crackers, candy corn, or festive sprinkles on top for added texture and flavor.
-
Fruit-based Pops:
- Want a healthier approach? Dip ripe strawberries in white chocolate and decorate with chocolate eyes instead. These little guys would make for a ghostly fruit display!
-
Vegan Version:
- Swap regular marshmallows for vegan marshmallows and use dairy-free chocolate instead. This way, everyone can enjoy a spooky treat!
Chef’s Notes
These Ghost Marshmallow Pops are a fantastic way to get creative and have fun in the kitchen, and I love watching everyone’s eyes light up when they see what you’ve made. They’ve evolved over the years from simple marshmallows dipped in chocolate to now becoming a mini canvas for culinary expression!
One funny kitchen story that comes to mind involves my dog, Charlie, who decided that he was the real ghost of the kitchen one Halloween. While I was getting ready to dip my marshmallows, he snuck onto the counter and helped himself to a few marshmallows! It was hilarious, and while I couldn’t be mad at him, I made sure to keep a watchful eye during future baking endeavors.
FAQs and Troubleshooting
1. What should I do if my chocolate seizes?
- If your chocolate seizes, don’t panic! Try adding a teaspoon of vegetable oil or shortening to the bowl and reheat gently while stirring. This should bring it back to a smoother consistency.
2. Can I use flavorings in the melted chocolate?
- Absolutely! Feel free to add a few drops of extract, like vanilla or almond, to enhance the flavor of your chocolate. Just be sure to use oil-based extracts if you’re melting chocolate, as water can cause it to seize.
3. What’s the best way to store leftovers?
- Store your pops in an airtight container at room temperature. They should last for 3-5 days. If you need to refrigerate them, be sure to separate layers with parchment to keep them from sticking.
4. Can I make these ahead of time?
- Yes! These Ghost Marshmallow Pops can be made a day in advance. Just make sure to keep them in a cool, dry place to prevent the chocolate from melting.
Nutritional Info (Optional)
For those interested in the nutritional aspect, each Ghost Marshmallow Pop contains approximately:
- Calories: 100
- Fat: 5g
- Carbohydrates: 15g
- Protein: 1g
However, keep in mind that this is an estimate based on the ingredients used.
So, there you have it! A delightfully spooky recipe that’s as fun to make as it is to eat. I hope you feel encouraged to tie on your apron, indulge in a little kitchen adventure, and perhaps even relive some of those special moments like I do every Halloween. Here’s to creating cherished memories with food and friends — one Ghost Marshmallow Pop at a time! Happy haunting!
PrintGhost Marshmallow Pops
Delicious and whimsical Ghost Marshmallow Pops perfect for Halloween celebrations.
- Prep Time: 15 minutes
- Cook Time: 5 minutes
- Total Time: 20 minutes
- Yield: 12 servings
- Category: Dessert
- Method: Dipping
- Cuisine: American
- Diet: Vegetarian
Ingredients
- Marshmallows (regular or mini)
- White chocolate chips or melts
- Black icing or chocolate (for eyes)
- Lollipop sticks or wooden skewers
Instructions
- Prep your workspace: Clear off a space in the kitchen, and gather all your ingredients. Lay down some parchment paper on a baking sheet.
- Melt the white chocolate in a microwave-safe bowl by heating in 30-second intervals, stirring until smooth.
- Skewer the marshmallows by inserting lollipop sticks or skewers halfway through them.
- Dip the marshmallows into the melted white chocolate, letting excess drip off.
- Set the dipped marshmallows on a parchment-lined baking sheet.
- Add the eyes with black icing or melted chocolate while the chocolate is still soft.
- Let them set at room temperature or refrigerate for about 10-15 minutes until chocolate hardens.
- Enjoy! Serve and enjoy these spooky treats, or decorate them for a festive display.
Notes
These pops can be made a day in advance. Store in an airtight container.
Nutrition
- Serving Size: 1 pop
- Calories: 100
- Sugar: 15g
- Sodium: 20mg
- Fat: 5g
- Saturated Fat: 3g
- Unsaturated Fat: 2g
- Trans Fat: 0g
- Carbohydrates: 15g
- Fiber: 0g
- Protein: 1g
- Cholesterol: 0mg
Keywords: Halloween, dessert, marshmallow, treats, spooky snacks, family fun
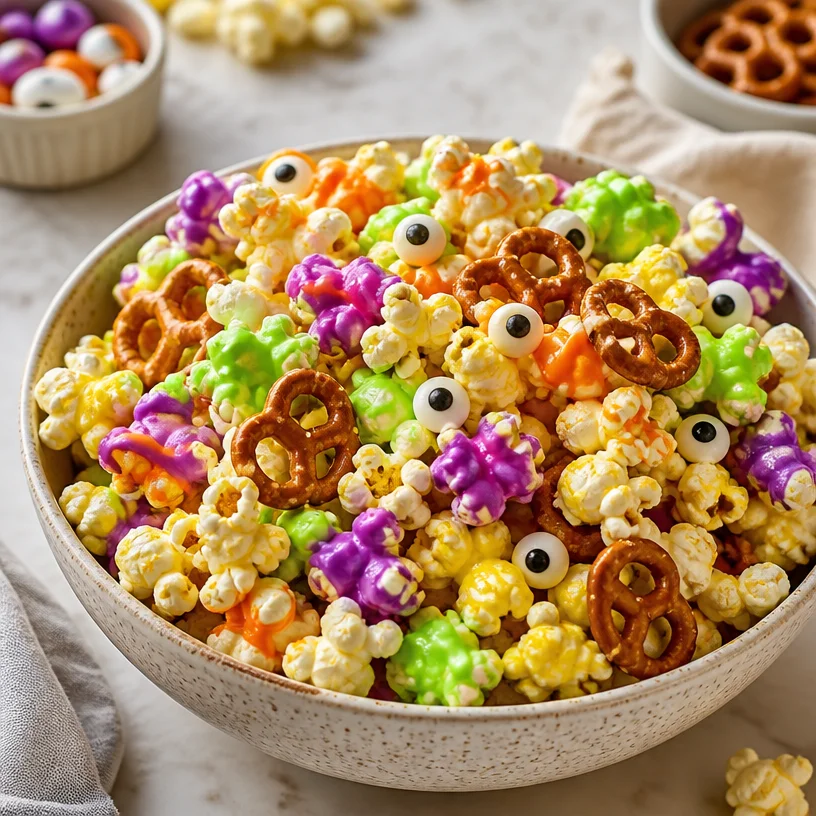
Monster Popcorn Mix
Monster Popcorn Mix: A Spooktacular Treat
Hello, fellow foodies! Today, we’re diving into something utterly delightful and perfect for any occasion that calls for a little extra fun in the kitchen. Get ready to unleash your creativity with this Monster Popcorn Mix—the ultimate festive snack that’s equal parts whimsical and delicious!
Introduction
Imagine this: it’s a crisp autumn evening, the leaves are turning, and there’s a delightful chill in the air. You gather your friends around for a cozy movie night or a spooky Halloween bash, and you want to serve something that sparks joy and maybe a scream or two! This Monster Popcorn Mix is just the ticket. It’s simple to make, incredibly fun, and absolutely irresistible!
Cooking should be a mix of creativity and joy, and this recipe embodies that spirit perfectly. Picture fluffy popcorn drizzled with colorful candy melts, crunchy pretzels, and, for a bit of flair, those ever-adorable candy eyes (yes, they really do make everything more fun!). This mix isn’t just a treat; it’s an experience. It’s about gathering around the table (or couch!), sharing laughs, and indulging in something that’s a delightful feast for both the eyes and the taste buds.
Let’s not forget, this colorful concoction is perfect for any occasion! Birthdays, Halloween, or just a fun movie night—this popcorn mix is a crowd-pleaser. So tie on your apron and let’s get popping!
Personal Story
I’ll never forget the first time I made a candy-coated popcorn mix. It was during a sleepover with my best friends in middle school, and we decided to take on the kitchen as our mission for the night. Armed with a giant bowl of popcorn, we spontaneously added everything we could find—mini marshmallows, chocolate chips, and a rainbow of colored candies. It was chaos in the best way! We spent the evening munching away, watching scary movies, and laughing until our sides hurt.
From that day on, I realized that food is more than just sustenance; it’s about creating memories. Every time I whip up a popcorn mix, I think of that magical night filled with laughter and a bit of sugar-induced silliness. Now, I get to share that joy with you through this Monster Popcorn Mix recipe, bringing whimsy and delight to your gatherings!
Ingredients
Here’s what you’ll need to make this eye-popping treat:
-
Popcorn:
- Use plain, unbuttered popcorn. You can pop your own kernels or use store-bought microwave popcorn. For a healthier option, air-popping is fantastic! If you’re feeling adventurous, try flavored popcorn for an added twist!
-
Candy Melts:
- These colorful chocolate wafers melt beautifully, adding sweetness and a vibrant pop to your mix. Feel free to substitute with almond bark or white chocolate melted down with a bit of vegetable oil for that same glossy finish!
-
Pretzels:
- Choose your favorite variety, whether it’s classic or chocolate-covered. They add a delightful crunch that perfectly balances the sweetness! Consider using mini pretzels for bite-sized fun or gluten-free options if needed.
-
Candy Eyes:
- These quirky little decorations take your mix to the next level. They’re available at most craft or baking stores. If you can’t find them, try using mini M&Ms or chocolate chips to achieve a similar fun effect.
Step-by-Step Instructions
-
Pop the Popcorn:
- Start by popping your popcorn according to package instructions. If you’re using a stovetop method, use about ½ cup of kernels. Once done, transfer it to a large, clean bowl—this mess is worth it!
-
Melt the Candy Melts:
- Using a microwave-safe bowl, place your candy melts (about 1 cup for starters) and microwave in 30-second intervals, stirring in between, until completely melted. Don’t rush this process; chocolate can go from perfect to burnt in a second! If using white chocolate, a teaspoon of vegetable oil can help it melt smoother.
-
Coat the Popcorn:
- Once your candy melts are silky and smooth, drizzle it generously over the popcorn. Use a spatula or large spoon to gently fold the melted candy into the popcorn until it’s evenly coated. It’s going to get a little sticky, but that’s part of the fun!
-
Add Pretzels:
- Fold in your pretzels next. You can break them into smaller pieces for easier munching. This is where the magic happens; the sweet and salty combination is just divine!
-
Add Candy Eyes:
- While the mixture is still warm and slightly sticky, sprinkle the candy eyes on top. This is a great time to get creative! Place them strategically for fun monster faces or just sprinkle them generously for a whimsical effect.
-
Set and Cool:
- Lay the popcorn mix out on parchment paper to cool completely. It might take about 30 minutes. Once set, it’ll be easier to break apart if it clumps together.
-
Serve and Enjoy:
- Finally, serve your beautiful monster mix in fun bowls or jars. If you’re feeling festive, add a few little decorations—think cobwebs or plastic spiders for a Halloween twist!
Serving Suggestions
For a fun presentation, consider serving your Monster Popcorn Mix in festive bowls or large mason jars. You could even portion them in individual bags tied with colorful ribbons for an adorable treat for parties or gatherings. And don’t forget to accompany it with a movie or some games; it’s perfect for sharing!
Recipe Variations
Here are some ideas to spice things up with your Monster Popcorn Mix:
-
Chocolate Drizzle: Add a drizzle of melted dark or milk chocolate on top for a rich flavor contrast.
-
Halloween Sprinkles: Toss in some Halloween-themed sprinkles for an extra festive flair.
-
Nutty Crunch: Add some chopped nuts like almonds or walnuts for an added texture.
-
Dried Fruits: Consider mixing in some dried cranberries or raisins for a touch of natural sweetness.
-
Savory Twist: For a unique take, sprinkle some cheese powder or experiment with savory snack toppings!
Chef’s Notes
As I whipped up this Monster Popcorn Mix, I couldn’t help but reminisce about countless joyful moments spent in kitchens with friends, trying new things and making delightful messes. This recipe has evolved over the years; I’ve tried everything from different types of chocolate melts to quirky add-ins, and honestly, the happiness remains the same. Each batch conjures up laughter and good times, making it a staple for friends and family gatherings!
FAQs and Troubleshooting
Q: What should I do if my candy melts didn’t melt smoothly?
A: It’s essential to heat them gently and stir often. If your melts are clumpy, try adding a drop of vegetable oil and microwaving in small intervals until smooth.
Q: Can I make this in advance?
A: Absolutely! Just store it in an airtight container at room temperature and consume within a week for the best crunch.
Q: How can I prevent my popcorn from getting soggy?
A: Make sure your popcorn is entirely cool before storing. If the moisture gets trapped, it can make the popcorn chewy rather than crunchy.
Q: Is it possible to make this recipe dairy-free?
A: Definitely! Look for dairy-free candy melts and check that your pretzels are also dairy-free. There are plenty of options on the market nowadays!
Nutritional Info
(As this popcorn mix can vary greatly depending on the ingredients used, please consider this a fun treat in moderation. Enjoy with joy!)
And there you have it—the ultimate Monster Popcorn Mix! Simple to make, packed with flavor and nostalgia, and utterly delightful. I can’t wait to hear about the memories you create with this delicious mix. Happy cooking! 🍿✨
PrintMonster Popcorn Mix
A whimsical and colorful popcorn mix perfect for any festive occasion.
- Prep Time: 15 minutes
- Cook Time: 10 minutes
- Total Time: 25 minutes
- Yield: 8 servings 1x
- Category: Snack
- Method: Mixing
- Cuisine: American
- Diet: Vegetarian
Ingredients
- Plain popcorn (about ½ cup kernels)
- 1 cup colorful candy melts
- 1 cup pretzels (classic or chocolate-covered)
- Candy eyes (for decoration)
Instructions
- Pop the popcorn according to package instructions and transfer it to a large bowl.
- Melt the candy melts in a microwave-safe bowl in 30-second intervals, stirring until smooth.
- Coat the popcorn with the melted candy, folding gently until evenly coated.
- Add the pretzels, breaking them into smaller pieces if desired.
- Add candy eyes while the mixture is still warm.
- Set the mix on parchment paper to cool completely, about 30 minutes.
- Serve in festive bowls or jars and enjoy!
Notes
This mix can be made in advance and stored in an airtight container for up to a week.
Nutrition
- Serving Size: 1 serving
- Calories: 200
- Sugar: 15g
- Sodium: 300mg
- Fat: 7g
- Saturated Fat: 3g
- Unsaturated Fat: 3g
- Trans Fat: 0g
- Carbohydrates: 32g
- Fiber: 1g
- Protein: 2g
- Cholesterol: 0mg
Keywords: popcorn, snack, Halloween, festive treat, candy melts