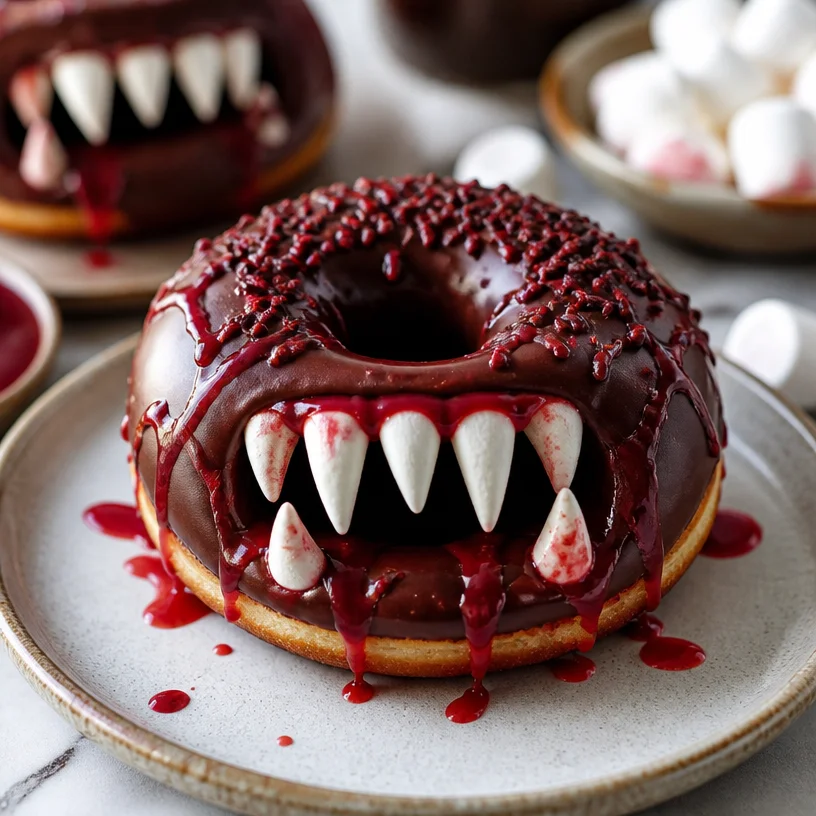
Vampire Donuts
Sink Your Teeth into These Spooktacular Vampire Donuts!
Hello, fellow foodies! It’s Savannah Pierce from Ivory Apron, and today, we’re diving into a fun and whimsical treat that’s sure to tickle your taste buds and bring a little bite to your next gathering—Vampire Donuts! These playful, fang-filled delights are perfect for Halloween parties, spooky movie nights, or any time you want to embrace your inner vampire in the kitchen. So, grab your apron, and let’s get started!
A Little Bite of Nostalgia
Growing up, Halloween was one of my favorite times of year. The crisp autumn air, the excitement of dressing up, and, of course, the candy! But there was this one Halloween when my friends and I decided we wanted to do something a bit different—we wanted to bake. Armed with flour-covered aprons and a heap of enthusiasm, we whipped up a tray of donuts. But these weren’t just any donuts; we transformed them into ghoulish delights, complete with gooey marshmallow fangs and a drip of red food coloring that made them look irresistibly spooky.
As we gathered around the kitchen table, laughter echoed off the walls, and sugary confections turned into our playful masterpieces! Those Vampire Donuts became a tradition, a memory filled with joy, creativity, and the kind of deliciousness that you can only create with friends. Years later, I still get giddy just reminiscing about that night. So, let’s recreate that magic together!
Ingredients
Here’s what you’ll need to make your very own Vampire Donuts:
-
Store-bought donuts: These will serve as the base for your creation. Feel free to choose your favorite flavor—glazed, chocolate, or even powdered sugar donuts. If you want to go the extra mile, you can try making homemade donuts.
-
Marshmallow fangs: These delightful candies will give your donuts their signature toothy appearance. You can find them in bulk at many candy stores or online. If you’re in a pinch, cut mini marshmallows in half to create your own fangs!
-
Red food coloring (optional): This is your “blood” for the donuts. Just a drop or two will do! If you prefer a natural option, you can use raspberry or strawberry puree to mimic that red coloring.
Step-by-Step Instructions
-
Gather Your Ingredients: Start by arranging all your ingredients on the counter. This will make your process easier and keep the kitchen zen. Trust me; you don’t want to be fumbling around at the last minute!
-
Prepare Your Donuts: If you’re using store-bought donuts, skip this step. If you’re making them from scratch, follow your favorite recipe for classic donuts. Remember, if you’re using a muffin tin, it will create a donut-like shape.
-
Snag Those Fangs: For the marshmallow fangs, pick out your favorite marshmallows. If they’re the mini kind, simply slice them in half with a sharp knife. Watch those fingers! Safety first!
-
Creating the Drip: If you’re going the red food coloring route, mix a little food coloring in a small dish with water or simply use the coloring straight from the bottle. This will help you create that deliciously creepy blood effect.
-
Assemble Your Donuts: Take each donut in hand and carefully insert marshmallow fangs on the front part of the donut. Place them so that they stick out like vampire fangs (pulling on one of those fangs can lead to delicious consequences).
-
Add the Finishing Touches: Now, take your finger or a spoon and dip into your blood—er, I mean red food coloring. Drip it around the donuts, allowing it to drip down a little. This is where things can get messy, so embrace the chaos!
-
Presentation is Key: If you want, add some powdered sugar on top for an extra sweet touch or sprinkle some cocoa powder for that haunting look!
-
Step Back and Admire: Before you dig in, take a moment to appreciate your creation! Ooh and ahh at the sight of your spooky donuts—after all, it’s a labor of love!
Serving Suggestions
Plating these donuts is as simple as it gets! Arrange them on a vibrant platter, adding a few Halloween-themed decorations like fake spider webs or little ghost candies for an eerie touch. These sugary creatures will surely steal the show at any gathering! And don’t forget napkins—they’ll come in handy!
Recipe Variations
Feeling creative? Here are some fun twists to turn your Vampire Donuts into something even more special:
-
Chocolate-Covered Donuts: Dip your donuts in melted chocolate before adding the fangs for a rich, decadent treat.
-
Fruit-Filled Donuts: Opt for jelly-filled donuts, and let the filling ooze out when you take a bite for that extra drama!
-
Spooky Sprinkles: Add Halloween-themed sprinkles to the fangs or around the base of the donuts for an added pop of color.
-
Nutty Crunch: Roll the edges of the donuts in crushed nuts or granola before adding fangs for a delightful crunch.
-
Vegan or Gluten-Free Options: Swap traditional donuts for gluten-free or vegan-friendly versions, ensuring everyone can enjoy these creepy creations.
Chef’s Notes
This recipe is one of my favorites because it effortlessly combines fun and deliciousness! Plus, it invites creativity—feel free to add your personal flair. I love hearing stories from readers about their own batches. The first time I made these with a team of friends, we spent more time laughing than cooking, which is precisely how it should be in the kitchen.
And remember, perfection is overrated; embrace those little imperfections that make your donuts uniquely yours!
FAQs and Troubleshooting
-
Can I use homemade donuts?
Absolutely! Making your own donuts can elevate this recipe even further. Use your favorite homemade donut recipe or try a quick cake donut method if you’re short on time. -
What if I don’t have marshmallow fangs?
No worries! You can simply cut mini marshmallows in half, as mentioned before, or try using candy corn or chocolate chips to make unique "fangs." -
How can I store leftover donuts?
Keep any leftover donuts in an airtight container at room temperature for up to 2 days. After that, they might start to get a little stale. But let’s be honest—there probably won’t be any left! -
How can I make the food coloring less messy?
Use a squeeze bottle to control the amount you’re dispensing. It can give you more precision without the splatter!
Nutritional Info (Optional)
While these Vampire Donuts are a treat, it’s always good to be mindful! Each donut may contain roughly 250 calories, but the joy they bring? Priceless!
So, there you have it! Whip up a batch of Vampire Donuts, gather your friends and family, and let the deliciously fun moments unfold. Embrace the spirit of the season and elevate your gatherings around the table with this spooktacular treat. Happy cooking and keep those aprons on!
PrintVampire Donuts

Transform store-bought donuts into spooky Vampire Donuts with marshmallow fangs and a drizzle of red food coloring for a fun Halloween treat.
- Prep Time: 15 minutes
- Cook Time: 0 minutes
- Total Time: 15 minutes
- Yield: 12 servings
- Category: Dessert
- Method: No-Cook
- Cuisine: American
- Diet: Vegetarian
Ingredients
- Store-bought donuts (glazed, chocolate, or powdered)
- Marshmallow fangs (or mini marshmallows cut in half)
- Red food coloring (optional, or raspberry/strawberry puree)
Instructions
- Gather your ingredients on the counter to make the process easier.
- Prepare your donuts if making from scratch; otherwise, use store-bought.
- Snag the marshmallow fangs and slice mini marshmallows if necessary.
- Create the red food coloring mixture for a spooky blood effect.
- Assemble each donut by inserting the marshmallow fangs.
- Add the red food coloring around the donuts for decoration.
- Presentation is key; add powdered sugar or cocoa powder for effect.
- Step back and admire your creation before enjoying!
Notes
Feel free to customize with chocolate dips, jelly filling, or toppings like sprinkles and nuts for added texture and flavor.
Nutrition
- Serving Size: 1 donut
- Calories: 250
- Sugar: 15g
- Sodium: 100mg
- Fat: 10g
- Saturated Fat: 4g
- Unsaturated Fat: 6g
- Trans Fat: 0g
- Carbohydrates: 35g
- Fiber: 1g
- Protein: 3g
- Cholesterol: 0mg
Keywords: Vampire Donuts, Halloween treats, spooky desserts, fun recipes, party food
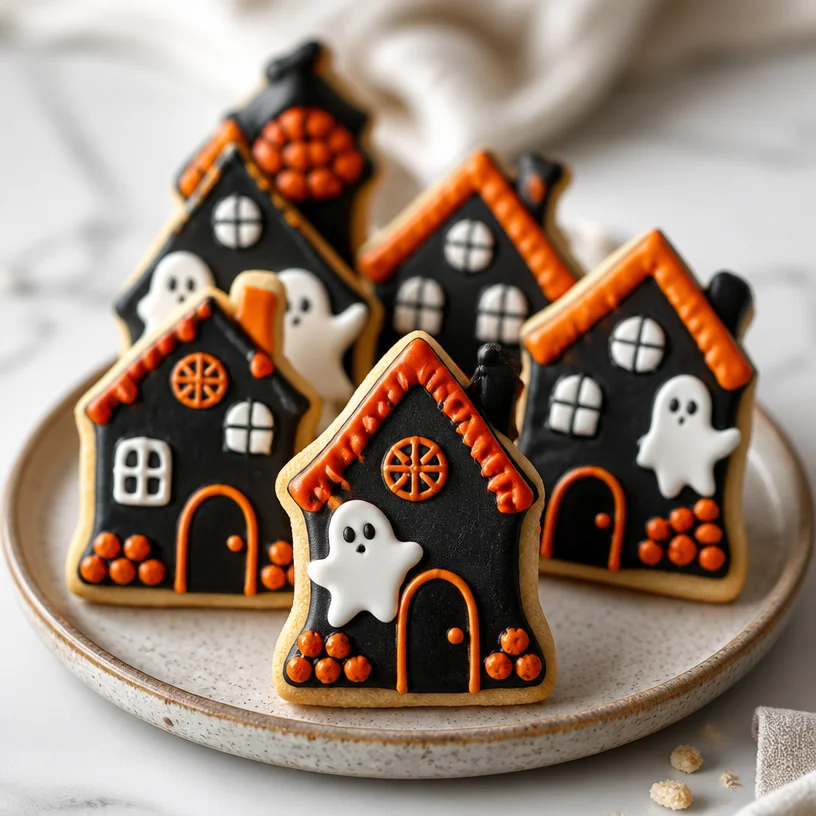
Minute Haunted House Cookies for a Spooky Halloween Treat
Spook-tacular Haunted House Cookies: A Treat for Your Halloween Gatherings!
Hello there, fellow food enthusiasts! As the leaves turn golden and the air gets that crisp bite, it’s time to channel our inner ghouls and goblins. If you’re anything like me, you can’t resist the seasonal charm that Halloween brings. Amongst the eerie decor and restless spirits, the real magic happens in the kitchen, and I have the perfect treat to elevate your spooky celebrations: Haunted House Cookies!
These aren’t just any cookies; they’re whimsical works of art that you and your little ghosts can create together. Picture this: ahouse made of delicious sugar cookies, drizzled with royal icing, and dusted with colorful sprinkles, all beckoning for a Halloween-themed gathering at your table. They’re ideal for crafting with kids, impressing your friends, or simply indulging your artistic spirit. Ready to get your mix on? Let’s dive into this delightful journey of baking!
A Whimsical Memory
Growing up, Halloween was my favorite holiday—not just because of the costumes and candies but because of the annual tradition of cookie decorating with my family. I can still recall the smell of sugar cookies baking in the oven, making the house feel warm and inviting, even when the weather outside was a bit frightful.
One crisp autumn evening, my mom and I decided to host a small gathering for my friends. We whipped up a massive batch of sugar cookie dough and rolled it out into all sorts of spooky shapes. Ghosts, tombstones, and of course, miniature haunted houses!
I remember the laughter as my friends and I got creative with icing; some cookies ended up looking like they came from a haunted nightmare, while others were surprisingly elegant! That magical night spent with family and friends over a table laden with colors, laughter, and stories is a sweet memory I carry with me. And today, I want to help you sprinkle some of that joy into your kitchen with these Haunted House Cookies!
Ingredients
Here’s what you’ll need to create your Haunted House Cookies:
-
Sugar Cookies
- These are the canvas of your cookie art! Their simplicity allows the decoration to shine through.
-
Royal Icing
- This icing is your magical glue and decorating medium. It hardens beautifully and is perfect for intricate designs. You can substitute it with buttercream icing if you prefer a softer frosting, but it won’t hold up quite as well for decoration.
-
Food Coloring
- Gel food coloring works best for bright, vibrant hues. You can get creative with shades of black, purple, and orange for that Halloween themed flair.
-
Sprinkles
- Think of sprinkles as the finishing touch or the festive confetti of your haunted houses. Without them, it’s like Halloween without a pumpkin—unthinkable!
-
Edible Decor (Candy Corn, Chocolate Chips, etc.)
- Use these to add some personality and charm to your haunted houses. They make for great windows, doors, and spooky decorations!
Step-by-Step Instructions
Grab your apron, pour yourself a spooky drink, and let’s get to baking these Haunted House Cookies!
-
Prepare the Sugar Cookie Dough
- In a large bowl, cream together softened butter and sugar until light and fluffy. (Tip: Using room temperature butter cream will ensure it mixes well and creates a light texture!)
- Mix in one egg and a splash of vanilla extract—trust me, this is the magic ingredient. Pro Tip: For an extra kick, you can add a dash of almond extract for a unique flavor!
-
Combine Dry Ingredients
- In a separate bowl, whisk together all-purpose flour, baking powder, and a pinch of salt. Gradually add this into the butter mixture until just combined. (Don’t overmix; it’s important for our cookies to be tender!)
-
Chill the Dough
- Divide the dough into two halves, wrap them in plastic wrap, and refrigerate for about 30 minutes. This step is crucial; it prevents the cookies from spreading too much while baking, keeping those beautiful shapes intact!
-
Preheat the Oven
- While the dough chills, preheat your oven to 350°F (175°C).
-
Roll Out the Dough
- Once chilled, on a floured surface, roll out the dough to about 1/4-inch thickness. Use cookie cutters to cut out spooky shapes! If you’re making haunted houses, use house-shaped cookie cutters.
-
Bake the Cookies
- Place the cookies on a parchment-lined baking sheet, giving them a little space to breathe. Bake for 8-10 minutes or until the edges are lightly golden. (Note: They’ll harden further while cooling!)
-
Cool the Cookies
- Transfer the cookies to a wire rack to cool completely. Patience, friends! You don’t want to ice warm cookies as they can melt your icing away.
-
Make the Royal Icing
- In a bowl, beat egg whites and powdered sugar until smooth and stiff peaks form. This can take a few minutes, but it’s worth the effort for that gorgeous hold. (Did you know you can use meringue powder as an egg white substitute? Perfect for those with egg allergies!)
-
Color the Icing
- Divide the icing into bowls and mix in your food coloring. For a traditional haunted house, try a spooky black, purple, and orange!
-
Decorate!
- Using piping bags, pipe outlines and details on your cookies. Don’t rush! The creative part is where the fun and stories come in. Let your imagination run wild—you might just create the next haunted cookie masterpiece!
Serving Suggestions
When it’s time to serve, gather your Haunted House Cookies on a charming platter and maybe even add a few floating candles for that spooky, enchanting ambiance. Dim the lights and let their glow highlight the edible artistry you’ve created.
For small gatherings, you can even create “cookie take-home bags” filled with a couple of decorated cookies for your guests—just tie them with a whimsical ribbon!
Recipe Variations
Now, if you’re looking to shake up the traditional haunted house vibe, here are a few creative twists:
- Gingerbread Houses: Use a gingerbread cookie recipe for a spicier twist that pairs wonderfully with icing.
- Gluten-Free Option: Substitute regular flour with a 1:1 gluten-free baking flour. Your cookies will still be tasty with an added crunch!
- Spooky Themed Flavors: Infuse your cookies with seasonal extracts, like pumpkin spice or maple, for a unique flavor experience.
- Fillings: Consider sandwiching your cookies with a layer of delicious pumpkin or gingerbread-flavored cream cheese filling. Treat yourself to that creamy goodness!
- Themed Toppers: Use different candies or edible glitter to decorate based on a theme—think “zombie apocalypse” or “witch’s brew”!
Chef’s Notes
These haunted house cookies bring back fond memories of Halloween, and over the years, I’ve expanded my decorating techniques and flavor profiles to keep the tradition alive. From my family’s kitchen to yours, these cookies have seen their fair share of spooky stories and laughs.
I can’t tell you how many Halloween parties I’ve attended with a batch of these cookies in tow, and it never fails—people love the creativity and fun that comes with decorating! Once, I brought to a party a cookie specifically designed to look like a creepy cat; let’s just say it garnered quite a few laughs and complements!
FAQs and Troubleshooting
Q: My cookies didn’t hold their shape. What went wrong?
A: This usually happens when the dough is too warm or isn’t chilled enough before baking. Make sure to chill the dough and keep your work surface floured.
Q: How can I achieve the perfect consistency for royal icing?
A: Aim for a flowy consistency that holds shape but isn’t too runny. If it’s too thick, add a tiny bit of water. If too runny, add more powdered sugar.
Q: How do I store my decorated cookies?
A: Allow the icing to dry completely before stacking or storing. Place them in an airtight container, and they can last for up to a week!
Q: Can I make these cookies in advance?
A: Absolutely! You can bake the cookies up to a week in advance and decorate them the day before your event.
Nutritional Info
While I believe good food should nourish the soul, it’s nice to keep track! One haunted house cookie roughly contains:
- Calories: 120 kcal
- Total Fat: 4 g
- Carbohydrates: 20 g
- Sugar: 10 g
- Protein: 1 g
Remember, enjoy in moderation—these cookies are certainly a treat worth every bite!
Onward to Spooky Delights!
Gather your family, your friends, or even whisk away your favorite little ghoul, and embark on this joyful baking adventure together. I promise that the laughter, creativity, and deliciousness are priceless. Wrap up your time crafting these Haunted House Cookies with a mug of hot cider or your favorite Halloween-themed drink.
Happy Halloween, my lovelies! May your days be filled with joy, creativity, and a sprinkle or two of magic. Until next time!
PrintHaunted House Cookies

Delightful sugar cookies shaped like haunted houses, perfect for Halloween gatherings!
- Prep Time: 30 minutes
- Cook Time: 10 minutes
- Total Time: 40 minutes
- Yield: 24 cookies 1x
- Category: Dessert
- Method: Baking
- Cuisine: American
- Diet: Vegetarian
Ingredients
- 3 cups all-purpose flour
- 1 cup unsalted butter, softened
- 1 cup granulated sugar
- 1 large egg
- 1 teaspoon vanilla extract
- 1/2 teaspoon almond extract (optional)
- 1 teaspoon baking powder
- 1/2 teaspoon salt
- 2 cups powdered sugar (for royal icing)
- 2 egg whites (or meringue powder)
- Gel food coloring (black, purple, orange)
- Sprinkles
- Edible decorations (candy corn, chocolate chips, etc.)
Instructions
- Prepare the Sugar Cookie Dough: In a large bowl, cream together softened butter and sugar until light and fluffy. Mix in one egg and a splash of vanilla extract; add almond extract if desired.
- Combine Dry Ingredients: In a separate bowl, whisk together flour, baking powder, and salt. Gradually add this to the butter mixture until just combined.
- Chill the Dough: Divide the dough in half, wrap in plastic, and refrigerate for 30 minutes.
- Preheat the Oven: While the dough chills, preheat your oven to 350°F (175°C).
- Roll Out the Dough: On a floured surface, roll out the dough to about 1/4-inch thickness and cut out spooky shapes.
- Bake the Cookies: Place them on a parchment-lined baking sheet, and bake for 8-10 minutes until edges are lightly golden.
- Cool the Cookies: Transfer to a wire rack to cool completely.
- Make the Royal Icing: Beat egg whites and powdered sugar until smooth and stiff peaks form.
- Color the Icing: Divide icing into bowls and mix in your food coloring.
- Decorate</strong!: Using piping bags, outline and detail your cookies creatively.
Notes
Allow the icing to dry completely before storing in an airtight container.
Nutrition
- Serving Size: 1 cookie
- Calories: 120
- Sugar: 10g
- Sodium: 50mg
- Fat: 4g
- Saturated Fat: 2g
- Unsaturated Fat: 1g
- Trans Fat: 0g
- Carbohydrates: 20g
- Fiber: 0g
- Protein: 1g
- Cholesterol: 30mg
Keywords: Halloween cookies, spooky treats, haunted house cookies
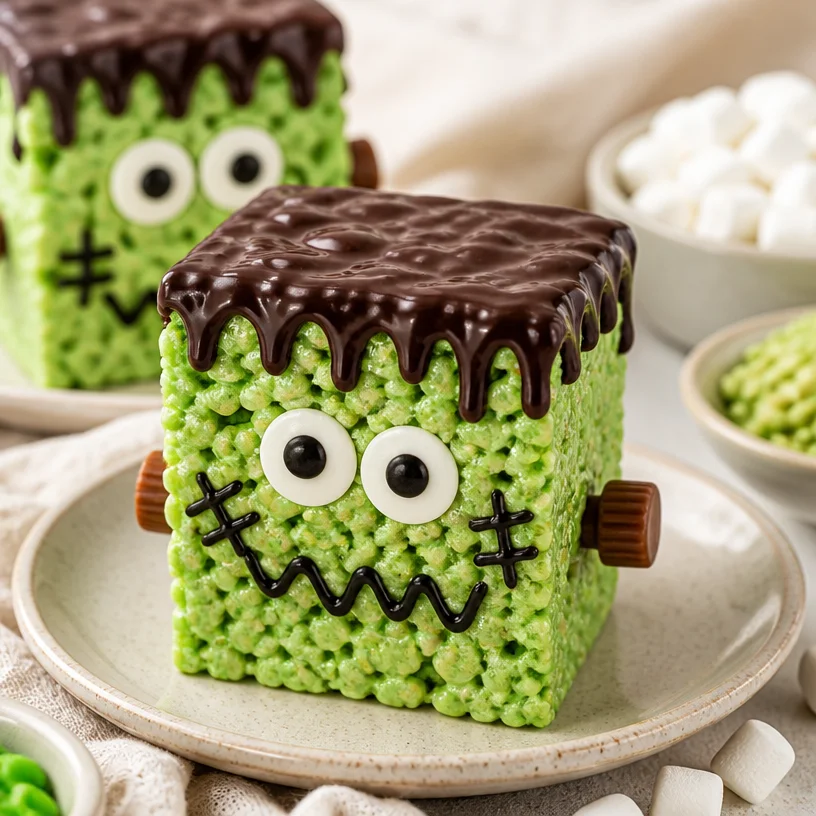
Frankenstein Rice Krispie Treats: Spooky No-Bake Halloween
Unleash the Halloween Fun with Frankenstein Rice Krispie Treats!
Hello, my lovely foodies! Welcome back to the delightful world of Ivory Apron, where cooking is all about elegance mixed with a sprinkle of fun! Today, I’m thrilled to share a spooky twist on a childhood favorite—Frankenstein Rice Krispie Treats! Perfect for Halloween or any festive gathering, these treats are not only super fun to make but also a fantastic way to gather friends or family in the kitchen.
As we dive into this deliciously sinister recipe, let’s embrace the nostalgia of kitchen experiments and playful creativity. Who said cooking had to be serious? It’s all about having fun and making memories, and what’s better than crafting adorable (and a little creepy) treats that will make everyone smile?
So, grab your apron (preferably your ivory one!), gather those little helpers or friends, and let’s embark on a kooky kitchen adventure. Trust me—the happiness on faces when they see these Frankenstein-themed treats will be worth every sticky hand and giggle along the way!
A Sweet, Spooky Memory
Growing up, my family’s kitchen was always alive with the sounds of laughter, and Halloween was no exception. One year, my mom decided that our treats would be as fun to make as they were to eat! We rolled up our sleeves, donned our aprons, and got messy making Rice Krispie treats. The challenge? Make them spooky!
As we melted marshmallows and added our favorite colors, we each had a hand in creating the ultimate Halloween treat. I remember my little brother, with marshmallow-covered fingers, declaring he would make the scariest monster anyone had ever seen. With a few googly eyes and candy decorations, we turned those treats into hilarious, spooky creatures that would go on to haunt our kitchen tables for years to come.
Every time I recreate these Frankenstein Rice Krispie Treats, I’m taken back to that sweet chaos in our family kitchen. They remind me that cooking isn’t just about the food—it’s about the experiences we share and the joy we create together. Now, I’m here to help you make your own spooky creations with this easy, delightful recipe!
Ingredients
To create your own Frankenstein Rice Krispie Treats, gather the following ingredients:
-
Rice Cereal: 6 cups
Perfect for that classic crunch! You can use any brand, but the classic Rice Krispies work best. If you want a twist, try a fruity cereal for a different flavor. -
Marshmallows: 10 ounces (about 4 cups)
The glue that holds these treats together! Mini marshmallows melt faster, while regular ones give a chewier texture. You can also use vegan marshmallows for a plant-based version. -
Butter: 4 tablespoons
Adds delicious flavor and richness. If you’re looking for a dairy-free option, coconut oil works beautifully here—just keep the flavor in mind! -
Green Food Coloring: 5-10 drops
This is what gives your Frankenstein its spooky hue! You can substitute with natural food coloring or even experiment with adding matcha for a green tint. -
Candy for Decoration: Use gummy worms, chocolate chips, candy eyes, or any spooky sprinkle
The fun part! Let your creativity run wild. Use anything festive to decorate your treat monsters—think orange and black for an extra Halloween touch!
Step-by-Step Instructions
Ready to create some monster magic? Follow these simple steps to whip up your own Frankenstein Rice Krispie Treats:
-
Prepare Your Workspace:
Start by greasing a 9×13-inch baking pan with cooking spray or butter. This will ensure that your treats release easily once they’re set. I like to keep everything organized before I begin—trust me, it saves so much time when you’re elbow-deep in gooey marshmallows! -
Melt the Butter and Marshmallows:
In a large saucepan, melt the butter over medium heat. Once melted, add in the marshmallows, stirring constantly until they’re completely melted and smooth. This part is crucial, so keep an eye on it—burnt marshmallows can throw off the flavor! -
Add Food Coloring:
Once your marshmallows are smooth, remove the pot from heat. Now comes the fun part! Add your green food coloring a few drops at a time, mixing well until you achieve your desired spooky green shade. Feel free to taste-test this creaminess—just make sure no one is watching! -
Mix the Cereal:
Slowly add the Rice Cereal to the marshmallow mixture, stirring gently until every piece is coated. You want to be careful here to avoid crushing the cereal too much. If it gets too sticky to handle, lightly grease your hands with butter—this is the ultimate kitchen hack! -
Press into the Pan:
Transfer the green cereal mixture to your prepared baking pan. Use a greased spatula or your hands to press it down evenly. Don’t pack it too tightly—fluffy treats are what we’re aiming for! -
Cool and Cut:
Allow the treats to cool for at least 30 minutes. Once they’re set, use a sharp knife to cut them into squares or rectangles. The fun doesn’t stop here; let’s make them look like Frankenstein! -
Decorate Your Monsters:
This is where you get to unleash your creativity! Use candy eyes and various candies to decorate your treats to look like little Frankenstein monsters. Gummy worms can be fun, and chocolate chips can be used for mouths. Each one can have its own character!
Serving Suggestions
Once you’ve decorated your Frankenstein Rice Krispie Treats, they’re ready for the spotlight! Arrange them on a bright platter, maybe with some spooky decor like mini pumpkins or edible spider confetti to enhance the festive vibes. The best way to serve them is to let everyone choose their monster—this adds to the fun and invites each guest to pick their favorite spooky creation!
Recipe Variations
Feeling adventurous? Here are some fun twists you can try with these treats:
- Monster Mash-Up: Mix in some crushed Oreo cookies into the Rice Krispie batter for a chocolatey twist.
- Peanut Butter Lovers: Stir in a little peanut butter to the melted marshmallow mixture for a nutty flavor.
- Sprinkle Surprise: Add in festive sprinkles while combining the cereal for a colorful crunch.
- Vegan Version: Use vegan marshmallows and coconut oil to keep it deliciously dairy-free!
- Spooky Flavors: Experiment with flavored extracts like mint or almond for an extra layer of taste.
Chef’s Notes
Every recipe has its tales, and this one is no different! I remember making a giant batch of these once for a neighborhood Halloween bash, and I had forgotten to add the food coloring until the very end. So, there I was, with a large green lump of Rice Krispie Treats in the center of my kitchen, frantically mixing in color while laughing at my mistake. It was the most playful kitchen fiasco, and the treats still turned out adorable! These Frankenstein Rice Krispie Treats are forgiving and always turn out delicious—plus, they’re always a hit, regardless of their color along the way!
FAQs and Troubleshooting
-
My Rice Krispie Treats are too hard. What happened?
This usually happens if they were overcooked. Make sure to melt the marshmallows just until they’re smooth—not boiling! If they are too hard, you can try warming them slightly in the microwave to soften. -
How can I make these treats last longer?
Store them in an airtight container at room temperature. They will stay fresh for about 3 days—but let’s be honest, they probably won’t last that long! -
Can I freeze these treats?
Yes! Wrap them tightly in plastic wrap and then place them in an airtight container. They can be frozen for up to two months. Let them sit at room temperature for a while before serving. -
What can I use instead of butter?
Coconut oil or vegan butter are fantastic alternatives if you’re looking for something dairy-free. Just keep the flavors in mind—coconut oil may impart a slight coconut flavor.
Conclusion
Bringing a festive spirit to your kitchen with these Frankenstein Rice Krispie Treats is a wonderful way to connect, create, and indulge in deliciousness! Remember, cooking is all about community, laughter, and sometimes a little friendly chaos. I hope this recipe inspires you to gather your loved ones and craft your own spooky treats this Halloween.
Tie on that apron, unleash your inner chef, and let’s make some delightful memories together! Happy cooking and happy haunting from Ivory Apron.
PrintFrankenstein Rice Krispie Treats
A spooky twist on classic Rice Krispie Treats, perfect for Halloween gatherings!
- Prep Time: 15 minutes
- Cook Time: 10 minutes
- Total Time: 45 minutes
- Yield: 12 servings 1x
- Category: Dessert
- Method: No-Bake
- Cuisine: American
- Diet: Vegetarian
Ingredients
- 6 cups Rice Cereal
- 10 ounces (about 4 cups) Marshmallows
- 4 tablespoons Butter
- 5–10 drops Green Food Coloring
- Candy for Decoration (gummy worms, chocolate chips, candy eyes, or festive sprinkles)
Instructions
- Prepare Your Workspace: Grease a 9×13-inch baking pan with cooking spray or butter.
- Melt the Butter and Marshmallows: In a large saucepan, melt the butter over medium heat. Add in the marshmallows and stir constantly until melted and smooth.
- Add Food Coloring: Remove from heat and mix in green food coloring until desired shade is achieved.
- Mix the Cereal: Slowly add the Rice Cereal to the marshmallow mixture and stir gently until coated.
- Press into the Pan: Transfer the mixture to the prepared baking pan and press down evenly.
- Cool and Cut: Allow to cool for 30 minutes, then cut into squares or rectangles.
- Decorate Your Monsters: Use candies to decorate the treats to look like Frankenstein monsters.
Notes
Store treats in an airtight container at room temperature for up to 3 days or freeze for up to 2 months.
Nutrition
- Serving Size: 1 treat
- Calories: 180
- Sugar: 15g
- Sodium: 95mg
- Fat: 6g
- Saturated Fat: 3g
- Unsaturated Fat: 3g
- Trans Fat: 0g
- Carbohydrates: 30g
- Fiber: 0g
- Protein: 1g
- Cholesterol: 15mg
Keywords: Halloween treats, Rice Krispie Treats, spooky snacks